| Download Docs | Site Map | Glossary | |
|
|
|||
| bea.com | products | dev2dev | support | askBEA |
|
|
|
||||||||
| e-docs > WebLogic Platform > WebLogic Integration > Deploying Solutions > Tuning Performance |
|
Deploying Solutions
|
Tuning Performance
The following sections describe how to tune the performance of your WebLogic Integration deployment:
Tuning WebLogic Integration Performance
The following sections describe how to tune WebLogic Integration performance:
Primary Tuning Resources
This section describes the primary WebLogic Integration resources that you can tune to manage the work that a server performs:
In addition, the J2EE-CA resource pool size should be set for each adapter. For information about how to tune an adapter, see the documentation for the adapter.
All other WebLogic Integration resources should be changed only to support these primary resources.
Tuning WebLogic Server Performance
The following sections describe how to configure WebLogic Server resources for a WebLogic Integration deployment:
For general information about tuning WebLogic Server performance, see BEA WebLogic Server Performance and Tuning at the following URL:
http://download.oracle.com/docs/cd/E13222_01/wls/docs70/perform/index.html
Configuring EJB Pool and Cache Sizes
You can tune WebLogic Integration performance by configuring EJB pool sizes and cache sizes: start with the default settings and change them as needed. From a performance standpoint, an overly large pool or cache size is generally better than an overly small one. For more information about configuring these settings, see Deploying EJBs to WebLogic Server in Programming WebLogic EJB at the following URL:
http://download.oracle.com/docs/cd/E13222_01/wls/docs70/ejb/index.html
Configuring BPM Event Listener Message-Driven Beans Pool Size
The wlpi-mdb-ejb.jar file contains the pool of event listener message-driven beans that pull events off the event queue. The pool size setting controls the number of workflows executed in the WebLogic Integration system, based on incoming events. Like message-driven beans for the event and validating event queues, time event listeners are deployed to the cluster in the wlpi-mdb-ejb.jar file. These message-driven beans pull work from com.bea.wli.bpm.TimerQueue.
You can access the default EventListener and TimeListener pool sizes by selecting Edit EJB Descriptor for the WLI-BPM Event Processor EJB (wlpi-mdb-ejb.jar) in the Administration Console. For example, the default setting for the Event Listener message-driven beans is 10 (5 unordered listeners plus 5 ordered listeners).
If you configure a custom JMS queue for your system, use the MDB Generator utility to set the pool size and associated queue, as described in "Configuring a Custom Java Message Service Queue" in Customizing WebLogic Integration in Starting, Stopping, and Customizing BEA WebLogic Integration.
We recommend starting with 20 beans and monitoring your system to determine whether you need more. For more information, see Do You Have Enough Message-Driven Beans?.
Configuring Other EJB Pool and Cache Sizes
The following cache and pool size settings are important to consider when you tune your system. These parameters can be tuned for each node in your WebLogic Integration cluster:
Configuring JDBC Connection Pool Sizes
You can tune WebLogic Integration performance by configuring the size of JDBC connection pools. For an introduction, see JDBC Connection Pools.
To determine the necessary size of a JDBC connection pool on each node in a WebLogic Integration cluster, calculate the number of required connections per server, based on the guidelines in the following table.
After calculating the number of connections required for each resource, calculate the total needed for all resources, and then configure the JDBC connection pool for each node in the cluster, using this total. For best performance, set the initial capacity and the maximum capacity to the same value. You can find information on monitoring JDBC connections in Do You Have Enough JDBC Connections? For more information about JDBC connection pools, see the following sections:
http://download.oracle.com/docs/cd/E13222_01/wls/docs70/perform/WLSTuning.html
http://download.oracle.com/docs/cd/E13222_01/wls/docs70/adminguide/jdbc.html
Configuring the Execution Thread Pool
You can tune WebLogic Integration performance by configuring the execution thread pool, which is described in Execution Thread Pool. For each node in a WebLogic Integration cluster, calculate the number of execution threads based on the guidelines described in the following table.
After calculating the number of threads required for each resource, calculate the total needed for all resources, and then configure the thread pool size for each server, using this total. For instructions on how to configure the thread pool size using the WebLogic Server Administration Console, see "Server Configuration Tasks" in Servers in Adminstration Console Online Help at the following URL: For information about monitoring threads on your system, see Do You Have Enough Threads?. Configuring Resource Connection Pools for J2EE Connector Architecture Adapters You can tune WebLogic Integration performance by configuring the resource connection pools for J2EE Connector Architecture (J2EE-CA) adapters, which are described in J2EE Connector Architecture. For instructions on how to tune resource connection pools for a particular adapter, see the documentation for the adapter. Configuring Large Message Support for B2B If the messages exchanged during B2B conversations are too large to fit in memory, enable large message support on the WebLogic Integration B2B Console and restart the server. (Messages larger than 20MB are considered large messages.) Figure 6-1 shows the portion of the B2B Console used for enabling large message support. Note: For information about configuring EJB transactions for large messages, see Configuring EJB Transactions. Figure 6-1 Enabling Large Message Support in the B2B Console
http://download.oracle.com/docs/cd/E13222_01/wls/docs70/ConsoleHelp/servers.html
Configuring EJB Transactions If your system returns an exception indicating that a transaction timed out while a message was being processed, we recommend that you tune the transaction timeout parameters in the following BPM resources: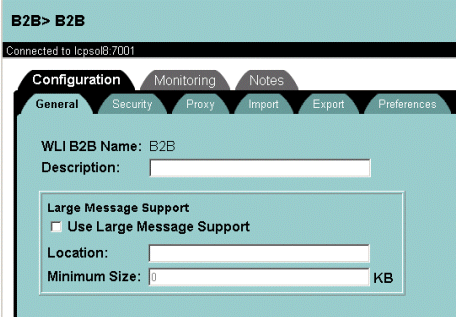
Note: Transaction timeouts are more likely to occur when large messages, rather than small messages, are being processed.
To tune the transaction timeout parameters, we recommend that you change the trans-timeout-seconds attribute in the wlpi-ejb.jar and wlpi-mdb-ejb.jar files from 90 seconds to 1090 seconds. To access the JAR files:
Monitoring and Tuning the Java Virtual Machine (JVM)
WebLogic Integration Java code is executed on the Java Virtual Machine (JVM). To achieve the optimal performance for a WebLogic Integration deployment, you need to tune the JVM configuration. For example, the JVM heap size determines how often and for how long the JVM collects garbage. For WebLogic Integration, the recommended minimum heap size is 512KB. For more information about configuring the JVM, see Tuning Java Virtual Machines (JVMs) in BEA WebLogic Server Performance and Tuning at the following URL:
http://download.oracle.com/docs/cd/E13222_01/wls/docs70/perform/JVMTuning.html
For more information about the Sun HotSpot JVM heap organization and garbage collection, go to the following URL:
http://java.sun.com/docs/hotspot/gc/index.html
For a complete list of command-line options for the Sun Hotspot JVM, go to the following URL:
http://java.sun.com/docs/hotspot/VMOptions.html
Many of the JVM options are set in setenv.cmd or setenv.sh and startWeblogic.cmd or startweblogic.sh. Some defaults are set low in order to enable low-end systems. If you have a larger system, you can benefit from tuning the JVM up. The following sections explore commonly used options.
Choosing the JVM
The JDK supplied with WebLogic Server supports different JVM implementations. On Solaris systems, we recommend that you use the server JVM. Use the -server argument to specify the use of the server JVM. This argument must be the first one immediately after the Java executable name.
On Windows systems, use the Hotspot JVM (the -hotspot option is used by default in WebLogic Integration scripts). If you experience problems using the Hotspot JVM on Windows systems, we recommend adding the following option to your scripts:
-xxMaxPermSize=131072K
The classic JVM is not recommended because it does not provide a JIT compiler. The server runs more slowly with the classic JVM than with the Hotspot or server JVM.
The Hotspot and server JVM are identical except that they use different run-time compilation algorithms. (The Hotspot JVM is also known as the client JVM.)
Tuning JVM Heap Size
The minimum (initial) and maximum sizes should be identical. For a large WebLogic Integration server, we recommend 512Mb for both values, as shown in the following option settings:
-Xms512m -Xmx512m
On Solaris systems, there are extra options that apply to very large heaps. In particular, it is possible to bypass virtual memory and use physical memory directly for the heap. This feature is called "Intimate Shared Memory," and information about it can be found at:
http://java.sun.com/docs/hotspot/ism.html
Garbage Collection Control on Hotspot JVM
The heap space in Hotspot is defined in two parts: the nursery heap space and the tenured heap space.
All new objects are created in the nursery heap space. They are moved to the tenured heap only after surviving garbage collection from the nursery heap. The tenured heap is not collected as often as the nursery heap, and the collection operation for it is more expensive than collection for the nursery heap.
In general, the nursery heap should be configured to be large enough to store temporary objects. In the case of an application server in general, and for WebLogic Integration in particular, the actual application state is kept in a database. Most memory allocated while a request is being processed is released at the end of the request. It is therefore important to configure the nursery heap to be large enough to prevent objects that are used in a single request to be moved to the tenured heap. Such a configuration also delays the need for collection on the tenured heap, which is much slower than collection on the nursery heap. (For this reason, this approach is sometimes referred to as delayed garbage collection).
Garbage collection in the nursery heap is generational. In generational garbage collection, all new objects are allocated from a nursery heap space. All the objects in the nursery heap space constitute a young generation of objects. When the nursery heap space is full, the garbage collector does a partial garbage collection. It reclaims memory in the nursery space for objects that are no longer accessible, that is, dead objects. Objects in the nursery space that are still live are moved to an area of memory for older objects. Generational garbage collection can be much faster than full garbage collection because the garbage collector does not have to search all of memory for dead objects.
For more information about garbage collection and JVM performance, see A Test of JavaTM Virtual Machine Performance, which is available at the following URL:
http://developer.java.sun.com/developer/technicalArticles/Programming/JVMPerf/
When you have a global heap of 512MB, a reasonable size for the nursery heap is 128MB. The specifications in the following line set the initial nursery heap size to 128 MB, and the maximum size to 128 MB, respectively:
-XX:NewSize=128m -XX:MaxNewSize=128m
The nursery space is composed of an eden space and two equal-size semispaces. During garbage collection, surviving objects are moved to a semispace. The survivor space is the combined size of the two semispaces.
You can use the SurvivorRatio parameter to tune the size of the survivor space. The initial recommended value for the survivor ratio is 2. You should monitor your application to determine if you need to change this. Use the following option setting to specify a survivor ratio of 2:
-XX:SurvivorRatio=2
This parameter sets the ratio between the eden space and each semispace to equal 2:1. In other words, the ratio of eden space to survivor space is 1:1; each semispace is one quarter the size of the nursery heap (not one half, because there are two semi spaces of equal size). If survivor spaces are too small, copying collection overflows directly into the old generation. If survivor spaces are too large, they are uselessly empty.
Monitoring JVM Heap Usage
The most efficient way to monitor heap usage and garbage collection is to use verbose garbage collection, selected by specifying the following flag:
-verbosegc
The output shows up on standard out. In the case of the Hotspot JVM two types of lines show up, indicating collection in the eden (GC) or in the tenured heap (Full GC).
It is also possible to use the Weblogic Server Administration Console to monitor heap utilization at run time. This helps define the heap requirements as well as identifying any memory leaks.
Monitoring and Tuning Run-Time Performance
The following sections describe how to monitor run-time performance in a WebLogic Integration deployment:
Monitoring and Tuning WebLogic Server Performance
Use the WebLogic Server Administration Console to monitor the health and performance of your WebLogic Server domain, including such resources as servers, JDBC connection pools, JCA, HTTP, the JTA subsystem, JNDI, and EJBs. For detailed information, see "Monitoring a WebLogic Domain" in the Creating and Configuring WebLogic Server Domains at the following URL:
http://download.oracle.com/docs/cd/E13222_01/wls/docs70/admin_domain/monitoring.html
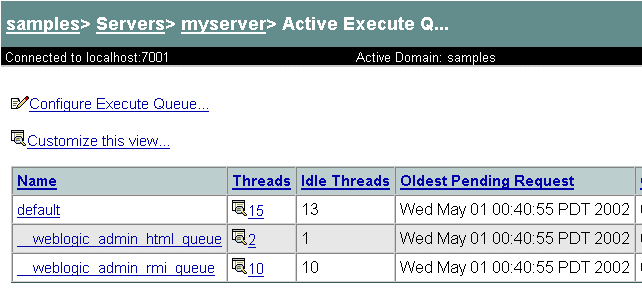
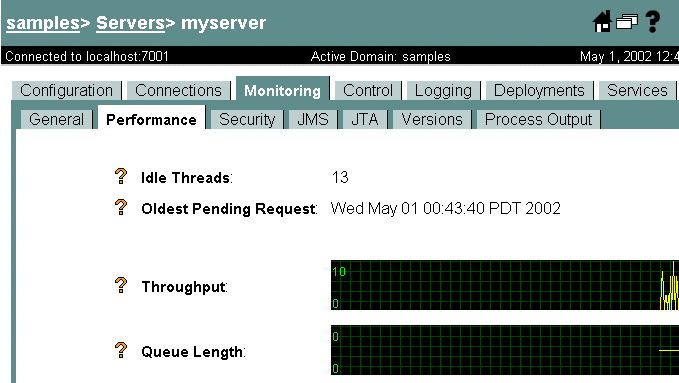
Do You Have Enough Threads?
To determine whether your system has enough threads configured:
Figure 6-2 Active Execute Queues Table
Figure 6-3 Server Performance Information
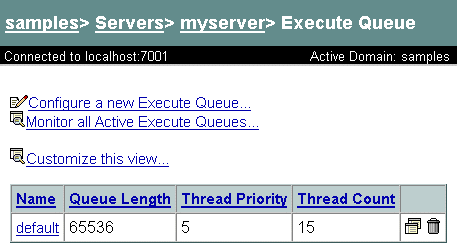
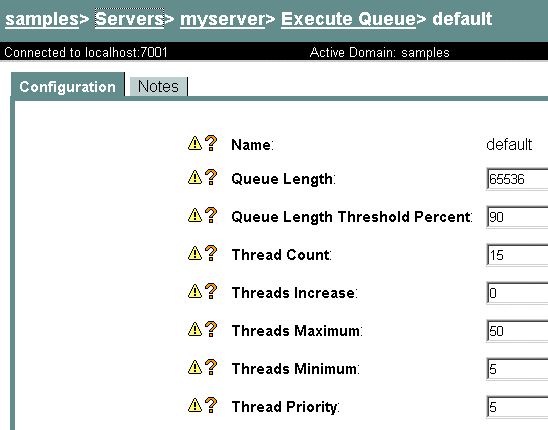
To add more threads, you must select the default queue and specify the thread count as follows:
You can specify the thread count as follows:
Figure 6-5 Default Execute Queue Configuration
On Solaris systems, you can also determine whether changing the number of threads improves performance by running the mpstat command at comparable load levels before and after you change the setting. A decrease in the number of context switches suggests that performance has improved.
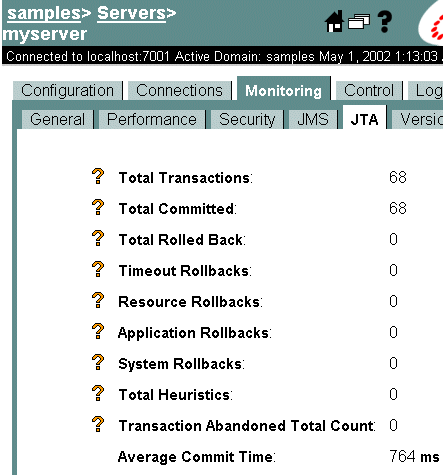
How Many Transactions Are Occurring?
To display the number of transactions of various types, select your server name in the Weblogic Server Administration Console. In the right frame, select the Monitoring tab, then the JTA tab. Select Monitor all instances.
Some transactions are associated with the BPM framework; they cannot be changed. Transactions associated with your applications can be changed, however. You can change transaction types or combine transactions by completing the following steps:
Figure 6-6 JTA Monitoring Tab
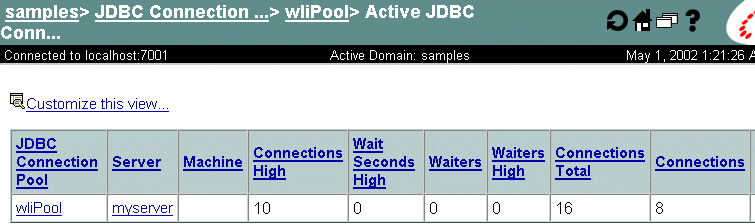
Do You Have Enough JDBC Connections?
JDBC connections are connections to your database, made available so that individual threads do not suffer performance problems caused by getting a new connection every time access to the database is required. You may have multiple pools of JDBC connections. It is important that each pool has enough connections so that no thread has to wait long for a connection. To monitor active JDBC connection pools:
Figure 6-7 Active JDBC Connection Pools
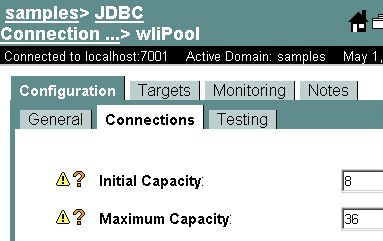
To modify connection pool configuration:
Figure 6-8 Connection Pool Configuration
Monitoring and Tuning BPM Performance
Use the WebLogic Integration Studio to monitor various aspects of workflow performance in real time, including the status of workflows and workflow variables. The Studio allows you to delete workflow instances and to view reports on workloads and performance statistics. For more information, see Monitoring Workflows in Using the WebLogic Integration Studio.
Key BPM performance measurements include:
One way to obtain statistics for these performance measurements is to extract them from the database instance table using SQL statements. For example, the SQL code in the following listing calculates statistics about the number of instantiations.
Listing 6-1 SQL Code to Determine Workflow Instantiation Statistics
select 'INSTANTIATIONS', count(*),
avg((completed-started)*86400),
max((completed-started)*86400),
86400*(max(started)-min(started)) total_duration,
from instance
The SQL code in the next listing calculates statistics about the number of completions.
Listing 6-2 SQL Code to Determine Workflow Completion Statistics
select 'COMPLETIONS',  count(*),
avg((completed-started)*86400),
max((completed-started)*86400),
86400*(max(completed)-min(started)) total_duration
from instance where completed is not null
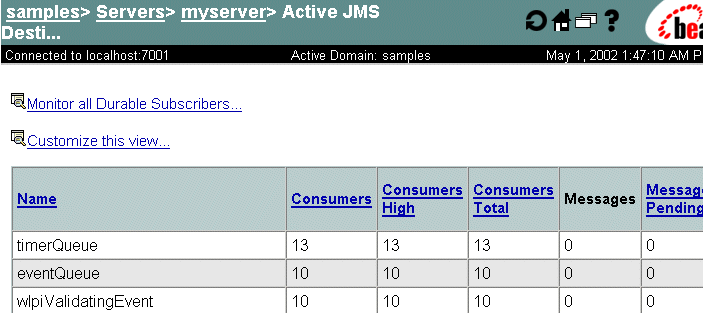
Do You Have Enough Message-Driven Beans?
To display information about message-driven beans:
Figure 6-9 Event Queue Monitoring
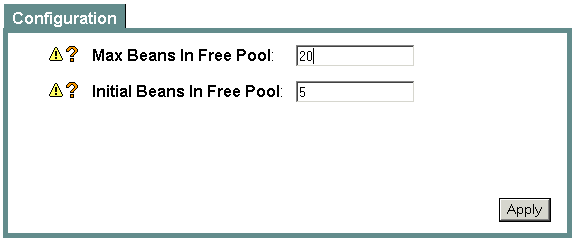
To change the number of message-driven beans:
Figure 6-10 Configuring MDBs
How Many of Each Type of Bean Does My System Have?
Use the WebLogic Server Administration Console to display information bean types and quantities:
For more information about these JAR files, see Configuring EJB Pool and Cache Sizes. The following figures (Figure 6-11, Figure 6-12, and Figure 6-13) show portions of the windows in which information for stateful, entity, and message-driven beans is displayed.
The following figure displays Stateful EJBRuntimes for the WLI-BPM Server EJB (wlpi-ejb.jar).
Figure 6-11 Stateful Bean Information
The following figure displays Entity EJBRuntimes for the WLI-BPM Server EJB (wlpi-ejb.jar). Figure 6-12 Entity Bean Information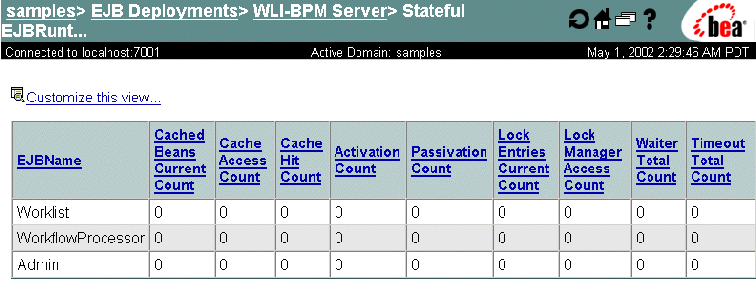
The following figure displays Message Driven EJBRuntimes for the WLI-BPM Event Processor EJB (wlpi-mdb-ejb.jar). Figure 6-13 MDB Information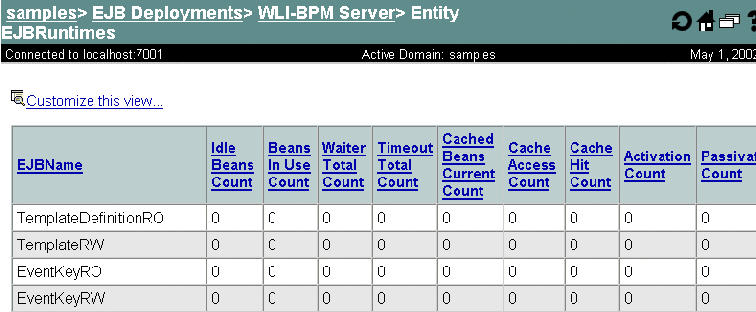
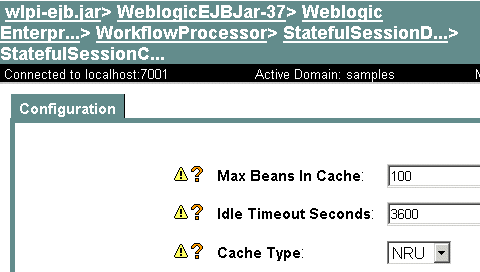
If a system message concerning cache full is displayed, increase the Max Beans in Cache parameter for the corresponding EJB by editing the EJB descriptor. If many entity beans are not passivated until the cache is full, you may want to decrease the Idle Timeout Seconds parameter for the entity bean: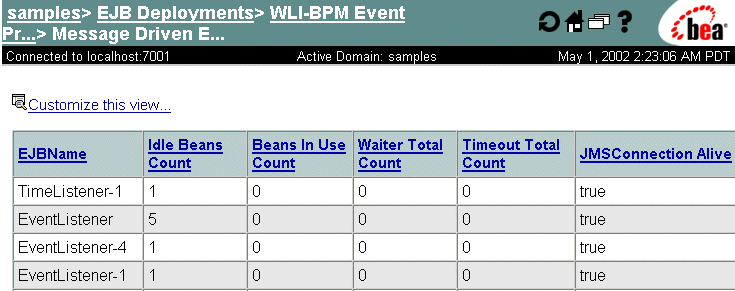
Figure 6-14 Idle Timeout Configuration
Guaranteeing Message Delivery
Depending on the design requirements for your business processes, you may want to take advantage of two features that can guarantee the delivery of a message to a workflow. The features summarized in this section apply specifically to messages sent from any JMS client to a workflow, which includes workflow-to-workflow, and not to business messages sent between trading partners (trading partner business messages use addressed messaging by default).
The following features guarantee the delivery of messages:
Using these two features together ensures that the delivery of a message to a workflow is guaranteed. For information about using these features, see the following:
For an example of using addressed messaging, see "Business Process and Workflow Modeling" in Understanding the Sample in Learning to Use BEA WebLogic Integration.
For information about delivery of business messages between trading partners, see Creating Workflows for B2B Integration.
Monitoring and Tuning B2B Integration Performance
To monitor the performance of B2B integration functionality, consider the following tips:
Key performance measurements for B2B integration include:
For more information, see Monitoring B2B Integration in Administering B2B Integration.
Monitoring B2B Activity
Use the WebLogic Integration B2B Console to determine the level of B2B activity:
Figure 6-15 Monitoring B2B Logs
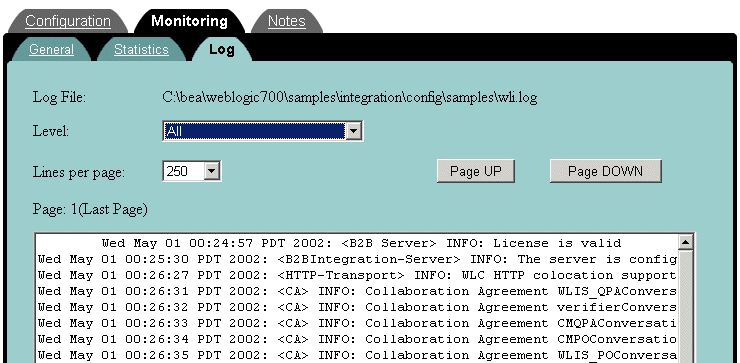
Figure 6-16 Monitoring B2B Statistics
Monitoring and Tuning Application Integration Performance This section provides information about monitoring and tuning application integration. It contains the following topics: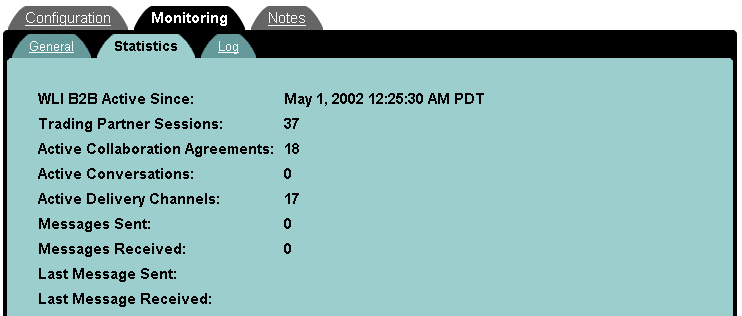
Monitoring and Tuning Application View Connections
You can check if you have sufficient connections available for your application view, using the Weblogic Server Administration Console:
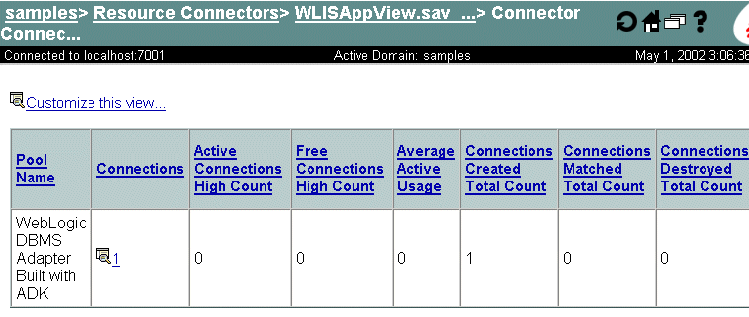
The connections to the EIS defined in your application view are displayed, as shown in the following figure.
These connections are made available so that individual threads do not suffer performance problems caused by getting a new connection every time access to the EIS is required. It is important that each has enough connections so that no thread has to wait long for a connection.
Figure 6-17 Monitoring Application View Connection
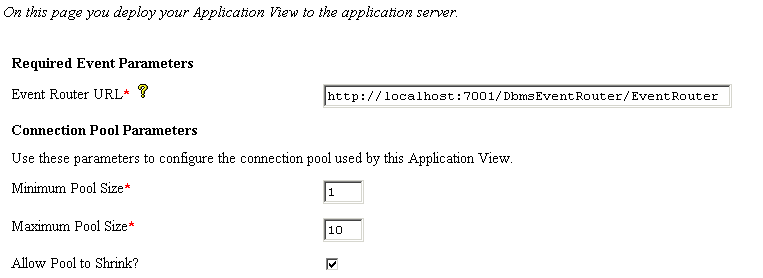
To view or modify your maximum connections for your application view:
Figure 6-18 Monitoring Maximum Pool Size
The Maximum Pool Size value shows the maximum number of connections. To modify the maximum pool size value, complete the following steps:
Figure 6-19 Modifying Maximum Pool size
Monitoring and Tuning EJB Pools for Application Integration
If you want to tune your application integration performance, consider tuning the following EJB pools:
For information about monitoring and tuning EJB pools, see Do You Have Enough Message-Driven Beans?, and How Many of Each Type of Bean Does My System Have?.
Profiling Applications
You can profile applications at run time using a Java profiler tool (such as Jprobe or OptimizeIt). Use these tools to identify performance bottlenecks and thread contentions in the system. Remember to profile run-time performance rather than boot-time performance.
Tuning Hardware, Operating System, and Network Resources
The following sections describe factors that you need to consider when you are tuning hardware, the operating system, and the network:
For detailed information, see "Tuning Hardware, Operating System, and Network Performance" in BEA WebLogic Server Performance and Tuning at the following URL:
http://download.oracle.com/docs/cd/E13222_01/wls/docs70/perform/HWTuning.html
Performance Bottlenecks
To optimize WebLogic Integration performance in a deployment, you need to understand how the following hardware resources interact with each other. Performance bottlenecks result from poor tuning of these hardware resources.
Tuning Hardware To optimize WebLogic Integration performance in a deployment, consider the following hardware factors:
Tuning the Operating System
To optimize WebLogic Integration performance in a deployment, consider the following operating system factors:
Configurable TCP Tuning Parameters on Windows NT/2000
For a Windows NT or Windows 2000 server, we recommend setting the TcpTimedWaitDelay parameter to 60 seconds instead of the default 240 seconds. The parameter is in the Windows registry and can be set or modified by using the regedit utility (regedit.exe). The entry is located as follows:
HKEY_LOCAL_MACHINE\SYSTEM\CurrentControlSet\Services\Tcpip\Parameters
The entry is not present by default.
TcpTimedWaitDelay determines the time that must elapse before TCP can release a closed connection and reuse its resources. This period between closure and release is known as the TIME_WAIT state or 2MSL state. During this time, the connection can be reopened at much less cost to the client and server than the cost of establishing a new connection.
RFC 793 requires that TCP maintain a closed connection for an interval at least equal to twice the maximum segment lifetime (2MSL) of the network. When a connection is released, its socket pair and TCP control block (TCB) can be used to support another connection. By default, the MSL is defined to be 120 seconds, and the value of this entry is equal to two MSLs, or 4 minutes. However, you can use this registry entry to customize this interval.
Reducing the value of this entry allows TCP to release closed connections faster, providing more resources for new connections. However, if the value is too low, TCP might release connection resources before the connection is complete, requiring the server to use additional resources to reestablish the connection.
Note: Normally, TCP does not release closed connections until the value of this entry expires. However, TCP can release connections before this value expires if it is running out of TCP control blocks (TCBs). The number of TCBs the system creates is specified by the value of MaxFreeTcbs.
System Monitoring on Windows NT/2000
Use the performance monitor (perfmon.exe) for monitoring all system resources or the task manager for monitoring CPU, memory, and threads.
Swap Space Configuration for Solaris
Insufficient swap space can show up as an out-of-memory error, such as an overly small heap or thread limit.
Network Tuning for Solaris
For network tuning information for Solaris systems, see the WebLogic Server platform information page at the following location:
http://download.oracle.com/docs/cd/E13222_01/wls/platforms/sun/index.html
System Monitoring for Solaris
The following table lists the commands suggested for use in monitoring Solaris systems.
Tuning Network Performance
To optimize WebLogic Integration performance in a deployment, consider the following requirements for a high-performance network:
Tuning Databases
To optimize WebLogic Integration performance in a deployment, you need to maximize the use of underlying resources. WebLogic Integration relies extensively on database resources for handling run-time operations and ensuring that application data is durable. The following sections describe how to tune databases in a WebLogic Integration deployment:
These sections provide a checklist of issues to consider when you are working to optimize your WebLogic Integration performance. For detailed instructions about specific database products, consult the appropriate product documentation.
General Database Tuning Suggestions
The following sections explain how you can optimize database performance by adjusting the settings for various parameters and features of your deployment:
Opened Cursors
While using multiple cursors for an operation can increase concurrency in most situations (for example, one opened cursor can perform updates while another opened cursor performs inserts), there is a limit to the maximum number of cursors that can be handled by a database server. This maximum pool is shared across all sessions and connections of the database server. Keeping too many cursors opened within a single connection can starve other connections, thereby slowing database performance and reducing system scalability. A good estimate can be derived from the maximum number of opened cursors that the database server can handle and the average number of simultaneous users. Another strategy is to minimize the length of time that each cursor is kept open.
Disk I/O Optimization
Disk I/O optimization is a key database tuning parameter that is related directly to throughput and scalability. Access to even the fastest disk is orders of magnitude slower than memory access. Whenever possible, optimize the number of disk accesses. In general, selecting a larger block / buffer size for I/O reduces the number of disk accesses and might substantially increase throughput in a heavily loaded production environment.
For recommended settings, see the appropriate database-specific sections about tuning databases, which are provided later in this document.
Database Sizing and Organization of Table Spaces
Distribute the database workload across multiple disks to avoid or reduce disk overloading. To optimize database performance:
For example, each workflow instance and its children create a row in the WORKFLOWINSTANCE table. These tables need to be optimized for insert and update operations. Delete operations on this table are performed in batches through the WebLogic Integration Studio. For a batch delete operation used to remove workflow instances, be sure to configure a rollback segment with a sufficient size so that it can handle a delete operation.
Checkpointing
Checkpoint is a mechanism that periodically flushes all dirty cache data to disk. This increases the I/O activity and system resource usage for the duration of the checkpoint. While frequent checkpointing can increase the consistency of on-disk data, it can also slow database performance. While most database systems have the notion of checkpoint, not all database systems provide user-level controls. Oracle, for example, allows administrators to set the frequency of checkpoints while users have no control over SQLServer 7.X checkpoints. For recommended settings, see the product documentation for the database you are using.
Database Compatibility
Use only the recommended versions of clients and servers. For a list of supported databases, see the software requirements in the BEA WebLogic Integration Release Notes for the release of WebLogic Integration that you are using.
Database Monitoring
Monitor the following aspects of database use:
Tuning Oracle Databases
This section describes performance tuning for Oracle 8.1.7.
V$Tables
Oracle 8.1.7 offers a series of dynamic performance views, often called V$tables, that allows users to monitor system statistics using SQL queries. Users need to be logged in to the database as SYS or SYSTEM, or they must have administrator privileges to access these dynamic views. Many of these dynamic views are referenced in the following sections. For details about these dynamic views, see your Oracle administrator's guide and tuning guide for details.
Initialization Parameters
The initialization parameter file (init.ora) contains the system initialization parameters and values for the Oracle server.
On Windows NT/2000, the pathname for the file is as follows:
d:\oracle\admin\sid\pfile\init.ora
In this pathname, d:\oracle is the installation directory and sid is the instance ID of the database (for example, d:\Oracle\admin\hsundb\pfile\init.ora).
The contents of this file are organized as attribute-value pairs, such as PROCESSES = 100.
You should always make a backup before modifying the file. You must bounce (shut down and restart) the server to reflect any modifications.
Modifications made to this file can and should be verified after bouncing the server. This validation can be done through an SQL statement or an SQL*Plus command. The parameters and their values are stored in a dynamic performance view, V$PARAMETER.
The following query validates changes made to the PROCESSES parameter. Note that the attribute name is lower case:
SELECT name, value FROM v$parameter WHERE name = `processes'
Another method is to use the SHOW PARAMETERS parameter_name command in an SQL*Plus shell. For example, the following command:
SHOW PARAMETERS "parameter"
is roughly equivalent to the following query:
SELECT name, value FROM v$parameter WHERE name LIKE `%parameter%';
Ensure that you have a full understanding of the parameter before modifying its value. For detailed information about specific parameters, see your Oracle documentation.
Shared Pool Size
The share pool in an important part of the Oracle server system global area (SGA). The SGA is a group of shared memory structures that contain data and control information for one Oracle database instance. If multiple users are concurrently connected to the same instance, the data in the instance's SGA is shared among the users.
The shared pool portion of the SGA caches data for two major areas: the library cache and the dictionary cache. The library cache is used to store SQL-related information and control structures (for example, parsed SQL statement, locks). The dictionary cache is used to store operational metadata needed for SQL processing.
For most applications, the shared pool size is critical to Oracle performance. If the shared pool is too small, the server must dedicate resources to managing the limited amount of available space. This consumes CPU resources and causes contention because Oracle imposes restrictions on the parallel management of the various caches. The more you use triggers and stored procedures, the larger the shared pool must be.
The SHARED_POOL_SIZE initialization parameter specifies the size of the shared pool in bytes. We recommend a value that is no less than 9MB in a production system. It is not uncommon for systems to require up to 75MB for the shared pool. The following query monitors the amount of free memory in the share pool:
SELECT * FROM v$sgastat
WHERE name = 'free memory' AND pool = 'shared pool';
If there is always free memory available within the shared pool, then increasing the size of the pool offers little or no benefit. Also, just because the shared pool is full does not necessarily mean there is a problem. There are no entries in the shared pool that cannot be paged out once they enter the pool. Application and deployment needs may differ, thus this value needs to be tuned on the basis of specific deployments and applications.
Maximum Opened Cursors
To prevent any single connection taking all the resources in the Oracle server, the OPEN_CURSORS initialization parameter allows administrators to limit the maximum number of opened cursors for each connection. Unfortunately, the default value for this parameter is too small for systems such as WebLogic Server and WebLogic Integration. A reasonable number falls in the range of 175 to 255. Cursor information can be monitored using the following query:
SELECT name, value FROM v$sysstat
WHERE name LIKE 'opened cursor%';
Maximum Number of Processes
On most operating systems, each connection to the Oracle server spawns a shadow process to service the connection. Thus, the maximum number of processes allowed for the Oracle server must account for the number of simultaneous users, as well as the number of background processes used by the Oracle server. The default number is usually not big enough for a system that needs to support a large number of concurrent operations. A reasonable number falls in the range of 200 to 255. For platform-specific issues. see your Oracle administrator's guide. The current setting of this parameter can be obtained with the following query:
SELECT name, value FROM v$parameter WHERE name = 'processes';
Database Block Size
A block is Oracle's basic unit for storing data and the smallest unit of I/O. One data block corresponds to a specific number of bytes of physical database space on disk. This concept of a block is specific to Oracle RDBMS and should not be confused with the block size of the underlying operating system. Note that since the block size affects physical storage, this value can be set only during the creation of the database; it cannot be changed once the database has been created.
Given the nature of WebLogic Integration repository tables and access patterns, it is recommended that the database used for WebLogic Integration is created with a block size of 8K. The current setting of this parameter can be obtained with the following query:
SELECT name, value FROM v$parameter WHERE name = 'db_block_size';
The following table shows the advantages and disadvantages of commonly used block sizes.
Tuning Options for System Administrators
This section contains tuning procedures that should be performed only by system administrators or users who are intimately familiar with the affected system.
Warning: Not all the tuning options described in this section have a positive effect on performance; you may need to derive values for parameters empirically.
SNP Processes
By default, the Oracle server creates several background processes to perform scheduled tasks. These tasks can be scheduled only through the use of the Job Queues functionality or Advanced Replication (check your Oracle documentation for details). If you are not using these Oracle features, however, these background processes waste resources. To turn off these processes until they are actually needed, modify the init.ora file.
The safest way to do this is by commenting out the following section in your init.ora file:
# The following parameters are needed for the Advanced Replication #Option
#job_queue_processes = 4
#job_queue_interval = 10
Sort Area Size
Increasing the sort area increases the performance of large sorts as this allows the sort to be performed in memory during query processing. This can be important, as there is only one sort area for each connection at any point in time. The default value of this init.ora parameter is usually the size of 6-8 data blocks. This value is usually sufficient for OLTP operations but should be increased for decision support operation, large bulk operations, or large index-related operations (for example, recreating an index). When performing these types of operations, you should tune the following init.ora parameters (which are currently set for 8K data blocks):
sort_area_size = 65536
sort_area_retained_size = 65536
Physical Storage Parameters for Tables
Database tables grow and shrink in size due to inserts, updates, and deletes. Growing a table incurs additional I/O that slows database operations. Thus, the physical storage parameters of each table should be set according to its expected access and usage pattern. This also means that the parameters are largely determined by the applications using the tables. In general, the default values used by Oracle work fairly well, but there are many instances where tuning these parameters can produce dramatic performance improvements. This work should be performed by a professional DBA with a deep understanding of the Oracle RDBMS. The following sections highlight some storage parameters that are common to schema objects, but are especially important to the CREATE TABLE command. It is not in the scope of this guide to recommend specific values for these parameters. (For details, see your Oracle documentation or DBA). Selected parameters are described and queries are provided to help you check for potential problems.
When a transaction modifies a block, it must first mark a flag in the header of the block. The marker is released when the transaction commits. Each marker takes space in the block, thus more transaction markers mean less space for data. Without a marker, the transaction is not allowed to modify the block and must wait. Oracle allows users to control the number of markers per block on a per-table basis. (Some tables provide users with an even finer level of control, but a description of such control is beyond the scope of this document.) The INITRANS parameter allows users to specify the initial number of markers allocated in each block (the minimum value is 1). Additional markers are allocated up to the number specified by MAXTRANS. Transactions are blocked when no free markers are available. As transactions become blocked, the possibility of deadlocks increases (that is, transactions that are not allowed to complete and hold on to resource locks). The default MAXTRANS value is 255, but it should be checked with the following query to ensure that the parameters have a reasonable value for tables involved in OLTP:
SELECT owner, table_name, ini_trans, max_trans, FROM all_tables;
These settings are important if your application involves many concurrent workflows because, during its lifecycle, each workflow executes a series of transactions against the WORKFLOWINSTANCE table.
These parameters control the size of tables as they grow and shrink. An extent is composed of one or more data blocks (see Database Block Size). These parameters control the number of extents that are allocated to a table during creation (the size of a table cannot shrink below the value specified by MINEXTENTS) and the maximum number of extents that can be allocated to a table. Generally users should create tables using the following settings:
CREATE TABLE foo (col1 number, col2 date)
STORAGE (MINEXTENTS 1 MAXEXTENTS UNLIMITED);
The following query is used to check the values of these parameters:
SELECT owner, table_name, min_extents, max_extents
FROM all_tables;
Note that when the UNLIMITED option is specified for MAXEXTENTS, the value returned by the query will be a large integer (for example, 2147483645).
Swapping of Redo Logs
To support recovery, all operations performed against the Oracle RDBMS are recorded in redo logs (unless you explicitly disable logging for certain operations). Over time, the amount of information in the log increases and eventually starts to affect the performance of each operation. Immediately after a successful database backup, the information in the redo logs is no longer necessary as recovery can be achieved with the backup. Thus, it is a good practice to start a new redo log after each backup to clean up the information that is no longer needed and potentially restore system performance. This operation can be done through the following SQL command:
ALTER SYSTEM SWITCH LOGFILE
For details about redo logging, managing redo logs and log groups, and best practices for RDBMS backup, see your Oracle documentation.
Table Reorganizations
As SQL operations (both OLTP and bulk) cause tables to grow and shrink, the storage space for the table can become fragmented. This can lead to performance degradations and requires user intervention to reclaim space gaps and compact table data. This operation is often referred to as a table reorganization. Oracle 8.1.7 does not have a built-in facility to support this operation, thus the user must perform the steps manually. Following good practices, this operation should be done soon after a database backup. The following steps show how to reorganize a table called foo:
CREATE TABLE foo_bkup AS SELECT * FROM FOO;
DELETE TABLE foo;
RENAME foo_bkup TO foo
Note that each step in the process involves DDL statements (such as CREATE TABLE, DROP TABLE, and so on). DDL statements are not transactional in Oracle. More specifically, each DDL statement executes in a self-contained transaction. Thus the ROLLBACK command is ineffective during a table reorganization.
Tuning Microsoft SQL Server Databases
The following table describes performance tuning parameters that are specific to Microsoft SQL Server databases. For more information about these parameters, see your Microsoft SQL Server documentation.
Tuning Sybase Databases The following table describes performance tuning parameters that are specific to Sybase databases. For more information about these parameters, see your Sybase documentation.

|

|

|