
| Download Docs | Site Map | Glossary | |
|
|
|||
| bea.com | products | dev2dev | support | askBEA |
|
|
|
||||||||
| e-docs > WebLogic Platform > WebLogic Integration > DI Topics > Translating Data > Running the Purchase Order Sample |
|
Translating Data
|
Running the Purchase Order Sample
The WebLogic Integration software includes a purchase order sample designed to illustrate the basic techniques of creating message format definitions for binary data using Format Builder. The purchase order sample consists of DTD, MFL, and DATA files. These samples can be used to test your installation of the data integration component of WebLogic Integration.
The following topics are discussed in this section:
What Is Included in the Purchase Order Sample
The following table describes the files provided with the purchase order sample application. All directory names are relative to the WebLogic Integration samples directory (SAMPLES_HOME\integration) where SAMPLES_HOME is the samples directory in your WebLogic Platform installation..
Prerequisite Considerations
Before you can run the purchase order sample, you must make sure that certain software applications are installed and certain tasks are complete. For more information, see BEA WebLogic Integration Release Notes.
To understand how the Format Builder is used, it helps to understand the data formats used by the data integration tools provided by WebLogic Integration: binary data, XML, and MFL. If you have not already done so, please review Understanding Data Formats.
Performing Binary-to-XML Translation
The following sections provide information about building a sample purchase order format definition and testing the translation of binary data into XML format:
You can build format definitions that provide the information required to translate binary data to or from XML. Format definitions are the metadata used to parse the content of a binary data file.
Analyzing the Data to Be Translated
The key to translating binary data to and from XML is to create an accurate description of the binary data. For binary data (data that is not self-describing), you must identify the following elements:
Listing C-1 shows sample binary data that is included on the WebLogic Integration CD-ROM (and the download) and is called \samples\di\po\po_01.data. In this sample, the data is taken from a fictitious purchase order on a proprietary system used by the XYZ Corporation. XYZ wants to exchange information with another system that accepts XML data.
Listing C-1 Sample Purchase Order in Binary Format
1234;88844321;SUP:21Sprockley's Sprockets01/15/2000123 Main St.;
Austin;TX;75222;555 State St.;Austin;TX;75222;PO12345678;
666123;150;Red Sprocket;
To analyze the purchase order data:
After you complete the preceding procedure, you may want to put the data into a spreadsheet, as shown in the example in Figure C-1. This spreadsheet can then serve as a guide when you create your purchase order message definition.
Figure C-1 Analysis of Purchase Order Data
Creating the Format Definition and Testing the Translation This section walks you through the process of creating a message format for translating the binary data described in yeah to XML. To make sure you create your purchase order message format correctly, you can compare the file you create with the \samples\di\po\po.mfl file on the product CD-ROM. Step 1. Start the Format Builder and Create a Message Format To start Format Builder and create a message format:
Step 2. Create the Basic Information Fields
To create the fields required to capture the basic identifying information for the purchase order:
Step 3. Create the Shipping Address and Billing Address Groups
To create the shipping address and billing address groups:
Step 4. Create the Remaining Items
Repeat the process of creating or duplicating fields and groups as required to complete the purchase order message format document. Use the analysis of the raw purchase order data presented in Figure C-1 to determine the values you need to enter for each item. For assistance, refer to the \samples\di\po\po.mfl file.
When you finish entering the required items, your navigation tree should look similar to the one shown in Figure C-2.
Figure C-2 Completed Navigation Tree for Purchase Order Sample
Step 5. Save the Completed Message Format Choose File The completed MFL document is saved. Depending on the Format Builder options currently set, the DTD and/or XML Schema that describes the content model captured in the MFL document are also saved. To set up the Format Builder to automatically generate a DTD and/or XML Schema for your message format documents: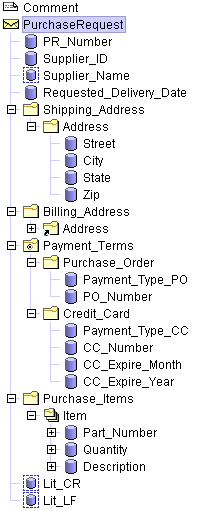
Now, whenever you save message format documents, Format Builder generates the specified file(s) for each message format document.
Step 6. Test the Message Format
To test the message format to identify any errors before using it to translate data:
Performing XML-to-Binary Translation
You can also use the Format Builder to create message definitions and test the translation of XML data to binary. The steps required to do this are essentially the same as those you follow to translate binary data to XML. To translate XML data to binary, first create an MFL description for the binary format. The purchase order sample files can be used to test the process as described in the following procedure.

|

|

|


