bea.com | products | dev2dev | support | askBEA
 Download Docs   Site Map   Glossary 
Search

Translating Data

 Previous Next Contents Index View as PDF  

Testing Format Definitions

After you build a format definition, you can test it using the Format Tester. The Format Tester parses and reformats data as a validation test and then generates sample binary or XML data. This sample data can be edited, searched, and debugged to produce the expected results. Format Tester uses the data translation run-time engine to perform the test translation.

This section discusses the following topics:


Starting the Format Tester

To start Format Tester:

  1. If Format Builder is not already running, choose Start—>Programs—>BEA WebLogic Platform 7.0—>WebLogic Integration 7.0—>Format Builder to start Format Builder, and then open the MFL document to be tested.

    Note: Before you can run Format Tester, you must have a message format document open in Format Builder.

  2. Choose Tools—>Test to display the Format Tester dialog box as shown in the following figure.

    Figure 2-1 Format Tester Dialog Box


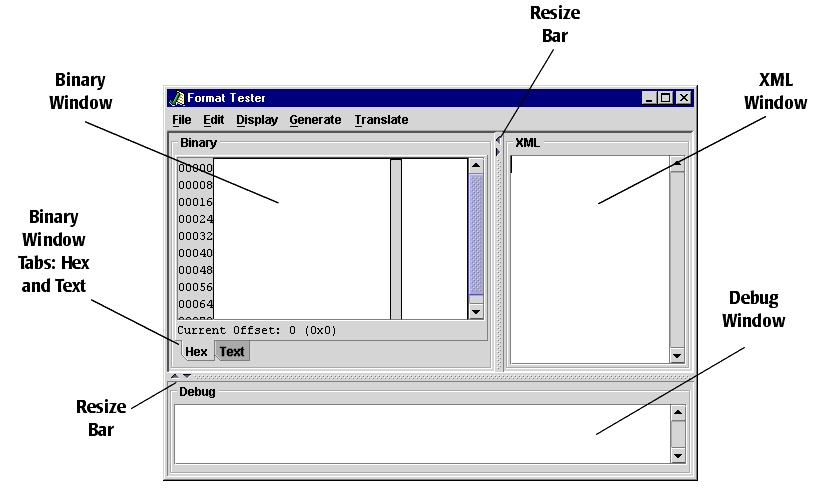
The Format Tester dialog box is divided into three windows: the Binary window, the XML window, and the Debug window. Resize bars divide the windows. You can drag the resize bar to adjust window size, or click an arrow on the bar to show or hide a window. For example, you can click the left arrow on the bar dividing the Binary and XML windows to hide the Binary window. If a window is hidden, you can drag the bar or click the appropriate arrow to restore the window.

Note: When you open the Format Tester for the first time in a session, only the Binary and XML windows are visible. To open the Debug window, use the resize bar at the bottom of the Format Test dialog box, or choose Display—>Debug to toggle the Debug window on and off.


Using the Format Tester Dialog Box

The following topics explain how to use various tools provided in the Format Tester dialog box to navigate and execute commands:

The following topics explain how to use each of these features to help you accomplish your task.

Using the Binary Window

The Binary window can contain sample data that has been:

You can open an existing binary data file, edit or save the contents of the window, or clear the window as required for your test situation. For details, see Using the Menu Bar and Using the Shortcut Menus.

The Binary window of the Format Tester dialog box serves as a binary file editor. The window contains the following tabs:

The editor allows you to edit a hex byte or a text value. If a hex data value is modified, the corresponding text value is updated, and vice versa.

Using the Data Offset Feature

The data offset feature of the Hex tab allows you to display the data offsets as hexadecimal or decimal addresses.

To change the format of the data offsets:

  1. Choose Display—>Hex. The following two data offset options are displayed.

  2. Select an option that best suits your needs. The data offset portion of the Binary window changes dynamically to reflect your choice.

Using the Text Feature

The Text tab of the Binary window displays the printable characters (usually in the form of words and numbers) and certain control characters (carriage return, tab, and so on). For example, carriage returns are shown as line breaks. Non-printable characters, are displayed as small squares.

Using the XML Window

The XML window can contain sample XML that has been:

You can open an existing XML file, edit or save the contents of the window, or clear the window as required for your test situation. For details, see Using the Menu Bar and Using the Shortcut Menus.

When XML is generated, the XML Formatting Options specified in the Format Builder options dialog box are used. For additional information, see Setting Format Builder Options.

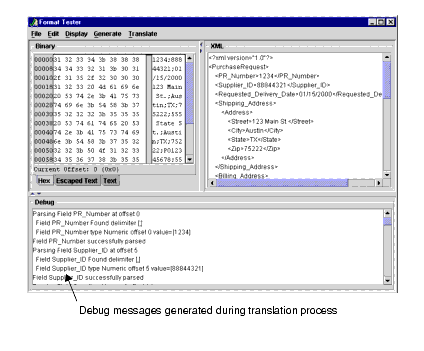
Using the Debug Window

The Debug window displays the actions that occur during a translation operation, any errors that are encountered, and field and group values, along with delimiters. To determine the cause of an error, identify the last field that parsed successfully and examine the properties of the field listed after it in the navigation tree.

When you open the Format Tester for the first time in a session, only the Binary and XML windows are visible. To open the Debug window, choose Display—>Debug to toggle the Debug window on and off. The Debug window opens below the Binary and XML windows.

Debug output is restricted to the most recent 64 KB of messages. This restriction prevents large debug output from causing a JVM out of memory event.

The debug log feature allows you to save all debugging information in a file. For details, see Using the Debug Log.

Note: Use of the Debug window or log file increases the time required to translate from XML to Binary.

Using the Resize Bars

You can change the dimensions of any window in the Format Tester by using the resize bars located between the Binary, XML, and Debug windows. To change the size of a window, select a resize bar and drag in the appropriate direction (up or down or to the left or right) to enlarge one of the windows and reduce the other.

Each resize bar also contains two directional buttons. Click the appropriate button to show or hide any of the three windows.

Using the Menu Bar

Format Tester functions can be accessed from the five menus listed in the menu bar at the top of the main window.

Figure 2-2 Menu Bar


You can expand a Format Tester menu in either of two ways:

To execute a command, select it from the menu. Some commands can also be executed via the keyboard shortcut indicated on the menu (For example, a Ctrl + key sequence.) The commands available on each menu are described in the following sections.

File Menu

The following commands are available from the File menu.

Table 2-1 File Menu Commands  

Command

Description

Open Binary

Displays the Open dialog box to allow you to select and open a file in the Binary window.

Note: The default file extension for binary files is .DATA.

Open XML

Displays the Open dialog box to allow you to select and open a file in the XML window.

Note: The default file extension for XML files is .XML.

Save Binary

Displays the Save dialog box to allow you to save the contents of the Binary window.

Save XML

Displays the Save dialog box to allow you to save the contents of the XML window.

Debug Log

Displays the Save dialog box to allow you to save the debugging information in a text file.

Close

Closes the Format Tester window.


Edit Menu

The following commands are available from the Edit menu.

Table 2-2 Edit Menu Commands  

Command

Description

Cut

Removes the currently selected text and places it on the clipboard for pasting in another location.

Copy

Copies the currently selected text and places it on the clipboard for pasting in another location.

Paste

Inserts the cut or copied text at the cursor location.

Find

Allows you to search for a hex or text value. This command applies to the content of the Binary window only.

Note: The text search is case sensitive.

Find Next

Repeats the last Find from the current cursor position. This command applies to the content of the Binary window only.

Go To

Allows you to move the cursor to a specified byte offset in the Binary window.


Display Menu

The following commands are available from the Display menu.

Table 2-3 Display Menu Commands  

Command

Description

XML checkbox

Check to display the XML window, uncheck to hide the window. When unchecked, the Binary window expands to fill the Format Tester dialog box.

Debug checkbox

Check to display the Debug window, uncheck to hide the window.

Clear—>Binary

Clears the contents of the Binary window.

Clear—>XML

Clears the contents of the XML window.

Clear—>Debug

Clears the contents of the Debug window.

Hex—>Offsets as Hexadecimal option button

Displays the offset values as hexadecimal. Mutually exclusive with the Hex—>Offsets as Decimal option.

Hex—>Offsets as Decimal option button

Displays the offset values as decimal. Mutually exclusive with the Hex—>Offsets as Hexadecimal option.

Text—>Values in ASCII option button

Changes the character set used for the text displayed in the binary file editor to ASCII. Mutually exclusive with the Text—>Values in EBCDIC option.

Text—>Values in EBCDIC option button

Changes the character set used for the text displayed in the binary file editor to EBCDIC. Mutually exclusive with the Text—>Values in ASCII option.


Generate Menu

The following commands are available from the Generate menu.

Table 2-4 Generate Menu Commands

Command

Description

Binary

Generates binary data to match the MFL document specification.

XML

Generates XML data to match the MFL document specification.

Prompt while generating data check box

If checked, you are prompted to specify the following during the generation process:


Translate Menu

The following commands are available from the Translate menu.

Table 2-5 Translate Menu Commands

Command

Description

Binary to XML

Based on the MFL document specification, converts the contents of the Binary window to XML. The XML output is displayed in the XML window.

XML to Binary

Based on the MFL document specification, converts the contents of the XML window to binary. The binary output is displayed in the Binary window.


Using the Shortcut Menus

When you right-click in the Binary, XML, or Debug window, a menu of the most frequently used commands for that window is displayed. The following table describes the commands that are available from the shortcut menus.

Table 2-6 Binary, XML, and Debug Shortcut Menu Commands  

Command

Description

Cut

Removes the currently selected text and places it on the clipboard for pasting in another location.

Copy

Copies the currently selected text and places it in the clipboard for pasting in another location.

Paste

Inserts the cut or copied text at the cursor location.

Clear

Clears the contents of the binary, XML, or Debug window.

Generate

Generates binary or XML data to match the MFL document specification. This command is only available on the Binary and XML shortcut menus.

To XML

Converts the contents of the Binary window to XML. This command is only available on the Binary shortcut menu.

To Binary

Converts the contents of the XML window to binary. This command is only available on the XML shortcut menu.

Text in ASCII

Changes the character set used for the text displayed in the text portion of the Hex tab to ASCII.

Text in EBCDIC

Changes the character set used for the text displayed in the text portion of the Hex tab to EBCDIC.


Testing Format Definitions

To test a message format definition:

  1. Start Format Builder.

  2. Open a Message Format file.

  3. Start Format Tester.

  4. Choose File—>Open Binary, or File—>Open XML to load the file you want to translate and view, or enter your own data in one of the two data windows.

  5. Choose Display—>Debug if you want to view the actions that take place during the translation operation. This step is optional. If you want to be able to view debugging information later, you must open the Debug window before starting the translation operation.

  6. Choose Translate—>Binary to XML, or Translate—>XML to Binary to translate your data to the appropriate format. The translated data is displayed in the Binary or XML window.

    Figure 2-3 Format Tester


  7. Correct any errors and test the translation again.

  8. Repeat steps 6 and 7 until the translation is successful.

Note: You can leave Format Tester open while you modify the message format document in Format Builder. Changes to the document are detected automatically by Format Tester.


Debugging Format Definitions

The following topics explain how to use three Format Tester features to debug and correct your data:

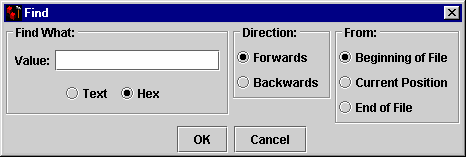
Searching for Values

The Find command allows you to search for hex or text values in the binary data.

To search for a hex or text value:

  1. In the Format Tester dialog box, choose File—>Open Binary to open the binary data file you want to search.

  2. Choose Edit—>Find to open the Find dialog box.

    Figure 2-4 Find Dialog Box


  3. Enter the target of the search in the Value field.

  4. Select the Text or Hex option button to specify the value type.

  5. Select the Forwards or Backwards option button to specify the search direction.

  6. Select the Beginning of File, Current Position, or End of File option button to specify the search starting position.

  7. Click OK to dismiss the Find dialog box and execute the specified search.

    If the value is found, the cursor moves the location of the value. If the value is not found, the following message is displayed: The specified search string was not found.

  8. To repeat the search from the current cursor position, choose Edit—>Find Next.

Positioning to an Offset

The Go To command allows you to move the cursor to a specified hexidecimal or decimal address (offset).

To move to a specified offset:

  1. In the Format Tester dialog box, choose Edit—>Go To to display the Go To dialog box.

    Figure 2-5 Go To Dialog Box


  2. Enter the target offset in the Offset field.

  3. Select the Dec or Hex option button to specify the type of offset.

  4. Select the Forwards or Backwards option button to specify the direction.

  5. Select the Beginning of File, Current Position, or End of File option button to specify the starting position.

  6. Click OK to dismiss the dialog box and move the cursor to the specified offset.

Using the Debug Log

Although debugging information is not saved by default, the Format Tester dialog box allows you to specify a debug log file. When you specify a debug log file, all debugging information generated during your testing session is appended to the specified file.

To specify a debug log file:

  1. In the Format Tester dialog box, choose the File—>Debug Log to display the Save dialog box.

    Note: The Debug Log checkbox on the File menu is toggled upon selection. If the checkbox is checked, choosing File—>Debug Log turns off logging to the file.

  2. Select the desired directory, and then do one of the following:

    If you select an existing file, the new debug information is appended to the end of the existing file.


Back to Top Previous Next