| Download Docs | Site Map | Glossary | |
|
|
|||
| bea.com | products | dev2dev | support | askBEA |
|
|
|
||||||||
| e-docs > WebLogic Platform > WebLogic Integration > B2B Topics > Using EDI > BEA WebLogic Adapter for Power.Enterprise! 3.1 |
|
Using EDI
|
BEA WebLogic Adapter for Power.Enterprise! 3.1
The BEA WebLogic Adapter for Power.Enterprise! 3.1 is an implementation of the application integration capability in BEA WebLogic Integration. The BEA WebLogic Adapter for Power.Enterprise! enables you to send and receive XML messages that are transformed into and from EDI messages by Power.Enterprise!. This section includes the following topics:
Overview of Application Integration
BEA WebLogic Integration is described in Introducing Application Integration. For more information about implementing and using application integration functionality, see Using Application Integration.
The integration solution provided by BEA WebLogic Integration supports existing and future standards for connecting applications both within and between enterprises. BEA WebLogic Integration provides a means to define communication endpoints, which you may add to a process flow through the business process management (BPM) functionality of BEA WebLogic Integration or by using custom code to form a complete integration solution.
As discussed previously, the BEA WebLogic Adapter for Power.Enterprise! is implemented using the integration functionality provided by BEA WebLogic Integration. The remainder of this chapter discusses this functionality as it applies to the BEA WebLogic Adapter for Power.Enterprise!.
Application Views
To accomplish message-level enterprise application integration, you can create any number of application views for each adapter. An application view defines a set of business functions on a specific adapter. The application view, via the underlying adapter, supports events and services for a particular business use:
Requests and responses for both events and services are passed through the system as XML documents. For more information about application views, see Understanding the Integration Framework in Introducing Application Integration.
The BEA WebLogic Adapter for Power.Enterprise! view provides multiple application views, each containing multiple user-definable services and events. Both services and events are defined by XML schemas, and both transmit data in XML form. This method allows any XML-aware component, such as WebLogic Integration, to use the BEA WebLogic Adapter for Power.Enterprise! for communication with Power.Enterprise!. BEA WebLogic Adapter for Power.Enterprise! application views, services, and events are managed from the WebLogic Application Integration Adapter home page.
Before the BEA WebLogic Adapter for Power.Enterprise! can operate properly with Power.Enterprise!, you must configure it to do so. You must also configure the Adapter services and events.
To facilitate these configuration tasks, BEA WebLogic Adapter for Power.Enterprise! application view provides three Java Server Pages (JSPs).
Configuring the BEA WebLogic Adapter for Power.Enterprise!
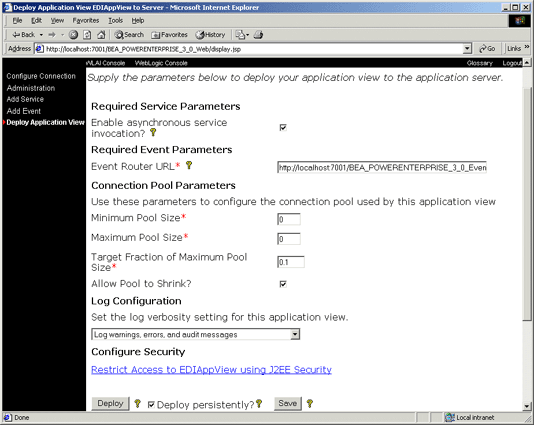
To enable the BEA WebLogic Adapter for Power.Enterprise! to communicate with Power.Enterprise!, you must configure it with suitable communication information. To do so, complete the following procedure:
Figure 3-1 Define New Application View JSP

Figure 3-2 Configure Connection Parameters JSP

Figure 3-3 Configuration Administration JSP

Note: Always start the Power.Server! before you start WebLogic Integration or WebLogic Server. The WebLogic Integration connectors expect to see an active instance of the Power.Server! when they are initialized, and they will throw exceptions if Power.Server! is not running when they are initialized.
Events
An event contains an XML document that is published by an application view when an event of interest occurs. Clients that want to be notified of events register their interest with an application view. After a client subscribes to events published by an application view, the application view notifies the client whenever a subscribed event occurs within the target application, and then passes the client an XML document that describes the event. For more information about adding events to an application view, see "Step 4B: Add an Event to an Application View" in Defining an Application View in Using Application Integration.
The BEA WebLogic Adapter for Power.Enterprise! provides user-definable events. These events are created and managed using a Java Server Page, which is published as part of the WebLogic Integration Application Interface. When Power.Enterprise! receives an EDI message from a trading partner and forwards it to the BEA WebLogic Adapter for Power.Enterprise!, the Adapter publishes the appropriate events. The process works as follows:
Configuring Events
Events are used by the BEA WebLogic Adapter for Power.Enterprise! to send information from a workflow to Power.Enterprise!, which forwards it to your trading partner. The BEA WebLogic Adapter for Power.Enterprise! allows you to define multiple events. As a rule, you will define one event per XML/EDI document type (a purchase order, for example) that you plan to send.
To define an event on the BEA WebLogic Adapter for Power.Enterprise!:
Figure 3-5 Add Event JSP

Testing an Event
After you configure both events and your workflows, you should verify that you can successfully send messages through those events. Use the Test Event link to test your event in the Application View console.
The following procedure is a simple test method for checking how an event receives a message:
Services
A service is a business operation in an application that is exposed by the application view. It functions as a request/response mechanism: when an application receives a request to invoke a business service, the application view invokes that functionality in its target application and then responds with an XML document that describes the results. For information about adding services to an application view, see "Step 4A: Add a Service to an Application View" in Defining an Application View in Using Application Integration.
The BEA WebLogic Adapter for Power.Enterprise! provides a number of services that can be configured by users. These services are created and managed using a Java Server Page, which is published as part of the WebLogic Integration Application Interface. They are used to send XML to Power.Enterprise!. Upon receipt, Power.Enterprise! converts an XML message to an EDI message. It then sends the EDI message to a trading partner.
To send an EDI message, submit an appropriately formatted XML document to the service defined for BEA WebLogic Adapter for Power.Enterprise!. The service uses RMI to pass the message to Power.Enterprise!, which translates the XML message to an EDI message format and dispatches it to the appropriate trading partner.
Configuring Services
Services are used by the BEA WebLogic Adapter for Power.Enterprise! to receive information for a workflow that is forwarded from your trading partner by Power.Enterprise!. Although the BEA WebLogic Adapter for Power.Enterprise! allows you to define multiple services, most situations require you to define only one event per XML/EDI document type (such as an EDI 855 message) that you plan to receive.
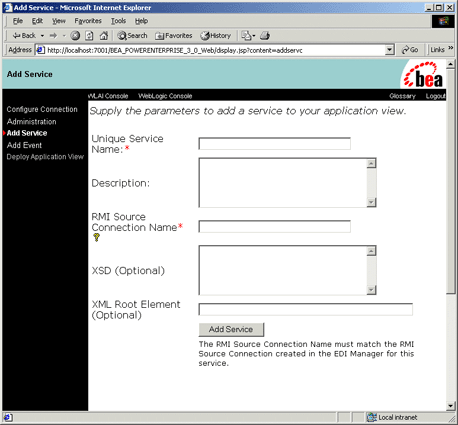
To define a service on the BEA WebLogic Adapter for Power.Enterprise!:
Figure 3-6 Add Service JSP
Testing a Service
After you configure both services and the workflows that will use those services, you should verify that you can properly receive messages from them. Use the Test Service link to test your event within the Application View console.
The following procedure is a simple method for testing how a service delivers a message:
Using the Adapter Plug-In to the BEA WebLogic Integration Studio
The BEA WebLogic Adapter for Power.Enterprise! includes a plug-in to the BEA WebLogic Integration Studio, a graphical tool for modeling business processes. Because the Adapter is an integral part of BEA WebLogic Integration, you can use this plug-in for EDI message handling and integration in exactly the same way you use any other application integration adapter.
For more information about BPM workflow design using adapters and the adapter plug-in to the BEA WebLogic Integration Studio, see Understanding the Application Integration Plug-in for BPM and Understanding the ADK in Introducing Application Integration.
Deploying an Adapter in a New WebLogic Integration Domain
If you want to deploy an instance of the BEA WebLogic Adapter for Power.Enterprise! 3.1 in a new domain, complete the procedure appropriate for your platform.
For Windows Systems
Before you begin, you must determine the location of the adapter EAR and JAR files on your computer. By default, they are located in WLI_HOME\adapters\powerenterprise\lib.
Listing 3-1 Domain Declaration in config.xml File on Windows System
<Application Deployed="true" Name="BEA_POWERENTERPRISE_3_0"
 Path="WLI_HOME\adapters\powerenterprise\lib\BEA_POWERENTERPRISE_3_0_EAR.ear">
    <ConnectorComponent Name="BEA_POWERENTERPRISE_3_0"
     Targets="myserver" URI="BEA_POWERENTERPRISE_3_0.rar"/>
    <WebAppComponent Name="BEA_POWERENTERPRISE_3_0_EventRouter"
     Targets="myserver"
     URI="BEA_POWERENTERPRISE_3_0_EventRouter.war"/>
    <WebAppComponent Name="BEA_POWERENTERPRISE_3_0_Web"
     Targets="myserver" URI="BEA_POWERENTERPRISE_3_0_Web.war"/>
</Application>
For UNIX Systems
Before you begin, you must determine the location of the adapter EAR and JAR files on your computer. By default, they are located in WLI_HOME/adapters/powerenterprise/lib.
Listing 3-2 Domain Declaration in config.xml File on UNIX System
<Application Deployed="true" Name="BEA_POWERENTERPRISE_3_0"
Path="WLI_HOME/adapters/powerenterprise/lib/BEA_POWERENTERPRISE_3_0_EAR.ear">
    <WebAppComponent Name="BEA_POWERENTERPRISE_3_0_EventRouter"
     Targets="myserver" URI="BEA_POWERENTERPRISE_3_0_EventRouter.war"/>
    <ConnectorComponent Name="BEA_POWERENTERPRISE_3_0" Targets="myserver"
     URI="BEA_POWERENTERPRISE_3_0.rar"/>
    <WebAppComponent Name="BEA_POWERENTERPRISE_3_0_Web"Targets="myserver"
     URI="BEA_POWERENTERPRISE_3_0_Web.war"/>
</Application>
Exception Handling
The response schema for a service method should include both a status Code and a Message:
To handle any exception that may occur, create an XPath expression to retrieve the status code from any response XML.
The following is an example of the response schema for a service call:
<Status>
  <Code>Success </Code>
  <Message>Translation Request Queued Successfully.</Message>
</Status>
The Code can be extracted from the response schema using the following Xpath expression:
"/Status/Code/text()".

|

|

|