|
|
|
|
|
|
Getting Started with the WebLogic Process Integrator Studio
In this section you will become familiar with the Studio client application, which you use to design workflows. The following tasks are described:
Starting the WebLogic Process Integrator Studio
To start the WebLogic Process Integrator Studio:
sh studio.sh
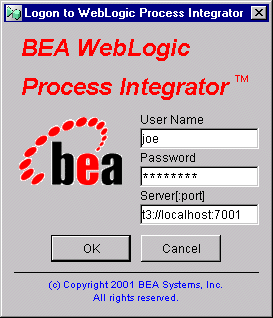
The Logon to WebLogic Process Integrator dialog box appears in front of the WebLogic Process Integrator Studio application window.
Figure 2-1 Logon to WebLogic Process Integrator Dialog Box
Table 2-1 Default CDExpress Users and Passwords
User Name
Password
joe
password
mary
password
admin
security
Note: User names and passwords are case-sensitive. Be sure to enter the user names and passwords shown in the table in lower case.
t3://host:7001
Here host is the computer name or IP address of the system that is running the WebLogic Process Integrator server. Specify localhost if the server is running on the same computer as the Studio application.
Figure 2-2 BEA WebLogic Process Integrator Studio Application Window

Understanding the Workflow Object Hierarchy
In WebLogic Process Integrator, data and process objects are represented at three different hierarchical levels, which you can think of as containers for other objects that you create in the Studio:
This section describes these three levels.
Global Configuration Objects
These exist at the highest level of the hierarchy, and are available for use by all workflows and organizations. Configuration objects are not displayed in the folder tree, but are accessed through the Configuration menu. They include interfaces such as business operations and event keys, and permissions for users.
Figure 2-3 Configuration Menu
Choose Permissions to invoke the Permissions dialog box. Figure 2-4 Permissions Dialog Box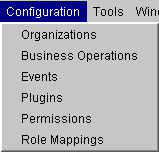
Note that all users defined in the system are displayed in the Permissions dialog box, including those not associated with the current organization. Organizations These represent the next level in the hierarchy. Besides the workflows themselves (represented as templates and template definitions), organizations contain objects that can be accessed by any workflow created in that organization. In the Studio interface, the folder tree in the left pane shows the objects contained within the currently selected organization. Figure 2-5 Organization Folder Tree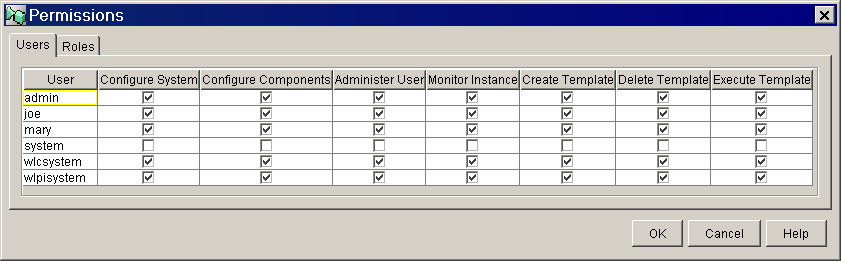
Although users and calendars can be associated with multiple organizations, the ones that are associated with the current organization are listed in the Users and Calendars folders, respectively. By contrast, all other objects, including roles, routings, and reports, are actually defined from within organizations. (For information about calendars, routings, and reports, see Administering Data in Using the BEA WebLogic Process Integrator Studio.) To see how roles are defined uniquely within organizations, you can choose Configuration Figure 2-6 Role Mappings Dialog Box for CDExpress Organization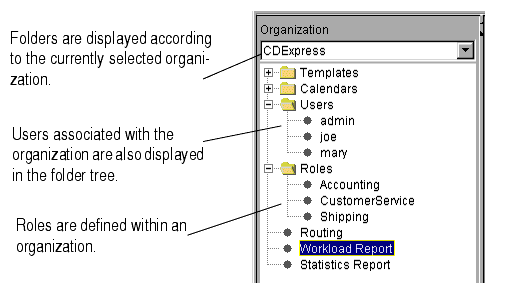
Select different options from the Organization drop-down list to see the different roles and their mappings to WebLogic Server groups. Templates and Template Definitions Templates are folders that can contain multiple workflow definitions. You can name a template however you want, but the name must be unique, including across organizations. Within a template folder, you create template definitions, which are the actual workflow definitions. Template definitions contain workflow objects such as nodes, actions, variables, and exception handlers. Template definitions are automatically assigned a label according to their effective and expiry dates and times, and multiple template definitions serve as different versions of a workflow. We will now import templates and template definitions so that you can view other workflow objects.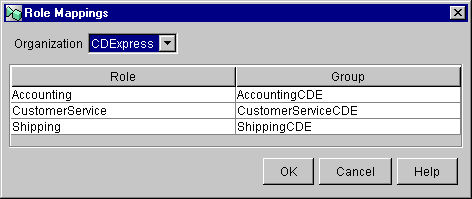
Importing Workflow Objects: Importing the Tutorial Package File
You can import or export complete workflow packages, including all dependencies, from or to a Java archive (JAR) package file, which stores workflow objects as binary files. The Import/Export Package feature allows you to import the following workflow objects:
Note: Template definitions can also be imported and exported from and to an XML file.
For complete information on Import/Export, see "Exporting and Importing Workflow Packages" in Defining and Maintaining Workflows in Using the BEA WebLogic Process Integrator Studio.
Importing the Tutorial.jar Workflow Objects
The tutorial.jar package contains the following objects:
The following procedure for importing the workflows gives you two options depending on whether you want to create the Order Processing workflow from scratch, as the tutorial recommends, or simply run the workflows without trying out the design procedures.
To import the example workflows:
Figure 2-7 Select File Dialog Box
Figure 2-8 Select Components to Import Dialog Box 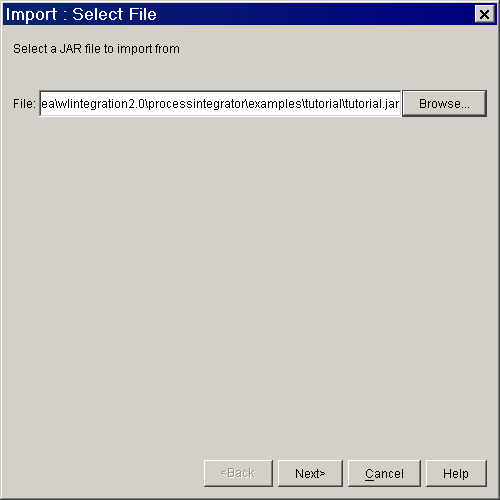
Note: You must activate a workflow before you can run it. Option 1: If you are not going to follow the tutorial, import the entire package, consisting of templates, template definitions, business operations, and event keys, by proceeding to step 9. Option 2: If you are going to follow the tutorial, import only the following by proceeding to step 6: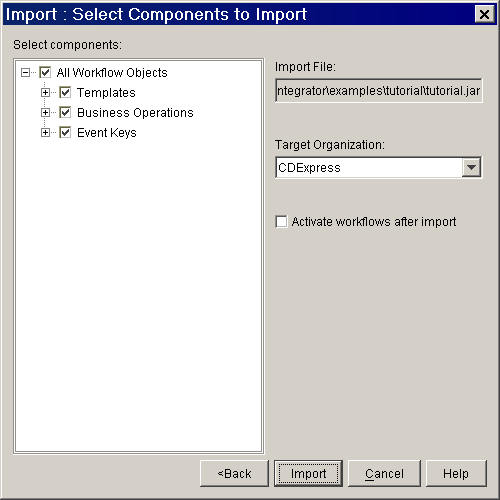
The dialog box should now appear as follows.
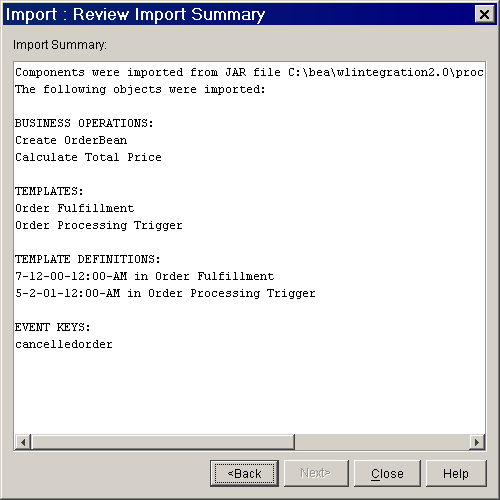
Figure 2-9 Review Import Summary Dialog Box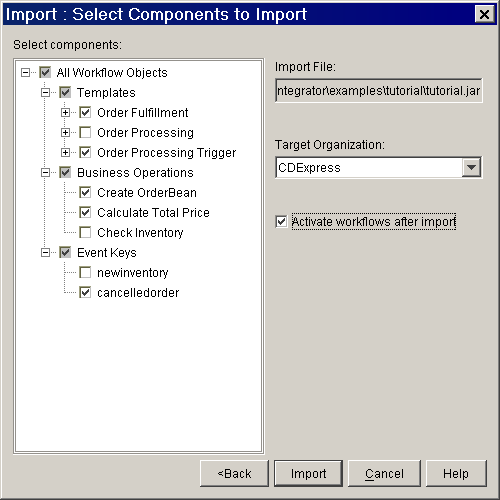
The imported templates and template definitions now appear in the folder tree.
Using the Folder Tree: Viewing the Order Processing Trigger Template Contents
You can view the folder tree for any template definition without actually opening it. Simply expand all the folders for that template definition folder. The following figure shows the folder tree structure for the Order Processing Trigger template definition.
Figure 2-10 Order Processing Trigger Workflow: Folder Tree
From the folder tree, you can view an object's properties by right-clicking the object and choosing Properties from the pop-up menu. If the template definition is closed, the properties dialog boxes are read-only; to edit them, you must first open the template definition. Note: Variable and exception handler properties are accessible only from the folder tree. Now we will view the imported workflow in the workflow design window and in Interface View. Before we can see the latter two views, we have to open the template definition.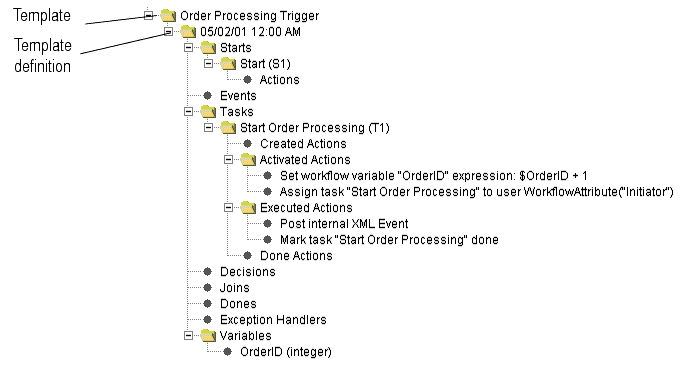
Viewing a Workflow: Opening the Order Processing Trigger Template Definition
To see the graphical view of a workflow, you have to open its template definition.
To open the Order Processing Trigger template definition:
Figure 2-11 Order Processing Trigger Template Definition: Workflow Design Window
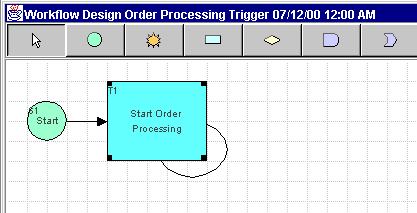
You can view and edit properties for any object in the workflow design window by double-clicking the appropriate object.
Using the Interface View
The Interface View gives additional information about a workflow by showing a graphical representation of inbound and outbound XML documents, business operations, sub-workflows and plug-ins that are associated with each node. The following table lists the Interface View icons and the objects they represent.
Table 2-2 Interface View Icons
Icon
Object

Business operation

Plug-in

Sub-workflow

Inbound XML document

Outbound XML document
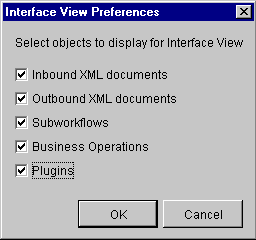
To use the Interface View for a workflow, you first set your preferences and then use the toolbar toggle button to switch Interface View on and off.
To set Interface View preferences:
Figure 2-12 Interface View Preferences Dialog Box
The workflow now appears as follows. Figure 2-13 Order Processing Trigger Workflow: Interface View
 .
.
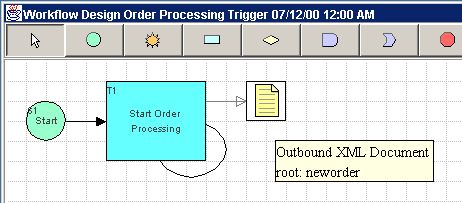
In Interface View you can also access read-only Properties dialog boxes for interface objects such as business operations and outbound XML documents. To view properties dialog boxes for interface objects, double-click the interface icon in the workflow design window.
Note: Because inbound XML documents are not workflow objects, double-clicking on their interface icon does not produce any effect; for basic information on their relevant properties, double-click on the appropriate event or start node to which they point.
In the next section of the tutorial, we will look at the different types of workflow objects and their properties.

|

|

|
|
|
|
Copyright © 2001 BEA Systems, Inc. All rights reserved.
|