

|
|
|
|
|
|
Defining and Maintaining Workflows
The following sections introduce you to BEA WebLogic Process Integrator workflow templates and workflow template definitions. It also explains how to perform a number of workflow template definition and maintenance tasks.
Understanding Workflow Templates and Workflow Template Definitions
A workflow template is, in essence, a folder or a container for BEA WebLogic Process Integrator workflow template definitions. Each workflow template can hold one or more BEA WebLogic Process Integrator workflow template definitions. BEA WebLogic Process Integrator workflow template definitions are identified in the folder tree by an Effective and Expiry date. For details, see Understanding Effective and Expiry Dates.
Figure 5-1 Workflow Templates and Workflow Template Definitions
Creating a New Workflow Template To create a new workflow template: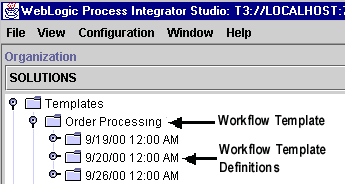
Figure 5-2 Template Properties Dialog Box
Note: If a plug-in is defined for workflow templates, this properties dialog box contains a selection to access the functionality provided by the plug-in. For more information about plug-ins, see Working with Plug-Ins. 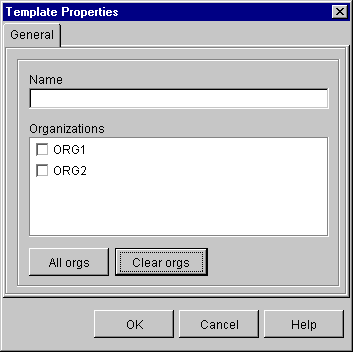
Creating a New Workflow Template Definition
To create a new workflow template definition, proceed as follows:
Figure 5-3 Template Definition Dialog Box

Note: If the Expiry option is not selected, the workflow template definition will always be valid and effective.
In the workflow drawing area, a default workflow template definition is presented along with a toolbar containing drawing shapes used for defining the workflow template. The default workflow template definition contains three shapes: Start, Task, and Done. Modify and define properties for the default workflow template definition as needed.
More than one workflow template definition diagram can be opened simultaneously, and you can toggle between these within BEA WebLogic Process Integrator.
Figure 5-4 Workflow Drawing Area
Specifying Workflow Template Definition Properties To specify the properties of a workflow template definition: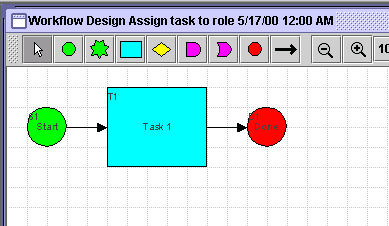
The Template Definition dialog box contains two tabs:
Figure 5-5 Template Definition Dialog Box: General Tab
Note: If a plug-in is defined for workflow template definitions, this properties dialog box contains a selection to access the functionality provided by the plug-in. For more information about plug-ins, see Working with Plug-Ins.
Note: Expressions are built using WebLogic Process Integrator expression syntax and typically use the syntax of XPath function to extract values out of XML documents. If you know the syntax of the expression you want to use, you can type the expression directly in the field. Alternatively, click the A+B button to display the Expression Builder dialog box. The Expression Builder helps you construct an expression, which is made up of functions, operators, literals, and variables. For more information on constructing expressions, see Using Expressions and Conditions.
Figure 5-6 Template Definition Dialog Box: Exception Handlers Tab
Note: If a plug-in is defined for workflow template definitions, this properties dialog box contains a selection to access the functionality provided by the plug-in. For more information about plug-ins, see Working with Plug-Ins.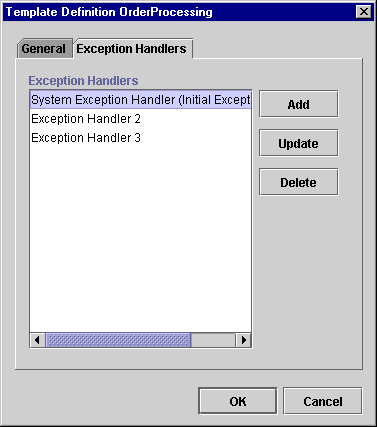
Note: For detailed instructions on using the Exception Handler Properties dialog box, see Handling Workflow Exceptions.
Opening Workflow Template Definitions
To open an existing workflow template definition:
Figure 5-7 Workflow Template Definition Menu
The Existing Instances dialog box is displayed, if there are existing instances of the selected workflow template definition, meaning that the selected workflow template definition has been started and an instance of the template definition exists in the server. Multiple instances of a single workflow template definition can exist. Figure 5-8 Existing Instances Dialog Box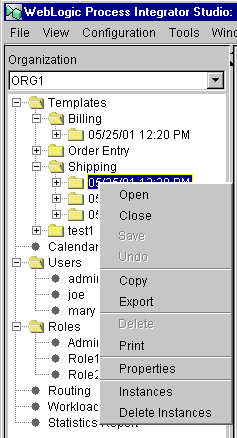
This message warns that changing a workflow template definition might cause a problem with the workflow template definitions currently in process. 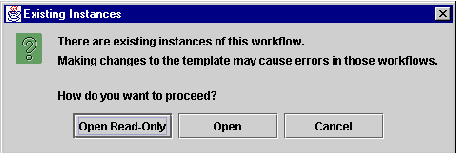
Note: Opening a workflow template definition in read-only mode prevents you from modifying a workflow. In fact all user interface options relating to making changes to workflows are not accessible. For example, you cannot access the OK button on a given Properties dialog box, shapes are browned out and cannot be added to the workflow drawing area, and so forth.
Saving and Closing Workflow Template Definitions
When you make changes within BEA WebLogic Process Integrator Studio, you must save them. If you make changes to a workflow template definition and attempt to close the workflow template definition in the drawing area without saving it, you will be prompted to save.
In the BEA WebLogic Process Integrator Studio folder tree, an asterisk (*) appears to the left of each workflow template definition that needs to be saved. From the folder tree, you save by right-clicking the workflow template definition and choosing Save from the pop-up menu. From the workflow drawing area, you save by right-clicking in the drawing area and choosing Save.
A workflow template definition cannot be modified unless it is opened. When a definition is not open, you cannot modify its values. Once you open a definition, it is locked and cannot be opened by another user. When you close a definition, it is unlocked and available for use by another user.
Printing Workflow Template Definitions
You can print workflow template definition diagrams from WebLogic Process Integrator. There are two methods for invoking the print facility.
The Text tab contains information relevant to each workflow node, including action and node notes, as well as details on actions within tasks, events, decisions and done nodes, including subactions within actions.
Figure 5-9 Print Workflow Text
The Graphics tab contains a diagram of the workflow template definition. Figure 5-10 Print Workflow Graphics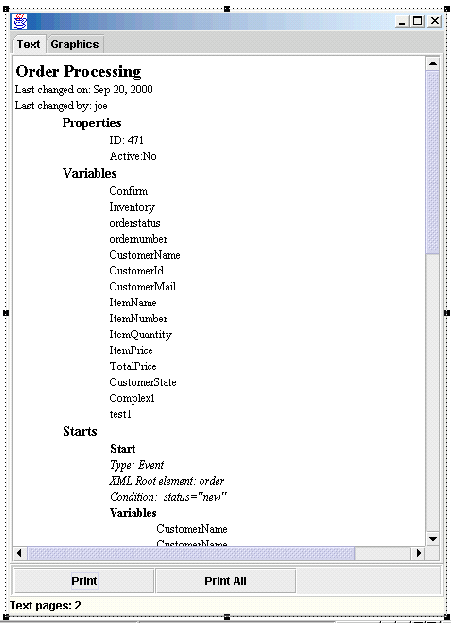
Click Print to print the information on the selected tab, or click Print All to print both the information contained in the Text tab and the diagram contained in the Graphics tab. In the Print dialog box, select the appropriate settings to print the workflow.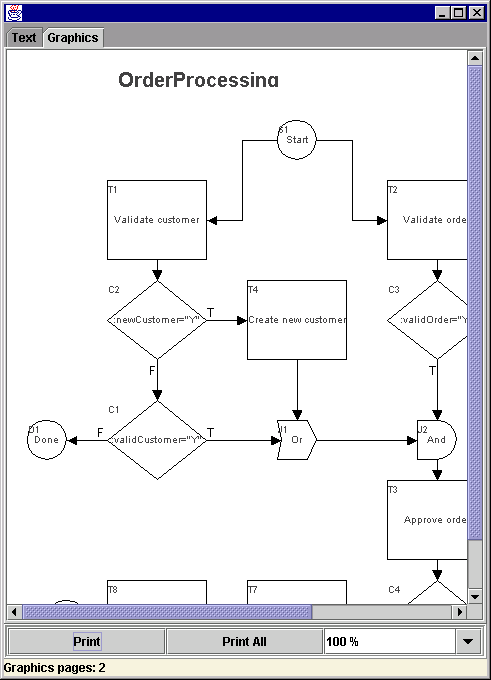
Copying Workflow Template Definitions
BEA WebLogic Process Integrator allows you to take an existing workflow template definition, copy it, and paste it as a new workflow template definition into the folder tree. When this is done, all of the assigned workflow template definition properties are copied as well. This saves you time when you must create more than one workflow template definition with similar properties. The properties of the new workflow template definition can be modified as needed.
In addition, BEA WebLogic Process Integrator allows you to copy nodes (shapes) within workflow template definitions and paste them into the current workflow template definition or other open workflow template definitions. All properties assigned to nodes are copied as well.
Note: The copied (new) workflow template definition will not be marked active. You must mark it active in the workflow Template Definition Properties dialog box in order for it to be processed in the workflow.
Copying Entire Workflow Template Definitions
To create a new workflow template definition based on an existing workflow template definition and its assigned properties, in the folder tree, right-click the workflow template definition to be copied, and choose Copy from the pop-up menu. A copy of the selected workflow template definition is instantly pasted as the last workflow template definition in the folder tree, and the new workflow template definition is opened and displayed in the drawing area. The new workflow template definition contains the same effective and expiry dates as the original workflow template definition. See Understanding Effective and Expiry Dates for more information on this topic.
To rename the new workflow template definition, right-click anywhere in the drawing area, choose Properties from the pop-up menu to access the Template Definition dialog box, and make changes as needed. Modifying the Expiry and Effective dates changes the name of the workflow template definition in the folder tree and reflects the new dates.
Copying Nodes Within Workflow Template Definitions
You can copy a shape representing a node within a workflow template definition and paste it into the current workflow template definition or into another open workflow template definition. Any properties that have been defined within the node are also copied. To do so, proceed as follows:
The shape is pasted in the indicated workflow template definition. Modify the properties of the node as needed.
Copying Actions Within or Between Workflow Node Shapes
BEA WebLogic Process Integrator also allows you to copy actions within or between shapes representing a node within a workflow template definition. Any properties that have been defined within the action are also copied. The ability to copy actions saves you time.
Copying Actions Within Workflow Nodes
The ability to copy actions within workflow nodes is useful when, for example, you must define a new action within a workflow task node that will contain properties similar to an already defined action within that task node. By copying the existing action and pasting it as a new action within the same task node, you save yourself time. Rather than having to define a whole new action, which might be a complex action, you might only have to make one or two modifications to the pasted action.
To copy actions within the same node, proceed as follows:
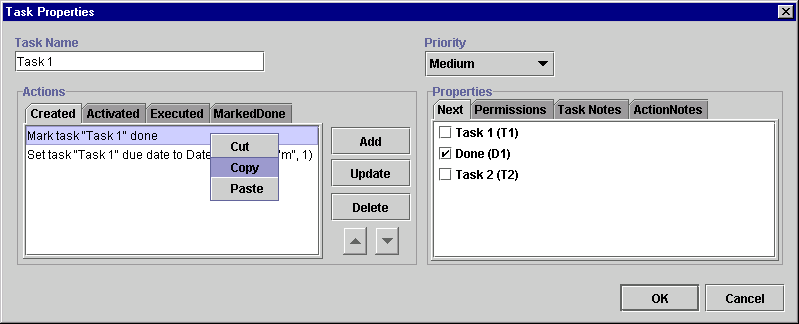
Figure 5-11 Copy Action
Copying Actions Between Workflow Nodes
The ability to copy actions between workflow nodes benefits you in the same manner as the ability to copy actions within workflow nodes. However, rather than copying actions within the same workflow node, you copy actions within one node and paste them into another node within the same workflow template definition. The ability to copy actions between nodes simplifies and speeds up the workflow definition process. When an action is copied, all of its properties are also copied, so you do not need to redefine all of the properties in the pasted node.
To copy actions between nodes, proceed as follows:
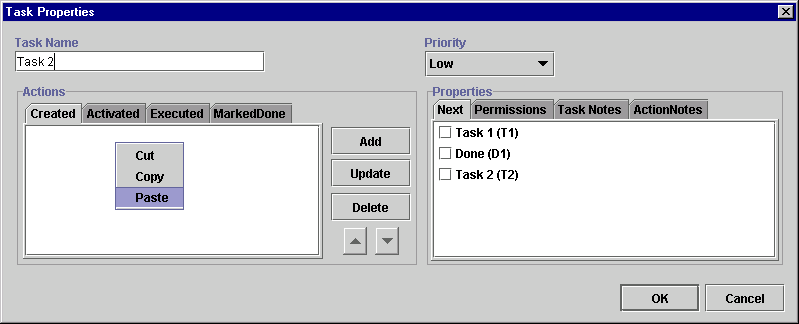
Figure 5-12 Copy Action
Figure 5-13 Paste Action
Deleting Workflow Template Definitions
To delete a workflow template definition, right-click the workflow template definition name in the folder tree, and choose Delete from the pop-up menu. The Delete Workflow dialog box asks you to confirm or cancel the delete.
Note: The workflow template definition must be closed in the drawing area before you delete it, or you will receive an error message.
Figure 5-14 Delete Workflow Dialog Box
When a workflow template definition is deleted, the following also occurs: 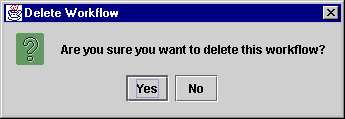
Deleting Workflow Templates
You can delete a workflow template from BEA WebLogic Process Integrator, in which case all workflow template definitions within the workflow template are also deleted. To delete a workflow template (and all of its workflow template definitions), proceed as follows:
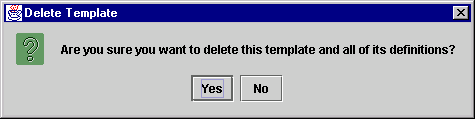
Figure 5-15 Delete Workflow Template
Figure 5-16 Delete Template Dialog Box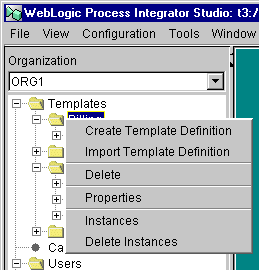
Understanding Effective and Expiry Dates
In the folder tree, a workflow template definition name consists simply of its Expiry and Effective dates. The effective and expiry dates represent the range of time within which the workflow template definition is available for instantiation.
The Effective and Expiry Date features are useful in that they allow you to make workflow template definitions valid for exact periods of time. Perhaps you have a cyclical business, which requires you to run a particular workflow template definition for the first six months of the year, followed by a second workflow template definition having different tasks or variables the remaining six months of the year.
Rather than having to manually inactivate one workflow template definition and activate another at different times, you can define separate workflow template definitions having different properties and make them available at the right time by managing the effective and expiry dates.
Within a single workflow template, a workflow template definition's timeline cannot overlap that of another workflow template definition. In other words, only one workflow template definition can run at a time within one workflow template.
You cannot have two active definitions with the same effective date. When trying to make a workflow template definition active, WebLogic Process Integrator prevents you from doing so, if another definition with the same effective date exists.
When a workflow template definition is started, the WebLogic Process Integrator server creates a new instance (or session) of that workflow template definition. Regardless of how many workflow template definitions exist for a given workflow template, the WebLogic Process Integrator server chooses only one of these definitions to instantiate. It chooses the most effective of the active workflow template definitions. For example, consider three definitions defined with the following effective dates:
If you instantiate your workflow in February, the most effective of the active workflow template definitions for the workflow template is selected, in this case, the one with the effective date of January to March.
Exporting and Importing Workflow Packages
WebLogic Process Integrator provides the capability of exporting and importing workflow objects as Java Archive (JAR) files. This capability allows you to export and import templates, template definitions, business operations, business calendars, plug-ins, event key tables, and XML repository items. Organizations, users, and roles cannot be exported or imported.
Exported packages can be marked as published packages. When a published package is imported, the objects in the package cannot be edited. In addition, you cannot create a new template definition in a published template. You can, however, delete published templates and template definitions.
You can also assign password protection to exported packages to prevent them from unauthorized import.
Exporting Packages
Figure 5-17 Export: Select File Dialog Box
If you specified an existing JAR file that is not password protected, the Export: Select Components to Export dialog box is displayed. If you specified an existing JAR file that is password protected, the Export: Enter Password dialog box is displayed. Enter the necessary password and click Next to display to display the Export: Select Components to Export dialog box, or click Back to specify an alternate file. Figure 5-18 Export: Select Components to Export Dialog Box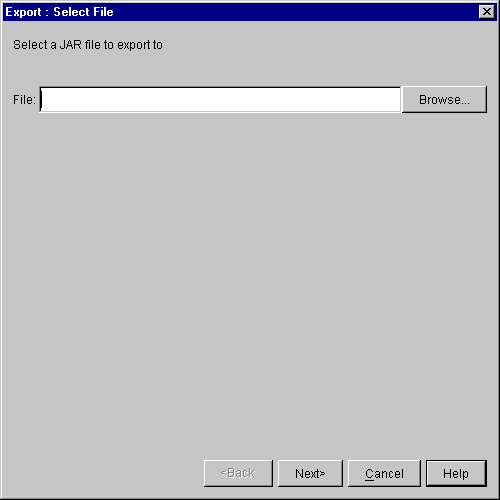
After the export operation is complete, a Review Export Summary report is displayed indicating if the export operation was successful.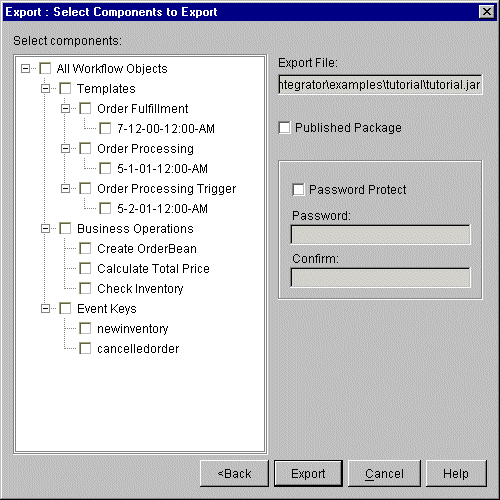
Importing Packages
Figure 5-19 Import: Select File Dialog Box
If the package you want to import is not password protected, the Import: Select Components to Import dialog box is displayed. If the package you want to import is password protected, the Import: Enter Password dialog box is displayed. Enter the necessary password and click Next to display the Import: Select Components to Import dialog box. Figure 5-20 Import: Select Components to Import Dialog Bo
Note: During the import process, a warning is displayed if you are attempting to import an object with the same name as an object that already exists on your system. You can overwrite templates, business operations, and business calendars. You are not permitted to overwrite template definitions. If you are importing a template definition from a published package (that is, a package that you previously exported and marked as published), and a template does not exist on the target system, a published template is automatically created. If, however, you are importing a published template definition into an existing template, the existing template must also be published. You can not import a published template definition into an unpublished template. Similarly, if you are importing a template definition from an unpublished package and a template does not exist on the target system, an unpublished template is automatically created. To import an unpublished template definition into an existing template, the existing template must also be unpublished. You can not import an unpublished template definition into an published template. After the import operation is complete, a Review Import Summary report is displayed. The report lists all the objects that were imported and any problems that were encountered during the import operation.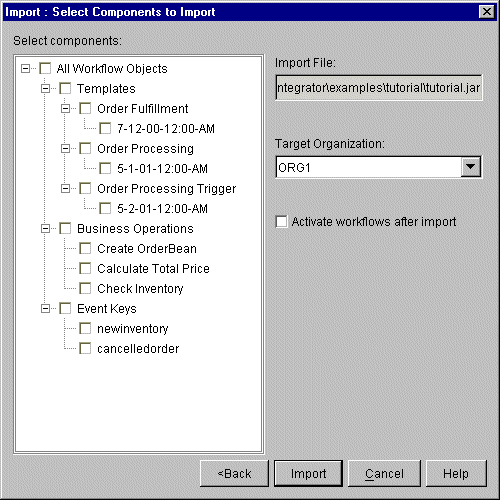 x
x
Click Close to close the Review Export Summary dialog box, or Back to return to the previous screen.
Exporting Workflow Template Definitions
For compatibility with earlier versions of BEA WebLogic Process Integrator, you can export a workflow template definition, in XML format, from BEA WebLogic Process Integrator to any drive mapped in your computer.
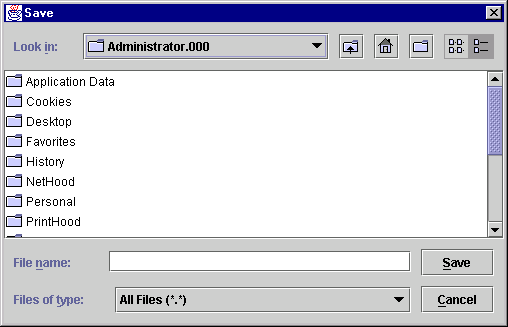
To export a workflow template definition:
Figure 5-21 Save Dialog Box
Importing Workflow Template Definitions
For compatibility with earlier versions of BEA WebLogic Process Integrator, you can import a workflow template definition (that was previously exported), in XML format, into BEA WebLogic Process Integrator to create a new workflow template definition.
Note: Imported workflow template definitions are always marked as "inactive." Before an imported workflow template definition can be instantiated, you must change the definition to "active" in the Template Definition dialog box. For details, see Creating a New Workflow Template Definition.
To import a workflow template definition, proceed as follows:
Note: If a template does not exist, you must create one before you can import a template definition. For details about creating a template, see Creating a New Workflow Template.
Figure 5-22 Open Dialog Box
Note: You cannot import a workflow template definition using a name that is different from the one that it was assigned when it was exported. If you attempt to do so, you will receive a warning message. Note: In some cases, importing workflows may display warning messages. When a workflow template definition contains a Perform Business Operation or Start Workflow action, the action must be redefined when the it is imported in a workflow.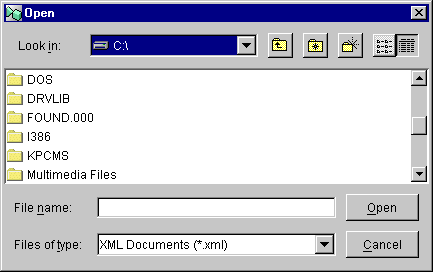

|

|

|
|
|
|
Copyright © 2001 BEA Systems, Inc. All rights reserved.
|