

|
|
|
|
|
|
Working with Workflow Components
The following sections describe how to use workflow components:
Adding Workflow Components to a Workflow Diagram
After you first create a workflow template definition, the workflow toolbar and workflow drawing area are displayed on the right side of the WebLogic Process Integrator Studio main window.
By default, the drawing area already contains three shapes (components) that you must define: start, task, and done. If you will be adding a shape to an existing workflow diagram, right-click the workflow template definition in the folder tree and choose Open from the pop-up menu to open the workflow diagram.
Add new shapes to the diagram by clicking the shape in the toolbar, then clicking in the workflow diagram where you want to drop the shape. To identify icons to the toolbar, see Workflow Drawing Area and Toolbar.
Deleting Components from a Workflow Diagram
Delete a component from a workflow diagram in one of two ways:
A confirmation dialog box is always presented.
Understanding Variables
Not all workflow template definitions require variables. However, for those workflow template definitions containing processes that require variables, you should define these before you begin defining the workflow template definition. You can also add these variables as you create the workflow template definition.
Process variables have a workflow-global scope. That is, a single variable instance is shared by all objects within a workflow template definition instance. Process variables are therefore defined at the workflow template definition level in the folder tree and are referred to as workflow variables.
Each workflow template definition can have a set of variables associated with it. Variables can hold values that are returned by business operations, that are extracted from XML documents, or that are set explicitly by workflow actions. Variables can also be used by the workflow for several other purposes, such as to evaluate a condition in a decision node, or to store the result of a response from the Worklist client application.
Defining Variables
To define a variable:
Figure 6-1 Variable Properties Dialog Box
Note: If a plug-in is defined for variables, this properties dialog box will contain the new variables in the Type field. For more information about plug-ins, see Working with Plug-Ins.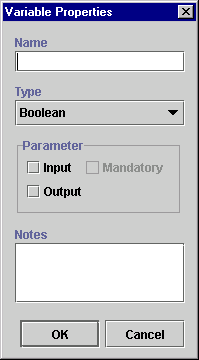
The parameter is used by a calling workflow to pass values to and receive values from a called subworkflow. The input parameter contains the values passed to the subworkflow, and the output parameter contains the return values from the subworkflow. For details about starting another workflow, see Start Workflow.
Updating Variables
To update an existing variable:
Locating Variables in the Workflow
To see where a variable is used within the workflow, right-click the variable in the folder tree and choose Usage from the pop-up menu. This displays the Variable Usage dialog box.
Figure 6-2 Variable Usage Dialog Box
The Variable Usage dialog box lists the nodes within a workflow template definition in which the selected variable is used and the value assigned to that variable. Variables can be used in all workflow nodes except joins and dones. In the preceding figure, the Confirm variable is used in the Confirm Order task and has a value of :Confirm="yes". The dialog box contains the following buttons: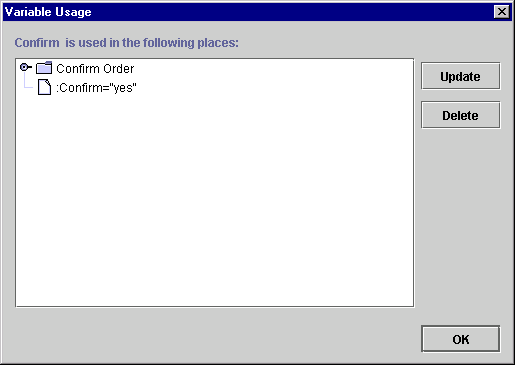
Variable Conversion Rules
The following table details the implicit conversions that are handled automatically by WebLogic Process Integrator between different variable types when values of one type are assigned to variables of another type.
Notes: NS means Not Supported. If one of the unsupported conversions are attempted, an error message is displayed indicating that the conversion is illegal.
Additionally, the conversion rules are not fully supported for calculations in expressions. For example, assume you have the following expression, and you want to assign the result to a string type variable:
XPath("your_expression") + 2 If XPath("your_expression")evaluates to a text value of 5, the value is not automatically converted to a string, and an error message is displayed.
To convert the result to a string, you need to indicate explicitly that you want the result of the expression converted. The expression needs to be modified as follows:
tostring XPath("your_expression") + 2 The following are notes relating to certain conversions in the preceding table:
Defining Start
Every workflow has at least one start shape that indicates the beginning of the workflow. The first node after the start will be the first activated node of the workflow, which can be a task, decision, or event.
Specifying Multiple Starts
You can specify more than one start shape, if more than one simultaneous path through the workflow is to be started. For example, when you want two streams of work to start at the same time within a single workflow, you can define two starts within the workflow.
These two streams of work can be started simultaneously, if they have the same triggering event and both are marked as manual starts or timed starts set to the same time. Otherwise, the two streams can be started separately with each start being an alternate way of starting the workflow.
The benefit of being able to specify more than one start is visual access to both streams of work within the same workflow, and sharing the same variables with both workflows. You also have the flexibility to take a portion of a workflow and start it in a different manner or at a different time within the workflow.
Note: If no Start node is specified, no task activation can occur in the workflow.
You specify the triggering properties of a workflow in the start node. If a workflow contains multiple starts, each start can have its own triggering method and start independently.
Defining a Start Node
To define a Start shape:
Figure 6-3 Start Properties Dialog Box
Note: If a plug-in is defined for the Start node, this properties dialog box contains a selection to access the functionality provided by the plug-in. For more information about plug-ins, see Working with Plug-Ins. 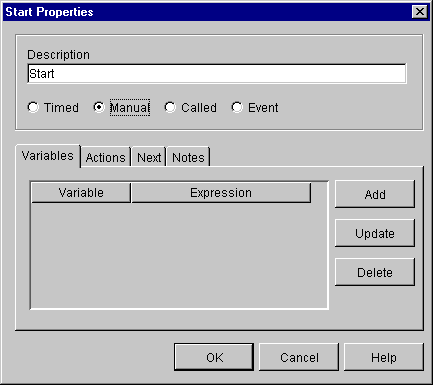
Figure 6-4 Timed Option
Start Date Expression — enter the expression that defines the start date for the workflow. The expression is evaluated at run time, and becomes the start date. You must use a date function, such as Date or DateAdd, in this expression. For details, see Using Expression Components. Reschedule — reschedule the timed workflow. If you define this option, the workflow will be rescheduled according to the incremental values entered here. Calendar — select the business calendar that is used to evaluate the start date. Start Organization — select a Start Organization from the drop-down list containing those organizations already defined within WebLogic Process Integrator. When the start node is an event or timed type, you must specify the organization for which the workflow instance will be started because you can start the same workflow template definition for different organizations. If you want to define the Start Organization using an expression, select the Workflow Expression option. The Expression Builder is displayed. Use it to enter a string that specifies the organization, or an expression that will be evaluated at run time and become the name of an organization. Note: Expressions are built using WebLogic Process Integrator expression syntax and typically use the syntax of XPath function to extract values out of XML documents. If you know the syntax of the expression you want to use, you can type the expression directly in the field. Alternatively, click the A+B button to display the Expression Builder dialog box. The Expression Builder helps you construct an expression, which is made up of functions, operators, literals, and variables. For more information on constructing expressions, see Using Expressions and Conditions.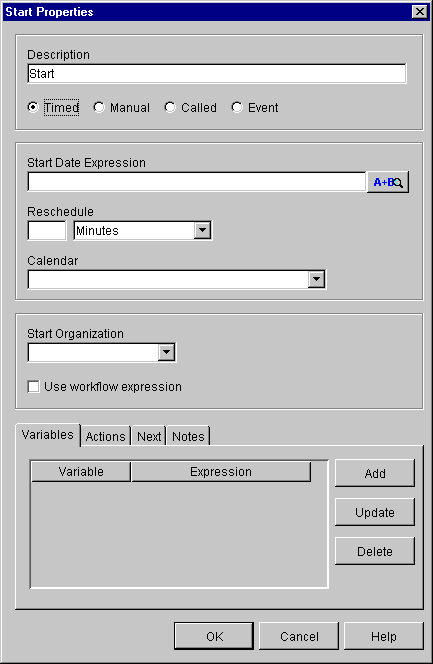
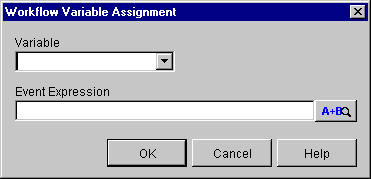
For example, you might have a counter in your workflow that you wish to take the value of 1 at the start of the workflow.You can assign a variable specifying that the counter takes the value of 1 upon initialization of the start node.
Clicking Add displays the Workflow Variable Assignment dialog box. The variables in the pull-down list are those defined in the Variables Properties dialog box. (See Understanding Variables.) The XML expression can be a string that you want to use as the value of the variable, or it can be an expression that is evaluated at run time to become the value of the variable.
Figure 6-5 Workflow Variable Assignment Dialog Box
Defining a Start Node Using an Event Trigger
A workflow can be started by responding to an event. An event is an asynchronous notification from another workflow or from an external source, such as another application. An event notification takes the form of an XML message. For further information about events and how they are triggered, see Understanding Event-Driven Processing.
To define an event trigger to start a workflow:
Figure 6-6 Start Properties Dialog Box
The DOCTYPE or root element you specify here must match the DOCTYPE or root element in the incoming XML message before BEA WebLogic Process Integrator starts the workflow. The key value you specify here must match an element in the incoming XML message before BEA WebLogic Process Integrator starts the workflow. You also need to define the expression that locates the key value in the incoming XML message, so BEA WebLogic Process Integrator can compare it against the key value you specify in this field. For details, see Defining an Event Key. Note: Expressions are built using WebLogic Process Integrator expression syntax and typically use the syntax of XPath function to extract values out of XML documents. If you know the syntax of the expression you want to use, you can type the expression directly in the field. Alternatively, click the A+B button to display the Expression Builder dialog box. The Expression Builder helps you construct an expression, which is made up of functions, operators, literals, and variables. For more information on constructing expressions, see Using Expressions and Conditions. Click Add to display the Workflow Variable Assignment dialog box. The variables in the pull-down list are those defined in the Variables Properties dialog box. (See Understanding Variables.) The XML expression can be the name of an element in the XML message the value of which you want to assign to the selected variable, or it can be an XPath function that extracts a value from the XML message and assigns it to the selected variable.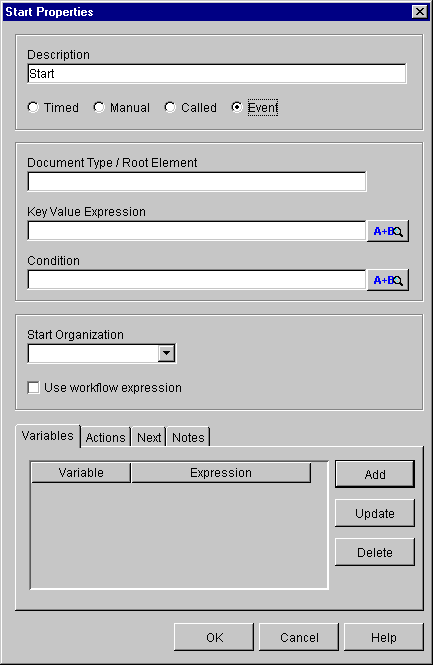
Defining Dones
A done shape represents the point within the workflow where the process completes. Once a done node is reached in the workflow, the running instance of the workflow is marked done, regardless of whether all the done nodes have been reached or not.
You can specify any number of done shapes in a workflow. If a workflow can exit from various points, you have the option of placing separate done nodes wherever needed.
To define a done:
Figure 6-7 Done Properties Dialog Box
Note: If a plug-in is defined for the Done node, this properties dialog box contains a selection to access the functionality provided by the plug-in. For more information about plug-ins, see Working with Plug-Ins. 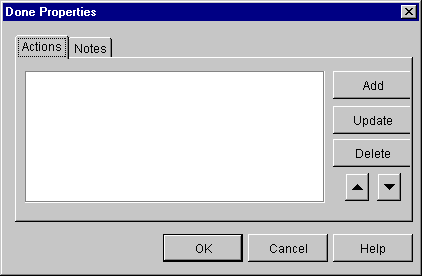
Defining Decisions
The workflow can use any number of decision shapes. Each decision shape contains a condition that is evaluated when a transition to that decision node occurs. The result is either True or False, with subsequent flow of control passed to the subsequent task, decision, event, and join or done node(s). Additionally, it is possible to specify actions to be executed on both a True and a False evaluation of the condition. (If the condition is verified, it is True. If it is not, it is False.)
To define a decision:
Figure 6-8 Decision Properties Dialog Box
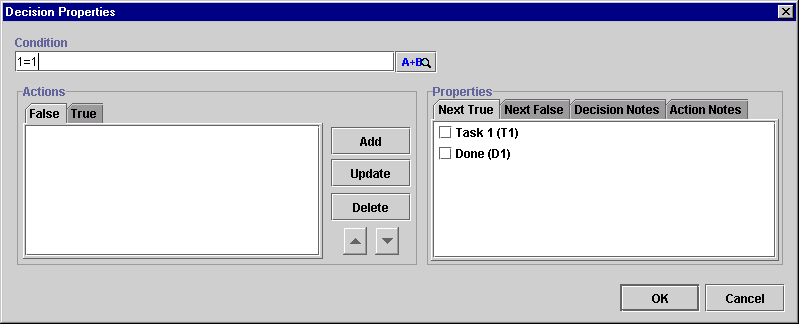
Note: Expressions are built using WebLogic Process Integrator expression syntax and typically use the syntax of XPath function to extract values out of XML documents. If you know the syntax of the expression you want to use, you can type the expression directly in the field. Alternatively, click the A+B button to display the Expression Builder dialog box. The Expression Builder helps you construct an expression, which is made up of functions, operators, literals, and variables. For more information on constructing expressions, see Using Expressions and Conditions.
False — actions defined in this tab are executed if the condition evaluates to false (is not verified).
True — actions defined in this tab are executed if the condition evaluates to true (is verified).
Defining Tasks
A task node represents a discrete business activity that is performed either automatically when a workflow runs, or manually by a user using the Worklist client application.
Each task node progresses through four different states: created, activated, executed, and marked done. Progress through these states is not automatic. Each state is activated by some event. For each state, you can specify a list of actions that are performed when the task reaches that state.
The following table shows each task state, and when the actions specified in each state are executed:
To define a task:
Figure 6-9 Task Properties Dialog Box
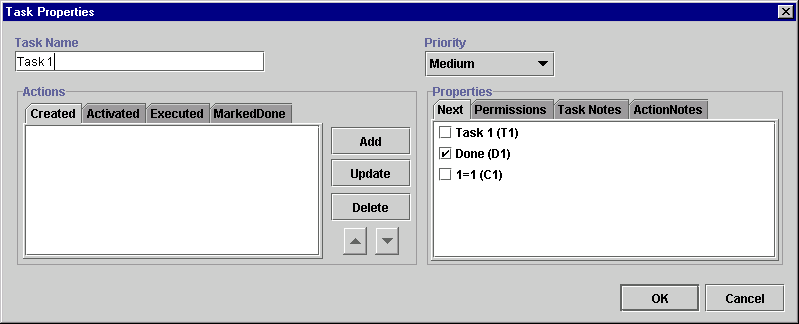
Mark done without executing — allows users to mark the task as having been done without actually executing it.
Re-execute if marked done — allows users to re-execute the task when it is already marked as done.
Unmark if marked done — allows users to change the status of the task back to not done when the task is marked as done. (If a user marks a completed task as not done, the task status is set to Active; it does not, however, reverse the effects of any actions that have been executed.)
Modifiable — allows users to change the properties of an existing task from the worklist.
Re-assignable — allows users to reassign the task to another user.
Defining Events
An event node represents a wait state that is activated by the receipt of an XML message. The XML message can come from another workflow or from an external source, such as another application. For further information about events and how they are triggered, see Understanding Event-Driven Processing.
To define an event:
Figure 6-10 Event Properties
Note: If a plug-in is defined for the Event node, this properties dialog box contains a selection to access the functionality provided by the plug-in. For more information about plug-ins, see Working with Plug-Ins. The DOCTYPE or root element you specify here must match the DOCTYPE or root element in the incoming XML message before BEA WebLogic Process Integrator will trigger the event. The key value you specify here must match an element in the incoming XML message before BEA WebLogic Process Integrator will trigger the event. You also need to define the expression that locates the key value in the incoming XML message, so BEA WebLogic Process Integrator can compare it against the key value you specify in this field. For details, see Defining an Event Key. Click Add to display the Workflow Variable Assignment dialog box. The variables in the pull-down list are those defined in the Variables Properties dialog box. (See Understanding Variables.) The XML expression can be the name of an element in the XML document the value of which you want to assign to the selected variable, or it can be an XPath function that extracts a value from the XML document and assigns it to the selected variable.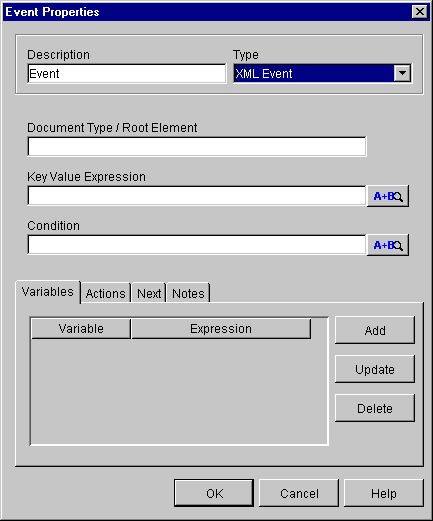
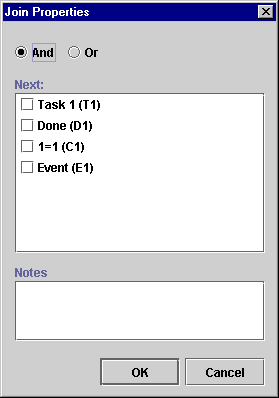
Using Joins (And/Or)
The possibility of multiple paths being active in the same workflow gives rise to the issue of path joining. There are two types of joining: AND joining and OR joining.
How Joins Work
AND joining melds multiple separate paths of control back into a single path, synchronizing them such that control does not continue until all paths converge. This type of join derives its name from the fact that control continues when the AND of all inputs is true. That is, when Path 1 and Path 2 and Path 3 ... etc. are all present, then control proceeds.
OR joining allows multiple path threads to enter and traverse down the same line of control within the workflow. In this case, the threads do not meld; the nodes along this part of the flow are executed multiple times, once for each thread control passing through it. This type of joining derives its name from the fact that control passes to the next node when the OR of its inputs is true. That is, if Path 1 or Path 2 or Path 3 ... etc. is present, then control proceeds.
An OR join can only be activated once. This avoids the multiple occurrence of actions and events succeeding the OR, which can happen by the completion of the various predecessors of the join. However, this single activation prevents a flow from looping when an OR join is defined, as the flow stops the second time at the OR join.
Use AND and OR joins to link task, decision, and event shapes and thus control the transition coming to the join and flowing from it.
Defining a Join
To define a join:
Figure 6-11 Join Properties Dialog Box

|

|

|
|
|
|
Copyright © 2001 BEA Systems, Inc. All rights reserved.
|