


|

|
|
|
|
Getting Started with the Studio
The following sections describe the user interface of the Studio, and how to log in to and exit from the Studio:
Logging In to the Studio
Go to step 5.
wlintegration2.0\processintegrator\bin
wlintegration2.0 is the product directory in which you installed the BEA WebLogic Process Integrator software.
Type studio at the prompt to display the Logon dialog box.
Go to step 5.
wlintegration2.0/processintegrator/bin
wlintegration2.0 is the product directory in which you installed the BEA WebLogic Process Integrator software.
Execute the studio.sh script by entering the following command at the prompt:
sh studio.sh
The Logon dialog box is displayed.
t3://host:port
To log in to clustered servers, enter the following in the Server[:port] field:
t3://host1,host2,host3:port
In this case, host1, host2, and host3 are the computer names or IP addresses of the clustered WebLogic Process Integrator servers.
Figure 2-1 BEA WebLogic Process Integrator Studio Main Window
Overview of the Studio Interface
This section describes the parts of the Studio user interface, and the functions they provide.
Menu Options
The following sections provide information about using the menu bar in the Studio.
File Menu
Choose File
View Menu
Choose View
Configuration Menu
Choose Configuration
Tools Menu
Choose Tools
Help Menu
Choose Help
Folder Tree Display
The BEA WebLogic Process Integrator Studio interface contains a folder tree display, which organizes workflow components in a standard tree structure.
Figure 2-2 BEA WebLogic Process Integrator Folder Tree Display
Note: Information is displayed for the current organization only. To select a different organization, use the Organization drop-down list at the top of the screen. To view details about any of the following items shown in the folder tree display, double-click the item to expand it: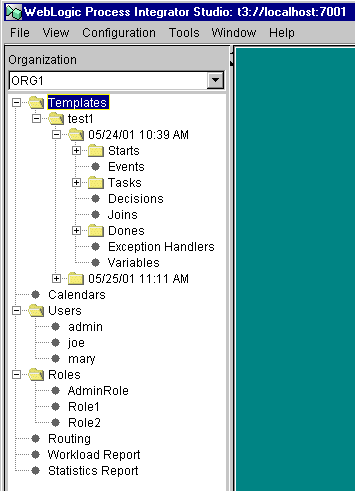
For example, double-click the Templates folder to display a list of workflow templates. Double-click a workflow template to display a list of all workflow template definitions. Expanding a particular workflow template definition displays folders containing the tasks, decisions, events, joins, starts, dones, and variables for that workflow template definition.
You can right-click most items in the folder tree to display a menu containing options relevant to the highlighted item. Choosing any menu option displays a corresponding dialog box on the right-hand side of the screen. However, right-click menus in the folder tree are context specific. Depending on the context in which you are accessing the right-click menu, certain options may not be accessible. For example, if your security realm does not permit you to add users and roles to WebLogic Process Integrator, the Create Role and Add Users menu options will not be accessible to you.
For example, right-click on an existing workflow template to display a menu with the options shown in the following figure:
Figure 2-3 Workflow Template Menu Options
You can have multiple workflow diagrams open simultaneously. You can view more than one workflow, and toggle back and forth between them. Figure 2-4 Multiple Workflow Diagrams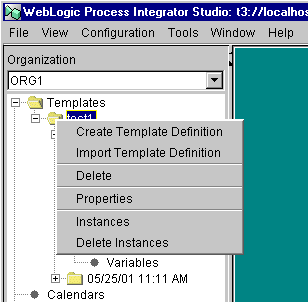
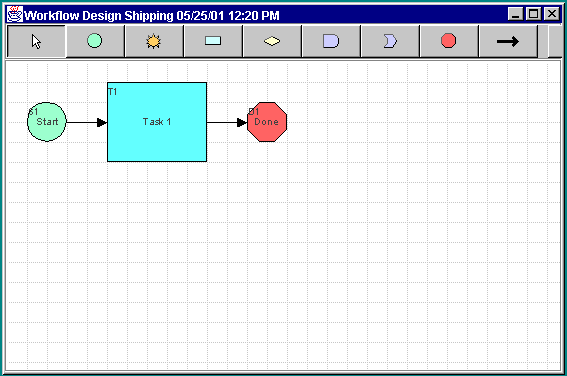
Workflow Drawing Area and Toolbar The workflow drawing area, shown in the following figure, is where you create your workflow diagrams. The workflow toolbar contains the shapes representing workflow nodes and the connector you use to define a workflow. To open the workflow drawing area, you either create a new workflow template definition or open an existing workflow template definition. Once the drawing area is open, you can perform the following tasks: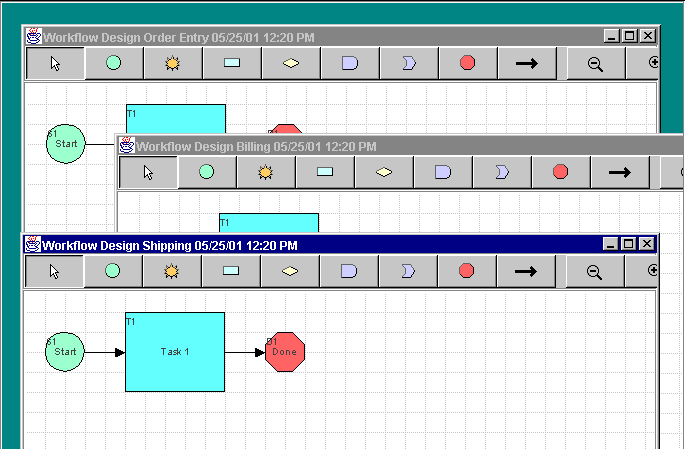
Refer to Defining and Maintaining Workflows, for detailed instructions on performing these tasks.
Figure 2-5 Workflow Drawing Area
The following table describes the various nodes the Studio provides to define a workflow template definition.
Relocating the Toolbar
By default, the workflow toolbar appears at the top of the drawing area. Depending on the size of the Studio window or drawing area, you might not be able to see the entire toolbar. To see the entire toolbar, relocate the toolbar to another part of the Studio drawing area, or to another location on your desktop.
To relocate the toolbar:
If you drag the toolbar to another location on your desktop outside of the Studio drawing area, the toolbar becomes a separate window on your desktop, which you can minimize, maximize, and close.
Toggling Between Normal and Interface View
Workflows often interface to different objects, such as subworkflows and business operations. At times, it might be useful to see the objects to which a workflow interfaces. You can view workflows using two views: normal and interface.
A normal view displays the components in the workflow diagram, but not the objects to which the workflow interfaces. An interface view displays the components in the workflow diagram, plus the following objects to which the workflow can interface:
To toggle between a normal and interface view, click the following button in the toolbar: 
Setting Interface View Preferences
Within an interface view, you can choose which objects to display in the workflow diagram. To specify the objects you want to view:
Figure 2-6 Interface View Preferences Dialog Box
The settings are system-wide; that is, they apply to all template definitions. They are saved from session to session in the Studio; they are not saved as part of the template definition.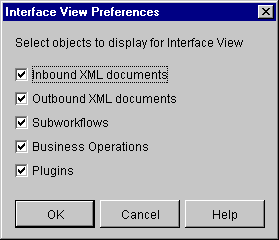
For details about displaying workflow objects in an interface view, see Toggling Between Normal and Interface View.
Viewing Inbound XML Document Data
In an interface view, the following icon represents an inbound XML document in the workflow diagram.
Note: The arrow points toward the parent template node to indicate inbound direction. An inbound XML document icon is displayed for start and event nodes that respond to incoming XML documents. Hover the mouse pointer over the XML document icon in the workflow diagram to display a text box containing the type (inbound or outbound), root, and key of the XML document. Viewing Outbound XML Document Data In an interface view, the following icon represents an outbound XML document in the workflow diagram. 
Note: The arrow points away from the parent template node to indicate outbound direction. An outbound XML document icon is displayed if either a Send XML to Client or Post XML Event action is defined for an object. You can obtain information about the XML document as follows:
For details about the Send XML to Client and Post XML Event actions, see Using Integration Actions.
Viewing Subworkflow Data
In an interface view, the following icon represents a subworkflow in the workflow diagram.
A subworkflow icon is displayed if a Start Workflow action is defined for an object. You can obtain information about the subworkflow as follows:
For details about the Start Workflow action, see Start Workflow.
Viewing Business Operation Data
In an interface view, the following icon represents a business operation in the workflow diagram.
A business operation icon is displayed if a Perform Business Operation action is defined for an object. You can obtain information about the business operation as follows:
For details about business operations, see Defining a Business Operation.
Viewing Plug-In Data
In an interface view, the following icon, or a custom icon, represents a plug-in action in the workflow diagram.
If a node contains a plug-in action, you can obtain information about the action as follows:![]()
Note: If a start, event, or done node contains a customized property defined by a plug-in, a small plug-in icon is displayed in the upper-right corner of the node icon.
Exiting the Studio
To exit the Studio:
Note: If you try to exit the Studio without saving your changes, a dialog box prompts you to do so.

|

|

|
|
|
|
Copyright © 2001 BEA Systems, Inc. All rights reserved.
|