BEA Logo BEA WLI Release 2.1

  BEA Home  |  Events  |  Solutions  |  Partners  |  Products  |  Services  |  Download  |  Developer Center  |  WebSUPPORT


   WLI Doc Home   |   Application Integration Topics   |   Using Application Integration   |   Previous Topic   |   Next Topic   |   Contents   |   Index   |   View as PDF

Defining an Application View


This section contains information on the following subjects:


Before You Begin

Before you attempt to define an application view, make sure the following prerequisites are satisfied.


Introduction to Defining an Application View

When you define an application view, you are creating an XML-based interface between WebLogic Server and a particular EIS application within your enterprise. Once you create the application view, a business analyst can use it to create business processes that use the application. For any adapter, you can create any number of application views, each with any number of services and events.

The Flow of Events

Figure 2-1 shows an overview of the steps involved in defining an application view.

Figure 2-1 The Flow of Events for Defining and Configuring Application Views


  1. Log on to the WebLogic Integration Application View Console. For detailed information, see Logging On to the WebLogic Integration Application View Console.

  2. Click Add Application View to create a new application view for the appropriate adapter. An application view enables a set of business processes for this adapter's target EIS application. For detailed information, see Defining an Application View.

  3. At the Configure Connection Parameters page, enter application connection parameters. For detailed information, see Defining an Application View.

    The information is validated, and the application view is configured to connect to the system you specified.

  4. Click Add Event or Add Service to define the appropriate events and services for this application view.

  5. Deploy the application view on WebLogic Server so other entities can interact with it according to your security settings.

    Note: You can only test an application view if it is deployed.

  6. Test the services and events to make sure they can properly interact with the target EIS application.

    Once the services and events are tested and functioning, you can use the application view in workflows. For more information, see Using Application Views in Business Process Management.

  7. Undeploy the application view if you need to reconfigure its connection parameters or add services and events.

    Note: When an application view is undeployed, no other entities can interact with it.


Steps for Defining an Application View

This section explains how to define and maintain application views using an EIS adapter for a hypothetical database EIS called simply "DBMS." When you create application views for your enterprise, they may look different than the screens shown in this document. This is normal, because the application view's adapter determines the information required for each application view page, and each enterprise has its own specialized adapters. For details on an adapter used in your enterprise, consult the relevant technical analyst or EIS specialist.

Logging On to the WebLogic Integration Application View Console

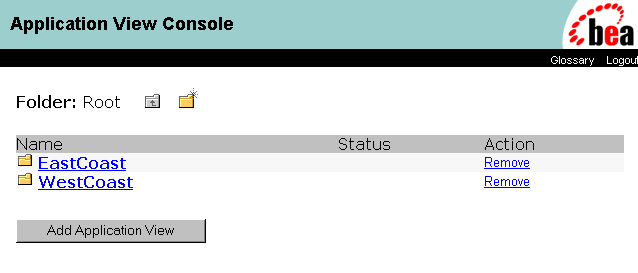
The first step in creating a new application view is to log on to the Application View Console page. The Application View Console displays all the application views in your WebLogic Integration environment, organized into folders.

To log on to the Application View Console:

  1. Open a new browser window.

  2. Open the URL for your system's Application View Console. The actual URL you enter depends on your system. It should follow the format:
    http://localhost:7001/wlai

    The Application View Console - Login page is displayed.
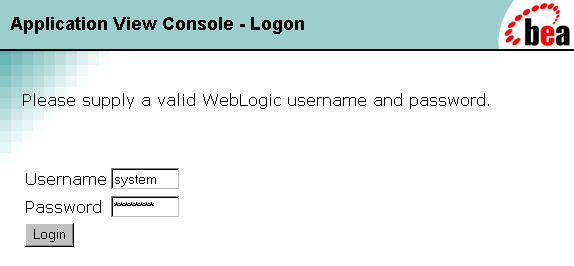


  3. To log on to the Application View Console, enter your WebLogic Server username and password, then click Login. The Application View Console is displayed.


    Note: If you do not see a page like this, consult the WebLogic Server administrator.

  4. To add a folder, click the New Folder icon. For more information, see Creating a Folder.

Defining an Application View

After you log on to the Application View Console and navigate to a folder, click Add Application View to define an application view.

  1. Log on to the Application View Console. For more information, see Logging On to the WebLogic Integration Application View Console.

  2. To add a new application view to the current folder, click Add Application View. The Define New Application View page is displayed.


    Note: Once you define the application view, you can not move it to another folder.
  3. In the Application View Name field, enter a name. The name should describe the set of functions performed by this application. Each application view name must be unique to its adapter. Valid characters are a-z, A-Z, 0-9, and _ (underscore).

  4. In the Description field, enter any relevant notes. These notes are viewed by users when they use this application view in workflows using business process management (BPM).

  5. From the Associated Adapter list, select the adapter to use to create this application view.

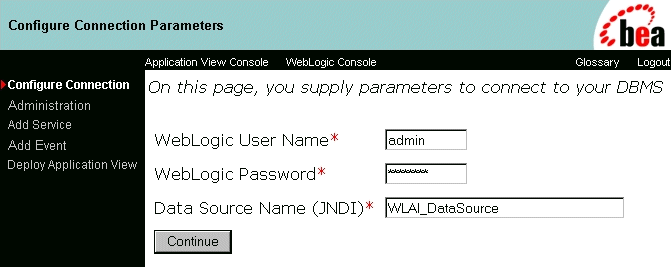
  6. Click OK. The Configure Connection Parameters page is displayed.


    At the Configure Connection Parameters page, you define the network-related information necessary for the application view to interact with the target EIS. You need to enter this information only once per application view.

  7. Enter your WebLogic Server User Name and Password.

    Note: Your page may have different fields than the ones shown. The fields are determined by the adapter.
  8. For any remaining fields, consult the relevant technical analyst or EIS specialist for the required information.

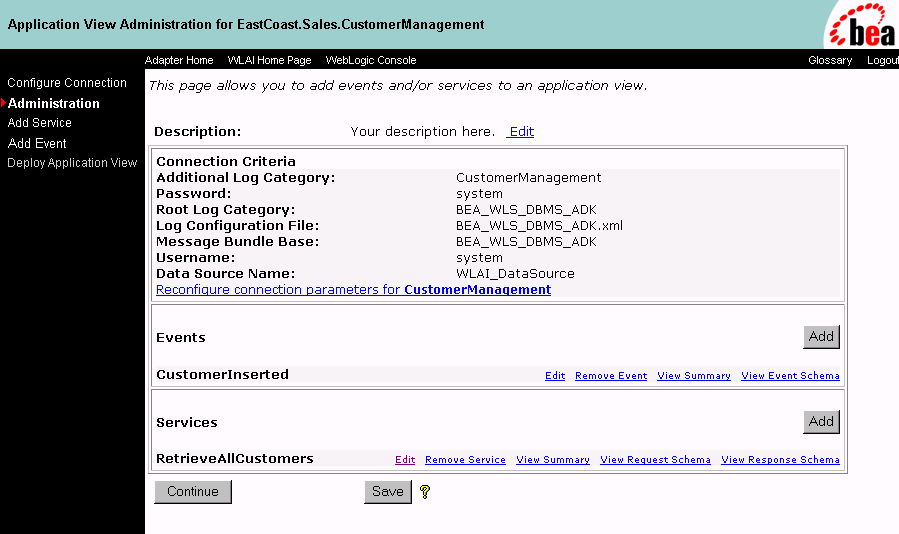
  9. Click Continue. The Application View Administration page is displayed.


Adding a Service to an Application View

After you create and configure an application view, add services that support the application's functions.

  1. While the application view is open, click Administration. The Application View Administration page is displayed.


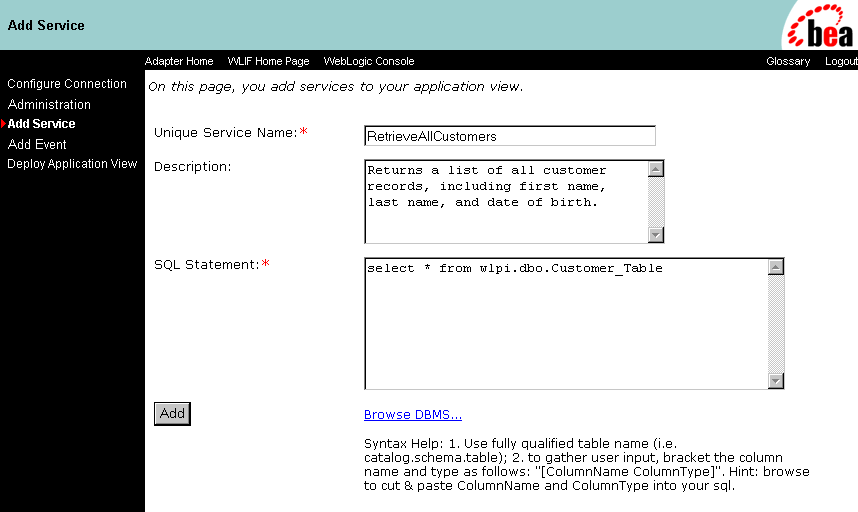
  2. Click Add Service. The Add Service page is displayed.


    Note: Your page may have different fields than the ones shown. The fields are determined by the adapter.

  3. In the Unique Service Name field, enter a name. The name should describe the function performed by this service. Each service name must be unique to its application view. Valid characters are a-z, A-Z, 0-9, and _ (underscore).

  4. In the Description field, enter any relevant notes. These notes are viewed by users when they use this application view service in workflows using BPM.

  5. For any remaining fields, consult the relevant technical analyst or EIS specialist for the required information or format.

  6. When finished, click Add.

Adding an Event to an Application View

After you create and configure an application view, add the appropriate events.

  1. While the application view is open, click Administration. The Application View Administration page is displayed.


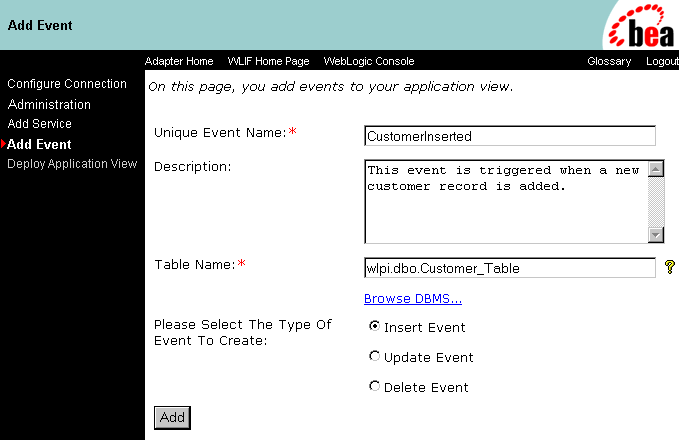
  2. Click Add Event. The Add Event page is displayed.


    Note: Your page may have different fields than the ones shown. The fields are determined by the adapter.

  3. In the Unique Event Name field, enter a name. Each event name must be unique to its application view. Valid characters are a-z, A-Z, 0-9, and _ (underscore).

  4. In the Description field, enter any relevant notes. These notes are viewed by users when they use this application view event in workflows using BPM.

  5. For any remaining fields, consult the relevant technical analyst or EIS specialist for the required information or format.

  6. When finished, click Add. The Application View Administration page is displayed.

  7. If you are finished adding services and events, click Continue to deploy the application view.

Deploying an Application View

You may deploy an application view when you have added at least one event or service to it. You must deploy an application view before you can test its services and events or use the application view in the WebLogic Server environment. Application view deployment places relevant metadata about its services and events into a run-time metadata repository. Deployment makes the application view available to other WebLogic Server clients. This means business processes can interact with the application view, and you can test the application view's services and events.

To deploy an application view:
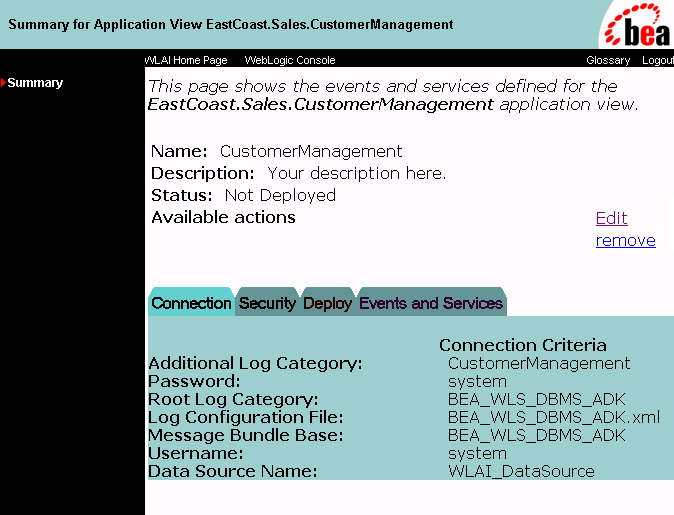
  1. Open the application view. For more information, see Logging On to the WebLogic Integration Application View Console. The Summary for Application View page is displayed.


  2. Click Edit. The Application View Administration page is displayed.


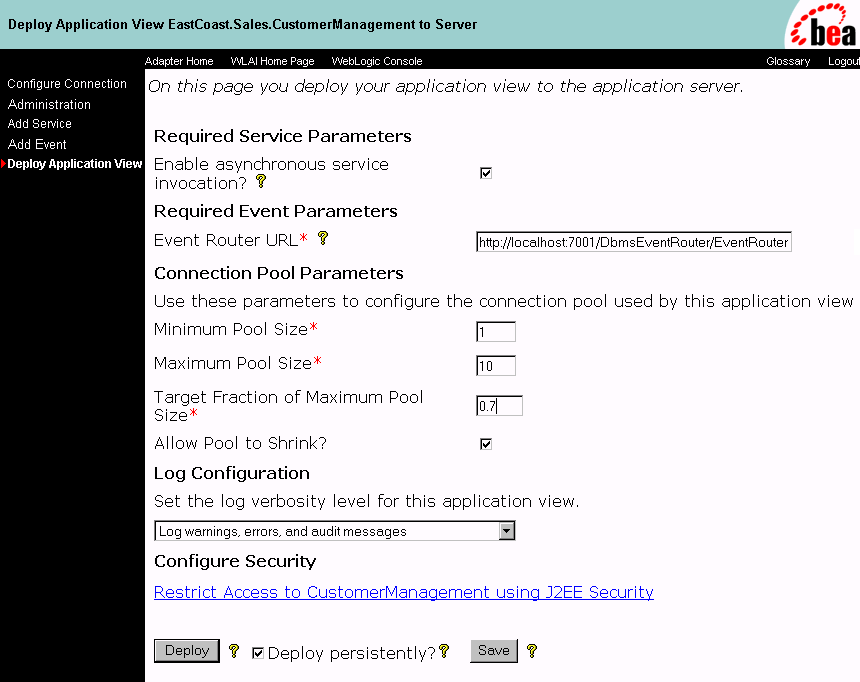
  3. Click Continue. The Deploy Application View page is displayed.


    Note: On the Deploy Application View page, the actual fields you see depend on the adapter. For an explanation of all fields, consult the relevant technical analyst or EIS specialist.

  4. To enable BPM tor other authorized clients to asynchronously call the services (if any) of this application view, select Enable Asynchronous Service Invocation.

    An entity that calls an application view service asynchronously will continue its process without waiting for a response from the service.

  5. If this application view has events, enter the URL of the adapter's event router. For example, http://localhost:7001/YourEIS_EventRouter/EventRouter

    Note: If this field is not displayed, it means the application view has no events defined.
  6. In the Minimum Pool Size field, enter the minimum number of connection pools to be used by this application view. For example, 1.

  7. In the Maximum Pool Size field, enter the maximum number of connection pools to be used by this application view. For example, 10.

  8. In the Target Fraction of Maximum Pool Size field, enter the ideal pool size, measured from 0 to 1.0. For example, 0.7. If the Maximum Pool Size is 10 and the Target Fraction is 0.7, this means the adapter will perform load balancing to attempt to maintain the connection pool size at 70% of the maximum, which in this case means 7 connections.

  9. To automatically delete unused connections, select Allow Pool to Shrink.

  10. On the Log Configuration area, select one of the following options according to your logging preferences:

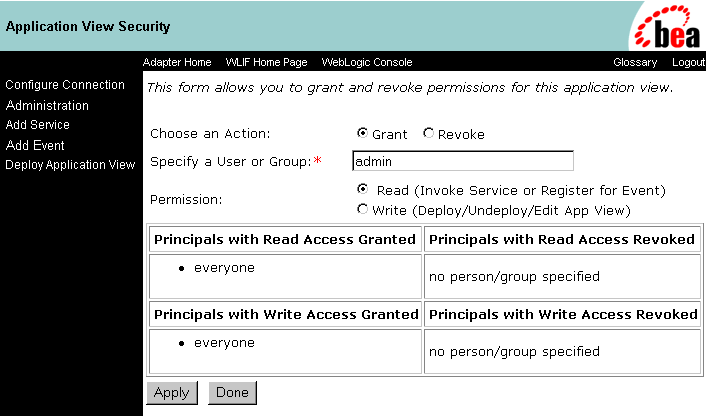
  11. If necessary, click Restrict Access using J2EE Security. The Application View Security page is displayed.


    Use this page to grant or revoke a WebLogic Server user or group's read and write access to this application view.

  12. When finished setting up permissions, click Apply to save your changes.

  13. To return to the Deploy Application View page, click Done.

  14. To save the Application View without deploying it, click Save.

  15. To automatically redeploy this application view whenever WebLogic Server is restarted, select Deploy Persistently.

    Note: To save the application view for later completion without deploying it now, click Save at any time.
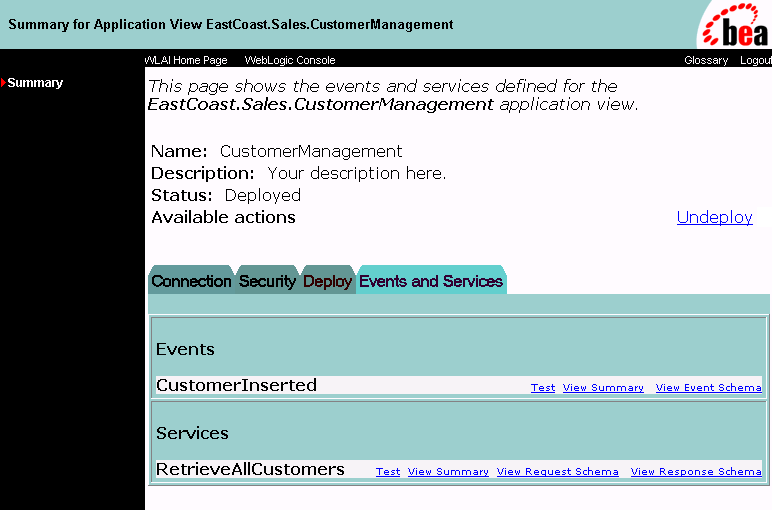
  16. To deploy the application view, click Deploy Application View. The Summary for Application View page is displayed.


Undeploying an Application View

Undeploy an application view when you want to edit its connection parameters, add services and events, or disable clients from using the application view. For information on editing connection parameters, see Defining an Application View. When an application view is undeployed, no other WebLogic Server clients can interact with it, and you can not test its services or events.

To undeploy an application view:

  1. Click Summary. The Summary for Application View page is displayed.


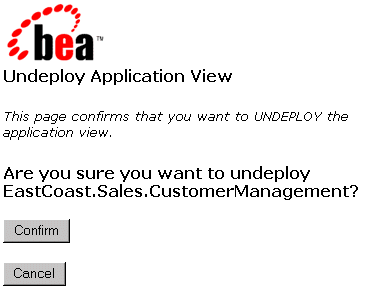
  2. To undeploy the application view from WebLogic Server, click Undeploy. The Undeploy Application View child window is displayed.


  3. Click Confirm. The Summary for Application View page is displayed, indicating you may deploy the application view again.

Testing an Application View's Services

After you create and deploy an application view that contains services, test the application view services. Testing evaluates whether or not the application view service interacts properly with the target EIS. To test application view services:

  1. Define an application view (See Defining an Application View.), add the appropriate services, and deploy the application view (See Deploying an Application View.) if you have not done so already.

    You can test an application view only if the application view is deployed and it contains at least one event or service.

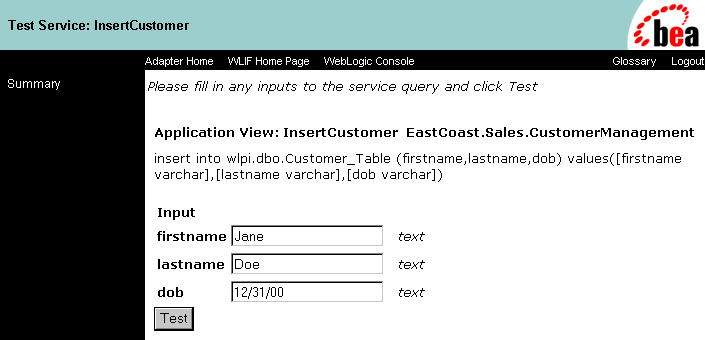
  2. On the left navigation area, click Summary. The Summary for Application View page is displayed.


  3. In the Current Services area, find the service and click Test. The Test Service page is displayed.


  4. If necessary, enter the service input data in the Input fields. If the application view service processes this data correctly, the test is successful.

    Note: Your Test Service page may have different fields than the ones shown. The fields are determined by the application view service. For an explanation of the fields, consult the relevant technical analyst or EIS specialist.
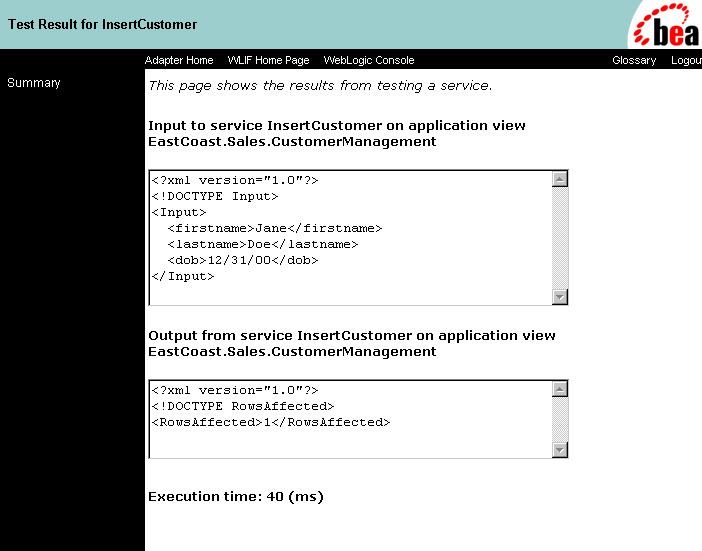
  5. Click Test after entering the service input data. The Test Result page is displayed. This page displays the input and output documents.


  6. Repeat the test procedure for each service you want to test.

  7. When finished testing the application view's services, you may keep the application view deployed or undeploy it (See Undeploying an Application View.) to edit the application view.

Testing an Application View's Events

After creating and deploying an application view that contains events, test the application view events. Testing evaluates whether or not the application view responds correctly to the EIS application. To test application view events:

  1. Define an application view (See Defining an Application View.), add the appropriate events, and deploy the application view (See Deploying an Application View.) if you have not done so already.

    You can test an application view only if it is deployed and contains at least one event or service.

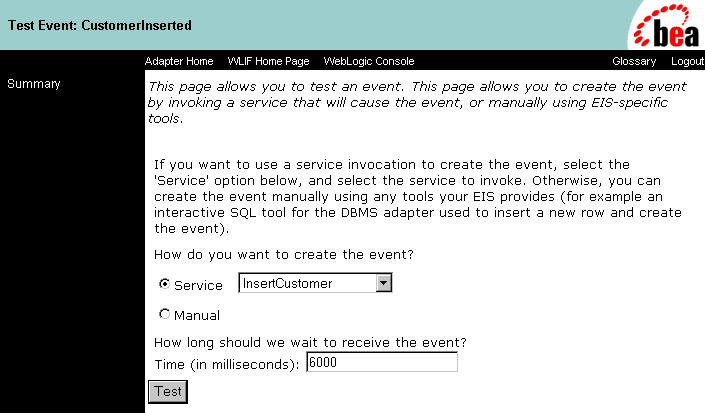
  2. Click Summary. The Summary for Application View page is displayed.


  3. In the Current Events area, find your event and click Test. The Test Event page is displayed.


    Note: Your Test Event page may have different fields than the ones shown. The fields are determined by the application view service. For an explanation of the fields, consult the relevant technical analyst or EIS specialist.

  4. Select the method to use to generate the test event:

    If the application view event correctly responds before the specified time elapses, the test is successful.

If You Select Service

    1. On the Service menu, select a service that will trigger the event you are testing. For example, if you are testing the "NewCustomer" event, select a service that will invoke it, such as "Insert Customer."

    2. In the Time field, enter a reasonable time to wait, in milliseconds. If this time elapses before the event succeeds, the test will time out and display a failure message.

    3. Click "Test." The triggering service is executed.

      If the service requires input data, an input page is displayed.
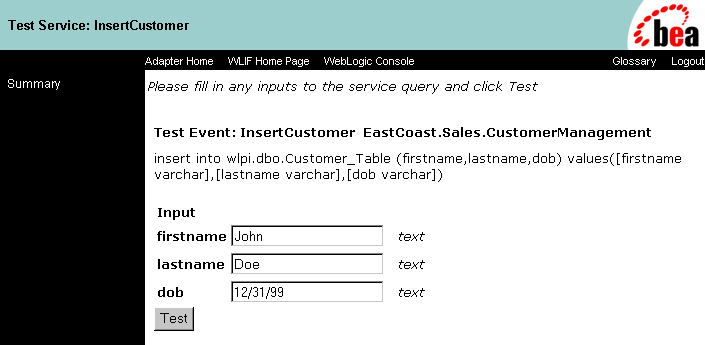


    4. If necessary, enter the service input data in the fields, then click Test.

      The service executes. If the test succeeds, the Test Result page is displayed. A successful test result displays the event document, the service input document, and the service output document.
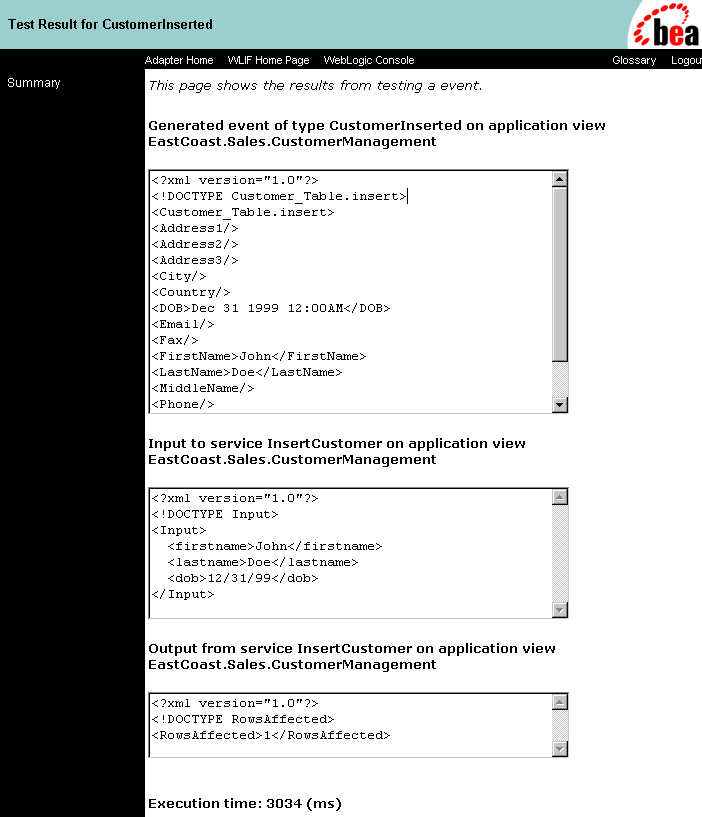


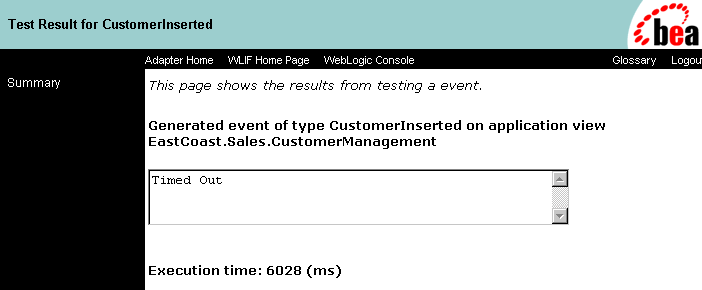
      If the test fails, the Test Result page displays only a Timed Out message.


    5. If the test failed, edit the event definition, or contact the system administrator or application manager.

    6. If the test succeeded, repeat the test procedure for each remaining event you want to test.

    7. When finished, save the application view.

If You Select Manual

    1. In the Time field, enter a reasonable time to wait, in milliseconds. (One minute = 60,000 ms.) If this time elapses before the event succeeds, the test will time out and display a failure message.

    2. Open the application you will use to trigger the event, if the application is not already open.

    3. Click Test. The test waits for an event to trigger it.

    4. Using the triggering application, perform an action that will execute the service that will test the application view event.

      If the test succeeds, the Test Result page is displayed. A successful test result displays the event document from the application, the service input document, and the service output document.


      If the test fails or takes too long, the Test Result page is displayed, including a Timed Out message.


    5. If the test failed, edit the event definition, or contact the system administrator or application manager.

    6. If the test succeeded, repeat the test procedure for each remaining event you want to test.

    7. When finished, save the application view.


Editing an Application View

When you define an application view, you must configure its connection parameters. After you add and test services and events, you may want to reconfigure the connection parameters or remove services and events. To edit an existing application view:

  1. Open the application view.

  2. Click Summary. The Summary for Application View page is displayed.


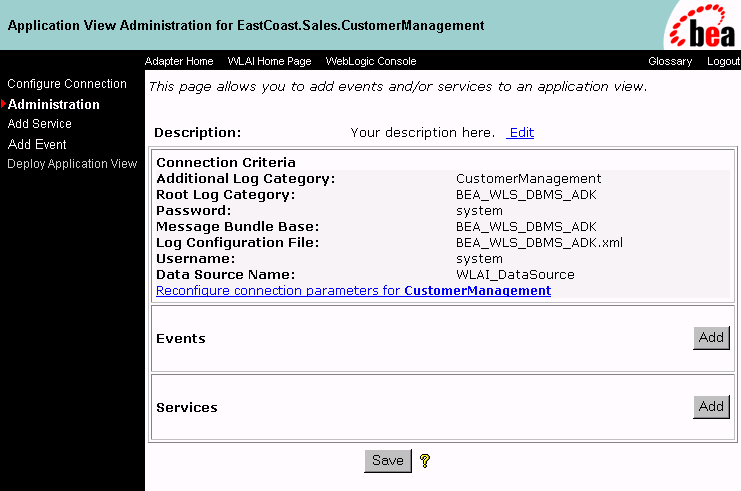
  3. Click Edit. The Application View Administration page is displayed.


  4. To reconfigure the application view's connection parameters, click Configure Connection (See Defining an Application View.)

  5. To add services and events, click Add Service or Add Event. For more information, see Adding a Service to an Application View or Adding an Event to an Application View.


back to top previous page next page