


|

|
|
|
|
Introduction to Business Process Management and the Sample Workflows
The example workflows documented in this tutorial, which are contained in the Tutorial.jar file provided in the bea/wlintegration2.1/samples/bpm_tutorial folder, illustrate many of the most commonly-used business process management (BPM) features of WebLogic Integration. They do not represent a real-world implementation, but present a highly simplified scenario that allows you to gain experience running the two client applications provided for business process management: the Studio (design environment) and the Worklist (run-time environment).
This overview provides the context for the example workflows so that you can gain a picture of the entire puzzle before you begin to piece it together in the remaining sections of the tutorial. Specifically, this section includes the following:
Overview of the Scenario
Our example workflows are loosely based on a generic Web-based sales order scenario. Once the order has been received, the workflows control the processing and fulfillment of the order, as it passes through the stages of approval, inventory checking, shipping, and invoicing. The following narrative describes the processes and data that make up the scenario:
To get an idea of what our workflow will look like, we can sketch out a preliminary flowchart, as shown in the following figure. The numbered sections correspond to the steps in the preceding procedure.
Figure 1-1 Sales Order Scenario
Overview of the BPM Environment
Although you can use a Studio workflow to perform certain business processes directly—such as sending e-mail to a client, or assigning a manual task to a Worklist user—mostly you design workflows to integrate external software components, while the workflow definition serves to control the sequence in which these external program modules are invoked. Thus, before you can begin to draw a workflow, you should identify the external components, such as Enterprise JavaBeans, Java classes, or other applications with which you will need to interface.
To help identify the external components that we will need for our scenario, let us first review the role of WebLogic Integration in relation to WebLogic Server and the middle tier of a Java 2 Enterprise Edition (J2EE) model-view-controller multitier application. The following figure locates the WebLogic Integration server in relation to the other components needed to implement our scenario in a distributed J2EE/WebLogic Server application.
Figure 1-2 WebLogic Integration BPM Environment
As the figure shows, BPM operates at the business-logic layer of the J2EE framework. This means that a workflow directly integrates business objects, such as Java classes and Enterprise JavaBeans (EJBs), while for communication with other components or applications, it exchanges eXtensible Markup Language (XML) messages via the intermediary of the Java Message Service (JMS). In fact, the entire front-end application, which receives and formats input from an external client, is not represented in a BPM workflow. Rather, it is at the point where the Web components need to interact with the EJB layer that the workflow takes control of processing. Thus, a common way for a workflow to be started is to be triggered by an external event, namely the arrival of the appropriate XML document on a JMS topic, as pictured in the figure. According to this framework, the order-placement process of our scenario is not normally captured in a BPM workflow. It is, however, simulated for the purposes of this tutorial. (See Working with the Sample Workflows for more information.) Rather, the start of the workflow would be the point at which the order is passed on for processing, as depicted in the following figure. Figure 1-3 Sales Order Scenario: Start Mechanism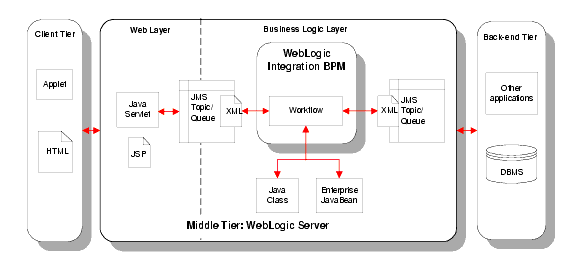
Let us redraw our scenario flowchart, then, so it shows, more accurately, the starting point of the workflow and the extra step that is needed to intercept a cancellation notice. Figure 1-4 Sales Order Scenario: Start and Finish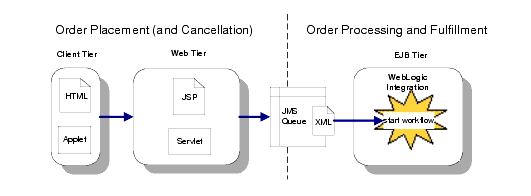
Modeling the Scenario in WebLogic Integration
Having defined the scenario and reviewed the WebLogic Integration BPM environment, we now need to determine how we will map the real-world processes and entities in the scenario to the workflow modeling constructs provided by the WebLogic Integration Studio. To do so, we must identify:
Each of these modeling tasks is discussed in the following sections.
Defining Application Users
Before we actually model the workflows, we first need to define the system in terms of the real-world agents who will interact with it. The Studio provides three constructs to define context of use: organizations, users, and roles. The following sections describe these constructs and explain how they are used in the tutorial scenario.
Organizations
An organization represents a company or site location. Organizations are business process management-specific constructs which you create in the Studio, and do not correspond to any users or groups defined in WebLogic Server. However, users can be associated with an organization, and roles (see Roles) are defined within one. Workflows may be associated with a single, or with multiple organizations.
The organization for our scenario is CDExpress, which has been predefined for you.
Users
These are users of the Studio and Worklist client applications, and are defined in a WebLogic Server security realm. Users may be created in the Studio, and should be associated with at least one default organization. Although users can access workflows associated with any organizations, they can only execute workflows within the organization(s) to which they have been assigned. Users may also be associated with roles (see Roles).
Our organization, CDExpress, includes three of the default users that are shipped with the Studio: joe, mary, and admin.
For complete information about users and permissions, see "Maintaining Users" in Administering Data in Using the WebLogic Integration Studio.
Roles
A role represents the generic business function that a user may perform, independent of his or her individual user account. For example, a role may be a department, or a job description or title. In our scenario, roles correspond to the customer service representative, accounting, and shipping roles.
Roles are contained within an organization, so that each organization has a unique set. Roles must be mapped to groups that have been configured on WebLogic Server, although you can automatically create a WebLogic Server group when you create a role in the Studio.
Finally, roles can have one-to-one, one-to-many, or many-to-one associations with users. That is, one user might take on several roles, while one role may be filled by several users.
The CDExpress organization contains the following roles, mappings, and member users, all of which have been predefined for you.
Table 1-1 Default CDExpress Roles, Groups, and Member Users
|
Role |
Maps to WebLogic Server Group |
Member Users |
|---|---|---|
|
CustomerService |
CustomerServiceCDE |
admin |
|
Accounting |
AccountingCDE |
admin joe |
|
Shipping |
ShippingCDE |
admin mary |
For complete information about roles and permissions, see "Maintaining Roles" in Administering Data in Using the WebLogic Integration Studio.
Identifying External Components
In the case of our scenario, we can identify the following Web and back-end components which we need to integrate in our workflow to accomplish the work we want to perform:
Without explaining the details of how a workflow interfaces with external components for now (which is discussed in Defining Workflow Interfaces), the following figure locates the points in our preliminary workflow at which external components are required.
Figure 1-5 Sales Order Scenario: External Components
In the example workflows, only the EJB-level components identified in the above figure are implemented and provided, although interfaces to the other components are defined in the workflows. Thus, external components are represented in the sample workflows as follows: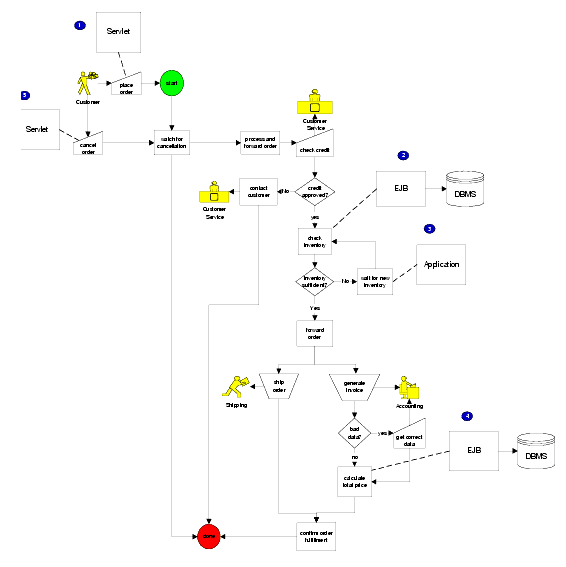
Note: The POBean EJB is automatically deployed on WebLogic Server when the WebLogic Integration server is started.
Defining Workflow Objects
Having identified the external components we will use in our application, we can now begin to model our scenario processes by defining the objects that our workflow requires. The following sections provide an introduction to workflow objects, and examples of the functions that each object serves in the sample workflows.
Nodes and Connections
Nodes are the major building blocks with which you construct your workflow and demarcate business processes. Connections form the transitions between nodes. Seven types of nodes can be used to capture the different requirements of a business scenario, as described in the following table.
Table 1-2 WebLogic Integration Studio Nodes
Normally the completion of one node causes the successor nodes to be activated in a sequential manner, unless the flow is overridden by a particular action (see Actions for a description).
Events represent a special type of node in that they function as wait states within a workflow. Although an event is activated by the completion of a predecessor node, it is triggered asynchronously by the arrival of an XML document for which the event has been configured to listen. XML messages may be received from external applications via an external JMS queue, or from other workflows via an internal JMS queue.
Note: Event nodes can also be triggered by plug-in-defined events, which can use a mechanism other than XML on JMS. For more information about programming plug-ins, see Programming BPM Plug-Ins for WebLogic Integration.
In our sample workflows, in addition to the required start, task, and done nodes, we also use:
Thus, our scenario can be represented as shown in the following figure.
Figure 1-6 Sales Order Scenario: Studio Workflow
In the example workflows provided, this single workflow has been split into two: a main workflow and a sub-workflow, as shown in the following figure. Figure 1-7 Sales Order Scenario: Main Workflow and Sub-Workflow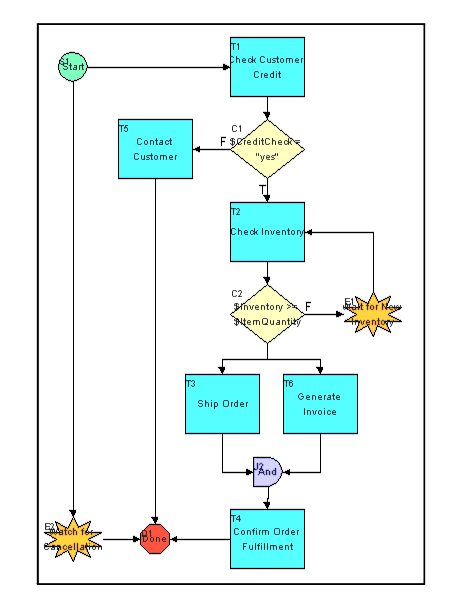
As the figure shows, an additional node is used in the main workflow to call the sub-workflow. We draw nodes in Creating a Workflow, and define them in Defining Workflow Nodes. Actions An action is the basic unit of work that you use to construct a workflow. The Studio provides 28 types of actions which perform different operations, ranging from assigning manual tasks to Worklist users, to controlling the overall program flow, and integrating and communicating with external components. Note: The default catalog of actions can be extended through the use of a plug-in. For more information about programming plug-ins, see Programming BPM Plug-Ins for WebLogic Integration. Actions are not represented visually within the workflow, but are specified within a node—usually a task node, although actions can be specified in starts, decisions, events, exception handlers (see Exception Handlers), and even other actions. Some of the actions used in the sample workflows include: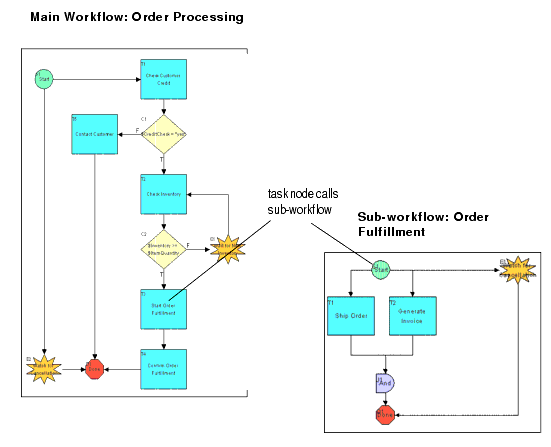
We work extensively with actions throughout this tutorial.
Variables
A variable is a container in which a workflow can store a value, whether it is text, numbers, dates, or even references to Java objects and EJBs. When you define a workflow template, you can create any number of variables. Over a workflow's lifetime, the value of any variable can change.
Typically, variables represent real-world data items that are gathered by the workflow at run time. They are populated by values that can be returned by business operations (see Defining Workflow Interfaces), extracted from XML documents, or explicitly set by workflow actions. Variables can also be used for several purposes by a workflow, such as evaluating a condition in a decision node, or storing the result of a Worklist user response to an XML message.
In the sample workflows we use variables for various functions, including the following:
We create variables throughout Creating a Workflow.
Exception Handlers
WebLogic Integration provides a system exception handler that it uses by default for all workflow instances, or running workflows. In cases where an exception occurs at run time, the system exception handler rolls back the active transaction and rethrows the exception.
You can also set up custom exception handlers for a workflow, in which you define specific actions for the exception handler to perform upon rolling back or committing the transaction.
We define and invoke an exception handler that can handle the possibility of invalid data being passed to the calculate() method of the POBean in Using a Custom Exception Handler.
Defining Workflow Interfaces
Our scenario and workflow design call for our workflow to interface with the following hypothetical and actual components and applications:
The following figure shows the various means by which a workflow interfaces with external components.
Figure 1-8 Interfacing with External Components and Applications
The following sections describe these interfaces in more detail. Business Operations To call a Java class or Enterprise JavaBean method from a workflow, you create a business operation. When you perform a business operation, you can pass workflow variable values as input parameters to EJB or Java object methods, which can then return values back to the workflow variables. In the sample workflows we use business operations to:
We will define and perform a business operation in Creating a Workflow.
XML Documents
To interact, in an asynchronous fashion, with other types of server-side components such as servlets or back-end applications, a WebLogic Integration workflow shares data via XML documents that are published to JMS topics or queues and received from JMS queues.
In fact, even to exchange information between multiple workflows in an asynchronous fashion, the WebLogic Integration server uses XML documents posted to an internal topic. And although communication between the workflow and the Worklist client is accomplished via the WebLogic Integration Application Programming Interface (API), in many cases requests and responses take the form of an XML document.
Note: For information about the WebLogic Integration API, see Programming BPM Client Applications and the BEA WebLogic Integration Javadoc.
Thus, to communicate with many of the external and even internal components in our workflows, we will need to compose and send XML messages to either a Worklist client user, or an external or internal topic or queue. XML elements and attributes correspond to workflow variables for which values are provided at run time. We use outgoing XML documents in the sample workflows for the following purposes:
XML documents may be embedded within specific workflows, depending on the action that you use to reference them. However, you can also export and import them to and from the XML repository, which stores XML documents, document type definitions (DTDs), and other XML entities outside of a workflow definition, so that you can access documents created in one workflow for reuse by another. We will compose, export, and import XML documents to and from the repository in Using the XML Repository: Exporting the Neworder XML Document and Defining XPath Statements.
Event Keys
When you define a workflow event to listen for incoming XML documents, you specify the document type or root element of the document that the event is expecting. To filter incoming XML documents so that only those containing particular element or attribute values can trigger the event, you can specify an event key. The event key identifies the document type and element value that is to be extracted from the XML document via an XPath expression. The event key is stored in a table so that at run time, the server's event processor compares the value returned from the XML document with the value of a key specified by the event node; if a match is found, the event is triggered. The mechanism is explained in more detail in Creating an Event: Defining the Wait for New Inventory Event.
Examples of event keys used in our workflows include event keys for recognizing an XML message sent to:
We define event keys and XPath expressions throughout Creating a Workflow.
Working with the Sample Workflows
In the sample workflows provided for business process management, our scenario is implemented as three workflows: a main workflow, a sub-workflow, and a trigger workflow that is included for use with the tutorial. While the same scenario may be implemented, just as easily, as a single workflow, the division of the processes into two separate workflows illustrates a strategy you may want to use for structuring long and complex workflows.
The following figure shows the relationship among the three sample workflows.
Figure 1-9 Relationship Among Three Sample Workflows
Each of the workflows is described in more detail in a separate section of the tutorial; however, a high-level overview of each workflow is provided here: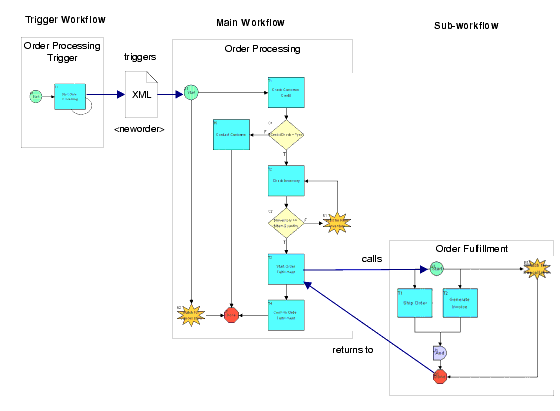
Order Processing is the main workflow. It defines the tasks that range from processing the initial customer request up to and including checking the inventory, at which point it passes control to the sub-workflow. When Order Processing regains program control, it sends out the confirmation notice and the entire process is complete.
Order Fulfilment is the sub-workflow that is called from the Order Processing workflow after the inventory is checked. This sub-workflow defines the shipping and invoicing tasks. When these tasks are complete, program control is returned to the main workflow.
Order Processing Trigger is included to simulate the Web-presentation application that accepts the order from the customer, so that you can run the workflow from the Worklist.
Complete, ready-to-use versions of the three workflows described in this tutorial are available in the Tutorial.jar package in the bea/wlintegration2.1/samples/bpm_tutorial folder of your installation. This package includes the templates, template definitions, business operations, and event keys required to run the workflows.
While we encourage you to follow the procedures in this tutorial, if you simply want to run the workflows as a demonstration without following the tutorial, you will need to do the following:
Using the Tutorial
This tutorial is organized to help you learn to use many of the common features of the Studio and Worklist applications. Each of the first four sections uses one example workflow to highlight different aspects of the Studio and workflow design, while the final section shows the completed workflows in action.
In Getting Started with the WebLogic Integration Studio, you log on to the Studio and import the Order Processing Trigger and Order Fulfillment workflows to explore various aspects of the Studio interface. Topics covered in this section include:
In Understanding Workflow Objects and Properties, you use the Order Processing Trigger workflow to explore the properties of a workflow, and to edit an XML message embedded in a workflow. Topics covered in this section are:
In Creating a Workflow, you create the Order Processing workflow from scratch by doing the following:
In Defining Workflow Nodes, you define the nodes of the Order Processing workflow by adding and defining variables, actions and other workflow objects. Topics covered in this section are:
Using a Custom Exception Handler, uses the Order Fulfillment workflow to look at the WebLogic Integration exception-handling facility and an additional Worklist user interaction.
Finally, in Executing and Monitoring the Example Workflows, you log on to the Worklist application and run the example workflows, while simultaneously monitoring them in the Studio.
Studio functions that are not demonstrated in this tutorial include:
For information about these functions, see Using the WebLogic Integration Studio.

|

|

|
|
|
|
Copyright © 2001 BEA Systems, Inc. All rights reserved.
|