

|
|
|
|
|
|
Deploying Domains and Server Configurations
A WebLogic Server domain is the administrative unit that you use to manage servers and enterprise applications. A server configuration is a set of properties that determines operating parameters for an active instance of an application server.
Each domain contains one or more active servers. For any given development project, you might create several different domain and server combinations, each configured to support the following types of environments:
WebLogic Portal includes sample (reference) domains, which are configured to support a single-server development environment.
The following sections in this topic describe creating and deploying domains:
How WebLogic Portal Domains Are Organized
WebLogic Portal domains conform to all requirements that WebLogic Server imposes for administrative domains. While they do not extend domain functionality or introduce additional requirements, they do represent one of many possible implementations. The files and directories in Table 3-1 are required for all WebLogic Portal domains.
Note: WebLogic Portal installs its reference domains in PORTAL_HOME/config.
For information on how WebLogic Server organizes domains and servers in general, refer to "Overview of WebLogic Server Management" in the WebLogic Server Administration Guide. For additional background information, refer to the "Application Assembly and Deployment" chapter of the JavaTM 2 Platform Enterprise Edition Specification, v1.3
.
Creating Domains and Configuring Servers
We recommend that you use one of the reference domains and servers as a starting point for your development.
This section contains the following subsections:
Review the Reference Domains
Review the following domains that WebLogic Portal provides and choose the one that most closely resembles your business needs:
petflowDomain
petflowDomain contains the petflowApp application, which features a demonstration of the Webflow service. To activate the domain and server, do the following:
Then, to view petflowApp, in a Web browser enter the following URL:
http://localhost:7501/petflow
p13nDomain
p13nDomain contains the p13nApp application, which demonstrates personalization services. To activate the domain and server, do the following:
Then, to view p13nApp from the p13nDomain, in a Web browser enter the following URL:
http://localhost:7501/
Note that this URL only specifies the server name and port number because the p13n Web application within p13nApp has been configured as the default Web application of the p13nDomain.
Any domain can specify a default Web application, which responds to HTTP requests that cannot be resolved to another deployed Web application. For information on how to specify a default Web application, refer to "Configuring WebLogic Server Web Components" in the WebLogic Server Administration Guide.
wlcsDomain
wlcsDomain contains both the p13nApp and wlcsApp applications. The p13nApp is the same application that you can access from p13nDomain. WebLogic Portal includes it in wlcsDomain to demonstrate that you can deploy multiple applications in a domain, and as a convenience to you: if you know that you want to use personalization and commerce services on your site, you can start wlcsDomain to access both p13nApp and wlcsApp.
wlcsApp features a demonstration of personalization, commerce, and campaign services.
To activate the domain and server, do the following:
To view wlcsApp, in a Web browser enter the following URL:
http://localhost:7501/wlcs
Then, to view p13nApp, in a Web browser enter the following URL:
http://localhost:7501/p13n
Note that the p13n Web application is not the default Web application for wlcsDomain and therefore the URL must specify the context root of the p13n Web application. To view the default application for wlcsDomain, enter the following URL:
http://localhost:7501/
portalDomain
portalDomain includes p13nApp, wlcsApp, and portal. The portal application demonstrates the portal service.
Because portalDomain includes three applications, it provides the best demonstration of the scope of WebLogic Portal features. This document assumes that in your development environment, you use portalDomain as your reference, though you can use any domain that best reflects your business needs.
Each application that you add to a domain increases the amount of time to start the server.
To activate the portalDomain and server, do any of the following:
StartPortal.bat calls config/startPortal.bat. We provide this script as a convenience to you.
Then, to view p13nApp, in a Web browser enter the following URL:
http://localhost:7501/p13n
To view wlcsApp, in a Web browser enter the following URL:
http://localhost:7501/wlcs
To view the portal application, in a Web browser enter the following URL:
http://localhost:7501/stockportal
Create Your Domains
To create a domain, do the following:
http://localhost:7501/console
http://host-name or IP-address:7501/console
Enter the system user ID and password as entered when you installed WebLogic Portal.
Figure 3-1 Create a Domain
Under the config directory that contains the currently active domain (portalDomain), the WebLogic Server Administration Console does the following: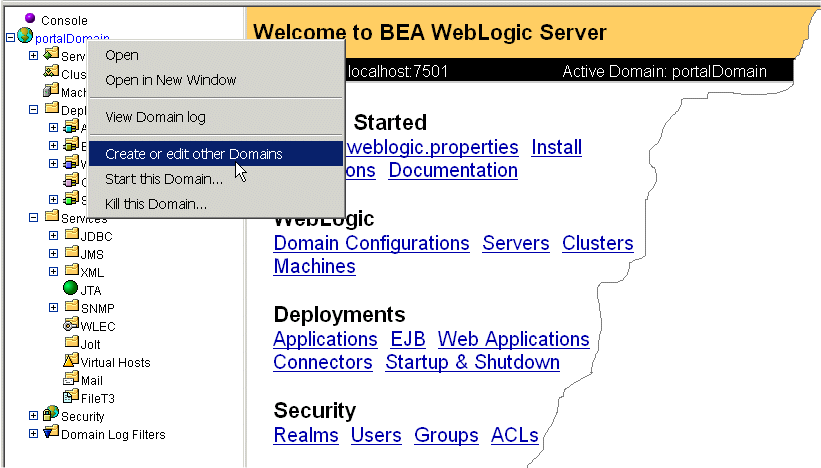
PORTAL_HOME/config/name-of-your-domain
For example, if you named your domain bank_development, the WebLogic Server Administration Console creates the following directory:
PORTAL_HOME/config/bank_development
Configure Servers
This section guides you through setting up a server instance that supports WebLogic Portal enterprise applications:
Create a Server
To create a server instance, do the following:
Figure 3-2 Editing the bank_development Domain
If the top pane does not state the name of your new domain, do the following: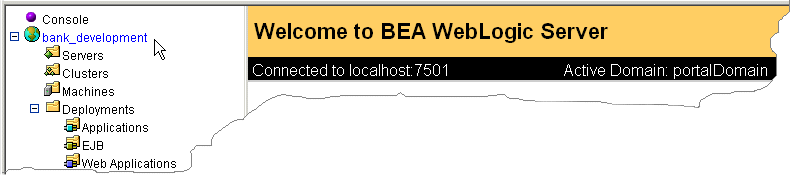
Note that at this point, while you are editing your new domain, the portalDomain is still the active domain.
Configure Listen Ports
To change the default listen ports, do the following:
http://localhost:7501/console
Figure 3-3 The SSL Listen Port to Support Sample Applications
You need a private key and digital certificate for each deployment of WebLogic Server that will use the SSL protocol. To acquire a digital certificate from a certificate authority, you must submit your request in a particular format called a Certificate Signature Request (CSR). For more information, refer to "Managing Security" in the WebLogic Server Administration Guide. Each WebLogic Portal reference domain provides sample security files, which you can use for demonstration purposes in your domain. To use these files, copy all *.pem files from PORTAL_HOME/config/portalDomain to PORTAL_HOME/config/yourDomain. Then change the values on the SSL tab to specify the files that you copied.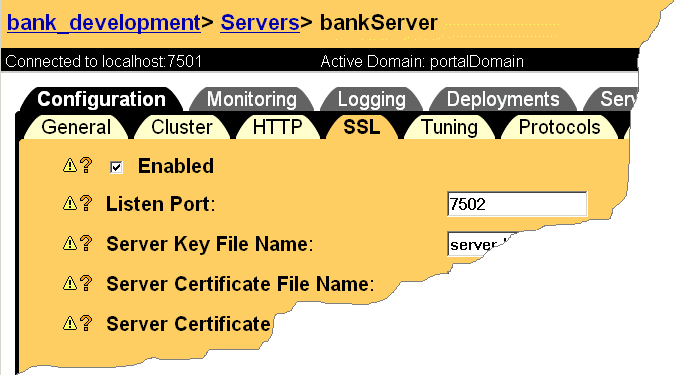
Note: You can create multiple servers in each domain. For example, you might create one server to support the enterprise applications and another server with different listen ports to support other applications.
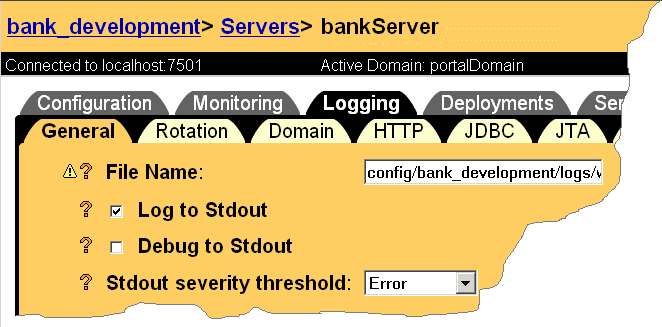
Configure the Message Output
You can use the WebLogic Server Administration Console to change the level of messages that the server generates and where the server locates log files.
To change the message output, do the following:
Figure 3-4 Stdout Severity Threshold List
Set Up a Security Realm
A security realm determines how a user is authenticated and retrieves access control lists for given names. The reference domain provides a custom security realm, wlcsRealm, that stores user IDs and passwords in the RDBMS repository. You can set up other types of security realms, as described in "Managing Security" in the WebLogic Server Administration Guide.
The reference domain also provides a caching realm, wlcsCachingRealm, which improves the performance of WebLogic Server by caching lookups, thereby reducing the number of calls into other security realms.
To set up wlcsRealm and wlcsCachingRealm, do the following:
For information on using other database types as the RDBMSRealm host, refer to Part II, Deploying Your Business Data.
Start Your Server
The remaining configuration tasks require that you deploy the WebLogic Server Administration Console to your new domain and then start your server:
The shell in which you run the script displays WebLogic Server messages. The following is an example of the messages that indicate a successful startup:
<Oct 15, 2001 9:20:13 AM MDT> <Notice> <Management> <Application Poller not started for production server.>
<Oct 15, 2001 9:21:49 AM MDT> <Notice> <WebLogicServer> <ListenThread listening on port 7501>
<Oct 15, 2001 9:21:49 AM MDT> <Notice> <WebLogicServer>
<SSLListenThread listening on port 7502>
<Oct 15, 2001 9:21:51 AM MDT> <Notice> <WebLogicServer> <Started WebLogic Admin Server "bankServer" for domain "bank_development" running in Production Mode>
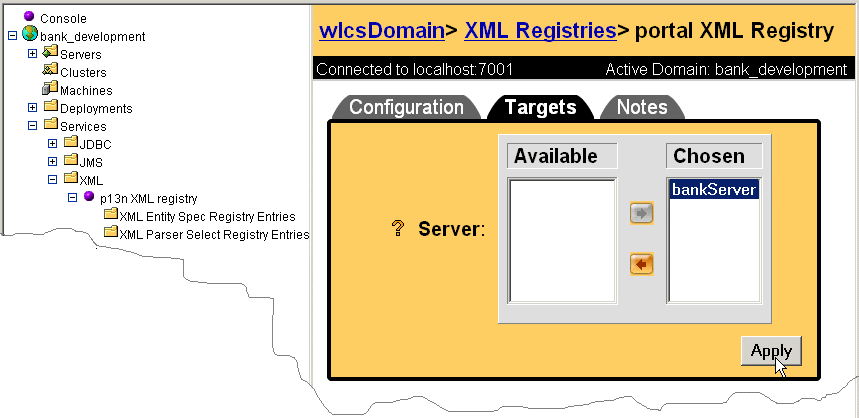
Configure an XML Registry
The XML registry configures XML parsers and XSLT transformers for your applications. For more information about the XML registry, refer to the "WebLogic Server Programming WebLogic XML" guide.
To configure an XML registry for your applications, do the following:
Figure 3-5 Deploy the XML Registry
Set Up JDBC Connection Pools and Data Sources
Connection pools provide ready-to-use pools of connections to your RDBMS. The application server creates the pools during server startup, thus eliminating the overhead of your enterprise application having to establish database connections for each transaction. For more information about connection pools, refer to "Overview of Connection Pools" in the WebLogic Server Programming WebLogic JDBC guide.
A DataSource is an interface between your enterprise application and a connection pool. For more information, refer to "Overview of DataSources" in the WebLogic Server Programming WebLogic JDBC guide.
This section contains the following subsections:
For information on setting up JDBC connection pools and data sources for your production RDBMS, refer to Part II, Deploying Your Business Data.
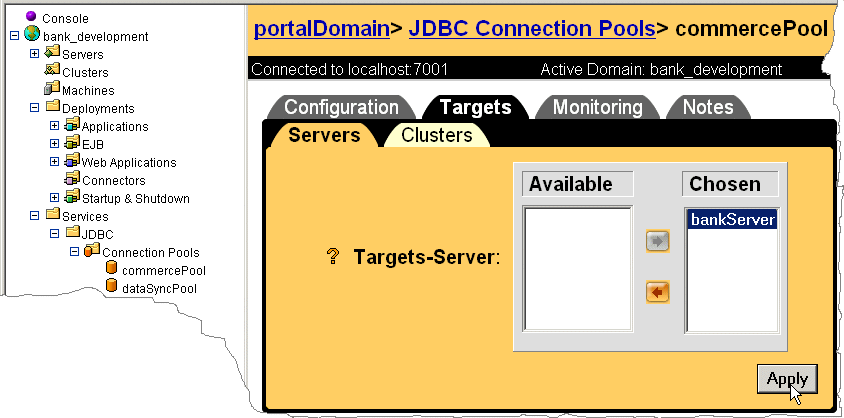
Configure commercePool for Cloudscape Databases
Create a JDBC connection pool named commercePool for Cloudscape by doing the following:
Figure 3-6 Deploy commercePool
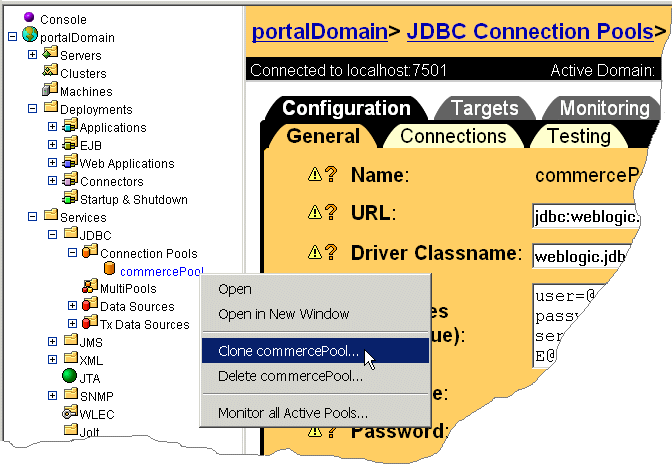
Tip: Cloning Resources
If you are creating a new server, you can clone the commercePool properties to simplify the creation of dataSyncPool.
After you create commercePool, do the following:
The WebLogic Server Administration Console creates a new connection pool with properties identical to commercePool.
Figure 3-7 Clone CommercePool
Configure dataSyncPool for Cloudscape Databases
Create a JDBC connection pool named dataSyncPool for Cloudscape by doing the following:
Configure JDBC Data Sources
The reference servers already configure the JDBC data sources that you need to access any database type. If you are modifying a reference server to meet your specific business needs, you do not need to change the configuration for the JDBC data sources.
If you are creating a new server, you must set up JDBC data sources by doing the following:
Viewing the JNDI Tree
From time to time you may find it useful to view the objects in the WebLogic Portal JNDI tree. To view the JNDI tree for a server:
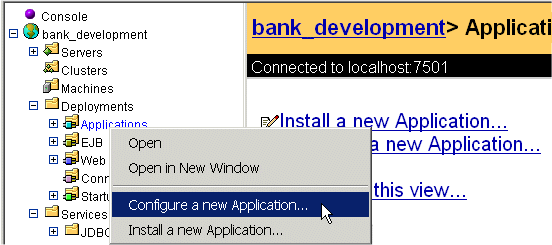
Add Extensions to the WebLogic Server Administration Console
WebLogic Portal includes extensions to the WebLogic Server Administration Console. You use these extensions to configure WebLogic Portal services.
To add the extensions to the WebLogic Server Administration Console, do the following:
Figure 3-8 Configure a New Application
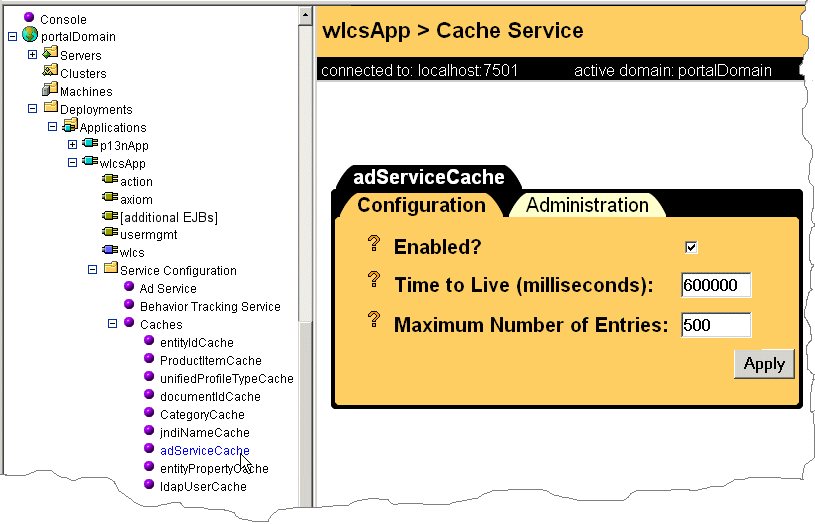
When you deploy a WebLogic Portal application that uses MBeans to configure its services, the application will now include a Service Configuration folder. This folder contains the WebLogic Portal extensions to the WebLogic Server Administration Console. (See Figure 3-9.)
Note: If your enterprise application does not contain the WLS-specific configuration file, META-INF/application-config.xml, then you must create one by stopping your server and taking the following additional steps. For instructions about setting values for the new tag, see Configure the JDBC Helper Service.
You can use the existing Portal enterprise applications as models by copying one of those files. Make sure the services that you want to be able to configure are present. For example, for the JDBC Helper Service:
  <ApplicationConfiguration>
    <JdbcHelper
      JdbcHelperDelegate=""
      MaxRetries="-1"
      MaxWaitTime="-1"
      Name="JdbcHelper"
    />
  </ApplicationConfiguration>
    <Application Deployed="true" Name="petflowApp" Path=".\applications\petflowApp">
        <WebAppComponent IndexDirectoryEnabled="false" Name="petflow"
        Targets="petflowServer" URI="petflow"/>
        <ApplicationConfiguration
        Name="petflowApp"
        Targets="petflowServer"
        URI="META-INF/application-config.xml" />
        <EJBComponent Name="pipeline" Targets="petflowServer" URI="pipeline.jar"/>
        <EJBComponent Name="petflow" Targets="petflowServer" URI="petflow.jar"/>
        <EJBComponent Name="petStore_EJB" Targets="petflowServer"
URI="petStore_EJB.jar"/>
        <WebAppComponent IndexDirectoryEnabled="false" Name="datasync"
        Targets="petflowServer" URI="datasync"/>
    </Application>
Figure 3-9 Extensions to the WebLogic Server Administration Console
Make weblogiccommerce.properties Available to the Domain
The PORTAL_HOME/weblogiccommerce.properties is an additional file that configures WebLogic Portal services. It is deprecated along with the sections of Java code that it configures.
Specify a Default Web Application
Every server and virtual host in your domain can declare a default Web Application. The default Web application responds to any HTTP request that cannot be resolved to another deployed Web application. In contrast to all other Web applications, the default Web application does not use the Web application name as part of the URI. Any Web application targeted to a server or virtual host can be declared as the default Web application.
For information on how to specify a default Web application, refer to "Configuring WebLogic Server Web Components" in the WebLogic Server Administration Guide.
Relocate the Domain (Optional)
If you want to relocate the domain into a different directory tree, perhaps on a different disk partition or in a directory tree that is separate from portalDomain, do the following:
For example, on a partition named usr2, you create the following tree:
/usr2/config/bank_development
/usr2/config/bank_development/config.xml
/usr2/config/bank_development/SerializedSystemIni.dat
If you locate your config directory and your domain's startup script in different directories, add the following argument to the Java command that is near the end of the script:
-Dweblogic.RootDirectory=path-to-the-parent-directory-of-your-config-directory
For example, you want to locate the startup script in /usr/local/bin and the config directory in /usr2. Modify the startup script by adding the bold text in the following example:
REM ----- Start WebLogic with the above parameters ------
%JDK_HOME%\bin\java %JAVA_VM% -Xms128m -Xmx128m -classpath %CLASSPATH% -Dcloudscape.system.home=%PORTAL_HOME%/db/data -Dweblogic.Domain=%DOMAIN_NAME% -Dweblogic.Name=%SERVER_NAME% -Dbea.home=%BEA_HOME% -Djava.security.policy==%WEBLOGIC_HOME%/lib/weblogic.policy -Dcommerce.properties=%PORTAL_HOME%/weblogiccommerce.properties -Dpipeline.properties=%PORTAL_HOME%/pipeline.properties -Dwebflow.properties=%PORTAL_HOME%/webflow.properties
-Dweblogic.RootDirectory=/usr2
weblogic.Server
Add the -Dweblogic.RootDirectory argument in front of weblogic.Server.
Place the New Directory Tree Under Source Control
To safeguard your work, keep a history of changes, and provide the ability to distribute a known version of source files to your development team, place your new domain and server configuration under source control. Do not place the generated directories, such as /config/applications/.wlnotdelete, under source control.
For information on changing other properties in the WebLogic Server Administration Console, refer to the following documents:

|

|

|
|
|
|
Copyright © 2001 BEA Systems, Inc. All rights reserved.
|