BEA Logo BEA WebLogic Portal Release 4.0

  BEA Home  |  Events  |  Solutions  |  Partners  |  Products  |  Services  |  Download  |  Developer Center  |  WebSUPPORT


   WebLogic Portal Documentation   |   Portals and Portlets   |   Previous Topic   |   Next Topic   |   Contents   |   Index

Portal Administration Tools


This topic contains instructions on using the WebLogic Portal Administration Tools to manage resources for Portal Web Applications that are already deployed on a server.

This topic contains the following sections:


About the Portal Administration Tools

The WebLogic Portal Administration Tools allow you to:

Getting Started with the Portal Administration Tools

Use the following procedure to log in:

  1. Start the WebLogic Portal Server. For instructions, see the WebLogic Portal Architectural Overview documentation.

  2. In your Start menu, select Programs->BEA WebLogic E-Business Platform->WebLogic Portal 4.0->Start Administration Tools.

    or

    Open a browser and type

    http://server:port/portalTools/index.jsp

    Note: Using the out of the box application, the server:port is localhost:7501

  3. Log in using the user name and password provided by your administrator, or use the initial login:

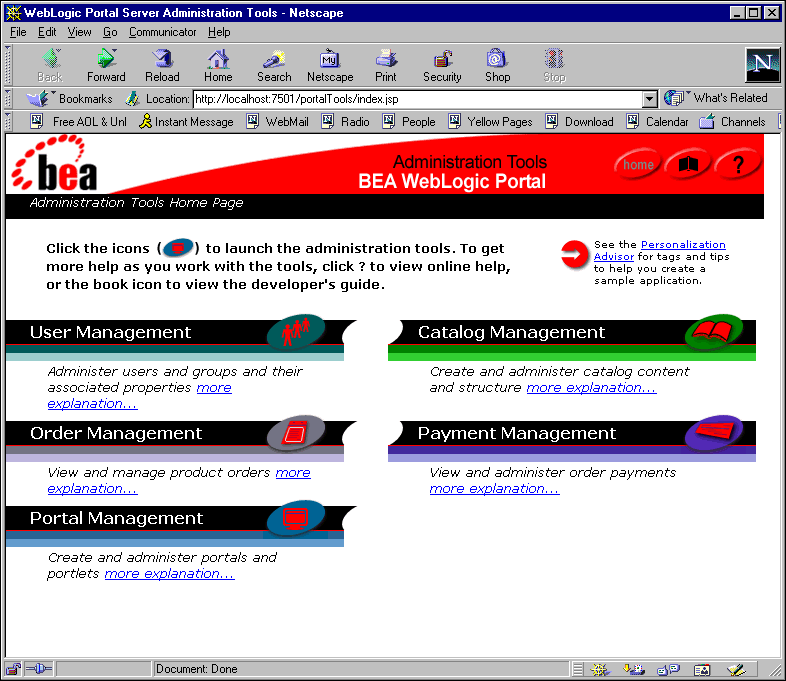
  4. The WebLogic Portal Administration Tools home page appears (Figure 4-1).

    Figure 4-1 Administration Tools Home Page for System Administrators


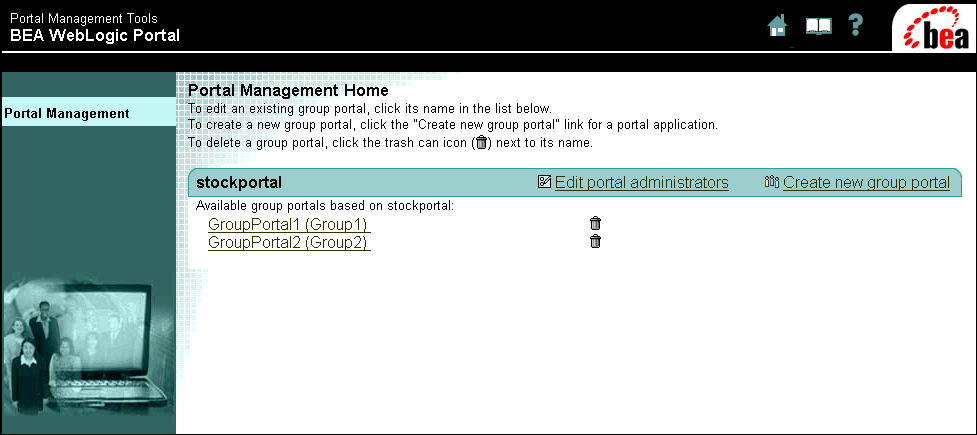
  5. All procedures in this section originate from the WebLogic Portal Administration Tools home page. Users without System Administrator (SA) authority will automatically begin in the Portal Management Home page (Figure 4-2), which is the second page in each procedure. Clicking on the Home icon at the top of any page returns you to your respective home page.

    Figure 4-2 Portal Management Home page


  6. Depending on your level of administrative authority, you should begin at the following sections of this chapter:


User Creation and Management

Using the WebLogic Portal Administration Tools, you can create a number of users with different authority. By assigning a person to a role-based group, you give them the authority that is assigned to that group. You can create the following types of users:

Creating Users

In order to assign someone administrative abilities of any kind, they must first be present in the system as a user. A user can be an administrator in the system or a visitor to a portal. Adding someone as a user gives them a user name and a password, and enables them to be selected for addition to other role-based user groups associated with portals.

  1. Click the User Management icon in the home page. The User Management home page appears (Figure 4-3).

    Figure 4-3 User Management Home Page


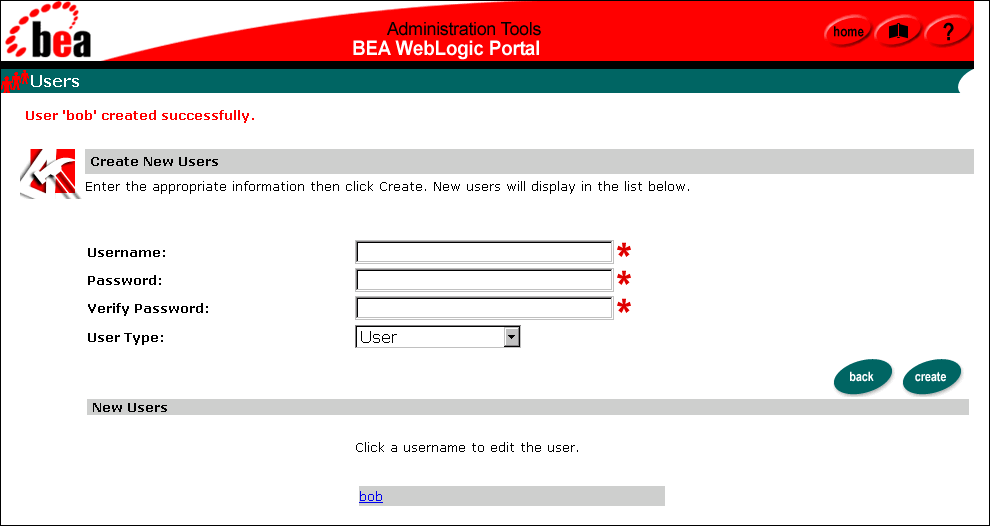
  2. Click the Create icon in the Users bar. The Create New Users page appears (Figure 4-4).

    Figure 4-4 Create New Users page


  3. In the Create New User page, enter the following information:

    1. Name

    2. Password

    3. Confirm password

    4. User type

  4. Click Create. The new user will appear at the bottom of the page.

Editing the Newly Created User

Use this procedure to assign property sets to the new user. For more information about property sets, see the Personalization Server Tour documentation:

  1. In the Create New Users page, click the name of the new user. A user management page for your new user appears.

  2. Use the drop-down menu to select a property set for the user then click Search.

  3. Click Finished when you are done.

Creating a System Administrator

In order to assign someone to a System Administrator group, they must already be created as a user. To create a new user, see Creating Users.

System administrators (SAs) can be created by other SAs. You create an SA by adding a user to the system administrator group. Use the following procedure to add an SA.

  1. Click the User Management icon in the Administration Tools Home page. The User Management page appears.

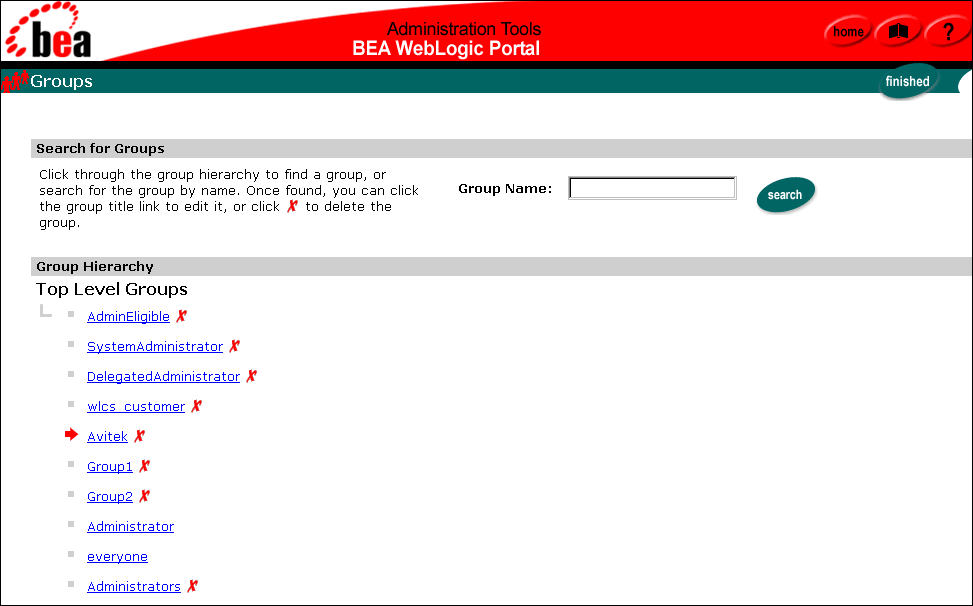
  2. Click the Groups icon in the User Management page. The Group Hierarchy page appears (Figure 4-5).

    Figure 4-5 Group Hierarchy page


  3. In the Group Hierarchy page, click "SystemAdministrator".

  4. The Edit Groups page displays information for the SystemAdministrator group.

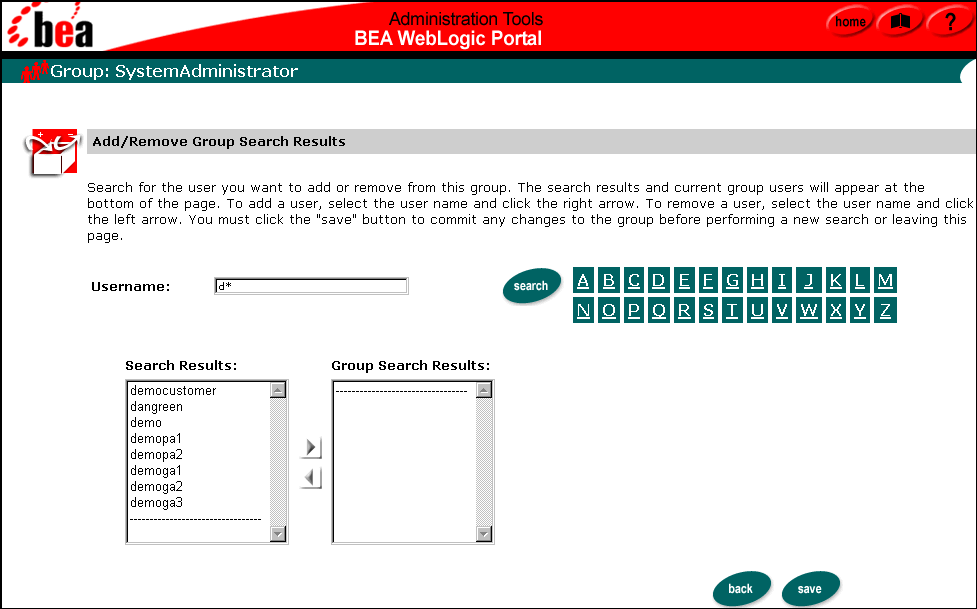
  5. Click the add (+/-) button. The Add/Remove page appears.

    Figure 4-6 Add/Remove page


  6. Search for the user you want to add to the SystemAdministrator group.

  7. Highlight the desired user and click the right arrow to add them to the Group Search Results list.

  8. Click Save. The selected user is added to the System Administrator group, granting that user all SA privileges.

Creating AdminEligible Members

Before you can give users portal administration or group administration authority, you must first add them to the AdminEligible group. AdminEligible members must first be created as users and can only be added to the AdminEligible group by SAs.

  1. Click the User Management icon in the home page. The User Management page appears.

  2. Click the Groups icon in the User Management page. The Group Hierarchy page appears.

  3. In the Group Hierarchy page, click the AdminEligible link.

  4. Click the add/remove icon (+/-) in the AdminEligible page.

  5. Search for the user you want to add to the AdminEligible group.

  6. Highlight the desired user and click the right arrow to add them to the Group Search Results list.

  7. Click Save. The selected user is added to the AdminEligible group, making the user eligible for portal and group portal administration authority. To assign administrative authority, see Creating Portal Administrators and Creating Group Administrators.

Creating Portal Administrators

Portal Administrators (PAs) have authority to manage aspects of their associated portal. A PA is created by adding a member of the AdminEligible group to the Portal Administrator group and specifying their privileges. To add a user to the Portal Administrator group, an SA must first add them to the AdminEligible group. See Creating AdminEligible Members for the procedure.

SAs and PAs can create a new portal administrator from an existing AdminEligible user. A PA may have authority in multiple portals. Use the following procedure to create a new portal administrator:

  1. Click the Portal Management icon in the home page. The Portal Management home page appears, listing all group portals within the portal application (Figure 4-7).

    Figure 4-7 Portal Management Home page


  2. Click the Edit Portal Administrators link. The Edit Portal Administrators page appears (Figure 4-8).

    Figure 4-8 Edit Portal Administrators page


  3. In the Edit Portal Administrator page, click Create New Administrator. The Add New Portal Administrator page appears (Figure 4-9).

    Figure 4-9 Add New Portal Administrator page
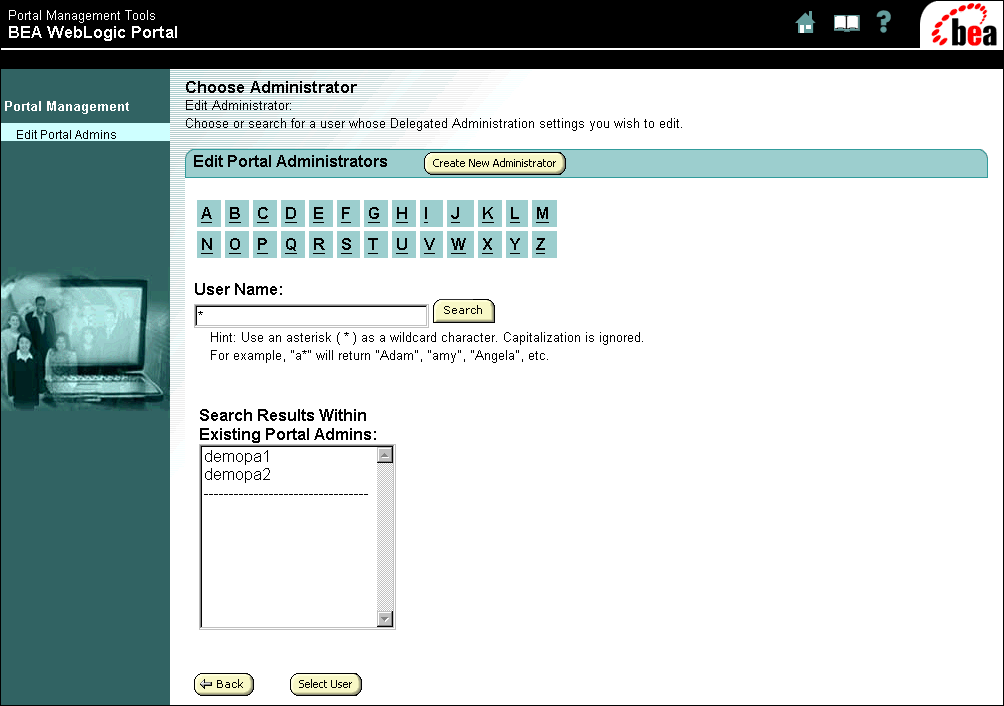
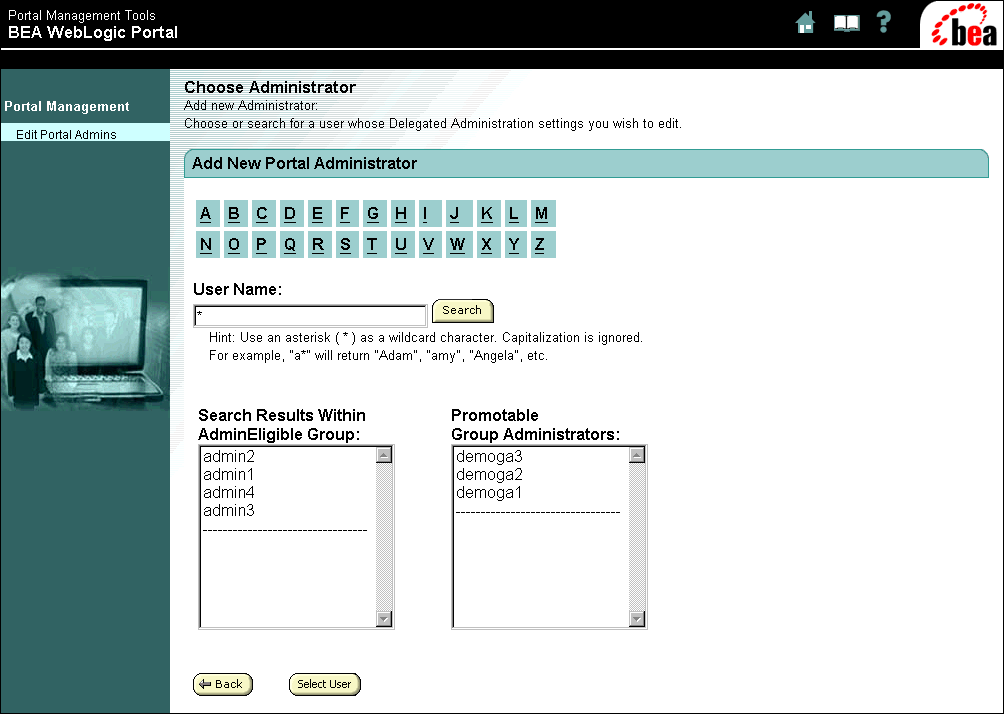


  4. To select a user to add to the Portal Administrator group, you can do any of the following:

    1. Search for the user you want to add as a PA. You can search for and add any AdminEligible user or existing GA.

    2. Select a user from the AdminEligible list: Any user in the AdminEligible group can be added to the Portal Administrator group.

    3. Select a User from the Promotable Group Administrator list.

  5. Once you have selected the user, click Select User.

  6. The Delegate Administration page appears (Figure 4-10).

    Figure 4-10 Delegate Administration page
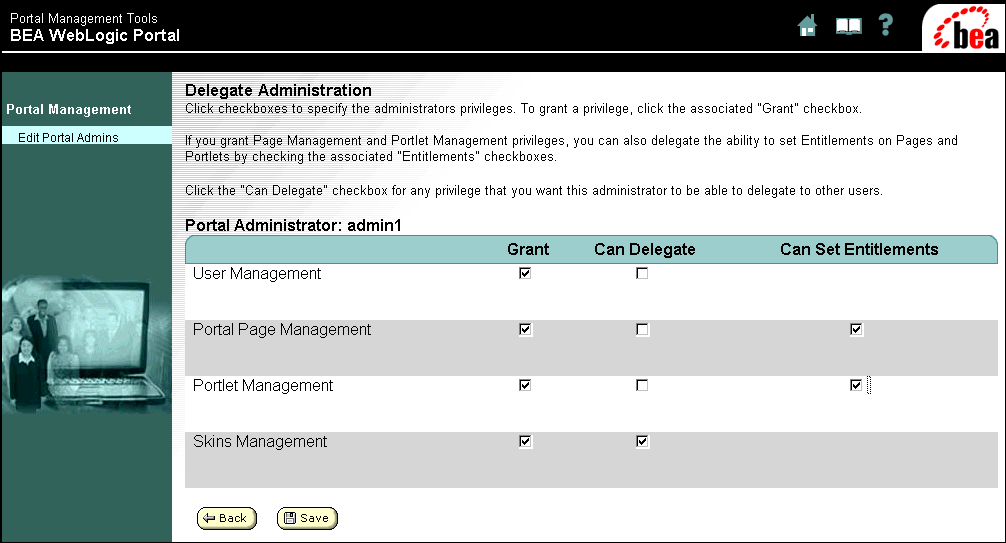


  7. Determine what administration permissions the PA will have. Checking each box allows the new PA to perform that function on any group portal within the associated portal Web application.

    1. User Management:

      Grant: The new PA can create, add, remove, delete, and edit the properties of visitors.

      Can delegate: The PA can choose to assign or remove user management authority of other PAs or GAs associated with this portal application.

    2. Portal Page Management:

      Grant: The PA can perform portal page administration. Portal page administration is discussed in detail in Creating a New Group Portal.

      Can delegate: The PA can choose to give or remove portal page management authority of other PAs or GAs associated with this portal application.

      Can set entitlements: PAs can control visitor portal page capabilities by associating entitlement segments with portal pages. For more information about entitlements, see the "Overview of Portal Administration" chapter of this guide.

    3. Portlet Management:

      Grant: PA can perform portlet administration. For information about managing portlets, see Setting Portlet Attributes.

      Can delegate: The PA can choose to give or remove portal management authority of other PAs or GAs associated with this portal application.

      Can set entitlements: PA can control visitor group capabilities by associating entitlement segments with portlets. For more information about entitlements, see the "Overview of Portal Administration" chapter of this guide.

    4. Skins Management:

      Grant: PA can perform skins management. Skins management is discussed in detail in Selecting Skins.

      Can delegate: The PA can choose to give or remove skins management authority of other PAs or GAs associated with this portal application.

Creating Group Administrators

Group Administrators (GAs) are users in the AdminEligible group who are given limited administrative authority for specific group portals. A GA can have management authority in multiple group portals. This section explains how to give an AdminEligible user authority in an existing group portal. To create a new group portal, see Creating a New Group Portal.

For a user to be a GA, they must first be placed in the AdminEligible group by an SA. See Creating AdminEligible Members.

Use the following procedure to create GAs:

  1. Click the Portal Management icon in the Portal Administrator Home page. The Portal Management Home page appears.

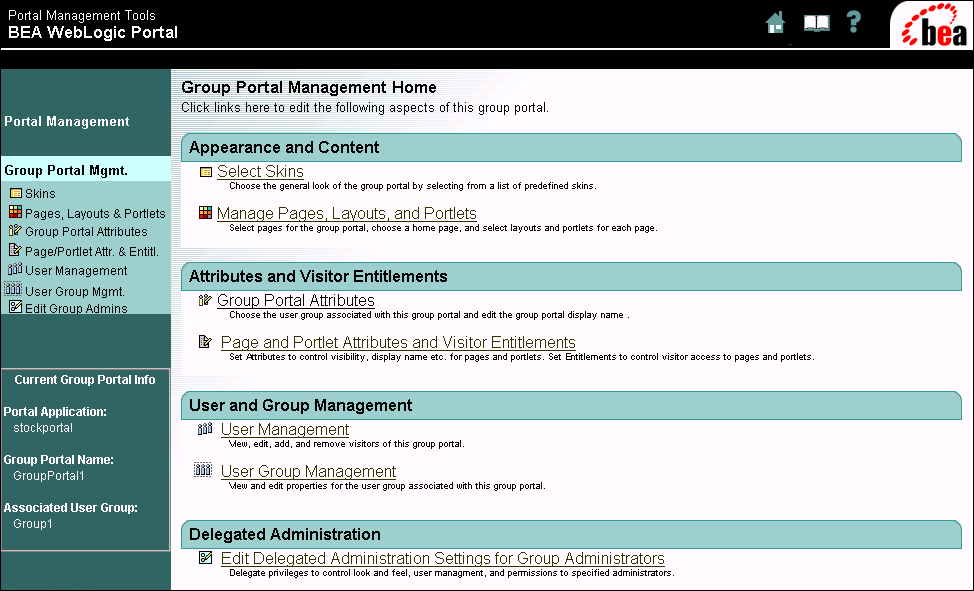
  2. Click the group portal for which you wish to add a GA. The Group Portal Management Home page appears (Figure 4-11).

    Figure 4-11 Group Portal Management Home page


  3. Click "Edit Delegated Administration Settings for Group Administrators". The Edit Group Administrators page appears (Figure 4-12).

    Figure 4-12 Edit Group Administrators page


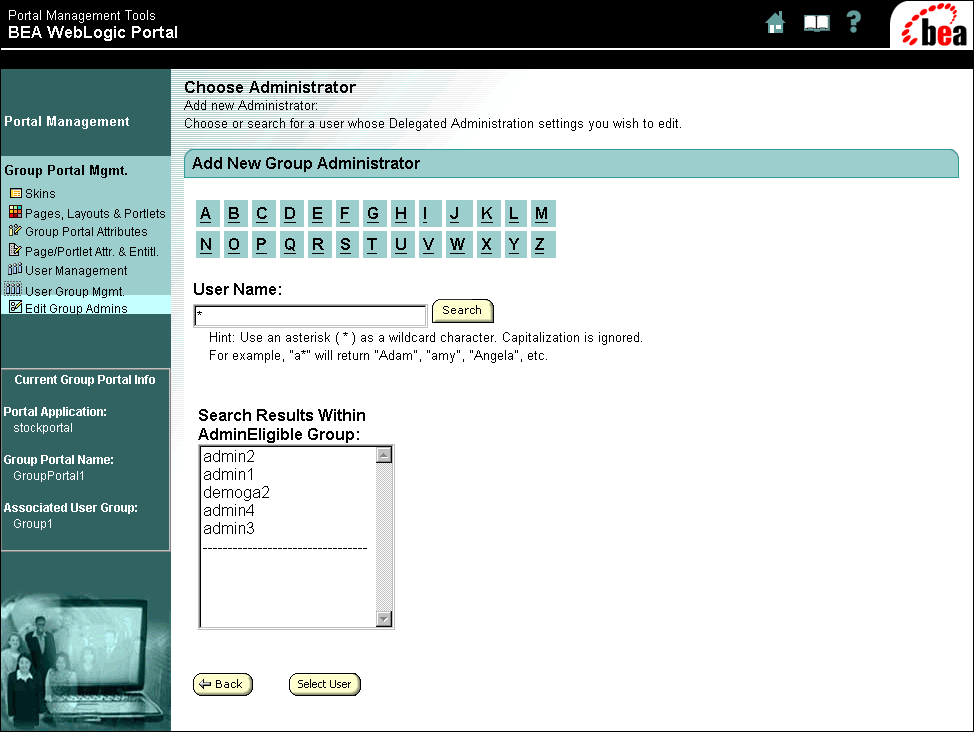
  4. Click Create New Administrator. The Choose Administrator page appears (Figure 4-13).

    Figure 4-13 Choose Administrator page


  5. Search for the user you want to add to the group.

  6. Highlight the desired user and click Select User.

  7. The Delegate Administration page appears (Figure 4-14).

  8. In the Delegate Administration page, determine what authority the GA will have. Checking each button allows the new GA to perform that function for this group portal only. See step 7. in Editing Delegated Administration Properties for Group Administrators for more information.

Editing Delegated Administration Properties for Group Administrators

Once a Group Administrator exists, you can modify their Administration authority via the WebLogic Portal Administration Tools.

  1. Click the Portal Management icon in the Portal Administrator Home page. The Portal Management Home page appears.

  2. Click the group portal for which you wish to add a GA. The Group Portal Home page appears (Figure 4-14).

    Figure 4-14 Group Portal Management Home page


  3. Click "Edit Delegated Administration Settings for Group Administrators". The Choose Administrators page appears (Figure 4-15).

    Figure 4-15 Choose Administrators page
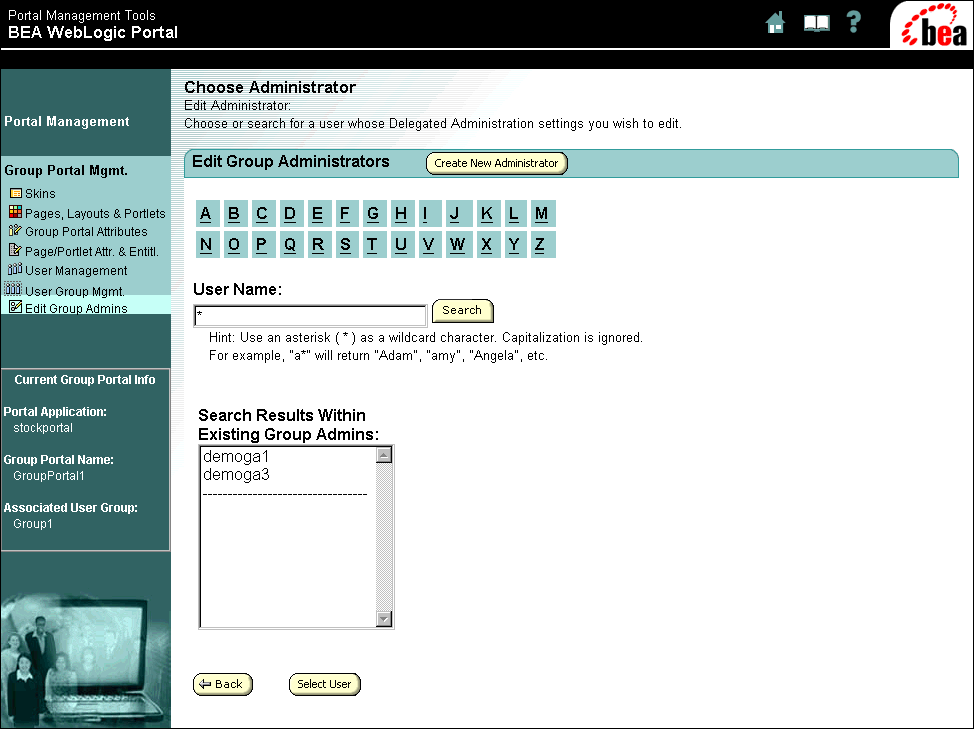


  4. You can search for the Group Administrator for whom you want to modify administrative privileges and select from the Existing Group Administrators list.

  5. Select the desired user and click the Select User button.

  6. The Delegate Administration page appears (Figure 4-16).

Figure 4-16 Delegate Administration page


  1. Determine what administration permissions the GA will have. Checking each box allows the new GA to perform that function in the within the associated group portal. See Creating Group Administrators for information about creating a GA associated with a specific group portal.

    1. User Management:

      Grant: The new GA can create, add, remove, delete, and edit the properties of visitors.

      Can delegate: The GA can choose to assign or remove user management authority of other GAs associated with this portal application.

    2. Portal Page Management:

      Grant: The GA can perform portal page administration. Portal page administration is discussed in detail in Creating a New Group Portal.

      Can delegate: The GA can choose to give or remove portal page management authority of other GAs associated with the associated group portal.

      Can set entitlements: GA can control visitor portal page capabilities by associating entitlement segments with portal pages. For more information about entitlements, see the "Overview of Portal Administration" chapter of this guide.

    3. Portlet Management:

      Grant: GA can perform portlet administration. For information about managing portlets, see Setting Portlet Attributes.

      Can delegate: GA can delegate portlet management to other GAs associated with this portal application.

      Can set entitlements: GA can control writer visitor portlet capabilities by associating entitlement segments with portlets. For more information about entitlements, see the "Overview of Portal Administration" chapter of this guide.

    4. Skins Management:

      Grant: GA can perform skins management. Skins management is discussed in detail in Selecting Skins.

      Can delegate: GA can delegate skins management authority to other GAs associated with this portal application.

  2. Click Save when you are finished.

Managing Existing Users

You can use the WebLogic Portal Administration Tools to manage existing users and groups associated with a portal.

  1. Click The Portal Management icon in the home page. The Group Portal page appears.

  2. Click on the Group Portal you wish to edit in the Portal Management Home page, the Portal Management Home page appears.

  3. In the User and Group Management section, click User Management. The Edit Users in Group page displays a list of users for the selected group (Figure 4-17).

    Figure 4-17 Edit Users in Group page


    1. To remove a user from the group, select the desired user and click the Remove User From Group button. The user will be removed from the group and will no longer be displayed in the list.

    2. To delete the user from the system, select the desired user and click the Delete button. The user is deleted from the system and is removed from the display list.

    3. To create new users, click Create New Users and see Creating Users for more information.

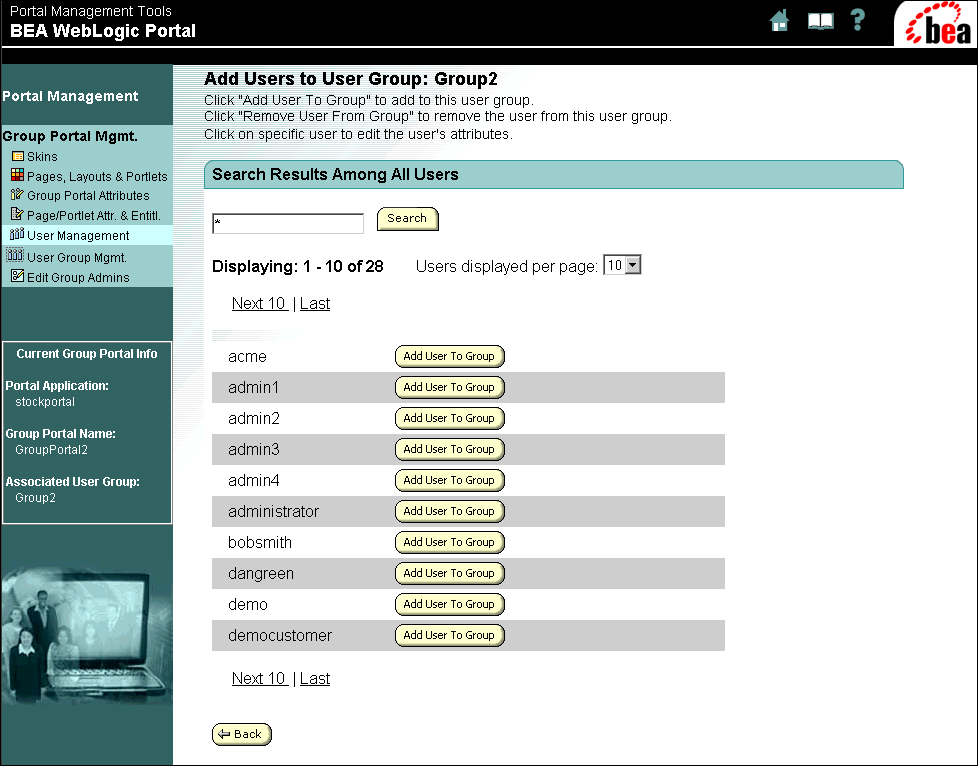
    4. To add users to the group, click Add Users to the Group; The Add users to Group page displays a list of available users (Figure 4-18).

      Figure 4-18 Add Users to Group page


    5. Select the user you want to add to the group and click the Add User to Group button.

  4. Click Back to return to the Edit Users in Group page.

  5. Click Back in the Edit Users in Group page when you are finished.

Managing Existing User Groups

  1. Click The Portal Management icon in the home page. The Group Portal page appears.

  2. Click on the Group Portal you wish to edit, the Portal Management Home page appears.

  3. In the User and Group Management section, click User Group Management. The Edit User Group page displays a list of attributes for the selected user group (Figure 4-19).

    Figure 4-19 Edit User Group page


  4. Select the desired property set for the selected group portal, then edit any of the following information:

    Developer: Check true if this property set requires that members be developers

    Preferred language: Indicate the preferred coding language if the members are developers

    Skill Level: Indicate a skill level if the member is a developer
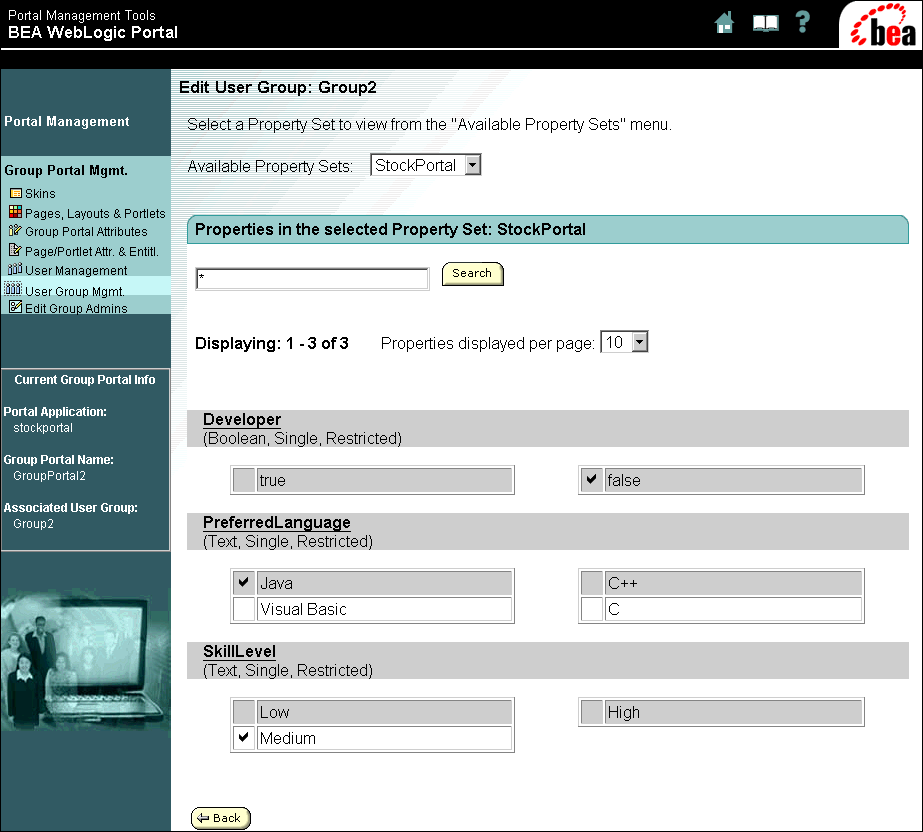
  5. Click Back when you are finished.


Portal Management

Although portals, pages and portlets are defined in the E-Business Control Center, you can modify certain runtime attributes using the WebLogic Portal Administration Tools.

Creating a New Group Portal

SAs and PAs can use the WebLogic Portal Administration Tools to create a new group portal within a portal application.

  1. Click The Portal Management icon in the home page. The Portal Management Home page appears (Figure 4-20).

    Figure 4-20 Portal Management Home page


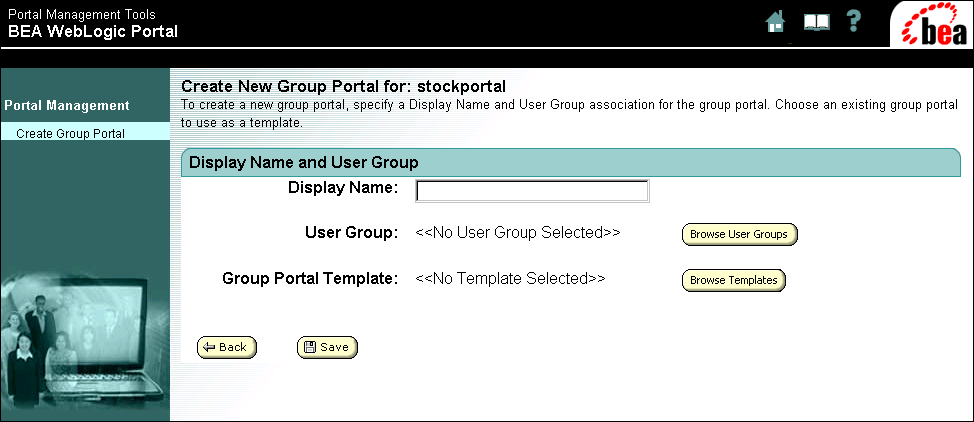
  2. Click "Create a New Group Portal" in the Portal Management Home page. The New Group Portal page appears (Figure 4-21).

    Figure 4-21 New Group Portal page


  3. Enter a Display name for the group portal.

  4. Select a user group to associate with this group portal.

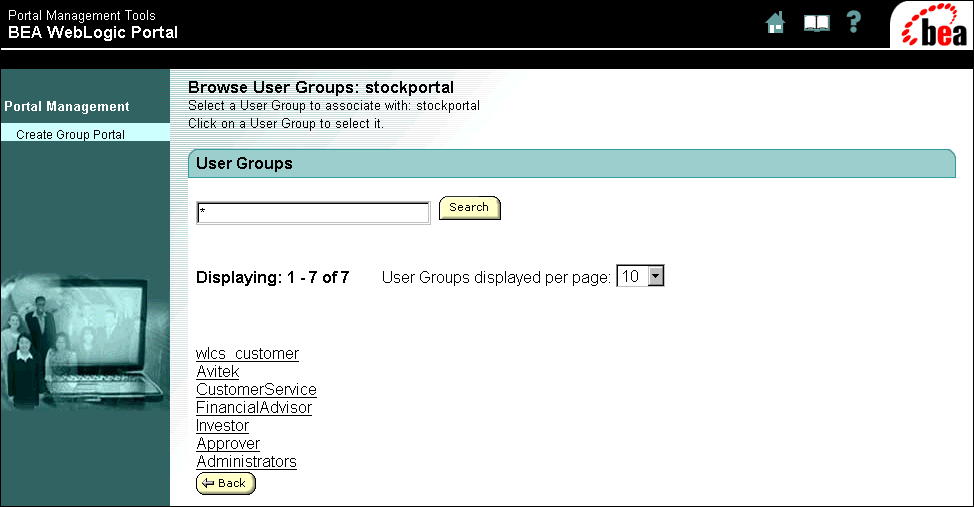
    1. Click Browse Groups; The Browse User Groups page appears (Figure 4-22).

      Figure 4-22 Browse User Groups page


    2. Click on a user group from those available for the portal. The Create New Group Portal page displays the chosen User group.

  5. Select a template for the new group portal.

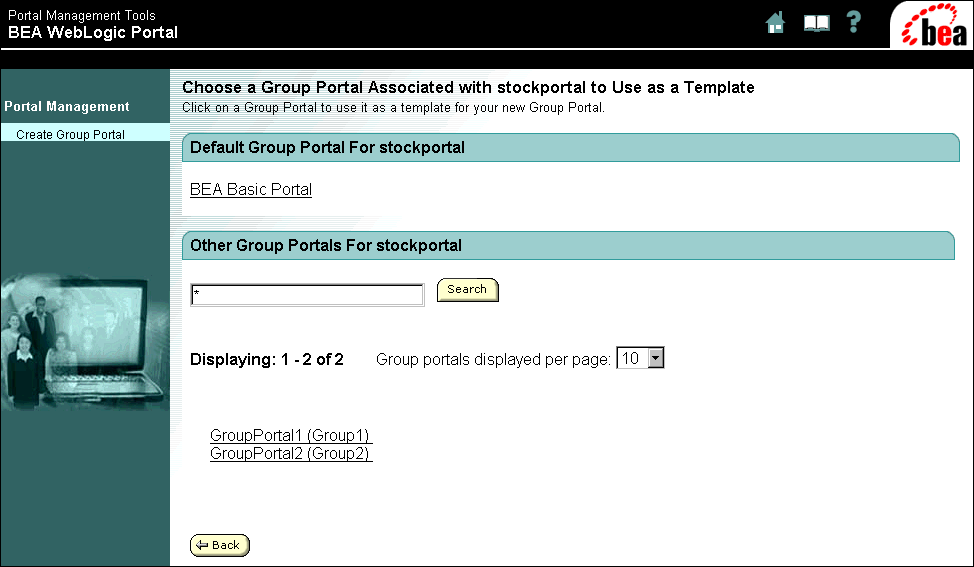
    1. Click Browse Templates; A list of existing group portals is listed in the Choose Group Portal page (Figure 4-23).

      Figure 4-23 Choose Group Portal page


    2. Click on the group portal you would like to use as a template. The Create New Group Portal page displays the selected template.

  6. In the Create New Group Portal page, determine the following information:

    1. Copy Entitlements: You can copy existing entitlements from the template group portal and keep them as is and/or edit them later. You can also choose not to copy the existing entitlements and create new entitlements. The procedure for creating new entitlements is described in greater detail later in this document: Setting Page Entitlements and Setting Portlet Attributes.

    2. Copy Group Administrators: When you copy GAs, the same GAs will have the same authority in this group portal as those in the template group portal you have selected. If you choose not to copy the GAs you can assign your own. If you choose to copy the existing GAs you can add to or remove them later. To add GAs, see Creating Group Administrators.

Modifying the Appearance and Content of Existing Portals

Portals are defined using the E-Business Control Center. You can use the WebLogic Portal Administration Tools to change the content and appearance of group portals, portal pages, and portlets. For more information about defining portals and portlets, see the "Using the E-Business Control Center" chapter in this document.

Selecting Skins

  1. Click The Portal Management icon in the home page. The Group Portal page appears.

  2. Click on the Group Portal you wish to edit in the Portal Management Home page, the Portal Management Home page appears.

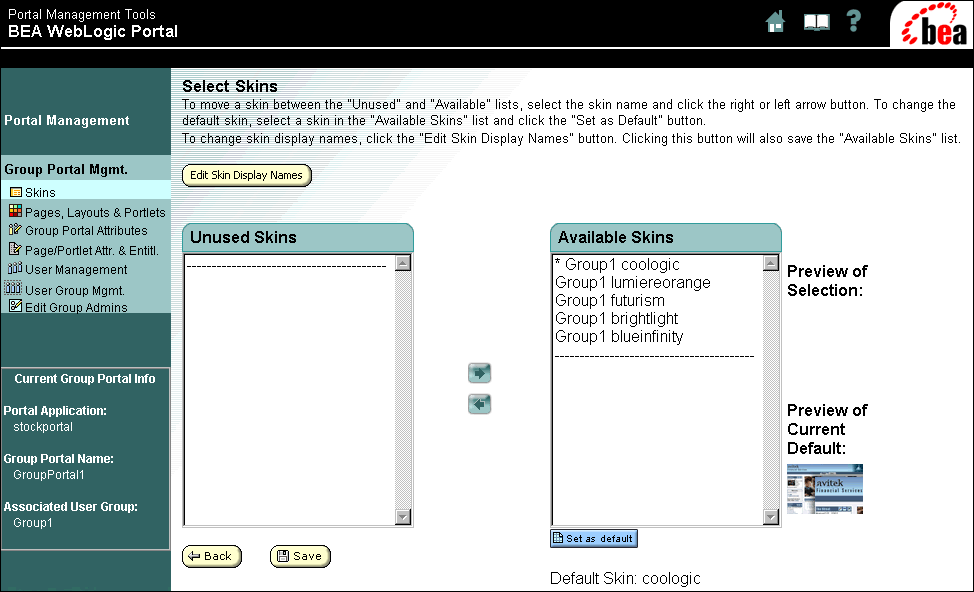
  3. Under Appearance and Content section, click Select Skins. The Select Skins page displays a list of unused and available skins (Figure 4-24). The default skin is indicated by an asterisk (*).

    Figure 4-24 Select Skins page


  4. To view a thumbnail of a skin, highlight the desired skin. A thumbnail of that skin will appear under the Preview Skin heading.

  5. To set a new default, highlight the desired skin and click Set as Default; The new default skin is marked with an asterisk (*).

  6. You can move skins between the Available and Unused lists by selecting the skin and clicking the left and right arrows. Making a skin available means that visitors can select that skin when personalizing their portal.

  7. Click Save when you are done.

Selecting and Ordering Pages:

  1. Click The Portal Management icon in the home page. The Portal Management Home page appears.

  2. Click on the Group Portal you wish to edit. The Group Portal Management home page appears.

  3. In the Group Portal Management Home page, click Manage Portlets, Pages and Layouts. The Pages, Layouts, and Portlets page appears (Figure 4-25).

    Figure 4-25 Pages, Layouts, and Portlets page


    1. Click the Select and Order Pages link. The Select and Order Pages page displays a list of available and unused pages (Figure 4-26). The Home (default) page is indicated by an asterisk (*).

      Figure 4-26 Select and Order Pages page
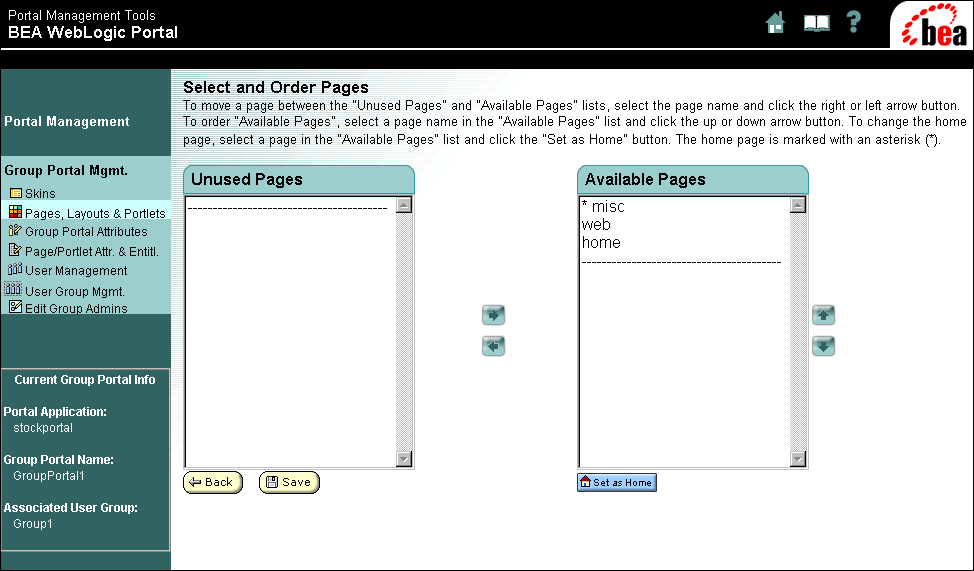


    2. To reset the Home page, highlight the desired page and click Set as Home; The new default page is indicated by an asterisk (*).

    3. You can move pages between the Available Pages and Unused Pages lists by selecting the page name and clicking the Left and Right arrows. Making a page available means that visitors may choose to display the page as a tab when personalizing their portal.

    4. You can reorder pages by selecting the desired page in the Available Pages list and using the Up and Down arrows. This determines the order in which the page tabs will be displayed.

    5. Click Save when you are finished.

Setting Page Attributes

  1. Click the Portal Management icon in the home page. The Portal Management Home page appears.

  2. Click on the Group Portal you wish to edit. The Group Portal Management home page appears.

  3. In the Group Portal Management Home page, click "Manage Portlets, Pages and Layouts". The Pages, Layouts, and Portlets page appears (Figure 4-27).

    Figure 4-27 Pages, Layouts, and Portlets page


    1. In the Pages, Layouts and Portlets page, click "Set Entitlements and Attributes" link. The Set Entitlements and Attributes page appears (Figure 4-28).

      Figure 4-28 Set Entitlements and Attributes page


    2. Select the page for which you wish to set the attributes and click Set Attributes. The Set Page Attributes page appears (Figure 4-29).

      Figure 4-29 Set Page Attributes page

      \
       

    3. You can modify the following:

      Available: The page will be available to the visitor.

      Visible: The page should be visible to the visitor default.

      Mandatory: The visitor will always see this page. That is, they cannot remove it from their personalized portal.

      Display Name: The display name for the page, this is the name that site visitors will see.
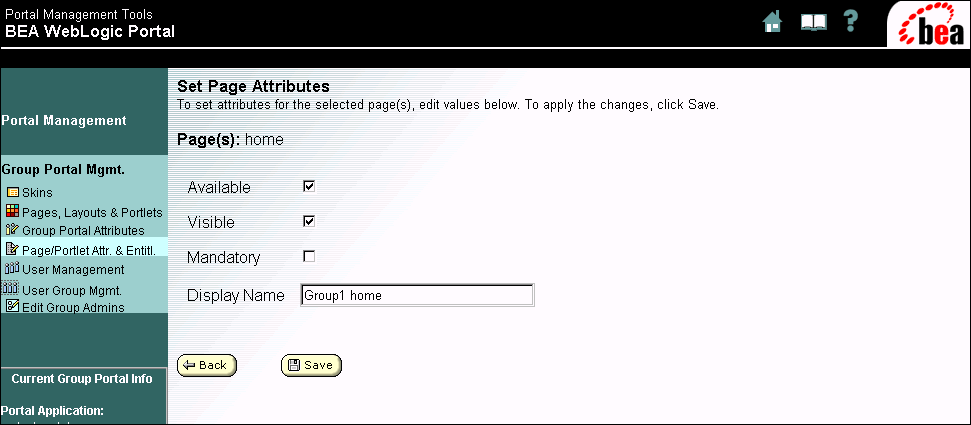
    4. Click Save when you are finished.

Setting Page Entitlements

  1. Click the Portal Management icon in the home page. The Portal Management Home page appears.

  2. Click on the Group Portal you wish to edit. The Group Portal Management home page appears.

  3. In the Group Portal Management Home page, click "Manage Portlets, Pages and Layouts". The Pages, Layouts, and Portlets page appears (Figure 4-30).

    Figure 4-30 Pages, Layouts, and Portlets page


  4. In the Pages, Layouts and Portlets page, click "Set Entitlements and Attributes" link. The Set Entitlements and Attributes page appears.

  5. Select the page for which you wish to set the entitlements and click the Set Entitlements button. The Set Page Entitlements page appears (Figure 4-31).

    Figure 4-31 Set Page Entitlements page


    1. Can See: Check the radio buttons to grant or deny availability of this page to the entitlement segment members.

    2. Can Remove: Check the radio buttons to grant or deny the entitlement segment members the ability to remove the portal page from their view.

      Note: The entitlement segment "Everyone" represents every user in the system.

  6. Click Save when you are finished.

Setting Portlet Attributes

  1. Click the Portal Management icon in the home page. The Portal Management Home page appears.

  2. Click on the Group Portal you wish to edit. The Group Portal Management home page appears.

  3. In the Group Portal Management Home page, click Manage Portlets, Pages and Layouts. The Pages, Layouts, and Portlets page appears (Figure 4-32).

    Figure 4-32 Pages, Layouts, and Portlets page


  4. In the Pages, Layouts and Portlets page, click Set Entitlements and Attributes link. The Set Entitlements and Attributes page appears (Figure 4-33).

    Figure 4-33 Set Entitlements and Attributes page
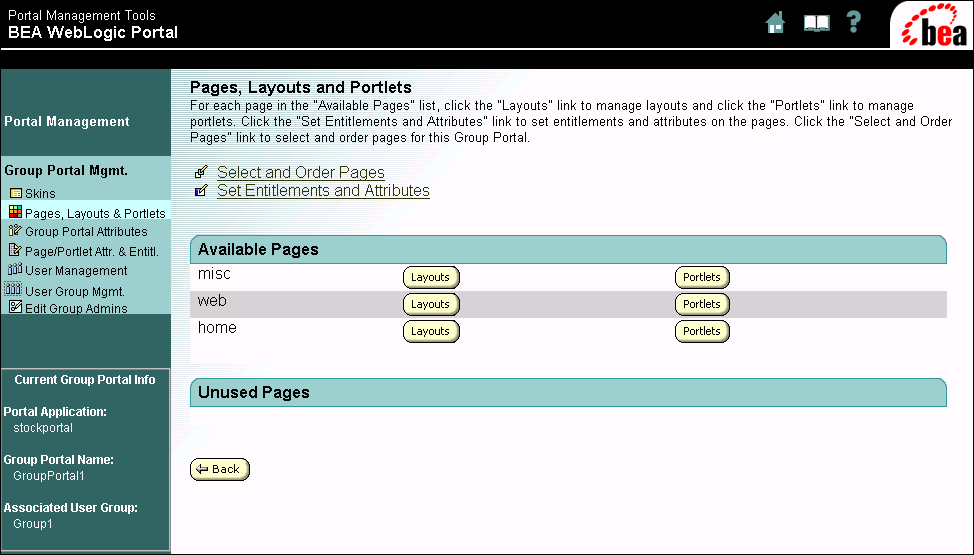


  5. Select the page for which you wish to set the portlet attributes and click Portlets for Selected Page: Set Entitlements and Attributes. The Set Entitlements and Attributes for Portlets page appears (Figure 4-34).
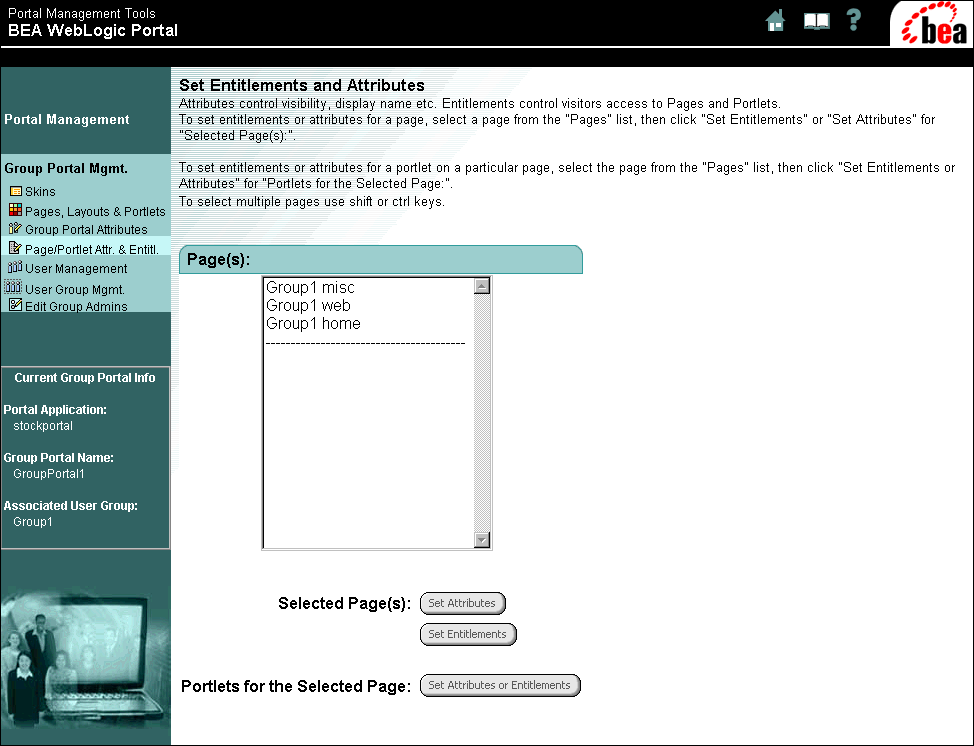
    Figure 4-34 Set Entitlements and Attributes for Portlets page


  6. Select the portlet you wish to edit and click Set Attributes. The Set Portlet Attributes page appears (Figure 4-35).

    Figure 4-35 Set Portlet Attributes page
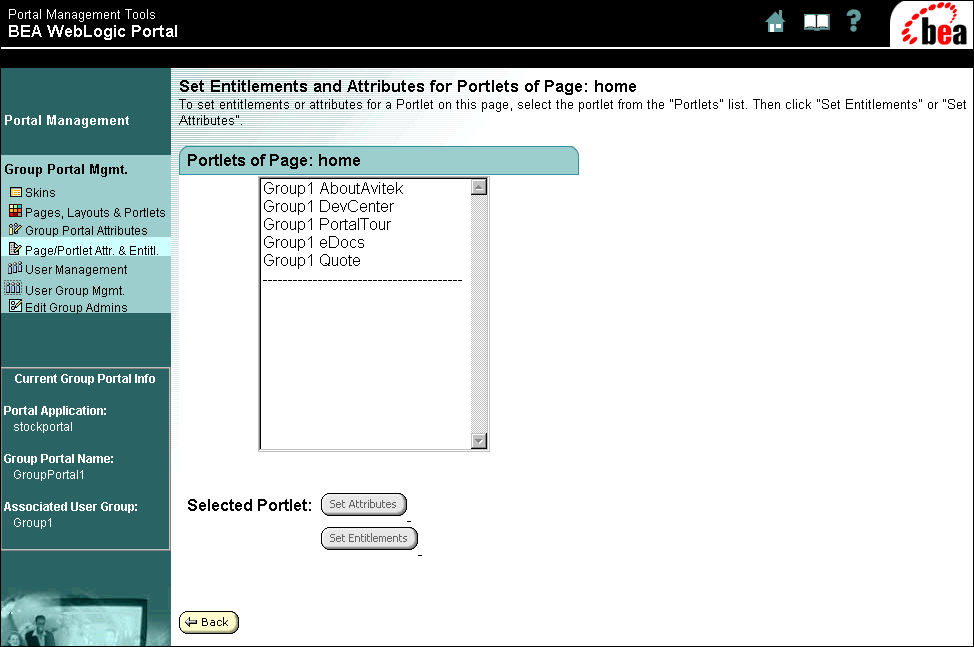
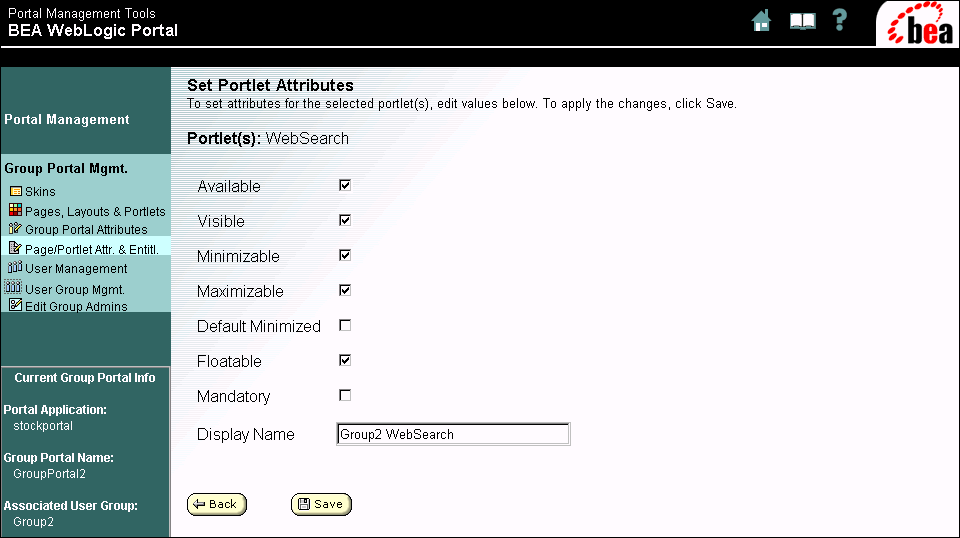


  7. You can set any of the following attributes:

    1. Available: The portlet will be available to the visitor.

    2. Visible: The portlet should be visible to the visitor default.

    3. Minimizable: The portlet can be minimized by the visitor.

    4. Maximizable: The portlet can be maximized by the visitor.

    5. Default Minimized: The portlet is minimized in the visitor default.

    6. Floatable: The portlet can be opened in a new browser.

    7. Mandatory: The visitor will always see this page. That is, they cannot remove it from their personalized portal.

    8. Display Name: The display name for the page, this is the name that site visitors will see.

  8. Click Save when you are done.

Setting Portlet Entitlements

  1. Click the Portal Management icon in the home page. The Portal Management Home page appears.

  2. Click on the Group Portal you wish to edit. The Group Portal Management home page appears.

  3. In the Group Portal Management Home page, click Manage Portlets, Pages and Layouts. The Pages, Layouts, and Portlets page appears (Figure 4-36).

    Figure 4-36 Pages, Layouts, and Portlets page


  4. In the Pages, Layouts and Portlets page, click Set Entitlements and Attributes. The Set Entitlements and Attributes page appears (Figure 4-37).

    Figure 4-37 Set Entitlements and Attributes page


  5. Select the page for which you wish to set the portlet entitlements and click Portlets for Selected Page: Set Entitlements and Attributes. The Set Entitlements and Attributes for Portlets page appears (Figure 4-38).

    Figure 4-38 Set Entitlements and Attributes for Portlets page


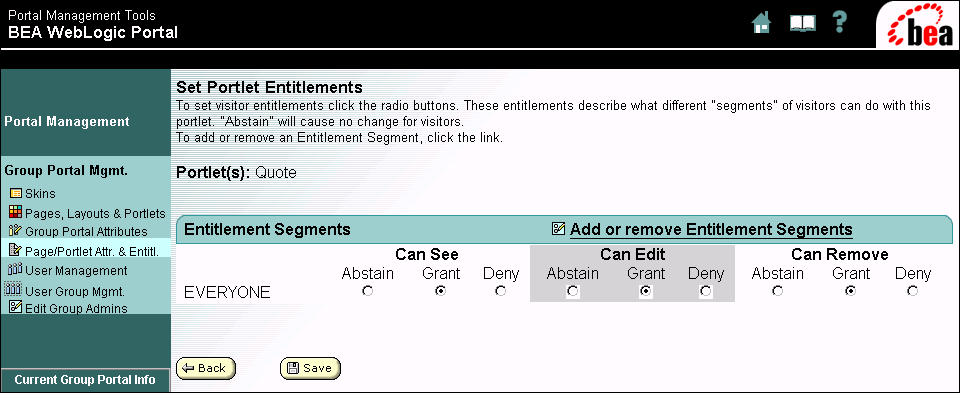
  6. Select the portlet you wish to edit and click Set Entitlements. The Set Portal Entitlements page appears (Figure 4-39).

    Figure 4-39 Set Portlet Entitlements


  7. You can set any of the following attributes:

    1. Can See: Check the radio buttons to grant or deny availability of the portlet to the entitlement segment member.

    2. Can Edit: Check the radio buttons to grant or deny the entitlement segment members the ability to edit the portlet.

    3. Can Remove: Check the radio buttons to grant or deny the entitlement segment members the ability to remove the portlet from their view.

      Note: The entitlement segment "Everyone" represents every user in the system.

  8. Click Save when you are done.


back to top previous page next page