


|

|
|
|
|
Overview of Portal Administration
Managing WebLogic Portal effectively requires an understanding of J2EE security concepts as well as a grasp of security features unique to the WebLogic Portal platform. Portal administration requires the ability to manage access on a many-to-many basis. In other words, access to many different groupings of resources must be provided to many different groupings of users. For this reason, the WebLogic Portal platform goes beyond the J2EE security standard as currently written, and also encompasses existing WebLogic Server security schemes.
This topic provides additional detail about the three levels of administration that WebLogic Portal supports, and includes information about how the access granted to these administrator users is scoped. Additionally, this topic includes information about how administrative users are managed, and how administration tasks may be delegated. Finally, some information about visitor entitlements for WebLogic Portal is provided.
Using the information in this topic, a System Administrator should be able to understand the basic tasks required to make portals available to developers, other administrators and ultimately to site visitors.
This topic includes the following sections:
Portal Administration Concepts
This section explains the following key aspects of administrating the WebLogic Portal platform:
Scoping Portal Resources and Services
Administrating portal Web applications means managing relationships among Web application-scoped objects such as users, user groups, portlets, skins, and layouts. But the Portal Platform also exposes enterprise-scoped elements such as Campaign and Commerce services.
Figure 2-1 shows two portal Web applications within a single enterprise application. Two group portals reside within each of these portal Web applications. In this illustration, group portal A and group portal B can share Webflows, portlets, skins, and layouts. To use the same Webflows, portlets, skins or layouts in portal Web applications #1 and #2, however, you would need to make copies of all the files used to support those resources—meaning the J2EE files and the metadata files maintained by the E-Business Control Center. Campaign and Commerce services, however, are enterprise-scoped, and thus can be accessed from any portal Web application within the enterprise application.
Figure 2-1 Application and Enterprise Scoping
Note: The relationship between enterprise applications, portal Web applications and group portals is introduced in Relationships Among Applications and Portals. Understanding the Administrator Hierarchy The "Development Roles" section of the Strategies for Developing E-Business Web Sites documentation explains most of the significant constituents in the WebLogic Portal workflow. A few are specific to the WebLogic Portal Administration Tools, and pertain specifically to the management of portal resources and visitor access to those resources. Three Levels of Administrator Permissions The WebLogic Portal platform recognizes three basic subdivisions of Administrators: the System Administrator (Portal SA), Portal Administrator (Portal PA), and Group Administrator (Portal GA). Individual Portal PAs and Portal GAs can be assigned fine-grained privileges, enabling the creation of a very complex administrator hierarchy customized to fit very specific security models. It is important to note the distinction between these Portal Administrators and system, the default account used to control the WebLogic Server Administration Console. The Portal SAs, PAs and GAs use the browser-based WebLogic Portal Administration Tools, whereas system is the sole member of a special, unchangeable user group called Administrator used to start and stop WebLogic Server. Note: For instructions on creating, editing, and deleting SA, PA, and GA users, see Portal Administration Tools. SA- System Administrators Out of the box, WebLogic Portal includes a Portal SA user called administrator, which has unlimited access to administrative tasks anywhere within the enterprise portal application. When a Portal SA logs into portalTools Web application, (by navigating to http://<hostname>:<port>/portalTools/index.jsp), the WebLogic Portal Administration Tools page appears, as shown Figure 2-2. Figure 2-2 WebLogic Portal Administration Tools home page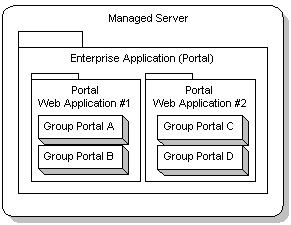
Within the WebLogic Portal, the System Administrator (Portal SA) may perform any of the following administrative actions: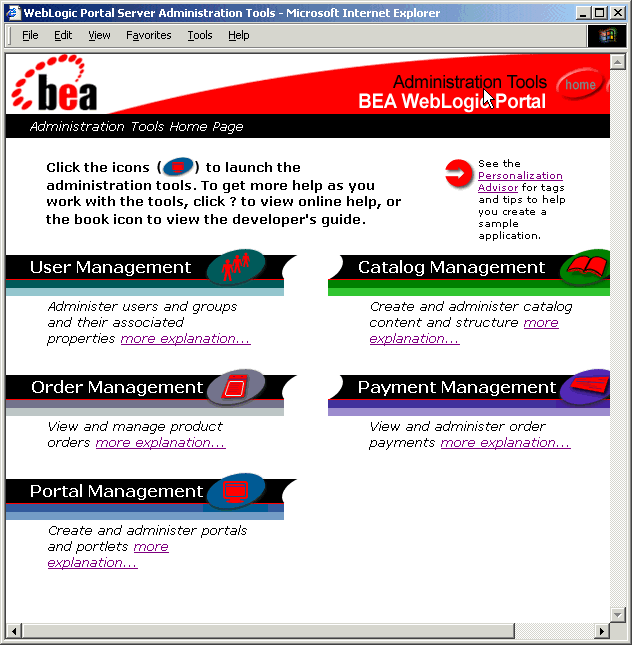
Because the Portal SA has access to all possible administrative tasks available within the WebLogic Portal Administration Tools, it is recommended that you observe the following guidelines:
PA - Portal Administrators
Out of the box, WebLogic Portal includes a pair of test users called demopa1 and demopa2. These users have access to administrative tasks on a portal-wide basis, and as such, they can be be granted administrative priveleges to any group portal within the portal Web application.
When a Portal PA logs into portalTools Web application, (by navigating to http://<hostname>:<port>/portalTools/index.jsp), the WebLogic Portal Management home page appears, as shown in Figure 2-3.
Figure 2-3 WebLogic Portal Management Home page
Within one or more portal Web applications, the Portal Administrator (PA) may be granted the ability to perform any of the following administrative actions: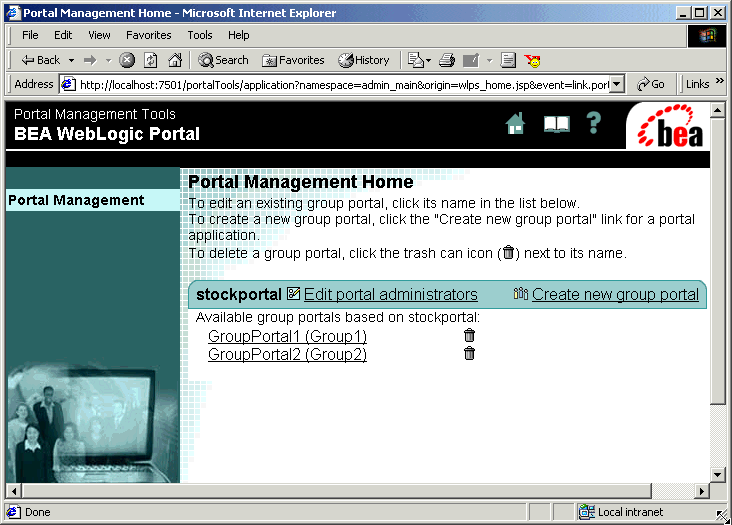
GA - Group Administrators
Out of the box, WebLogic Portal includes a test users called demoga1, demoga2 and demoga3. These users have access to administrative tasks at the group portal level. These users can be granted administrative priveleges to any group portal within the portal Web application. Also, Portal GAs can be promoted by Portal SA or Portal PA users.
When a Portal GA logs into portalTools Web application, (by navigating to http://<hostname>:<port>/portalTools/index.jsp), the WebLogic Group Portal Management home page appears, as shown in Figure 2-4.
Figure 2-4 WebLogic Group Portal Management Home page
Note: Portal GAs may manage more than one group portal. In that case, the the page shown in Figure 2-4 would include the name of another group portal. Within one or more group portals, the Portal Administrator (Portal PA) may be granted the ability to perform any of the following administrative actions: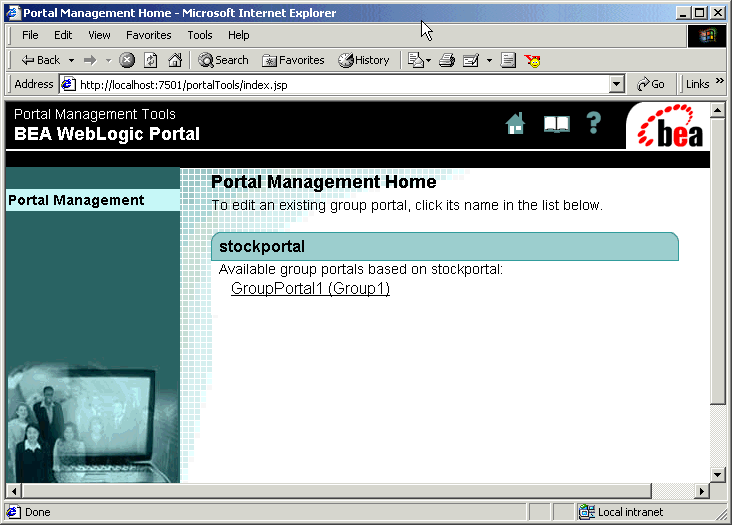
Application Assembler/Deployer
Though not given a specific role within the administrative workflow of WebLogic Portal, the Application Assembler/Deployer is distinct in that it is most closely associated with the use of the Portal Module of the E-Business Control Center.
The Application Deployer/Assembler is the user who performs the synchronize task using the E-Business Control Center, which requires Portal SA privileges. (In other words, the Application Deployer/Assembler must be a member of the SystemAdministrator user group.)
How Users are Managed
The User Management home page allows Portal SA users to add or remove specific users from pre-defined user groups. After the user belongs to the appropriate user group, a mechanism called Delegated Administration is used to bestow specific privileges upon a single user.
Note: For information on Delegated Administration, consult the section called Delegated Administration.
User Groups
Membership in WebLogic Portal user groups are used to grant privileges to the user as follows.
Administration Considerations Specific to Portal
A few important deployment concepts should be understood before specific administration tasks are introduced.
Life Cycle of a Portal Application
Table 2-1 lists the various tasks in the cycle of developing, deploying and managing a portal Web application.
Which Tool for Which Task?
Throughout the life cycle of a portal application, different tools are used to complete different steps. Table 2-2 shows the tools used for each of the tasks commonly performed throughout the life cycle of a portal application.
Portal Metadata Versus Application Files
Before a Business Analyst can begin to define a new portal Web application using the E-Business Control Center, the J2EE application files must have been migrated by a J2EE Developer.
Additionally, when the Business Analyst has finished defining, troubleshooting and validating the new application, the Application Assembler/Deployer can take over and perform the deployment of the metadata. The metadata created by the E-Business Control Center is saved in XML files, and is deployed to the WebLogic Portal server.
Figure 2-5 Using the EBCC to Deploy Portal Metadata
Two important points arise from this fact: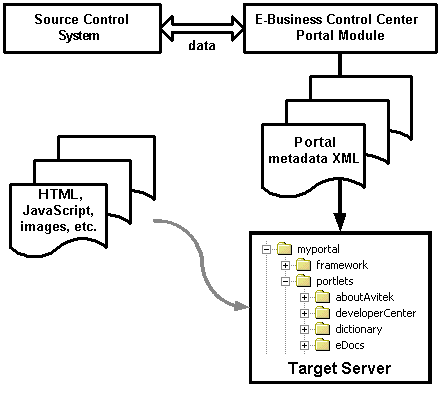
Procedures for configuring and synchronizing your E-Business Control Center are addressed in detail in the Deployment Guide.
Verifying Your Synchronization
To view what applications the target server is able to see, open the data repository browser by entering this URL into your Web browser:
http://localhost:<port>/portalDataSync/index.html
This tool, shown in Figure 2-6, allows you to troubleshoot applications that seem to be deployed but do not show up on the server, for instance.
Figure 2-6 The Data Repository Browser
From this browser, you can view information on the deployment descriptor for your portal Web application. Note: For a detailed description of deployment descriptors in the WebLogic Portal platform, consult the Security Guide. Delegated Administration Delegated administration means assigning specific administrative privileges to individual administrators within a specified domain. In WebLogic Portal, these privileges can be assigned by one user as long as that user has more permissions than the assignee. To manage the content of your portal applications at a centralized corporate office while delegating localization and design to regional offices, an elegant solution would be to create some administrative user accounts and then assign different sets of permissions to each user, based on the tasks you needed to hand out. WebLogic Portal now includes advanced delegated administration functionality to enable the creation of administrator roles with fine-grained administrative privileges. Note: For details on the database objects used to manage these privileges, consult The RESOURCE_GROUP_ADMIN Database Table section in Portal Management Database Schema. Scoping Privileges To revisit the administration model used by WebLogic Portal, the J2EE application scoping is also the basis for the three basic levels of administrator: System Administrator (SA), Portal Administrator (PA), and Group Administrator (GA). The scope of each of these roles can be explained in terms of the application scoping shown in Figure 2-7. Figure 2-7 Scoping of Administrators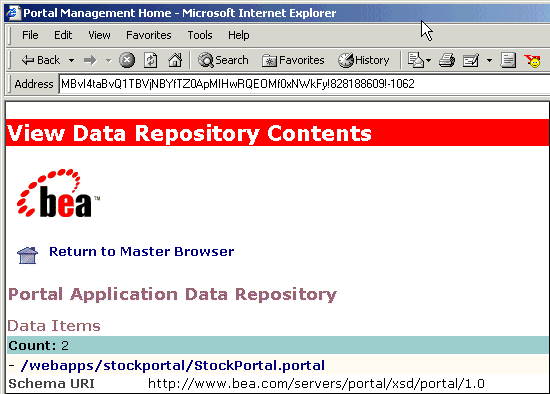
Visitor Entitlements
Visitor entitlements are created by associating existing entitlement segments with portal resources. The entitlement segments are created in the E-Business Control Center, and are explained in detail in the Guide to Using the E-Business Control Center documentation. The process of associating entitlement segments with portal resources is explained in Portal Administration Tools.
Rule-Based Entitlements Versus Rule-Based Personalization
WebLogic Portal enables rule-based personalization. Generally, with rule-based personalization, a rules engine is used to dynamically determine whether a user is part of a segment based on profile attributes, request or session attributes, or a time element. Based on this decision, specific content may be shown to the user. A developer uses JSP tags provided with WebLogic Portal, such as a placeholder or the content selector tag, to specify where on the site the personalized content should be displayed.
On the other hand, rule-based entitlements represent a specific usage of rule-based personalization at the system level. Entitlements are applied to specific portal resources: portlets and portal pages, rather than arbitrary content and areas on the site. The entitlements are controlled completely from administration tools, and no HTML/JSP developer involvement is required.
In addition, rule-based entitlements are typically used to control access to portal content, whereas rule-based personalization is used to serve targeted content. Inevitably, there will be scenarios where the line between rule-based entitlements and rule-based personalization will be blurred. For example, rule-based entitlements may be used to show a portal page with recommended content to a segment of users.
Both rule-based personalization and rule-based entitlements rely on the same set of infrastructure components—the BEA rules engine, the user profile, and property sets.
Portal Rendering
When an HTTP request for a portal arrives at an instance of WebLogic Portal, the request is sent to the PortalWebflowServlet, which inherits from the WebflowServlet. Figure 2-8 shows a high-level view of the objects used to respond to such a request. Based on the Webflow file defined for that portal, presentation nodes such as JSPs are invoked, providing the "wireframe" on which the portlets will be arranged.
Rendering Implementation
This rendering process involves determining what portlets go in what position on the page, what content objects the user is entitled to view, and what other application functionality should be exposed based on the group(s) to which this user belongs.
Figure 2-8 Portal High-Level Architecture
Note: In Figure 2-8, every object except for the Pipeline Executor and the Pipeline Components (see asterisk) are scoped to the Web application. This means that only the Pipeline Executor and Pipeline Components can be shared from one Web application to another within the same enterprise application. What Is Rendered First? The following factors are considered when a portal page is rendered: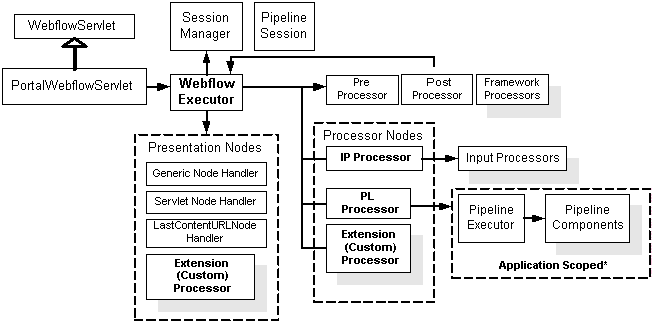
Default Rendering
Part of creating a portal using the E-Business Control Center involves selecting a layout, then setting the default placement of portlets on that layout. This setting is used when a given visitor requests that page, unless the visitor has overwritten these default settings by selecting and saving customization.
However, individual visitors can be entitled to see some portlets while being prohibited from seeing others. This poses a problem in deciding how to render a portal if the default settings are in conflict with those determined by visitor entitlements. What if, for instance, the default layout is three-column, and the center column contains a portlet to which visitor A does not have access? As previously explained, visitor A would view the portal with a huge gap running straight down the center of the page. Obviously, this is not the intended behavior.
The Auto Placer and "Homeless" Portlets
One aspect of the Portal Servlet involves efficient determination of the placement of portlets, especially when certain layout parameters are changed. It is possible for instance, for a portal visitor to modify the layout for a portal page such that some of the portlets become "homeless."
A portlet can become homeless for a number of reasons. If default portlets are arranged on a three-column layout, but then the visitor changes the layout to two columns without rearranging the portlets, those in the center column become "homeless." The next time that visitor goes to this page, whether within the same session or another, the auto placer mechanism responds to the presence of a homeless portlet. At this point, the auto placer's custom logic makes certain decisions about the placement of the portlets in the center column, usually meaning the portlets are redistributed more or less equally within the layout. These decisions are saved to the database and consulted each time that page is visited.
Note: The auto placer only runs if the layout for a page has changed since the page was last saved, and if this change causes portlets to become homeless.
For information on creating custom layouts and using the placeholder JSP tag, consult Create a Custom Layout, in Customizing Portals and Portlets.
Administrator Tasks
This section outlines the tasks required to administrate WebLogic Portal, and includes the following sections:
Note: The sample entities used within the steps in this section are listed in Table 2-3.
Create Users and Groups
Navigate to the following URL and login as Administrator/<password>
http://<hostname>:<port>/portalTools/index.jsp
For the remainder of this topic, use this credential.
Go to the User Management page in the WebLogic Portal Administration Tools and click Create on the Users tab.
All the users you have created are automatically placed in the default "everyone" group, and granted no administrative privileges. You can leave the Visitor users alone for now. The administrative users, however, must be added to groups in order for them to have any administrative capability.
Warning: From this point on, avoid the User Management home page when performing administrative actions that can be performed in the Portal Management or Group Portal Management home pages. This page should only be used when creating new System Administrators, user groups, or when moving users into the AdminEligible user group. Instead, go into the Portal Management home page and manage users at the portal or group portal level.
Place GAs and PAs in AdminEligible Group
Go to the Group Management page in the WebLogic Portal Administration Tools and place all PAs and GAs in the AdminEligible user group. At this point, these users still have no administrator privileges, but they can now be granted privileges, as shown in Scope Administrator Users: Group or Portal?
Create SA Users
Go to the Group Management page in the User Management Home page, place TestSA1 and TestSA2 in the SystemAdministrator user group.
Scope Administrator Users: Group or Portal?
Once they have been placed into the AdminEligible user group, users can be granted administrative privileges at one of two levels:
Note: GAs may belong to more than one group portal. Also, GAs may be promoted to PAs by clicking on Edit Portal Administrators from within the Portal Management Home page.
Create and Delegate PAs
To turn users (that is, users already associated with the AdminEligible user group,) into PAs, take the following steps:
Repeat this procedure for the user TestPA2, but this time when you repeat step 4, click Grant under Portal Page Management, Portlet Management, and Skins Management. Click Save.
Create Group Portals
From the Portal Management Home page, create new group portals from the user group and group portal template associations as shown in Table 2-4.
Note: Notice that each user group can only be associated with one group portal within a portal Web application.
Create and Delegate GAs
The users in the AdminEligible user group can now be associated with the group portals defined in Table 2-4.
Repeat this procedure for the user TestGA2, associating it with GroupPortalA, but this time when you repeat step 5, click Grant under Portal Page Management, Portlet Management, and Skins Management. Click Save.
Place Visitors in User Groups
The users in the everyone user group can now be associated with the user groups defined in Table 2-4. From the User Management Home page, search for the user group to which you want to add users from the Manage Groups page:
Rudimentary Portal Personalization
To understand content personalization in WebLogic Portal, consider the following simple example:
http://<server>:7501/stockportal/
This is based on the StockPortal property set.
Replicate Sample Users in LDAP Service
The WebLogic Portal platform can use LDAP authentication as part of the Unified User Profile, but in this situation, the LDAP service is always the system of record, meaning that WebLogic Portal does not write to the LDAP directory. Figure 2-9 shows the relationship between the Unified User Profile user scheme used by WebLogic Portal, along with its relationship with LDAP and other services.
Figure 2-9 LDAP and Unified User Profile Authentication
If you use LDAP for authentication and want to use the sample accounts provided by WebLogic Portal, you must set up the accounts and user groups in your LDAP server. It is not necessary to enter the account's first and last name fields. The required fields are the username and password. Note: For instructions on setting up LDAP services, consult the Guide to Registering Customers and Managing Customer Services.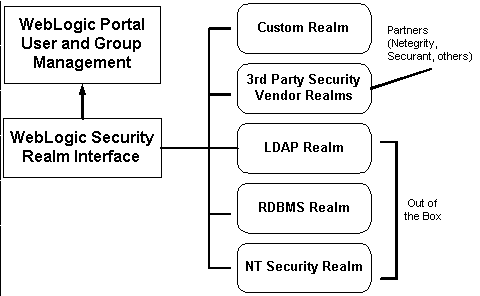
Table 2-5 Sample User Groups
Table 2-6 Sample User Accounts
You should now be able to work with the sample accounts installed with the product, even if your authentication system is LDAP.

|

|

|
|
|
|
Copyright © 2002 BEA Systems, Inc. All rights reserved.
|