| Download Docs | Site Map | Glossary | |
|
|
|||
| bea.com | products | dev2dev | support | askBEA |
|
|
||||||||
| e-docs > WebLogic Platform > WebLogic Portal > Migration Guide > Migrating From WebLogic Portal 4.0 to WebLogic Portal 7.0 |
|
Migration Guide
|
Migrating From WebLogic Portal 4.0 to WebLogic Portal 7.0
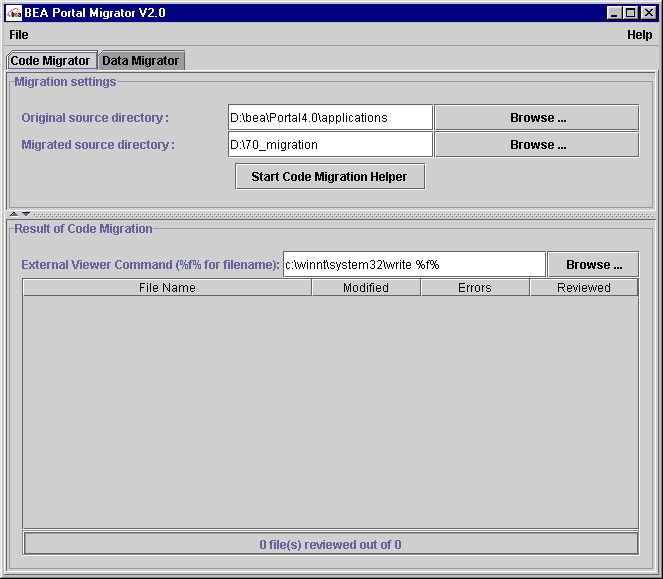
This section provides information on migration from WebLogic Portal Release 4.0 to 7.0. To assist in the migration process, you will use the migration tool, as shown in Figure 2-1,
Figure 2-1 Migration Tool Code Migrator Window
Note: Step 5 contains essential tasks that you must perform in order to make your migrated 7.0 implementation run. For additional migration tasks, check the troubleshooting index entry. Also, for additional migration tips, check the Customer Support (http://websupport.bea.com/welcome.jsp) and BEA dev2dev (http://developer.bea.com/index.jsp) Web sites.
Step 1: Prepare Environment and Files for Migration
This section contains information on the following subjects:
Obtain Latest Documentation and Associated Files
To get the latest documentation and associated files, check the following:
The release notes for any service pack provides important information about changes to the software. Review them before completing a migration. Service packs are available at the following sites:
Check Patches You Have Installed
Before you install a service pack, determine which patches are currently installed. This includes patches for all WebLogic products you use, such as WebLogic Server.
The WebLogic Portal migration is based on a WebLogic Portal 4.0 installation with the patches provided in Service Pack 2. However, before you migrate, you need to evaluate all your WebLogic patches because some patches are distributed outside of service packs for WebLogic Portal and other WebLogic products. For instance, a different version of a JAR file that the migration relies on might be included in a non-service pack patch that you have installed. Contact BEA Customer Support (http://www.bea.com/support/programs.shtml)and with their assistance determine all patches that you have installed, whether all those patches have been included in service packs, and if not determine any migration-related issues with those patches.
Address Issues Related to Migration
Carefully read each subject in the following list and take the appropriate steps, before or during the migration process, as indicated by your implementation and how each issue affects it:
Migration Interaction With WebLogic Integration
If you already have WebLogic Portal or WebLogic Integration and migrate to the WebLogic 7.0 Platform, you will have to migrate both WebLogic Portal and WebLogic Integration. The two products share the WebLogic Portal RDBMS realm. The configured RDBMS should contain WebLogic Integration predefined data. The installed fileRealm from WebLogic Integration should only contain the system user for WebLogic Integration and no other pre-defined data from WebLogic Integration.
These configuration issues are affected by migration as well as the Configuration Wizard. For complete information, refer to the WebLogic Integration Platform Security Guide at http://download.oracle.com/docs/cd/E13222_01/wls/docs70/security.html.
Important Information About the Database Migration and Sybase
Sybase has relaxed its limits on column size, and WebLogic Portal has taken advantage of these relaxed limits.
If you are using Sybase, you must follow these steps in this order:
If you are currently using Sybase 11.9 or 12.0, migrate from 4.0 to 7.0. If you decide to update to Sybase 12.5, download the Sybase schema update scripts from BEA dev2dev (http://developer.bea.com/index.jsp), run them, and then update to 12.5.
If you are currently using Sybase 12.5, migrate from 4.0 to 7.0. Then download the Sybase schema update scripts from the BEA dev2dev Web site and run them.
Notes on Triggers and WebLogic Portal 4.0 Service Pack 1
Service Pack 1 omitted triggers that can negatively affect an implementation. If you are only using Service Pack 1, install Service Pack 2 before migrating.
Service packs are available through the following sites:
About the E-Business Control Center Project Migration
Typically, your E-Business Control Center project migration should go smoothly. However, some variations in content or currentness can produce unexpected results. If the project is not complete, the validity of the content will not be checked when it is migrated, so any corrupted files will be migrated. To avoid this, complete all work on E-Business Control Center projects before migrating. After migrating, check the projects to ensure that they function as expected, and make any necessary changes using the administration tools.
For more detail about how the projects are migrated, see Details of the E-Business Control Center Project Migration.
Migrating the Default Configuration Setting for Portals
Each portal has a default configuration, which is used when an anonymous user accesses the portal. The default configuration, along with other data about the portal, is migrated in this release.
To ensure that the default configuration is migrated, sync your portal configurations to the server before you begin. If you do not do so, or if for any other reason a migrated portal does not have a default configuration set, a default default configuration is assigned to the portal. If you want to change the default configuration, use the WebLogic Portal Administration Tools.
Prepare the Environment
This section contains information on the following subjects:
Check Supported Platforms
Ensure that your system conforms to the specifications in the supported platforms document for WebLogic Portal 7.0, available at http://download.oracle.com/docs/cd/E13196_01/platform/docs70/support/index.html.
Install Latest Service Pack
Be sure that you have installed the latest service pack. The instructions in this guide are written based on the assumption that you are migrating from Service Pack 2 (SP2).
Install BEA WebLogic 7.0 and Set Up Build Environment
Follow the instructions in "Installing WebLogic Platform" at http://download.oracle.com/docs/cd/E13196_01/platform/docs70/install/index.html and any other referenced documentation in that guide to install release 7.0 correctly on your system. Be sure that your installation environment and the software are installed and set up correctly before you continue.
Set up your 7.0 build environment system—creating .jar files and other files—so that you will be able to modify, test, and deploy converted code files later in the migration process. This is your own build environment that you create and provide yourself.
Warning: Do not run the create_all script on your 4.0 database. You can run it to create an empty database, point your server to it, and ensure that 7.0 is installed and running correctly before you begin migrating.
Note: You will not be able to run the WebLogic Server 7.0, pointed to your 4.0 database, before you finish migrating WebLogic Portal to 7.0.
Make One or More Complete Backups of Code, Data, and Database
Completely back up your entire WebLogic Portal 4.0 system at least once, including your database schema. If some migration processes fail, you will need to restore the backup and migrate again.
Check Migration Environment
Be sure that the migration files are installed on the same computer where WebLogic Server is installed. The migration requires access to the weblogic.jar and license files in the BEA directory.
Sync E-Business Control Center Projects to Server
Make sure the latest version of any portal file is synced to the server so that the default configuration is captured.
Determine Whether to Modify DataMigratorBundle.properties or MigratorBundle.properties
These files control significant aspects of the migration. If you need to skip tasks in the Data Migrator (provides the ability to be done out of order) or if you need to internationalize the migration tool, see Migration Files.
Warning: In a typical migration, you do not need to modify these files. Modifying them should be done only if you are an accomplished developer and have changes you must make to the migrator tool or process.
Edit the migrator.bat and migration_install.properties Files
Enter configuration settings as follows:
Listing 2-1 migrator.bat File
echo off
REM --------------------------------------------------------#
REM  Migrator Starter Script on Windows                    #
REM --------------------------------------------------------#
SETLOCAL

set DATABASE=ORACLE_THIN
REM set DATABASE=MSSQL
REM set DATABASE=SYBASE_JCONNECT
REM set DATABASE=DB2_TYPE2
if "%DATABASE%" == "" ( echo "The DATABASE variable must be uncommented in migrator.bat"
    exit 1 )

CALL ..\..\bin\win32\set-environment.bat

REM --------------------------------------------------------#
REM         VARIABLES TO SET
REM --------------------------------------------------------#

REM Due to database specifics, you may have to set your
REM path to include dll

REM --------------------------------------------------------#
REM          The mini script
REM --------------------------------------------------------#
set MIGRATION_DIR=%WL_COMMERCE_HOME%\migration
set MIGRATION_LIB=%MIGRATION_DIR%\lib
set MIG_CLASSPATH=%BEA_HOME%\lib\tools.jar;%MIGRATION_LIB%\migration.jar;%MIGRATION_LIB%\apache\xerces-1_4_3\xerces.jar;%MIGRATION_LIB%\apache\xalan-j_2_0_1\xalan.jar;%MIGRATION_LIB%\p13n_system.jar;%WEBLOGIC_HOME%\lib\weblogic.jar;%BEA_HOME%

REM --------------------------------------------------------#
REM 	For testing the setup only
REM --------------------------------------------------------#
REM echo BEA_HOME=%BEA_HOME%
REM echo WEBLOGIC_HOME=%WEBLOGIC_HOME%
REM echo WL_COMMERCE_HOME=%WL_COMMERCE_HOME%
REM echo MIGRATION_DIR=%MIGRATION_DIR%
REM echo MIGRATION_LIB=%MIGRATION_LIB%
REM echo MIG_CLASSPATH=%MIG_CLASSPATH%


%JDK_HOME%\bin\java -cp %MIG_CLASSPATH%  -DMIGRATION_DIR=%migration_dir% com.bea.commerce.migration.tools.Migrator

echo on
Notes: The only database.version setting for oracle can be 817. If you use 9I, you should still set it to 817.
SQL Server may be set to 7 or 2000 by un-commenting the appropriate version.
For the value server=YOURSERVER, enter the name of the database server. For instance, for Oracle, enter the Oracle SID or the netservice name, depending on how your system is configured.
Listing 2-2 migration_install.properties File
#################################################################
#
# PROPERTIES TO BE SET BY THE USER AT 'INSTALL' TIME
#
#################################################################

# --------------------------------------------------------------
#       When you have set the properties you need, set the
#       following flag to 'true' so the migrator tool will start.
#       Otherwise, the Migrator will assume you have NOT set
#       any property and will refuse to run.
# --------------------------------------------------------------
start_migrator=false

# --------------------------------------------------------------
#	Database Properties  // uncomment the database you are using
                      // and enter the appropriate connection values
# --------------------------------------------------------------


# Database connection properties
#
#------Oracle Thin Driver----------------------#
#
# For oracle, replace the following:
#    @USER@, @PASSWORD@, @SERVER@, @PORT@, and @SID@
#    e.g. jdbc:oracle:thin:@localhost:1521:ORCL
#
database.connection.driver = oracle.jdbc.driver.OracleDriver
database.connection.url = jdbc:oracle:thin:@@SERVER@:@PORT@:@SID@
database.connection.props = user=@USER@;password=@PASSWORD@


#------MS SQL Server ----------------------#
#
# For SQL Server, replace the following:
#    @SERVERPORTNUMBER@, @USER@, @PASSWORD@, and @SERVER@ (in two different locations)
#
#database.connection.driver = weblogic.jdbc.mssqlserver4.Driver
#database.connection.url = jdbc:weblogic:mssqlserver4:@SERVER@:@SERVERPORTNUMBER@
#database.connection.props = user=@USER@;password=@PASSWORD@;server=@SERVER@;weblogic.t3.waitForConnection=true;weblogic.t3.waitSecondsForConnection=999999999999;weblogic.jts.waitSecondsForConnectionSecs=999999999999


#------Sybase jConnect 5.2 ----------------------#
#
# For Sybase, replace the following:
#    @SERVER@, @PORTNUMBER@, @USER@, and @PASSWORD@
#
#database.connection.driver=com.sybase.jdbc2.jdbc.SybDriver
#database.connection.url=jdbc:sybase:Tds:@SERVER@:@PORTNUMBER@
#database.connection.props = user=@USER@;password=@PASSWORD@;server=@SERVER@;weblogic.t3.waitForConnection=true;weblogic.t3.waitSecondsForConnection=999999999999;weblogic.jts.waitSecondsForConnectionSecs=999999999999


#------IBMS's DB2 ---------------------------------------#
#
# For DB2, replace the following:
#    @DB2_DATABASE@, @USER@, and @PASSWORD@
#
#database.connection.driver=COM.ibm.db2.jdbc.app.DB2Driver
#database.connection.url=jdbc:db2:@DB2_DATABASE@
#database.connection.props = user=@USER@;password=@PASSWORD@;server=@SERVER@;weblogic.t3.waitForConnection=true;weblogic.t3.waitSecondsForConnection=999999999999;weblogic.jts.waitSecondsForConnectionSecs=999999999999


#
# Database and version
#
# for Oracle users use database.version=817 for either Oracle 8.1.7 or 9i
database.name=oracle
database.version=817
#database.name=sql_server
#database.version=2000
#database.version=7
#database.name=sybase
#database.version=12
#database.name=db2
#database.version=7
Step 2: Migrate Data From 4.0 to 7.0
This section describes how to migrate your data to the 7.0 release. It includes information on the following subjects:
Understand the Tool and Process
This section provides a brief overview of the following topics:
Extent of Migration Tool Capabilities
The migration tool assists you in migrating your code and data from WebLogic Portal version 4.0 to 7.0. It is a helper utility—it migrates and annotates your code and data but does not fully complete the migration. Your team will need to perform a significant portion of the migration.
The migration tool is a stand-alone tool that does not need to interact with a running server.
Review Data Migration Process
The migration process performs a variety of tasks, including leaving some files unaltered, renaming files, creating new files, and so on. The database migration takes place on the 4.0 tables themselves; it does not create a new set of 7.0 tables without touching the 4.0 tables.
The affected tables are backed up and named tablename_temp40. You can drop these tables after the migration is complete and you have verified that your system is working correctly in release 7.0.
Review Data Migration Tool Tasks
This section describes the tasks that the tool completes. The order of tasks is not crucial, except for the last two. The server will not start if the Data Sync RDBMS task (in the following list) is not completed. The server will not function correctly until all tasks are completed.
You must migrate each E-Business Control Center project separately, that is, run the E-Business Control Center migration once for every project.
The following steps and descriptions are also displayed onscreen when you perform the data migration with the migration tool.
Note: If you have modified your database tables, the following tasks might be affected; the previous two are not.
Warning: This step not repeatable after the next step, Entitlement Ruleset Data Migration, is run.
Manually Migrate Any Databases You Have Changed
If you changed the definition of any of your 4.0 database tables, you need to run those migrations manually.
Note: This can be a complex procedure. Study the migration tasks, their dependencies, and the SQL involved carefully before you begin. We recommend that you run the migration on a copy of your 4.0 data first.
Use the migration tool to complete migration tasks that are not affected by your modifications. Use an SQL tool to run the appropriate migration SQL statements affected by your modifications. Do the modifications in the order they are listed in Review Data Migration Tool Tasks.
Follow these steps to migrate your changed databases:
Listing 2-3 Partial oracle-817-v4_0to7_0.sql File
-- ===============================

-- ENTITLEMENT_RULESET RDBMS Migration

CREATE TABLE ENTITLEMENT_RULESET_TEMP40 ( APPLICATION_NAME VARCHAR2(100) NOT NULL, RULESET_URI VARCHAR2(254) NOT NULL, RULESET_DOCUMENT CLOB NULL, CREATION_DATE DATE DEFAULT SYSDATE NOT NULL, MODIFIED_DATE DATE DEFAULT SYSDATE NOT NULL)

INSERT INTO ENTITLEMENT_RULESET_TEMP40 ( APPLICATION_NAME, RULESET_URI, RULESET_DOCUMENT, CREATION_DATE, MODIFIED_DATE ) SELECT APPLICATION_NAME, RULESET_URI, RULESET_DOCUMENT, CREATION_DATE, MODIFIED_DATE FROM ENTITLEMENT_RULESET
Migrate Your Data Using the Migration Tool
To complete data migration steps with the migration tool, follow the steps in this section.
Warning: Be sure you have edited the migration_install.properties file in the PORTAL_HOME\migration directory. If you have not entered the appropriate information, an error message appears when you attempt to run the migrator.
Use a database viewing/editing tool to check the data migration process as it progresses. After each task that affects databases, you can view your 4.0 database and the changes that took place.
Note: If you encounter problems, open the migrator.bat file and be sure all settings are correct.
Figure 2-2 Data Migration Window
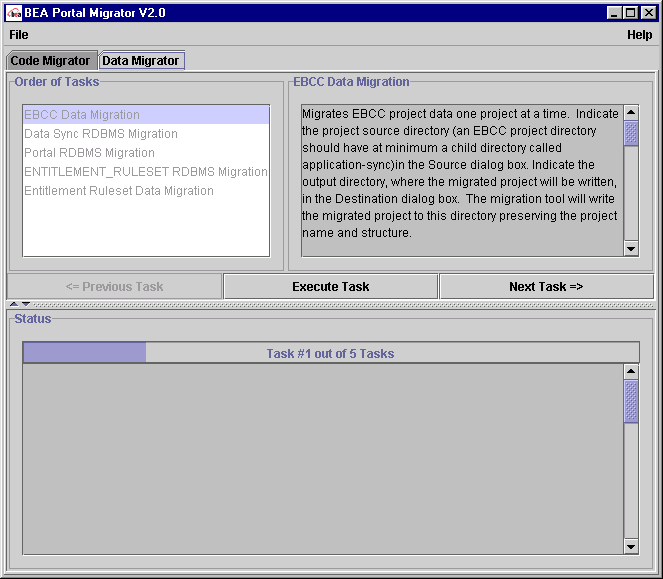
Figure 2-3 Selecting the E-Business Control Center Project Source Directory

Note: You can enter a project destination directory that does not yet exist and it will be created.
The project directories appears in your destination directory in the same structure, with the same directory names.
Regarding messages in the data migration window Many of the messages are extremely detailed, and contain valuable information, sometimes indicating the directory where a migrated or new file was created. Tables affected by the migration task are listed. At the bottom of each set of comments for the task, a message states whether the migration was successful.
The migration.log file contains more complete information. It contains all messages displayed in the window, as well as additional information such as the stack trace.
If any other message appears stating that there were problems migrating, use the error messages onscreen to address the problem, then run the task again. Some tasks require that you restore the database from a backup, then fix the problem and run the task again. If this is the case, the description in the window says so. If the problem stems from modifications you have made to the database, see Manually Migrate Any Databases You Have Changed.
Manually Updating Events to the Latest XSLT
If you are not using events in WebLogic Portal 4.0, ignore this section.
Events are actions taken by users, such as clicking a particular option in your site. You can choose to track events in a database, and analyze them with the tool of your choice, such as Broadbase. (WebLogic Portal does not provide analysis tools for events.)
We recommend that you simply create the new events database for the 7.0 format and start recording events in that database. Events are analyzed via third party tools so migration is not necessary.
Events in WebLogic Portal 7.0 use the most recent XSLT. If you want to use Xylon or a similar tool to update your WebLogic Portal 4.0 events to the latest format, you can use the provided .XSL files.
The files are in the migration.jar file, shown in Figure 2-4. Only files that are named *Event.xsl are relevant. Use Xylon or another tool of your choice and the *Event.xsl files to apply the new XSLT to your 4.0 events.
Figure 2-4 XSL Files for Event Updating
Drop 4.0 Tables When System Has Been Migrated Successfully The migration process does not drop the backup tables it creates (tablename_temp40). Drop these 4.0 tables after you have successfully run your site for a satisfactory amount of time.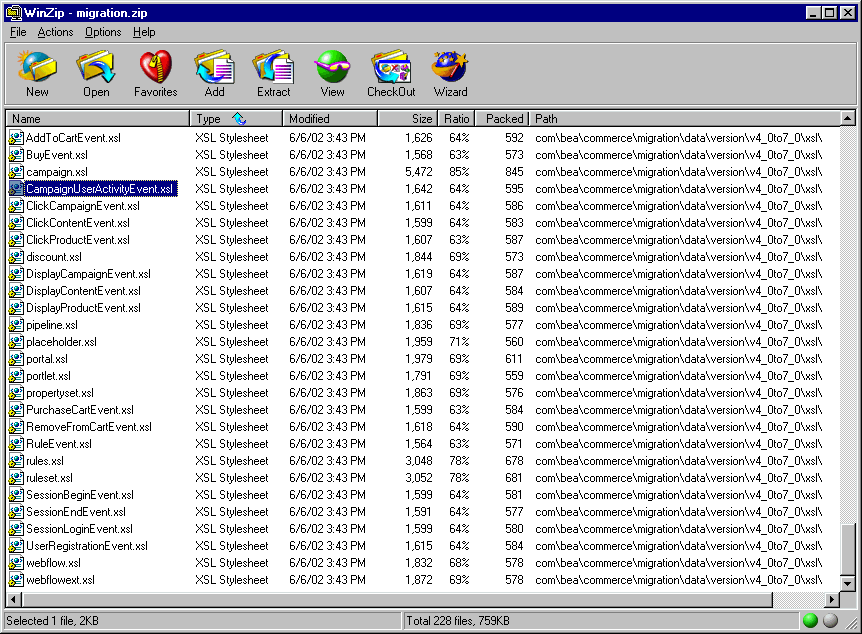
Step 3: Migrate Code From 4.0 to 7.0
Use the information in this section to migrate the code. The information in this section is organized as follows:
Note: To speed up the migration process, multiple people can run the migration simultaneously. For instance, if you use a source code control system, one developer could check out and migrate each of the main subdirectories within your main release 4.0 directory.
Warning: To prevent one person's changes overwriting another's, be sure that no one is migrating a subdirectory of code that another person is migrating.
Review Code Migration Process
The code migrator analyzes .java files and either makes the appropriate change or flags the necessary portions for change, without updating the code. No matter what the change, a comment is added to the file. The code migrator assists you in the migration process, but you must still review all code files and make any necessary changes before the migration is complete. The changes and comments are put in a new copy of the files, created in a location you specify before beginning the migration.
The amount of code the tool can migrate varies drastically from one implementation to another.
You can migrate both standard .java files and JSPs by precompiling the JSPs; running the code migration tool; and making the appropriate updates to JSPs, tags, and any other dependent code.
The code migration tool focuses on the following:
Use the Migration Viewer
The changes to code in release 7.0 are described in the migrinfo.html file, included in the <PORTAL_HOME>\migration\doc directory. To search and sort the information, use the Migration Viewer tool. For more information, see Viewing Code Changes Using the Migration Viewer Tool.
This is extremely valuable information, providing details on what classes, packages, methods, and other API elements have changed in this release. Use the Migration Viewer concurrently with the migration tool as you migrate code and JSPs. As you review each migrated file and the migration comments, use the Viewer to get more information on how you need to accommodate the changes to the API.
Migrate Code
This section contains the steps for using the utility to migrate your code to WebLogic Portal 7.0.
Figure 2-5 Code Migrator Tab

Warning: If more than one person is migrating code, be sure that no one is migrating a subdirectory that another person is already migrating.
Figure 2-6 Entering Path to External Viewer

Note: You must retain the space and %f% at the end of the path; this is the placeholder for the code file that you are editing.
Figure 2-7 List of Migrated Files and Status
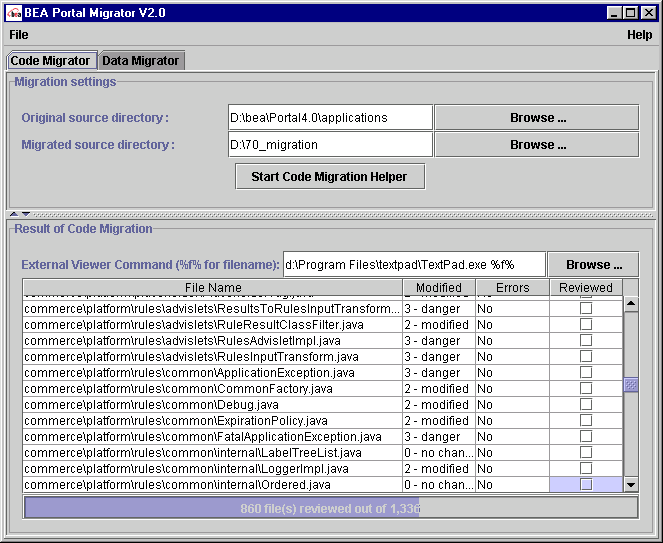
Note: Errors occur on empty statements (often preceded by static initialization blocks). For details, see the migration.log file. The log clearly shows the sources of problems caused in the migration. If you see that errors were caused by an empty statement, remove the empty statement and run the code migration again.
Note: Use the Migration Viewer to help you determine what changes you need to make and how to make them based on how files were migrated and the generated comments in each migrated file. For instructions on using the Migration Viewer, see Viewing Code Changes Using the Migration Viewer Tool.
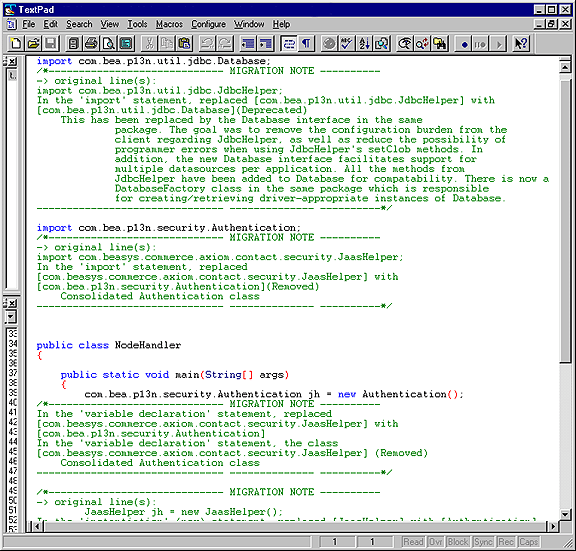
An example of a migrated file and migration notes is shown in Figure 2-8.
Figure 2-8 Migrated Code File With Notes
Migrate JavaServer Pages
This section covers the changes to JavaServer Pages (JSPs) in release 7.0 and what you need to accommodate those changes.
Note: After migration is complete, you need to consider how to make changes to JSPs based on the information in Configure Webflows and JSPs.
Repeat these steps until no more conversions or warnings show up in the code migrator.
Generating .java Files for JSPs
You can do this in a number of ways:
<!-- JSP configuration -->
<jsp-descriptor>
<jsp-param>
<param-name>keepgenerated</param-name>
<param-value>true</param-value>
</jsp-param>
</jsp-descriptor>
Step 4: Migrate Other WebLogic Products
If you are using prior versions of WebLogic Server, WebLogic Integration, or the other WebLogic products, you should migrate them now. Refer to the migration documentation for migration to 7.0, at http://download.oracle.com/docs/cd/E13196_01/platform/docs70/index.html.
View WebLogic Platform 7.0 Documentation
The WebLogic Platform 7.0 documentation contains important, useful information about the WebLogic Server, WebLogic Integration, and WebLogic Workshop, including the new directory structure organized by domain. For more information, see http://download.oracle.com/docs/cd/E13196_01/platform/docs70/index.html.
Step 5: Assemble Migrated Files and Perform Additional Configuration Tasks
After all files are migrated, you need to organize and configure them to work in the WebLogic Portal 7.0 environment, as shown in the following list:
Ensure All Files and Databases Are Migrated
Before you complete the tasks in this section, be sure all necessary migration has been completed.
Create a New 7.0 Project Directory
The directory structure for release 7.0 is significantly different, so create a new build environment, as described in the following steps:
Note: You must create a new domain instead of rearranging your existing directories and files. Web application tools for tasks such as creating users and syncing have changed significantly, and 4.0 versions do not work in release 7.0.
Move Files to the New Domain
For more information on the directory structure, review the WebLogic Server Administration Guide, at http://download.oracle.com/docs/cd/E13222_01/wls/docs70/adminguide/overview.html. To learn more about domains, see the Creating and Configuring WebLogic Server Domains guide http://download.oracle.com/docs/cd/E13222_01/wls/docs70/admin_domain/index.html.
The gist of the change in directory structure is illustrated in Figure 2-9 and Figure 2-10. Reassemble the migrated files into the appropriate directories.
Figure 2-9 WebLogic Portal Applications in the WebLogic Portal 4.0 Directory Structure
Figure 2-10 WebLogic Portal Applications in the WebLogic Platform 7.0 Directory Structure 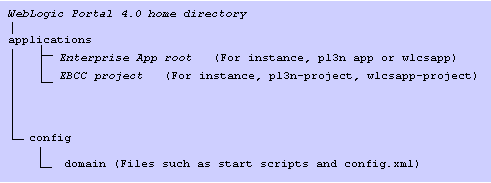
Configure Webflows and JSPs The information in this section helps you to incorporate the latest WebLogic Portal 7.0 portal functionality in your migrated portal while maintaining compatibility with any changes you may have made to the standard portal webflows or JSPs. This is a manual process whose difficulty varies depending on these changes. Use the instructions in the following sections to make the appropriate configurations.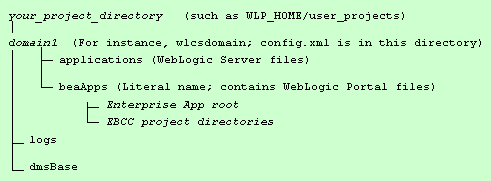
Determining Whether You Need to Perform These Steps
If you did not use a portal in your Web application, skip this section. If you do not know if there is a portal in your webapp, look for the following files in your application-sync/webapps/yourWebAppName directory:
If these files do not exist, you can skip this section. If you have these files, continue to the next section.
Before You Begin
Required base version of WebLogic Portal These instructions apply to migrating from WebLogic Portal 4.0 Service Pack 2 only. If you are using Service Pack 1 or earlier, you must upgrade to SP2 first. There are differences between SP2 and previous versions that affect these instructions.
In this section, <SAMPLE_DIR> is used to refer to the directory <BEA_HOME>/weblogic700/samples/portal/sampleportalDomain/
beaApps
Configuring Webflow Files
Portal uses three webflow files that must be updated to work with WebLogic Portal 7.0. They are security, tools, and user_account. (The portal webflow is also used by Portal Web applications, but there were no changes to it from release 4.0 to 7.0).
Each webflow is represented by a file of the same name with the .wf extension.
If you have not made changes You do not have to do anything; simply use the new versions in the new domain and Web application you created.
If you have made changes You have two potential paths to take for the changed files; it is up to you to decide what is easiest, based on the extent of your changes.
Note: You can find these new files in the following directory:
<SAMPLE_DIR>\beaApps\sampleportal-project\application-sync\webapps\sampleportal
Configuring JSP files
Some of the JSP files that make up the portal framework have changed from WebLogic Portal 4.0 to WebLogic Portal 7.0. These changes must be applied to your Web application for it to function properly. There are also some new files that you must add to your migrated Web application.
New Directories
Two new directories are now in your Web application, in the new domain you created:
<WEBAPP>\registration
<WEBAPP>\util
New Files
These are the new files; you do not need to do anything to them, just note that they are there.
<WEBAPP>\framework\tools\change_name.jsp
<WEBAPP>\framework\tools\change_name.properties
Modified Files
The following list shows that files that have been updated for WebLogic Portal 7.0. You can:
If you need to reconcile the files, examine each one before you copy it to determine if any changes need to be preserved. If you have made any changes to a file, it is up to you to resolve the differences with the 7.0 version of the files. Decide if it is easier to re-apply your changes to the new 7.0 files or make the 7.0 changes to your existing files and then make the changes.
<WEBAPP>\framework\edit_titlebar.inc
<WEBAPP>\framework\header_links.inc
<WEBAPP>\framework\hnav_bar.jsp
<WEBAPP>\framework\maximize_titlebar.inc
<WEBAPP>\framework\minimize_titlebar.inc
<WEBAPP>\framework\normal_titlebar.inc
<WEBAPP>\framework\resourceURL.inc
<WEBAPP>\framework\titlebar.jsp
<WEBAPP>\framework\vnav_bar.jsp
<WEBAPP>\framework\security\badlogin.properties
<WEBAPP>\framework\security\login.properties
<WEBAPP>\framework\tools\portal_prefs.jsp
<WEBAPP>\framework\tools\portal_prefs.properties
<WEBAPP>\framework\tools\select_portal_pages.jsp
<WEBAPP>\framework\tools\select_portal_pages.properties
<WEBAPP>\framework\tools\select_portlets.jsp
<WEBAPP>\framework\tools\select_portlets.properties
<WEBAPP>\framework\tools\select_skins.properties
Note: If you have problems opening a migrated project, check the .eaprj file. If the "EnterpriseAppRoot" element has an uppercase E at the beginning, change it to a lowercase e.
Set Database Connection Variable Values in the Start Script for Each Domain
Database information, including the database connection information, is specific to each domain. WebLogic Platform 7.0 has changed so that the database connection information is defined in the start script and assigned to a variable, which is used by set-environment.bat or set-environment.sh.
Therefore, for each start script you have, such as start-portal.bat, where you call WebLogic Server and other items, set the definitions for variables called in set-environment. Do this by editing the database connection values in the dbsettings.properties file, which is created by the Domain Wizard, as follows:
Set the Value of the mem_args Variable
The mem_args variable is new in this release and appears in all start scripts. You must assign a value to this variable or your migrated system will not run and the server will appear to hang. This variable tells WebLogic Server how to handle memory.
MEM_ARGS="-Xms128m -Xmx128m -XX:MaxPermSize=128m"
Change How Start Scripts Call WebLogic Server
Formerly, each start script made a Java call to WebLogic Server directly. In the WebLogic Platform 7.0 release, this has changed. Each start script must call the server as follows:
call %WLP_HOME%\bin\win32\startWebLogic.cmd
Replace your start scripts' server calls with the above line. The WLP_HOME variable's value is set when you install WebLogic Portal 7.0.
Edit the config.xml File to Set Two-Phase MBean Deployment
A new feature in this release is two-phase Mbean deployment. This is covered in the WebLogic Server documentation for this release (http://download.oracle.com/docs/cd/E13222_01/wls/docs70/index.html.
You must set up WebLogic Portal to accommodate the feature by editing the config.xml file.
Add the following, shown in Listing 2-4, to the application tag in your config.xml file.
Note: You can set the value to true or false, but the attribute must be there for every application.
Listing 2-4 Attribute to Add to config.xml
<Application
  Deployed="true" TwoPhase="false"
  Name="p13nConsoleApp"
  Path="D:/bea/weblogic700/samples/portal/p13nDomain/beaApps/p13nConsoleApp">
  <WebAppComponent
    Name="p13nConsole"
    ServletReloadCheckSecs="300"
    Targets="p13nServer"
    URI="p13nConsole"
  />
</Application>
Add Database Information to config.xml
Modify DOMAIN_DIR/config.xml to use the appropriate database driver. For information about doing so, see the Administration Guide at http://download.oracle.com/docs/cd/E13218_01/wlp/docs70/index.htm.
If you need any database connection pools or data sources besides the default commercePool, add them to DOMAIN_DIR/config.xml. Make sure that you add an appropriate line to DOMAIN_DIR/fileRealm.properties for each pool that you create. For example, if you add a connection pool named "oraclePool", add this line to fileRealm.properties as follows:
acl.reserve.weblogic.jdbc.connectionPool.oraclePool=everyone
Update Any Hard-Coded Paths in Configuration Files
Search all of the following files and update the paths so that they are correct for the new directory structure:
Add References to EJBs to Configuration Files
Add entries for your EJBs, if any, and your Web application(s) to the following:
<DOMAIN_DIR>/beaApps/portalApp/application.xml
<DOMAIN_DIR>/config.xml
Add weblogic-application.xml File to All Applications
The new weblogic-application.xml file lets you tune WebLogic Server features for use with WebLogic Portal applications.
The file must be present for your application to run. Copy it to the META-INF directory for every application. For example:
weblogic700\samples\portal\p13nDomain\beaApps\p13nApp\META-INF
To use the file for tuning, see the WebLogic Server documentation at http://download.oracle.com/docs/cd/E13222_01/wls/docs70/index.html.
Copy New JAR Files to Migrated Web Application Directory Structure
Delete all JAR files that are not specific to your application from the <migrated_webapp>/WEB-INF/lib directory, and replace them with all of the JAR files from this directory:
<WLS_HOME>/weblogic700/samples/portal/sampleportalDomain/beaApps/sampleportal/sampleportal/WEB-INF/lib
Follow Instructions in WebLogic Server Upgrade (Migration) Guide
Follow the WebLogic Server upgrade instructions at http://download.oracle.com/docs/cd/E13222_01/wls/docs70/upgrade/index.html. Pay particular attention to changes to EJB-QL in the descriptors for CMP entity beans.
Complete a Build of Your Java Source and EJBs
Complete a build of your java source and EJBs. Remember, you must use your build scripts to perform the build.
Configure Classpath to Use Xerces
If your source uses the Xerces parser, add the JAR file <WLS_HOME>/weblogic700/lib/xerces.jar to the startup classpath for your server.
Check for Additional Migration Information
Any additional migration information of a similar nature is posted on the Customer Support (http://websupport.bea.com/welcome.jsp) and BEA dev2dev (http://developer.bea.com/index.jsp) Web sites.
Step 6: Verify the Migration From 4.0 to 7.0
Start the server. Validate the application using the 'Validate' button in the E-Business Control Center. Perform a datasync either from the E-Business Control Center, or using the sync.bat file in the EBCC project directory. At this point, the portal Web application should now be properly synced, but some data must be migrated using the following manual DB task:
SELECT PORTAL_XML_REF From PORTAL;
UPDATE PORTAL SET PORTAL_XML_REF='portalApp/stockportal' where PORTAL_XML_REF='portal/stockportal';
If Entitlement Rules Exist
If the ENTITLEMENT_RULESET table in WebLogic 4.0 is not empty at migration, a problem may arise because of a difference in the schema used to evaluate entitlements. If this problem arises, the following error will appear in the console:
Listing 2-5 ENTITLEMENT_RULESET Error
Caused by: org.xml.sax.SAXParseException: General Schema Error: Grammar with uri: http://www.bea.com/servers/p13n/xsd/rules/corerules/2.1 , can not be found; schema namespace may be wrong: Xerces supports schemas from the "http://www.w3.org/2001/XMLSchema"; namespace or the instance document's namespace may not match the targetNamespace of the schema.
This problem can be resolved in three ways:
Step 7: Next Steps
Now that you have successfully completed migration, complete the next steps for continuing migration and using WebLogic Portal 7.0.
Use the online documentation site to locate the documentation you need for additional learning at http://download.oracle.com/docs/cd/E13218_01/wlp/docs70/index.html.

|

|

|