Using WSRP with WebLogic Portal
|
|
Working with Producers
This chapter describes some of the activities you can accomplish with Producers, such as how you can use WSRP with Struts or Page Flow applications running in a Basic WebLogic Server Domain and how to enable individual portlets for consumption.
This chapter includes the following topics:
Using WSRP in a Basic WebLogic Server Domain
In some cases, you may want to expose portlets with WSRP from a producer environment that does not include any WebLogic Portal components. For example, you may be running a Struts Web application in a Basic WebLogic Server Domain, or a Java Page Flow application in a Basic WebLogic Workshop Domain. In either case, WebLogic Portal is not part of the server configuration.
This chapter describes how to configure a (non-portal) WebLogic Server environment as a WSRP producer so that you can expose portlets based on Struts (see Figure 4-1) or Java Page Flows (see Figure 4-2). The exposed portlets can then be consumed as remote portlets running in a regular WebLogic Portal Domain.
Figure 4-1 WebLogic Portal consumer consumes Struts portlets from a WebLogic Server producer
Figure 4-2 WebLogic Portal consumer consumes Page Flow portlets from a WebLogic Workshop producer
Overview
This chapter explains how to configure a Basic WebLogic Server Domain or Basic WebLogic Workshop Domain to be a WSRP producer. Although the producer is configured with a Basic WebLogic Server or Workshop Domain, the consumer is assumed to be running in a Basic WebLogic Portal Domain.
The portlets that are exposed on the Basic WebLogic Server Domain producer are usually Struts-based portlets, while the portlets exposed on the Basic WebLogic Workshop Domain are usually Java Page Flow portlets.
Note: Before attempting to expose a Java PageFlow or Struts portlet with WSRP, be sure the underlying application works properly before you attempt portletize it.
The environments described in this section are summarized as follows:
Domain: Basic WebLogic Server (typically for Struts applications) or Workshop Domain (typically with Java Page Flow applications)
Application: Default Application
Project: Web Project (with Struts or Java Page Flow portlets)
Domain: Basic WebLogic Portal Domain
Application: Portal Application
Note: The terms Application and Project have specific meanings in WebLogic Workshop. A WebLogic Workshop application is a J2EE Enterprise Application and ultimately produces a J2EE Enterprise Application Archive (EAR) file. A project groups related files that comprise a component of an application. Each Web project ultimately produces a J2EE Web application, each of which is included in the complete WebLogic Workshop application's EAR file when the application is built for deployment.
This chapter contains the following sections:
- Getting Started — Describes the server environments discussed in this chapter.
- Installing the WSRP Producer — Explains how to install the WSRP producer using WebLogic Workshop and manually. If you do not have WebLogic Workshop, the manual procedure explains which library and configuration files are required and how to modify the configuration files to install the producer.
- Testing the Producer — Explains how to test the producer for both Java Page Flow and Struts based portlets.
Getting Started
The rest of this section assumes the following domain and project configurations:
- You have created a WebLogic Server or Workshop Domain. You can create this domain using the BEA WebLogic Configuration Wizard. This domain does not contain any WebLogic Portal components.
- You have created a default application that uses the WebLogic Server or Workshop Domain. For example, to created a default application in WebLogic Workshop, select File > New > Application. In the New Application dialog box, select Default Application and select the domain you wish to use.
- You have created a Web project in the domain. For example, you can create a Web project in WebLogic Workshop by right-clicking the application name in the Application tree and selecting Web Project.
Installing the WSRP Producer
If you are using WebLogic Workshop, it is simple to install a WSRP Producer into your Web Application. If you are not using Workshop, but wish to configure the producer manually, this section describes the configuration step by step.
Installing the WSRP Producer Using WebLogic Workshop
This section explains how to use WebLogic Workshop to assist in the process of installing a producer in a WebLogic Server or WebLogic Workshop domain. This section assumes that you have developed your Web application using WebLogic Workshop and is the simplest method of installing a WSRP producer.
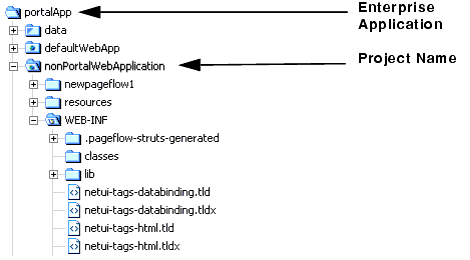
- In the WebLogic Workshop application tree, right-click the project name and select Install > WSRP Producer (see Figure 4-3). This function modifies and installs the files that are required to expose portlet files as remote portlets.
Figure 4-3 Workshop Application Tree Showing Selected Project
On Windows: DOMAIN_HOME\setDomainEnv.cmd (or setEnv.cmd)
On Linux: DOMAIN_HOME/setDomainEnv.sh (or setEnv.sh)
Find the CLASSPATH definition, and add the following elements:
Note: Be sure there are no newlines within the CLASSPATH elements. Do not delete any of the elements that are already assigned to the CLASSPATH.
%JAVA_HOME%\jre\lib\rt.jar;
%WL_HOME%\server\lib\webservices.jar;
%WL_HOME%\portal\lib\wsrp\wsrp-common.jar;
%WL_HOME%\server\lib\xbean.jar;
%WL_HOME%\server\lib\wlxbean.jar;
%WL_HOME%\portal\lib\netuix\system\netuix_schemas.jar;
%WL_HOME%\portal\lib\netuix\system\netuix_system.jar;
%WL_HOME%\server\lib\knex.jar;
%WL_HOME%\javelin\lib\javelin.jar
$JAVA_HOME/jre/lib/rt.jar;
$WL_HOME/server/lib/webservices.jar;
$WL_HOME/portal/lib/wsrp/wsrp-common.jar;
$WL_HOME/server/lib/xbean.jar;
$WL_HOME/server/lib/wlxbean.jar;
$WL_HOME/portal/lib/netuix/system/netuix_schemas.jar;
$WL_HOME/portal/lib/netuix/system/netuix_system.jar;
$WL_HOME/server/lib/knex.jar;
$WL_HOME/javelin/lib/javelin.jar
Installing the WSRP Producer Manually
If you wish to configure the WSRP producer manually, follow the steps in this section. This section walks through the steps that are performed automatically if you install the WSRP producer using WebLogic Workshop.
On Windows: DOMAIN_HOME\setDomainEnv.cmd (or setEnv.cmd)
On Linux: DOMAIN_HOME/setDomainEnv.sh (or setEnv.sh)
Find the CLASSPATH definition, and add the following elements:
Note: Be sure there are no newlines within the CLASSPATH elements. Do not delete any of the elements that are already assigned to the CLASSPATH.
%JAVA_HOME%\jre\lib\rt.jar;
%WL_HOME%\server\lib\webservices.jar;
%WL_HOME%\portal\lib\wsrp\wsrp-common.jar;
%WL_HOME%\server\lib\xbean.jar;
%WL_HOME%\server\lib\wlxbean.jar;
%WL_HOME%\portal\lib\netuix\system\netuix_schemas.jar;
%WL_HOME%\portal\lib\netuix\system\netuix_system.jar;
%WL_HOME%\server\lib\knex.jar;
%WL_HOME%\javelin\lib\javelin.jar
$JAVA_HOME/jre/lib/rt.jar;
$WL_HOME/server/lib/webservices.jar;
$WL_HOME/portal/lib/wsrp/wsrp-common.jar;
$WL_HOME/server/lib/xbean.jar;
$WL_HOME/server/lib/wlxbean.jar;
$WL_HOME/portal/lib/netuix/system/netuix_schemas.jar;
$WL_HOME/portal/lib/netuix/system/netuix_system.jar;
$WL_HOME/server/lib/knex.jar;
$WL_HOME/javelin/lib/javelin.jar
Application_Dir/Project_Dir/WEB-INF/web.xml
Be sure that the following elements are in your Web application's web.xml file. If any of these elements are missing, you must add them:
<filter>
   <filter-name>WsrpPageflowFilter</filter-name>
   <filter-class>com.bea.wsrp.producer.adapter.pageflow.WsrpPageflowFilter
      </filter-class>
</filter>
<filter-mapping>
   <filter-name>WsrpPageflowFilter</filter-name>
   <url-pattern>/producer/*</url-pattern>
</filter-mapping>
<servlet>
   <servlet-name>com.bea.wsrp.producer.WsrpServer</servlet-name>
   <servlet-class>com.bea.wsrp.producer.WsrpServer</servlet-class>
   <load-on-startup>2</load-on-startup>
</servlet>
<servlet-mapping>
   <servlet-name>com.bea.wsrp.producer.WsrpServer</servlet-name>
   <url-pattern>/producer/*</url-pattern>
</servlet-mapping>
<!-- Standard Action Servlet Configuration (with debugging) -->
<servlet>
...
   <init-param>
      <param-name>moduleConfigLocators</param-name>
      <param-value>com.bea.struts.adapter.util.ModuleConfigLocator</param-value>
   </init-param>
...
</servlet>
<servlet>
   <servlet-name>com.bea.wsrp.logging.MessageMonitor</servlet-name>
   <servlet-class>com.bea.wsrp.logging.MessageMonitor</servlet-class>
   <init-param>
      <param-name>enableSoapMessageLogging</param-name>
      <param-value>true</param-value>
   </init-param>
   <load-on-startup>1</load-on-startup>
</servlet>
<servlet-mapping>
   <servlet-name>com.bea.wsrp.logging.MessageMonitor</servlet-name>
   <url-pattern>/monitor</url-pattern>
</servlet-mapping>
<taglib>
   <taglib-uri>/WEB-INF/struts-html.tld</taglib-uri>
   <taglib-location>/WEB-INF/lib/struts-adapter-html.tld</taglib-location>
</taglib>
<taglib>
   <taglib-uri>/WEB-INF/struts-nested.tld</taglib-uri>
   <taglib-location>/WEB-INF/lib/struts-adapter-nested.tld</taglib-location>
</taglib>
<taglib>
   <taglib-uri>/WEB-INF/struts-tiles.tld</taglib-uri>
   <taglib-location>/WEB-INF/lib/struts-adapter-tiles.tld</taglib-location>
</taglib>
<taglib>
   <taglib-uri>/WEB-INF/struts-adapter-naming.tld</taglib-uri>
   <taglib-location>/WEB-INF/lib/struts-adapter-naming.tld</taglib-location>
</taglib>
<?xml version="1.0" encoding="UTF-8"?>
<wsrp-producer-config
xmlns="http://www.bea.com/servers/weblogic/wsrp-producer-config/8.0"
xmlns:xsi="http://www.w3.org/2001/XMLSchema-instance"
xsi:schemaLocation="http://www.bea.com/servers/weblogic/wsrp-producer-config/8.0 wsrp-producer-config.xsd">
<description>
This is a WSRP Producer
</description>
<!-- This element describes the capabilities of this producer. Set
the secure attribute to "true" if you require this producer offer
any port over SSL. If this webapp is portal-enabled, you may
enable registration and portlet management services by setting the
required attribute to "true". -->
<service-config>
<registration required="false" secure="false"/>
<service-description secure="false"/>
<!-- Set accepts-mime to true to more efficiently process uploaded files when the consumer is a WebLogic Portal. -->
        <markup secure="false" rewrite-urls="true"
         transport="string" accepts-mime="false"/>
<portlet-management required="false" secure="false"/>
</service-config>
<supported-locales>
<locale>en</locale>
<locale>en-US</locale>
</supported-locales>
</wsrp-producer-config>
Note: Be sure the registration required and portlet-management required parameters are set to false.
Note: The WEB-INF directory should contain the following files:
netui-tags-databinding.tld
netui-tags-databinding.tldx
netui-tags-html.tld
netui-tags-html.tldx
netui-tags-template.tld
netui-tags-template.tldx
validation_1_1.dtd
validator-rules_1_1.dtd
web.xml
weblogic.xml
wlw-config.xml
wsrp-producer-config.xml
Testing the Producer
This section describes a simple procedure for testing your producer depending on whether you are surfacing Page Flow or Struts based portlets.
Testing a Page Flow Based Portlet
Note: In the Portlet Details dialog box, select the Content URI by picking the jpf file for the page flow you want to portletize.
- Create a remote portlet in the Portal Web Application you just created. Point the WSDL to the Web Project on the producer. For example:
http://producerHost:producerPort/WebProject/producer?WSDL
Testing a Struts Based Portlet
This section assumes that you have a Struts application running successfully in the producer domain.
struts-auto-config-modulePath.xml, where modulePath is the module path to the Struts application, relative to the Web project root, with all instances of `/' or `\' changed to `-'. For example, if the module path is:
Application_Dir/Project_Dir/struts/myStrutsModule
the struts-config.xml file should be given the following name:
struts-auto-config-struts-myStrutsModule.xml
Note: It is important that your Struts application be configured to use the Struts module feature. For information on the Struts module feature, refer to the Struts Framework documentation.
<controller processorClass=
"com.bea.struts.adapter.action.AdapterRequestProcessor"/>
Note: When you create the Struts portlet, the Portlet Wizard asks you to select a Configuration File. To do this, use the Browse button provided in the Struts Config File panel to browse to the directory that contains the Struts module (for example, /struts/myModule), and click Open to select that directory.
If you renamed your struts-config.xml file properly, the Portlet Wizard automatically recognizes that file as the correct configuration file for the module you selected. In the appropriate Wizard panel, click Add to specify the configuration file and then follow the Wizard to finish creating the portlet.
For more information on building Struts portlets, see:
http://download.oracle.com/docs/cd/E13226_01/workshop/docs81/doc/en/portal/buildportlets/
portletStruts.html
- Create a remote portlet in the Portal Web Application you just created. Point the WSDL to the Web Project on the producer. For example:
http://producerHost:producerPort/WebProject/producer?WSDL
Enabling Portlets on the Producer
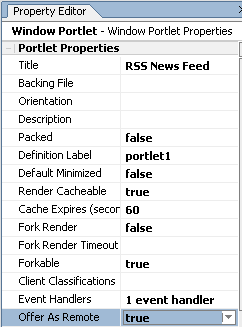
A Producer can have any number of portlets built on it, sometimes into the thousands. By default, all of these portlets are available to consumers as remote portlets. You can, however, specify which portlets are actually available to consumers by setting the offerPortlets property in the Portlet Property Editor.
Figure 4-4 Proxy Portlet Property Editor—Offer as Remote Property Selected
For instructions on how to set this property, please refer to Enabling/Disabling a Portlet for Remote Consumption in the WebLogic Workshop online help system at:
http://download.oracle.com/docs/cd/E13226_01/workshop/docs81/doc/en/portal/buildportlets/portletEnable.html


