

|
|
|
|
|
|
Worklist User Interface
The following sections describe the worklist and explain how to use the WebLogic Process Integrator Worklist interface:
Overview
You use the WebLogic Process Integrator Worklist application to view, perform, and work with tasks that are currently assigned to you or to the roles to which you belong. Various workflow commands enable you to reassign tasks to other users, mark tasks as done, unmark tasks done, view a workflow status, manually start a workflow, and more.
The Worklist is the primary user interface for WebLogic Process Integrator. You can customize the interface to suit your needs.
Starting the Worklist
To start the Worklist application from your desktop, choose Start > Programs > WebLogic Process Integrator > Worklist to display the Logon dialog box.
Figure 1-1 Logon to WebLogic Process Integrator Dialog Box
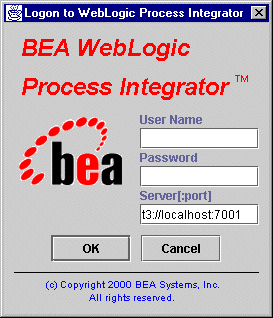
Enter the following information in the Logon dialog box:
Viewing Workflow Status
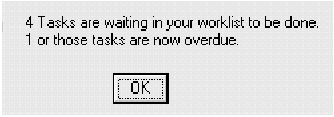
After you log on to Worklist and if notification is turned on, a workflow status dialog box displays the total number of pending tasks (tasks waiting to be done) as well as the total number of overdue tasks, if any.
For information on the notification functionality, refer to Options Command.
Figure 1-2 Workflow Status
Using the Worklist Interface
The Worklist window may contain a series of tabs, depending on whether you are a member of a role. A role is a common area of responsibility, ability, or authorization level that is shared by a group of individuals. A single user can belong to one or more roles.
The first tab contains your WebLogic Process Integrator user ID and shows the tasks that have been assigned only to you. The remaining tabs contain the names of the roles to which you belong. Selecting a role tab displays the tasks associated with that role only. Only you can execute tasks displayed in your user ID tab. However, any user who belongs to a role can execute a task assigned to that role.
The information displayed in the Worklist window depends on the selected organization. An organization can represent different business entities, geographical locations, or any other distinction relevant to the particular business of the company. Use the drop-down list to the right of the window to select the organization for which you want to view task information; the Worklist window displays the user ID and role tabs corresponding to each organization to which you belong. Information is displayed only for those organizations to which a user belongs.
Note: If you belong to only one organization, the organization drop-down list is not displayed in the Worklist window.
Figure 1-3 Worklist User ID Tab
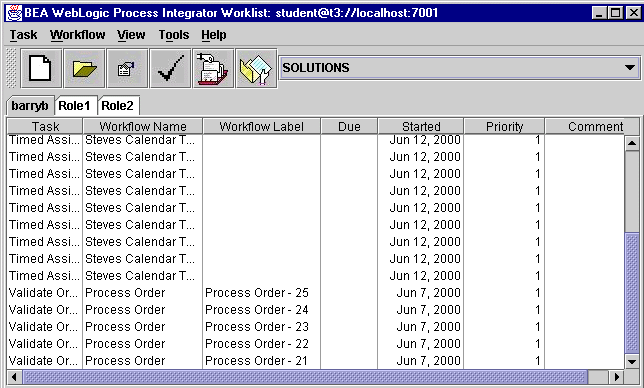
Worklist Task Columns Each task in the Worklist window displays various properties, depending on how the worklist is tailored. These properties are displayed as columns in the worklist:
Worklist Toolbar
The following table describes the various Worklist toolbar commands. These commands correspond to menu commands; however, the menus contain many commands that are not shown on the toolbar.
The worklist is a dynamic list. When new work is assigned to users, a task automatically appears in the list. As work is performed, the task status may change automatically. Tasks can be removed from the worklist either automatically or manually by the user, if they are reassigned or completed.
Exiting the Worklist
To exit the worklist, choose Task > Exit. Because the WebLogic Process Integrator server is responsible for maintaining the actual worklist contents, you do not need to save your work. When you exit the worklist, any customization you have done is saved.

|

|

|
|
|
|
Copyright © 2000 BEA Systems, Inc. All rights reserved.
|


