

|
|
|
|
|
|
Starting, Stopping, and Customizing BEA WebLogic Process Integrator
This section provides the information you need to start, stop, and customize the WebLogic Process Integrator components. It includes the following topics:
WebLogic Process Integrator Users and Passwords
The BEA WebLogic Process Integrator installation configures a default RDBMS security realm. When you create the database tables as described in Step 9. Creating the WebLogic Process Integrator Tables, the default users and passwords shown in the following table are defined. Additional users can be added through the WebLogic Process Integrator Studio interface.
Table 4-1 Default User Names and Passwords
|
User Name |
Password |
|---|---|
|
system |
security |
|
admin |
security |
|
mary |
password |
|
joe |
password |
For example, to change the system password, enter system.
If you have installed WebLogic Process Integrator 1.2.1 for WebLogic Server 5.1, the default passwords can only be changed directly in the database users table.
Starting and Stopping BEA WebLogic Process Integrator Components
The following sections describe how to start and stop each WebLogic Process Integrator component.
Starting the WebLogic Process Integrator Server
The following sections provide instructions for starting the WebLogic Process Integrator Server on a Windows or UNIX system.
Note: When you start the WebLogic Process Integrator Server, the WebLogic Server is started with WebLogic Process Integrator specific settings. If the WebLogic Server is already running, you must stop it before starting the WebLogic Process Integrator Server.
Starting on Windows
To start the WebLogic Process Integrator Server on a Windows system:
If you have installed WebLogic Process Integrator 1.2.1 for WebLogic Server 5.1 start up messages are displayed.
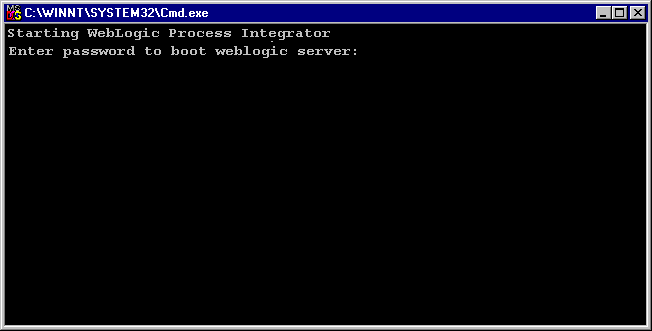
If you have installed WebLogic Process Integrator 1.2.1 for WebLogic Server 6.0, you are prompted to enter the WebLogic Server system password as shown in the following figure. After you have entered the password, start up messages are displayed.
Figure 4-1 Launch WebLogic Process Integrator Server
Note: If you have not yet changed the password, refer to WebLogic Process Integrator Users and Passwords for the default password.
Starting on UNIX
To start the WebLogic Process Integrator Server on a UNIX system:
cd /bea/wlprocessintegrator1.2.1/bin
. ./server.sh
If you have installed WebLogic Process Integrator 1.2.1 for WebLogic Server 5.1, start up messages are displayed.
If you have installed WebLogic Process Integrator 1.2.1 for WebLogic Server 6.0, you are prompted to enter the WebLogic Server system password. After you have entered the password, start up messages are displayed.
Note: If you have not yet changed the password, refer to WebLogic Process Integrator Users and Passwords for the default password.
Starting the WebLogic Process Integrator Studio
To start the BEA WebLogic Process Integrator Studio on Windows:
cd /bea/wlprocessintegrator1.2.1/bin
. ./studio.sh
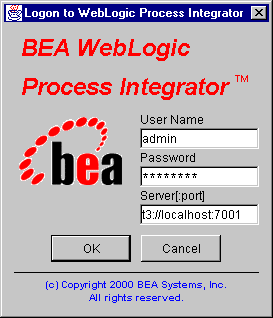
The Logon dialog box shown in the following figure is displayed in front of the BEA WebLogic Process Integrator Worklist application window.
Figure 4-2 BEA WebLogic Process Integrator Studio Logon Dialog Box
t3://host:7001
where host is the computer name or IP address of the system that is running the WebLogic Process Integrator Server. Specify localhost if the Server is running on the same computer as the Studio application.
Starting the BEA WebLogic Process Integrator Worklist
To start the BEA WebLogic Process Integrator Worklist:
cd /bea/wlprocessintegrator1.2.1/bin
. ./worklist.sh
The Logon dialog box shown in the following figure is displayed in front of the BEA WebLogic Process Integrator Worklist application window.
Figure 4-3 BEA WebLogic Process Integrator Worklist Logon Dialog Box

t3://host:7001
where host is the computer name or IP address of the system that is running the WebLogic Process Integrator Server. Specify localhost if the Server is running on the same computer as the Worklist application.
Stopping the BEA WebLogic Process Integrator Server
To stop the BEA WebLogic Process Integrator Server application:
Terminate batch job (Y/N)
Stopping the BEA WebLogic Process Integrator Studio or Worklist
To stop the BEA WebLogic Process Integrator Studio or Worklist:
Updating the WebLogic Process Integrator Environment Settings
The WebLogic Process Integrator environment is set by the following files:
These files are located in the bin subdirectory of the WebLogic Process Integrator installation directory. By default the pathname for this directory is bea\wlprocessintegrator1.2.1\bin.
Examples of these files are provided in BEA WebLogic Process Integrator Sample Configuration Files. The content of these files depends on the version of the WebLogic Process Integrator you have installed. Refer to the section appropriate to the version installed on your system; either Configuration Files for WebLogic Process Integrator 1.2.1 for WebLogic Server 6.0 or Configuration Files for WebLogic Process Integrator 1.2.1 for WebLogic Server 5.1.
Instructions for updating the server and client environment are provided in the following sections.
Updating the Server Environment
To update the server environment:
On a Windows System:
For information about the required values, see Configuration Files for WebLogic Process Integrator 1.2.1 for WebLogic Server 6.0 or Configuration Files for WebLogic Process Integrator 1.2.1 for WebLogic Server 5.1 in Appendix A.
The setwlpiserverenv.cmd file will run to set these environment variables for the Server environment when you start the WebLogic Process Integrator Server.
On UNIX:
cd /bea/wlprocessintegrator1.2.1/bin
For information about the required values, see Configuration Files for WebLogic Process Integrator 1.2.1 for WebLogic Server 6.0 or Configuration Files for WebLogic Process Integrator 1.2.1 for WebLogic Server 5.1 in Appendix A.
The setwlpiserverenv.cmd file will run to set these environment variables for the Server environment when you start the WebLogic Process Integrator Server.
Updating the Client (Studio and Worklist) Environment
To update the client environment:
On Windows NT:
See Configuration Files for WebLogic Process Integrator 1.2.1 for WebLogic Server 6.0 or Configuration Files for WebLogic Process Integrator 1.2.1 for WebLogic Server 5.1 in Appendix A.
The setwlpiclientenv.sh file will run to set these environment variables for the client environment when you start the Studio or the Worklist.
On UNIX:
cd /bea/wlprocessintegrator1.2.1/bin
See Configuration Files for WebLogic Process Integrator 1.2.1 for WebLogic Server 6.0 or Configuration Files for WebLogic Process Integrator 1.2.1 for WebLogic Server 5.1 in Appendix A.
The setwlpiclientenv.sh file will run to set these environment variables for the client environment when you start the Studio or the Worklist.
Customizing WebLogic Process Integrator 1.2.1 for WebLogic Server 6.0
If you have installed WebLogic Process Integrator 1.2.1 for WebLogic Server 6.0 changes to the configuration are made through the WebLogic Server 6.0 Administration Console interface.
This section describes how to make changes to the JDBC Connection Pool and Mail Session configurations through the Administration Console. For more information about using the WebLogic Server 6.0 Administration Console, refer to the WebLogic Server 6.0 documentation set at http://download.oracle.com/docs/cd/E13222_01/wls/docs60.
Launching the Administration Console
To launch the Administration Console:
Your default Web browser is started, then you are prompted to enter the user name and password. Note: If you have not yet changed the password, refer to WebLogic Process Integrator Users and Passwords for the default password.
Refer to the WebLogic Server 6.0 documentation set for instructions on using and navigating the Console.
Customizing Your JDBC Connection Pool Using the Administration Console
To customize the JDBC Connection Pool:
Modifying Your Mail Session Properties Using the Administration Console
To customize the Mail Session Properties:
Customizing WebLogic Process Integrator 1.2.1 for WebLogic Server 5.1
The following sections describe how to customize the WebLogic Process Integrator Mail Session, JDBC configuration, and RDBMS realm properties.
Setting the Mail Session Properties
Before you can use WebLogic Process Integrator to define workflows that include send e-mail actions, you must set the Mail Session properties in the weblogic.properties file and configure the mail session properties for the Workflow processor EJBs as described in the following sections.
Setting the Mail Session Properties in the weblogic.properties File
The weblogic.properties file is located in the WebLogic Process Integrator installation directory. By default the pathname for this directory is c:\bea\wlprocessintegrator1.2.1.
To set the mail session properties:
cd /bea/wlpiprocessintegrator1.2.1
Listing 4-1 Mail Session Example
# Mail session
weblogic.resource.MailSession.com.bea.wlpi.MailSession=\
    mail.from=xyz@mycompany.com,\
    mail.host=smtp.mycompany.com
Configuring the Mail Session Properties for the Workflow Processor EJBs
To configure the mail-session properties:
On Windows NT:
On UNIX:
cd /bea/wlpiprocessintegrator1.2.1
. ./deployertool.sh
The EJB Deployer is displayed. The upper-left panel tree view controls are used to navigate to the hierarchy of entry types as shown in the following figure.
Figure 4-4 WebLogic EJB Deployer Tool Tree View Control
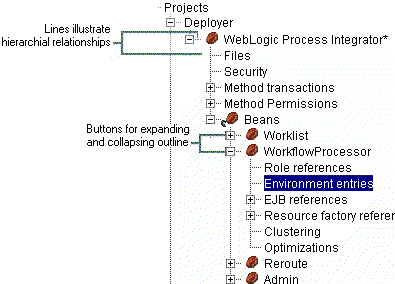
The Environment Entries for the Workflow Processor EJB are displayed in the upper-right panel as shown in the following figure.
Figure 4-5 WebLogic EJB Deployer Tool Showing Environment Entries

For more information, see Deploying EJBs with the Deployer Tool at http://www.weblogic.com/docs51/classdocs/API_ejb/EJB_deploy.html
Updating the JDBC Configuration
The JDBC Configuration is set in the weblogic.properties file located in the WebLogic Process Integrator installation directory. By default the pathname for this directory is \bea\wlprocessintegrator1.2.1.
To edit the JDBC configuration:
cd /bea/wlpiprocessintegrator1.2.1
Listing 4-2 JDBC Connection Pool Properties for Oracle Thin
# Connection pool to Oracle using Thin
weblogic.jdbc.connectionPool.wlpiPool=\
	url=jdbc:oracle:thin:@MyOracleHost:1521:MyDB,\
	driver=oracle.jdbc.driver.OracleDriver,\
	loginDelaySecs=1,\
	initialCapacity=1,\
	maxCapacity=3,\
	capacityIncrement=1,\
	allowShrinking=true,\
	shrinkPeriodMins=15,\
	refreshTestMinutes=10,\
	props=user=MyUserName;password=MyPassword
Listing 4-3 JDBC Connection Pool Properties for MS SQL Server
# Connection pool for MS SQL Server 7.0 database connectivity
weblogic.jdbc.connectionPool.wlpiPool=\
	url=jdbc:weblogic:mssqlserver4:MyDB@MySqlServerHost\
	:1433?sql7=true,\
	driver=weblogic.jdbc.mssqlserver4.Driver,\
	loginDelaySecs=1,\
	initialCapacity=1,\
	maxCapacity=2,\
	capacityIncrement=1,\
	allowShrinking=true,\
	shrinkPeriodMins=15,\
	refreshTestMinutes=10,\
	props=user=MyUserName;password=MyPassword
Listing 4-4 JDBC Connection Pool Properties for Sybase jConnect
# Connection pool to Sybase using jConnect
weblogic.jdbc.connectionPool.wlpiPool=\
        url=jdbc:sybase:Tds:MySybaseHost:5000/MyDB,\
        driver=com.sybase.jdbc.SybDriver,\
        loginDelaySecs=1,\
        initialCapacity=1,\
        maxCapacity=3,\
        capacityIncrement=1,\
        allowShrinking=true,\
        shrinkPeriodMins=15,\
        refreshTestMinutes=10,\
        props=user=MyUserName;password=MyPassword
Listing 4-5 JDBC Connection Pool Properties for Cloudscape
# Connection pool to CLOUDSCAPE
weblogic.jdbc.connectionPool.wlpiPool=\
      url=jdbc:cloudscape:<CLOUDSCAPE_DBNAME>,\
      driver=COM.cloudscape.core.JDBCDriver,\
      initialCapacity=1,\
      maxCapacity=2,\
      capacityIncrement=1,\
      props=user=none;password=none;server=none
Editing the rdbmsrealm.properties File
The rdbmsrealm.properties file is located in the WebLogic Process Integrator installation directory. By default the pathname for this directory is \bea\wlprocessintegrator1.2.1.
To edit the rdbmsrealm.properties file:
cd /bea/wlprocessintegrator1.2.1/bin
Configuring an Alternate Security Realm for BEA WebLogic Process Integrator
By default, WebLogic Process Integrator users, organizations, and roles are maintained in an RDBMS security realm. This section provides instructions for configuring an alternate security realm.
Users, roles, and organizations within BEA WebLogic Process Integrator are maintained in a BEA WebLogic Server security realm. Creating a new user, role, or organization for use in BEA WebLogic Process Integrator means adding those entities to the BEA WebLogic Server security realm. Therefore, the functions of creating and deleting users, roles, and organizations are accessible only if a manageable realm is used and detected by BEA WebLogic Process Integrator.
For an overview of the available security realm types, see "Security Fundamentals" at http://download.oracle.com/docs/cd/E13222_01/wls/docs60/security/concepts.html.
When you install BEA WebLogic Process Integrator, the software is configured to use an RDBMS security realm, where users, groups, and access control lists are read from your configured database.
Using the default RDBMS security realm you can create users, organizations, and roles through the BEA WebLogic Process Integrator Studio interface.
If you use an alternate security realm the realm must conform to certain guidelines. The requirements and relationships between WebLogic Server security realm elements and the WebLogic Process Integrator users, roles, and organizations are summarized below:
WLPIOrg@OrgName
For example, to create an organization called ORG1, you must create the BEA WebLogic Server group WLPIOrg@ORG1.
For example, to assign the users to the ORG1 organization, add them to the WLPIOrg@ORG1 group.
WLPIRole@RoleName+OrgName
For example, to create a Role called Role1 within the ORG1 organization, you must create the BEA WebLogic Server group WLPIRole@Role1+ORG1.
For example, to assign users to Role1 assign them to the WLPIRole@Role1+ORG1 group.
Once a manageable security realm is configured and populated in conformance with the above guidelines, you can create additional users, roles, and organizations through the WebLogic Process Integrator Studio interface.

|

|

|
|
|
|
Copyright © 2001 BEA Systems, Inc. All rights reserved.
|