Configuring WebLogic Servers and Clusters
This section discusses the following topics:
Overview of Server and Cluster Configuration
The persistent configuration for a domain of WebLogic Servers and clusters is stored in an XML configuration file. You can modify this file in three ways:
- Through the Administration Console, BEA's graphical user interface (GUI) for managing and monitoring a domain configuration. This is intended as the main way to modify or monitor the domain configuration.
- By writing a program to modify the configuration attributes, based on the configuration Application Programmatic Interface (API) provided with WebLogic Server.
- By running the WebLogic Server command-line utility for accessing configuration attributes of domain resources. This is provided for those who want to create scripts to automate domain management.
Role of the Administration Server
IWhichever method you choose, the Administration Server must be running when you modify your domain configuration.
The Administration Server is the WebLogic Server on which the Administration Service runs. The Administration Service provides the functionality for WebLogic Server, and manages the configuration for an entire domain.
By default an instance of WebLogic Server is treated as an Administration Server. When the Administration Server starts, it loads the configuration files, which are stored, by default, in a directory called config under the WEBLOGIC_HOME directory. The config directory has a sub-directory for each domain that is available to the Administration Server. The actual configuration file resides inside the domain-specific directory and is calledconfig.xml. By default, when an Administration Server starts, it looks for configuration file (config.xml) under the default domain directory, which is named -mydomain.
Each time the Administration Server is successfully started, a back up configuration file named config.xml.booted is created in the domain specific directory.In the unlikely event that the config.xml file should become corrupted during the lifetime of the server, it is possible to revert to this previously known, good configuration.
A domain may consist of only one WebLogic Server, which operates as the Administration Server.
A typical production environment contains an Administration Server and multiple WebLogic Servers. When you start the servers in such a domain, the Administration Server is started first. As each additional server is started, it is instructed to contact the Administration Server for its configuration information. In this way, the Administration Server operates as the central control entity for the configuration of the entire domain. No more than one Administration Server can be active in a domain. Only the Administration Server can modify the configuration files when it is running.
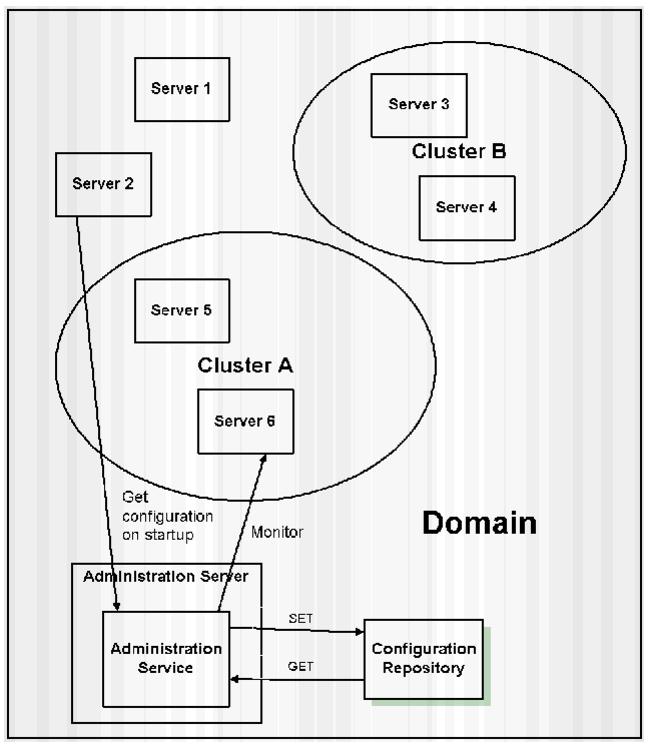
Figure 3-1 WebLogic Server Configuration
Starting the Administration Console
The main point of access to the Administration Server is through the Administration Console. To open the Administration Console, complete the following procedure:
http://host:port/console
In this URL, host is the host name or IP address of the machine on which the Administration Server is running and port is the address of the port at which the Administration Server is listening for requests (by default, 7001).
The system prompts you to enter a user ID and password. Enter your UserID and password. The system performs an authentication and authorization check: it verifies the user ID and password against the user database.
If you are authorized to work with the console, then the console is displayed in the access mode that the system administrator originally assigned to you: either ReadOnly or Read/Write
How Dynamic Configuration Works
WebLogic Server allows you to change the configuration attributes of domain resources dynamically, that is, while servers are running. In most cases you do not need to restart WebLogic Server for your changes to take effect. When an attribute is reconfigured, the new value is immediately reflected in both the current run-time value of the attribute and the persistent value stored in the XML configuration file.
There are exceptions, however. If, for example, you change a WebLogic Server's listen port, the new address will not be used until the next time you start the affected server. In that case, if you modify the value, you are changing the persistent value stored in the XML file and the current run-time configuration value for the attribute may differ from that persistently stored value. The Administration Console indicates if the persistent and runtime values for a configuration attribute are not the same using an icon which changes to an alert  when the server needs to be restarted for changes to take effect.
The console does a validation check on each attribute that users change. The errors that are supported are out-of-range errors and datatype mismatch errors. In both cases, an error popup displays telling the user that an error has occurred.
Once the Administration Console has been started, if another process captures the Listen Port assigned to the Administration Server, you should remove the process that has captured the server. If you are not able to remove the process that has captured the Listen Port assigned to the Administration Server, you must edit the Config.XML file to change the assigned Listen Port. For information about editing the Config.XML file, please see the Configuration Reference.
Planning A Cluster Configuration
When planning a cluster configuration, keep in mind the following constraints on the networking environment and the cluster configuration.
- The machine(s) you will be using as WebLogic hosts for the cluster must have
permanently assigned, static IP addresses. You cannot use dynamically-assigned IP
addresses in a clustering environment. If the servers are behind a firewall and the
clients are in front of the firewall, each server must have a public static IP address
that can be reached by the clients.
- All WebLogic Servers in a cluster must be located on the same local area network
(LAN) and must be reachable via IP multicast.
- All servers in a cluster must be running the same version of WebLogic Server.
Configure the Servers in your cluster to support the particular mix of services that you are offering.
- For EJBs that are using JDBC connections, all the servers that deploy a particular EJB must have the same deployment and persistence configuration. This means configuring the same JDBC connection pool on each server.
- Every machine that hosts servlets must maintain the same list of servlets with identical ACLs (access control lists).
- If your client application uses JDBC connection pools directly, you must create identical connection pools (with identical ACLs) on each WebLogic Server. This means that it must be possible to create any connection pool in use on all machines in the cluster. If, for example, you configure a pool of connections to a Microsoft SQL Server database on an NT server running WebLogic, you cannot use this connection pool in a cluster that contains any non-Windows machines (that is, any machines that cannot support a Microsoft SQL Server connection).
- Other configuration details may differ for various members in the cluster. You might, for example, configure a Solaris server to process more login requests than a small NT workstation. Such differences are acceptable. Thus, in the example given here, the performance-specific attributes of individual cluster members may be configured with different values, so long as the service configuration for all members is identical.In practice, this often results in WebLogic Servers in the cluster being identically configured in all areas to do with WebLogic services, class files, and external resources (such as databases).
Server Configuration Tasks
Server configuration tasks that can be accomplished from the Administration Console include:
- Configuring an individual server using the Server node of the Administration Console. The attributes that can be changed using this node include the Server Name, the ListenPort, and the IP Address.
- Cloning an individual server using the Server node of the Administration Console. The individual server is cloned, maintaining the attribute values in the original server and the name of the new server is set on the Configuration portion of the Server node.
- Deleting a server using the Server node of the Administration Console. Click the delete icon for the server you want to delete. A dialog will appear asking you to confirm the deletion of the server. Click Yes to confirm your decision to delete the server.
- Viewing a server log using the Server node of the Administration Console. Click the server you want to monitor. Click the Monitoring tab. Click the View Server Log link and monitor the server log in the right hand pane of the Administration Console.
- Viewing a server JNDI tree using the Server node of the Administration Console. Click the server you want to monitor. Click the Monitoring tab. Click the View JNDI Tree link and view the tree in the right hand pane of the Administration Console.
- Viewing server execute queues using the Server node of the Administration Console. Click the server you want to monitor. Click the Execute Queues link and view the table in the right hand pane of the Administration Console.
- Viewing server execute threads using the Server node of the Administration Console.Click the server you want to monitor. Click the Execute Queues link and view the table in the right hand pane of the Administration Console.
- Viewing server sockets using the Server node of the Administration Console. Click the server you want to monitor. Click the View Sockets link and view the table in the right hand pane of the Administration Console.
- Viewing server connections using the Server node of the Administration Console. Click the server you want to monitor. Click the View Connections link and view the table in the right hand pane of the Administration Console.
- Forcing garbage collection on a server using the Server node of the Administration Console. Click the server you want to monitor. Click the JVM tab. Click the Force Garbage Collection link. A dialog will appear to confirm that garbage collection has taken place.
- Monitoring server security using the Server node of the Administration Console. Click the server you want to monitor. Click the Monitoring tab. Click the Security tab. The security information will be displayed.
- Viewing server version using the Server node of the Administration Console. Click the server you want to monitor. Click the Version tab. The version data for this server will be displayed.
- Monitoring server clusters using the Server node of the Administration Console. Click the server you want to monitor. Click the Cluster tab. The cluster data for this server will be displayed.
- Deploying EJBs on a server using the Server node of the Administration Console. Click the server on which you want to deploy EJBs. Click the EJB you want to deploy and use the move control to move it to the Chosen column. Click Apply to save your selections.
- Monitoring all EJB deployments on a server using the Server node of the Administration Console. Click the server on which you want to monitor EJBs. Click the Monitor All EJB Deployments link to display the EJB Deployments table.
- Deploying web application components on a server using the Server node of the Administration Console. Click the server on which you want to deploy web applications. Click the web application you want to deploy and use the move control to move it to the Chosen column. Click Apply to save your selections.
- Monitoring all web application components on a server using the Server node of the Administration Console. Click the server on which you want to monitor web applications. Click the Monitor All Web Applications link to display the Web Application Deployments table.
- Deploy startup and shutdown classes on a server using the Server node of the Administration Console. Click the server on which you want to deploy startup classes. Click the startup class you want to deploy and use the move control to move it to the Chosen column. Click Apply to save your selections. Use the same process to deploy shutdown classes using the Shutdown Class control.
- Assigning web servers to a server using the Server node of the Administration Console. Click a server for web-application deployment. A dialog displays in the right-hand pane showing the tabs associated with this instance. Click one or more web applications in the Available column that you want to deploy on the server and use the mover control to move the web application you selected to the Chosen column. Click Apply to save your assignments.
- Assigning JDBC connection pools to a server using the Server node of the Administration Console. Click a server for web-server assignment. Click one or more JDBC connection pools in the Available column that you want to assign to the server and use the mover control to move the JDBC connection pools you selected to the Chosen column. Click Apply to save your assignments.
- Monitoring all JDBC connection pools on a server using the Server node of the Administration Console. Click a server for JDBC connection-pool monitoring. Click the Monitor All JDBC Connection Pools on This Server text link. The JDBC connection pools table displays in the right-hand pane showing all the connection pools assigned to this server.
- Assigning WLEC connection pools to a server using the Server node of the Administration Console. Click a server for WLEC connection-pool assignment. Click one or more WLEC connection pools in the Available column that you want to assign to the server and use the mover control to move the WLEC connection pools you selected to the Chosen column.
- Monitoring all WLEC connection pools on a server using the Server node of the Administration Console. Click a server for WLEC connection-pool monitoring. Click the Monitor All WLEC Connection Pools on This Server text link on the WLEC tab. The WLEC Connection Pools table displays in the right-hand pane showing all the connection pools assigned to this server.
- Assigning JMS servers, connection factories, and destinations to a server using the Server node of the Administration Console. Click a server for JMS assignments. Click one or more JMS servers in the Available column that you want to assign to the server. Click the mover control to move the JMS servers you selected to the Chosen column. Repeat using the JMS Connection Factories and JMS Destinations controls to assign connection factories and destinations t
- Assigning XML registries to a server using the Server node of the Administration Console. Click a sever for XML registry assignment. Click a registry from the XML Registry drop-down list box. Click Apply to save your selection.
- Assigning mail sessions to a server using the Server node of the Administration Console. Click a server for mail session assignment. Click one or more mail sessions in the Available column that you want to assign to the server. Use the mover control to move the mail sessions you selected to the Chosen column. Click Apply to save your selections.
- Assigning File T3s to a server using the Server node of the Administration Console. Click a server for file T3 assignment. Click one or more file T3s in the Available column that you want to assign to the server. Use the mover control to move the file T3s you selected to the Chosen column. Click Apply to save your selections.
Cluster Configuration Tasks
Cluster configuration tasks that can be accomplished from the Administration Console include:
- Configuring a cluster of servers using the Cluster node of the Administration Console. The attributes that can be changed using this node include the Cluster Name, the Cluster ListenPort, and the names of the servers in the cluster.
- Cloning a cluster of servers using the Cluster node of the Administration Console. The cluster is cloned, maintaining the attribute values and individual servers in the original cluster and the name of the new cluster is set on the Configuration portion of the Server node.
- Monitoring servers in a cluster using the Cluster node of the Administration Console. Click a cluster for server monitoring. Click the Monitor Server Participation in This Cluster text link. The server table displays in the right-hand pane showing all the servers assigned to this cluster.
- Assigning servers to a cluster using the Cluster node of the Administration Console. Click a cluster for server assignment. Click one or more servers in the Available column that you want to assign to the cluster. Use the mover control to move the servers you selected to the Chosen column. Click Apply to save your selections.
- Deleting a cluster using the Cluster node of the Administration Console. Click the Delete icon in the row of the cluster you want to delete. A dialog displays in the right-hand pane asking you to confirm your deletion request. Click Yes to confirm your decision to delete the cluster.
Creating a New Domain
This section describes how to create a new domain. The configuration information for all of the WebLogic administrative domains reside in the configuration repository, which is located under the /config directory. Each domain has a separate subdirectory under the /config directory. The name of the subdirectory for a domain must be the name of that domain.
When you first install WebLogic Server software, it is recommended that you create a zip file that has a copy of the default /mydomain configuration directory. You should keep a copy of this zip file as a backup that you can use for creating new domains. This subdirectory contains components that are required for a working configuration, such as a fileRealm.properties file and a configuration file.
To create a new domain, do the following:
- Start the Administration Server under an existing domain such as the default
mydomain.
- Invoke the Administration Console by pointing your browser to:
http://hostname:port/console
where hostname is the name of the machine where you started the Administration Server and port is the Administration Server's listen port (default is 7001).
- Select mydomain
 Create or edit other domains.
This displays the domains table.
- Select DefaultCreate a new Domain.
Enter the name of the new domain and click Create.
- Select the new domain from the list of domains at left to make that the current
domain.
- Now you will need to create an Administration Server entry for the new domain:
- Select ServersCreate a new Server.
- Enter the name of the new Administration Server and click Create.
- The Administration Console will have created a new subdirectory with the name
of your domain and a configuration file, config.xml, under that subdirectory.
Now you need to create an \applications subdirectory in that domain
directory. You can create an \applications subdirectory in a command shell or,
on Windows, by using Explorer.
- Next, copy the Administration Console application to the new \applications
directory that you just created. To do this, copy the file console.war from the
\applications directory under mydomain to the new \applications
directory.
- The default mydomain directory contains start scripts for starting the WeLogic
Server. For Windows installations, these are startWebLogic.cmd and
startManagedWebLogic.cmd. For UNIX installations, these are
startWebLogic.sh and startManagedWebLogic.sh. Copy these start scripts
to the new domain directory.
- You will need to edit the start scripts in a text editor. By default, the name of the
domain is set as:
-Dweblogic.Domain=mydomain
Replace mydomain with the name of the new domain.
By default the name of the Administration Server is set as:
-Dweblogic.Name=MyServer
Replace MyServer with the name of the new Administration Server.
- At the end of the start script there is a cd command:
cd config\mydomain
Replace mydomain with the subdirectory name of the new domain. There is also a line in the start script that reads:
echo startWebLogic.cmd must be run from the config\mydomain directory.
Replace mydomain here with the name of the new domain.
- Copy SerializedSystemIni.dat and fileRealm.properties from the
default mydomain directory to your new domain directory. Do not boot the new
Administration Server before copying these files.
- If you created a password.ini file during installation, you must also copy the
password.ini file from the default mydomain directory to the directory for your
new domain.
Once you have completed this procedure, you can start the Administration Server for your new domain.

|
|
|
Copyright © 2000 BEA Systems, Inc. All rights reserved.
Required browser: Netscape 4.0 or higher, or Microsoft Internet Explorer 4.0 or higher.
|

