|
| e-docs > WebLogic Server > Securing WebLogic Resources > Security Policies |
|
Securing WebLogic Resources
|
A security policy is an association between a WebLogic resource and one or more users, groups, or security roles that is designed to protect the WebLogic resource against unauthorized access.
Note: Security policies replace the access control lists (ACLs) and permissions that were used to protect WebLogic resources in previous releases of WebLogic Server.
The following sections provide more information about security policies:
Security Policy Granularity and Inheritance
Security policies are always scoped to a WebLogic resource, but because WebLogic resources are hierarchical, the level at which you define a security policy is up to you. For example, you can define security policies on: entire enterprise applications (EARs); an EJB (Enterprise JavaBean) JAR containing multiple EJBs; a particular EJB within that JAR; or a single method within that EJB.
If you create a security policy for a type of WebLogic resource (for example, EJB resources), all new instances of that WebLogic resource inherit the security policy. (For more information about the types of WebLogic resources, see Types of WebLogic Resources.) This inheritance of security policies means that you can secure multiple WebLogic resources efficiently. Out of the box, WebLogic Server secures each WebLogic resource type with a default security policy that is inherited by all instances of that WebLogic resource. For more information, see Default Security Policies.
A security policy created for a specific instance of a WebLogic resource will override any security policy assigned to the WebLogic resource type. So, if you create a security policy for a particular EJB, this security policy (and not the one you created for the EJB resource type) will be used.
Security Policy Storage and Prerequisites for Use
Security policies are stored in the security provider database of the Authorization provider that is configured in the default (active) security realm. By default, the WebLogic Authorization provider is configured, and security policies are stored in the embedded LDAP server.
When creating a security policy with a user or group, the user or group must be defined in the security provider database of the Authentication provider that is configured in the default security realm. When creating a security policy with a security role, the security role (whether global or scoped) must be defined in the security provider database of the Role Mapping provider that is configured in the default security realm. By default, the WebLogic Authentication and Role Mapping providers are configured, and the default groups and default global roles are stored in the databases for these security providers (also the embedded LDAP server).
Note: For more information about the WebLogic Authentication, Authorization, and Role Mapping providers, see "The WebLogic Security Providers" in the Introduction to WebLogic Security.
By default, WebLogic Server defines the security policies shown in Table 5-1. These security policies are defined for each type of WebLogic resource described in Types of WebLogic Resources, and are based on the default global roles and default groups.
Warning: Do not modify the default security policies for Administrative and Server resources to make them more restrictive. Eliminating some of the existing security roles might negatively impact the functioning of WebLogic Server. However, if you like, you can make the default security policies more inclusive (for example, by adding new security roles).
Note: For more information about the WebLogic resources shown in Table 5-1, see Types of WebLogic Resources.
You can add to the default security policies by creating your own, as described in Working With Security Policies.
The WebLogic Server Administration Console, the weblogic.Admin command, and MBean APIs are secured using the default security policies, which are based on the default global roles and default groups described in Table 4-1and Table 4-6. Therefore, to use the Administration Console, a user must belong to one of these default groups or be granted one of these global roles. Additionally, administrative operations that require interaction with MBeans are secured using the MBean protections described in the "Protecting System Administration Operations" section of the WebLogic Server Administration Guide. Therefore, interaction with the following protected public interfaces typically must satisfy both security schemes.
For information about using this public interface, see the Administration Console Online Help.
For information about using this public interface, see Protected MBean Attributes and Operations and "weblogic.Admin Command-Line Reference" in the WebLogic Server Command Line Reference.
For information about using these APIs, see Protected MBean Attributes and Operations and Programming WebLogic Management Services with JMX.
Components of a Security Policy: Policy Conditions, Expressions, and Policy Statements
A policy condition is a condition under which a security policy will be created. The policy conditions that are available in this release of WebLogic Server are:
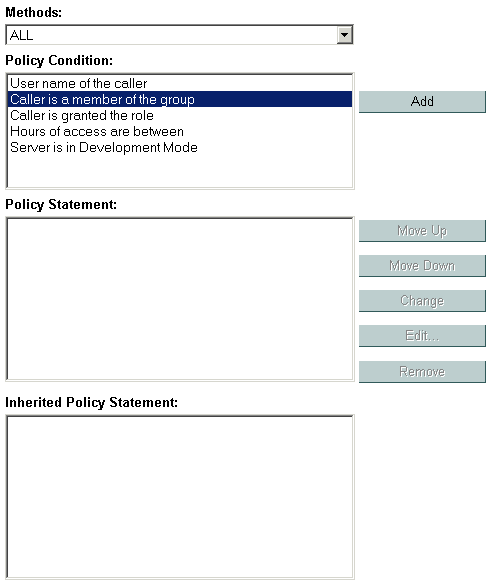
These policy conditions, along with the specific information you supply for the condition (such as an actual user name, group, or security role, or start/stop times), are called expressions. An example of an expression that you may see in the WebLogic Server Administration Console is shown in Figure 5-1.
In this expression example, the first line is the policy condition, the second line is the specific information you supply for the condition—in this case, a group called FullTimeBankEmployees.
A policy statement is the collection of expressions that define who is granted access to a WebLogic resource, and is therefore the main part of any security policy you create. The ability to use multiple expressions means that you can create complex security policies that meet your organization's security requirements. The use of and and or between these expressions, as well as the ordering of the expressions, is also an important feature:
Notes: The entire policy statement must be true in order for security policy to be applied. More restrictive expressions should come later in a policy statement. WebLogic Server evaluates expressions in a policy statement from left to right.
An example of a policy statement that you may see in the Administration Console is shown in Figure 5-2.
Figure 5-2 Policy Statement Example
In this policy statement example, there are two expressions: the first and second lines contain an expression based on the Caller is Granted the Role policy condition, and the third and fourth lines contain another expression based on the Hours of Access are Between policy condition.
Working With Security Policies
The following sections provide instructions for working with security policies for the various types of WebLogic resources:
Notes: The instructions for working with security policies vary slightly from WebLogic resource to WebLogic resource. Be sure to follow any variations noted in this procedure that pertain to the type of WebLogic resource with which you are working. For more information, see Types of WebLogic Resources.
In this release of WebLogic Server, you must keep track of the security policies you create. There is currently no listing mechanism for previously created security policies in the WebLogic Server Administration Console.
To create a security policy for a WebLogic resource, follow these steps:
Step 1: Select the WebLogic Resource
Follow the instructions in the appropriate section to select the type of WebLogic resource:
In the left pane of the WebLogic Server Administration Console, right-click the name of the WebLogic Server domain (for example, examples), and choose Define Policy... to display the Policy Editor page (see Figure 5-3, "Policy Editor Page," on page 5-9).
Notes: In this version of WebLogic Server, you can only secure the unlockuser method. For more information about user lockouts, see "Protecting User Accounts" in Managing WebLogic Security.
Notice the Caller is Granted the Role: Admin policy statement that the Administrative resource you selected has inherited from the default security policy associated with the Administrative resource type. If you proceed to Step 2: Create the Policy Conditions, you will be overriding this default security policy. For more information, see Default Security Policies and Security Policy Granularity and Inheritance.
Note: Notice that there are no default policy statements for Application resources. (For more information, see Default Security Policies.)
If you want to create a security policy for a package of EJB classes (such as ejb20.basic.beanManaged.*) that will be accessed by a COM client, follow these steps:
Note: If you create a security policy for a package of EJB classes that will be accessed by a COM client and want to use scoped roles in the Caller is Granted the Role condition, be sure to use the scoped role you associated with the package of EJB classes (described in COM Resources).
If you want to create a security policy for a package of Java classes (such as java.util.*) or individual classes (such as java.util.Collection) that will be accessed by a COM client, follow these steps:
Notes: The value you enter in the COM class field is a Java class or package name that is exposed to COM via the jCOM bridge.
Notice that there are no default policy statements for COM resources. (For more information, see Default Security Policies.)
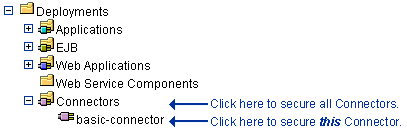
To secure all the Connectors with a single security policy, right-click Connectors. To secure a particular Connector, expand Connectors, then right-click the name of a Connector. Figure 5-4 illustrates where you might click, using the basic-connector Connector as an example.
Figure 5-4 Deployments Portion of the Administration Console Navigation Tree
Note: Notice the Caller is Granted the Role: Everyone policy statement that the EIS resource you selected has inherited from the default security policy associated with the EIS resource type. If you proceed to Step 2: Create the Policy Conditions, you will be overriding this default security policy. For more information, see Default Security Policies and Security Policy Granularity and Inheritance.
Note: These instructions also apply to Message-driven Beans (MDBs).
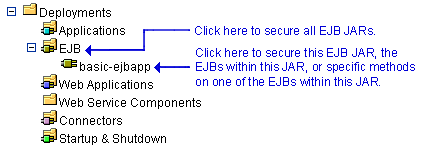
To secure all the EJB JARs with a single security policy, right-click EJB. To secure a particular EJB JAR, an EJB within a JAR, or a method on one of the EJBs within a JAR, expand EJB, then right-click the name of an EJB JAR. Figure 5-5 illustrates where you might click, using the basic-ejbapp JAR as an example.
Figure 5-5 Deployments Portion of the Administration Console Navigation Tree
If you are creating the security policy for a particular EJB within an EJB JAR, or a method on one of the EJBs within the JAR, follow these steps:
Note: Notice the Caller is Granted the Role: Everyone policy statement that the EJB resource you selected has inherited from the default security policy associated with the EJB resource type. If you proceed to Step 2: Create the Policy Conditions, you will be overriding this default security policy. For more information, see Default Security Policies and Security Policy Granularity and Inheritance.
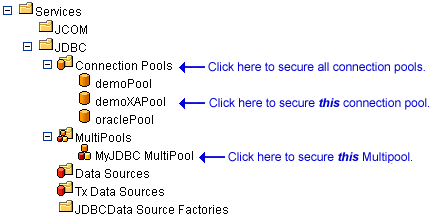
To secure all the connection pools with a single security policy, right-click Connection Pools. To secure a particular connection pool, expand Connection Pools, then right-click the name of a connection pool. To secure individual MultiPools, expand MultiPools, then right-click the name of a MultiPool.
Notes: You cannot secure all MultiPools with a single security policy.
If a security policy controls access to a connection pool that is in a MultiPool, access checks will be performed at both levels of the JDBC resource hierarchy (once at the MultiPool level, and again at the individual connection pool level). As with all types of WebLogic resources, this double checking ensures that the most restrictive security policy controls access.
Figure 5-6 illustrates where you might click, using various connection pools and a MultiPool as an example.
Figure 5-6 Services Portion of the Administration Console Navigation Tree
Note: Notice the Caller is Granted the Role: Everyone policy statement that the JDBC resource you selected has inherited from the default security policy associated with the JDBC resource type. If you proceed to Step 2: Create the Policy Conditions, you will be overriding this default security policy. For more information, see Default Security Policies and Security Policy Granularity and Inheritance.
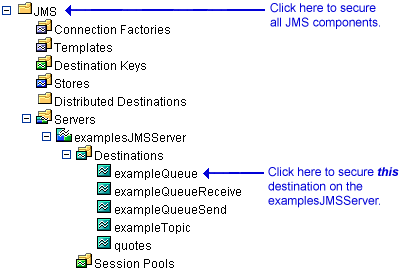
To create a security policy for all JMS components, right-click JMS. To create a security policy for a particular destination (JMS queue or JMS topic) on a JMS server, expand Servers, then the JMS server and the Destinations node, then right-click the name of a destination. Figure 5-7 illustrates where you might click, using various destinations on the examplesJMSServer as an example.
Figure 5-7 Services Portion of the Administration Console Navigation Tree
Note: Notice the Caller is Granted the Role: Everyone policy statement that the JMS resource you selected has inherited from the default security policy associated with the JMS resource type. If you proceed to Step 2: Create the Policy Conditions, you will be overriding this default security policy. For more information, see Default Security Policies and Security Policy Granularity and Inheritance.
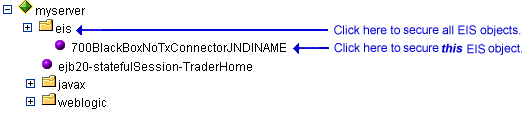
To secure a group of objects, right-click the node that represents that object type. To secure a particular object, expand the node that represents that object, then right-click the name of an object. Figure 5-8 illustrates where you might click, using the examplesServer JNDI tree as an example.
Figure 5-8 New Administration Console Window for examplesServer JNDI Tree
Note: Notice the Caller is Granted the Role: Everyone policy statement that the JNDI resource you selected has inherited from the default security policy associated with the JNDI resource type. If you proceed to Step 2: Create the Policy Conditions, you will be overriding this default security policy. For more information, seeDefault Security Policies and Security Policy Granularity and Inheritance.
To create a security policy for all servers, right-click Servers. To create a security policy for a particular server, expand Servers, then right-click the name of a server. Figure 5-9 illustrates where you might click, using the examplesServer as an example.
Figure 5-9 Servers Portion of the Administration Console Navigation Tree
Note: Notice the Caller is Granted the Role: Admin or Caller is Granted the Role: Operator policy statement that the server resource you selected has inherited from the default security policy associated with the server resource type. If you proceed to Step 2: Create the Policy Conditions, you will be overriding this default security policy. For more information, see Default Security Policies and Default Security Policies.
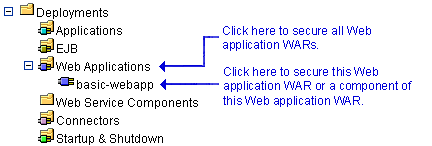
To secure all the Web applications (WARs) with a single security policy, right-click Web Applications. To secure a particular WAR or a component of a WAR (for example, a specific servlet or JSP), expand Web Applications, then right-click the name of a Web application (WAR). Figure 5-10 illustrates where you might click, using the basic-webapp WAR as an example.
Figure 5-10 Deployments Portion of the Administration Console Navigation Tree
If you are creating the security policy for a particular WAR or component of the WAR, follow these steps:
Note: Notice the Caller is Granted the Role: Everyone policy statement that the URL resource you selected has inherited from the default security policy associated with the URL resource type. If you proceed to Step 2: Create the Policy Conditions, you will be overriding this default security policy. For more information, see Default Security Policies and Security Policy Granularity and Inheritance.
Step 2: Create the Policy Conditions
Note: Because the JMS subsystem performs its security check only once and this condition requires a subsequent security check, you should not use the Hours of Access are Between condition if you are securing a JMS resource.
If you selected one of the other conditions, follow these steps:
Move Up and Move Down change the ordering of the highlighted user or group name. Change switches the highlighted and and or statements between expressions. Remove deletes the highlighted user or group name.
To modify a security policy for a WebLogic resource, follow these steps:
To delete a security policy for a WebLogic resource, follow these steps:

|

|

|