|
| e-docs > WebLogic Server > Securing WebLogic Resources > Types of WebLogic Resources |
|
Securing WebLogic Resources
|
A WebLogic resource represents an underlying WebLogic Server entity that can be protected from unauthorized access using security roles and security policies.
WebLogic resources are hierarchical. Therefore, the level at which you define these security roles and security policies is up to you. For example, you can define security roles and security policies on an entire enterprise application (EAR), an Enterprise JavaBean (EJB) JAR containing multiple EJBs, a particular EJB within that JAR, or a single method within that EJB.
WebLogic Server defines the resources described in the following sections:
An Administrative resource is a type of WebLogic resource that allows users to perform administrative tasks. You secure Administrative resources when you want to protect the WebLogic Server Administration Console, the weblogic.Admin tool, and MBean APIs.
Administrative resources are limited in scope. Currently, you can only secure the User Lockout operation on an Administrative resource using the WebLogic Server Administration Console. This operation provides compatibility with WebLogic Server 6.x., and allows users who meet the security requirements to unlock users who have been locked out of their accounts. For more information about user lockout, see "Protecting User Accounts" in Managing WebLogic Security.
An Application resource is a type of WebLogic resource that represents an enterprise application, packaged as an EAR (Enterprise Application aRchive) file. Unlike the other types of WebLogic resources, the hierarchy of an Application resource is a mechanism for containment, rather than a type hierarchy. You secure an Application resource when you want to protect multiple WebLogic resources that comprise the enterprise application (for example, EJB resources, URL resources, and Web Service resources) at one time. In other words, securing an enterprise application will cause all the WebLogic resources within that application to inherit its security configuration.
You can also secure the WebLogic resources that comprise an enterprise application (EAR) individually. Doing both will cause the security configuration inherited from the enterprise application to be overridden for that WebLogic resource.
EIS (Enterprise Information System) Resources
A J2EE Connector is a system-level software driver used by an application server such as WebLogic Server to connect to an EIS (Enterprise Information System). BEA supports Connectors developed by EIS vendors and third-party application developers that can be deployed in any application server supporting the Sun Microsystems J2EE Platform Specification, Version 1.3. Connectors, also known as Resource Adapters, contain the Java, and if necessary, the native components required to interact with the EIS.
An EIS (Enterprise Information System) resource is a specific type of WebLogic resource that is designed as a Connector. To secure access to an EIS, you can create security policies and security roles for all Connectors as a group, or individual Connectors.
Notes: Information about securing EIS resources can be found both in this document, and in the "Security" section of Programming WebLogic J2EE Connectors.
Instructions for creating the credential maps for use with EIS resources are available in the "Single Sign-On with Enterprise Information Systems" section of Managing WebLogic Security.
WebLogic jCOM is a software bridge that allows bidirectional access between Java/J2EE objects deployed in WebLogic Server, and Microsoft ActiveX components available within Microsoft Office family of products, Visual Basic and C++ objects, and other Component Object Model/Distributed Component Object Model (COM/DCOM) environments.
A COM resource is a specific type of WebLogic resource that is designed as a program component object according to Microsoft's framework. To secure COM components accessed through BEA's bi-directional COM-Java (jCOM) bridging tool, you can create security policies and security roles for packages containing multiple COM classes, or individual COM classes.
Note: Information about securing COM resources can be found both in this document and in the "Configuring Access Control" section of Programming WebLogic jCOM.
JDBC (Java DataBase Connectivity) Resources
A JDBC (Java DataBase Connectivity) resource is a specific type of WebLogic resource that is related to JDBC. To secure JDBC database access, you can create security policies and security roles for all connection pools as a group, individual connection pools, and MultiPools. When you secure individual connection pools, you can choose whether to protect all operations on the connection pool, or specify one of the following operations:
Note: If a security policy controls access to a connection pool that is in a MultiPool, access checks will be performed at both levels of the JDBC resource hierarchy (once at the MultiPool level, and again at the individual connection pool level). As with all types of WebLogic resources, this double checking ensures that the most restrictive security policy controls access.
JMS (Java Messaging Service) Resources
A JMS (Java Messaging Service) resource is a specific type of WebLogic resource that is related to JMS. To secure JMS destinations, you can create security policies and security roles for all destinations (JMS queues and JMS topics) as a group, or an individual destination (JMS queue or JMS topic) on a JMS server. When you secure a particular destination on a JMS server, you can choose whether to protect all operations on the destination, or specify the send, browse, or receive operations (for a JMS queue) and the send and receive operations (for a JMS topic).
JNDI (Java Naming and Directory Interface) Resources
JNDI provides a common-denominator interface to many existing naming services, such as LDAP (Lightweight Directory Access Protocol) and DNS (Domain Name System). These naming services maintain a set of bindings, which relate names to objects and provide the ability to look up objects by name. JNDI allows the components in distributed applications to locate each other.
JNDI is defined to be independent of any specific naming or directory service implementation. It supports the use of a number of methods for accessing various new and existing services. This support allows any service-provider implementation to be plugged into the JNDI framework using the standard service provider interface (SPI) conventions.
A JNDI (Java Naming and Directory Interface) resource is a specific type of WebLogic resource that uses the industry-standard JNDI SPI to enable connectivity to heterogeneous enterprise naming and directory services. To secure access to the JNDI tree, you can create security policies and security roles for the entire JNDI tree, or an individual branch of that tree. Regardless, you can choose whether to protect all operations, or specify the lookup, modify, or list operations.
Many engineering teams divide administration responsibilities into distinct roles. Each project might give only one or two team members permission to deploy applications or modules, but allow all team members to view the server configuration. As described in Security Policies, WebLogic Server supports this division of responsibility by allowing administrators to secure WebLogic resources with security policies. Typically, these security policies are based on whether users or groups of users are granted a particular security role.
A Server resource is a specific type of WebLogic resource that is related to WebLogic Server instances. This type of WebLogic resource includes operations that start, shut down, lock, or unlock servers, and is therefore the type of WebLogic resource with which most administrators interact. Like other types of WebLogic resources, a Server resource and its operations are secured with security policies. However, because the configuration of a server is exposed through a set of MBeans, a Server resource also has additional protections that affect how administrators access MBean operations.
Note: Information about securing Server resources can be found both in this document and in the "Protecting System Administration Operations" section of the WebLogic Server Administration Guide.
URL (Web) and EJB (Enterprise JavaBean) Resources
A URL (Web) resource is a specific type of WebLogic resource that is related to Web applications. To secure Web applications, you can create security policies and security roles for a WAR (Web Application aRchive) file or individual components of a Web application (such as servlets and JSPs). An EJB (Enterprise JavaBean) resource is a specific type of WebLogic resource that is related to EJBs. To secure EJBs, you can create security policies and security roles for EJB JARs, individual EJBs within an EJB JAR, or individual methods on an EJB.
Because the Java 2 Enterprise Edition (J2EE) platform standardizes Web application and EJB security in deployment descriptors, WebLogic Server integrates this standard mechanism with its Security Service to give you a choice of two techniques for securing URL and EJB resources. The technique you choose will affect the procedure you will follow, and will require different prerequisite settings in the WebLogic Server Administration Console. For more information, see Techniques for Securing URL and EJB Resources and Prerequisites for Securing URL and EJB Resources, respectively.
Note: The instructions for EJB resources provided in this document also apply to Message-driven Beans (MDBs).
Techniques for Securing URL and EJB Resources
The following sections describe the different techniques for securing URL (Web) and EJB (Enterprise JavaBean) resources in more detail:
Using the WebLogic Server Administration Console
The first technique for securing your URL and EJB resources is to use the WebLogic Server Administration Console. The primary benefit of this technique is unified security management. Instead of requiring developers to modify multiple deployment descriptors when organizational security requirements change, administrators can modify all security configurations from a centralized, graphical user interface. Users, groups, security roles, and security policies can all be defined using the Administration Console. As a result, the process of making changes based on updated security requirements becomes more efficient.
With the exception of Web Service resources, you can secure all types of WebLogic resources using this technique. Therefore, the instructions for securing WebLogic resources contained within this document are written specifically for users of the Administration Console.
The second technique for securing your URL and EJB resources is to use the Java 2 Enterprise Edition (J2EE) and WebLogic deployment descriptors. The primary benefit of this technique is that it is a widely-known, standard technique for adding declarative security to URLs and EJBs. It may also be the technique with which most organizations are familiar. This technique implies that users and groups may be defined in the WebLogic Server Administration Console, but that security roles and security policies may be specified in the web.xml, weblogic.xml, ejb-jar.xml, and weblogic-ejb-jar.xml deployment descriptors.
Notes: When using this technique, you can edit deployment descriptors using a text editor of your choice, or by using the Administration Console. (See the "Web Application Deployment Descriptor Editor Help" and "Using the EJB Deployment Descriptor Editor" in Programming WebLogic Enterprise JavaBeans for more information on using the Administration Console.)
Starting in WebLogic Server 7.0 SP02, there is a special tag called <global-role/> that allows you to specify on a role-by-role basis whether a security role mapping is defined in the deployment descriptors or in the Administration Console. For more information about using this tag with URL or EJB resources, see "Using the <global-role/> Tag with Web Applications" or "Using the <global-role/> Tag with EJBs" in Programming WebLogic Security, respectively.
You can secure only URL and EJB resources using this technique. The instructions for using deployment descriptors are available in the "Using Declarative Security with Web Applications" and "Using Declarative Security with EJBs" sections of Programming WebLogic Security, respectively.
Some organizations currently using deployment descriptors to secure their URL and EJB resources may want to take advantage of the unified security management capabilities that the WebLogic Server Administration Console provides. In a situation like this, the Administration Console can be instructed to copy security configurations from existing deployment descriptors upon the initial deployment of a Web application or EJB module. Once these security configurations are copied, the Administration Console can be used for subsequent updates. It is also possible to use this combined technique to reinitialize security configurations for URL and EJB resources to the state specified in the deployment descriptors.
Warning: When using the combined technique, it is possible to override security configurations for URL and EJB resources. Therefore, administrators using the combined technique need to take extra care to ensure that the appropriate security configuration is in place for their Web applications and EJBs. Read Prerequisites for Securing URL and EJB Resources for important information.
For more information about using the combined technique, see Examples: Copying and Reinitializing Security Configurations for the basicauth Web Application.
Prerequisites for Securing URL and EJB Resources
Whether using the WebLogic Server Administration Console or deployment descriptors to secure your URL and EJB resources, there are two important settings in WebLogic Server that you need to understand. Failure to understand these settings could result in incorrect or lost security configurations.
Before attempting to secure URL or EJB resources, read the following sections:
Understanding the fullyDelegateAuthorization Flag
To give you control over performance, the WebLogic Server Administration Console requires you to specify how the WebLogic Security Service should perform security checks. You specify this preference using the fullyDelegateAuthorization flag, a command-line argument that you set when you start WebLogic Server.
Note: Starting in WebLogic Server 7.0 SP3, you can choose to specify this preference in the WebLogic Server Administration Console instead of using the command-line argument. For more information, see The Check Roles and Policies Setting.
When the value of the fullyDelegateAuthorization flag is false, the WebLogic Security Service only performs security checks on URL and EJB resources that have security specified in their associated deployment descriptors (DDs). This is the default setting.
When the value of the fullyDelegateAuthorization flag is true, the WebLogic Security Service performs security checks on all URL (Web) and EJB resources, regardless of whether there are any security settings in the deployment descriptors (DDs) for these WebLogic resources. If you change the value of the fullyDelegateAuthorization flag to true, you also need to specify what the WebLogic Security Service should do when the Web application or EJB module is redeployed. For more information, see Understanding the Ignore Security Data in Deployment Descriptors Check Box.
Note: The fullyDelegateAuthorization flag only has an effect on the WebLogic Server instances (servers) in which it is set. Therefore, you should ensure that the fullyDelegateAuthorization flag is set the same way for both your Administration and Managed Servers.
How to Change the fullyDelegateAuthorization Flag
You can set the fullyDelegateAuthorization flag in one of three ways:
-Dweblogic.security.fullyDelegateAuthorization = boolean_value
where boolean_value is true or false. This is more efficient because it will save you from having to set the flag each time you start a WebLogic Server instance. However, keep in mind that this setting will apply to all WebLogic Server domains in the installation.
Listing 2-1 shows the appropriate portion of the startWLS file with this flag set to true (in bold).
Listing 2-1 Sample startWLS Script
@rem Start Server
@echo off
if "%ADMIN_URL%" == "" goto runAdmin
@echo on
"%JAVA_HOME%\bin\java" %JAVA_VM% %MEM_ARGS% %JAVA_OPTIONS%
-Dweblogic.Name=%SERVER_NAME% -Dbea.home="d:\bea"
-Dweblogic.management.username=%WLS_USER%
-Dweblogic.management.password=%WLS_PW%
-Dweblogic.management.server=%ADMIN_URL%
-Dweblogic.ProductionModeEnabled=%STARTMODE%
-Djava.security.policy="%WL_HOME%\server\lib\weblogic.policy"
-Dweblogic.security.fullyDelegateAuthorization=true
weblogic.Server
goto finish
:runAdmin
@echo on
"%JAVA_HOME%\bin\java" %JAVA_VM% %MEM_ARGS% %JAVA_OPTIONS%
-Dweblogic.Name=%SERVER_NAME% -Dbea.home="d:\bea"
-Dweblogic.management.username=%WLS_USER%
-Dweblogic.management.password=%WLS_PW%
-Dweblogic.ProductionModeEnabled=%STARTMODE%
-Djava.security.policy="%WL_HOME%\server\lib\weblogic.policy"
-Dweblogic.security.fullyDelegateAuthorization=true
weblogic.Server
:finish
ENDLOCAL
set JAVA_OPTIONS=... -Dweblogic.security.fullyDelegateAuthorization=true
This method allows you to set the fullyDelegateAuthorization flag for each WebLogic Server domain, rather than all the domains in the installation.
Listing 2-2 shows the appropriate portion of the startWebLogic file with this flag set to true (in bold).
Listing 2-2 Sample startWebLogic Script Excerpt
@rem Set JAVA_OPTIONS to the java flags you want to pass to the vm. i.e.:
@rem set JAVA_OPTIONS=-Dweblogic.attribute=value -Djava.attribute=value
set JAVA_OPTIONS=-Dweblogic.security.SSL.trustedCAKeyStore=C:\bea_sp02_7a\
     weblogic700\server\lib\cacerts
     -Dweblogic.security.fullyDelegateAuthorization=true
If you are using Node Manager to start your Managed Servers, the start scripts previously described are not used. Therefore, you will need to set the fullyDelegatedAuthorization flag using the WebLogic Server Administration Console.
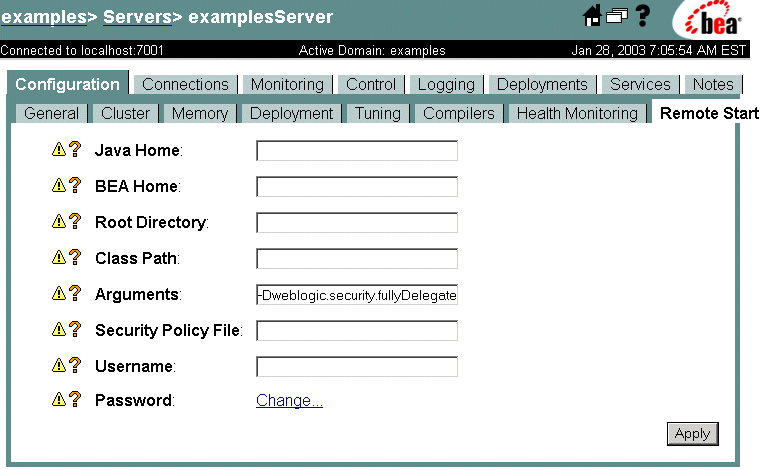
To do this, click the Configuration
-Dweblogic.security.fullyDelegatedAuthorization=true
Figure 2-1 shows the appropriate field in the Administration Console for the examplesServer, with this flag set to true.
Figure 2-1 Configuration > Remote Start Tab for the ExamplesServer
Be sure to click the Apply button and restart your server to save your changes.
The Check Roles and Policies Setting
Prior to WebLogic Server 7.0 SP3, you had to specify how the WebLogic Security Service would perform security checks using the fullyDelegateAuthorization command-line argument, as described in How to Change the fullyDelegateAuthorization Flag. In WebLogic Server 7.0 SP3, the Check Roles and Policies setting was introduced to allow you to specify the same preference in the WebLogic Server Administration Console. The Check Roles and Policies drop-down menu is located on the General tab after clicking Security
Note: The Check Roles and Policies setting affects all the WebLogic Server instances (servers) in the WebLogic Server domain in which it is set.
Understanding the Ignore Security Data in Deployment Descriptors Check Box
If you decide that the WebLogic Security Service should perform security checks on all Web applications and EJBs by setting the fullyDelegateAuthorization flag to true, you also need to tell WebLogic Server which technique you want to use to secure these URL (Web) and EJB resources. (See Techniques for Securing URL and EJB Resources for more information.) You specify this preference using the Ignore Security Data in Deployment Descriptors check box.
Note: Starting in WebLogic Server 7.0 SP3, this setting appears as the Deployment Descriptor Security Behavior drop-down menu in the WebLogic Server Administration Console. The Seed Security From Deployment Descriptor value is equivalent to an unchecked Ignore Security Data in Deployment Descriptors check box; The Ignore Security Data in Deployment Descriptor is equivalent to a checked Ignore Security Data in Deployment Descriptors check box.
You should set the value of the Ignore Security Data in Deployment Descriptors check box as follows:
Warning: Switching the value of the Ignore Security Data in Deployment Descriptors check box is risky and can lead to incorrect or lost security configurations. If you need to switch between these settings (specifically for the situations described in Combining the Two Techniques), you can carefully follow the instructions in Using the Combined Technique to Secure Your URL and EJB Resources
How to Change the Ignore Security Data in Deployment Descriptors Check Box
To change the value of the Ignore Security Data in Deployment Descriptors check box, follow these steps:
Understanding How These Settings Interact
Table 2-1 shows how to achieve the behavior you want from the WebLogic Security Service using different combinations of the fullyDelegateAuthorization and Ignore Security Data in Deployment Descriptors settings.
Using the Combined Technique to Secure Your URL and EJB Resources
As described in Techniques for Securing URL and EJB Resources, you can combine the use of the WebLogic Server Administration Console and J2EE/WebLogic deployment descriptor techniques, and would typically do so for two reasons:
Notes: Use of the combined technique for other purposes is not recommended. Before continuing, be sure you have read Prerequisites for Securing URL and EJB Resources.
The following sections provide step-by-step instructions for using the combined technique to secure your URL and EJB resources:
Note: You may also want to review Examples: Copying and Reinitializing Security Configurations for the basicauth Web Application, before performing these tasks.
Copying Security Configurations
These instructions are intended for administrators who presently secure URL (Web) and Enterprise JavaBean (EJB) resources using J2EE and WebLogic deployment descriptors, but want to exclusively use the WebLogic Server Administration Console from this point foward. Note that BEA does not recommend maintaining security configurations in both the deployment descriptors and the Administration Console.
Caution: When using the combined technique, it is possible to override security configurations for URL and EJB resources. Therefore, you must take extra care to ensure that the appropriate security configuration is in place. Follow these instructions carefully to prevent data loss and to ensure that your URL and EJB resources are secured properly.
To copy security configurations for a URL or EJB resource so that you can use the WebLogic Server Administration Console for subsequent modifications, follow these steps:
Step 1: Modify the Prerequisite Settings and Deploy the Resource
Notes: Recall what this setting means: you are telling WebLogic Server that you want the WebLogic Security Service to perform security checks on all URL (Web) and EJB resources. For more information, see Understanding the fullyDelegateAuthorization Flag.
The fullyDelegateAuthorization flag appears in the console as the server starts.
Note: Recall what this setting means: you are telling WebLogic Server to copy security for URL (Web) and EJB resources from the deployment descriptors into the configured Authorization and Role Mapping providers' databases each time you deploy the resource. For more information, see Understanding the Ignore Security Data in Deployment Descriptors Check Box.
Note: For instructions about how to deploy Web applications, see "Deploying J2EE Applications with the Administration Console" in Developing WebLogic Server Applications.
Step 2: Verify the Copied Security Policies (Optional)
To verify the copied security policies, follow the instructions shown in the appropriate column of Table 2-2.
Step 3: Verify the Copied Security Roles (Optional)
To verify the copied security roles, follow the instructions shown in the appropriate column of Table 2-3.
Step 4: Revert the Ignore Security Data in Deployment Descriptors Setting
Caution: You must perform this step. Failure to revert this setting may result in inconsistent security configurations when your Web application and EJB modules are redeployed. Therefore, be sure to perform this step before you restart your server.
Note: Recall what this setting means: you are telling WebLogic Server that you will set security for Web application and EJB resources using the Administration Console, not deployment descriptors. For more information, see Understanding the Ignore Security Data in Deployment Descriptors Check Box.
Step 5: Modify Security Roles and Security Policies Using the Administration Console (Optional)
Follow the instructions in Modifying Global Roles and Modifying Security Policies to modify your URL (Web) resource's security roles and security policies.
Reinitializing Security Configurations
To reinitialize security configurations for URL (Web) and Enterprise JavaBean (EJB) resources to their original state as specified in their deployment descriptors, follow these steps:
Step 1: Modify the Prerequisite Settings and Redeploy the WebLogic Resource
Notes: Recall what this setting means: you are telling WebLogic Server that you want the WebLogic Security Service to perform security checks on all URL (Web) and EJB resources. For more information, see Understanding the fullyDelegateAuthorization Flag.
The fullyDelegateAuthorization flag appears in the console as the server starts.
Note: Recall what this setting means: you are telling WebLogic Server to copy security for URL (Web) and EJB resources from the deployment descriptors into the configured Authorization and Role Mapping providers' databases each time you deploy the resource. For more information, see Understanding the Ignore Security Data in Deployment Descriptors Check Box.
Note: For instructions about how to deploy Web applications and EJBs, see "Deployment Tools and Procedures" in Developing WebLogic Server Applications.
Step 2: Verify the Reinitialized Security Policies and Security Roles (Optional)
To verify the reinitialized security policies and security roles, follow the instructions shown in the appropriate column of Table 2-2 and Table 2-3, respectively.
Step 3: Revert the Ignore Security Data in Deployment Descriptors Setting
Caution: You must perform this step. Failure to revert this setting may result in inconsistent security configurations when your Web applications and EJBs are redeployed. Therefore, be sure to perform this step before you restart your server.
Note: Recall what this setting means: you are telling WebLogic Server that you will set security for Web application and EJB resources using the Administration Console, not deployment descriptors. For more information, see Understanding the Ignore Security Data in Deployment Descriptors Check Box.
Step 4: Modify Security Roles and Security Policies Using the Administration Console (Optional)
Follow the instructions in Modifying Global Roles and Modifying Security Policies to modify your URL (Web) or EJB resource's security roles and security policies.
A WebLogic Web Service is typically packaged as an enterprise application that contains a special type of Web application that includes an additional deployment descriptor called web-services.xml. If your Web Service is implemented with a Java class, then the Web application WAR file contains the Java class files. If the Web Service is implemented with a stateless session EJB, then the enterprise application EAR file contains the corresponding EJB JAR file.
Note: A Web Service can also be packaged as a stand-alone Web application WAR file if the Web Service is implemented with just a Java class. This type of packaging for a Web Service is uncommon, however; typically Web Services are packaged as EAR files.
A Web Service resource is a specific type of WebLogic resource that is related to Web Services. To secure Web Services, you can create security policies and security roles for:
Note: For more information about securing WebLogic Web Services, see "Configuring Security" in Programming WebLogic Web Services.

|

|

|