Example: Securing URL (Web) Resources Using the Administration Console
In this example, you will restrict access to all the deployed Web applications to a user who has been granted a default global security role. Next, you will further restrict access to the basicauthWeb application to a different user. Last, you will tighten security even further on a particular JSP within the Web application (welcome.jsp), using a scoped role.
Note: Recall what this setting means: you are telling WebLogic Server that you want the WebLogic Security Service to perform security checks on all URL (Web) and EJB resources. For more information, see Understanding the fullyDelegateAuthorization Flag.
From the Windows Start menu, select Programs —> BEA WebLogic Platform 7.0 —> WebLogic Server 7.0 —> Server Tour and Examples —> Launch Examples Server to start the server called examplesServer.
The fullyDelegateAuthorization flag appears in the console as the examplesServer starts, and the BEA WebLogic Server Out-of-the-Box Examples Index Page opens in your browser.
Click the Administration Console link, located at the top of the BEA WebLogic Server Out-of-the-Box Examples Index Page.
Click the Sign In button to sign in to the Administration Console for the examplesServer.
Using the navigation tree at the left side of the Administration Console, expand Security, then Realms.
Click the myrealm security realm.
On the General tab, click the Ignore Security Data in Deployment Descriptors check box. (That is, you should be putting a check mark in the box.)
Note: Recall what this setting means: you are telling WebLogic Server that you will set security for Web application and EJB resources using the Administration Console, not deployment descriptors. For more information, see Understanding the Ignore Security Data in Deployment Descriptors Check Box.
Click Apply to save your changes.
Step 2: Create Users
Using the navigation tree at the left side of the Administration Console, expand Security, then Realms.
Expand the myrealm security realm.
Click Users.
The Select Users displays all the users currently defined in the WebLogic Authentication provider's database.
Click the Configure a New User... link to display the Create User page.
On General tab, in the Name field, type: Tom
If desired, enter a description of the user in the Description field.
In the Password and Confirm Password fields, type: webexample
Click Apply to save your changes.
Repeat steps 4 - 8 to create a user named Neil.
Using the navigation tree, click Users, and confirm that users Tom and Neil have been added.
The Select Users page shows that Tom and Neil have been added to the WebLogic Authentication provider's database.
Step 3: Add a User to a Group
Note: Instead of creating a new group, this step uses one of WebLogic Server's default groups.
On the Select Users page, click the hyperlinked user name Tom.
Click the Groups tab.
In the Possible Groups list box, click the Administrators group to highlight it.
Click the highlighted arrow to move the Administrators group from the Possible Groups list box to the Current Groups list box.
Click Apply to save your changes.
Note: Do not add Neil to the Administrators group.
Step 4: Grant a Global Role to the Group
Note: Because the default group called Administrators is automatically granted the default global role called Admin, there is no need to create a global role nor grant that global role to the Administrators group.
If you want to verify that this is done, however, follow these steps:
Using the navigation tree, click Roles.
The Select Roles page displays all the global roles currently defined in the WebLogic Role Mapping provider's database.
Click the hyperlinked global role name Admin.
Click the Conditions tab.
The Role Statement list box reads:
Caller is a Member of the Group
Administrators
Step 5: Create a Security Policy for All URL (Web) Resources Using the Global Role
Using the navigation tree, expand Deployments, then right-click Web applications.
From the menu, select the Define Policy... option to display the Policy Editor page.
Note: Recall what this option means: you are creating a security policy that will encompass all the deployed URL (Web) resources and their components.
In the Policy Condition list box, highlight: Caller is Granted the Role.
Click Add to open the Roles window.
In the Enter Role Name field, type: Admin
Click Add, then OK.
The Roles window closes. The Policy Statement list box reads:
Caller is a Member of the Group
Everyone
and Caller is Granted the Role
Admin
Note: The Caller is a Member of the Group policy condition that appears is part of the default security policy for URL resources. For more information, see Default Security Policies.
Highlight the Caller is a Member of the Group policy condition, then click Remove.
The Policy Statement list box reads:
Caller is Granted the Role
Admin
Click Apply to save your changes.
Step 6: Attempt to Access a Web Application
Note: All instructions provided in this section assume that you are working in a Windows environment.
Obtain the "Basic Authentication Sample Web Application" (available under "Code Samples: WebLogic Server" on the dev2dev Web site).
Unzip the basicauth.zip file to a temporary directory (for example, C:\basicauth).
Deploy the basicauth Web application and target it to the examplesServer.
Open a new Web browser and type: http://localhost:7001/basicauth.
The browser prompts you for a username and password.
In the username field, type: Neil, and in the password field, type: webexample, then click OK.
The browser re-prompts you for a username and password.
In the username field, type: Tom, and in the password field, type: webexample, then click OK.
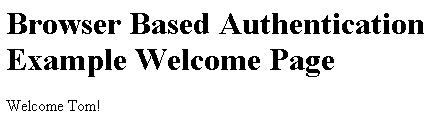
The browser displays a page like the one shown inFigure 6-1.
Figure 6-1 Browser-Based Authentication Example Web Page
This result occurs because you just secured all URL (Web) resources (including the basicauth Web application) with a security policy based on the global security role Admin, which user Tom is granted but user Neil is not.
Note: If you accidentally close your Web browser after this step, you can get back into the Administration Console by typing: http://localhost:7001/console and clicking the Sign In button. If you accidentally close the console window that runs WebLogic Server, and attempt to use steps 1-3 in Step 1: Specify Server and Prerequisite Settings, you will notice that you first have to log in using Tom/webexample, because by securing all Web applications in this step, you also secured the examplesWebapp.
Step 7: Restrict Access to the basicauth Web Application
Using the navigation tree at the left side of the Administration Console, expand Web Applications, then right-click basicauth.
From the menu, select the Define Policy... option.
Note: Recall what this option means: you can create a security policy for a particular Web application or a particular component within the Web application.
On the General tab, in the URL Pattern field, type: /*
Note: The URL pattern of /* will secure all components within the basicauth Web application, including JSPs and servlets.
Click the Define Policy... button to proceed.
In the Policy Condition list box, highlight: User Name of the Caller.
Note: Do not modify the value shown in the Methods drop-down menu. (It should read: ALL.)
Click Add to open the Users window.
In the Enter User Name field, type: Neil
Click Add, then OK.
The Users window closes. The Policy Statement list box reads:
User Name of the Caller
Neil
Note: Recall that by defining this security policy on the basicauth Web application, you are overriding the security policy that has already been defined for all URL (Web) resources in Step 5: Create a Security Policy for All URL (Web) Resources Using the Global Role. Specifically, you are overriding the inherited policy statement of:
Caller is Granted the Role
Admin
that is shown in the Inherited Policy Statements list box.
The basicauth Web application behaves in the opposite way. In other words, when you attempt to access the basicauth Web application with the user Tom, you are re-prompted for a username and password. When you attempt to gain access with user Neil, the browser displays the page shown in Figure 6-1, but says "welcome" to Neil.
This result occurs because you just secured all components in the basicauth Web application with a security policy based on a particular user (in this case, the user Neil).
Step 8: Create a Scoped Role
Using the navigation tree at the left side of the Administration Console, right-click basicauth.
From the menu, select the Define Role... option.
Note: Recall what this option means: you can create a security role that is scoped to a particular Web application. Thereafter, the scoped role can only be used in a security policy for this Web application.
On the General tab, in the URL Pattern field, type: /*
Note: The URL pattern of /* will scope the security role to all components within the basicauth Web application, including JSPs and servlets.
Click the Define Role... button to proceed.
Click the Configure a New Role... link to display the Create Role page.
On General tab, in the Name field, type: AppAdmin
Click Apply to save your changes.
Step 9: Grant the Scoped Role to a Group
Click the Conditions tab.
In the Role Condition list box, highlight: Caller is a Member of the Group.
Click Add to open the Groups window.
In the Enter Group Name field, type: Administrators
Click Add, then OK.
The Groups window closes. The Role Statement list box reads:
Caller is a Member of the Group
Administrators
Click Apply to save your changes.
Step 10: Restrict Access to the welcome JSP Using the Scoped Role
Using the navigation tree at the left side of the Administration Console, right-click basicauth.
From the menu, select the Define Policy... option.
Note: Recall what this option means: you can create a security policy for a particular Web application or a particular component within the Web application.
On the General tab, in the URL Pattern field, type: /welcome.jsp
Click the Define Policy... button to proceed.
In the Policy Condition list box, highlight: Caller is Granted the Role.
Note: Do not modify the value shown in the Methods drop-down menu. (It should read: ALL.)
Click Add to open the Roles window.
In the Enter Role Name field, type: AppAdmin
Click Add, then OK.
The Roles window closes. The Policy Statement list box reads:
Caller is Granted the Role
AppAdmin
Note: Recall that by defining this security policy on the welcome.jsp, you are overriding the security policy that has already been defined for the basicauth Web application in Step 7: Restrict Access to the basicauth Web Application. Specifically, you are overriding the inherited policy statement of:
User Name of the Caller
Neil
that is shown in the Inherited Policy Statements list box.
The basicauth Web application behaves in the opposite way. In other words, when you attempt to access the basicauth Web application's welcome.jsp page with the user Neil, you are re-prompted for a username and password. When you attempt to gain access with user Tom, the browser displays the page shown in Figure 6-1.
This result occurs because you just secured the welcome.jsp page with a security policy based on the scoped security role AppAdmin, which user Tom is granted but user Neil is not.