 Understanding Voucher Processing and the Voucher Life Cycle
This chapter provides an overview of voucher processing and the voucher life cycle, lists prerequisites, and discusses how to:
Enter invoice information for online vouchers.
Copy source documents to create vouchers online.
Schedule and create voucher payments for online vouchers.
Complete voucher attributes.
View voucher summary information.
View related documents information.
View voucher error information.
View voucher approval summary information.
Run on-demand voucher processes as a batch request.
Note. Because the online voucher component is used to enter all voucher styles, but acts differently depending on the voucher style, this chapter provides sections that discuss how the Voucher (VCHR_EXPRESS) component works generally. Discussions about how to enter and update each voucher style specifically are provided in other chapters in this PeopleBook.
See Also
Entering and Processing Vouchers Online: Specific Voucher Styles
Entering and Importing Spreadsheet Vouchers
Understanding Voucher Processing and the Voucher Life Cycle
After you have set up all your control information, established your PeopleSoft Payables control hierarchy, and entered approved vendors in the system, you are ready to enter vouchers into the system.
This section discusses one method of entering vouchers into the system: using the online Voucher component. The pages in this component are the equivalent of electronic voucher forms on which you can record invoice information from your vendors in the PeopleSoft Payables database. You can also quickly copy line item information from purchase orders and receivers from PeopleSoft Purchasing tables.
We also provide the Voucher Build Application Engine (AP_VCHRBLD) process for creating vouchers. This process builds and edits voucher records from various sources, including the Quick Invoice Entry (VCHR_QUICK_PNL) component, the Summary Invoice Entry (VCHR_SUMM_PNL) component, and the Spreadsheet Voucher workbook. The Voucher Build process, the Quick Invoice Entry component, and the Spreadsheet Voucher feature are discussed elsewhere in this PeopleBook.
This section discusses:
Voucher process flow.
Voucher life cycle.
Voucher styles.
Voucher validation.
Voucher session defaults.
Processing that is initiated by the Voucher component.
(USA) Vouchers for Health Insurance Portability and Accountability Act of 1996 (HIPAA) payments.
See Also
Entering and Importing Spreadsheet Vouchers
 Voucher Process Flow
The following flowchart illustrates the processing routes that a voucher can follow. It includes optional stages of voucher processing, such as creating control groups and applying matching rules to approve a voucher:
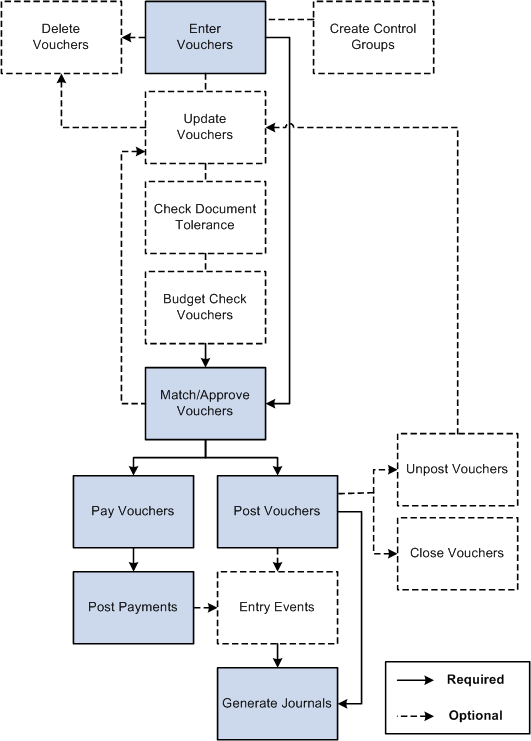
Voucher processing flow
Voucher Life Cycle
Vouchers go through several stages from initial entry to payment to posting. PeopleSoft Payables tracks these stages using various statuses for the following status types that relate to various actions and processes that can be run on a voucher:
Entry status.
Match status.
Approval status.
Budget status.
Document Tolerance status.
Post status.
Payment status.
Payment Post status.
This table illustrates the values for each voucher status, before and after processing:
|
Status Type |
Process |
Initial Status |
Post-Processing Statuses |
|
Entry Status |
Voucher Entry |
Open |
Deleted Recycle Postable |
|
Match Status |
Matching |
To Be Matched |
Exception Manually Overridden Manually Set to Credit Note Matched Match - Dispute No Match |
|
Approval Status |
Voucher Approval |
To Be Approved |
Pending Approval Approved Denied |
|
Budget Status |
Budget Processor (Budget checking) |
Not Checked |
Valid Error |
|
Document Tolerance Status |
Document Tolerance Checking |
Not Checked |
Valid Error |
|
Post Status |
Voucher Posting |
Not Posted |
Posted |
|
Payment Status |
Pay Cycle Payment Selection subprocess |
Not Selected |
Selected for Payment |
|
Payment Status |
Pay Cycle Payment Creation subprocess |
Selected for Payment |
Paid |
|
Payment Post Status |
Payment Posting |
Not posted |
Posted |
When you first enter a voucher into PeopleSoft Payables, it has an entry status of Open. When you save the voucher for the first time, the system validates the input with information that is provided by default from the control hierarchy to ensure correct entries. If the voucher passes all validations, it goes into a Postable state. The system generates accounting entries when the Voucher Posting Application Engine (AP_PSTVCHR) process selects the voucher for posting. At this time, the voucher is available for distribution to the general ledger using the Journal Generator Application Engine (FS_JGEN) process.
If one or more of the validations fail, a couple of events can happen. For some edits, the system does not allow you to save the voucher until the error condition is corrected. For example, if you do not enter a date on the voucher header, you cannot save the voucher.
For other edits, you can choose less restrictive error handling, such as Recycle, which lets you save the voucher. However, you cannot post or pay the voucher until you correct the error. You set these rules at the business unit level of the control hierarchy and can override them at other levels: voucher origin, control group, vendor, and voucher. With duplicate invoice checking, for example, you can choose recycle error handling, which means that the system accepts the suspect vouchers but does not enable them to be posted or paid. To post and pay these vouchers, you must update the voucher with correct information.
Until a voucher has been reviewed for approval, or unless it is preapproved, it has an approval status of Pending. After that, a voucher can be approved or denied. A voucher cannot be paid unless it has been approved. However, if your business unit definitions enable you to, you can post a voucher even though it has not been approved for payment.
When you post a voucher in PeopleSoft Payables, the system creates balanced accounting entries to record the liability and sets the post status to Posted. When a voucher is in a posted state, you can make only limited changes to it. Essentially, you can change only descriptive information that does not affect the numbers on the voucher. To change the numbers on a posted voucher, you must first unpost the voucher to create reversing entries. This action puts the voucher back into a postable state, as if it had never been posted. You can then change the necessary fields.
A voucher can have one or more payment records selected for payment based on their scheduled pay date and other parameters. The payment status is Unselected, Selected for Payment, or Paid.
Note. If you are using budget checking (through the Commitment Control feature), you cannot post or pay a voucher until it has successfully passed budget checking.
See Also
Defining Voucher Error-Handling Options
Budget-Checking PeopleSoft Payables Transactions Using Commitment Control
Processing Document Sequencing in PeopleSoft Payables
Running Voucher and Payment Posting
Voucher Styles
PeopleSoft Payables provides various voucher styles, each of which addresses a particular objective:
|
Adjustments |
Enter adjustment vouchers for credit or debit memos, or for relating one voucher to another. This style is also used for debit memo adjustment vouchers that are created by the Matching Application Engine process (AP_MATCH). |
|
Journal Voucher |
Enter vouchers for adjusting accounting entries. |
|
Prepaid Voucher |
Enter prepayments (down payments, progress payments, or deposits). |
|
Register Voucher |
Accrue an individual voucher for which the expense distribution is not known or not yet approved. |
|
Regular Voucher |
Enter standard vouchers (this is the default setting). This style is also used to enter purchase order vouchers and vouchers that require matching to purchase orders and receiving documents. |
|
Reversal voucher |
Create a new voucher with reversal accounting entries and back out encumbrances. |
|
Single Payment Voucher |
Enter a voucher for a one-time vendor without having to define the vendor in the system. |
|
Template Voucher |
Create a voucher that can be used as a template for generating regular vouchers that share voucher data. |
|
Third Party Voucher |
Enter vouchers for charges other than merchandise charges, for example, freight-only vouchers. |
This chapter describes the online voucher pages and how to enter regular vouchers online. The other methods of voucher entry and voucher styles are described in separate chapters of this PeopleBook.
See Also
Entering and Importing Spreadsheet Vouchers
Voucher Validation
When you save vouchers, many edits and processes occur automatically. Any problems that PeopleSoft Payables detects with a voucher are brought to your attention so that you can fix them immediately.
Other edits that are specific to particular voucher styles, payment terms, and other circumstances are discussed in the sections or chapters about those styles and circumstances.
This section discusses:
Voucher field validation.
Financial sanctions validation.
Voucher Field Validation
The system performs a series of validation checks to ensure that you have completed all the fields correctly. Some of the validations that occur are:
Duplicate invoice checking.
Verifying the existence of a vendor ID.
Verifying the existence of an invoice date and invoice ID.
Balancing header amounts against voucher line amounts for both transaction and base currency amounts.
Balancing voucher line amounts against distribution line amounts for both transaction and base currency amounts.
Ensuring that the user ID that is approving the voucher is the same as the user who is signed in.
Validating accounting distribution field values and combinations and error processing.
Where appropriate, validating the calculation and proration of nonmerchandise charges, such as sales and use taxes, value-added taxes (VAT), freight charges, and miscellaneous charges.
Validating the bank ID, bank account number, and DFI ID.
Financial Sanctions Validation
PeopleSoft provides validation of your vendors against financial sanctions lists (for example, the Specially Designated Nationals [SDN] list) at the vendor level, voucher level, and payment level. At the voucher level, if financial sanctions validation is enabled at the installation level, the invoicing vendor and remit vendor or vendors, if different from the invoicing vendor, are validated. If financial sanctions validation is enabled at the bank level, no validation of the vendor is done during voucher processing unless you specify a bank for the remit vendor and the bank requires financial sanctions validation. The system updates the vendor's financial sanctions status on the Vendor Information (VNDR_ID) component.
At the voucher level, the system validates your vendors upon:
Saving the voucher if financial sanctions validation is enabled at the installation level, or if financial sanctions validation is enabled at the bank level, you specify a bank for the remit vendor and the bank requires financial sanctions validation.
The system displays a warning message that the vendor is currently under financial sanctions review. You can proceed with saving the voucher; however, the system does not allow payments to vendors with a financial sanctions status of Review or Blocked.
At the time of voucher entry, if financial sanctions validation is enabled and the vendor that you entered has a financial sanctions status of Review or Blocked, the system displays a warning message that the vendor that is selected is currently under financial sanctions review. You can proceed with adding or updating the voucher for this vendor.
Note. You cannot record a manual payment on the Voucher
- Payments page if the vendor has a financial sanctions status of Review or Blocked. The
system does not allow you to select Record as the
payment action.
You cannot create an express payment on the Voucher - Payments page
if the vendor has a financial sanctions status of Review or Blocked. The
system does not allow you to click the Express Payment link.
Running the Financial Sanctions Validation Application Engine (AP_SDN_VAL) process.
You can schedule the Financial Sanctions Validation process to run on a predefined schedule using the Process Scheduler, or you can run it on an ad hoc basis.
See Understanding Financial Sanctions Validation.
Voucher Session Defaults
You can define voucher defaults that automatically populate voucher fields for an entire session, and you can override those defaults for a particular voucher. These defaults override the defaults that the system applies using the PeopleSoft Payables control hierarchy. To set up voucher defaults, you can:
Predefine session defaults using the Session Defaults (AP_VCHR_DFLT_PG) page.
The system saves these defaults that you can apply to vouchers that you enter using the Voucher component or the Quick Invoice Entry component. You define session defaults for all users, for users with the same primary permission list, or for specific users.
Define ad hoc session defaults using the Session Defaults (AP_SESSN_DFLT_SEC) page within the Voucher and Quick Invoice Entry components.
The system does not save the defaults and only applies them during the current session.
Note. Session defaults can be applied only to vouchers with a voucher style of Journal Voucher, Regular Voucher, Single Payment Voucher, and Template Voucher.
Processing That Is Initiated by the Voucher Component
Processing steps that occur when you save a voucher include:
Assigning a voucher ID for auto-numbered vouchers.
You can preassign voucher IDs on the add search page, as long as they are unique. In fact, if the auto-numbering option is disabled for the business unit, using the add search page is the only way to enter vouchers. Only the auto-numbered vouchers are assigned a voucher ID at save time.
Determining whether the status of the control group should be updated.
Setting one-time vendors to inactive status.
Calculating and prorating the discount amount, if any.
Prorating sales tax, use tax, freight, and miscellaneous charges, as applicable.
Calculating and prorating VAT and sales and use tax (SUT) amounts.
Converting the transaction amount to the base currency.
Determining payment net and discount due dates.
Determining the scheduled payment date.
Creating payment records.
Performing withholding processing, as applicable.
Creating payment records for manual payments that are recorded on the voucher.
Checking the voucher match status.
Validating your vendors if financial sanctions validation is enabled.
Voucher component-initiated processing that is specific to particular circumstances (such as integration with third-party tax applications or federal payment schedule processing) is discussed in the chapters that cover those circumstances.
(USA) Vouchers for HIPAA Payments
The Health Insurance Portability and Accountability Act of 1996 (HIPAA) is a set of regulations from the U.S. Department of Health and Human Services. One of the primary concerns of HIPAA is to restrict the use of individually identifiable health information to protect the privacy of healthcare consumers. In addition to the privacy rules, HIPAA includes regulations that establish national standards for the format and structure of electronic communications between covered entities.
PeopleSoft Payables generates HIPAA payments for only two transaction handling codes: Payment Only and Payment + Advice.
HIPAA entails communication protocol and standards for several business documents. PeopleSoft Payables supports Electronic Data Interchange (EDI) Format 820 (OUTBOUND), specifically designed for HIPAA required fields and values. To fully employ HIPAA functionality, you must use a third-party vendor to process the generated electronic funds transfer (EFT) file and transform it to the HIPAA 820 EDI format.
The HIPAA information that you define at the vendor level (in the HIPAA Information collapsible region on the Vendor Information - Payables Options page) appears by default on the HIPAA page in the Voucher component if the payment method for the voucher has an EFT layout of HIPAA. The system performs validation during online voucher entry and as part of the Voucher Build process, which checks for the HIPAA payment designation and marks such vouchers as Payment Separate.
See Also
(USA) Entering HIPAA Information
(USA) Defining HIPAA Information
Setting Up Files for Electronic Funds Transfers
Prerequisites
Before entering vouchers into the system, you must:
Set up all control information.
Establish your PeopleSoft Payables control hierarchy.
Enter approved vendors in the system.
Specify user preferences for online voucher entry on the Define User Preferences - Payables Online Vouchering page.
See Also
Setting Up PeopleSoft Payables Business Units
PeopleSoft Enterprise Source-to-Settle Common Information 9.1 PeopleBook
Defining Payables User Preferences
Setting Up Draft, Payment, and Voucher Processing
Entering Invoice Information for Online Vouchers
This section provides an overview of voucher dependencies and balancing functionality and discusses how to:
Access the Voucher component.
Create vouchers online.
Define payment terms.
Enter nonmerchandise charge details.
Review nonmerchandise charges.
View purchase order and receiver references.
Associate receivers with voucher lines.
Associate receiver lines with voucher lines for matching.
Enter SUT summary information.
Enter voucher line tax information.
Enter session defaults.
Understanding Voucher Dependencies and Balancing FunctionalityThis section discusses:
The dependencies of the Voucher component on voucher style and other factors.
Voucher balancing.
The Dependencies of the Voucher Component on Voucher Style and Other Factors
The Voucher component looks and acts differently for each voucher style. It also displays different fields and provides different processing depending on:
Tax environment (SUT, VAT, Indian excise and customs duty, installed third-party tax applications, and so forth).
Your installation options (such as whether you are a U.S. federal agency, for example).
Various processing and display options that you can select at each level of the PeopleSoft Payables control hierarchy.
For this reason, the description of the Voucher component that follows here includes page elements that you may not see or use for a particular voucher style or that you may not see or use in your implementation of PeopleSoft Payables. Whenever a page element has such dependencies, these are documented, except in the case of tax environment. The tax environment—whether VAT, SUT, Indian excise tax, sales tax, or customs duty—is usually reflected in the field labels themselves.
For discussions of specific voucher styles, see the chapters that discuss those styles.
The Voucher component has various functions that enable you to view and correct balance discrepancies. These include:
Displays of totals for separate voucher regions— lines, charges and taxes—enabling you to quickly identify the unbalanced area.
Calculate button: Located at the header level, this button enables you to perform on-demand balance calculations.
Highlighted fields: Displays out-of-balance information highlighted in red .
When the voucher is in balance, the system displays an amount of 0.00 in the Difference field .
We discuss three common out-of-balance scenarios:
The first scenario is a regular voucher with the header out of balance to the distribution lines.
In this example, a regular voucher has a header total of 1,500.00 USD, but distribution lines totaling 1,505.00 USD. The system displays discrepancies between the header and the lines in the Difference field at the header level.
The next scenario is a regular voucher with the distribution lines out of balance to the invoice line.
This regular voucher has a header total of 2,000.00 USD and an invoice line total of 2,000.00 USD, but the distribution lines total 2,002.00 USD. When the invoice lines and distribution lines are out of balance, the system displays the discrepancy in the Difference field.
The third scenario is a purchase order voucher with distributions that balance to the line, but the voucher has multiple lines that do not balance to the header.
The purchase order voucher has a header total of 2,100.00 USD, but the invoice line total and the distribution lines total 500.00 USD. The Difference field at the header level displays the 1,600.00 USD discrepancy between the header amount and the lines amount. The Difference field at the invoice and distribution line level displays a 0.00 USD discrepancy between the merchandise amount and the distributed amount, but it appears highlighted in red, because the voucher is out of balance.
See Also
Entering and Processing Vouchers Online: Specific Voucher Styles
Managing Voucher Line Tax Information with Taxware and Vertex
Processing Value Added Tax (VAT) in PeopleSoft Payables
(USF) Processing PeopleSoft Payables for U.S. Federal Agencies
Pages Used to Enter Invoice Information for Online Vouchers|
Page Name |
Definition Name |
Navigation |
Usage |
|
VCHR_EXPRESS1 |
Accounts Payable, Vouchers, Add/Update, Regular Entry, Invoice Information |
Enter or view invoice information, including invoice header information, nonmerchandise charges, and voucher line and distribution information. |
|
|
VNDR_LOOKUP_WRK |
Click the Advanced Vendor Search link on the Invoice Information page. |
Enter search criteria to retrieve vendor address information. Note. Selecting an address here does not automatically change the vendor location to any default location that is associated with the address. The system uses different defaults for the vendor location value. Change the default location value using the Location field on the Invoice Information page. |
|
|
VCHR_LN_CNTRCT_SEC |
Click the View Contract ID Line link on the Invoice Information page |
View contract ID, line and release number information for recurring vouchers. This link only appears for recurring vouchers. |
|
|
VCHR_COMMENTS_TXT |
Click the Comments link on the Invoice Information page. |
Enter internal voucher comments. |
|
|
VCHRHDR_ATT_SEC |
Click the Voucher link on the Invoice Information page. |
View or attach documents related to the voucher. |
|
|
VCHR_DT_CALC_SBP |
Click the Calc Basis Date link on the Invoice Information page. |
(USF) Define the date calculation basis for U.S. federal prompt payment due date requirements and enable enforcement of valid reimbursable periods for project-related vouchers. |
|
|
FS_AUDITLOG_SEARCH |
Click the View Audit Logs link on the Invoice Information page. |
Search for and view audit logs. |
|
|
VCHR_TERMS_EXP |
Click the Transfer to Pay Terms Detail button on the Invoice Information page. |
View or change the default payment and discount terms for the voucher. |
|
|
VCHR_FRGHT_SEC |
Enter a freight amount and click the Transfer to Freight Detail button on the Invoice Information page. |
Allocate the freight charges for the voucher at a more detailed level. |
|
|
VCHR_MISC_SEC |
Enter a miscellaneous charge amount and click the Transfer to Misc Chrgs Detail (transfer to miscellaneous charges detail) button on the Invoice Information page. |
Allocate the miscellaneous charges for the voucher at a more detailed level. |
|
|
VCHR_SALETX_SEC |
Enter a sales tax amount and click the Transfer to Sales Tax Detail button on the Invoice Information page. |
Allocate the sales tax amount at a more detailed level. |
|
|
VCHR_USETAX_SEC |
Click the Transfer to Use Tax Detail button on the Invoice Information page. |
Specify the use tax to apply to this voucher. |
|
|
VCHR_LINE_MISC_CHG |
Click the Non Merchandise Summary link on the Invoice Information page. |
View the miscellaneous amounts that are allocated to each voucher line. On this page, you can also change the allocation for a particular voucher. |
|
|
AP_SUT_SUMM_PG |
Click the Sales/Use Tax Summary link on the Invoice Information page. |
Review the sales and use tax information for all the voucher lines, and if applicable, modify tax information. |
|
|
AP_SESSN_DFLT_SEC |
Click the Session Defaults link on the Invoice Information page. |
Enter voucher defaults for an ad hoc session, or use an existing available session default. These defaults override the values that the system applies using the PeopleSoft Payables control hierarchy. |
|
|
VCHR_VAT_SM_EXP |
Click the VAT Summary link on the Invoice Information page. |
Review the VAT amounts summarized by VAT rate. This page provides a preliminary view of the VAT calculations based on the parameters that have been supplied by default (or have been manually updated), as well as the amounts that are entered. You can also link from this page to the VAT header, line, and distribution line defaults pages. |
|
|
VCHR_VAT_HD_EXP |
Click the VAT Summary link on the Invoice Information page. Click the Transfer to VAT Header link on the Invoice VAT Summary Information page. |
Review and, if applicable, override the voucher's VAT settings. |
|
|
VCHR_LINE_VAT_SEC1 |
Click the Invoice Line VAT link in the Distribution Lines scroll area on the Invoice Information page. |
Review and, if applicable, override VAT defaults for the distribution line. |
|
|
DISTRIB_LN_VAT_SEC |
Click the VAT link on the VAT tab in the Distribution Lines scroll area on the Invoice Information page. |
Review and, if applicable, override VAT defaults for the distribution line. |
|
|
VCHR_PO_INFO |
Click the Purchase Order & Receiver Info link in the Invoice Lines group box on the Invoice Information page. |
View references to purchase orders and receivers. View any comments that are associated with the purchase order or receiver header or line from which the voucher and voucher line information have been copied. |
|
|
VCHR_RECV_MTCH |
Click the Associate Receiver(s) link in the Invoice Lines group box on the Invoice Information page. |
Edit any of the receiver lines that are associated with the voucher line and delete a receiver line. |
|
|
RECEIVER_LOOKUP |
Click the Associate Receiver Lines link on the Associate Receiver page. |
Manually associate receiver lines with the voucher line for matching. |
|
|
VCHR_LINE_TAX |
Click the Sales/Use Tax link in the Invoice Lines group box on the Invoice Information page. |
Review and, if applicable, override tax settings for the voucher line. |
|
|
VCHR_LINE_TXGEO |
Click the Override Tax Location link on the Invoice Line Tax Information page. |
Define a new tax location for vouchers. (Taxware or Vertex users only.) |
Accessing the Voucher Component
The Voucher component in PeopleSoft Payables uses deferred processing. If you are adding a new voucher, you can use the fields on the add search page for the component to prepopulate the new voucher and reduce the amount of prompting and editing that you need to do on the new voucher. Note also that:
The voucher style that you select on the add search page determines how the system displays, edits, and processes the voucher.
The default voucher style is Regular Voucher.
The selected voucher style also determines what nonmerchandise and tax-exempt fields appear on the add search page. These fields are Miscellaneous Amount, Freight Amount, Sales Tax Amount, Tax Exempt, and VAT Amount. The selected business unit determines whether the latter three fields appear.
Important! When copying purchase order vouchers, do not enter gross, nonmerchandise, and tax-exempt amount information in the fields on the add search page. Be sure to use the Copy PO functionality on the Invoice Information page, which ensures that the system provides these amounts by default into the appropriate fields and creates the correct voucher lines.
The system prepopulates the control group on the add search page with the earliest assigned group for the business unit and user ID.
PeopleSoft Payables functionality performs duplicate invoice checking using the information that you add on the add search page.
If the system finds any vouchers that appear to be duplicates, it issues a warning before you enter the Invoice Information page. It also performs duplicate invoice checking when you save a voucher. However, the more information that you enter on the add search page, the more likely you will catch a duplicate invoice before you create another duplicate voucher.
PeopleSoft Payables uses default information from the voucher origin table and information from other default levels to determine how the system processes the voucher.
Each user who enters vouchers must be assigned to an active voucher origin. If the user is not assigned to a voucher origin or the voucher origin is inactive, the user cannot save the voucher. Also, you cannot change the voucher origin of a voucher after it is entered into the system.
The system automatically populates ChartField values that are defined at the vendor location level into the voucher distribution lines.
Entering the estimated number of invoice lines in the Estimated No. of Invoice Lines (estimated number of invoice lines) field enables you to enter lines on the Invoice Information page without repeatedly needing to click the Add button in the Invoice Lines scroll area.
Any lines that you leave blank are automatically deleted when you save.
When you enter gross amount and nonmerchandise amount values on the add search page, the system supplies the difference by default on the first voucher line and distribution line.
Note. If you are adding a voucher, the Invoice Information page appears when you have entered data on the add search page and clicked Add. If you are accessing a voucher that already exists in the system, then the Voucher - Summary page appears when you have entered the search information and clicked Search.
Creating Vouchers Online
Access the Invoice Information page (Accounts Payable, Vouchers, Add/Update, Regular Entry, Invoice Information).
Note. If financial sanctions validation is enabled at the
installation level, the system validates the vendor against financial sanctions
lists upon saving the voucher. If financial sanctions validation is enabled
at the bank level, no validation of the vendor is done during voucher processing
unless you specify a bank for the remit vendor and the bank requires financial
sanctions validation. The system updates the vendor's financial sanctions
status on the Vendor Information component.
If the system determines that the vendor is a potential match to a financial
sanctions list, the system displays a warning message that the vendor is currently
under financial sanctions review. You can proceed with saving the voucher;
however, the system does not allow payments to vendors with a financial sanctions
status of Review or Blocked.
See Understanding Financial Sanctions Validation.
|
Related Content |
Click and choose a link to view information related to this vendor and business unit combination. The system displays information from today's date to one year prior, allowing you to see at a glance information in a graphical format. You can expand the viewing area by clicking on the box above the frame and dragging it up. You can also close the viewing area by clicking the X in the upper right corner of the viewing area. Information available for viewing is:
|
|
Invoice Number |
Enter the invoice number or some other control number from the voucher's supporting document. The system uses this number as a reference for duplicate invoice checking if you have selected it to be one of your match criteria. Note. For evaluated receipt settlement (ERS) vouchers that were built by the Voucher Build process, the invoice number is appended with the ERS invoice sequence number suffix. |
|
Invoice Date |
Enter the date that the invoice is entered into the system. It is usually the current date. |
|
Displays the accounting control date, which is based on the settings that are defined in the PeopleSoft Payables default hierarchy. You can override it here on the voucher. Changing this date also changes the VAT declaration date on the Invoice Header VAT Information page if the declaration point is Accounting Date. Note. If Current Date is selected as the accounting date option in the PeopleSoft Payables hierarchy, and the current date is not in an open PeopleSoft General Ledger period, the system uses the first available date in an open PeopleSoft General Ledger period as the accounting date. |
|
|
Tax Exempt |
Select if you want to override the default sales and use tax setup for this voucher and make it exempt from taxation. |
|
Print Invoice |
Click to create the invoice in a PDF file format. The system opens a new window where you can view and print the invoice. |
|
Calculate (calculate on-demand balancing) |
Click to perform on-demand balancing calculations and check whether the voucher is in or out of balance. The system displays an amount of 0.00 in the Difference field when the voucher is in balance. |
|
Vendor and Name |
Select the vendor by entering the vendor ID or short name. After you press Tab to exit either field, the system retrieves and populates the voucher with the full vendor name, primary address, default location information, and payment terms. In addition, the system uses default information from the vendor table in conjunction with information from other default levels (business unit, origin, and control group) to determine how the system processes this voucher. Note. If financial sanctions validation is enabled and the vendor has a financial sanctions status of Review or Blocked, the system displays a warning message that the vendor that is selected is currently under financial sanctions review. You can proceed with adding or updating the voucher for this vendor. |
|
Location |
Override the default location by selecting a new location. The vendor location controls much of the default voucher processing. |
|
Address |
Override the default address by selecting a new address. |
|
Advanced Vendor Search |
Click to search for vendors using partial names and wildcard symbols. Note. If you find that the referenced vendor does not exist on the vendor table and you want to add the vendor, you do not have to cancel the voucher on which you are working. Access the Vendor Search page by clicking the vendor link and then clicking the Add Vendor button. This takes you to the Vendor Information component, enabling you to add the vendor to the system. After saving the new vendor, close the newly opened browser session to return to the Vendor Search page. When you are back on the Vendor Search page, select the new vendor. |
|
Control Group |
Select a control group for the voucher if applicable. The default is the earliest assigned group for the business unit and user ID. If no groups are assigned for your user ID, the Group field does not appear. |
|
Miscellaneous Freight, and Sales Tax |
Enter any miscellaneous charge amount, freight amount, or sales tax amount. To allocate these charges at a more detailed level, click the icons next to these fields to access detail pages (the Miscellaneous Charges, Freight Charges, and Sales Tax Charges pages). You should enter any amounts on the voucher page first before accessing the detail page. When you save the voucher, the system allocates the charges that you enter to the voucher lines based on the defaults that you set in the Procurement Control (BUS_UNIT_INTFC2) component for the PeopleSoft Payables business unit. Note. If you override the default tax information on the Invoice Line Tax Information page and then change the sales tax amount in this field, the overridden tax information will revert to the default. Enter a tax amount here before you update any tax information on the Invoice Line Tax Information page. See Entering Nonmerchandise Charge Details. See (IND) Processing Excise Duty, Sales Tax, VAT, and Customs Duty for India in PeopleSoft Payables. |
|
|
Click to access the Miscellaneous Charges page and define miscellaneous charges. |
|
|
Click to access the Freight Charges page and define freight charges. |
|
|
Click to access the Sales Tax Charges page and define sales tax charges. |
|
Use Tax |
Displays the calculated use tax. The system calculates the use tax either from:
Click the Transfer to Use Tax Detail icon to access the Use Tax Charges page, where you can specify how to allocate the use tax charges. |
|
|
Click to access the Use Tax Charges page and define prorated or nonprorated use tax charges. |
|
|
Click to access the Invoice Header VAT Information page and define VAT default information for this voucher. |
|
Total and Currency |
Enter the full amount of the voucher, including merchandise and service amounts (entered on the voucher lines), freight, and tax. Enter the gross amount to ensure balancing between the voucher header and voucher lines. You can enter gross amounts only up to the limit that is specified on your PeopleSoft Payables user profile. |
|
Difference |
Displays the amount that you are currently out of balance. To arrive at this figure, the system compares the sum of the invoice lines plus the applicable charge amounts and the entered gross amount. |
|
Pay Terms |
Select the payment terms. These terms are supplied from the PeopleSoft Payables default hierarchy. Click the Transfer to Pay Terms Detail button to access the Payment Terms page, where you can override the defaults or change associated information. |
|
Basis Date Type |
Displays the basis date type which controls the basis date on which the payment terms are based. You can override the basis date type on the Payment Terms page. |
|
(USF) Pay Schedule |
Indicate a federal payment schedule type for this voucher. The system uses this information to group this voucher with others and assign it to the appropriate payment schedule. Select from:
See (USF) Processing PeopleSoft Payables for U.S. Federal Agencies. |
|
Non Merchandise Summary |
Click to access the Non Merchandise Charges Summary Information page, where you can view the miscellaneous amount that is allocated to each voucher line for each charge code. This page is useful only after you enter or copy voucher line information. |
|
Session Defaults |
Click to access the Session Defaults page, where you can select existing available session defaults or set ad hoc default values for all of the invoices that you enter in the current session. These defaults override the defaults that the system applies using the PeopleSoft Payables control hierarchy. |
|
(USF) Calc Basis Date |
Click to access the Date Calculation page, where you can enter information that enables you to schedule the payment for this voucher on a U.S. federal prompt payment basis. You can also use the Date Calculation page to enable enforcement of valid reimbursable periods for project-related vouchers. See Applying Prompt Payment Protocols. See Enforcing Valid Reimbursable Periods for Project-Related Vouchers. |
|
Attachments (n) |
Click to add or view attachments related to this voucher. The system displays the number of attachments attached to the voucher. If no attachment is attached, the system displays (0). If you have enabled the Approval Framework, you can decide if you want to allow approvers to view the attachments on this page. |
|
Comments (n) |
Click to enter comments for a voucher to explain payment schedules, issues with the vendor, or anything else that you need to document the invoice. Any comments that you enter in this field are meant for your reference only. You can enter up to 254 characters for a comment. If you exceed 254 characters, the system displays a warning message that it can save only 254 characters and truncates the message. The system displays the number of comments attached to the voucher. If no comment is attached, the system displays (0). Warning! For claim vouchers, the system populates this field with identification information that is necessary for processing. Do not edit or delete any existing information in this field. |
|
Approval History |
Click this link to access the Approval History page and view the approval history for the voucher. Note. This link is only available for vouchers that are submitted for approval in the Approval Framework. |
|
View Audit Logs |
Click to access the Search Audit Logs page and view audits associated with this voucher. Note. This link is only available if you enable audit logs. Information displayed depends on the events selected for auditing. |
|
Submit for Approval |
Click to submit the voucher for approval. Note. This button only appears if the voucher is enable for approvals in the Approval Framework. |
|
Sales/Use Tax Summary |
Click to access the Sales/Use Tax Summary page, where you can review and modify, if applicable, the SUT information for all the voucher lines. |
Invoice Information
|
Related Voucher |
Journal vouchers only. Use this field to associate the journal voucher with the voucher for which you are correcting accounting entries. |
|
Click the Finalize Document icon to finalize the predecessor PO. This icon also appears in the Invoice Lines group box as the Finalize Line icon, which you can click to finalize the predecessor PO line. |
|
|
|
Click the Undo Finalize icon to undo the finalization of the predecessor PO. This icon also appears in the Invoice Lines group box as the Undo Finalize Line icon, which you can click to undo finalization of the predecessor PO line. |
|
Dispatch Method |
Debit memo adjustment vouchers only. Select a dispatch method for this debit memo adjustment voucher. This field is available only if the voucher style is Adjustment and the voucher source is Match Adjustment. You can override the dispatch method that is defined in the Debit Memo Options collapsible region on the Vendor Information - Payables Options page. Values include Blank, EDI/XML, Email, Fax, Phone, and Print. |
|
VAT Amount (value-added tax amount) |
If this is a VAT-applicable voucher that is subject to exclusive VAT, enter the gross VAT amount. Click the Transfer to VAT Header icon to access the Invoice Header VAT Information page if you need to review and override the voucher's default VAT settings. When you click this icon, the system retrieves the VAT defaults based on your VAT setup and entered vendor and vendor location information. Note. If your voucher is in a VAT environment and you do not enter any of the VAT pages for your voucher before saving it, the process to retrieve the VAT defaults is triggered automatically at save time. |
When you have finished entering your voucher and saved it, you have three options for processing your voucher:
Perform budget-checking, matching, document tolerance checking, asset loading, posting, and journal generation on this and other vouchers in batch from the batch request pages for those processes.
Process the voucher on demand, directly from the Invoice Information page, using the Action field.
Process this and other vouchers in batch from the Voucher On-Demand Processes batch request page using on-demand process groups.
The first option is generally the most efficient, but the second option is useful when you must process a voucher immediately, on demand. The third option is convenient when you want to perform multiple sequential processes, such as matching, asset loading, voucher posting, and journal generation, on a batch of vouchers.
If you want to process a voucher on demand from the Invoice Information page:
Save the voucher.
Select an on-demand process group in the Action field.
Click Run to initiate processing.
While the voucher is being processed, the fields on the Voucher component are unavailable for entry. Click Refresh to view the processing status of the voucher on the Voucher Summary page.
The process groups that are available depend on whether you have on-demand processing enabled, your user ID, and whether your voucher requires the processing. If budget-checking isn't applicable to a voucher, for example, the Budget Checking process group will not be available. Process groups that may be available include:
Budget Checking (BUDGET_CHK).
Document Tolerance (DOC_TOL).
Matching (MATCHING).
Matching, Doc Tolerance, Budget Check (MTCH_DT_BC).
Voucher Post (PST_VCHR).
Journal Generate (PST_VCHRGL).
Voucher Post Load AM (POSTAPAM).
Journal Gen, Load AM (POSTAPGLAM).
See Setting Up On-Demand Processing.
See Running On-Demand Voucher Processes as a Batch Request.
Other Header Information
|
Document Sequencing |
Click to access the Document Sequence page, where you can view or override the document sequencing settings. This link appears only if you have implemented document sequencing. |
|
Withholding |
Click to access the Withholding Information page, where you can view or override the default withholding details for the voucher. This link appears only if the voucher is associated with a vendor that is set up for withholding. If you are adding a voucher and enter the vendor on this page rather than the add search page, the link appears when you press Tab to move out of the Vendor field. See Reviewing and Entering Withholding Information for Vouchers. |
|
VAT Summary |
Click to access the Invoice VAT Summary Information page, where you can view the calculated VAT totals for the invoice by VAT code. You can also link from the Invoice VAT Summary Information page to the VAT default pages if you need to review or override VAT defaults for the voucher. Note. If the voucher is in a VAT environment and you do not enter any of the VAT default pages for the voucher before you save it, the process to retrieve VAT defaults is triggered automatically at save time. |
If you are creating a prepayment voucher and you are a U.S. federal agency with Enable Federal Payment selected on the Installation Options - Payables page, the Advance Payment Option group box appears. When you select Use Advance Payment in that group box, you are required to associate the prepayment with a purchase order.
Note. The voucher component does not copy lines from the associated purchase order when you enter the PO number here.
See Handling Advances for Federal Agencies.
Use the following fields for copying from a source document. The voucher style determines which fields appear here:
|
PO Unit (PeopleSoft Purchasing business unit) and PO Number |
If you want to copy all of the lines from a purchase order into the voucher, enter the PeopleSoft Purchasing business unit and the PO ID for the purchase order that you want to copy. Then click the Copy PO (copy purchase order) button. This option is available only if you are creating a regular voucher, template voucher, or third-party voucher. Important! When copying a purchase order into a voucher, do not begin by entering nonmerchandise and tax-exempt information on the add search page. Use the Copy PO button to ensure that the system provides these amounts by default to the appropriate fields. |
|
Voucher ID |
If you want to copy all of the lines from another voucher into the voucher, enter the voucher ID number that you want to copy. Then click the Copy to Voucher button. To copy individual voucher lines, enter a vendor and click the Copy from Worksheet link. This option is available only if you are creating an adjustment or third-party voucher. |
|
Voucher to be Reversed |
If you want to reverse a voucher, select the voucher ID number of the voucher you want to reverse, and click the Copy to Voucher button. The system copies all information that is related to the selected voucher (such as voucher lines, distribution lines, freight, miscellaneous charges, and sales tax, and VAT information) into the reversal voucher. This option is available only if you are creating a reversal voucher. |
|
Reverse Remaining Vchr Balance (reverse remaining voucher balance) |
Select to reverse only the unpaid voucher balance. This option is available only if you are creating a reversal voucher. |
|
Adjust PO/Restore Encumbrance (adjust purchase order/restore encumbrance) |
Select to restore the encumbrance and to adjust the purchase order matched quantity or amount. This option is available only if you are creating a reversal voucher, and if the related purchase order has not been reconciled. If the related purchase order on the voucher line has been reconciled, this check box is deselected and unavailable for entry on the voucher line of the Invoice Information page. |
|
Copy From |
If you want to search for individual source documents to copy, to select a range of source documents, or to review individual source documents, select one of the values in this field to access the appropriate Copy Worksheet:
|
Use the Invoice Lines scroll area to enter information for each line on the invoice: the merchandise amount, unit price, quantity, and description. Initially, at least one line appears automatically; enter as many additional lines as needed. The system assigns a line number to each voucher line that you add to ensure that each voucher line is unique.
Note. Rebalancing and calculations are affected by deferred
processing.
You cannot enter or adjust voucher lines after a voucher has been payment
posted.
You cannot combine replacement type return-to-vendor (RTV) vouchers
with credit or exchange type RTV vouchers (vouchers having credit and replacement
type lines, or exchange and replacement type lines). Doing so causes match
exceptions, because these differing voucher types are created with dissimilar
statuses. The Voucher Build process builds replacement RTV debit memos with
a To Be Matched status so that the Matching process correctly
updates the matched amounts between the purchase order, the receiver, and
the voucher. However, the system receives credit and exchange RTV vouchers
that are already configured with a Matched status. They
do not need to be run through the Matching process as their totals do not
affect quantities that need to be matched.
|
Distribute by |
Select a distribution method: Amount: You must enter the merchandise extended amount for the voucher line. You can also enter the quantity, unit price, and unit of measure (UOM) on the voucher line and a quantity on the distribution line for informational purposes only. If you change the value in the merchandise Extended Amount field, the Unit Price field is recalculated. Note. Any changes in the extended amount will be reflected in the distribution. The system adjusts the distribution line that has the maximum distribution line number. If you reduce the amount below the original PO amount, then the only adjustment is to set the amount to zero on the distribution line that has the maximum distribution line number. In this case, you must still adjust the distribution amounts so that they tie back to the voucher line amount. In addition, any change to the merchandise amount will be accompanied by a corresponding change to unit price. If the original distribution method on the purchase order was quantity and you change the method to amount, then the distribution as well as the voucher line information remains unchanged. Even under the amount distribution method, the voucher line quantity should equal the sum of the distribution line quantity. If they are not equal, then an error message is issued. Quantity: The system calculates the merchandise amount on the invoice lines and distribution lines based on the quantity and unit price. You must enter the quantity, unit price, and UOM. The Extended Amount field is not available for entry. Select the Force Price option if you want to force the unit price based on the entered merchandise amount. This option is described subsequently. Note. If you change voucher line quantity, the system does not adjust the distribution lines in response. Therefore, if you change the voucher line quantity, you must adjust the corresponding distribution level quantity. A validation exists to check whether the voucher line quantity is equal to the sum of distribution quantities. In addition, if you change the quantity on the copy worksheet (either PO or receiver), then the changed quantity is copied onto the voucher line, whereas the distribution still retains the original PO quantity. You should manually adjust the distribution quantity such that the sum of the distribution quantity equals the voucher line quantity. If the original distribution method on the purchase order was amount and if you change the method to quantity, then the system recalculates the distribution amounts using the quantity on the distribution line and the unit price on the voucher line. An option also exists of forcing the price that is available under this method. Selecting this option will force the system to calculate the price based on the extended amount. When you select this option, the unit price field is not available. |
|
SpeedChart |
Enter a SpeedChart. When you press Tab to move out of the edit box, prorated amounts and distribution ChartFields appear on the voucher distribution lines. If the SpeedChart was defined with no proration percentages, you must enter the distribution amounts yourself. SpeedChart is not available on the reversal or prepaid voucher, as these voucher styles do not enable you to add voucher lines. See Defining SpeedCharts. |
|
Work Order Resources |
If the invoice line is for a Work Order Management external resource, use these fields to enter the actual resource procurement cost. You then transfer the information back to Work Order Management to help determine the actual cost. These fields appear only if your organization has installed the Work Order component in PeopleSoft Maintenance Management. If the system populates these fields with data that is copied from a purchase order, you cannot edit the information.
Important! If you are creating a non-purchase order voucher
for items that are already entered in the Inventory application, do
not enter work order information here. Doing so creates a duplicate
charge situation, because PeopleSoft Payables and Inventory individually send
work order charges for the same item to Work Order Management. |
|
Maintenance Work Order |
Select the specific work order for the invoice line. |
|
Task Number |
Select a work order task for the invoice line. Available tasks depend on the selected maintenance work order. |
|
Resource Type |
Select Labor, Material, or Tools. |
|
Resource Line No (resource line number) |
Select a specific resource line number for this invoice line. Available resource line numbers depend on the selected resource type. |
|
Item |
Enter an item ID reference code and a line item description of up to 30 characters. If you also have PeopleSoft Purchasing installed, you can use an existing item from the PeopleSoft Purchasing item table. When you press Tab to move out of this field, the system populates the Description field with the associated description. |
|
Related Voucher |
For reversal and adjustment vouchers, displays the voucher ID of the voucher line that is being reversed or adjusted. |
|
Use One Asset ID |
Select to override all assets on the voucher line to use the same asset ID. Selecting this option causes the system to update all of the asset IDs for all asset-applicable distribution lines under the voucher line to NEXT, each sequence number to 1, and the profile ID to the profile ID of the first distribution line. You can override these values on individual distribution lines. |
|
Force Price |
Select if you want to force a change to the unit price to achieve the entered extended amount. Use when the sum of the merchandise amounts on the distribution lines does not match, usually because of rounding. Selecting Force Price enables you to change the extended amount and have the unit price recalculated to achieve that extended amount. Note. This check box is available only if you are distributing by quantity and copying from either a purchase order or a receiver. You must refresh the page to enable the Force Price check box. |
|
Override PO Pct (override purchase order percentage) |
Click this button to override the purchase order percentages. After clicking the button, the Percentage column becomes available for edit. The totals entered must equal 100. Once reallocated, click the Allocate by Pct button to reallocate the expenses. This button only appears for vouchers created from purchase orders or receipts. |
|
Allocate by Pct (allocate by percentage) |
Click this button to reallocate the voucher line's quantity and amount over the distributions by the percentage copied forward from the purchase order. This button only appears for vouchers created from purchase orders or receipts. |
|
Sales/Use Tax |
Click to access the Invoice Line Tax Information page, where you can override the default tax settings for the voucher line. |
|
Purchase Order & Receiver Info (purchase order and receiver information) |
Click to access the View Source PO/Receiver Information page, where you can view information about the source purchase order or receiver, including comments of various types, including header, line, and ship-to comments. This link appears only if you have PeopleSoft Purchasing installed on the same database. |
|
Associate Receiver(s) |
Click to access the Associate Receiver page and Associate Receiver Lines page, where you can manually associate individual receivers with the voucher line for three-way matching. This link is active only if you have copied purchase order or receiver information onto the voucher using the Copy Worksheet Option field and the purchase order requires matching, or if the vendor is set up for receipt-only matching. |
|
Invoice Line VAT or VAT and Intrastat |
Click to access the Invoice Line VAT Information page if you need to review and override the default VAT and Intrastat settings for the voucher line. The VAT and Intrastat link appears only on VAT-applicable adjustment vouchers. Note. If your voucher is in a VAT environment and you do not enter any of the VAT pages for your voucher before saving it, the VAT default process is triggered automatically at save time. |
|
View Contract ID Line |
Click to access the Contract Line Info page and view the contract ID, contract line and release number. Note. This link is only available for vouchers with a contract ID value. |
For each voucher line that you enter, you must also enter the distribution information in the Distribution Lines grid. Each voucher line must have one or more distribution lines. You can select the Copy Down check box on a distribution line to copy that line's general ledger business unit and ChartField values to new distribution lines.
Note. You cannot enter or adjust distribution lines after a voucher has been payment posted.
You can enter project information on distribution lines, and the project information that you capture on vouchers is available to PeopleSoft Project Costing. By entering multiple distribution lines, you can add multiple project lines for each voucher line to categorize project costs. If you have implemented PeopleSoft Project Costing during installation and add project information to a distribution line, you need at minimum to add the project business unit, project ID, activity ID, and resource type. The other fields are optional. If you have not installed PeopleSoft Project Costing, you are not required to enter a project business unit.
See Understanding Integration with PeopleSoft Payables.
Fields on this tab that are not documented here are optional ChartFields that are delivered with PeopleSoft Payables. They share the same validation error processing when you save the voucher as do the fields described here.
Important! ChartFields that appear here depend on how you configure options on the Standard Chartfield Configuration page.
See Completing the Standard ChartField Configuration Page.
|
Copy Down |
Select the check box on a distribution line and click the Insert Row button to copy that line's general ledger business unit and ChartField values to new distribution lines. If multiple distribution lines are selected, the system will issue a warning and arbitrarily select the ChartField values from one of the selected lines to populate the new lines. If no line is selected, only the default general ledger business unit will be populated. |
|
PO Percent |
This field appears only if the voucher was created by copying a purchase order into the voucher. |
|
Percent |
If the user removes distributions or reallocates the distribution amounts, the Percent column will update with the changes to reflect the actual percentage (Distribution Amount / Line Amount). Note. This field appears only if the voucher was created by copying a purchase order into the voucher. |
|
Merchandise Amt (merchandise amount) |
Enter the amount that you want to charge to the ChartField values that follow. The total of all amounts that you enter on the distribution lines for a voucher line must equal the merchandise amount on the parent voucher line. An error message appears if an imbalance occurs. |
|
Quantity |
Enter the number of units purchased that should be associated with the distribution line. This field is required if you are distributing by quantity. It is optional if you are distributing by amount. If you have entered a quantity on the voucher line, the total of all quantities entered on the distribution lines for that voucher line must equal the quantity on the parent voucher line. If you are entering a voucher line for a fixed asset that you will send to PeopleSoft Asset Management, you must enter a quantity for the asset. |
|
GL Unit (general ledger business unit) |
Identifies the general ledger business unit that will be charged with the expense that is coded on the distribution line. The default value is the general ledger business unit of the PeopleSoft Payables business unit under which the voucher is being entered. If you change the value to charge a different PeopleSoft General Ledger business unit, the system creates interunit accounting entries. This occurs during voucher and payment posting. In this case, ChartField validation occurs based on the ChartFields of the PeopleSoft General Ledger business unit. Note. When you enter interunit vouchers on the Invoice Information page, the value for the Budget Status field on the Voucher Summary page changes from Valid to Not Budget Checked. You must run the budget checking process to reset the status to Valid to make the voucher eligible for posting during voucher post. |
|
Entry Event |
Enter the entry event code for the voucher if applicable. The system displays this field if you have enabled entry events. See Processing Vouchers, Payments, and Cash Clearing Transactions with Entry Events. |
|
Account |
Enter an account. When you save the voucher, the system validates the account that you enter along with any other ChartField values. If the account that you select has been set up as a statistical account, the Amount and Quantity fields on the invoice line become inactive and any values that you may have already entered are deleted. If the Installation option is enabled, the Altacct (alternate account) field appears next to the Account field in the grid. |
|
OpenItem |
If the account that you enter has been set up as an OpenItem account, you must enter an open item reference. Select a reference by prompting. If you enter a reference for an account that is not an open item account, an error message appears when you attempt to save the voucher. You must remove the invalid reference before you can save the voucher. |
|
Project ID |
Enter a project identifier. This field appears if you do not have PeopleSoft Project Costing installed on your database. |
|
Budget Date |
Displays the budget date of the distribution line if the Commitment Control feature is enabled. You define which field the system uses for the budget date on a voucher in the Source Transactions component when you set up the Commitment Control feature in PeopleSoft General Ledger. You can also specify at the installation options whether the default budget date is the accounting date of the voucher or of the predecessor document (purchase order). |
|
Affiliate |
If the vendor is an interunit vendor, this field is not editable and the affiliate code appears by default. |
|
GL Unit (general ledger business unit) and Currency |
Identifies the general ledger business unit that is charged with the expense that is coded on the distribution line, as well as the currency in which it will be charged. |
|
Exchange Rate |
Appears automatically based on the default rate type from the market rate tables. You can override this value on the Voucher Attributes page. This field appears only when the distribution general ledger business unit is different from the voucher's general ledger business unit, or when the voucher is saved. |
This page displays statistical quantity information.
If you are distributing by quantity, you can distribute that quantity using a statistics code. The system converts the distribution line quantity from the distribution line UOM to the standard UOM that is associated with the Statistics Code field. The converted quantity is stored in the Statistic Amount field. The Statistic Amount and Unit of Measure fields are inactive.
If you enter a statistic account on a voucher line, you must refresh the page by clicking the Refresh button (access key: Alt+0) so that the merchandise amount and quantity fields on the invoice line are unavailable and blank. You must enter a statistic amount. You can enter the statistic amount in a UOM that is different from the standard UOM that is associated with the statistic account. After you enter the statistic amount, enter the corresponding UOM. The system converts the statistic amount that you enter back to the standard UOM that is associated with the statistic account. The Statistics Code field becomes unavailable for entry.
Whether you are using a statistic account or a statistics code, if the system cannot find a conversion formula between the two UOMs in the UOM conversion table, an error message appears. For example:
If you are using a statistic account, the system resets the UOM to the standard UOM for the account, and you must modify the Statistic Amount field manually so that it corresponds to the standard unit of measure.
If you are using a statistics code, the system does not calculate a statistic amount; you must delete the Statistic Code field value or enter another one.
|
Asset |
Select to enter asset information for the distribution line. All the fields on this tab become active when you select the Asset check box. |
|
Business Unit (PeopleSoft Asset Management business unit) and Profile ID |
Enter a business unit and a profile ID to indicate that the distribution line is related to an asset. These fields are required.
Note. You cannot assign the same asset ID to different profile
IDs. |
|
Asset ID |
Enter an asset ID. Otherwise, the field value NEXT appears by default. This value indicates that the next asset ID value in the PeopleSoft Asset Management system is assigned automatically. When you accept NEXT as the default, you can use the Sequence Number field to make more than one distribution line share the same automatically incremented asset ID. The system validates that a unique asset ID has only one profile ID associated with it for a given voucher line. Note. You cannot perform asset transfers in PeopleSoft Payables. You can make ChartField changes in PeopleSoft Payables, but you must also have your asset manager make a corresponding change in the appropriate PeopleSoft Asset Management page. |
|
Sequence Number |
If you have accepted the default asset ID value of NEXT, you can enter a sequence number to indicate an asset grouping of voucher distribution lines. If the asset ID is NEXT, you can enter any numeric value in this field. The unique combination of NEXT in the Asset ID field and the sequence number that you enter here cause a unique asset ID to be generated when the information is processed by PeopleSoft Asset Management. For example, if you have four distribution lines for assets that you want to assign to two separate asset IDs, you can specify an asset ID of NEXT and a sequence number of 1 for the first two lines and an asset ID of NEXT and a sequence number of 2 for the next two. Each group of two lines is assigned its own asset ID number. Leave this field blank if you entered a known asset ID. If the asset ID is NEXT and the Sequence Number field is blank, the system generates a unique number. If you selected the Use One Asset ID check box for the voucher line, the system populates the Asset ID field with NEXT and the Sequence Number field with 1 for each asset-applicable distribution line, and causes PeopleSoft Asset Management to assign all distribution lines to the same asset ID. |
|
Cost Type |
Select the cost type for the asset. Values are: A: Allowance for ADV depreciation. C: Cost type. G: Grant reimbursements. I: Impairment loss. M: Margin. P: Scrap on asset. R: Revaluation. S: Sale of assets. V: Reserve for ADV depreciation. W: Depreciation write-off. X: Revaluation reversal. Y: Impairment reversal. |
See Sending Information to PeopleSoft Asset Management.
VAT Tab
This page appears only for business units that are enabled for VAT.
Click the VAT link to access the Invoice Distribution Line VAT Information page if you need to review or update the VAT control settings for the distribution line.
Note. If your voucher is in a VAT environment and you do not enter any of the VAT pages for your voucher before saving it, the VAT default process is triggered automatically at save time.
See Reviewing and Overriding Voucher Distribution Line VAT Defaults.
The system automatically enters default values that are entered for miscellaneous charges, freight charges, VAT, and taxes on the add search page into the appropriate fields. You can edit these amounts.
In addition, field display in this group box varies depending on add search page values that are entered. For example, when you use a Prepaid voucher style, the system disables the Misc Charge Amount (miscellaneous charge amount), Freight Amount, and Sales Tax Amount fields. And if you select a VAT-applicable business unit, the system enables VAT fields on the voucher.
Note. The system acts differently when calculating VAT depending on whether you are in the Add mode or the Update/Display mode. When you enter a VAT amount using the add search page, the system supplies the VAT line amount on the Invoice Information page, and if the amount is edited, correctly recalculates this amount. However, when you modify an existing voucher VAT amount using the Update/Display mode, the system does not recalculate the VAT line amount. Instead, it displays the difference between the header and line amounts in the Difference Amount field.
Defining Payment Terms
Access the Payment Terms page (click the Transfer to Pay Terms Detail button on the Invoice Information page).
|
Payment Terms ID |
Controls how the voucher is paid, including the discount date and discount amount. PeopleSoft Payables supports both single and multipayment (installment) terms. You define payment terms on the Payment Terms - Multi Payment page or the Payment Terms - Single Payment page. The default setting on the voucher is based on the payment terms that are established for the vendor location for this voucher. Multipayment terms generate multiple scheduled payment records when you save the voucher by allocating the total payment amount for the voucher over these scheduled payments, according to the percentages that are established in the terms definition. With multipayment terms, you can also generate installment payment records (and review them and edit them, if necessary) in advance of committing them by saving the voucher. You can always edit the voucher immediately after saving, but this alternate method may offer more peace of mind. |
|
|
Click the Schedule Payments icon to generate payment records in advance of saving the voucher. For multipayment terms, this prepopulates multiple schedule payment records (installments). For single payment terms, this calculates and supplies the net due date, the discount amount, and the discount due date if the terms are discount-applicable. You can also do this by clicking the Schedule Payment button on the Payments page. |
|
Due Date Control |
Either accept the default due dates, or enter user-specified amounts. Select from: Terms: This is the default setting. When you select this value, the Basis Dt Type (basis date type) field is available for entry, but the Discount Due Date and Due Date fields are not. If the Due Date Control field is specified as Terms, then the scheduled due dates and net due dates are determined by the payment term specified. User: When you select this value, the Discount Due Date and Due Date fields are available for entry and you can modify them. The Basis Dt Type field is unavailable for entry. If the Due Date Control field is set to User, then the date is derived from the Due Date field. |
|
Enter the date for the system to use to calculate the discount due date and payment due date for the voucher. This field controls the basis date on which the payment terms are based. Values are: Acct Date (account date): The accounting date determines the payment basis date. Doc Date (document date): The date that the voucher is entered, which determines the payment basis date. If you select this value, the document date appears in the Basis Date field. Inv Date (invoice date): The invoice date determines the payment basis date. Recpt Date (receipt date): The receipt date determines the payment basis date. Ship Date: The ship date determines the payment basis date. User Date: The user-defined date that is entered in the Basis Date field determines the payment basis date. Note. Just because you can select an alternate basis date source does not necessarily guarantee that the particular date is currently available for the voucher. For example, the receipt date and ship date values would typically be available only if the invoice had first been matched to the purchase order, the receiver, or both. If you select a basis date value for which no corresponding date value is populated, a warning appears asking whether you want to use the invoice date as the override basis date. If you select Yes, you can save the voucher and generate scheduled payment data. Until a voucher is posted or paid, you can always update the voucher for the intended basis date if it becomes available. |
|
|
Basis Date |
Displays the date used to calculate the discount due date and payment due date for the voucher. The system populates the date based on the basis date type. If the basis date type is User Date, this field is available and the system requires that you enter a date. This basis date is not the same as the federal payment basis date on the Date Calculation page. |
|
Discount Due Date |
If you select User in the Due Date Control field, enter a discount due date. |
|
Due Date |
If you select User in the Due Date Control field, enter a due date. |
|
Discount Amount Control |
Accept the default discount amounts or enter user-specified amounts. Values are: Terms: This is the default setting. When you select this value, the Account At field is available for entry but the Discount Amount field is not. User: When you select this value, the Discount Amount field is available for entry and you can enter the amount for the discount in the Discount Amount field. |
|
Account At |
Determines whether the discount is accounted at gross or net. Values are: Net: Any discounts not taken are accounted for as discounts lost. Gross: Any discounts taken are accounted for as discounts earned. |
|
Basis Amt (basis amount) |
Displays the amount upon which the discount is calculated. This amount is the total of the merchandise amount for each line with the Apply Discount check box selected. |
|
Discount Amount |
If you select User in the Discount Amount Control field, enter a discount amount. |
|
Apply Discount |
Select to make individual voucher lines discount-applicable. |
Note. Payment terms for a third-party voucher cannot include a discount. For third-party vouchers, the payment terms are supplied by default from the Prepay/Third/Claim Pay Terms option that is selected for the setID on the Payables Options - Payment Options page.
See Also
Entering Nonmerchandise Charge Details
Access the Miscellaneous Charges page. (enter a miscellaneous charge amount and click the Transfer to Misc Chrgs Detail (transfer to miscellaneous charges detail) button on the Invoice Information page).
Note. The fields on this and the other nonmerchandise charges detail pages (Freight Charges page, Sales Tax Charges page, and Use Tax Charges page) are similar. Rather than documenting all four pages, we have documented the Miscellaneous Charges page as an example of these detail pages.
Use this page to allocate your miscellaneous charges to multiple charge codes. The total of the separate miscellaneous charges that you enter must equal the total miscellaneous amount that is entered on the Invoice Information page.
Note. You can add multiple charge codes on the freight and miscellaneous charges detail pages, but you can enter only one charge code on the sales tax and use tax detail pages.
|
Prorate |
The charge code appears based on the defaults that you have set on the Procurement Control - Non-Merch Charges page. If the default is to prorate the freight, the Prorate check box is selected. This field is unavailable for entry. |
|
Charge Type |
Select a charge code for each miscellaneous charge amount that you add. You define these codes on the Misc Charge/Landed Cost Defn page and set up the default charge codes for the PeopleSoft Payables business unit on the Procurement Control - Non-Merch Charges page. If you select a nonprorate charge code, the system uses the allocation option that you selected on the Procurement Control - Non-Merch Charges page to either allocate the charge to the distribution line or expense it to the header. |
|
Account and other ChartFields |
If you add a prorated charge code, no ChartFields appear on this page. If you add a nonprorated charge code and allocate the charge, the system requires an account. The value appears by default from the Accounting Entry Template. You can override the account. If you are expensing, the account and other ChartField values appear by default based on the inheritance rules. You cannot modify balanced ChartFields. |
See Also
Defining Miscellaneous Charges and Landed Costs
Setting Up Nonmerchandise Charges
Creating Accounting Entry Templates
Reviewing Nonmerchandise Charges
Access the Non Merchandise Charges Summary Information page (click the Non Merchandise Summary link on the Invoice Information page).
|
Refresh |
Click to reallocate the unapplied amount to the other voucher lines. |
|
Apply |
Deselect this option to remove a particular charge for a given voucher line. |
See Also
Entering Nonmerchandise Charge Details
Viewing Purchase Order and Receiver References
Access the View Source PO/Receiver Information page (click the Purchase Order & Receiver Info link in the Invoice Lines group box on the Invoice Information page).
|
Line Match Option |
Select a matching option for the line: Full Match: Requires matching. No Match: Does not require matching. |
|
PO/Receipt Header Comments and PO/Receipt Line Comments |
Use these group boxes to view any comments that are associated with the purchase order or receiver line from which the voucher line information has been copied. The original comments were entered with the purchase order or receiver in PeopleSoft Purchasing. The Comment Type field indicates whether the comment is a ship-to comment, PO header comment, and so forth. |
|
Send to Vendor |
Indicates whether this comment has been sent to the merchandise vendor through PO Dispatch. |
See Also
Creating Purchase Orders Online
Associating Receivers with Voucher Lines
Access the Associate Receiver page (click the Associate Receiver(s) link in the Invoice Lines group box on the Invoice Information page).
|
Amt Only (amount only) |
Appears as checked if the purchase order is an amount-only PO. For amount-only POs, you can modify the Merch Amt (merchandise amount) field, but you cannot modify the Quantity to Match (PO UOM) field. |
|
Delete |
Manually delete receiver lines that are associated with the voucher line by deleting a row. This field does not appear when you are creating adjustment or reversal vouchers. |
|
Quantity to Match (PO UOM) (quantity to match, purchase order unit of measure) |
Edit the quantity in the purchase order unit of measure to be matched for any of the receiver lines that are currently associated with the voucher line. You cannot modify this field if the receiver is associated with an amount-only PO. Note. A warning message appears if the sum of the quantity to be matched does not equal the voucher line quantity. |
|
Merch Amt (merchandise amount) |
Enter the merchandise amount for amount-only POs to be matched for any of the receiver lines that are currently associated with the voucher line. |
|
Merchandise Amount Received |
Displays the amount received for the receiver line. |
|
Associate Receiver Lines |
Click to access the Associate Receiver Lines page, where you can manually associate receivers with the voucher line for matching. This link does not appear when you are creating adjustment or reversal vouchers. |
Associating Receiver Lines with Voucher Lines for Matching
Access the Associate Receiver Lines page (click the Associate Receiver Lines link on the Associate Receiver page).
Using the search function that is provided, you can display all receivers that are related to the purchase order schedule line that is specified on the voucher line.
|
Recv Dt Opt (receiver date option) and Recv Date (receiver date) |
You can further narrow your search by selecting from the following values and then specifying a receiver date: <=: The system searches for receivers that are dated before or on the date that is specified in the Recv Date field. =: The system searches for receivers with a date that is equal to the date that is specified in the Recv Date field. >=: The system searches for receivers that are dated after or on the date that is specified in the Recv Date field. No Date: The date of the receiver is not included in the search. This is the default setting. |
|
Search |
When you have entered the search criteria, click this button and the system returns all receivers that are related to the specified search criteria and the purchase order on the voucher line. |
|
Select |
Select the receiver or receivers that you want to associate with the voucher line, and click OK. The system associates the selected receiver or receivers' details with the voucher to be used when matching the voucher. |
Entering Sales and Use Tax Summary Information
Access the Sales/Use Tax Summary page (click the Sales/Use Tax Summary link on the Invoice Information page).
The Sales/Use Tax Summary page provides tax details by line for the voucher. The fields on this page display values that are either passed to the voucher line through the PeopleSoft Payables default hierarchy or inherited from the purchase order. You can enter override tax values for each voucher line or you can access the Invoice Line Tax Information page to view additional details and override tax values.
This page includes different fields from those described here if you have installed and enabled a third-party tax application, such as Taxware or Vertex.
See Reviewing and Modifying Tax Summary Information for a Voucher.
SUT Amounts
Displays the merchandise amount and calculated tax amounts for each line.
|
|
Click to access the Invoice Line Tax Information page to review detailed tax information for this voucher line. |
|
SUT Apply (apply sales and use tax) |
Indicates the tax that applies to the tax destination. Values are: Direct Pay: Select if you do not want sales tax calculated. The system treats a direct pay line as a use tax line, except that it uses a different value for tax applicability. Item is Exempt: Select if the line is exempt from sales and use tax. Purchaser is Exonerated: Select if the purchaser does not have to pay sales or use tax. Sales Tax Appl (sales tax applicable): Select to calculate and apply sales tax to the line. Enter the gross sales tax amount on the voucher header. Use Tax Appl (use tax applicable): Select to calculate and apply use tax to the line. Do not enter the tax amount on the voucher header. |
|
Ultimate Use Code |
Enter an ultimate use code to override the default tax rate for a line. |
|
Tax Code SUT (sales and use tax code) |
Enter the tax code for the line. A tax code consists of a group of tax authorities. For example, if a certain locality has a city tax, county tax, and state tax, you can create three tax authorities and group them into a single tax code. |
Tax Parameters
Fields displayed when you select the Tax Parameters tab are discussed in detail in the following section.
Entering Voucher Line Tax Information
Access the Invoice Line Tax Information page (click the Sales/Use Tax link in the Invoice Lines group box on the Invoice Information page).
Similar to the Sales/Use Tax Summary page, the fields on this page display values that are passed to the voucher line through the PeopleSoft Payables default hierarchy. If the voucher was created by copying a purchase order, purchase order values override the PeopleSoft Payables default hierarchy, so the voucher inherits sales and use tax data from the purchase order. When you create a new voucher, all of the fields on this page can be overridden for the voucher line.
This page includes different fields from those described here if you have installed and enabled a third-party tax application, such as Taxware or Vertex.
See Managing Voucher Line Tax Information with Taxware and Vertex.
|
Sales/Use Tax Destination |
Indicates the location for which a sales or use tax is applicable. This value is defined as a ship to location, but it does not have to be the same as the ship to location that is defined in the PeopleSoft Payables control hierarchy. |
|
Sales/Use Tax Applicability |
Indicates the tax that applies to the tax destination. Values are: Direct Pay: The system handles a direct pay line as a use tax line, except that it uses a different value for tax applicability. Exempt: The line is exempt from sales tax. Exonerated: The purchaser is exonerated from sales tax. Sales Tax: Apply sales tax. Enter the gross sales tax amount on the voucher header. Note. If you copy a single purchase order line that has use tax applicability, and you enter sales tax on the voucher header, the system automatically changes the tax applicability for that voucher line to sales tax. Use Tax: Apply use tax. Do not enter the tax amount on the voucher header. Note. If you copy purchase order lines with sales tax applicability, and you do not enter sales tax on the voucher header, the system automatically changes the tax applicability for those voucher lines to use tax. |
|
Ultimate Use Code |
Enter a code to override the default tax rate that is based on the ship to location. This field is available for entry only if an ultimate use code is defined for the ship to location on the Ship To Sales/Use Tax Default page. |
|
Tax Code SUT (sales and use tax code) |
Enter the tax code that applies to this voucher line. A tax code consists of a group of tax authorities. The tax code that is supplied by default here depends on a number of factors. See Understanding PeopleSoft-Only Sales and Use Tax Processing. |
Calculation Parameters
|
Include Misc Charges (include miscellaneous charges) |
Select to indicate that any additional charges must be taxed and added to the net-extended amount before the system calculates SUT. |
|
Include Discount |
Select to have the system calculate any applicable discount and subtract it from the net-extended amount before calculating SUT. Note. If the discount is lost, the system does not automatically recalculate and adjust any tax amounts. |
|
Include Freight |
Select to indicate that any freight amount must be taxed and added to the net-extended amount before the system calculates SUT. |
|
Include VAT |
Select to indicate that any VAT amount must be taxed and added to the net-extended amount before the system calculates SUT.
|
Note. The values in these fields are supplied by default from the tax code in a PeopleSoft-only tax calculation environment and from the ship to location if you are using a third-party tax application.
See Also
Managing Voucher Line Tax Information with Taxware and Vertex
Entering Session Defaults
Access the Session Defaults page (click the Session Defaults link on the Invoice Information page).
Session defaults are available for the Journal Voucher, Regular Voucher, Single Payment Voucher, and Template Voucher styles.
This page is similar to the page that you use to predefine session defaults. You can select existing available session defaults or set ad hoc default values for all of the invoices that you enter in the current session. These defaults override the defaults that the system applies using the PeopleSoft Payables control hierarchy. Only fields that are particular to this page or act in ways that are particular to this page are documented here.
See Defining Voucher Session Defaults.
|
Available Session Defaults |
Select an existing session default to use in the current session. When you select an option, the system supplies the predefined default attributes and the Apply button is activated. Note. You can use the predefined attributes or modify them. However, if you modify the attributes, they are available only for the current session. To retain these attributes, you must use the Session Defaults page. Select Set Up Financials/Supply Chain, Product Related, Procurement Options, Vouchers, Session Defaults. |
|
Apply |
Click to apply the predefined session default attributes in your current session. This button is active if you select an available session default. |
|
Ad Hoc |
Enter default attributes. and then click the Ad Hoc button to apply these default attributes in your current session. Also, click this button if you select an existing session default and modify the attributes. |
|
Clear |
Click to deselect the current session defaults. This applies only to the ad hoc default attributes. You cannot clear the predefined session defaults from this page. |
Note. You must click either the Apply button or theAd Hoc button to use session defaults in your current session. Your session remains current until you sign out.
Copying Source Documents to Create Vouchers Online
This section provides an overview of source document copy functionality and discusses how to:
Copy purchase order information.
Copy receiver information.
Copy voucher information.
Copy template information.
Understanding Source Document Copy FunctionalityThis section discusses:
Source document copy functionality.
Default logic.
Copying sales and use tax information from source documents.
Procurement card settlement method considerations.
Work order data integration.
Source Document Copy Functionality
Depending on your setup and business needs, you can create online vouchers by entering invoice information manually. In some cases, you may also want to copy existing information (from a purchase order, receiver, or another voucher) into the voucher that you are creating. PeopleSoft Payables enables you to copy entire source documents, or portions of them, saving data entry time and reducing potential input errors.
The types of documents that you can copy depend on the voucher style that you select. The Copy from a Source Document group box on the Invoice Information page changes depending on the voucher style that you select. The group box offers only the types of source documents that you are allowed to copy for that voucher style.
This table lists source transactions that are available for a particular voucher style:
|
Voucher Style |
Source Transactions Available to Copy |
|
Regular |
|
|
Adjustments |
Voucher. Note. The nonmerchandise charges are copied into the voucher only if you copy the entire voucher. They are not copied if you copy select lines. |
|
Claim Note. You cannot manually create claim vouchers, but you can update existing claim vouchers. |
|
|
Journal |
None. |
|
Prepaid |
None. |
|
Register |
None. |
|
Reversal |
Voucher. |
|
Single-payment |
None. |
|
Template |
Note. When you copy a voucher into the template voucher, the nonmerchandise charges are copied only if you copy the entire voucher. They are not copied if you copy select lines. |
|
Third-party |
|
When you copy individual source documents to a voucher, the voucher inherits the source document header, line, and distribution information. When you copy multiple purchase orders or multiple receipts to a voucher, the voucher inherits the first instance of the source document's header information. As an example, if you copy multiple lines from different purchase orders to a voucher, the first purchase order's header information is copied to the voucher.
Note. The match rule control and accounting template from the purchase order are copied to the voucher similar to other header fields.
Copying Sales and Use Tax Information from Source Documents
Whenever you copy purchase order information to a voucher, you copy only the sales and use tax codes and other processing parameters, not the calculated amounts. The calculated amounts on the voucher may therefore differ from those on the purchase order if, for example, a tax rate has changed for a tax code between the time that a purchase order was entered and the time that you copy it to the voucher.
If you copy a single purchase order line that is created with use tax applicability, and you enter sales tax on the voucher header, the system automatically changes the tax applicability for that voucher line from Use Tax to Sales Tax on the Sales/Use Tax Summary and Invoice Line Tax Information pages.
Note. When you copy multiple lines from a purchase order and enter sales tax on the voucher header, the system does not automatically apply the tax applicability as Sales Tax for all voucher lines. This is to maintain the integrity of the purchase order because you can enter a purchase order with lines specifically for sales tax applicability and lines for use tax applicability.
If you copy a purchase order that is created with a single line or multiple lines that indicate sales tax applicability, and you do not enter sales tax on the voucher header, the system automatically changes the tax applicability for those voucher lines from Sales Tax to Use Tax on the Sales/Use Tax Summary and Invoice Line Tax Information pages.
See Setting Up Sales and Use Taxes and Value-Added Taxes (VAT).
Procurement Card Settlement Method Considerations
Procurement cards (PCards) are used by authorized staff to buy small purchases of regularly consumed supplies and services, such as supplies (office, maintenance, computer), conference and registration fees, subscriptions, repairs, services, and so on. The card provider makes settlements for all transactions that are made with PCards directly to suppliers. The organization then makes a single monthly payment to the card provider.
PeopleSoft Purchasing has added PCards settlement functionality to requisitions and their associated purchase orders, enabling organizations to streamline the payment process. Using PCards reduces the amount of paperwork that is involved in receiving invoices, creating vouchers, and mailing or dispatching payments individually to suppliers.
PeopleSoft Payables handles PCard transaction settlements differently than other payments. The system processes PCard settlements through the PCard interface in the following way:
The card provider is paid immediately by a prepayment voucher.
Each cardholder's individual transactions are then paid by a regular voucher that clears the outstanding prepayment.
The prepayments are submitted monthly; one or more regular vouchers will clear the prepayment.
Because PCard settlements must be processed through the PCard interface, the system prevents purchase orders or receivers that are marked with this payment method from being copied to a voucher or a quick invoice, or from being selected by the voucher build association logic. The system excludes purchase orders and their associated receivers that are marked for PCard settlement from displaying on these pages:
Associate Receiver Lines (RECEIVER_LOOKUP).
Copy Worksheet for purchase orders (VCHR_LINE_PO_WRK).
Copy Worksheet for receiver lookup criteria (VCHR_LINE_RECV_WRK).
Invoice Information (VCHR_EXPRESS1).
Quick Invoice (VCHR_HEADER_QV).
PeopleSoft Payables integrates with Work Order Management to record the actual cost of external resources. If your organization installs the Work Order component in PeopleSoft Maintenance Management, this integration occurs during the following scenarios:
When you copy a purchase order or receiver that is associated with a work order into a regular voucher or a quick invoice voucher.
When you manually enter work order data into a regular voucher.
When the Voucher Build process creates vouchers with copied work order-associated purchase orders from the following voucher sources:
EDI.
ERS.
Quick Invoice.
RTV.
XML.
At voucher save, the system retrieves default distribution data from Work Order Management and automatically populates the distribution line level. This information includes Project ChartField information, and is not editable.
If you are associating a non-purchase order voucher with a work order, enter the work order data using the Invoice Information or Quick Invoice pages.
Important! If you are creating a non-purchase order voucher for items that are already entered in the Inventory application, do not enter work order information on these pages. Doing so creates a duplicate charge situation, because PeopleSoft Payables and Inventory will individually send work order charges for the same item to Work Order Management.
Run the Payables to Projects Cost Collection Application Engine (PC_AP_TO_PC) program, which retrieves the distribution and line information from the Voucher Line table and creates entries in the Project Transactions (PROJ_RESOURCE) table.
See Also
Voucher Build Processing Logic for Associating Voucher Lines with Purchase Order and Receiver Lines
Pages Used to Copy Source Documents to Create Vouchers Online|
Page Name |
Definition Name |
Navigation |
Usage |
|
VCHR_EXPRESS1 |
Accounts Payable, Vouchers, Add/Update, Regular Entry, Invoice Information |
Select the type of source document that you want to copy. |
|
|
VCHR_LINE_PO_WRK |
Select Purchase Order Only in the Worksheet Copy Option field on the Invoice Information page. |
Select the lines from one or more purchase orders for copying to the Invoice Information page. |
|
|
VCHR_LINE_RECV_WRK |
Select PO Receipt or Non PO Receipt in the Worksheet Copy Option field on the Invoice Information page. |
Select the lines from one or more receivers for copying onto the Invoice Information page. |
|
|
VCHR_TP_VCHR_WRK |
Select Voucher in the Worksheet Copy Option field on the Invoice Information page. |
Select the lines from one or more merchandise vouchers for the third-party voucher that you are entering. You can select this option only if you are creating template, third-party, adjustment, or reversal vouchers. |
|
|
VCHR_TEMPLATE |
Select Template in the Worksheet Copy Option field on the Invoice Information page |
Copy information from a template voucher. |
Copying Purchase Order Information
Access the Copy Worksheet (purchase order) page (select Purchase Order Only in the Worksheet Copy Option field on the Invoice Information page).
To copy a purchase order, you can enter the PO unit and purchase order on the Invoice Information page and click Copy PO, or you can select Purchase Order Only in the Worksheet Copy Option field to access the Copy Worksheet page for purchase orders.
Note. You cannot copy from a purchase order that is associated
with a PCard transaction.
When you use the PO worksheet copy functionality, the system always
uses the first listed PO to derive payment term information, regardless of
whether you define only one PO or multiple POs. It does not derive payment
term information from the PeopleSoft Payables default hierarchy.
PO Lookup Criteria
|
PO Business Unit (PeopleSoft Purchasing business unit) |
Search for purchase orders by PeopleSoft Purchasing business unit. You must enter a PeopleSoft Purchasing business unit. |
|
View Matched/Cancelled Only |
Select to limit the search to include matched and canceled purchase orders only. You must have authority to copy matched and canceled purchase orders. You set this up in Defining User Preferences. Note. When you copy the PO to the voucher using this option and Commitment Control is enabled for Purchasing, only PO lines with a not finalized status (KK_CLOSE_FLAG <> "Y" on the purchase order distributions) are available to be copied to the voucher. |
|
PO Number From (purchase order number from) and PO Number To (purchase order number to) |
Enter a PO number in the PO Number From field to search for individual purchase orders. Search for a range of purchase orders by entering PO numbers in the PO Number From and the PO Number To fields. You must also enter a PeopleSoft Purchasing business unit. |
|
PO Line Number From (purchase order line number from) and PO Line Number To (purchase order line number to) |
Enter a PO line number in the PO Line Number From field to search for individual purchase order lines. Search for a range of purchase order lines by entering PO line numbers in the PO Line Number From and the PO Line Number To fields. You must also enter a PO number. These fields are not available if you select a range of PO numbers. |
|
PO Date Option (purchase order date option) and PO Date (purchase order date) |
Complete the PO Date Option field in conjunction with the PO Date field to limit your search to purchase orders that fall within a selected date range. |
Additional Search Criteria
This section initially appears as collapsed; you must expand it to access these optional fields. You can specify additional criteria with PO lookup criteria or with only the PO business unit defined. However, any information that you define in this group box overrides the values that are specified in the PO Lookup Criteria group box.
|
Get only the PO lines that contain the following information |
Select to include only the PO lines that contain the data that is specified in the additional search criteria. This field is set as the default. |
|
Get all PO lines for any PO that contains the following information |
Select to include all purchase order lines for purchase orders that contain the data that is specified in the additional search criteria. |
|
Item ID, Item Description, Quantity, Unit Price, Merch Amt (merchandise amount), Vendor Item ID, Mfg Item ID (manufacturing item identification), Contract ID, Contract Line, orRelease Number |
Enter data to further refine your search. You can enter data in more than one field. When you search for quantity, unit price, or merchandise amount, you should also enter at least one of the following fields: Item ID or Item Description. |
Search and Copy
|
Search |
Click Search to populate the Select PO Lines scroll area with the purchase orders that match your search criteria. This button is not available until you enter a PeopleSoft Purchasing business unit. |
|
Copy Selected Lines |
Click Copy Selected Lines to copy selected purchase-order lines onto the voucher. This field is not available until you select Search to display PO lines. Note. If the Copy Matched and Closed PO option is selected for your user preferences and you create a voucher that references a PO that has a matched line (because an earlier voucher also referenced the PO) and an unmatched line, then when you copy the PO to the voucher, the matched PO line will be copied with both the amount and the quantity at zero. |
|
Reset |
Click to remove the Select PO Lines scroll area and clear selection criteria. |
|
Select All |
Click to select all of the lines for all purchase orders that are displayed. |
|
Clear All |
Click to clear all of the lines for all purchase orders that are displayed. |
Select PO Lines
|
Select |
Select individual purchase order lines by selecting this check box in the appropriate row. |
|
Quantity Vouchered |
Displays the quantity on the PO line. This field can be modified if the PO line is not an amount-only PO line. If you change the quantity that is vouchered, this value and the extended amount (quantity × unit price) are carried forward to the voucher line. However, you must change the distribution line manually on the Invoice Information page to match both the quantity and the extended amount. |
|
Merchandise Amt (merchandise amount) |
Displays the merchandise amount on the PO line. This field can be modified if the PO line is an amount-only PO line. |
|
Select All |
Click to select all of the lines for a single purchase order. Each purchase order that the system returns has a Select All button. You must click the button for each purchase order to select its lines. |
|
Clear All |
Click to deselect all of the lines for a single purchase order. Each purchase order that the system returns has a Clear All button. You must click the button for each purchase order to deselect its lines. |
See Also
Pages Used to Define Application-Specific User Preferences
Copying Receiver Information
Access the Copy Worksheet (receiver) page (select PO Receipt or Non PO Receipt in the Worksheet Copy Option field on the Invoice Information page).
Note. You cannot copy from a receipt on a purchase order that is associated with a PCard transaction.
Receiver Lookup Criteria
|
PO Business Unit (PeopleSoft Purchasing business unit) |
Search for purchase orders by PeopleSoft Purchasing business unit. You must enter a PeopleSoft Purchasing business unit, a receiving business unit, or both. Note. This field appears only if you selected PO Receipt in the Worksheet Copy Option field on the Invoice Information page. |
|
PO Number |
Enter a PO number to search for individual purchase orders. You must also enter a PeopleSoft Purchasing business unit. Note. This field appears only if you selected PO Receipt in the Worksheet Copy Option field on the Invoice Information page. |
|
PO Dt Opt (purchase order date option) and PO Date |
Enter the PO date option in conjunction with the PO Date field to limit your search to purchase orders that fall within a selected date range. Note. This field appears only if you selected PO Receipt in the Worksheet Copy Option field on the Invoice Information page. |
|
Receipt Unit |
Search for the receipts by receiving business unit. You must enter a PeopleSoft Purchasing business unit, a receiving business unit, or both. |
|
Receipt Number From and Receipt Number To |
Enter a receipt number in the Receipt Number From field to search for individual receipts. Search for a range of receipts by entering receipt numbers in the Receipt Number From and Receipt Number To fields. You must also enter a receiving business unit. |
|
Receiver Line From and Line |
Enter a receiver line number in the Receiver Line From field to search for individual receiver lines. Search for a range of receiver lines by entering receiver line numbers in the Receiver Line From and Line fields. You must also enter a receipt number. These fields are not available if you select a range of receipt numbers. |
|
Receipt Date Option and Receipt Date |
Enter the Receipt Date Option field in conjunction with the PO Date field to limit your search to receipts that fall within a selected date range. |
|
Ship To, Packing Slip, Pro Number, Bill of Lading, and Carrier ID |
Enter data in these fields to further refine your search. You can enter data in more than one field. You must enter a receipt unit if you use these fields to limit your search results. |
Additional Search Criteria
This section initially appears as collapsed; you must expand it to access these optional fields. You can specify additional criteria with receiver lookup criteria or with only the receipt unit defined. However, any information that you define in this group box overrides the values that are specified in the Receiver Lookup Criteria group box.
|
Get only the Receipt lines that contain the following information |
Select to include only the receiver lines that contain the data that is specified in the additional search criteria. This field is set as the default. |
|
Get all Receipt lines for any Receipt that contains the following information |
Select to include all receiver lines for receipt orders that contain the data that is specified in the additional search criteria. |
|
Item ID, Item Description, Quantity, Unit Price, Merch Amt (merchandise amount), Vendor Item ID, Mfg Item ID (manufacturing item identification), Contract ID, Contract Line, orRelease Number |
Enter data to further refine your search. You can enter data in more than one field. When you search for quantity, unit price, or merchandise amount, you should also enter at least one of the following fields: Item ID or Item Description. |
Search and Copy
|
Search |
Click to populate the Select Receiver Lines scroll area with the purchase orders that match your search criteria. This button is not available until you enter a purchasing or receiving business unit. |
|
Copy Selected Lines |
Click to copy selected receiver lines onto the voucher. This field is not available until you select Search to display receiver lines. |
|
Reset |
Click to remove the Select Receiver Lines scroll area and clear selection criteria. |
|
Select All |
Click to select all of the lines for all receipts displayed. |
|
Clear All |
Click to deselect all of the lines for all receipts displayed. |
Select Receiver Lines
If you are searching for purchase order receipts, you can view both purchase order and receiver information for each receiver that is returned by your search. If you are searching for non-purchase order receipts, only the receiver information appears.
|
Select |
Select individual receiver lines by selecting this check box in the appropriate row. |
|
Quantity |
Displays the unmatched quantity (in the voucher unit of measure) on the receiver line. This field can be modified if the receiver line is not an amount-only line. If you change the quantity, this value and the extended amount (quantity × unit price) are carried forward to the voucher line. However, you must change the distribution line manually on the Invoice Information page to match both the quantity and the extended amount. |
|
Merchandise Amount |
Displays the merchandise amount on the receiver line. This field can be modified if the receiver line is an amount-only line. |
|
Select All |
Click to select all of the lines for a single receipt. Each receipt that the system returns has a Select All button. You must click the button for each receipt to select its lines. |
|
Clear All |
Click to deselect all of the lines for a single receipt. Each receipt that the system returns has a Clear All button. You must click the button for each receipt to deselect its lines. |
Copying Voucher Information
Access the Voucher Worksheet page (select Voucher in the Worksheet Copy Option field on the Invoice Information page).
|
Vendor ID |
Search for vouchers by vendor. The vendor's short name appears when you select the vendor. Note. For third-party vouchers, an edit check ensures that you do not enter the same vendor that you entered on the Invoice Information page. |
|
Voucher ID |
Search for individual vouchers. The voucher's invoice number appears when you select the voucher ID. |
|
From Voucher Line and To Voucher Line |
Enter a voucher line number in the From Voucher Line field to search for individual voucher lines. Search for a range of voucher lines by entering voucher line numbers in the From Voucher Line and To Voucher Line fields. You must also enter a voucher ID. |
|
Voucher Date Option and Voucher Date |
Complete the Voucher Date Option field in conjunction with the Voucher Date field to limit your search to vouchers that fall within a selected date range. |
|
Currency |
Search for vouchers by voucher currency. |
Additional Search Criteria
This section initially appears as collapsed; you must expand it to access these optional fields. You can specify additional criteria with receiver lookup criteria or with only the receipt unit defined. However, any information that you define in this group box overrides the values that are specified in the Voucher Lookup Criteria group box.
|
Get only the Voucher lines that contain the following information |
Select to include only the voucher lines that contain the data that is specified in the additional search criteria. This field is set as the default. |
|
Get all Voucher lines for any Voucher that contains the following information |
Select to include all voucher lines for vouchers that contain the data that is specified in the additional search criteria. |
|
Item ID, Item Description, Quantity, Unit Price, and Merchandise Amount |
Enter data to further refine your search. You can enter data in more than one field. When you search for quantity, unit price, or merchandise amount, you should also enter at least one of the following fields: Item ID or Item Description. |
Search and Copy
|
Search |
Click to populate the Voucher Information scroll area with the voucher lines that match your search criteria. |
|
Copy Selected Lines or Copy Entire Document |
Click to copy voucher information onto the voucher. This button is not available until you select Search to display returned voucher information results. When the system retrieves multiple vouchers, you can copy selected voucher lines. When the system retrieves only one document, you can copy the entire document. |
|
Reset |
Click Reset to remove the Voucher Information scroll area and clear selection criteria. |
|
Select All |
Click to select all of the lines for all vouchers displayed. |
|
Clear All |
Click to deselect all of the lines for all vouchers displayed. |
Voucher Information
|
Unpaid |
Displays the unpaid balance of the voucher that is being adjusted. This field is displayed only if you are creating an adjustment voucher. The system issues a warning if the adjustment amount is greater than the unpaid balance of the voucher that is being adjusted. |
|
Reverse Qty/Amt (reverse quantity/amount) |
If the voucher that you are adjusting references a purchase order, select this check box to reverse matched quantities or amounts for the purchase order. This field is available only if you are creating an adjustment voucher. |
|
Select |
Select individual voucher lines by selecting this check box in the appropriate row. |
|
Adjust Matched Values, Restore Encumbrance, or Adjust Mtch Value/Encumbrance (adjust matched value and encumbrance) |
This field is available only if you are creating an adjustment voucher and the original voucher has an unreconciled related purchase order. The field label and action of this field change depending on the following factors:
|
|
Select All |
Click to select all of the lines for a voucher. Each voucher that the system returns has a Select All button. You must click the button for each voucher to select its lines. |
|
Clear All |
Click to deselect all of the lines for a voucher. Each voucher that the system returns has a Clear All button. You must click the button for each voucher to select its lines. |
Copying Template Information
Access the Voucher Template page (select Template in the Worksheet Copy Option field on the Invoice Information page).
Note. You must enter a vendor ID on the Invoice Information page before you can access the Voucher Template page by selecting the Worksheet Copy option.
|
Template ID |
Select a template ID. If only one template ID is defined for the vendor, that template ID will be entered in this page field. |
|
Copy from Template |
Click Copy from template to copy the appropriate invoice header, line, and distribution information from the source template voucher onto the voucher you are adding. This action returns you to the Invoice Information page. |
Scheduling and Creating Voucher Payments for Online Vouchers
This section discusses how to:
Enter payment information for vouchers.
Define holiday processing and currency options.
Override late charge information.
Enter draft settings for draft payments.
Entering layout information.
(USA) Enter HIPAA information.
Pages Used to Schedule and Create Voucher Payments for Online Vouchers|
Page Name |
Definition Name |
Navigation |
Usage |
|
VCHR_PAYMENT_PNL |
Accounts Payable, Vouchers, Add/Update, Regular Entry, Payments |
View the payment schedule for a voucher and override payment settings. On this page, you can change the payment schedule, schedule multiple payments, schedule direct payments to an alternate vendor or vendor location, record a manual payment, and create an express payment. |
|
|
PAY_OPT_SEC |
Click the Holiday/Currency Options link on the Voucher - Payments page. |
Override the default bank holiday processing options and currency options for the payment. |
|
|
PAY_TO_BANK_SCHED |
Click the Vendor Bank link on the Voucher - Payments page. |
Set the pay to bank account for the remit to vendor. After selecting the account, bank information is displayed on the page. |
|
|
LATE_CHRG_SBP |
Click the Late Charge link on the Voucher - Payments page. |
Override late interest charge information. |
|
|
PYMNT_VCHR_MSG |
Click the Messages link on the Voucher - Payments page. |
Enter a payment message text or select a predefined payment message code to include on the payment remittance advice. |
|
|
APD_MATURIT_DT_SEC |
Click the Drafts link on the Voucher - Payments page. This link is active only for a draft payment method. |
Specify draft settings for a draft payment method. |
|
|
LC_AP_INQ1 |
Click the View Related Links icon next to the Letter of Credit ID field on the Voucher - Payments page or the Voucher Attributes page. |
View details about a letter of credit. |
|
|
LC_AP_INQ2 |
|
View details about a letter of credit document. |
|
|
AP_EFT_LYT_SEC |
Click the Layout link on the Voucher - Payments page. |
Enter information to settle a payment through PeopleSoft Financial Gateway or Pay Cycle Manager functionality. |
|
|
VCHR_HIPAA_SEC |
Click the HIPAA link on the Voucher - Payments page. |
(USA) Enter information for Health Insurance Portability and Accountability Act of 1996 (HIPAA) compliance. The link and page appear only if the payment method for the voucher has an EFT layout of HIPAA. |
Entering Payment Information for Vouchers
Access the Voucher - Payments page (Accounts Payable, Vouchers, Add/Update, Regular Entry, Payments).
PeopleSoft Payables schedules payments for a voucher when you save the voucher. At that time, the system processes the voucher fields against the Payment Terms table to determine the net due, discount due, and scheduled due dates for the payment.
Note. Remember that if the vendor is on hold, the system
does not select the voucher for payment until you remove the payment hold
status for the vendor.
If a payment has been reconciled, the fields on this page are unavailable.
Header
|
Pay Terms |
Modify the payment terms. |
|
Schedule Payments |
Click to schedule the payment before you save the voucher. This function enables you to preview the payment due dates and discount (if any). With multipayment terms, you can also generate installment payment records (and review and edit them, if necessary) in advance of committing them when saving the voucher. You can always edit the voucher immediately after saving, but this alternate method may offer more peace of mind. |
|
HIPAA |
Click to access the HIPAA page, where you can enter HIPAA information for the voucher. This link appears only if the payment method for the voucher has an EFT layout of HIPAA. |
The Action field appears on this page as well as other pages in the Voucher component. This field is discussed in detail in a previous section.
Payment Information
|
Scheduled Payment |
Displays the scheduled payment number. |
|
Remit to, Location, and Address |
Displays the appropriate remit to vendor for the payment based on the remit to vendor that is established for the vendor on the Invoice Information page. This value is supplied by default from values that are established at the vendor location level. Whereas in most cases you remit directly to the vendor that sent you the voucher, the system enables you to override the default choices for remit to vendor, location, and address. For example, if a vendor requires that payments be sent to its company corporate office rather than to a local office address, you can select the location to which the payment should be sent. You can also change the remit to vendor to pay one vendor for the vouchers of another, as is the case with factoring relationships, for example. |
|
|
Click the Alternate Names icon to enter alternate names for the remit-to vendor. |
|
(USF) Schedule ID |
U.S. federal payment schedule ID. This field is populated only after you have run the Pay Cycle Application Engine (AP_APY2015) process for the payment. See (USF) Processing PeopleSoft Payables for U.S. Federal Agencies. |
|
Gross Amount |
Enter the payment amount for the scheduled payment if you do not take a discount. If you have multiple payments scheduled for the voucher, the sum of the gross amounts for each of these payments must equal the gross amount of the voucher on the Invoice Information page. |
|
Discount |
Enter the amount of the discount that can be taken on the scheduled payment. If you have multiple payments scheduled for the voucher, the sum of all the discount amounts must equal the total discount amount that is available for the voucher. If you miss the discount due date and elect not always to take the discount, you cannot take advantage of this discount amount unless you reschedule the payment with new dates. |
|
Scheduled Due |
Determines when to pay the scheduled payment. During the payment selection step of the Pay Cycle process, the system compares the pay through date (entered as part of your payment selection criteria) to the scheduled pay date. If the scheduled pay date is less than or equal to the pay through date, the scheduled payment is a candidate for payment. When PeopleSoft Payables automatically schedules payments, the scheduled due date is set to one of these values:
Users who are authorized to schedule payments manually can manipulate these dates and amounts to tailor the voucher's scheduled payments to meet your organization's cash flow requirements.
Note. When bank holiday processing is enabled, the system
adjusts the scheduled due date forward or backward according to whether the
due date falls on a work day, weekend, or holiday, depending on the parameters
that are in effect. |
|
Net Due |
Displays the net due date. When PeopleSoft Payables automatically schedules payments, the system calculates the net due date by applying the appropriate net payment terms timing calculation for the payment terms on the Invoice Information page. If you have specified net delay days for the vendor or for the PeopleSoft Payables business unit, the system adds that number of days to the date that is calculated from the payment terms to determine the net due date when the gross amount for the scheduled payment is due. |
|
Discount Due |
The system calculates the discount due date by applying the appropriate discount payment terms timing calculation for the payment terms on the Invoice Information page. If you have specified discount delay days for the vendor or for the PeopleSoft Payables business unit, the system adds that number of days to the date that is calculated from the payment terms to determine the latest date that you can legitimately retain the discount amount for the scheduled payment. |
|
Accounting Date |
The accounting date is based on the settings that are defined in the PeopleSoft Payables default hierarchy. |
|
Payment Inquiry |
Click to access the Payment Inquiry page to view payment information. This link is active only if the voucher has been paid. |
|
Holiday/Currency Options |
Click to access the Holiday/Currency Options page, where you can change the default bank holiday processing and currency options for the payment. |
|
Discount Denied |
This check box is display-only and is set by the Pay Cycle process. When the Evaluate Discount Rate feature is enabled at the Installation Options level, the Pay Cycle process determines whether the discount should be taken. If the discount is not taken, the Discount Denied check box is selected. |
|
Click to access the Late Charge Information page, where you can review and override the system-assigned payment reason code and the late charge information that appears by default through the PeopleSoft Payables control hierarchy. You can override the payment reason code after you have paid the voucher, but you cannot change the Late Charge Option or the Late Charge Code fields after payment. Only user-defined codes appear. Note. This page is available only if you have enabled late charge calculation on the Installation Options - Payables page. |
|
|
Express Payment |
Click to access the Express Payment page, where you can create an express payment. The system copies all relevant information on the voucher to the payment fields for creating an express payment. Note. You cannot create an express payment if the vendor has a financial sanctions status of Review or Blocked. The Express Payment link is not available. |
|
Prepayment |
Click to search for and apply eligible regular vouchers to a prepaid voucher. This link is active only if you are entering a prepaid voucher. |
Payment Options
|
Bank and Account |
Select the bank and bank account from which the payment is issued. This appears by default from the control hierarchy, but you can override these settings. |
|
Method |
Select a payment method. Values are: ACH: Automated Clearing House. BEF: Customer-initiated EFT draft. BOO: Customer-initiated draft. CHK: System check. DD: Direct debit. DFT: Vendor-initiated draft. EFT: Electronic Funds Transfer. GE: Giro EFT. GM: Manual giro. LC: Letter of credit. MAN: Manual check. WIR: Wire report. |
|
Drafts |
Click to access the Draft Maturity Dates page, where you can specify the draft maturity date options for the payment. This link is active only if you select a draft payment method. See Processing Drafts. |
|
Pay Group |
Select the pay group for this payment, where applicable. Pay groups are used as part of the pay cycle selection criteria. You can use them to better control which payment schedules are selected. You define vendor pay groups on the Vendor Pay Group Codes page. |
|
Displays the payment handling code, which appears by default from the PeopleSoft Payables control hierarchy. Each payment handling code has a sort sequence related to it that determines the order in which it prints. Checks are printed according to the sort sequence in ascending order: the lower the sort sequence number, the higher the sort priority. You must always have a payment handling code on a scheduled payment. You define payment handling codes on the Payment Handling Codes page. |
|
|
Netting |
Displays the status for the Automatic Netting Selection Application Engine (TR_NET_ASEL) process: H (hold): Net payment is on hold for the Automatic Netting Selection process in Treasury. This payment schedule is available for the netting selection process to select it. N (not applicable): Netting does not apply to this payment. This vendor is not a netting vendor S (selected): Net payment is selected for payment. Payment has been processed by the Automatic Netting Selection process and is now ready to be processed by the Netting Closing Application Engine (TR_NET_CLOSE and TR_NET_ARCLS) processes in pay cycle processing. |
|
Hold Reason |
Select a code to explain the payment hold. Values are:
The reason codes are stored in a translate table. You can add more codes to the translate table using PeopleTools. |
|
Messages |
Enter a payment message of up to 70 characters to appear on the remittance advice (check stub). You can also click the Messages link to access the Payment Message page, where you can select message codes for predefined messages to appear on the remittance advice and specify the order in which they appear. You can repeat this for each scheduled payment. You define message codes on the Payment Messages page which you access from the Procurement Options menu. |
|
Vendor Offset TOP(vendor offset Treasury Offset Program) |
The value entered for the vendor provides the default for TOP eligibility at the voucher payment level. When using the SPSMISC EFT file format, the system will automatically populate this field based on settings at the vendor level. |
|
Vendor Bank Account |
Click to access the Vendor Bank Account page, where you can select the bank account sequence number. |
|
Letter of Credit |
Displays the ID for the letter of credit. This field is active only for a payment method of LC. Click the View Related Links icon to view the Letter of Credit Details page and the Letter of Credit document page. See Letters of Credit. |
|
Hold Payment |
Select this option to place a payment on hold. The system stores the scheduled payment but the Pay Cycle process does not pay it. When you are ready to take the payment off hold, deselect the check box. |
|
Separate Payment |
Select this check box if you do not want this payment to be grouped with other payments for the remit to vendor. |
|
(USF) Inbound IPAC (inbound intra-governmental payment and collection transaction) |
Select to indicate that this voucher is to be applied to an inbound IPAC transaction. This places the voucher payment on hold with a hold reason of IPC, IPAC hold, until the inbound IPAC data has been staged and is ready for you to associate with the voucher. This field is available only if you have enabled federal payments on the Installation Options - Payables page. |
|
(USF) Select IPAC (select intra-governmental payment and collection transaction) |
Click to access the Inbound IPAC Stage Selection page, where you can search for and select staged inbound IPAC transactions to associate with the voucher. This field is available only if you have enabled federal payments on the Installation Options - Payables page. |
|
(USF) IPAC (intra-governmental payment and collection transaction) |
Click to access the IPAC page, where you can enter and review IPAC information for the voucher. This link is active only if you have enabled federal payments on the Installation Options - Payables page and the payment method that you selected is defined as an IPAC EFT layout for the bank that you have selected. |
Schedule Payment
|
Action |
Select the payment action. Values are:
|
|
Pay |
This field is enabled only if you have set the payment action to Record. This field enables you to indicate that either the Full amount or the Discounted amount is being paid. |
|
(USF) Reference Voucher and Reference Payment |
Enter the original voucher (reference voucher) in the Reference Voucher field and the schedule payment number of the canceled payment in the Reference Payment field. This creates a relationship between the source voucher and the reference voucher for reclassification purposes. These fields are available only if you have enabled federal payments on the Installation Options - Payables page. |
|
Payment Date |
The default is today's date. You can change it to reflect the date of the manual payment. |
|
Reference |
Enter a reference number when recording a manual payment. |
|
Applied Voucher |
Displays the voucher ID of the prepaid voucher to which this regular voucher was applied. This field appears only on regular vouchers that are applied to prepayments. |
Payment Amounts Other Than Gross or Discount
If you want to enter a payment that differs from the gross or discount amounts, you must enter additional payment schedules that add up to one of those amounts. Do this by inserting new rows for the payment and scheduling those payments for a later date.
For example, if the gross amount is 100.00 EUR, and you want to enter a manual payment of 70.00 EUR, you must create two payment schedules for the voucher:
One for 70.00 EUR.
One for 30.00 EUR.
Change the gross amount on the existing payment schedule to 70.00 EUR, and then insert a new payment schedule row and enter a payment of 30.00 EUR to equal the gross amount of the voucher. The system does not allow you to save the manual payment of 70.00 EUR until the voucher balances to either the gross or discount amount.
Vouchers with Payment Terms That Include Rebate Processing
Some vendors provide a rebate rather than a discount for payments that are made early. You can set up such payment term on the Payment Terms - Single Payment page.
When the Voucher component processes vouchers with rebate terms, it performs the following validations:
Accounting policy must be gross.
Discount due date and scheduled due date must be today's date.
All voucher lines must be set to discount applicable.
Only one scheduled payment per voucher is allowed.
No discount calculation is applied when you save the voucher. Rebate calculation takes place in the payment selection step of the Pay Cycle process.
See Defining Single Payment Terms.
Defining Holiday Processing and Currency Options
Access the Holiday/Currency Options page. (click the Holiday/Currency Options link on the Voucher - Payments page).
The system calculates bank holidays using the business calendar.
|
Holiday Options |
Select from the following values: Due After Holiday: The system takes any bank holidays into consideration when it calculates the payment due date and delays payment until after the bank holiday. If you select this value, you can also select the Allow due date in next month check box to enable the payment to be made in the next month. If you don't select this check box, and the payment date after a holiday does fall in the next month, the system schedules the payment before the holiday. For example, you would not select this value if you generally want payments to be made after a holiday but not in the next month when a holiday falls at the end of a month. Due Before Holiday: The system takes any bank holidays into consideration when it calculates the payment due date and makes the payment before the bank holiday. Not Applicable: The system does not take bank holidays into consideration when it calculates the payment due dates. |
|
Days |
Enter the number of days after or before the holiday that the payment can be made. |
|
Payment Currency |
Select the currency in which the payment is made. |
|
Rate Type |
Select the rate type for converting the invoice currency to the payment currency. |
|
Specify Rate |
Select if you want to enter a specific rate for converting the invoice currency to the payment currency in the Exchange Rate field. |
|
Paid |
If you enter a specific exchange rate, the amount in the payment currency is calculated and reported here. Note. This field is in deferred processing mode and a trip to the server is required to calculate the paid amount. You can invoke a trip to the server by clicking the Refresh button. |
Overriding Late Charge Information
Access the Late Charge Information page (click the Late Charge link on the Voucher - Payments page).
|
Payment Reason Code |
Displays the system-assigned payment reason code; you can override this value after you have paid the voucher. You set up payment reason codes on the Payment Reason Codes page. The system-applied reason code that you attach to the setID for this business unit on the Payables Definition - Payments page appears as default in this field. |
|
Late Charge Option |
Select either Compute Charges to have the system calculate late charges, or Not Applicable. You cannot change this value after the voucher has been paid. |
|
If you choose to compute late charges at the voucher level, set the value here. You cannot change this value after the voucher has been paid. You set up late charge codes on the Late Interest Charges page. |
|
|
Late Charge Amount |
Displays the amount of the late charge to be paid. |
|
Late Charge Denied |
If the system-calculated late charge is below the minimum pay amount (as defined during late charge setup), the system does not pay the late charge. The late charge is denied. The system displays the denied amount in the Late Charge Denied field, and the late charge amount becomes zero. When the late charge is above the minimum pay amount, it appears in the Late Charge Amount field and the Late Charge Denied field becomes zero. |
See Also
Entering Draft Settings for Draft Payments
Access the Draft Maturity Dates page (click the Drafts link on the Voucher - Payments page).
|
Draft Sight |
References the agreed-upon payment terms between you and your vendor. These terms are similar to accounts payable and accounts receivable payment terms, except that they do not use discounts. You maintain your default sight codes at the business unit, voucher origin, and vendor levels of the control hierarchy. The system uses the draft sight code to calculate the maturity date. |
|
Maturity Date |
When you save a voucher with a payment method of draft, the system calculates the draft maturity date and the scheduled maturity date using the scheduled due date, draft sight code, and bank holiday processing options. You can override the Maturity Date field here, but the schedule due date for the voucher payment must be before or equal to the maturity date. |
|
Scheduled Maturity Date |
When you save a voucher with a payment method of draft, the system calculates the draft maturity date and the scheduled maturity date using the scheduled due date, draft sight code, and bank holiday processing options. You can override the Scheduled Maturity Date field here, but the schedule due date for the voucher payment must be before or equal to the maturity date. |
|
Group Code |
Use to group payment schedules manually into one draft. |
See Also
Entering Layout Information
Access the Layout page (click the Layout link on the Voucher - Payments page).
To enable editing of the Layout fields, you must first specify a payment method of ACH: Automated Clearing House, BEF: Customer-initiated EFT draft, EFT: Electronic Funds Transfer, GE: Giro EFT, or WIR: Wire report.
|
Layout |
Select an applicable layout code. The system displays codes depending on the bank code, bank account, and payment method that are defined on the Payments page. When you click Save, the system validates layout codes against those defined at the bank account level. |
|
Settle by |
Displays the settlement method of the selected layout, either Financial Gateway or Pay Cycle Manager. Note. You must select layouts that are settled through Pay Cycle Manager for federal payments, single payment vouchers, and (USA) HIPAA payments. |
(USA) Entering HIPAA Information
Access the HIPAA page (click the HIPAA link on the Voucher - Payments page).
|
Entity Identified Code |
Enter a code to identify the organizational entity, physical location, property, or individual: 3rd Party or Payer. |
|
Reference Identifier Qualifier and Reference Identifier |
Enter a qualifier against which to indicate that the payment is to be applied—Invoice, Master, or Plan—and a corresponding identifier number from the agency that is authorizing the payment. |
|
Identification Code Qualifier and Identification Code |
Enter a qualifier to indicate the code structure method of the identification code—D&B (Dun and Bradstreet), D&B + Sfx (Dun and Bradstreet plus 4-character suffix), Insurance, Plan ID, or Tax ID—and enter the corresponding code. |
|
Policy Information Type and Policy Information |
Enter Account, Contract, Invoice, or Policy to define the policy type, and enter additional information, such as the policy number. |
|
Contact Method and Contact Name |
Enter the preferred contact method: Email, Fax, or Telephone. Also enter the contact person's name. |
|
Contact Information |
Enter specific contact information, such as email address. |
|
Start Date and End Date |
Enter the dates to define the duration of the policy. |
See Also
(USA) Vouchers for HIPAA Payments
Completing Voucher Attributes
This section discusses how to view and modify voucher attributes.
Page Used to Complete Voucher Attributes|
Page Name |
Definition Name |
Navigation |
Usage |
|
VCHR_STATUS_IA |
Accounts Payable, Vouchers, Add/Update, Regular Entry, Voucher Attributes |
View and, if applicable, override the default transaction currency processing, the match status, the voucher approval setting, voucher processing options, tax group, and accounting instructions. Where applicable, you can also pay unmatched vouchers and access SBI (Self Billing Invoice), prepayment, and Letter of Credit information on this page. |
Viewing and Modifying Voucher Attributes
Access the Voucher Attributes page (Accounts Payable, Vouchers, Add/Update, Regular Entry, Voucher Attributes).
The Action field and Print Invoice button appear on this page as well as other pages in the Voucher component. These fields are discussed in detail in a previous section.
The fields in the Voucher Processing group box enable you to select various voucher processing options. Depending on the status of the voucher and its stage in the voucher life cycle, not all of these options may be available.
|
Post Voucher |
Select to allow the voucher to post. The default for a voucher is derived from the control hierarchy: control group, origin, business unit. If the default is post, the check box is selected and the voucher is available to the Voucher Posting process, assuming that all other edit, approval, and control group criteria are met. To prevent the voucher from posting during the next Voucher Posting process, deselect this check box. If the voucher has been posted, this check box is selected and display-only. |
|
Revalue Voucher |
Displays as selected by default. This check box must be selected if the voucher is to be picked up by the PS/AP Revaluation Application Engine (AP_REVALUE) process. |
|
Packing Slip |
Enter a packing slip number from the supplier's invoice. The packing slip number can be used by the Matching Application Engine (AP_MATCH) process to associate the voucher with the receiver if the document association rule is set up to use this criteria. This field also appears for vouchers with the ERS or Quick Invoice source type. See Viewing and Updating Document Association Rules. See ERS Vouchers. |
|
Close Voucher |
This field is display-only. It displays as selected if the voucher has been selected for closure using the Close Voucher page. The system closes the voucher during the next Voucher Posting process. |
|
Delete Voucher |
Select to delete a voucher from PeopleSoft Payables. For control purposes, you can do this only if the voucher is in an unposted state and no portion of the voucher has ever been paid. When you save the voucher, the system prompts you to confirm your action. Note. This checkbox is only available when adding a new voucher. If you need to delete a voucher after adding it, you must use the Delete Voucher page. |
See Running Voucher and Payment Posting.
The values appear by default based on the PeopleSoft Payables control hierarchy. You can override them.
|
Account At |
Determines how you view discounts. Select from: Gross: If you account at gross, the discount is earned when you are able to take it. Net: Accounting at net assumes that you will always take a discount. If you do not, the discount is lost. |
|
Identifies the Accounting Entry Template that is associated with this voucher. The Accounting Entry Template controls the offset accounts, for example, the sales tax, freight, and discount accounts. |
|
Status |
Displays the current matching status of the voucher. You can change the match status, but what you can change varies depending on where the voucher is in the Matching process. For example, before running the Matching process, you can change the matching status to No Match on a line-by-line basis; that is, you can indicate which lines require matching and which lines do not. The user ID does not require match override authority to switch between a matching status of Ready and a status of No Match. The match status values are: CreditNote: Marks the voucher as being matched with a credit memo adjustment voucher. Dispute: Indicates that the voucher is on hold from further matching processing. Exceptions: A voucher that fails the Matching process initially has a status of Exceptions. In this case, you can select the Exceptions link on the Voucher - Summary page to transfer to the Match Exception Workbench Details page. Or you can override the match status here, provided that your user ID has match override authority. Matched: Indicates that the voucher has successfully passed the Matching process. No Match: Indicates that all voucher lines are flagged as Do Not Match. If no lines are flagged for matching, the system sets voucher matching to No Match. The system sets this value automatically when it copies voucher information from a purchase order or receiver. You can set this value manually as well. Overridden: Enables the voucher to pass matching by setting the match status to Matched, even though the voucher does not match specified purchase orders or receivers. If you had previously set the status to Overridden, you can change it back to Exceptions. Ready: Marks the voucher as ready for matching so that it can be processed the next time the Matching process is run. If voucher lines exist that have been flagged as full match, the system sets the voucher matching status to Ready before the voucher can be saved. The system sets this value automatically when it copies voucher information from a purchase order or receiver. You can set this value manually as well. The user ID does not require match override authority to switch between a matching status of Ready and a status of No Match. |
|
Match Due Date |
Edit the match due date for this specific voucher. The Matching process selects only the vouchers that are ready to be matched as of that date. |
|
Pay UnMatched |
Select to pay an unmatched voucher. You must have authority, defined in user preferences, to do this. |
See Running the Matching Process.
The fields in the Transaction Currency group box enable you to view and override the default voucher transaction currency and the rate type (or user-defined exchange rate) that is used to convert the voucher transaction currency into the business unit's base currency when you post the voucher. You can override the default settings before posting the voucher.
Note. The exchange rate that you view or enter here has no effect on the payment currency. To convert the invoice currency to a different payment currency, use the Holiday/Currency Options page, accessed from the Voucher - Payments page.
|
Source |
Select the source of the currency exchange rate: Tables: The system determines the currency exchange rate automatically using the PeopleSoft Financials exchange rate table. If the system is assigning the exchange rate using the PeopleSoft Financials exchange rate tables, then the voucher transaction currency, rate type, and invoice date determine which rate the system uses to convert amounts to the business unit's base currency. User: Enter your own exchange rate (independent of the tables) in the Exchange Rate field. |
|
Currency, Rate Type, and Exchange Rate |
The currency and rate type appear by default from the control hierarchy of business unit, origin, control group, and vendor. You can override these settings here on the voucher. |
|
Tax Group and Tax Pmnt Type (tax payment type) |
PeopleSoft Payables uses these fields to create payments, for example garnishment payments, for PeopleSoft Payroll. |
|
Approval |
Set the approval status of the voucher: Approval Framework: Select to use the Approval Framework for voucher approval routing.. Pre-Approved: The voucher's approval status is set to approved. The voucher is not routed for approval and is immediately available for payment. Virtual Approver: Specify the business process and approval rule set to use for approving the voucher using the Virtual Approver. |
|
Bus Proc(business process) |
If you select Virtual Approver for the approval type, you must enter a business process for the approval process. |
|
Appr Rule(approval rule) |
If you select Virtual Approver for the approval type, you must enter an approval rule for the approval process. |
Note. A voucher must be approved before it can be paid.
See Approving Vouchers.
Letter of Credit
|
L/C ID (letter of credit ID) |
Select the letter of credit ID for the payment. This field is populated during voucher save based on the value in the L/C ID field on the Payments page. |
|
|
Click the View Related Links icon to view the Letter of Credit Details page and the Letter of Credit Doc (letter of credit document) page. See Letters of Credit. |
Self Billing Invoice
Enter a self-billing invoice number option and number.
See Processing Self-Billed Invoices.
Prepayment
Enter prepayment information.
Lease Key
Enter the lease number for a lease payment voucher. This field appears only when you have also installed the Real Estate Management module.
Viewing Voucher Summary Information
This section discusses how to view voucher summary information.
Page Used to View Voucher Summary Information|
Page Name |
Definition Name |
Navigation |
Usage |
|
VCHR_SUMMARY_PG |
Accounts Payable, Vouchers, Add/Update, Regular Entry, Summary |
View important voucher information, summarized from the other three primary pages, such as voucher header information, various statuses, and payment terms. Also view voucher entry information, such as the voucher source, the date entered, the user ID that entered the voucher, and the date on which the voucher was last updated. Note. This page appears only after you save the voucher. |
Viewing Voucher Summary Information
Access the Voucher - Summary page (Accounts Payable, Vouchers, Add/Update, Regular Entry, Summary).
|
Contract ID |
Displays the contract ID that is associated with this voucher. |
|
Entry Status |
Displays the phase of the voucher's processing. Values include Recycled, Approved, Open, and Postable. |
|
Match Status |
Values include Exception, Manually Overridden, Manually Set to Credit Note, Matched, Match - Dispute, No Match, and To Be Matched. If match exceptions exist, click the Exceptions link to access the Match Exception Workbench Details page. |
|
Post Status |
Voucher posting status: Posted: The Voucher Posting process has run successfully. Unposted: The Voucher Posting process has not been run. |
|
Document Tolerance Status |
If Document Tolerance checking is enabled, the system displays the Document Tolerance Status field. Values are: Valid: The voucher has passed document tolerance checking. Not Chk'd (not checked): The voucher requires document tolerance checking. If any amounts, quantities, or ChartFields are modified after the document tolerance is checked, the system resets the document tolerance status to Not Checked. Error: Exceptions were generated for the voucher during document tolerance checking. Click the link to access the Document Tolerance page, and override document tolerance exceptions. |
|
Budget Status and Budget Misc Status (budget miscellaneous status) |
Displays the budget checking status of the voucher total amount and nonprorated miscellaneous charges, respectively, if you are using Commitment Control. Values include: Error: When this value appears, the Budget Check Exception link also appears. Click the link to access one of the following two exception pages and review the error:
Not Chk'd (not budget checked). Valid. See Budget-Checking PeopleSoft Payables Transactions Using Commitment Control. |
|
Voucher Source |
Indicates the source that is used to create this voucher. |
|
Origin |
Displays the voucher origin. |
|
ERS Type |
Indicates the source for the ERS (evaluated receipt settlement) voucher. See ERS Vouchers. |
|
View Related |
Select from the following values and click Go to view related invoice information. The system opens the inquiry pages in new browser windows, so you can review both the invoice and the related information at the same time. Accounting Entries Inquiry: Select to access the Voucher Accounting Entries inquiry page and view accounting entries for posted vouchers. If a voucher has not yet been posted, the page does not display accounting entries. Payment Inquiry: Select to access the Payment Inquiry page and search for related payments. Purchase Order Inquiry: Select to access the Purchase Order Inquiry page and search for related purchase orders. Voucher Document Status: Select to access the Voucher Document Status inquiry page to view related documents. Voucher Inquiry: Select to access the Voucher Inquiry page and search for related vouchers. |
Viewing Related Documents Information
This section discusses how to view related documents information.
Page Used to View Related Documents Information|
Page Name |
Definition Name |
Navigation |
Usage |
|
AP_RELATED_DOC |
Accounts Payable, Vouchers, Add/Update, Regular Entry, Related Documents |
View related document information, including payment details, purchase order information, receiver information, and voucher adjustment details. You can access further detail information from this page. |
Viewing Related Documents Information
Access the Voucher - Related Documents page (Accounts Payable, Vouchers, Add/Update, Regular Entry, Related Documents).
The Voucher - Related Documents page appears when you save the voucher. It displays related payment, purchase order, receiver, and adjustment information. The system:
Displays PO information when you copy from the purchase order or purchase order receipt.
Displays receiver information when you copy from the purchase order receipt or associate the receiver with the voucher.
Displays voucher adjustment information when you create an adjustment voucher that is related to this voucher.
The Action field and Print Invoice button appear on this page as well as other pages in the Voucher component. These fields are discussed in detail in a previous section.
Payment Details
Displays payment information, including the status, scheduled pay date, payment method, and paid amount.
|
|
Click to access the Voucher - Payments page to view additional payment details. |
|
Payment Reference |
Displays the payment reference number when the voucher is paid. |
|
Remit Vendor |
Displays the remit vendor number. Click the View Related Links icon to access additional vendor information. |
Voucher Line - PO Information
Displays purchase order information for a voucher line, including match option, purchase order number, item ID, quantity, unit of measure, and unit price.
|
|
Click to access the Purchase Order Inquiry - Purchase Order page to view additional purchase order details. |
|
Invoice Line |
Click to access the Voucher - Invoice Information page to view additional voucher line details. |
Voucher Line - Receiver Information
Displays receiver information for a voucher line, including receipt number, quantity entered, and merchandise amount.
|
|
Click to access the Receipts page to view additional receipt details. |
|
Invoice Line |
Click to access the Voucher - Invoice Information page to view additional voucher line details. |
Voucher Adjustments
Displays adjustment information, including the related voucher ID and whether it is a debit memo adjustment.
|
|
Click to access the Voucher - Invoice Information page for the adjustment voucher to view additional voucher details. |
Viewing Voucher Error Information
PeopleSoft Payables logs errors for any vouchers in recycle status, regardless of whether you entered the voucher online or built it through the Voucher Build process, and lists them on the Error Summary page in the voucher component. To find vouchers with errors, enter Recycle in the Entry Status field on the add search page. You can also use the Voucher Maintenance (VCHR_CORRECTION) component to review and correct voucher errors and the Voucher Mass Maintenance (VCHR_MASS_MAINT) component to correct batches of vouchers that share the same error. These components are designed expressly for voucher error review or modification.
This section discusses how to view voucher errors using the Voucher component.
See Also
Pages Used to View Voucher Error Information|
Page Name |
Definition Name |
Navigation |
Usage |
|
VCHR_ERRORSMMRY_PG |
Accounts Payable, Vouchers, Add/Update, Regular Entry, Error Summary |
View any Voucher Build processing errors, matching errors, duplicate invoices, and out-of-balance and combination edit errors on the voucher. Note. This page appears only after you save the voucher. |
|
|
VCHRHDR_ERRORS_SEC |
Accounts Payable, Vouchers, Add/Update, Regular Entry, Invoice Information |
View errors on the voucher header. |
|
|
VCHRLN_ERRORS_SEC |
|
View errors on a voucher line. |
|
|
VCHRDST_ERRORS_SEC |
|
View errors on a voucher distribution line. |
|
|
VCHRMSC_ERRORS_SEC |
|
View miscellaneous charge errors for a voucher. |
|
|
VCHRSCH_ERRORS_SEC |
Accounts Payable, Vouchers, Add/Update, Regular Entry, Payments |
View errors for a scheduled payment. |
Viewing Voucher Errors Using the Voucher Component
Access the Voucher - Error Summary page (Accounts Payable, Vouchers, Add/Update, Regular Entry, Error Summary).
Note. Five different scroll areas can appear on this page: Header Errors, Miscellaneous Charge Errors, Invoice Line Errors, Distribution Line Errors, and Scheduled Payment Errors. Only scroll areas that contain errors appear.
|
Field Name |
Displays the field where the error occurred. |
|
Message |
Displays an explanation of the error. |
Viewing Voucher Errors from the Invoice Information Page and Payments Page
You can also view voucher errors directly from the Invoice Information page and the Payments page.
|
|
Click the Go to Review Errors icon to view a description of a voucher error:
|
Viewing Voucher Approval Summary InformationIf you use the Approval Framework for approvals, users with access can view summary approval information in the Voucher component. You can further drill down and see the status of specific reviewers and approvers.
Page Used to View Voucher Approval Summary Information|
Page Name |
Definition Name |
Navigation |
Usage |
|
Approval Summary |
VCHR_APPROVAL_IA2 |
Account Payable, Vouchers, Add/Update, Regular Entry Click the Submit for Approval button on the Invoice Information page. |
View a graphical summary of the approval process. Note. This page only appears after submitting a voucher for approval in the Approval Framework. |
Running On-Demand Voucher Processes as a Batch RequestIf your user ID has access to the appropriate on-demand process group, you can process a voucher on demand, directly from the Invoice Information page, after you save the voucher. You also can run on-demand voucher processes from a batch request page. The advantage of this option over regular batch processing is that you can run a sequential group of processes on a batch of vouchers without having to enter multiple batch requests.
This section discusses how to run batch on-demand voucher processes.
See Also
Setting Up On-Demand Processing
Page Used to Run On-Demand Voucher Processes as a Batch Request|
Page Name |
Definition Name |
Navigation |
Usage |
|
VCHR_STM_RQST |
Accounts Payable, Batch Processes, Vouchers, Voucher On-Demand Process |
Run on-demand process groups (predefined groups of multiple, sequential voucher processes) for a batch of vouchers. |
Running Batch On-Demand Voucher ProcessesAccess the Voucher On-Demand Processes page (Accounts Payable, Batch Processes, Vouchers, Voucher On-Demand Process).
|
Voucher Process Option |
Select from the following values: Process All Units: Process all available vouchers in all business units. Process Business Unit: Process all available vouchers in a specific business unit, which you enter in the Business Unit field. Process Voucher: Process a specific voucher, which you enter in the Voucher field. |
|
Initiate Entry Event Generator |
Select to initiate the FS_EVENTGEN Application Engine process, also called the Entry Event Generator, to generate entry events when you run the on-demand process group. |
|
Action |
Select one of the following on-demand process groups:
Note. The process groups that are available depend on your user ID. |