13 Entering Additional Operations
This chapter contains the following chapters.
13.1 Managing Additive Operations
This section provide overviews of additive operations and the Additive Workbench program; lists prerequisites; and discusses how to:
-
Set processing options for Additive Workbench (P31B84).
-
Enter single or multiple additives using the Additive Workbench program.
-
Enter a single additive for a single vessel.
-
Create additive templates.
-
Manage additive thresholds.
13.1.1 Understanding Additive Operations
Additives are dry goods that are added directly to the product during the blend process. Examples might include:
-
Alcohol
-
Sulfur
-
Cultures
-
Wine-based additions
-
Fining agents
-
Sugar
You set up additives as items in the JD Edwards EnterpriseOne Inventory Management system. Item setup includes information such as stocking type, line type, and lot processing information. When setting up item information, you must set up the unit of measure conversions that you need when creating additive operations. For costing purposes, define an item cost for the additive.
Additives are composed of active and inactive ingredients. Set up a bill of material to list all the ingredients of the additive and to specify whether each ingredient is an active or an inactive ingredient. An additive can have more than one active ingredient. You can only use zero batch bills for additives. When you create additive operations, the system uses the bill of material quantities to calculate the quantity of additives required to produce the specified quantity of bulk material.
|
Note: Additives must be included in a bill of material. If you try to add an additive or item that is not associated with a bill of material, the system issues an error message. |
Additive operations are configured to be in-place operations.
When you create an additive operation, the system stores the active ingredients with the lot as parts-per-million. The ingredients are copied or added to the lot's existing active ingredients. You can review the existing and new active ingredients added for a lot on the Instructed Attributes form.
The types of information that you must specify when instructing additives include:
-
Additive identifier.
-
Additive form (liquid, gas, and so on).
-
Amount or rate.
-
Instructions.
-
Equipment necessary to use the additive.
-
Limits and other specifications that the system uses for validation.
13.1.1.1 Methods for Adding Additives and Calculating Additive Quantity
The system provides five methods for adding additives and calculating the additive quantity:
-
Fixed quantity.
You add a fixed quantity of the additive to the vessel and lot.
-
Targeted Parts Per Million (PPM).
The system calculates how much additive quantity to add to the vessel or lot based on a targeted concentration of the active ingredient. The concentration is expressed as parts per million (PPM) of an active ingredient: PPM = 1 milligram ÷ 1 liter.
You must select the ingredient to be targeted within the grid, specify the targeted PPM, and click the Calculate button. The system calculates the quantity of the additive that is necessary to meet the targeted PPM.
-
Rate
The system calculates the total quantity of an additive based on a specified rate. For example, you might want to add 10 grams of an additive every 10 minutes for the duration of the operation (two hours). The system calculates the total additive quantity for the operation to equal 120 grams. Specify the rate quantity and rate interval when using this method.
-
Flow
The system calculates the total quantity of an additive based on a flow. For example, you might want to add 10 grams of an additive for every 100 gallons in the vessel. If the vessel contains 2000 gallons, the system calculates the amount of additive that you must add during that operation (in this case, 200 grams). Specify the flow quantity and per volume quantity when using this method.
-
Total Vessel Volume
Note:
The Total Vessel Volume method is enabled only in the Additive Workbench.When you select the Total Vessel Volume option, you can add additive quantities based on the total volume of the group of vessels that you select. For example, if you select three vessels to which you want to add a total of 10 pounds of an additive, the system adds a portion of the 10 pounds to each vessel in proportion to the total volume of each vessel. Note that the system calculates the proportion in relation to the volume, which is the amount in the vessel, and not in relation to the capacity, which is the maximum volume that the vessel can hold.
The purpose of the total vessel volume calculation method is to add a proportionate amount of the additive to multiple vessels. The system enables you to use the total vessel volume calculation when you select only one vessel to which to add an additive. However, because the proportion of the additive for only one vessel is 100%, the effect of using the total vessel volume method for one vessel is the same as the effect of selecting the fixed calculation method.
13.1.1.1.1 Example of the Total Vessel Volume Calculation Method
Suppose that you want to add 10 pounds of an additive proportionally to three vessels. Suppose further that vessel 1 has a volume of 900 gallons, vessel 2 has a volume of 1440 gallons, and vessel 3 has a volume of 2160 gallons. When you apply the total vessel volume calculation method to these vessels, the system totals the volume of the vessels, and then divides the total volume by each vessel's volume to arrive at the percentage of additive to add to each vessel. The calculations are:
Sum of the three vessels: 900 + 1440 + 2160 = 4500.
900 (the volume of vessel 1) divided by 4500 (the sum of the volume of the vessels) is equal to .2, or 20 percent. 20 percent of 10 pounds of the additive is equal to 2 pounds.
1440 divided by 4500 (the volume of vessel 2) is equal to .32, or 32 percent. 32 percent of 10 pounds of the additive is equal to 3.2 pounds.
2160 divided by 4500 (the volume of vessel 3) is equal to .48, or 48 percent. 48 percent of 10 pounds of the additive is equal to 4.8 pounds.
This table summarizes the figures for each vessel's volume, the sum of the vessel volumes and the proportionate additive amount for each vessel.
| Vessel | Vessel Volume | Sum of Vessel Volumes | Quantity Added |
|---|---|---|---|
| 1 | 900 | 4500 | 2 |
| 2 | 1440 | 4500 | 3.2 |
| 3 | 2160 | 4500 | 4.8 |
13.1.1.2 Single Vessel, Single Additive
You can use the Create/Edit Operation Detail program (P31B87) to work with a single vessel and a single additive
When you enter an additive operation in the Create/Edit Operation Detail program, the system displays the single vessel entry form. You must specify the tank or barrel to which you want to add an additive. Specify only one additive per additive operation. Enter the additive information on the Additive tab. You can specify the item number of the additive, the business unit where it is stored, the batch quantity that you want to use, and the lot and location. When you add an additive to an operation, the active ingredients from the bill of material of the additive item are displayed in the detail area.
13.1.1.3 Multiple Vessels, Multiple Additives
You can uses the Additive Workbench program to work with multiple additives and multiple vessels at the same time. For example, you can:
-
Add the same additive to multiple vessels.
-
Add multiple additives to a single vessel.
-
Add multiple additives to multiple vessels.
Additionally, you can use the Additive Workbench program instead of the Create/Edit Operation Detail program (P31B87) to work with one additive and one vessel.
13.1.1.4 Additive Templates
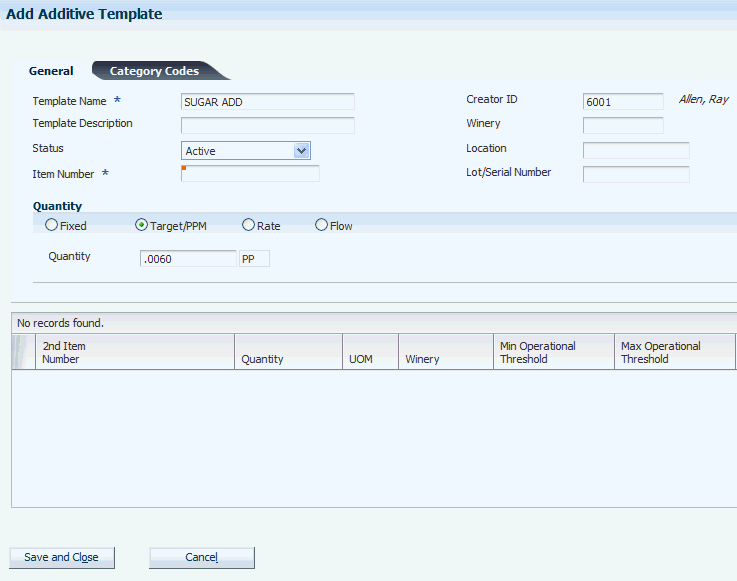
If you add certain additives in set quantities frequently, you can set up additive templates to simplify data entry. You enter additive information on the Edit Operation Detail form, such as additive item and quantity and then save the information with a template name. After you have set up this template, you can reuse it every time you want to use a specific additive.
13.1.1.5 Additive Thresholds
You can set up the system to check whether the quantity of active ingredient in an additive exceeds a specified range. You set up this range by defining operational or cumulative thresholds for the additive item when you set up the Item Master and the Item Branch record. You can set up threshold values for the active ingredients on the parent item's bill of material, and the system uses these values to evaluate the extended quantity of the active ingredient that you enter for the operation.
If you set up operational threshold values, the system compares the extended quantity of the active ingredient for the current operation with minimum and maximum threshold value that you defined for the item. If you use cumulative threshold values, the system compares the PPM quantity of the accumulated additive for an operation with the minimum and maximum threshold value. You can use either operational or cumulative thresholds or both.
Depending on the status of an additive operation, the system issues either a warning or an error when the quantity for the active ingredient is outside of the allowed range that you specified for the additive item. The warning or error is generated when you click the Calculate button on the Additive form or when you click Save and Close on the operation header. As long as an operation is still in status Active, the system issues a warning. For operations that are in status Actual or Closed, the system issues an error. In this case, the system displays the Threshold Reason area of the form. You must enter a reason code if you want to make any changes to the operation with the threshold error.
13.1.1.6 Additive Threshold - Example
The following table illustrates a scenario that would cause the system to issue a warning or an error:
| Ingredient | Quantity | Extended Quantity | Unit of Measure | PPM Quantity | Minimum Operational Threshold | Maximum Operational Threshold |
|---|---|---|---|---|---|---|
| Sulfur | 1000 | 21000 | MG | 21.9895 | 10000 | 20000 |
In this scenario the extended quantity exceeds the specified maximum threshold. If the additive operation is active, the system issues an warning. If the operation is actual or closed, the system issues an error.
13.1.2 Understanding the Additive Workbench Program
The Additive Workbench program (P31B84) enables you to work with multiple vessels and multiple additives at the same time. When you work in the Additive Workbench program, you can:
-
Search for and select multiple vessels.
-
Specify multiple additives for one or more vessels.
-
Enter the additive method and quantity information for one or more additives.
-
Review and modify the results of adding the additives before committing the addition of the additives.
-
Create additive and quality operations for multiple vessels and additives.
13.1.2.1 Manage Additive Form
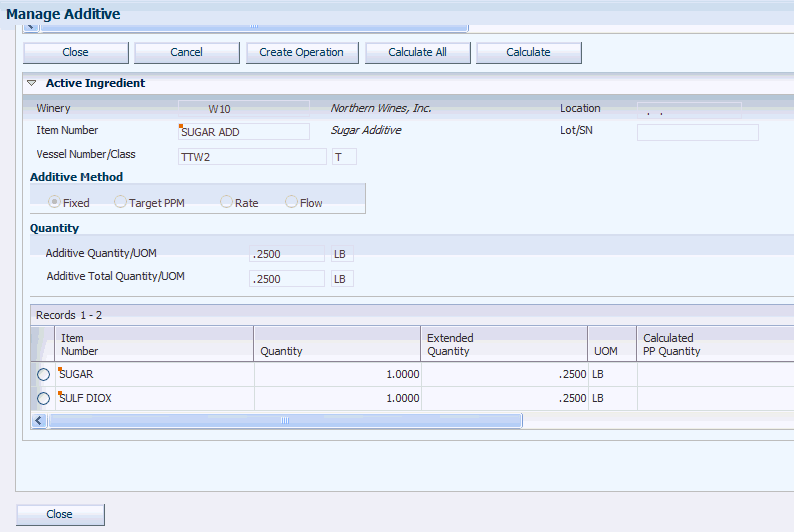
The Manage Additive form in the Additive Workbench includes these areas and subforms:
-
Search header area and Lot Attributes tab.
At a minimum, you must specify the winery, unit of measure, and vessel class to use when you search for vessels. The Manage Additive form provides additional search fields in the header, the QBE (query by example) line, and the Lot Attributes tab.
Click the Find button in the search header area to display the search results. Click the Clear Search Criteria button to clear the search header area and Lot Attributes tab of all search criteria. Note that the Clear Search Criteria button does not clear the values that you enter in the QBE line.
-
Vessel records.
The vessel records area displays the results of your search. You must use the search function to display the vessel records because you must select the vessels to work with before you can calculate the effect of the additives that you add.
Note:
The system always adds the additive to the most current lot in the vessel, even if your search returns an older lot because of your search criteria. Take care when setting your search criteria so that you do not display and select a lot that is not the current lot. -
Add Additive subform.
You specify the additive, additive method, and quantity in the Add Additive subform. If you select the Rate or Flow additive method, you also specify the additive rate quantity. You can also specify whether to use a test or panel when creating quality operations, enter the test specification, and specify a lot and location of the additive.
You can add multiple additives to the vessels that you selected, and can specify a different additive method for each additive. You can also specify to add additives from a branch/plant (winery) other than the winery to which the vessel belongs.
The Add Additive subform includes these buttons:
-
Calculate
After you add additives in the Add Additive subform, select the vessels to which to apply the additives, and then click the Calculate button. When you click the Calculate button, the program creates a row in the Vessel/Additive Quantity subform for each vessel/additive combination.
-
Delete
Select a record in the Add Additive subform and click Delete to remove the additive from the Add Additive subform and the vessel/additive records from the Vessel/Additive Quantity subform.
-
-
Create Work Order by area.
You use this option to specify whether to group the work orders that you create by the vessels or by the additives.
-
Vessel/Additive Quantity subform.
After you click the Calculate button to calculate the additive quantities for the selected vessels, this section shows the additive quantities for each vessel. The subform includes a line for each vessel/additive combination. For example, if you select three vessels and add two additives, the Vessel/Additive Quantity subform includes six lines. You can make changes to the additive method and quantity for each line as necessary.
The Vessel/Additive Quantity subform includes these buttons:
-
Select All
Before you can create operations, you must select the records for which to create the operations. Click the Select All button to select all records in the Vessel/Additive Quantity subform. The program places a check mark in the Create Op (create operation) field for all records in the grid area of the Vessel/Additive Quantity subform. When you click the Create Operations button, the program groups all of the selected records by vessel or additive, depending on the selection in the Create Work Order by option, and displays the Operation/WO Template Selection form.
-
Clear All
Click the Clear All button to deselect all records in the Vessel/Additive Quantity subform. You should deselect the records for which you do not want to create operations.
-
Close
Click the Close button to exit the Additive Workbench program without saving data.
-
Cancel
Click the Cancel button to remove all vessel/additive combinations from the subform.
-
Create Operation
When you are ready to create operations, select an option in the Create Work Order by area, use the Select All button or manually select the vessel/additive records for which to create operations, and then click the Create Operations button. The system opens the Operation / WO Template Selection form when you click the Create Operation button.
-
Calculate All
Click Calculate All to update all records in the Active Ingredient subform. Generally, you update records only if you've made changes to the records in the Add Additive or Active Ingredients subforms.
-
Calculate
After you select the vessels and enter additive information, click the Calculate button to calculate the additive quantities for each selected vessel. Records for the vessel/addition combination appear in the Vessel/Additive Quantity subform.
-
-
Active Ingredient subform.
The Active Ingredient subform shows the details about the active ingredients for a vessel/additive combination. Select a record in the Vessel/Additive Quantity subform to view the detailed information about a combination.
13.1.2.2 Typical Process Flow
The Additive Workbench provides flexibility to view and modify the additives before you commit the additive operation. When using the Additive Workbench, you might follow these steps, or might incorporate other steps in your business process:
-
Enter search criteria, and then click Search to display records.
-
In the search results area, select the tanks or VBTs to which to add additive operations.
Select one or more vessels. If the vessel is reserved because of a different operation, the system displays a lock icon.
-
In the Add Additive subform, specify the additive method, the additive, and the additive quantity.
You might also complete other fields for the additive method selected, or to specify test and lot/location information.
-
Click the Calculate button in the Add Additive subform.
The program displays the amount of the additive for each selected vessel in the Vessel/Additive Quantity subform.
-
Review the vessel and additive information in the Vessel/Additive Quantity subform. You can change the additive information if necessary.
-
To view the active ingredients for a vessel/additive combination, select the combination in the Vessel/Additive Quantity subform.
The system displays the details about the active ingredients for the vessel/additive combination in the Active Ingredient subform.
-
To update the active ingredient amounts, make your changes to the additive method or quantity in the Vessel/Additive Quantity subform, select the active ingredient in the Active Ingredient subform, and then click the Calculate button.
The system updates the active ingredients if the changes you made affect the calculated parts per million, which is the value in the Calculated PP Quantity field.
-
When you are ready to create the operations:
-
Select either Vessel or Additive in the Create Work Order by option.
-
In the Vessel/Additive Quantity subform, select the vessel/additive combinations for which to create the operations.
You can use the Select All button to select all records, or you can manually select records using the Create Op (create operation) check box.
-
Click the Create Operation button.
The system displays the Operation/WO Template Selection form for the additive operation.
-
Complete the fields as desired, and then click Save and Close.
The system submits the additive operations.
-
If you entered information to create QA (quality assurance) operations and completed the Configured Operation Code for Quality Operations processing option, the system displays the Operation/WO Template Selection form for the QA operation. Complete the fields as desired, and then click Save and Close.
The system submits the quality operation.
-
13.1.3 Prerequisites
Before you can enter additive operations, you must set up:
-
Item and item branch records for the additive and its components.
-
Unit of measure conversions for the active ingredient.
-
A bill of material for the additive, defining the active ingredient.
-
A standard unit of measure conversion for each unit of measure used for additive operation blend lots (weight or volume) and liters (LT) to enable PPM calculations.
13.1.4 Forms Used to Manage Additive Operations
13.1.5 Setting Processing Options for Additive Workbench (P31B84)
Processing options enable you to specify default values for reports and programs.
|
Note: The Default Vessel Class for Search processing option works in conjunction with the Configured Operation Code for Additive Operations processing option. The additive operation must be an allowed operation type for the vessel class. The system does not validate whether the operation type and vessel class combination is valid when you complete the processing options. Instead, the validation occurs when you click the Save and Close button on the Operations / WO Selection Template form, which appears after you click the Create Operations button in the Additive Workbench program.You can change the vessel class on the Manage Additive form before you search for vessels. You can change the configured operation code for the additive operation on the Operations / WO Selection Template form. To avoid the need to re-enter data due to a failed validation, Oracle recommends that you verify that the configured operation code is valid for the vessel type before you click the Save and Close button on the Operations / WO Selection Template form. |
13.1.5.1 Defaults
- 1. Default Vessel Class for Search
-
Enter the vessel class to use as the default search criteria. Valid values are:
1: Tank
2: VBT (virtual barrel tank)
3: Unknown Tank.
- 2. Named Calculation Path
-
Specify the default value for the named calculation path. You cannot change the default value on the Manage Additive form.
If you do not specify a value, the system uses the default value that is associated with your user ID.
- 3. Configured Operation Code for Additive Operations
-
Specify the configured operation code to use to create the in-place additive operation. When you click the Create Operation button in the Vessel/Additive Quantity subform, the system displays the Operation / WO Template Selection form, and completes the Configured Operation Code field with the value that you enter in this processing option. If you leave this processing option blank, you must complete the Configured Operation Code field on the Operation / WO Template Selection form.
The configured operation code that you enter in this processing option must correspond to the vessel class for the additive operation that you create. For example, if you work with tanks, then the base operation code on which the configured operation code is based must be ADDT. Likewise, if you work with VBTs, the base operation code on which the configured operation code is based must be ADDB.
The Additive Workbench program does not perform a validation for the relationship between the vessel class and the base operation code when you complete the processing options. Instead, the program issues an error message when you attempt to create and save the operation. If the base operation code for the configured operation code that you enter in the processing option does not correspond to the vessel type for which you create the additive operation, then the system displays an error message in the Operation / WO Template Selection form when you click the Save and Close button on that form. If you receive an error message, you must change the value in the Configured Operation Code field to a code that corresponds to the appropriate base operation code.
- 4. Configured Operation Code for Quality Operations
-
Specify the configured operation code to use to create the in-place quality operation. The base operation code of the configured operation code must be QA. If the base operation code is other than QA, the system displays an error message in the Operation/WO Template Selection form when you click the Save and Close button.
If you do not complete this processing option, the system does not provide a default value for the quality operation in the Operation/WO Template Selection form. If you complete the Test/Panel and Test Specifications fields on the Add Additive subform, you must enter a configured operation code for the QA operation on the Operation/WO Template Selection form before you can create the quality operation when you click the Save and Close button.
- 5. Elapsed Time Between Operations (in Minutes)
-
Enter the number of minutes for the elapsed time between the operations that you create from the Additive Workbench program. For example, if you enter 2.00, the system creates the operations to begin at two minute intervals.
- 6. Search Operation Status
-
Enter a value from the Operation Status (31B/PO) UDC table to specify the status of the operations for which to search. You can change the value on the Manage Additives form. If you do not complete this processing option, you must specify a value on the Manage Additives form.
Valid values are:
1: Closed
2: Closed or actual
3: Closed, actual, or active.
- 7. Default Workflow Status
-
Enter a value from the Operation Workflow Status Mapping table (F31B74) to specify the workflow status of the operations that you want to locate. If you complete this processing option with a valid value, the Manage Additives form displays only the operations with the workflow status that you specify when you click the Find button. If you do not complete this processing option, the Manage Additives form displays all operations when you click the Find button.
If you do not complete this processing option, you can use the QBE (query by example) line in the Manage Additives form to restrict the operation records that the form displays.
- 8. Default Additive Method
-
Enter a value from the Additive Method (31B/AD) UDC table to specify the default additive method for the additive operations that you want to add or modify. The fields in the Add Additive section of the Manage Additives form change depending on the method that you select. If you do not specify a value in this processing option, you must specify a value on the Manage Additives form.
Values are:
C: Vessel volume
F: Fixed
L: Flow
P: Targeted parts per million
R: Rate
- 9. Material Type UOM
-
Enter a value from the Material Type Unit of Measure (31B/MU) UDC table to specify the default value for the Material Type UOM field. If you do not complete this processing option, the system uses the default value of V (volume). You can change the value on the Manage Additives form.
Values are:
A: Area
V: Volume
W: Weight
- 10. Default Work Order Type
-
Enter a value from the Work Order Type (31B/TW) UDC table to specify the work order type to create when you create new operations.
13.1.6 Adding a Single or Multiple Additives Using the Additive Workbench
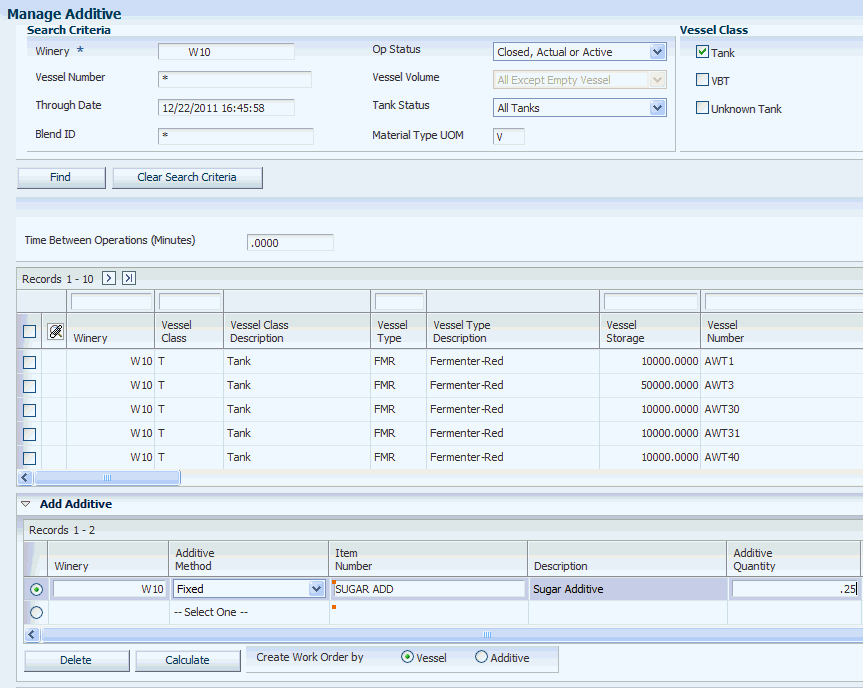
Access the Manage Additive form.
Figure 13-1 Manage Additive form (1 of 2)
Description of "Figure 13-1 Manage Additive form (1 of 2)"
13.1.6.1 Search Criteria Section
- Winery
-
Specify the winery for which you create the additive operations. You must complete this field.
- Op Status (operation status)
-
Specify the status of the vessels that you want to locate. The system completes this field with a value from a processing option, if you completed the processing option. If you do not complete the processing option, the system uses the value Closed, Actual or Active.
- Vessel Volume
-
This field is not editable. The Additives Workbench enables you to search for all vessels except empty vessels.
- Tank Status
-
Select the tank status of the tanks that you want to locate. The system enables this field only when you select Tank as the vessel class. Values are:
All Except Decommissioned
All Tanks
Decommissioned Tanks Only
- Material Type UOM (material type unit of measure)
-
Specify the material type unit of measure to use in your search. If you specified a value in the Material Type UOM processing option, the system uses that value as the default value. If you did not specify a value in the processing option, the system uses a default value of V (volume).
You can change the value to any value from the Material Type Unit of Measure (31B/MU) UDC table.
13.1.6.2 Vessel Class Section
Select the vessel class to use for your search. If you completed the Default Vessel Class for Search processing option, the system sets the selection in this section to the value of the processing option. You can change the vessel class from the default value.
Values are:
Tank
VBT (virtual barrel tank)
Unknown Tank
|
Note: You can select both Tank and Unknown Tank. No other combinations of values are valid.If you select VBT or Unknown Tank, the system disables the Tank Status field. |
13.1.6.3 Search Detail Section
- Named Calculation Path
-
The system completes this field with the value from the Named Calculation Path processing option. You cannot change the value on the Manage Additives form.
If you did not complete the processing option, the system completes this field with the calculation path that is associated with your user ID.
- Named Calculation Format
-
The program displays the named calculation format associated with the named calculation path. You can select a different format to use.
- Override Format
-
Select this option to enable a field in which you can enter a named calculation format that is not associated with the named calculation path.
- Time Between Operations (Minutes)
-
Specify the time that elapses between the operations that you create. The program completes this field with a default value from a processing option. You can change the value in the field.
13.1.6.4 Add Additive Section
- Winery
-
The system displays the winery that you used in your search. You can change it. You can add an additive from a winery other than the winery of the vessel.
- Additive Method
-
The system displays the method that you specified in the Default Additive Method processing option. If you do not complete the processing option, the system uses the Fixed method as the default value.
Note:
The Vessel Volume additive method is designed for use only when working with multiple vessels. The Vessel Volume additive method divides additive amounts proportionately among multiple vessels. After the program divides the additives, the vessel/additive combination is handled by the system as a fixed amount. When you click the Calculate button, the system shows the additive method as Fixed in the Vessel/Additive Quantity subform because the additive amounts have been divided and allocated to each vessel.The additive methods are:
Fixed
Flow
Rate
Targeted Parts Per Million
Vessel Volume - Item Number
-
Enter the item number of the additive. The item must be associated with a bill of material.
- Additive Quantity
-
Specify the amount of the additive to add.
- Additive UOM (additive unit of measure)
-
The system displays the production unit of measure for the additive entered.
- Additive Rate Quantity
-
Enter the rate quantity if you selected the Rate or Flow additive method.
- Test/Panel
-
When you complete this field, the system adds the test or panel to the quality assurance operation specified in the Configured Operation Code for Quality Operations processing option.
- Test Specification
-
Enter a value that corresponds to the value in the Test/Panel field to specify the test specifications for the quality operation that you create.
- Location
-
Specify the location of the additive that you add.
- Lot Number
-
Specify the lot number of the additive.
- Create Work Order By
-
Select whether to group the work orders that you create by vessel or additive. When you click the Create Operation button in the Vessel/Additive Quantity section, the program:
-
Creates one work order for the vessel if you add multiple additives to one vessel.
-
Creates one work order for the additive if you add one additive to multiple vessels.
-
Creates one work order for each additive if you add multiple additives to multiple vessels.
-
Creates one work order for each vessel if you add multiple additives to multiple vessels.
-
13.1.6.5 Vessel/Additive Quantity Section
- Create Op (create operation)
-
Select the check box adjoining the records for which you create operations. You can also use the Select All or Clear All buttons to select or deselect records. You must select records before you click the Create Operation button.
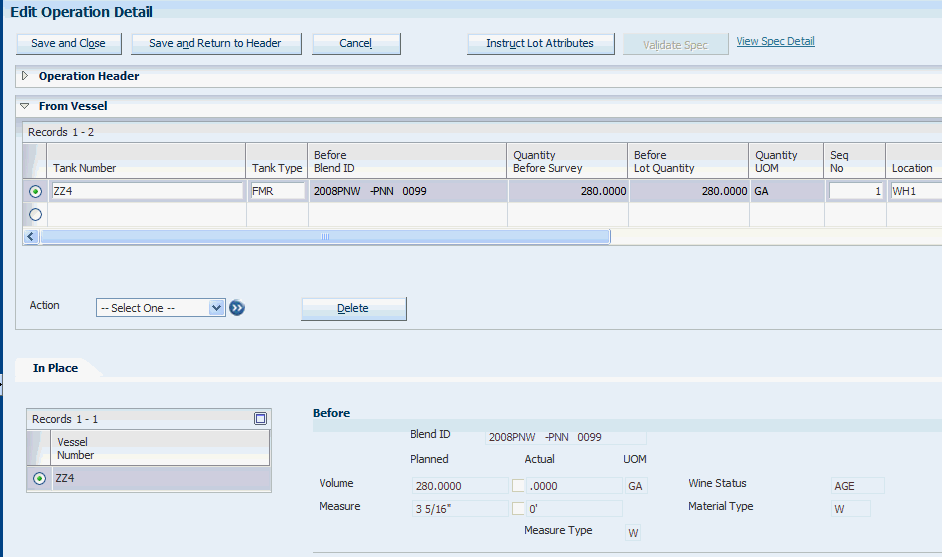
13.1.7 Entering An Additive Using the Create/Edit Detail Program
Access the Edit Operation Detail form.
Figure 13-3 Edit Operation Detail form (1 of 2)
Description of "Figure 13-3 Edit Operation Detail form (1 of 2)"
Figure 13-4 Edit Operation Detail form (2 of 2)
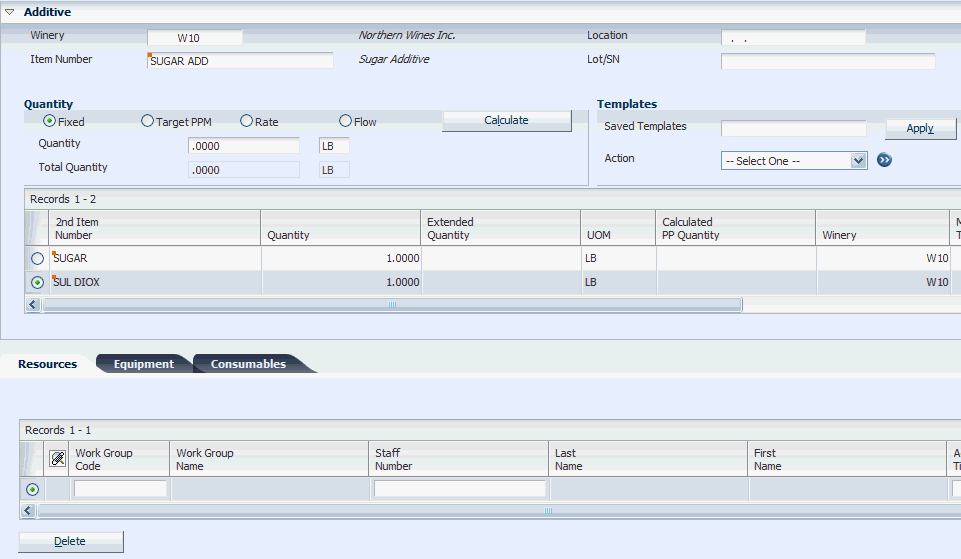
Description of "Figure 13-4 Edit Operation Detail form (2 of 2)"
- Winery
-
Enter the branch/plant for the additive item.
- Item Number
-
Enter the item number of the additive. You can use additives that are set up in a different branch/plant than the current facility.
- Before Blend ID and After Blend ID
-
The system displays the blend ID of the Before lot and the blend ID after you calculate the additive operation.
- Batch Quantity
-
Enter a batch quantity to use to specify a batch bill of material.
- Location
-
Enter the location from which you want to commit the additive.
- Lot/SN
-
Enter the lot from which you want to commit the additive quantity if the additive is a lot-controlled item.
- Fixed/Target PPM/Rate/Flow
-
Select one method for calculating the additive quantity.
- Quantity
-
Enter a quantity for an additive. This value represents a fixed quantity, PPM, flow, or rate, depending the method that you select.
- Calculate
-
Click to calculate the extended additive quantity based on the quantity that you entered and the calculation method that you specified.
- Total Quantity
-
Displays the total quantity of additive to apply to the lot. This value is calculated from the additive quantity based on the selected calculation method
- Saved Templates
-
Select an additive template to simplify data entry, if you have set up templates with additive items and quantities.
- Apply
-
Select to use the data from the selected template for the current additive operation. Selecting this option removes existing additive information.
- Action
-
Select the Save As a Template option if you want to reuse the additive information that you entered as a template. By selecting this option, you access the Add Additive Template form where you create the template.
Use the Edit Templates option to access the View Additive Templates form. On this form, you can retrieve existing templates and copy or revise them. You can also access the Add Additive Template form.
13.1.8 Creating Additive Templates
Access the Add Additive Template form.
- Template Name
-
Enter a name for the template you want to create.
- Status
-
Assign either an active or an inactive status to the additive template.
- Item Number
-
Enter the number of the additive parent item. You can enter only one parent item. The system uses the parent item number to retrieve the bill of material, which lists the active and inactive ingredients of the additive.
- Winery
-
Enter the facility with which the item and its bill of material are associated. You can save the template without facility information, but without it the system does not retrieve the bill of material and therefore does not display the active ingredients.
You might want to save the template without facility information if the parent item is used in several facilities.
- Quantity
-
Enter the quantity of the additive items and specify whether you want to use a fixed quantity, a target of parts per million, a rate, or a flow.
13.1.9 Managing Additive Thresholds
Access the Edit Operation Detail form.
If you enter an additive quantity outside of the tolerance range that you defined for the active ingredient, the system issued a warning or an error and displays the Threshold Reason area at the bottom of the form.
Figure 13-6 Edit Operation Detail form: Threshold Reason area

Description of "Figure 13-6 Edit Operation Detail form: Threshold Reason area"
- Additive Operational Threshold Reason and Additive Cumulative Threshold Reason
-
Enter an explanation as to why the additive quantity is acceptable even though it falls outside of the tolerance range.
13.2 Entering Administrative Operations
This section provides an overview of administrative operations and discusses how to:
-
Adjust inventory.
-
Declare loss.
-
Override the composition material type.
13.2.1 Understanding Administrative Operations
Administrative operations do not involve actual work in the facility. They are in-place operations and are most frequently used to make changes or to correct errors on blend lot attributes. You can perform administrative operations to:
-
Adjust lots.
-
Adjust inventory.
-
Correct errors.
-
Declare loss.
-
Override the composition material type.
13.2.1.1 Adjust Lots
You can adjust attributes for multiple blend lots in a single operation. Generally, you change lot attributes and lot summary attributes as part of another operation; however, sometimes you need to change the attributes on a current blend lot when no other treatment is occurring.
13.2.1.2 Adjust Inventory
An inventory administrative operation is used to adjust the volume of a blend lot.
13.2.1.3 Error Correction
Error correction operations are the only way to modify lot composition and accumulated additives without performing work against the bulk material.
13.2.1.4 Declared Loss
A declared loss operation records a loss of bulk material that is unusual or extraordinary. It is not a survey or operational loss and does not affect yield or total allowable losses. Causes for a declared loss could be a tanker crash or a warehouse disaster.
13.2.1.5 Composition Material Type
The system provides an administrative operation that enables you to override the composition material type for a blend lot. You can specify the new composition material on the operation header. When you close the operation, the system updates the composition material type on the After composition record for the lot.
13.2.2 Form Used to Enter Administrative Operations
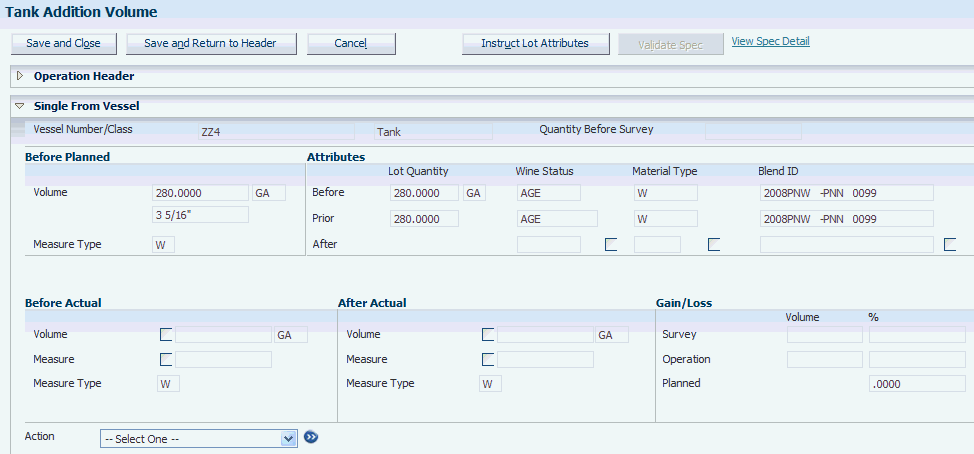
13.2.3 Adjusting Inventory
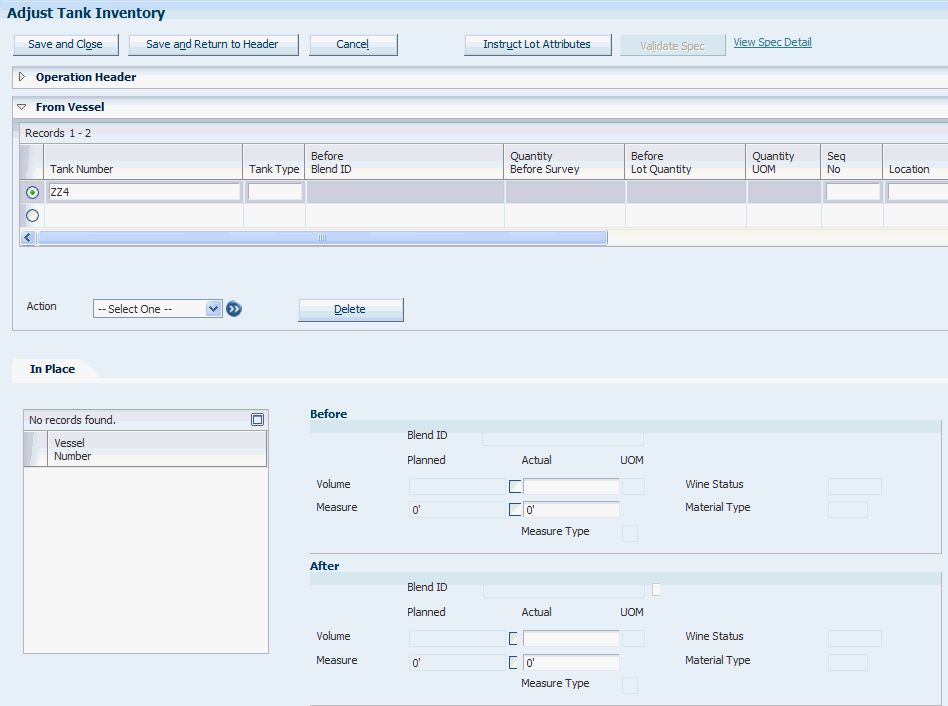
Access the Adjust Tank Inventory form.
Enter the actual Before volume or measure if you want the inventory adjustment reported as a survey gain/loss. Enter the actual After volume or measure if you want the inventory adjustment reported as an operation gain/loss.
13.2.4 Declaring Loss
Access the Edit Operation Detail form.
13.2.5 Overriding the Composition Material Type
Access the Operations Header form.
13.3 Instructing Removal Operations
This section provides an overview of removal operations, lists a prerequisite, and discusses how to:
-
Enter shipping operations.
-
Enter bill of lading details for shipping operations.
-
Enter transfer operations.
13.3.1 Understanding Removal Operations
For the purpose of shipping and transferring bulk material, the system provides a number of base operations that you use to create configured operations. You can create configured transfer and shipping operations based on the following base operations:
| Base Operation Code | Description |
|---|---|
| SHIP | Ship wine |
| TRANS | Transfer wine |
| SHIPFULTNK | Ship full tank |
| SHIPFULVBT | Ship full barrel |
13.3.1.1 Ship Bulk Material
The shipping/dispatch operation involves the physical movement of a bulk material lot to a transport tanker for shipment to a third party for specialized processing. Shipments are also used for sales of bulk material. The bill of lading is a document that is generated at the shipping facility and serves as a source document at the receiving facility. A printed bill of lading is a legal document between the shipper and carrier, and is required for the transportation of wine or juice between blend and bottling facilities. The bill of lading records the origin and destination of the shipment, the weight or volume of the shipment, and vehicle attributes, such as registration number and bond number. In addition, the bill of lading records the attributes of the material being shipped (primarily the composition details), but may also report the style, accumulated additives, and quality results.
|
Note: A bill of lading vessel may contain a bill of lading document number. In the United States, a bill of lading document is a TTB Form 703. In Australia, a bill of lading document is an LIP Declaration Form. The bill of lading number is a state-controlled number, and a record must exist for each consecutive number. |
This type of operation is used for external shipping. This operation creates a bill of lading vessel, including the trucking details. Once a bill of lading document number is generated, it cannot be deleted from a bill of lading vessel. The bond serial number is generated only if it is required, and it is generated only if the shipping operation is active. A new bill of lading vessel is created for every ship operation. You cannot reuse a bill of lading.
A shipping/dispatch operation:
-
Reduces inventory by the amount shipped. ERP inventory is increased for the item that is cross-referenced with the material type on the bill of lading vessel.
-
Generates a bill of lading to certify the state and composition of the bulk material for shipping.
-
Records a survey loss associated with the bill of lading, but not an operational loss.
-
Uses a user-defined weight factor to calculate liquid volume.
The volume dispatched from the shipping facility is the volume that is on the transfer documents. The system validates the volume using one of these methods:
-
From tank measures
The From Tank Before and After tank measures determine the volume that is moved and entered on the transfer document.
-
Flow Meter
A flow meter can also be used at some sites. (United States only)
-
Tanker Gauging
Volumes are measured from tanker gauges. This information is entered on dispatching facility and tanker company consignment notes. (Australia only)
13.3.1.2 Ship Full Tanks and Barrels
An operation shipping full vessels involves the physical transfer of bulk material in full vessels to another facility, including transfer to a third party for specialized processing, where the third party is managed within the facility. This operation does not require the additional movement from vessels to tankers. You can associate an internal operation for receiving bulk material at the receiving facility, including the preservation of blend lot details. The bulk material being transferred remains property of the shipping facility until received.
These operations are for internal shipment.
A ship full vessel operation has the same characteristics as a shipping/dispatch operation. In addition to these characteristics, a ship full vessel operation:
-
Updates the associated vessel master record so that vessel is in new facility.
The barrel facility is changed from one facility to another within the master table. The tanks are copied and associated with the new facility. When this record is copied, the tank status in the receiving facility is updated to Waiting for Receipt.
-
Copies the From vessels from the associated ship operation to the To vessels in the receive operation.
The From Vessels must be of the same material type.
Once a ship operation is closed, the tank status is updated to Not In Branch in the shipping facility. When the receive operation is closed, the tank status in the receiving facility is updated to Active. ERP inventory is increased for the item that is cross-referenced with the material type on the bill of lading vessel.
13.3.1.3 Transfer Bulk Material
A transfer bulk material operation involves the physical transfer of bulk material to a transport tanker for shipment to another facility, or to a third party within the facility for specialized processing. This type of operation is only used internally within blend facilities.
|
Note: To successfully transfer bulk material from one facility to another, both facilities have to be set up with the same unit of measure system. For example, if the shipping facility uses metric units of measure, the receiving facility has to use metric units of measure as well. |
This operation creates a bill of lading vessel, including the trucking details. Once a bill of lading document number is generated, it cannot be deleted from a bill of lading vessel. The bond serial number is generated only if it is required, and it is generated when the transfer operation is at an active status. A new bill of lading vessel is created for every transfer operation. You cannot reuse a bill of lading.
A transfer bulk material operation:
-
Reduces inventory at the shipping facility by the amount shipped.
ERP inventory is increased for the item that is cross-referenced with the material type on the bill of lading vessel.
-
Generates a bill of lading to certify the state and composition of the bulk material for shipping, as well as trucking details.
-
Records a survey loss associated with the bill of lading, but not an operational loss.
-
Uses a user-defined weight factor to calculate liquid volume.
13.3.2 Prerequisite
To ship a full tank, you must define the tank as moveable in the Tank Master program (P31B08).
See Creating a Tank.
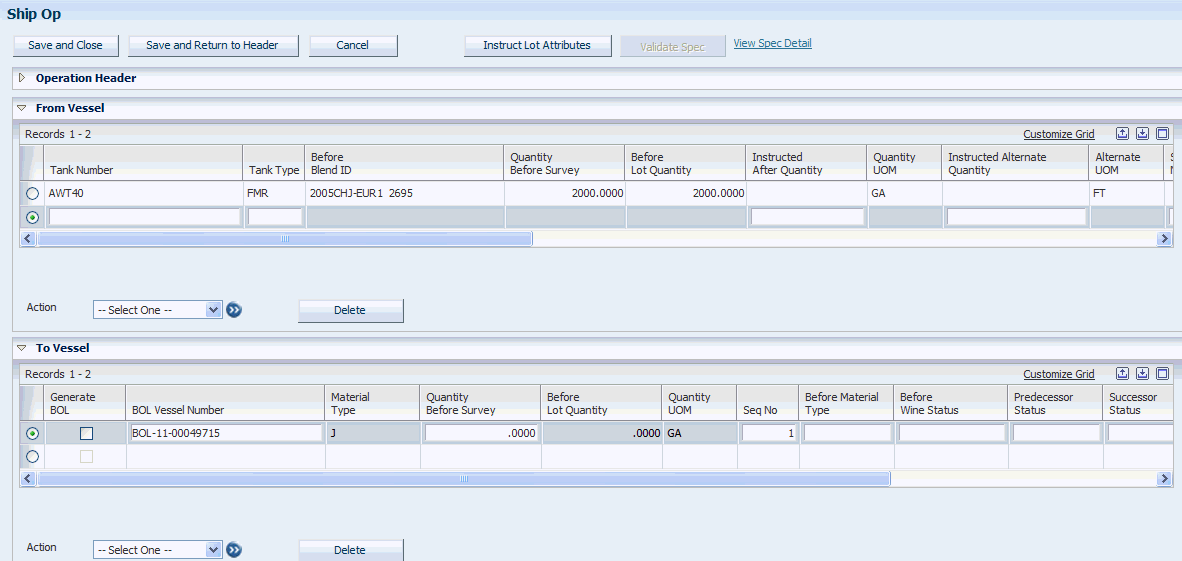
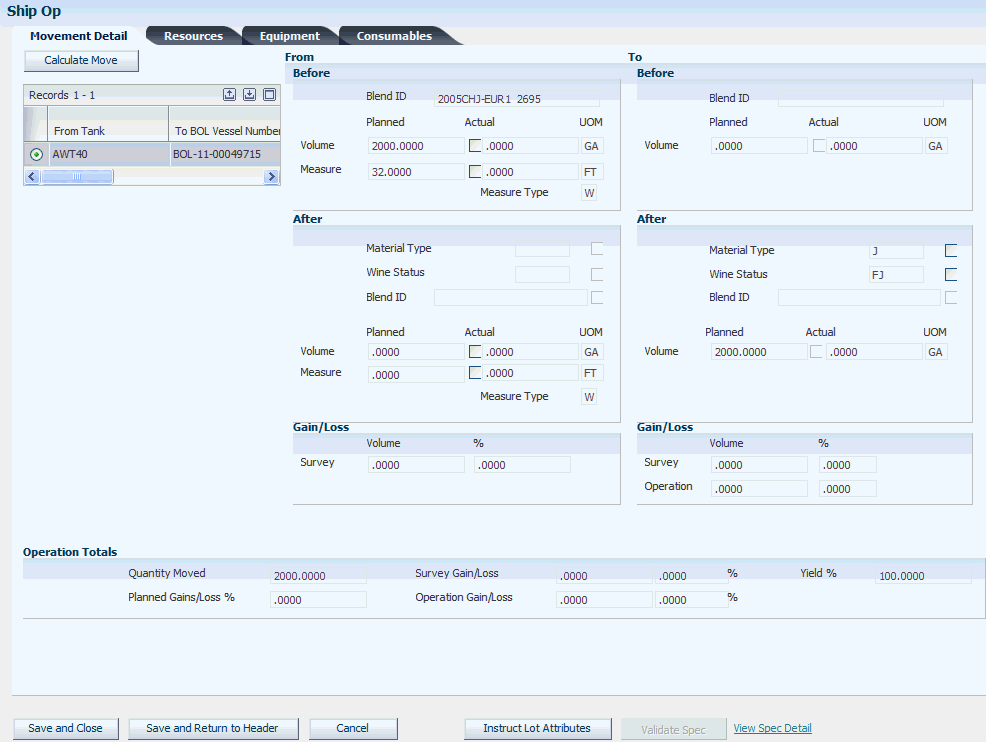
13.3.3 Entering Shipping Operations
Access the Edit Operation Detail or a ship operation form.
Enter the tank from which you are shipping bulk material, or the full tank or barrel that you are shipping.
- Generate BOL (generate bill of lading)
-
This option appears for shipping operations. Select this check box to generate a bill of lading.
13.3.4 Entering Transfer Operations
Access the Edit Operation Detail form or a receive form if you are adding an operation.
Figure 13-11 Receive to Tank Op form (1 of 2)
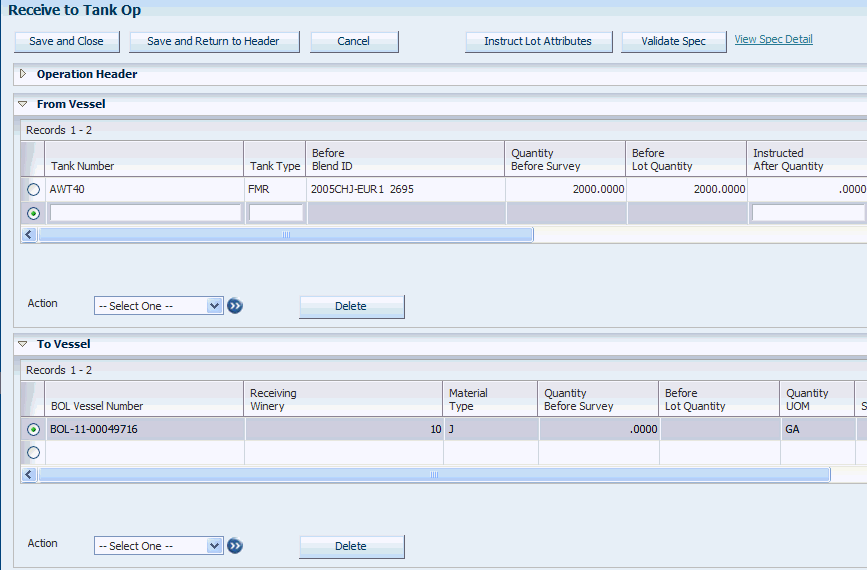
Description of "Figure 13-11 Receive to Tank Op form (1 of 2)"
Figure 13-12 Receive to Tank Op form (2 of 2)
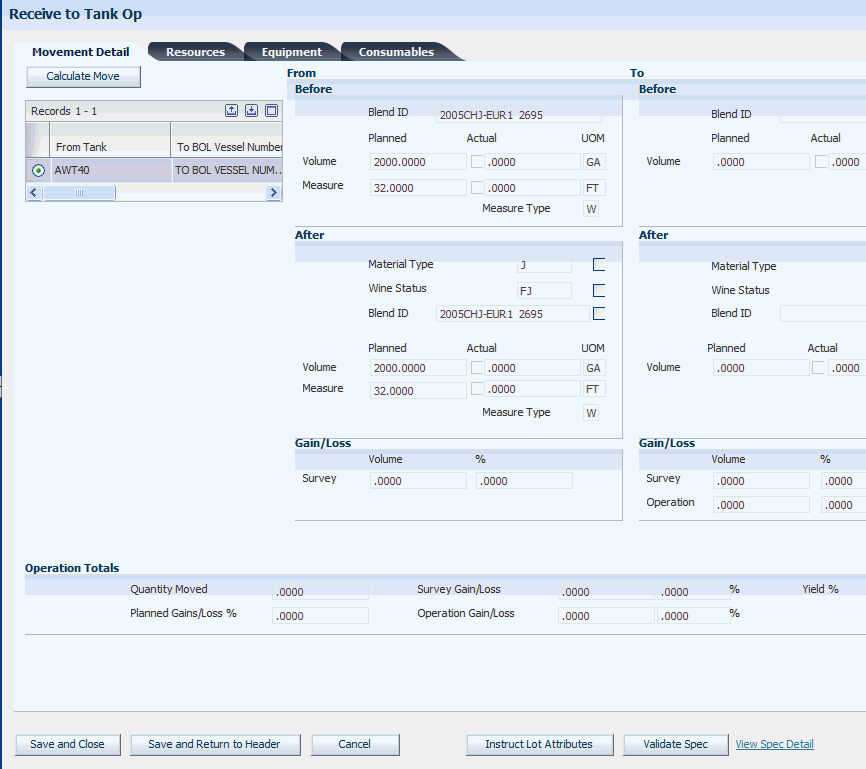
Description of "Figure 13-12 Receive to Tank Op form (2 of 2)"
Enter the tank from which you transfer bulk material and specify the quantity of bulk material that you want to transfer. You must enter the receiving facility. The system generates a bill of lading number, or you can manually enter a bill of lading number.
13.4 Instructing Bottling Operations
This section provides an overview of bottling operations and discusses how to:
-
Set processing options for Bottling Vessel (P31B26).
-
Enter bottling operations.
-
Enter bottling vessel details.
-
Enter decanting operations.
-
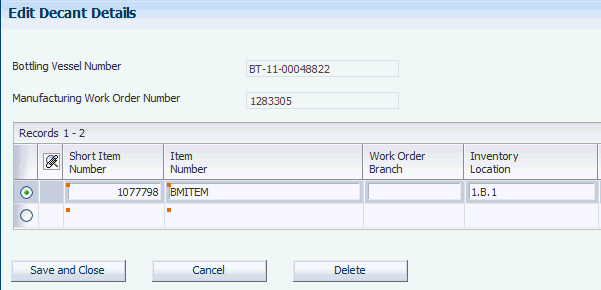
Enter decant details.
13.4.1 Understanding Bottling Operations
Bottling operations are another type of removal operations and take place at the end of the blend process. Bottling can also be reversed by returning the finished goods to the facility as bulk material.
13.4.1.1 Bottling
A bottling operation is the final step of the blend process that records the movement of bulk material to bottles, resulting in transfer of inventory.
A bottling operation removes the bulk material from inventory and adds it to raw materials in the finished goods system, in addition to any transaction required for the finished goods bottling inventory. A bottling operation creates a single end-use reservation (EUR). If multiple EURs are in the From vessels when you are blending their contents for a bottling vessel, a single EUR is created. You can issue the EUR item to a parts list for producing bottled product.
A bottling operation:
-
Costs the blend lot, accounting for variance to standard cost and gains and losses.
-
Instructs the To After details.
There can only be one bottling vessel per bottling operation.
-
Records bottled, sampled, and broken quantities.
-
Accounts for bulk losses incurred in bottling, such as bottles used as samples and broken bottles to be used for legal reporting.
-
Incorporates the operational losses in a calculation for a complete lot yield for the blend lot.
-
Records quality tests to the To After blend lot.
-
Updates the bottling operation with bottling details associated with the To After blend lot.
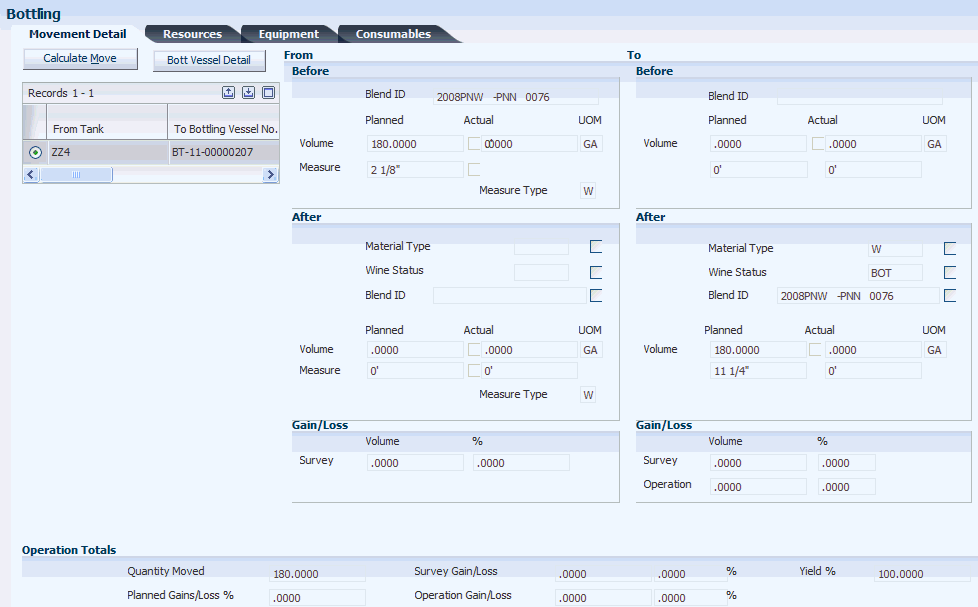
You enter the bottling completion quantities either in volumes or using the production unit of measure. You can enter the bottling quantities only on the Movement Details tab on the Edit Operation Detail form. The Edit Bottling Vessel Details form displays both volume and production unit of measures, but only the volume quantities are saved. The volume unit of measure used is set up in the winery constants.
You can also enter the COLA Number (U.S.) or Internal Approval Number (Australia).
13.4.1.2 Bottling Vessels
The system generates a bottling vessel number during a bottling operation. A decant operation can use only an existing bottling vessel. You can enter only the bottling quantities in the move details. When you click the Vessel Details button, the system disables the quantity fields.
13.4.1.3 Decant
A decant operation involves bottles of finished goods brought back to the facility as a bulk material in a tank because the material is unacceptable, expired, defective, or may simply need to be rebottled.
The decanting process occurs after maturation, such as six months or more The tirage bottles are taken to the transfer line by pallet. Decanting generally has other associated operations such as additives.
There are three types of decants:
-
Bulk material from bottles from the finished goods bottling line.
This is also known as bottled wine returns. In this instance, the wine is considered to have left the bulk wine system and needs to be returned.
-
Bulk material from finished goods.
-
Blends that are being decanted into the same To vessel.
A decant operation:
-
Stores the following historical details:
-
Finished goods.
-
Item number.
-
Finished goods lot number.
-
Historical blend lot number.
-
Bottling operation number.
-
Historical blend ID number.
-
Blend lot details.
-
-
Identifies the quantity of finished goods to return to inventory.
Decant operations use a bottling vessel that can also have decant details. These details can list specific items that are decremented in inventory.
-
Increases inventory and inherits blend lot details from the related bottling lot.
13.4.2 Forms Used to Enter Bottling Operations
13.4.3 Setting Processing Options for Bottling Vessel (P31B26)
This processing option controls default processing for the Bottling Vessel program.
13.4.3.1 Version
This processing option controls the version that the system uses when the program calls other programs. The following table lists the programs in the order that they appear on the Versions tab, along with the default version. If you leave the processing options blank, the system uses this default version. You can define different versions in accordance with business processes.
- 1. Work Orders Where Used Version (P13226)
-
ZJDE0001
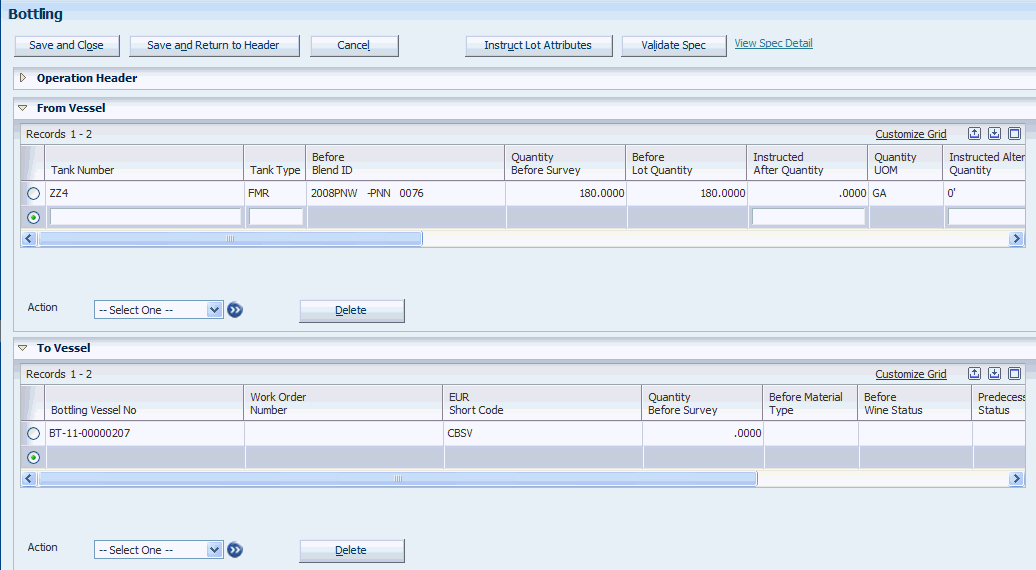
13.4.4 Entering Bottling Operations
Access the Bottling form.
13.4.5 Entering Bottling Vessel Details
Access the Edit Bottling Vessel Details form.
Figure 13-15 Edit Bottling Vessel Details form
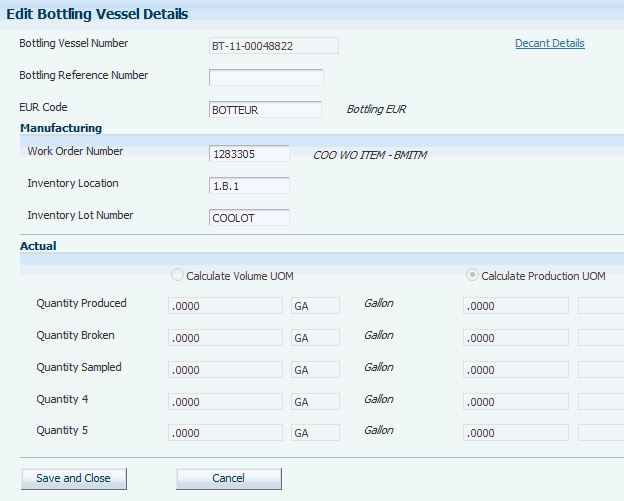
Description of "Figure 13-15 Edit Bottling Vessel Details form"
- Bottling Reference Number
-
Enter the bottling reference number, for example, the COLA number.
- EUR Code
-
Displays the EUR code that you specified for the bulk material to be bottled.
- Work Order Number
-
Select the number of the work order that uses the EUR item on its parts list.
- Inventory Location
-
Enter the storage location from which goods will be moved.
- Inventory Lot Number
-
Enter a lot number for the EUR item.
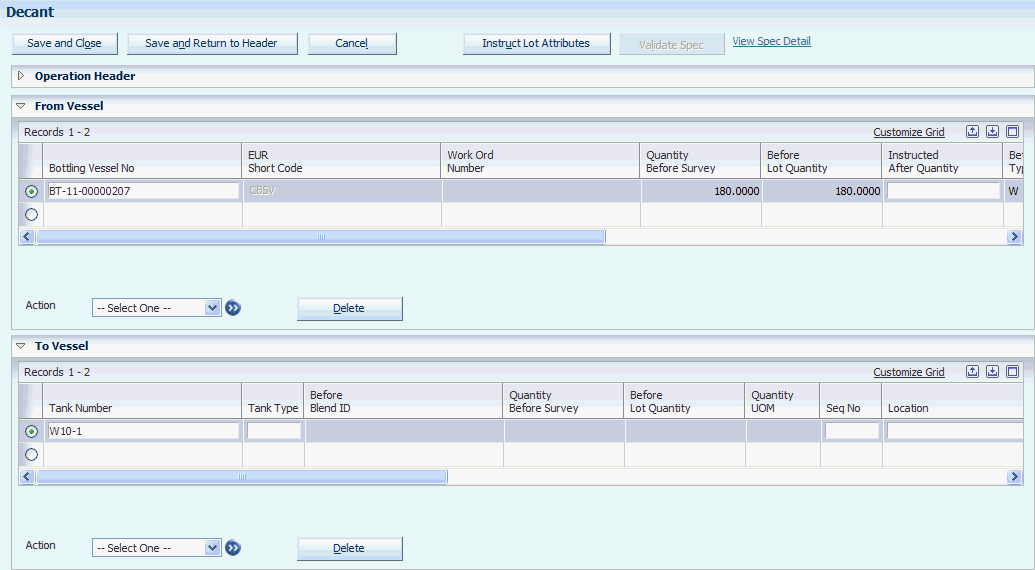
13.4.6 Entering Decanting Operations
Access the Decant form.
Figure 13-17 Edit Operation Detail form (2 of 2)
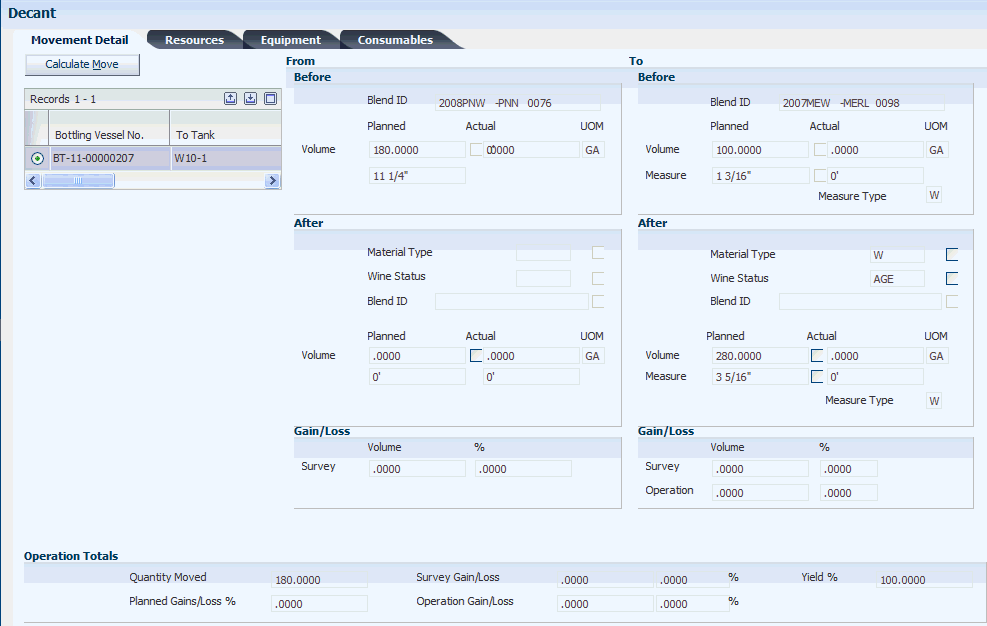
Description of "Figure 13-17 Edit Operation Detail form (2 of 2)"
13.5 Entering Administrative Operations
This section provides an overview of administrative operations and discusses how to:
-
Adjust inventory.
-
Declare loss.
-
Override the composition material type.
13.5.1 Understanding Administrative Operations
Administrative operations do not involve actual work in the facility. They are in-place operations and are most frequently used to make changes or to correct errors on blend lot attributes. You can perform administrative operations to:
-
Adjust lots.
-
Adjust inventory.
-
Correct errors.
-
Declare loss.
-
Override the composition material type.
13.5.1.1 Adjust Lots
You can adjust attributes for multiple blend lots in a single operation. Generally, you change lot attributes and lot summary attributes as part of another operation; however, sometimes you need to change the attributes on a current blend lot when no other treatment is occurring.
13.5.1.2 Adjust Inventory
An inventory administrative operation is used to adjust the volume of a blend lot.
13.5.1.3 Error Correction
Error correction operations are the only way to modify lot composition and accumulated additives without performing work against the bulk material.
13.5.1.4 Declared Loss
A declared loss operation records a loss of bulk material that is unusual or extraordinary. It is not a survey or operational loss and does not affect yield or total allowable losses. Causes for a declared loss could be a tanker crash or a warehouse disaster.
13.5.1.5 Composition Material Type
The system provides an administrative operation that enables you to override the composition material type for a blend lot. You can specify the new composition material on the operation header. When you close the operation, the system updates the composition material type on the After composition record for the lot.
13.5.2 Form Used to Enter Administrative Operations
13.5.3 Adjusting Inventory
Access the Adjust Tank Inventory form.
Enter the actual Before volume or measure if you want the inventory adjustment reported as a survey gain/loss. Enter the actual After volume or measure if you want the inventory adjustment reported as an operation gain/loss.
13.6 Instructing Removal Operations
This section provides an overview of removal operations, lists a prerequisite, and discusses how to:
-
Enter shipping operations.
-
Enter bill of lading details for shipping operations.
-
Enter transfer operations.
13.6.1 Understanding Removal Operations
For the purpose of shipping and transferring bulk material, the system provides a number of base operations that you use to create configured operations. You can create configured transfer and shipping operations based on the following base operations:
| Base Operation Code | Description |
|---|---|
| SHIP | Ship wine |
| TRANS | Transfer wine |
| SHIPFULTNK | Ship full tank |
| SHIPFULVBT | Ship full barrel |
13.6.1.1 Ship Bulk Material
The shipping/dispatch operation involves the physical movement of a bulk material lot to a transport tanker for shipment to a third party for specialized processing. Shipments are also used for sales of bulk material. The bill of lading is a document that is generated at the shipping facility and serves as a source document at the receiving facility. A printed bill of lading is a legal document between the shipper and carrier, and is required for the transportation of wine or juice between blend and bottling facilities. The bill of lading records the origin and destination of the shipment, the weight or volume of the shipment, and vehicle attributes, such as registration number and bond number. In addition, the bill of lading records the attributes of the material being shipped (primarily the composition details), but may also report the style, accumulated additives, and quality results.
|
Note: A bill of lading vessel may contain a bill of lading document number. In the United States, a bill of lading document is a TTB Form 703. In Australia, a bill of lading document is an LIP Declaration Form. The bill of lading number is a state-controlled number, and a record must exist for each consecutive number. |
This type of operation is used for external shipping. This operation creates a bill of lading vessel, including the trucking details. Once a bill of lading document number is generated, it cannot be deleted from a bill of lading vessel. The bond serial number is generated only if it is required, and it is generated only if the shipping operation is active. A new bill of lading vessel is created for every ship operation. You cannot reuse a bill of lading.
A shipping/dispatch operation:
-
Reduces inventory by the amount shipped. ERP inventory is increased for the item that is cross-referenced with the material type on the bill of lading vessel.
-
Generates a bill of lading to certify the state and composition of the bulk material for shipping.
-
Records a survey loss associated with the bill of lading, but not an operational loss.
-
Uses a user-defined weight factor to calculate liquid volume.
The volume dispatched from the shipping facility is the volume that is on the transfer documents. The system validates the volume using one of these methods:
-
From tank measures
The From Tank Before and After tank measures determine the volume that is moved and entered on the transfer document.
-
Flow Meter
A flow meter can also be used at some sites. (United States only)
-
Tanker Gauging
Volumes are measured from tanker gauges. This information is entered on dispatching facility and tanker company consignment notes. (Australia only)
13.6.1.2 Ship Full Tanks and Barrels
An operation shipping full vessels involves the physical transfer of bulk material in full vessels to another facility, including transfer to a third party for specialized processing, where the third party is managed within the facility. This operation does not require the additional movement from vessels to tankers. You can associate an internal operation for receiving bulk material at the receiving facility, including the preservation of blend lot details. The bulk material being transferred remains property of the shipping facility until received.
These operations are for internal shipment.
A ship full vessel operation has the same characteristics as a shipping/dispatch operation. In addition to these characteristics, a ship full vessel operation:
-
Updates the associated vessel master record so that vessel is in new facility.
The barrel facility is changed from one facility to another within the master table. The tanks are copied and associated with the new facility. When this record is copied, the tank status in the receiving facility is updated to Waiting for Receipt.
-
Copies the From vessels from the associated ship operation to the To vessels in the receive operation.
The From Vessels must be of the same material type.
Once a ship operation is closed, the tank status is updated to Not In Branch in the shipping facility. When the receive operation is closed, the tank status in the receiving facility is updated to Active. ERP inventory is increased for the item that is cross-referenced with the material type on the bill of lading vessel.
13.6.1.3 Transfer Bulk Material
A transfer bulk material operation involves the physical transfer of bulk material to a transport tanker for shipment to another facility, or to a third party within the facility for specialized processing. This type of operation is only used internally within blend facilities.
|
Note: To successfully transfer bulk material from one facility to another, both facilities have to be set up with the same unit of measure system. For example, if the shipping facility uses metric units of measure, the receiving facility has to use metric units of measure as well. |
This operation creates a bill of lading vessel, including the trucking details. Once a bill of lading document number is generated, it cannot be deleted from a bill of lading vessel. The bond serial number is generated only if it is required, and it is generated when the transfer operation is at an active status. A new bill of lading vessel is created for every transfer operation. You cannot reuse a bill of lading.
A transfer bulk material operation:
-
Reduces inventory at the shipping facility by the amount shipped.
ERP inventory is increased for the item that is cross-referenced with the material type on the bill of lading vessel.
-
Generates a bill of lading to certify the state and composition of the bulk material for shipping, as well as trucking details.
-
Records a survey loss associated with the bill of lading, but not an operational loss.
-
Uses a user-defined weight factor to calculate liquid volume.
13.6.2 Prerequisite
To ship a full tank, you must define the tank as moveable in the Tank Master program (P31B08).
See Creating a Tank.
13.6.3 Entering Shipping Operations
Access the Edit Operation Detail or a ship operation form.
Enter the tank from which you are shipping bulk material, or the full tank or barrel that you are shipping.
- Generate BOL (generate bill of lading)
-
This option appears for shipping operations. Select this check box to generate a bill of lading.
13.6.4 Entering Transfer Operations
Access the Edit Operation Detail form or a receive form if you are adding an operation.
Figure 13-23 Receive to Tank Op form (1 of 2)

Description of "Figure 13-23 Receive to Tank Op form (1 of 2)"
Figure 13-24 Receive to Tank Op form (2 of 2)

Description of "Figure 13-24 Receive to Tank Op form (2 of 2)"
Enter the tank from which you transfer bulk material and specify the quantity of bulk material that you want to transfer. You must enter the receiving facility. The system generates a bill of lading number, or you can manually enter a bill of lading number.
13.7 Instructing Bottling Operations
This section provides an overview of bottling operations and discusses how to:
-
Set processing options for Bottling Vessel (P31B26).
-
Enter bottling operations.
-
Enter bottling vessel details.
-
Enter decanting operations.
-
Enter decant details.
13.7.1 Understanding Bottling Operations
Bottling operations are another type of removal operations and take place at the end of the blend process. Bottling can also be reversed by returning the finished goods to the facility as bulk material.
13.7.1.1 Bottling
A bottling operation is the final step of the blend process that records the movement of bulk material to bottles, resulting in transfer of inventory.
A bottling operation removes the bulk material from inventory and adds it to raw materials in the finished goods system, in addition to any transaction required for the finished goods bottling inventory. A bottling operation creates a single end-use reservation (EUR). If multiple EURs are in the From vessels when you are blending their contents for a bottling vessel, a single EUR is created. You can issue the EUR item to a parts list for producing bottled product.
A bottling operation:
-
Costs the blend lot, accounting for variance to standard cost and gains and losses.
-
Instructs the To After details.
There can only be one bottling vessel per bottling operation.
-
Records bottled, sampled, and broken quantities.
-
Accounts for bulk losses incurred in bottling, such as bottles used as samples and broken bottles to be used for legal reporting.
-
Incorporates the operational losses in a calculation for a complete lot yield for the blend lot.
-
Records quality tests to the To After blend lot.
-
Updates the bottling operation with bottling details associated with the To After blend lot.
You enter the bottling completion quantities either in volumes or using the production unit of measure. You can enter the bottling quantities only on the Movement Details tab on the Edit Operation Detail form. The Edit Bottling Vessel Details form displays both volume and production unit of measures, but only the volume quantities are saved. The volume unit of measure used is set up in the winery constants.
You can also enter the COLA Number (U.S.) or Internal Approval Number (Australia).
13.7.1.2 Bottling Vessels
The system generates a bottling vessel number during a bottling operation. A decant operation can use only an existing bottling vessel. You can enter only the bottling quantities in the move details. When you click the Vessel Details button, the system disables the quantity fields.
13.7.1.3 Decant
A decant operation involves bottles of finished goods brought back to the facility as a bulk material in a tank because the material is unacceptable, expired, defective, or may simply need to be rebottled.
The decanting process occurs after maturation, such as six months or more The tirage bottles are taken to the transfer line by pallet. Decanting generally has other associated operations such as additives.
There are three types of decants:
-
Bulk material from bottles from the finished goods bottling line.
This is also known as bottled wine returns. In this instance, the wine is considered to have left the bulk wine system and needs to be returned.
-
Bulk material from finished goods.
-
Blends that are being decanted into the same To vessel.
A decant operation:
-
Stores the following historical details:
-
Finished goods.
-
Item number.
-
Finished goods lot number.
-
Historical blend lot number.
-
Bottling operation number.
-
Historical blend ID number.
-
Blend lot details.
-
-
Identifies the quantity of finished goods to return to inventory.
Decant operations use a bottling vessel that can also have decant details. These details can list specific items that are decremented in inventory.
-
Increases inventory and inherits blend lot details from the related bottling lot.
13.7.2 Forms Used to Enter Bottling Operations
13.7.3 Setting Processing Options for Bottling Vessel (P31B26)
This processing option controls default processing for the Bottling Vessel program.
13.7.3.1 Version
This processing option controls the version that the system uses when the program calls other programs. The following table lists the programs in the order that they appear on the Versions tab, along with the default version. If you leave the processing options blank, the system uses this default version. You can define different versions in accordance with business processes.
- 1. Work Orders Where Used Version (P13226)
-
ZJDE0001
13.7.5 Entering Bottling Vessel Details
Access the Edit Bottling Vessel Details form.
Figure 13-27 Edit Bottling Vessel Details form

Description of "Figure 13-27 Edit Bottling Vessel Details form"
- Bottling Reference Number
-
Enter the bottling reference number, for example, the COLA number.
- EUR Code
-
Displays the EUR code that you specified for the bulk material to be bottled.
- Work Order Number
-
Select the number of the work order that uses the EUR item on its parts list.
- Inventory Location
-
Enter the storage location from which goods will be moved.
- Inventory Lot Number
-
Enter a lot number for the EUR item.
13.7.6 Entering Decanting Operations
Access the Decant form.
Figure 13-29 Edit Operation Detail form (2 of 2)

Description of "Figure 13-29 Edit Operation Detail form (2 of 2)"
