4 Creating an Event
This chapter contains the following topics:
4.1 Understanding Events
Use the Event Workbench program (P43Q70) to review and create sourcing events. This program enables you to create both a request for information (RFI) and a request for quote (RFx).
When you create a sourcing event, you enter information to define the event, such as the business unit and the event name. Using settings in the Sourcing Constants program (P43Q90), the system provides default values for the event properties, such as whether a bid is required and whether to display question weights. You can either use the default values or change them as needed for each event that you create.
After defining the event, you must attach bid questions to your event. For an RFI, you attach only header questions, which typically ask for information about a company. For a request for quote, you attach header questions, which are optional, and detail questions, which ask for specific information about the items for which you created the event. You can use existing bid questions, modify existing bid questions, or add new questions. The percentage for the header questions must equal 100, and the percentage for the line questions must also equal 100. You can either assign a percentage to the header questions and add that percentage into each event line, or add the percentage to the combined percentages of each line.
See Understanding Header and Line Question Weighting.
After defining the event and attaching questions, you must invite bidders. You can invite bidders and suppliers that already exist in the JD Edwards EnterpriseOne Address Book system, or you can add them on an ad hoc basis. When you add bidders on an ad hoc basis, the system prompts you to enter a company name, a contact name, and contact information, and then adds the bidder to the Address Book Master table (F0101). For ad hoc bidders, the system does not create a supplier master record unless they are awarded a bid. The system stores bidders that you have invited to the event in the Event Invited Bidders table (F43Q30).
If you invite bidders who do not already have a user identification (ID) and a password, the system prompts you to create a user ID and password for the bidder. The system stores user passwords in the Event Bidder Password Temp table (F43Q35).
When you finish creating the event, click Submit to post the event for bidders to view. When you click Submit, the system notifies invited bidders using the preferred contact method that is specified in the bidders' address book records.
See Understanding System Setup for Operational Sourcing.
4.1.1 Prerequisites
Before completing the tasks in this chapter:
-
Set up the JD Edwards EnterpriseOne Operational Sourcing system constants.
-
Set up bid question templates.
-
Set up processing options for the Create Event Processing, Create Event, and Event Workbench programs.
See Setting Up System Constants for Operational SourcingSetting Up Bid Question Templates.
See Setting Processing Options for Create Event Processing (P43Q0040).
See Setting Processing Options for Create Event (P43Q10).
See Setting Processing Options for Event Workbench (P43Q70).
4.2 Understanding the Processing Options for the Event Workbench Program
Before using the Event Workbench program (P43Q70), you must set up processing options for three separate programs in the following order:
-
Create Event Processing (P43Q0040)
These processing options provide the default line type for event lines, specify how the system validates the branch/plant, and provide a version of the Sourcing Fax Event Message program (P43Q90).
-
Create Event (P43Q10)
These processing options provide default versions of the Create Event Processing and Copy From Bill of Material programs and specify how the system displays the account number fields in the Event Workbench program.
-
Event Workbench (P43Q70)
These processing options provide default versions of the Create Event, Analyze Event, and Bid History programs and provide a version of the Sourcing Fax Event Message program (P43Q90).
You can access the processing options for the Event Workbench program from the menu; but to access the processing options for the Create Event Processing and Create Event programs, you must use the Interactive Versions program.
4.3 Creating an RFI
This section provides an overview of RFIs and discusses how to:
-
Set processing options for Create Event Processing (P43Q0040).
-
Set processing options for Create Event (P43Q10).
-
Set processing options for Event Workbench (P43Q70).
-
Add an RFI.
-
Invite bidders.
-
Add ad hoc bidders.
-
Add bid questions to an event.
-
Copy an RFI.
4.3.1 Understanding RFIs
You create RFIs to gather information about organizations. You can use an RFI to ask questions about potential bidders, such as:
-
What is the company's annual revenue?
-
How long has the company been in business?
-
Is the company ISO (International Organization for Standardization) certified?
Because RFIs are used only for gathering information about companies, you attach only header bid questions to them. When you analyze the responses from the bidders for your RFI, you can efficiently eliminate companies that have unfavorable responses, therefore providing you with an idea of what bidders to invite to a request for quote event.
4.3.2 Forms Used to Create an RFI
| Form Name | FormID | Navigation | Usage |
|---|---|---|---|
| Search for Events | W43Q70A | Daily Processing (G43Q11), Event Workbench | View events. |
| Add/Edit Event | W43W10A | Click Add RFI on the Search for Events form. | Add an RFI. |
| Search and Select Bidders | W43Q30A | Click the Invite Bidders button on the Add/Edit Event form. | Invite bidders. |
| Select Contacts | W43Q30C | Click Review Contacts on the Search and Select Bidders form. | Change the primary contact for the bidder. |
| Add Adhoc Bidder | W43Q30B | Click Add Adhoc Bidder on the Search and Select Bidders form | Add an ad hoc bidder. |
| Add New User | W43Q30D | Click Save and Close or Save and Add New on the Add Adhoc Bidder form.
Click Change Contact on the Select Contacts form. |
Add a user name and password for the new bidder. |
| Event Header Bid Questions | W43Q20D | Click Maintain RFI Event Questions on the Add/Edit Event form. | Add bid questions to an event. |
| Search for RFIs | W43Q201A | Click Copy From RFI on the Add/Edit Event form. | Copy an RFI. |
4.3.3 Setting Processing Options for Create Event Processing (P43Q0040)
These processing options provide default processing information.
4.3.3.1 Defaults
- 1. Line Type
-
Specify the default line type for the event lines that you create. The line type determines how the system processes lines on a transaction. The line type affects the systems with which the transaction interacts (JD Edwards EnterpriseOne General Ledger, JD Edwards EnterpriseOne Job Cost, JD Edwards EnterpriseOne Accounts Payable, JD Edwards EnterpriseOne Accounts Receivable, and JD Edwards EnterpriseOne Inventory Management). The line type also specifies the conditions for including a line on reports and in calculations. Specify a valid line type from the Line Type Constants Revisions program (P40205). Examples include:
S: Stock item.
J: Job Cost, subcontracts, or purchasing to the general ledger.
N: Nonstock item.
4.3.3.2 Interfaces
- 1. Business Unit Validation
-
Specify how the system validates the branch/plant. Values are:
Blank: The system validates the branch/plant against the Business Unit Master table (F0006). Typically, you use this processing option when you are performing services expenditure purchasing. When you leave this processing option blank, the Ship To address book number is supplied by default from the address book number in the Business Unit Master table (F0006). You can access the Business Unit Master table through the Revise Single Business Unit program.
1: The system validates the branch/plant against the Inventory Constants table (F41001). If you are performing stock purchasing, enter 1 for this processing option. When you enter 1, the system uses the address book number in the Inventory Constants table (F41001) as the default for the Ship To address book number.
4.3.3.3 Versions
- 1. Sourcing Event Fax Messaging Version
-
Specify a version of the Sourcing Fax Event Message program (R43Q90). If you leave this processing option blank, the system uses version ZJDE0001.
4.3.4 Setting Processing Options for Create Event (P43Q10)
These processing options provide default processing information for creating events.
4.3.4.1 Versions
- 1. Create Event Processing (P43Q0040)
-
Specify a version of the Create Event Processing program for the system to use. If you leave this processing option blank, the system uses version ZJDE0001.
- 2. Copy from Bill of Material (P43Q101)
-
Specify a version of the Copy from Bill of Material program for the system to use. If you leave this processing option blank, the system uses version ZJDE0001.
4.3.4.2 Display
- 1. Account Display
-
Specify how the system should display the Account Number field on the Add/Edit event form. Values are:
Blank: The system displays the Account Number field and you enter the account in the standard format of business unit.object account.subsidiary.
1: The system displays the fields Business Unit, Obj Acct, and Sub and you enter each segment of the account number into the separate fields.
2: The system displays both the Account Number field and the Business Unit, Obj Acct, and Sub fields.
4.3.5 Setting Processing Options for Event Workbench (P43Q70)
These processing options provide default processing information for creating events.
4.3.5.1 Versions
- 1. Create Event
-
Specify a version for the system to use when accessing the Create Event program (P43Q10). If you leave this processing option blank, the system uses version ZJDE0001.
- 2. Analyze Event
-
Specify a version for the system to use when accessing the Analyze Event program (P43Q50). If you leave this processing option blank, the system uses version ZJDE0001.
- 3. Bid History
-
Specify a version for the system to use when accessing the Bid History program (P43Q41). If you leave this processing option blank, the system uses version ZJDE0001.
- 4. Fax Event Message
-
Specify a version of the Sourcing Fax Message program (R43Q90).
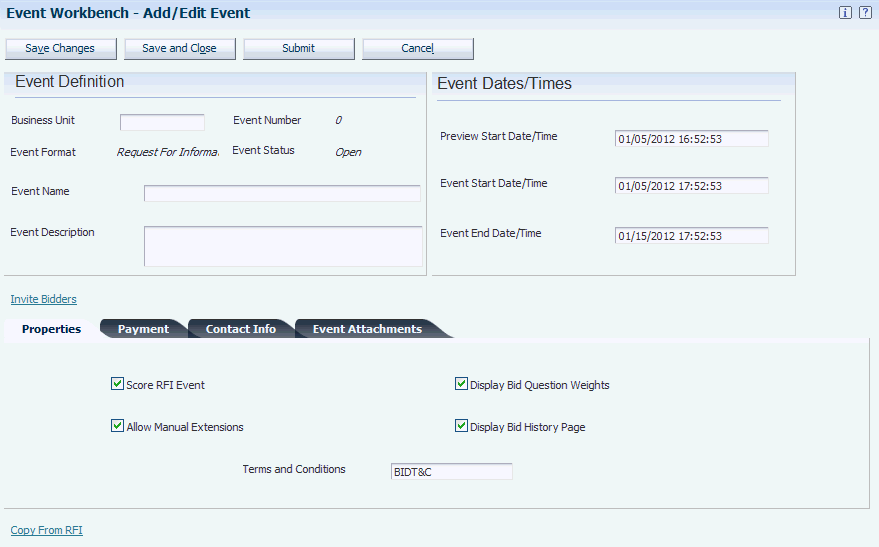
4.3.6 Adding an RFI
Access the Add/Edit Event form.
-
Complete the following fields:
-
Business Unit
Enter the business unit for which you are creating the sourcing event.
-
Event Name
Enter a name for the sourcing event.
-
Event Description
Enter a description for the sourcing event.
-
Preview Start Date/Time
The system populates this field with the date and time that are specified in the Sourcing Constants program. Change the value in this field if you do not want to use the default start date and time.
-
Event Start Date/Time
The system populates this field with the date and time that are specified in the Sourcing Constants program. Change the value in this field if you do not want to use the default start date and time.
-
Event End Date/Time
The system populates this field with the date and time that are specified in the Sourcing Constants program. Change the value in this field if you do not want to use the default end date and time.
-
-
Complete the following fields on the Properties tab:
-
Score RFI Event
Select to score the RFI event.
-
Allow Manual Extensions
Select to allow users to change the event end date and time after the event has been posted.
-
Display Bid Question Weights
Select to display the question weights for the bidder.
-
Display Bid History Page
Select to enable bidders to view bid history. If you select this option, bidders will be able to review their responses to their questions after submitting a response for an event.
-
Terms and Conditions
Specify the terms and conditions that the bidder must agree to accept before the bidder can respond to an event. Select a valid code from user-defined code (UDC) table 40/PM.
-
-
Complete the following fields on the Payment tab:
-
Event Currency Code
The system uses the currency code of the business unit as the default currency.
-
Multiple Currencies Event
Select to allow bids in foreign currencies. If you do not select this option, the system accepts bids in your company's domestic currency only.
-
Currencies Allowed
Click to access the Edit Allowed Currencies for Event form, where you can specify the currencies that bidders can use for the event. The system displays this link only when you click the Multiple Currencies Event button. You must specify all currencies that you plan to allow for the event, even the domestic currency of your company.
-
-
Complete the following fields on the Contact Info tab:
-
Buyer
Enter the address book number of the buyer for the event. After you enter the address book number, the system populates the Contact Name, E-Mail, and Phone Number fields with the information that is associated with the address book number.
-
-
Enter text as an attachment to the event on the Event Attachments tab.
-
Click Allow Bidder to View Attachment if you want the bidder to be able to view the text that you entered on the Event Attachment tab.
-
Click Invite Bidders to select bidders for the event.
See Inviting Bidders.
-
Click Maintain RFI Event Questions to add header questions to the event.
-
When you are finished creating the event, click Submit.
4.3.7 Inviting Bidders
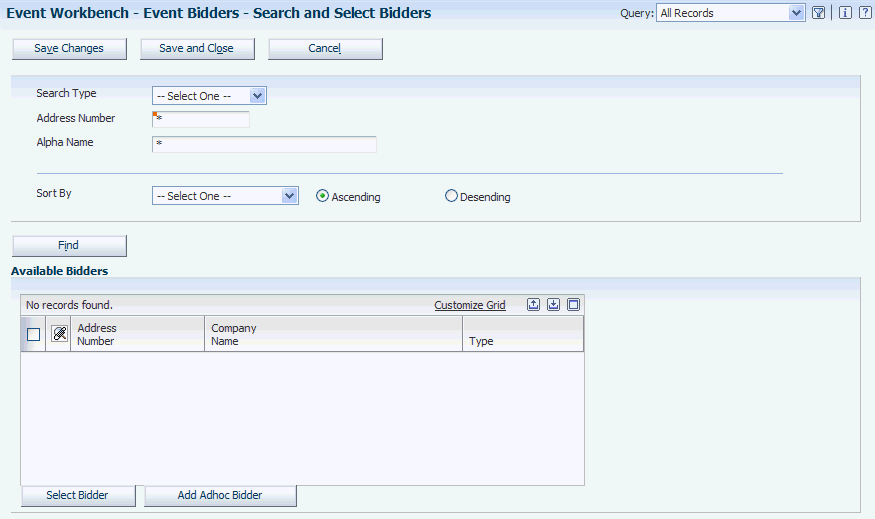
Access the Search and Select Bidders form.
Figure 4-3 Search and Select Bidders form (1 of 2)
Description of ''Figure 4-3 Search and Select Bidders form (1 of 2)''
Figure 4-4 Search and Select Bidders form (2 of 2)
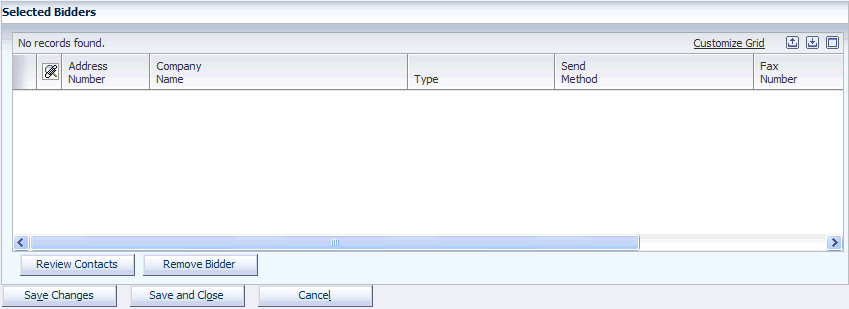
Description of ''Figure 4-4 Search and Select Bidders form (2 of 2)''
-
To filter your search for bidders, complete one or more of the following fields:
-
Search Type
-
Address Number
-
Alpha Name
-
-
To sort bidders, select a value in the Sort By field, and then click either the Ascending or Descending option.
-
Click Find.
The system displays the applicable bidders on the Available Bidders form.
-
Choose the bidders that you want to participate in the event by selecting one or more bidders, and then click the Select Bidders button.
The system displays the bidders that you selected in the Selected Bidders subform.
Note:
You can select only bidders that have a primary contact set up in the Who's Who program (P0111), with the same contact type that is specified in the Sourcing Constants program (P43Q90). The primary contact must also have a preferred contact method. If the bidder does not have the correct contact information set up, you can add it by clicking the link for the supplier or bidder's address book number. -
To add bidders that do not already exist in your system, click the Add Adhoc Bidder button.
-
Click the Review Contacts button to review and, if necessary, change contacts for the bidder.
-
Click the Remove Bidder From List button to remove bidders.
-
Click Close to save the list of bidders that you want to participate in the event.
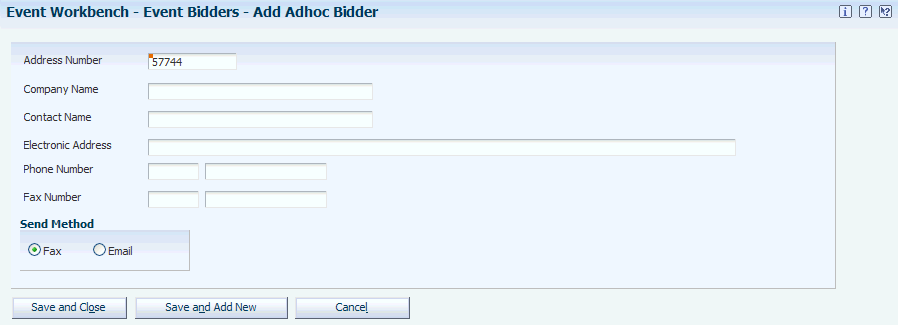
4.3.8 Adding Ad Hoc Bidders
Access the Add Adhoc Bidder form.
- Address Number
-
The system provides the next available address book number.
- Company Name
-
Enter the company name of the bidder. The system uses the name that you enter as the alpha name for the address book record that it creates.
- Contact Name
-
Enter the name of the contact person for the bidder. The system adds this name as the primary contact for the bidder, and assigns the contact type that you specified in the Sourcing Constants. The system updates the Address Book - Who's Who table (F0111) with the primary contact and contact type that you specify.
- Electronic Address
-
Enter the email address for the primary contact. The system updates the Electronic Address table (F01151) with the email address that you specify.
- Phone Number
-
Enter the phone number for the primary contact. The system updates the Address Book - Phone Numbers table (F0115) with the phone number that you specify.
- Fax Number
-
Enter the fax number for the primary contact. The system updates the Address Book - Phone Numbers table (F0115) with the phone number that you specify.
- Send Method
-
Specify whether to send communication to the bidder using fax or email. The system updates the Preferred Contact Method field in the Address Book - Who's Who table with the value that you specify.
4.3.9 Adding Bid Questions to an Event
Access the Event Header Bid Questions form.
Figure 4-6 Event Header Bid Questions form
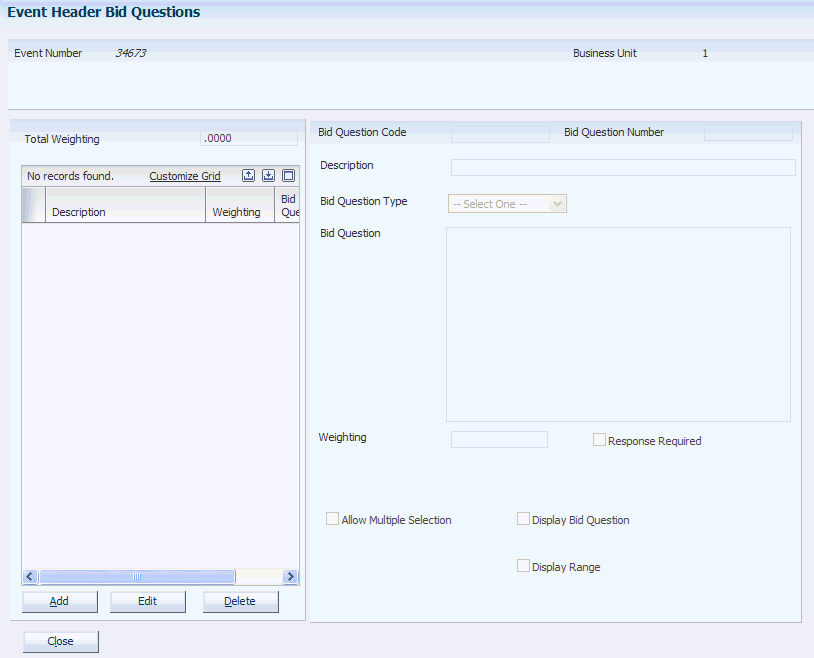
Description of ''Figure 4-6 Event Header Bid Questions form''
-
Click Add on the Event Header Bid Questions form.
-
To use an existing header question, click Search Template on the Create Event Question form.
To create a new header bid question, proceed to step 5.
-
Choose questions on the Search for Bid Questions form and click Select.
-
Click Save and Close on the Create Event Question form, or make any necessary changes to the question and then click Save and Close.
Note:
Click Add to Template if you want to save your changes as a new question template. -
To create a new header question, complete the following fields on the Create Event Question form:
-
Bid Question Type
-
Bid Question Number
-
Bid Question Code
-
Description
-
Weighting
-
Response Required
-
Allow Out of Range
-
Allow Multiple Selection
-
Ideal
-
Add to Template
Select this option to add this header question as a template.
-
Display Bid Question
-
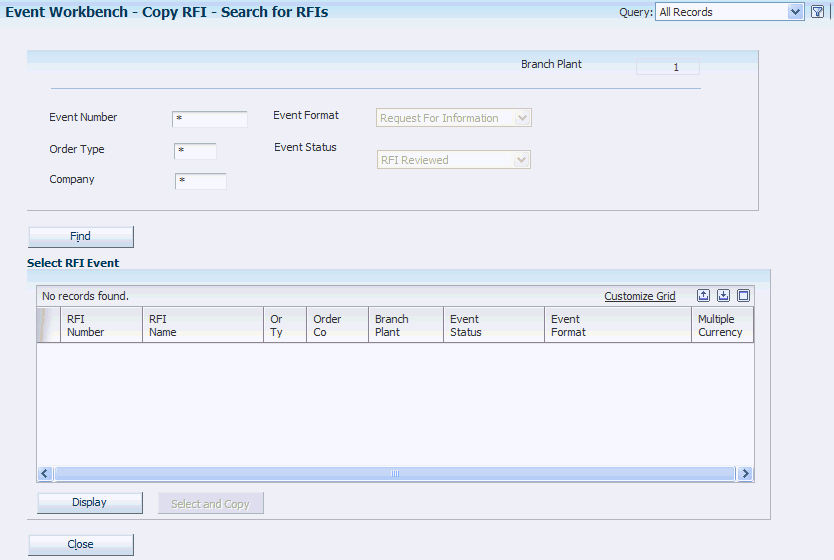
4.3.10 Copying an RFI
Access the Search for RFIs form.
-
Select the event that you want to copy, and click Display.
The system displays the header questions and bidders that are associated with the event.
-
Select the header questions and bidders that you want to copy, and click Select and Copy.
-
Make changes as needed on the Add/Edit Event form, and click Submit.
4.4 Creating a Request for Quote
This section provides overviews of requests for quotes and header and line question weighting and discusses how to:
-
Add a request for quote.
-
Add additional line information.
-
Add ad hoc items.
-
Copy from an RFx.
-
Copy from a bill of material (BOM).
4.4.1 Understanding Requests for Quotes
Use the Event Workbench program (P43Q70) to create a request for quote (RFx). In addition to creating a new request for quote, you can also use one of the following methods:
-
Copy an existing RFI.
You can copy from RFI events at a status of RFI Reviewed only. The system copies the invited bidders and the header questions to create the new RFx. The system does not copy any invited bidders for which a value of D (disallow) or R (rejected) is in the Award Action field for the RFI.
-
Copy an existing request for quote (RFx).
You can copy from RFx events at a status of Awarded only. The system copies the invited bidders, header questions, selected event lines, and line questions to create the new RFx. The system does not copy any invited bidders for which a value of D (disallow) or R (rejected) is in the Award Action field for the RFI.
-
Copying a BOM.
The system copies the selected item components to create the event lines for the RFx.
Creating a request for quote is similar to creating a request for information: you define the event, invite bidders, and attach questions. However, a request for quote has the additional task of adding lines to the event. You can create lines for services, inventory items, and items that you add on an ad hoc basis.
For service lines, you enter the account number for the service. Using the processing options for the Create Event program (P43Q10), you can specify the format in which you enter the account number. You must use line type J when entering a service line.
When you create event lines for items, you specify information such as item number, quantity, unit of measure, and whether a bid is required on the event line. Using the Edit link in the Additional Line Info field, you can add attachments to the line and you can specify whether bidders must bid on the quantity that is specified on the line. If you allow bidders to bid on a quantity other than that specified in the line, you can define a minimum and maximum quantity.
You can also create event lines for ad hoc items, which are items that do not already exist in your inventory. When you create ad hoc items, the system enables you to specify a new number for the item, but it does not add the item to the JD Edwards EnterpriseOne Inventory Management system until you create the purchase order or blanket order.
While header questions are optional for a request for quote, you must attach at least a price question to each line of the event. If you do not attach a price question to a line, the system searches for an associated price question to assign using the following hierarchy:
-
Using the item number that you specified in the event line, the system searches the Bid Questions table (F43Q60) for a price question that is attached to the item number.
-
If unsuccessful, the system determines whether the item in the event line has a commodity code attached to it and, if so, searches the Bid Questions table (F43Q60) for a price question that is attached to the commodity code.
If the system does not locate a price question attached to the item number or commodity, it attaches the default price question that you set up in the Sourcing Constants program (P43Q90).
See Setting Up System Constants for Operational Sourcing.
When attaching price questions, you can add price component and price break detail. Price component detail enables you to list each component of the item, such as material, shipping, and packaging, so that bidders can respond to the question by entering the price for each component. Price break detail enables you to list quantity ranges so that bidders can respond to the question by entering possible price breaks for each quantity range.
If you do not enter price break detail, bidders will have the opportunity to enter their own quantity ranges and price breaks for your review.
After you finish creating event lines and attaching questions to the lines, you can submit the RFx. The system sends an email or fax to each invited supplier and bidder, depending on their preference, and changes the status of the event to Posted - Pending. After the event has been posted, you can pause, end, extend, or cancel the event, and the system sends the corresponding message to the invited suppliers and bidders.
See Managing an Event.
4.4.2 Understanding Header and Line Question Weighting
When you set up an event, you can choose from two methods of weighting the header question score:
-
Assign header weighting
You assign a percentage for the header score and the system adds it to the total percentages from all of the event lines added together. The combined total of the header percentage and the percentages in the Line Weighting fields for each line must be 100.
-
Factor header score into line
You assign a percentage for the header score and the system adds it to each individual line of the event. The total percentage of each line must be 100.
4.4.2.1 Example: Assign Header Weighting
Buyer A creates an event with two lines and wants to assign a weight of 20 percent to the header questions. Buyer A wants the header weight to be added to the sum of the two event lines.
The following table describes how Buyer A would set up the event:
| Field | Field Value or Setting |
|---|---|
| Assign Header Weighting | Selected |
| Factor Header Score Into Line | 20 |
| Line Weighting for Line 1 | 45 |
| Line Weightingfor Line 2 | 35 |
In this example, the amount in the Total Question Weight field must be 100 for each line in the event, which means that the question weights for each line must total 100.
4.4.2.2 Example: Factor Header Score into Line
Buyer B creates an event with two lines and wants to assign a weight of 30 percent to the header questions. Buyer B wants the header weight to be added to each individual event line.
The following table describes how Buyer B would set up the event:
| Field | Field Value or Setting |
|---|---|
| Factor Header Score Into Line | Selected |
| Header Score Into Line Score | 30 |
| Line Weighting for Line 1 | 45 |
| Line Weighting for Line 2 | 55 |
In this example, when Buyer B adds questions to each line, he notices that the system automatically adds a question with a description of FactorHeaderScoreIntoLine and a weight of 30 to the list of questions for the line. Buyer B can then choose questions that total to the remaining 70 percent, creating a total of 100 percent for the line.
4.4.3 Forms Used to Create a Request for Quote
| Form Name | FormID | Navigation | Usage |
|---|---|---|---|
| Search for Events | W43Q70A | Daily Processing (G43Q11), Event Workbench | View events. |
| Add/Edit Event | W43Q10A | Click Add RFx on the Search for Events form. | Add a request for proposal or request for quote. |
| Edit Allowed Currencies For Event | W43Q10C | Click Currencies Allowed on the Add/Edit Event form. | Specify the currencies in which bidders can submit a bid. |
| Enter Additional Line Information | W43Q10D | On the Add/Edit Event form, click Edit on the line that you want to revise. | Enter line information, such as item reporting and measurement information, and shipment information. |
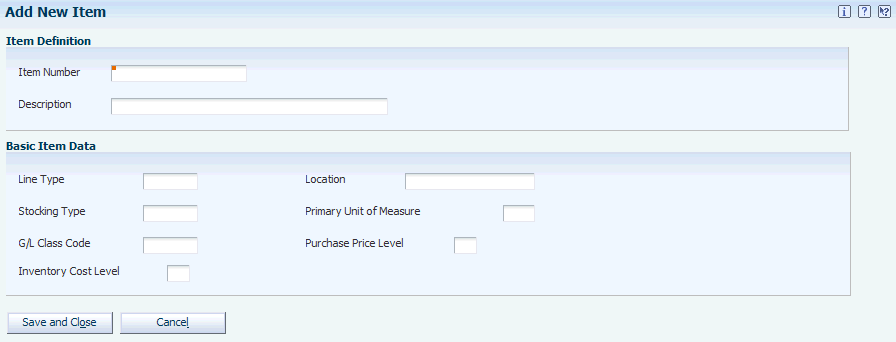
| Add New Item | W43Q10E | Click New on a detail line on the Add/Edit Event form. | Add an inventory item that does not already exist in your system. |
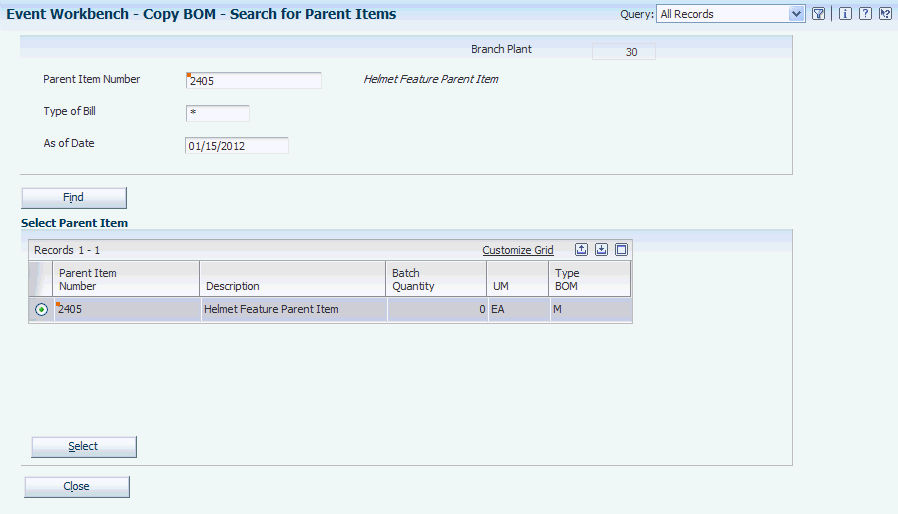
| Search for Parent Items | W43Q101A | Click Copy from BOM on the Add/Edit Event form. | Find and select a BOM from which to copy. |
| Select BOM Components | W43Q101B | On the Search for Parent Items form, select a BOM from which to copy, and click Select. | Select BOM components to copy into the event. |
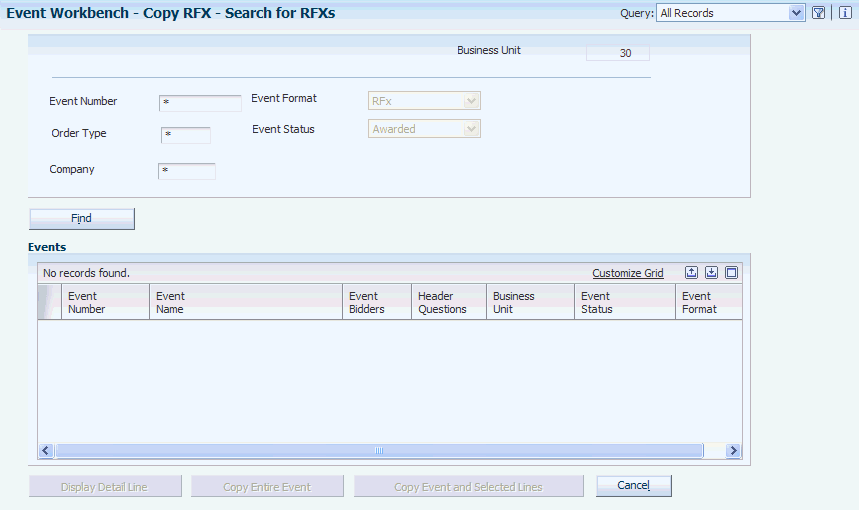
| Search for RFXs | W43Q202A | Click Copy From RFx on the Add/Edit Event form. | Search for an RFx from which to copy. |
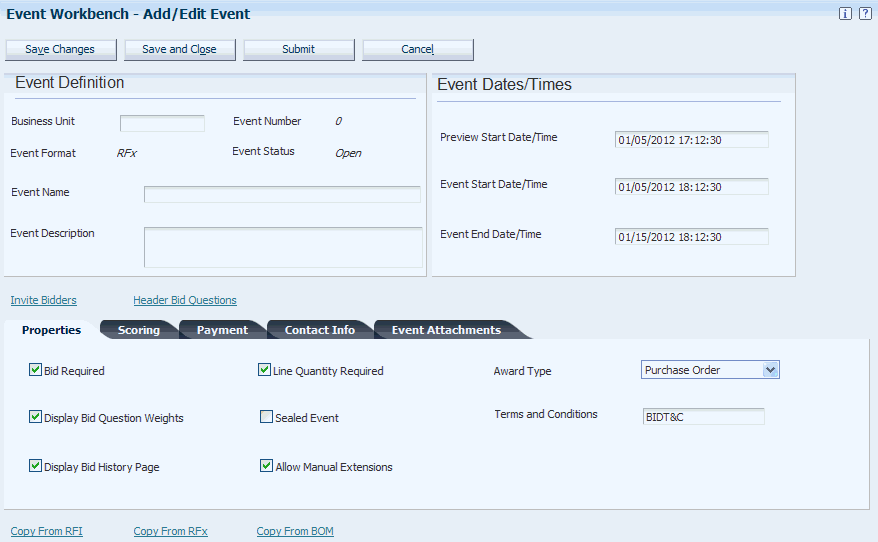
4.4.4 Adding a Request for Quote
Access the Add/Edit Event form.
-
Complete the following fields:
-
Business Unit
Enter the business unit for which you are creating the sourcing event.
-
Event Name
Enter a name for the sourcing event.
-
Event Description
Enter a description for the sourcing event.
-
Preview Start Date/Time
The system populates this field with the date and time that are specified in the Sourcing Constants program. Change the value in this field if you do not want to use the default start date and time.
-
Event Start Date/Time
The system populates this field with the date and time that are specified in the Sourcing Constants program. Change the value in this field if you do not want to use the default start date and time.
-
Event End Date/Time
The system populates this field with the date and time that are specified in the Sourcing Constants program. Change the value in this field if you do not want to use the default end date and time.
-
-
Complete the following fields on the Properties tab:
-
Bid Required
Select to specify that bidders must enter a bid amount for all event lines and a bid quantity for all quantity-based lines.
-
Display Bid Question Weights
Select to display the question weights for the bidder.
-
Display Bid History Page
Select to enable bidders to view bid history. If you select this option, bidders will be able to review their responses to an event after submitting their bid.
-
Line Quantity Required
Select to specify that bidders must bid on the exact quantity that is specified for the line.
-
Sealed Event
Select to indicate that the event is sealed, which means that the buyer cannot view bids until after the event has ended.
-
Allow Manual Extensions
Select to allow users to change the event end date and time after the event has been posted.
-
Award Type
Specify whether the winning bidder will be awarded a blanket order or purchase order upon completion of the event.
-
Terms and Conditions
Specify the terms and conditions that the bidder must agree to accept before the bidder can respond to an event. Select a valid code from user-defined code table 40/PM.
-
-
Complete the following fields on the Scoring tab:
-
Assign Header Weighting
Select to specify that the weighting of the header questions should be added to the total score.
-
Header Weighting
Specify a percentage for the header score weight. This percentage will be added to the total of the percentages in the Line Weighting fields, the total of which must be 100 percent.
-
Factor Header Into Score
Select to specify that the header score should be added to the total percentage of each event line.
-
Header Score into Line Score
Specify a percentage for the header score weight. This percentage will be added into the total question percentage for each event line.
-
-
Complete the following fields on the Payment tab:
-
Event Currency Code
The system uses the currency code of the business unit as the default currency.
-
Multiple Currency Event
Select to allow bids in foreign currencies. If you do not select this check box, the system accepts bids in your company's domestic currency only.
-
Currencies Allowed
Click to access the Edit Allowed Currencies for Event form, where you can specify the currencies that bidders can use for the event. The system displays this link only when you select the Multiple Currency Event check box.
-
Event Payment Method
Select the form of payment that you will use upon completion of the event.
-
Payment Terms
Select payment terms for the event. You set up payment terms in the Payment Terms Revisions program.
-
Tax Exempt
Select to indicate to the supplier that you are a tax exempt company.
-
Tax Exempt ID
Enter your tax exemption identification number.
-
-
Complete the following fields on the Contact Info tab:
-
Buyer
Enter the address book number of the buyer for the event. After you enter the address book number, the system populates the Contact Name, E-Mail, and Phone Number fields with the information that is associated with the address book number.
-
-
Enter text as an attachment to the event on the Event Attachments tab.
-
Click Allow Bidder to View Attachment if you want the bidder to be able to view the text that you entered on the Event Attachment tab.
-
Click Invite Bidders to select bidders for the event.
See Inviting Bidders.
-
Click Header Bid Questions if you want to attach header questions to the event. Header questions are not required for RFx events.
-
Click Copy from RFI to create an RFx from an existing RFI.
When you copy from an RFI, the system creates header questions based on the header questions that are assigned to the RFI from which you copy.
See Copying an RFI.
-
Click Copy from RFx to create an RFx from an existing RFx.
See Copying from an RFx.
-
Click Copy from BOM to create an RFx from a BOM.
When you copy from a BOM, the system creates event lines from the components of the BOM.
See Copying from a BOM.
-
To create a detail line for a new item that does not already exist in your inventory, click New in the Event Lines subform.
See Adding Ad Hoc Items.
-
To create a detail line for an inventory item, complete the following fields in the Event Lines subform:
-
Item Number
Specify the number of the item for which you are creating the sourcing event. When you enter an item number, the system populates the Item Description, Line Type, and Commodity Code fields, based on the setup for that item.
Leave this field blank if you are entering a line for a service.
-
Quantity
Specify the quantity for the item for which you are creating the sourcing event.
-
UOM(unit of measure)
Specify a unit of measure for the quantity.
-
Additional Line Info
Click the Edit link in this field to add additional information for the detail line.
-
Event Line Bid Questions
When you enter an item number, the system attaches all bid questions for that item number or commodity. If you do not have any questions attached to that item number or commodity, the system attaches the default price question. To edit bid questions for the line, or to add new bid questions, click the Edit link in this field.
-
-
When you are finished creating the event, click Submit.
4.4.5 Adding Additional Line Information
Access the Edit Additional Line Information form.
Figure 4-10 Edit Additional Line Information form (1 of 2)
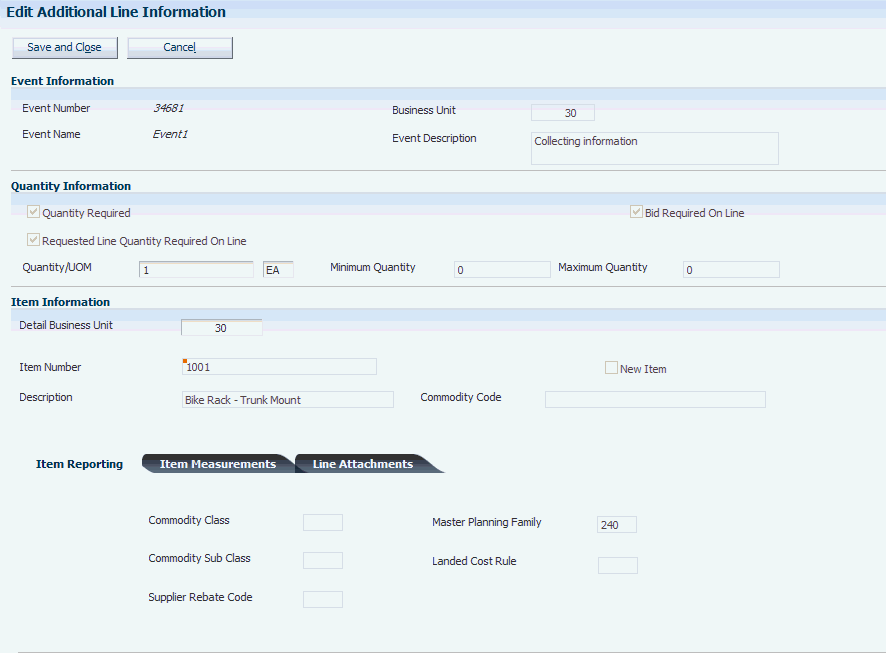
Description of ''Figure 4-10 Edit Additional Line Information form (1 of 2)''
Figure 4-11 Edit Additional Line Information form (2 of 2)

Description of ''Figure 4-11 Edit Additional Line Information form (2 of 2)''
- Quantity Required
-
This field is selected if you have entered a quantity for the line. If you have entered a service line, for which no quantity is required, the system clears this field.
- Bid Required On Line
-
Select this option to indicate that for this line, bidders are required to enter a bid. The system does not enable this option if you have already selected the Bid Required option on the Properties tab on the Add/Edit Event form.
- Requested Line Quantity Required On Line
-
Select this option to indicate that for this line, the quantity that the bidder enters must match the line quantity. The system does not enable this option if you have already selected this option on the Properties tab on the Add/Edit Event form.
- Quantity/UOM(quantity/unit of measure)
-
Specify the quantity and the corresponding unit of measure for the item.
- Minimum Quantity
-
Specify a minimum quantity that the bidder can enter for his or her response. The system enables this field only when you do not select the Requested Line Quantity Required On Line option.
- Maximum Quantity
-
Specify a maximum quantity that the bidder can enter for his or her response. The system enables this field only when you do not select the Requested Line Quantity Required On Line option.
- Detail Business Unit
-
Use this field if the business unit for which this item is tracked is different from the business unit for the event.
- Commodity Code
-
Enter a commodity code for the item.
4.4.5.1 Item Reporting
The system populates these fields using the information that you have set up for each item. Use these fields to change the default item information or to add information for an ad hoc item.
- Commodity Class
-
Enter a code from user-defined code table 41/P1 to represent an item property type or classification, such as commodity type, planning family, and so forth. The system uses this code to sort and process like items. This field is one of six classification categories that are available primarily for purchasing purposes.
- Commodity Sub Class
-
Enter a code from user-defined code table 41/P2 to represent an item property type or classification, such as commodity type, planning family, and so forth. The system uses this code to sort and process like items. This field is one of six classification categories that are available primarily for purchasing purposes.
- Supplier Rebate Code
-
Enter a code from user-defined code table 41/P3 to represent an item property type or classification, such as commodity type, planning family, and so forth. The system uses this code to sort and process like items. This field is one of six classification categories that are available primarily for purchasing purposes
- Master Planning Family
-
Enter a code from user-defined code table 41/P4 to represent an item property type or classification, such as commodity type or planning family. The system uses this code to sort and process like items. This field is one of six classification categories that are available primarily for purchasing purposes.
- Landed Cost Rule
-
Enter a code from user-defined code table 41/P5 to indicate the landed cost rule for an item. The landed cost rule determines purchasing costs that exceed the actual price of an item, such as broker fees or commissions. You set up landed cost rules on the Landed Cost Revisions form.
4.4.5.2 Item Measurements
The system populates these fields using the information that you have set up for each item. Use these fields to change the default item information or to add information for an ad hoc item.
- Weight
-
Enter the weight of one unit of the item. This value is expressed in the primary unit of measure.
- Volume
-
Enter the cubic units that are occupied by the item. The definition of the unit itself (cubic feet, yards, meters, and so on) is defined in the volume unit of measure.
4.4.5.3 Line Attachments
Enter additional information for the line. Select the Allow Bidder To View Attachment option if you want bidders to view the additional information that you enter.
4.4.5.4 Shipment Information
The system populates these fields using the information that you have set up for each item. Use these fields to change the default item information or to add information for an ad hoc item.
- Ship To Number
-
Enter the address number of the location to which you want to ship this order. The address book provides default values for customer address, including street, city, state, zip code, and country.
- Requested Date
-
The system uses the current date as the default date.
- Freight Handling
-
Specify the method by which supplier shipments are delivered. For example, the supplier could deliver to your dock, or you could pick up the shipment at the supplier's dock. You can also use these codes to indicate who has responsibility for freight charges. For example, you can have a code indicating that the customer legally takes possession of goods as soon as they leave the supplier warehouse and is responsible for transportation charges to the destination. Select a valid value from user-defined code table 42/FR.
- Mode of Transport
-
Specify the method that is used to transport goods, for example, by rail, by road, and so on. Select a valid value from user-defined code table 00/TM.
- Supplier Remarks
-
Enter additional text that is applicable to the supplier.
4.4.6 Adding Ad Hoc Items
- Item Number
-
Enter a number for the item.
- Description
-
Enter a description for the item.
- Line Type
-
Enter a valid line type for the item. The line type controls how the system processes lines on a transaction and controls the systems with which the transaction interacts, such as General Accounting, Job Cost, Accounts Payable, Accounts Receivable, and Inventory Management. It also specifies the conditions under which a line prints on reports, and it is included in calculations. Examples are:
S: Stock Item
J: Job Cost
N: Nonstock item
- Stocking Type
-
Enter a valid stocking type from user-defined code table 41/I. The stocking type indicates how you stock an item, for example, as finished goods or as raw materials.
- G/L Class Code
-
Enter a code from user-defined code table 41/9. The G/L class code controls which general ledger accounts receive the monetary amount of inventory transactions for this item.
- Inventory Cost Level
-
A code that indicates whether the system maintains one overall inventory cost for the item, a different cost for each branch/plant, or a different cost for each location and lot within a branch/plant. Values are:
1: Item level
2: Item/Branch level
3: Item/Branch/Location level
- Location
-
Enter the storage location in which goods will be received.
- Primary Unit of Measure
-
Enter a value from user-defined code table 00/UM to indicate the primary unit of measure for the item. The primary unit of measure must be the smallest unit of measure in which you handle the item. This is the primary stock accounting unit (PSAU) of measure that the system uses to store all inventory. If you change the primary unit of measure, the conversion factors in the item-level conversion table are no longer valid. The default value for this field is the unit of measure that you specify for the item on Item Master Information.
- Purchase Price Level
-
Specify a code to indicate where to retrieve the purchase price for an item when you enter a purchase order. Values are:
1: Use the supplier/item price from the Purchase Price table (F41061).
2: Use the supplier/item/branch price from the Purchase Price table (F41061).
3: Use the inventory cost from the Inventory Cost table (F4105). This cost is based on the inventory cost level and the purchasing cost method that you specify for the item.
The first two codes are applicable only if you set up supplier costs in the JD Edwards EnterpriseOne Procurement system. If you do not set up supplier costs, the system uses the inventory cost as the default for the purchase order.
4.4.7 Copying from an RFx
Access the Search for RFXs form.
-
Click Find to display the RFxs from which you can copy.
-
Select an RFx.
-
Click Display Detail Line on the Search for RFXs form to display the lines that are included in the RFx that you selected.
-
Click Copy Entire Event to copy the event and all attached lines, or select individual lines and click Copy Event and Selected Lines.
4.5 Printing an Event
This section provides an overview of the RFx Print report and discusses how to:
-
Run the RFx Print report.
-
Set processing options for RFx Print.
4.5.1 Understanding the RFx Print Report
If you want to expand your sourcing event to bidders who do not have access to the internet, you can print the event and then fax it to those bidders. The RFx Print report (R43Q110) prints the details of the event, the questions associated with the event, and the event terms and conditions. The RFx Print report also provides space in which bidders can enter their responses to the questions.
After bidders fill out the RFx Print report, they can fax the form back to the buyer, and the buyer can enter the bidders' responses for them.
4.5.2 Running the RFx Print Report
Select Daily Processing (G43Q11), RFx Print.
4.5.3 Setting Processing Options for RFx Print (R43Q110)
These processing options specify default processing information for the report.
4.5.3.1 Event Header
- 1. Print Invited Bidder List
-
Specify whether to print a list of all bidders who were invited to the event on the report. You would typically select this option if the buyer wants a printed copy of the event.
4.5.3.2 Header Question
- 1. Weight Allowed
-
Specify whether to print the weight that is associated with each header question.
- 2. Range Allowed
-
Specify whether to print the range that is associated with each header question.
4.5.3.3 Detail Line Question
- 1. Weight Allowed
-
Specify whether to print the weight that is associated with each detail line question.
- 2. Range Allowed
-
Specify whether to print the range that is associated with each detail line question.
4.6 Managing an Event
This section provides an overview of event management and discusses how to:
-
Pause, resume, cancel, or end an event.
-
Extend an event.
4.6.1 Understanding Event Management
Use the Event Workbench program (P43Q70) to manage sourcing events. The Event Workbench enables you to perform the following actions for the event:
-
Pause and resume the event.
-
Cancel the event.
-
Extend the event.
-
End the event.
The current status of the event determines the actions that you can perform for the event. For example, you cannot extend events that have already reached their end time. When you select an event on the Search for Events form, the system enables the corresponding buttons for the actions that you can take for that event.
For each action that you perform for an event, the system sends an email message or fax to the suppliers, depending on their preferences, notifying them of the change in event status. The system uses the print messages that you specify in the Sourcing Constants program (P43Q90) when determining which message to send.
4.6.2 Forms Used to Manage an Event
| Form Name | FormID | Navigation | Usage |
|---|---|---|---|
| Search for Events | W43Q70A | Daily Processing (G43Q11), Event Workbench. | Review, pause, resume, cancel, extend, and end events. |
| Extend Event Time | W43Q70C | Click Extend Event on the Search for Events form. | Extend the event to a later date or time. |
4.6.3 Pausing, Resuming, Canceling, or Ending an Event
Access the Search for Events form.
Figure 4-15 Search for Events form (1 of 2)
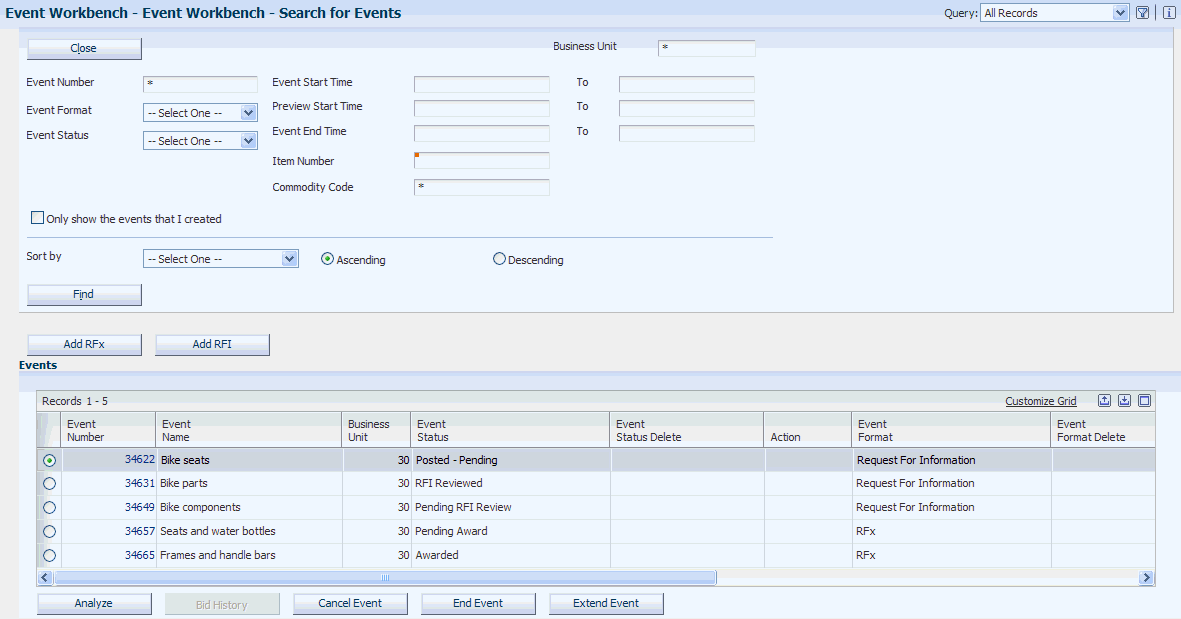
Description of ''Figure 4-15 Search for Events form (1 of 2)''
Figure 4-16 Search for Events form (2 of 2)

Description of ''Figure 4-16 Search for Events form (2 of 2)''
Perform one of the following actions on the Search for Events form:
-
Click Pause in the Action field.
-
Click Resume in the Action field.
-
Click Cancel Event.
-
Click End Event.
