6 Responding to Events
This chapter contains the following topics:
6.1 Understanding Event Response
When bidders receive a fax or email notifying them that they are invited to an event, they access the Bidder Workbench to register for the event, accept or decline the invitation, preview the event, and respond to the event questions. Bidders and suppliers access the Bidder Workbench from the Bidder/Supplier SRM Portal.
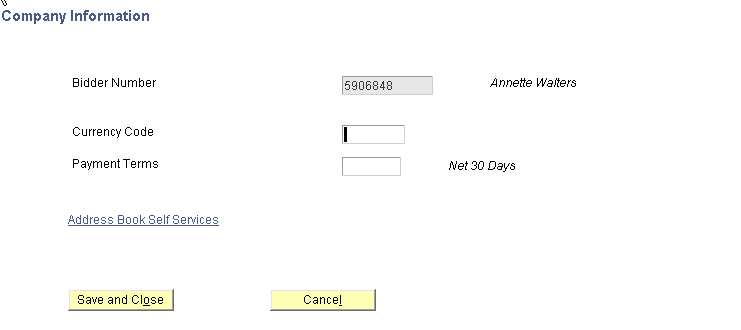
If bidders have not yet participated in an event with your company, the system prompts them to first register by entering company information, which includes entering a currency code and payment terms. Bidders need to enter company information only once; they will not have to enter the information for the next event to which they are invited.
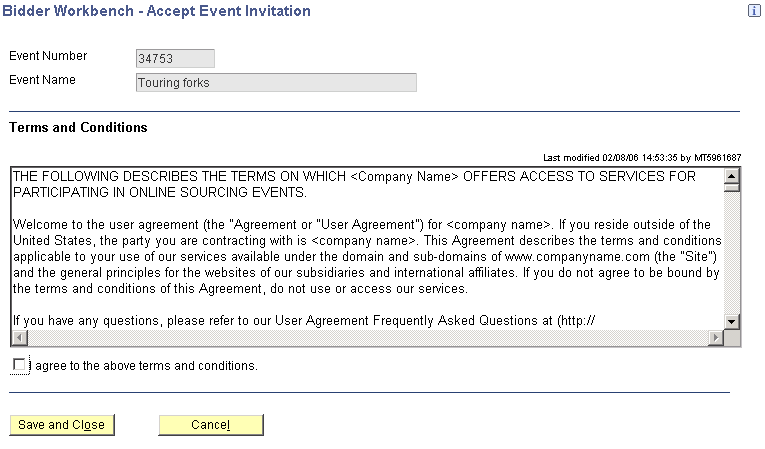
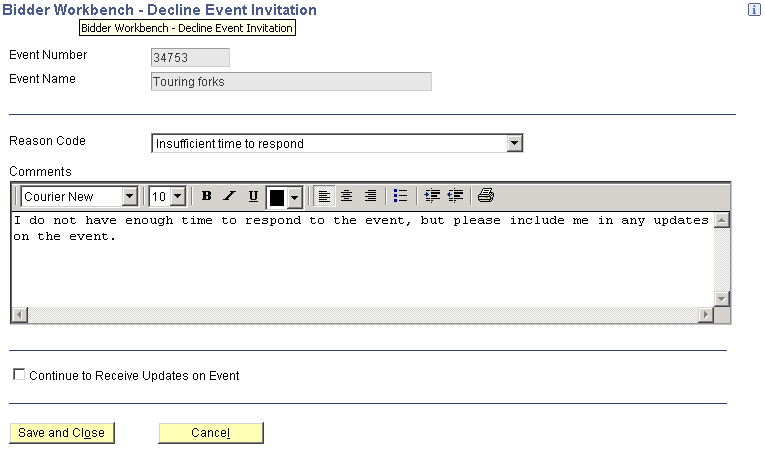
After they register for the event, bidders can then accept or decline the invitation to the event. To accept an invitation, bidders must agree to the event terms and conditions. To decline an invitation, bidders must select a reason code for declining, but they can select an option to receive updates about the event.
6.2 Managing User Profiles
This section provides overviews of the Sourcing Bidder Portal program and the User Profile Self Service program and discusses how to:
-
Add user profiles
-
Edit user roles
-
Revise passwords
6.2.1 Understanding the Sourcing Bidder Portal Program
You can provide bidders and suppliers with access to your company's portal using the Sourcing Bidder Portal program (P43Q01). Bidders and suppliers use the Bidder Workbench link on your company's portal to respond to questions included in sourcing events. In addition to accessing the Bidder Workbench, bidders and suppliers can also manage their user profiles using one of two links. Form-level security determines the links to which bidders and suppliers have access. Bidders have access only to the Change Password link, and can only change their passwords. Suppliers have access to the Change Password link and also the Manage User Profiles link. The Manage User Profiles link enables suppliers to create, edit, and delete user profiles, change passwords, and edit user roles.
6.2.2 Understanding the User Profile Self Service Program (P0092SS)
Both the Change Password and the Manage User Profiles links access the User Profile Self-Service program (P0092SS). When suppliers click the Manage User Profiles link, they can select only the role to which they are assigned, and they can view only the user profiles that are attached to their address book record. When suppliers create new user profiles, the system attaches their address book number to the new user profiles.
You can use the tasks discussed in this chapter to provide instructions to your bidders and suppliers on how to change their passwords and manage their user profiles.
|
Note: The P0092SS program should not be used by JD Edwards EnterpriseOne users who are internal to your company. All tasks related to managing user profiles for internal users should be managed by a system administrator using the Work With User / Role Profiles program (P0092). |
See JD Edwards EnterpriseOne Tools Security Administration Guide.
6.2.3 Forms Used to Manage User Profiles
| Form Name | FormID | Navigation | Usage |
|---|---|---|---|
| View Company Users | W0092SSA | Click the Manage User Profiles link on the Sourcing Bidder Portal. | Locate user IDs to revise. This form is accessible only to suppliers |
| User Profile and Preferences | W0092SSC | Click Add or Edit on the View Company Users form. | Add user profiles or edit existing user profiles. This form is accessible only to suppliers. |
| Manage Users Role Relationships | W0092SSB | Click the Search button in the Role field on the User Profile and Preferences form. | Add or edit roles for users. This form is accessible only to suppliers. |
| Administrative Password Revisions | W0092SSE | Suppliers: Click the Revise Password on the View Company Users form.
Bidders: Click the Change Password link on the Sourcing Bidder Portal. |
Revise passwords. |
| Role Search and Select | W0092SSF | Click the Search button in the Assigned Role field on the User Profile and Preferences form. | Select a role for the user profile. |
| Delete Confirmation | W0092SSG | Click Delete on the View Company Users form | Click OK to confirm that you want to delete the user profile. |
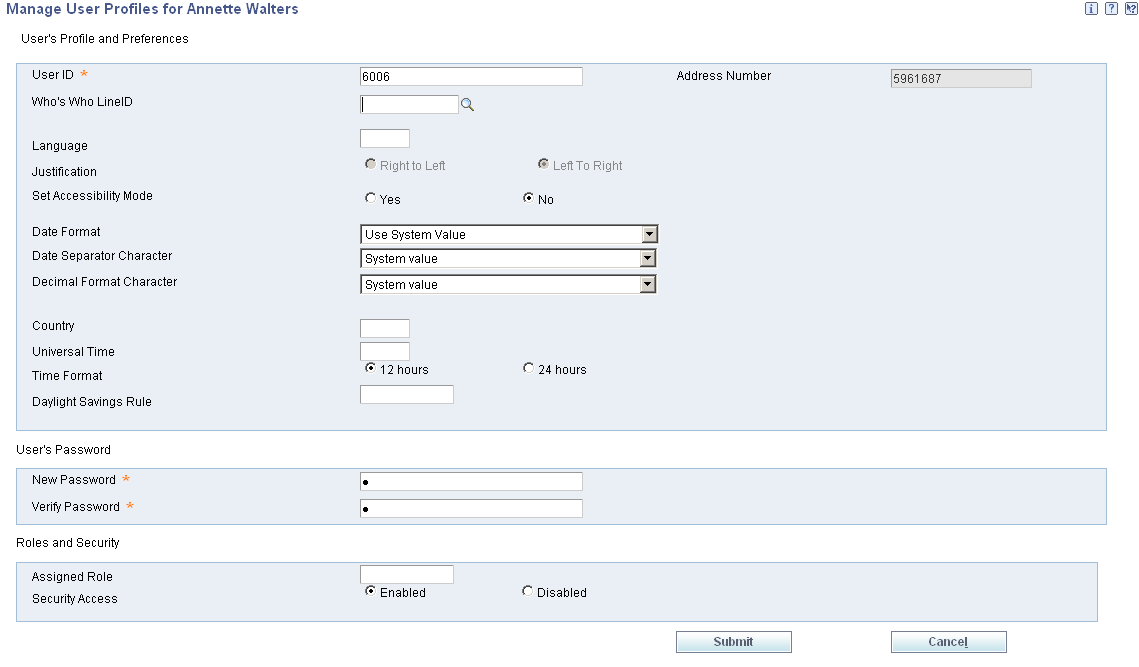
6.2.4 Adding User Profiles
Access the User Profile and Preferences form.
-
Complete the following fields:
-
User ID
Enter a unique value to identify the user profile.
-
Who's Who LineID
Enter the line identification number of the who's who record to which this user profile corresponds.
-
Language
Select a language preference from user-defined code (UDC) table 01/LP to specify the language to use on forms and printed reports. Before you specify a language, a code for that language must exist at either the system level or in your user preferences.
-
Justification
If you have selected Arabic in the Language field, select an option to determine the order in which to read text.
-
Set Accessibility Mode
Select Yes to enable accessibility mode for the user. If you select this option, the system enables the JD Edwards EnterpriseOne web client to be fully accessible through the JAWS screen reader software for visually impaired users. This option is set to No by default when a user profile is created.
-
Date Format
Specify the format of a date as it is stored in the database.
-
Date Separator Character
Specify the character to use when separating the month, day, and year of a given date. If you enter an asterisk (*), the system uses blank for the date separator. If you leave the field blank, the system uses the system value for the date separator.
-
Decimal Format Character
Specify the number of positions to the right of the decimal you want to use. If you leave this field blank, the system value is used as the default.
-
Country
Specify the country in which the user resides. The system displays country-specific forms based on this value.
-
Time Zone
Specify a code to associate a time zone with a user's profile. This code represents the user's preferred time zone, and it must be a valid value from UDC table (H91/TZ).
-
Time Format
Specify the user's preferred format for time-of-day.
-
Daylight Savings Rule
Specify a value identifying a daylight savings rule. Use daylight savings rules to adjust time for a geographic and political locale.
-
New Password and Verify Password
Enter the user password that JD Edwards EnterpriseOne uses to validate during the sign on process. Use the following guidelines:
-
The new password cannot be the same as the old password.
-
The new password cannot be the same as the user ID.
-
The new password must be at least six characters in length.
System administrators using Administrative Password Revisions to reset a user's password are not restricted by these rules. Often, standards exist for resetting a forgotten password. For example, a new password reset by a system administrator may need to be the same as the user ID or it may simply be the word "password" each time. Regardless, the new value specified in this field will become effective when the user signs on to JD Edwards EnterpriseOne for the next time.
-
-
Security Access
Specify whether the user profile is active.
-
-
To assign user roles, click the search button in the Role field.
-
On the Manage User's Role Relationship form, select the role to assign to the user.
-
Click Assign.
-
Click Close.
-
On the Use Profile and Preferences form, click Close.
6.2.5 Editing User Roles
Access the Manage User's Role Relationships form.
-
Select the role to assign to or remove from the user ID.
-
Click Assign or Remove.
-
Click Close.
6.2.6 Revising Passwords
Access the Administrative Password Revisions form.
Figure 6-2 Administrative Password Revisions form

Description of ''Figure 6-2 Administrative Password Revisions form''
-
Enter and verify a new password.
-
Click Submit.
6.3 Registering for an Event
This section discusses how to enter registration information.
6.3.1 Form Used to Enter Registration Information
| Form Name | FormID | Navigation | Usage |
|---|---|---|---|
| Company Information | W43Q95A | Click Bidder Workbench on the Bidder/Supplier SRM Portal. | Register for an event. |
6.3.2 Entering Registration Information
Access the Company Information form.
- Currency Code
-
Specify the currency in which amounts are stored in the JD Edwards EnterpriseOne Address Book system. For example, the credit limit, invoiced this year, invoiced prior year, and so on. The currency that you specify is used to record and store transaction history.
- Payment Terms
-
Select the payment terms to be used as the default payment terms. Payment terms determine the due date, discount amount, and discount due date that the system assigns when you create an invoice.
- Address Book Self Services
-
Click this link to revise contact information, user profile information, and company information.
6.4 Working with Events
This section provides an overview of working with events and discusses how to work with events.
6.4.1 Understanding How to Work with Events
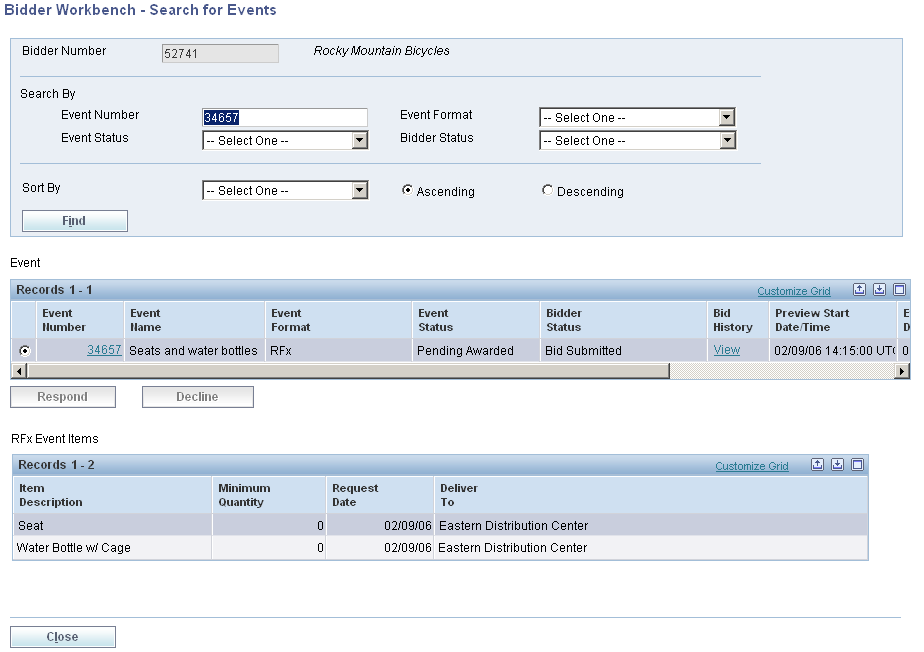
Bidders and suppliers use the Search for Events form in the Bidder Workbench program to work with events. The Search for Events form displays all events in which they have participated and all events in which they are currently participating. Using this form, bidders and suppliers can respond to events, access bid history, and update address book information.
6.4.2 Form Used to Work with Events
| Form Name | FormID | Navigation | Usage |
|---|---|---|---|
| Search for Events | W43Q40A | Click Bidder Workbench on the Bidder/Supplier SRM Portal. | Work with events. |
6.4.3 Working with Events
Access the Search for Events form.
6.5 Accepting or Declining an Event Invitation
This section discusses how to:
-
Accept an invitation.
-
Decline an invitation.
6.5.1 Forms Used to Accept and Decline Event Invitations
| Form Name | FormID | Navigation | Usage |
|---|---|---|---|
| Search for Events | W43Q40A | Click Bidder Workbench on the Bidder/Supplier SRM Portal. | Accept or decline an event invitation. |
| Decline Event Invitation | W43Q40D | Click Decline on the Search for Events form. | Decline an event invitation. |
| Accept Event Invitation | W43Q40E | Click Respond on the Search for Events form. | Accept an event invitation. |
6.5.2 Accepting an Event Invitation
Access the Accept Event Invitation form.
- Terms and Conditions
-
Review the terms and conditions for the event.
- I agree to the above terms and conditions.
-
Select this option to agree to the terms and conditions of the event.
6.5.3 Declining an Event Invitation
Access the Decline Event Invitation form.
Figure 6-6 Decline Event Invitation form
Description of ''Figure 6-6 Decline Event Invitation form''
- Reason Code
-
Select a reason for declining the invitation. The system stores valid reason codes in user-defined code table 43Q/DR.
- Comments
-
Enter text to provide a further explanation for declining the invitation.
- Continue to Received Updates on Event
-
Select this option to inform the buyer that you would like to continue to receive updates on the sourcing event.
6.6 Previewing an Event
This section provides an overview of the event preview process and discusses how to preview an event.
6.6.1 Understanding the Event Preview Process
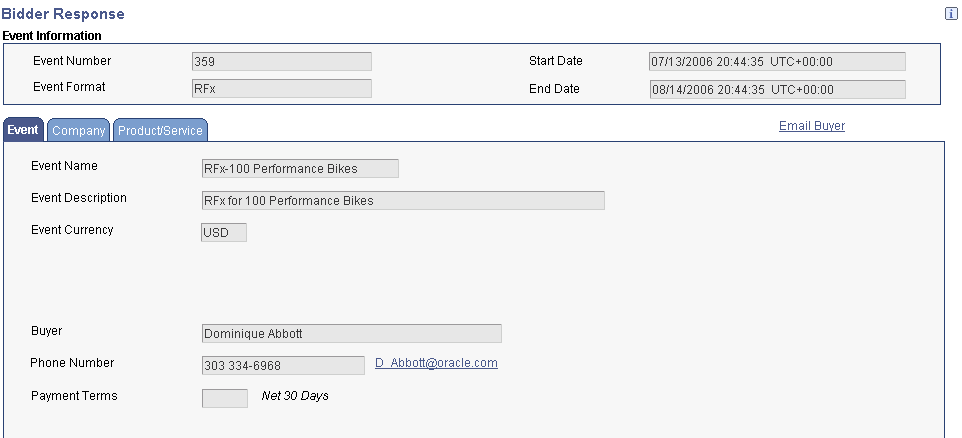
The event preview process enables bidders to review information about the event before it begins. During event preview, bidders can review the event name and description, obtain contact information for the buyer, and review all questions for the event. Bidders can only view the bid questions; they cannot respond to them.
After previewing an event, bidders may decide that they no longer want to participate in the event. They can decline their invitation, thus removing themselves from the list of bidders.
6.6.2 Forms Used to Preview an Event
| Form Name | FormID | Navigation | Usage |
|---|---|---|---|
| Search for Events | W43Q40A | Click Bidder Workbench on the Bidder/Supplier SRM Portal. | Search events and select the event that you want to preview. |
| Bidder Response | W43Q45A | Click the link in the Event Number field on the Search for Events form. | Review overview information for the event. |
6.6.3 Previewing an Event
Access the Bidder Response form.
Figure 6-7 Bidder Response form: Event tab (1 of 2)
Description of ''Figure 6-7 Bidder Response form: Event tab (1 of 2)''
Figure 6-8 Bidder Response form: Event tab (2 of 2)

Description of ''Figure 6-8 Bidder Response form: Event tab (2 of 2)''
When the event is in a status of Preview, you can only view the bid questions; you cannot respond. If you need to contact the buyer, click the Email Buyer link.
6.7 Responding to an Event
This section provides an overview of event response and discusses how to:
-
Respond to an event.
-
Enter bidder price breaks.
-
Enter buyer price breaks.
-
Enter price components.
-
Select values for a list question.
-
Submit a bid.
6.7.1 Understanding Event Response
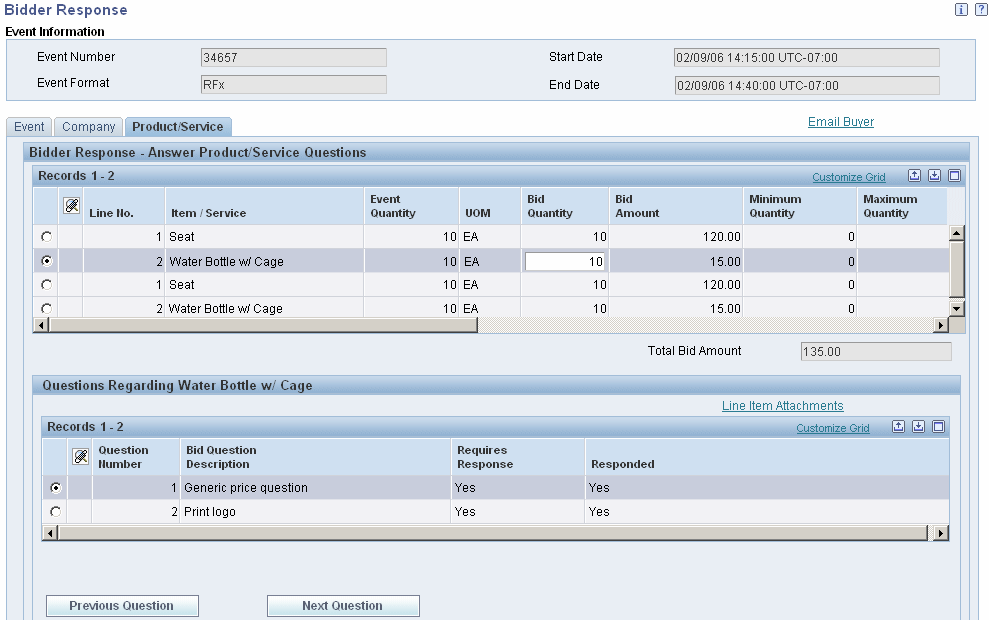
After an event starts, bidders can access the Bidder Response form and begin the process for submitting a bid. If the event contains both header and detail questions, the Bidder Response form contains these tabs: Event, Company, and Product/Service. The Company tab provides access for answering header-level questions, which are questions about your company, and the Product/Services tab provides access to the event lines and the associated detail-level questions.
As bidders click each line for the event, the system displays the corresponding questions for that line. For each question, the system indicates whether a response is required and whether the bidder has responded to the question. The system updates the Responded field after the bidder has selected a response and then selected the next question.
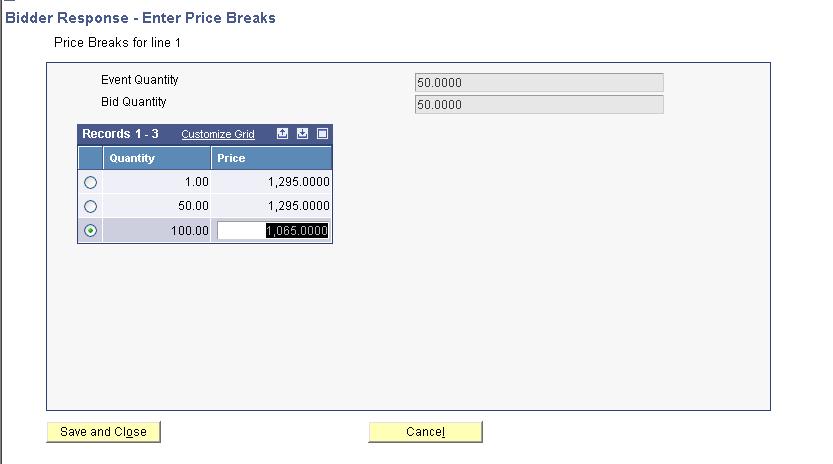
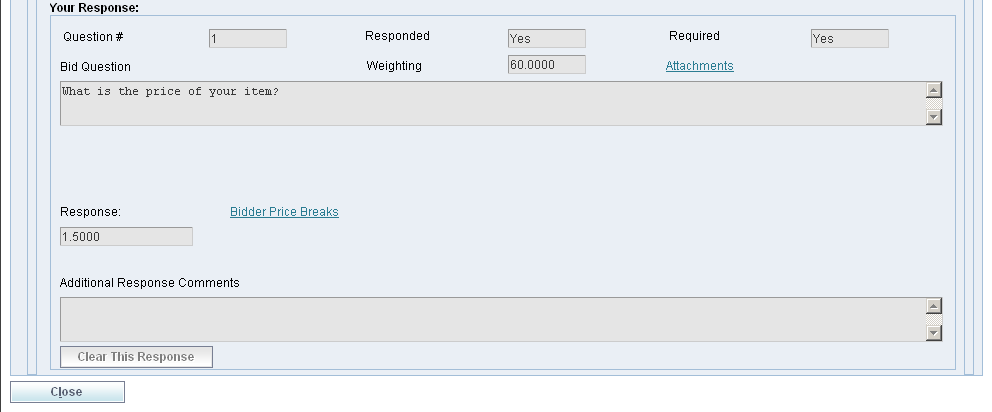
If the buyer has entered price break information, the system displays the Buyer Price Breaks link, which bidders can use to enter applicable price breaks for the ranges specified by the buyer. If the buyer did not attach price break information to the price question, the system displays the Bidder Price Breaks link, which bidders can use to enter their own quantity ranges and applicable price breaks.
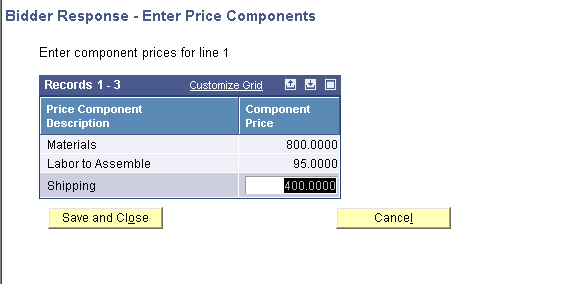
If the buyer has entered price component information, the system displays the Enter Price Components link. When bidders click this link, the system displays a form on which bidders must enter the price for each component, such as shipping, labor, and parts, of an item.
When bidders are finished responding to an event, they click Review and Submit to access the Review and Submit form. This form enables bidders to review and then submit their bids.
6.7.2 Forms Used to Respond to an Event
| Form Name | FormID | Navigation | Usage |
|---|---|---|---|
| Search for Events | W43Q40A | Click Bidder Workbench on the Bidder/Supplier SRM Portal. | Search events and select the event for which you want to respond. |
| Bidder Response | W43Q45A | Click Respond on the Search for Events form. | Review overview information for the event. |
| Ship To Address | W43Q411C | Click the link in the Ship To field. | View the address to which the item should be shipped. |
| Enter Price Breaks | W43Q412A | Click Bidder Price Breaks or Buyer Price Breaks on the Bidder Response form. | Enter bidder or buyer price breaks. |
| Enter Price Components | W43Q413A | Click Price Components on the Bidder Response form. | Enter price component information. |
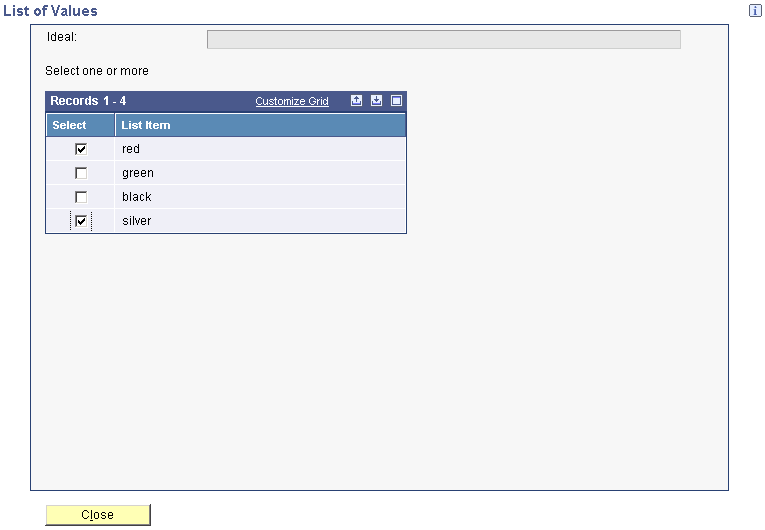
| Select from a List of Values | W43Q402C | Click Select from a list of values on the Bidder Response form. | Select one value from a list of possible values. |
| List of Values | W43Q414D | Click Select from a list of values on the Bidder Response form. | Select multiple values for a list question. |
| Bidder Response Revisions | W43Q75A | Click Review and Submit on the Search for Events form. | Review and submit a bid. |
6.7.3 Responding to an Event
Access the Bidder Response form.
Figure 6-9 Bidder Response form (1 of 2)
Description of ''Figure 6-9 Bidder Response form (1 of 2)''
Figure 6-10 Bidder Response form (2 of 2)
Description of ''Figure 6-10 Bidder Response form (2 of 2)''
-
Select an event line and complete the following fields for that line:
-
Bid Quantity
If the properties of this event indicate that you must bid on the quantity specified by the buyer, this field displays the specified quantity but it is disabled. If the properties do not indicate that you must bid on the quantity specified by the buyer, this field is blank.
-
Promised Delivery Date
Specify the date by which you plan to deliver the item.
Note:
If this date is in the past when you post an award for this supplier, the system does not allow you to create a purchase order. -
Bid Amount
The system displays the bid amount, which is calculated using the price question response multiplied by the quantity.
-
Event Quantity
The system displays the total quantity for the event.
-
Min Bid Quantity(minimum bid quantity)
The system displays the minimum quantity for which bidders can submit a response. The system displays a value in this field only when the buyer has set up the event line to allow a quantity range instead of a specific quantity.
-
Max Bid Quantity(maximum bid quantity)
The system displays the maximum quantity for which bidders can submit a response. The system displays a value in this field only when the buyer has set up the event line to allow a quantity range instead of a specific quantity.
-
Request Date
The system displays the date on which the event was created.
-
Bid Required
The system displays either Yes or No, depending on how the buyer set up the event.
-
Buyer Attachments
Click View to review attachments that the buyer added to the event line.
-
Ship To
Click the link in this field to view the address to which you should ship the item.
-
Mode of Transport
The system displays the mode of transport, which the buyer enters when creating the event. The mode of transport describes the nature of the carrier being used to transport goods, for example, by rail, by road, and so on. The system stores valid values for this field in user-defined code table 00/TM.
-
Freight Handling Code
The system displays the method by which supplier shipments are delivered, which the buyer enters when creating the event. Examples include: the bidder delivers to the buyer's dock, or the buyer picks up the shipment at the bidder's dock. The system stores valid values for this field in user-defined code table 42/FR.
-
-
Review and respond to each question attached to the selected event line.
-
To toggle between questions, click Next Question, Previous Question, or select the grid row for the question to which you want to respond.
-
Click Email Buyer if you want to contact the buyer for additional information.
-
Click Attachments to add additional information to your response.
-
When you are finished responding to the questions, click Review and Submit if you want to submit your bid. To save your responses and submit at a later time, click Save and Close.
See Submitting a Bid.
6.7.4 Entering Bidder Price Breaks
Access the Enter Price Breaks form.
Enter the quantities and corresponding prices at which the buyer can receive a price break. When you are finished, click Save and Continue.
|
Note: You must enter price breaks in ascending order in the grid rows. |
6.7.5 Entering Buyer Price Breaks
Access the Enter Price Breaks form.
Enter prices for the quantities defined by the buyer and then click Save and Close.
6.7.6 Entering Price Components
Access the Enter Price Components form.
Enter a price for each component and then click Save and Close.
6.7.7 Selecting Values for a List Question
Access the List of Values form if the question allows only one response or the Select from a List of Values form if the question allows multiple responses.
Select values from the list and then click Close.
The system allows you to select more than one value only when the Allow Multiple Selection option for the list question is selected.
6.7.8 Submitting a Bid
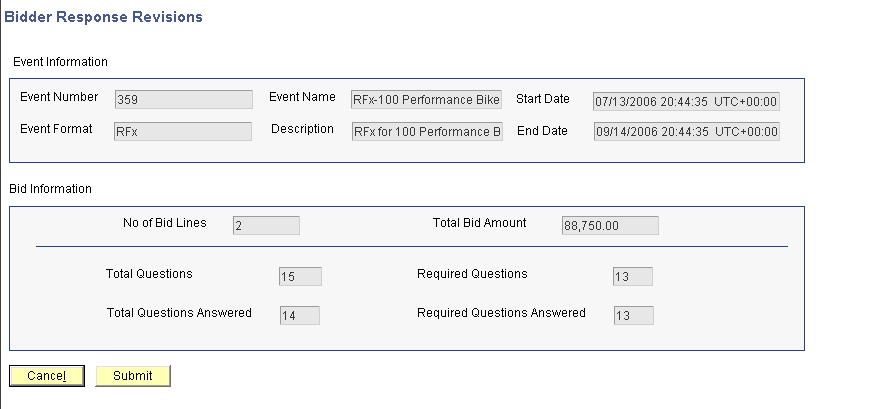
Access the Bidder Response Revisions form.
Figure 6-14 Bidder Response Revisions form
Description of ''Figure 6-14 Bidder Response Revisions form''
Click Submit to submit your final bid or click Cancel to return to the Bidder Response form.
|
Note: You must respond to all required questions before you click Submit, or the system generates an error. |
6.8 Reviewing Bid History
This section provides an overview of bid history review and discusses how to review bid history.
6.8.1 Understanding Bid History Review
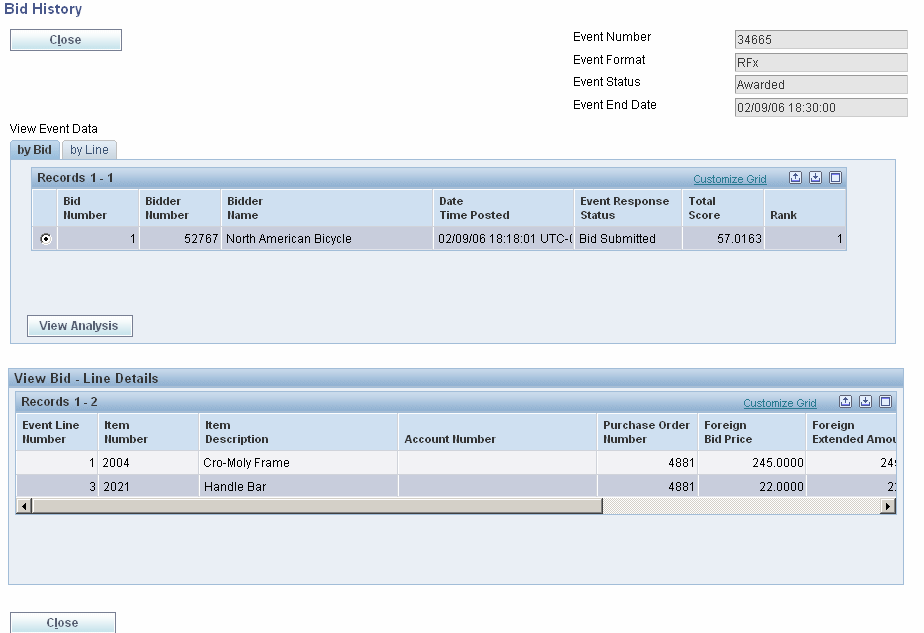
If the buyer has selected the Display Bid History Page option for the event, bidders can review their bid history after submitting their bid. Bidders cannot change any of their responses when reviewing their history, but they can contact the buyer if they need additional information.
6.8.2 Forms Used to Review Bid History
| Form Name | FormID | Navigation | Usage |
|---|---|---|---|
| Search for Events | W43Q40A | Click Bidder Workbench on the Bidder/Supplier SRM Portal. | Search for the event that you want to preview. |
| Bid History | W43Q41D | Click View in the Bidder History field on the Search for Events form. | Review lines and click View Response. |
| Bidder Response form | W43Q45A | Click View Response on the Bid History form. | Review overview information for the event. |
6.8.3 Reviewing Bid History
Review event information. To review more detailed information or to review responses to questions, click View Response on the Overview and Questions form.
6.9 Responding on Behalf of Bidders
This section provides an overview of responding on behalf of bidders and discusses how to respond on behalf of bidders.
6.9.1 Understanding How to Respond on Behalf of Bidders
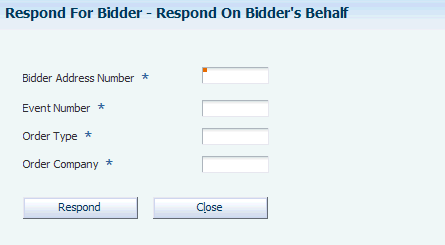
To expand your event to bidders who do not have access to the internet, you can fax an event to bidders and then respond on behalf of those bidders. You use the Respond For Bidders program (P43Q47) to respond on behalf of bidders. This program enables you to specify a bidder number, event number, order type, and order company to locate the event for which you want to enter responses. After you specify this information, you click Respond, and the system displays the Bidder Response form.
6.9.2 Form Used to Respond on Behalf of Bidders
| Form Name | FormID | Navigation | Usage |
|---|---|---|---|
| Respond On Bidder's Behalf | W43Q47A | Select Daily Processing (G43Q11), Respond For Bidders. | Enter responses to an event on behalf of a bidder. |
6.9.3 Responding on Behalf of Bidders
Access the Respond On Bidder's Behalf form.
Figure 6-16 Respond on Bidder's Behalf form
Description of ''Figure 6-16 Respond on Bidder's Behalf form''
6.10 Updating Address Book Information
This section provides an overview of updating information in the JD Edwards EnterpriseOne Address Book system and discusses how to update address book information.
6.10.1 Understanding JD Edwards EnterpriseOne Address Book Updates
In addition to responding to events, bidders and suppliers can update their own address book information. Suppliers can update company information, supplier master information, and user profile information, and they can add, delete, and modify existing contact information. Bidders can modify company information and user profile information, and they can modify and delete existing contact information.
6.10.2 Form Used to Update Address Book Information
| Form Name | FormID | Navigation | Usage |
|---|---|---|---|
| Update Address Book Record | W01012SSA | If you are a bidder, click Address Book Self Services on the Company Information form or click Modify in the Event Bidder Contact field on the Search for Events form.
If you are a supplier, click Address Book Self Services on the Bidder/Supplier SRM Portal or click Modify in the Event Bidder Contact field on the Search for Events form. |
Update company, user profile, supplier master, and contact information, and add, edit, or update contact information. |
6.10.3 Updating Address Book Information
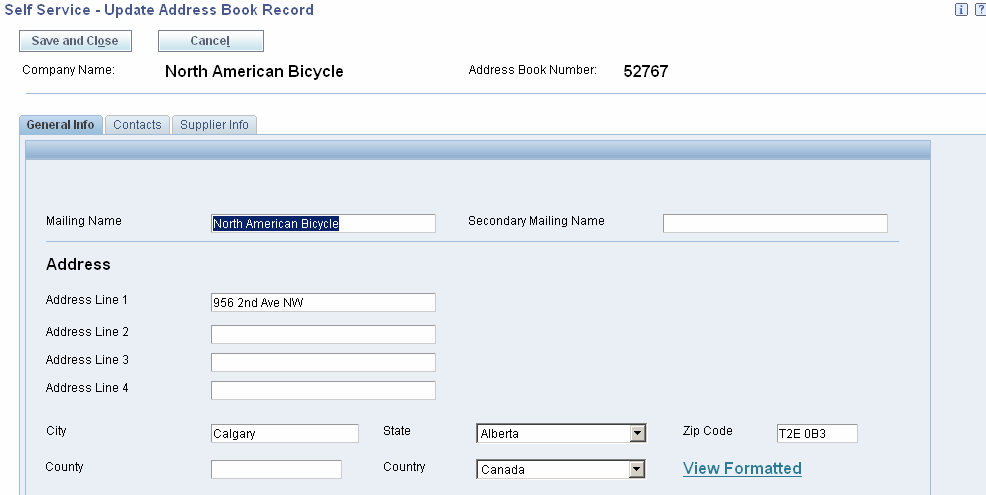
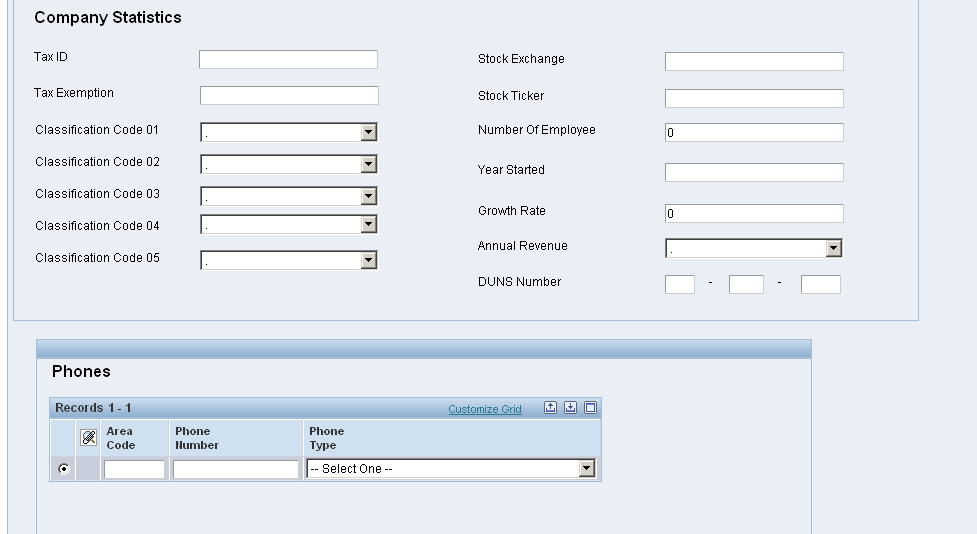
Access the Update Address Book Record form.
Figure 6-17 Update Address Book Record form (1 of 3)
Description of ''Figure 6-17 Update Address Book Record form (1 of 3)''
Figure 6-18 Update Address Book Record form (2 of 3)
Description of ''Figure 6-18 Update Address Book Record form (2 of 3)''
Figure 6-19 Update Address Book Record form (3 of 3)
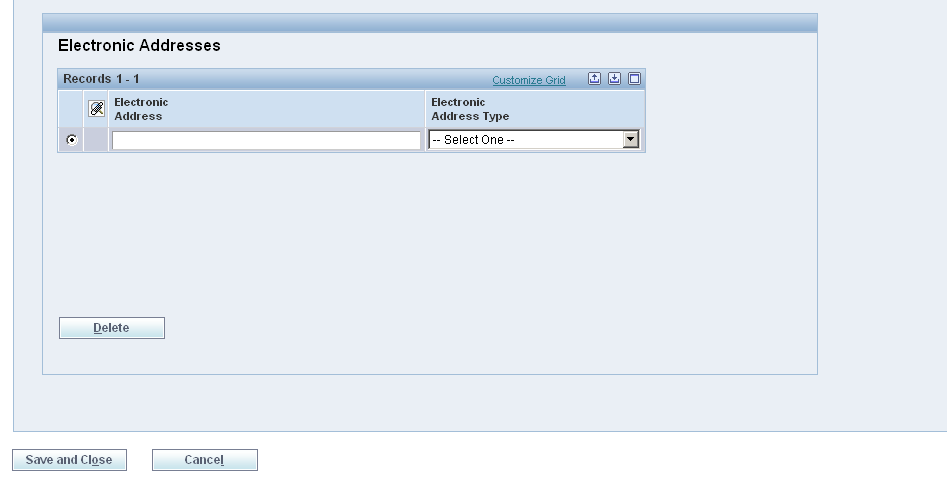
Description of ''Figure 6-19 Update Address Book Record form (3 of 3)''
If the user is a bidder, the Update Address Book Record form contains the General Info tab and the Contacts tab. If the user is a supplier, the Update Address Book Record form contains an additional tab called Supplier.
