3 Processing U.S. Payroll Cycle Information
This chapter contains the following topics:
-
Section 3.2, "Working with Prevailing Wages (Release 9.1 Update)"
-
Section 3.5, "Reviewing Country-Specific Payroll Cycle Reports"
-
Section 3.6, "Entering Tax Overrides for an Interim Payment"
3.1 Understanding U.S. Payroll Setup
To process payroll for employees in the U.S., you must set up the information in this chapter and also set up all basic payroll information. The information in this chapter discusses only the country-specific setup tasks that you must complete. All other setup tasks are discussed in the JD Edwards EnterpriseOne Payroll 9.0 implementation guide.
3.2 Working with Prevailing Wages (Release 9.1 Update)
This section provides an overview of prevailing wages, lists prerequisites, and discusses how to review prevailing wages information, and adjust the prevailing wages if there are discrepancies between an employee's actual pay and the prevailing wages.
3.2.1 Understanding Davis Bacon Prevailing Wages
United States federal law states that employees working on federal government construction projects must be paid no less than the stated prevailing wages and prevailing fringe benefits for similar projects. This legislation requires the contractors to:
-
Pay prevailing wage rates and benefits for corresponding classes of laborers or similar projects in the area (the Prevailing Wage is determined by the Secretary of Labor).
-
Keep specific records.
-
Report weekly certified payroll.
-
Post employee rights.
Prevailing wages are based on the employee's work classification and what the average rate of pay for that classification is in the area that the job is performed. The federal contractor must pay employees working on a federal project the prevailing rate for the job classification assigned to that employee plus any benefits that apply to that classification. This means that the employer has to determine whether the total of an employee's pay and benefits equals the prevailing wage for the union and job. If the total of an employee's pay and benefits is less than the prevailing wage, then the employer must pay the employee the additional amount.
|
Note: If an employee has multiple jobs with different prevailing wages, the prevailing wage calculation must be done for each job. |
JD Edwards EnterpriseOne Payroll enables you to:
-
Determine an employee's rate of pay by job.
-
Compare that rate to the job´s prevailing rate.
-
Determine what action the system should take when a discrepancy occurs and make the appropriate adjustments.
-
Review detailed reports showing changes made to an employee's pay.
This process flow describes how the prevailing wages are calculated:
Figure 3-1 Prevailing Wages Process Flow
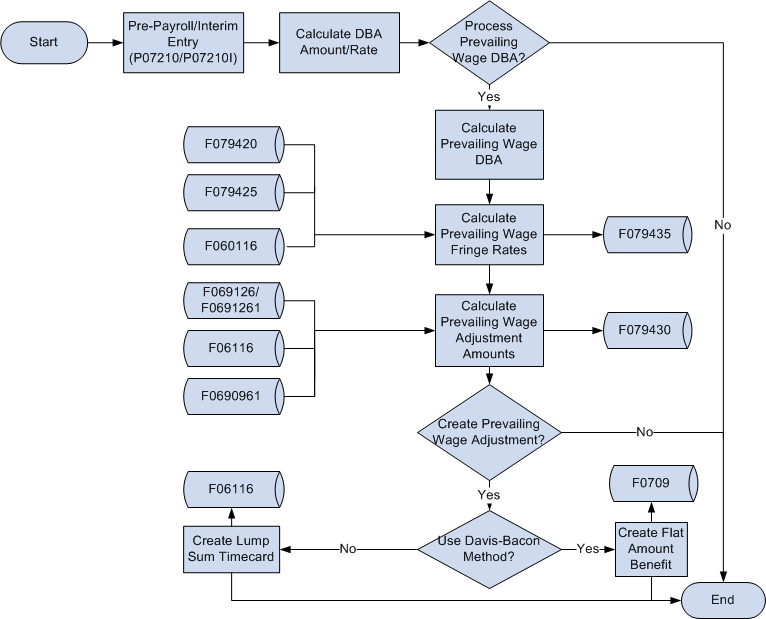
Description of ''Figure 3-1 Prevailing Wages Process Flow''
|
Note: (Release 9.1 Update) The JD Edwards EnterpriseOne Prevailing Wage solution provides:
The JD Edwards EnterpriseOne Prevailing Wage enhancement may not address all potential customer requirements, based on customer interpretation of the law or employer-specific application of prevailing wage methodology. In addition, this enhancement does not specifically address all possible state-level (mini Davis Bacon) requirements; however, a range of calculation methods are included that may support various needs. |
3.2.2 Prerequisites
Before you complete the tasks in this section:
-
Define the prevailing wage summarization level.
-
Set up union pay rates for job.
-
Create your company's Prevailing Wage DBAs.
Note:
When you create prevailing wage DBAs, you must specify B as the method of calculation (prevailing wage calculation method). -
Set up Prevailing Wage DBAs.
-
Set up prevailing wage basis.
-
Enter job fringe rates using group plan DBAs.
-
Enter employee timecards.
3.2.3 Forms Used to Process Prevailing Wages
| Form Name | FormID | Navigation | Usage |
|---|---|---|---|
| Work With Prevailing Wage DBAs | W079420A | Prevailing Wage Setup (G05BD41), Prevailing Wage DBAs | Select the Prevailing Wage DBA Code for which you want to review the prevailing wage processing parameters. |
| Add Prevailing Wage DBAs | W079420B | Click the Add button on the Work With Prevailing Wage DBAs form. | Set up prevailing wage DBAs. |
| Prevailing Wage DBA Revisions | W079420C | On the Work With Prevailing Wage DBAs form, select a record and click Select. | Review the prevailing wage processing parameters. |
| Work With Prevailing Wage DBA Range | W079425A | Prevailing Wage Setup (G05BD41), Prevailing Wage DBA Range.
Alternatively, select PW DBA Range from the Form menu on the Work With Prevailing Wage DBAs form. |
Review the actual DBAs that the employee receives to compare with the prevailing wage DBAs. |
| Prevailing Wage Transactions | W079430A | Payroll Workbench (G07BUSP11), Prevailing Wage Transaction Detail or select Prevailing Wage from the Row menu on the Work With Pay Cycle Workbench (P07210), Employee Payment Review (P07350), Work With Interims Workbench (P07210I), and Work With Interim Payments (P07350I) forms. | Review the prevailing wage calculation for each timecard that is processed. |
| Prevailing Wage Fringe Detail | W079435A | On the Prevailing Wage Transactions form, select a record and click Select. | Review detailed DBA information that is used to calculate the prevailing wage. |
| Prevailing Wage Transaction History | W079440A | U.S. History Inquiries (G07BUSP14), Prevailing Wage Transaction History or select Prev Wage History from the Row menu on the Work With Payment History (P070601). | Review prevailing wage transaction history. |
| Prevailing Wage Fringe History | W079440D | On the Prevailing Wage Transaction History form, select a record and click Select. | Review the fringe amount associated with the historical prevailing wage transactions. |
3.2.4 Setting Up Prevailing Wage DBAs
Access the Add Prevailing Wage DBAs form.
Figure 3-2 Add Prevailing Wage DBAs form

Description of ''Figure 3-2 Add Prevailing Wage DBAs form''
- Prevailing Wage PDBA Code
-
Specify the PDBA code that is used in the prevailing wage calculation. The PDBA code indicates the type of pay, deductions, benefits, or accruals.
- Active
-
Select to activate the prevailing wage DBA.
- Prevailing Wage Calculation Method
-
Specify the calculation method used to compute the prevailing wages.
Values are:
WI: If you use the WI (wage invasion) method, the system adds a lump sum timecard to the employee's pay if the employee's actual pay is lower than the prevailing wage. If the employee's actual pay is higher, the system creates a negative lump sum timecard to reduce the employee's pay to an amount not lower than the employee's base hourly rate defined in the Employee Master Information table (F060116).
NW: If you use the NW (non-wage invasion) method, the system adds a lump sum timecard if the employee's actual pay is lower than the prevailing wage.
DB: If you use the DB (Davis-Bacon) method, the system adds a flat dollar one-time override to the DBA Ledger File table (F0709) if the employee's actual pay is lower than the prevailing wage.
FC: If you use the FC (fringe credit) method, the system provides a credit to the employer for the fringe benefits paid to an employee. The system creates a negative lump sum timecard that is equal to the employee's fringe benefit hourly rate multiplied by the timecard hours.
- Lump Sum PDBA
-
Specify the PDBA code used to indicate whether to generate a lump sum timecard or a flat dollar one-time override if the employee's actual pay is lesser than the minimum prevailing fringe rate.
- Job Fringe Multiplier
-
Select to use the timecard multiplier when calculating the prevailing wage fringe amount.
If you select this option, the prevailing wage fringe amount is calculated by multiplying the employee's DBA amount for the prevailing wage DBA code by the timecard multiplier. If you do not select this option, the prevailing wage fringe amount is equal to the employee's DBA hourly rate for the prevailing wage DBA code.
3.2.5 Reviewing Prevailing Wage DBA Range
Access the Work With Prevailing Wage DBA Range form.
Figure 3-3 Work With Prevailing Wage DBA Range form
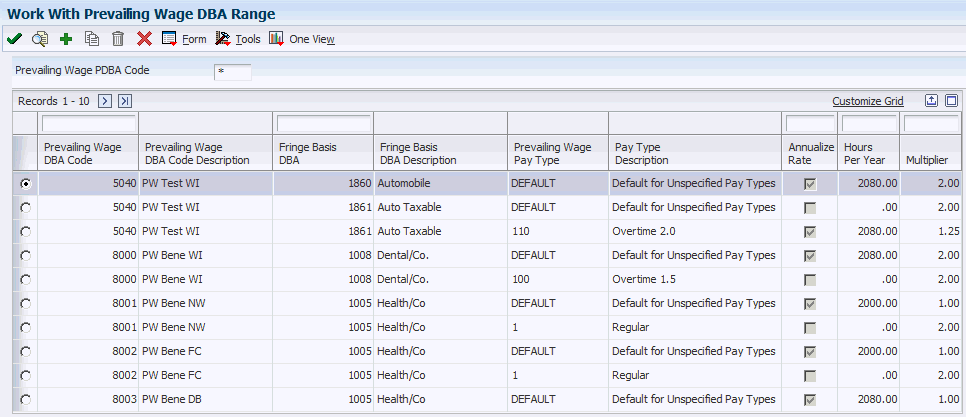
Description of ''Figure 3-3 Work With Prevailing Wage DBA Range form''
- Prevailing Wage DBA Code
-
Specify the prevailing wage DBA code that is used in the prevailing wage calculation.
- Fringe Basis DBA
-
Displays the fringe basis DBA code that defines the type of benefit. Benefits are numbered from 1000 to 9999.
If the accruals must be calculated as fringe benefit in the prevailing wage calculations, the fringe basis DBA must be associated with the method of calculation J.
- Prevailing Wage Pay Type
-
Displays the pay type that is associated with the prevailing wage DBA range record. The value can either be a valid pay type or DEFAULT. If the system displays a valid pay type, the prevailing wage DBA range record applies only to that pay type. If the system displays DEFAULT, the prevailing wage DBA range record is used for pay types that are not found in the F079425 table during the calculation of the employee's fringe amount.
It is required that one default prevailing wage DBA range record exists for each combination of prevailing wage DBA and fringe basis DBA. If a record is not marked as DEFAULT, you must specify a valid pay type.
- Annualize Rate
-
This option determines whether annualized hours or timecard hours are used when calculating the employee's fringe amount.
- Hours Per Year
-
Displays the number of hours in one year used in calculating the employee's fringe amount if the Annualize Rate option is selected. In this calculation, each fringe basis DBA code is converted to an hourly rate by multiplying the pay period fringe amount by the employee' s pay frequency and then dividing the result by the value in the Hours Per Year field.
- Multiplier
-
Displays the multiplier used in the employee's fringe amount calculation after the hourly rate is determined for a fringe basis DBA. The multiplier is typically used when an employee works overtime hours and receives an additional fringe credit for those hours.
3.2.6 Reviewing Prevailing Wage Transactions Information
Access the Prevailing Wage Transactions form.
Figure 3-4 Prevailing Wage Transactions form
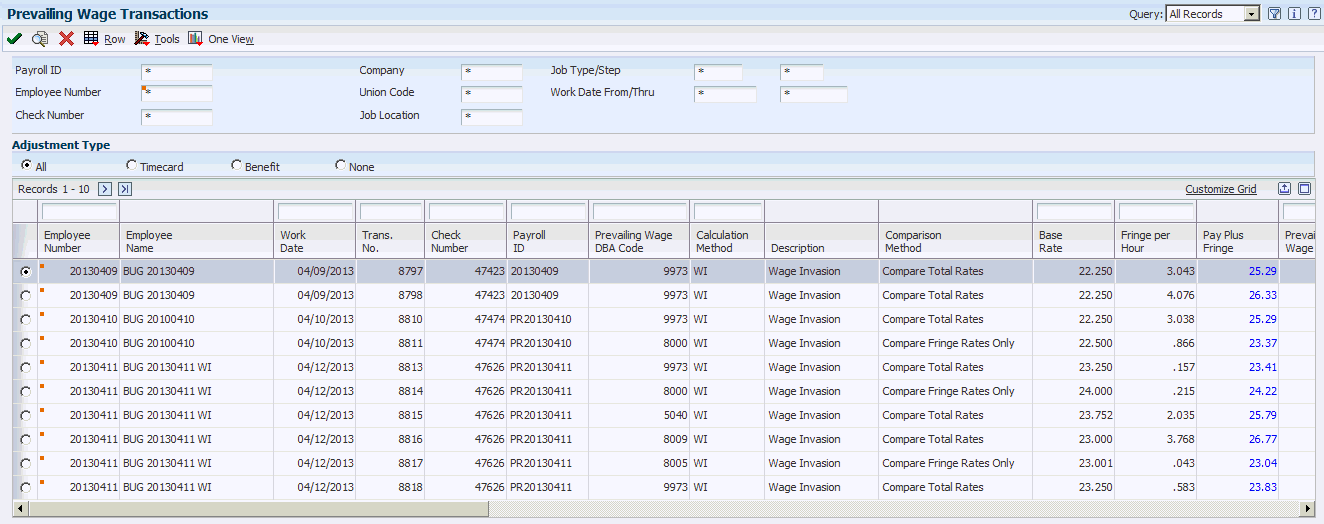
Description of ''Figure 3-4 Prevailing Wage Transactions form''
- Employee Number
-
Displays the number that identifies an entry in the Address Book system, such as employee, applicant, participant, customer, supplier, tenant, or location.
- Work Date
-
Displays the date used as the actual work date or pay-period ending date.
- Trans. No.
-
Displays the unique number that is assigned to each timecard.
- Check Number
-
Displays the number used to group all payroll transactions for each payment or individual interim payment. This number is carried into the accounting journal entries and facilitates the update of the actual check number after payment printing is complete.
This number is also used for automatically voiding payments. The payment work table contains both the actual check number and the check control number. All associated payment transactions are automatically reversed using the check control number.
Note:
This is not the actual check number. - Payroll ID
-
Displays the code that identifies a group of employees for whom payroll is being processed. Use the Payroll ID to process each step of the payroll cycle.
This code is also used to identify the interim identifier that you select when you enter interim payments.
- Calculation Method
-
Displays the calculation method used to compute the prevailing wages.
Values are:
WI: If you use the WI (wage invasion) method, the system adds a lump sum timecard to the employee's pay if the employee's actual pay is lower than the prevailing wage. If the employee's actual pay is higher, the system creates a negative lump sum timecard to reduce the employee's pay to an amount not lower than the employee's base hourly rate defined in the Employee Master Information table (F060116).
NW: If you use the NW (non-wage invasion) method, the system adds a lump sum timecard if the employee's actual pay is lower than the prevailing wage.
DB: If you use the DB (Davis-Bacon) method, the system adds a flat dollar one-time override to the DBA Ledger File table (F0709) if the employee's actual pay is lower than the prevailing wage.
FC: If you use the FC (fringe credit) method, the system provides a credit to the employer for the fringe benefits paid to an employee. The system creates a negative lump sum timecard that is equal to the employee's fringe benefit hourly rate multiplied by the timecard hours.
- Base Rate
-
This is the employee's base hourly rate assigned to the timecard record.
Note:
If you change the value of the data display decimals for the PHRT or SHRT fields in Time Entry, you must also change the base rate (BHRT) field to have exactly the same data display decimals. - Fringe per Hour
-
Displays the employee's actual fringe benefit hourly rate calculated based on the existing DBA instructions.
- Prevailing Wage Rate
-
Displays the prevailing wage hourly rate associated with the processed timecard that is retrieved from the Union Rates File table (F069126).
- Prevailing Fringe Rate
-
Displays the prevailing wage fringe rate retrieved from the Union Benefits Master table (F069106). If the Job Fringe Multiplier field is set to 'Y' on the Prevailing Wage DBA Types form, the prevailing wage fringe rate will be further increased by the timecard multiplier.
- Difference Per Hour
-
Displays the difference between the prevailing wage job rate and the employee's total hourly rate, which includes the timecard base rate and the employee's calculated fringe hourly rate.
When comparing fringe amounts only, this amount is the difference between the prevailing wage fringe hourly rate and the employee's fringe hourly rate.
If you use the prevailing wage fringe credit (FC) method, this amount is the employee's calculated fringe hourly rate as a negative value.
- Adjustment Amount
-
Displays the amount paid to the employee due to a difference in the prevailing wage rate and the employee's actual rate.
- Adjustment PDBA Code
-
Displays the PDBA code used to calculate the prevailing wage adjustment. When the adjustment is a lump sum timecard, this value is a valid pay type from the F069116 table. When the adjustment is a flat amount benefit, this value is a valid DBA code from the F069116 table.
- Union Code
-
Displays the user-defined code (UDC) (06/UN) that represents the union or plan in which the employee or group of employees work or participate.
- Job Type
-
Displays the user-defined code (UDC) (07/G) that defines the jobs within the organization. You can associate pay and benefit information with a job type and apply that information to the employees who are linked to that job type.
The value in this field overrides the rates that are set up in the F069126 table if the table is set up by job or business unit.
- Job Step
-
Displays the user-defined code (UDC) (06/GS) that indicates a specific level within a particular job type. The system uses this code in conjunction with the job type to determine pay rates by job in the Pay Rates table.
3.2.7 Reviewing Prevailing Wage Fringe Detail Information
Access the Prevailing Wage Fringe Detail form.
Figure 3-5 Prevailing Wage Fringe Detail form
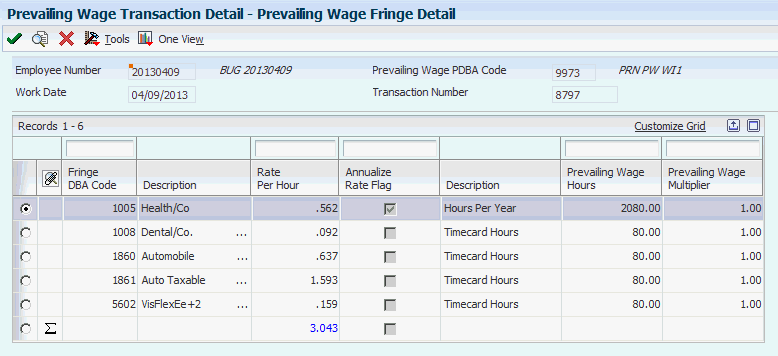
Description of ''Figure 3-5 Prevailing Wage Fringe Detail form''
- Fringe DBA Code
-
Displays the code that defines the type of benefit. Benefits are numbered from 1000 to 9999.
- Rate Per Hour
-
Displays the employee fringe hourly rate amount for a prevailing wage DBA and prevailing wage fringe DBA.
- Annualize Rate Flag
-
This option determines whether the system uses annualized hours or timecard hours when calculating the employee fringe amount. If this option is selected, Hours per Year from the F079425 table are used in the calculation. If this option is not selected, the hours from the timecard are used.
- Prevailing Wage Hours
-
Displays the actual hours used in the employee fringe calculation.
- Prevailing Wage Multiplier
-
Displays the multiplier used in the employee fringe calculation after the hourly rate is determined for a fringe basis DBA. The multiplier is typically used when an employee works overtime hours and receives an additional fringe credit for those hours.
3.2.8 Reviewing Prevailing Wage Transaction History Information
You can review historical records for prevailing wages transactions using the Prevailing Wage Transaction History program (P079440). Most of the fields on the Prevailing Wage Transaction History form are the same as those on the Prevailing Wage Transactions form.
3.2.9 Prevailing Wage Transaction Reports
You can generate the Prevailing Wage Transaction Detail report (R079430D) and Prevailing Wage Transaction Summary report (R079430S) to review the prevailing wage transactions processed for each timecard included in the prevailing wage calculations.
You can generate the reports to include or exclude the prevailing wage fringe details. You use the Print Fringe Detail processing option to specify whether to run the reports with the prevailing wage fringe details.
The system retrieves the information provided on these reports from these tables:
-
Prevailing Wage Transaction Detail (F079430)
-
Prevailing Wage Fringe Detail (F079435)
-
Employee Transaction Detail File (F06116)
3.2.10 Prevailing Wage History Report
When you run the final update for prevailing wages, the system creates prevailing wage history records and stores them in history tables. You can generate the Prevailing Wage History report (R079440) to review and print records from these prevailing wage history tables:
-
Employee Transaction History (F0618)
-
Prevailing Wage Transaction History (F079440)
-
Prevailing Wage Fringe History (F079445)
3.2.11 Setting Processing Options for Prevailing Wage Transaction Detail Report (R079430D)
Processing options enable you to specify the default processing for programs and reports.
3.2.11.1 Display
Use these processing options to determine what information is displayed on the report.
- 1. Print Fringe Detail
-
Specify whether to include the fringe details in the report.
Values are:
Blank: Do not include fringe details.
1: Print fringe details.
- 2. Payroll ID
-
Specify the Payroll ID to use if you are running the report from Batch Versions.
3.2.12 Setting Processing Options for Prevailing Wage Transaction Summary Report (R079430S)
Processing options enable you to specify the default processing for programs and reports.
3.2.12.1 Display
Use these processing options to determine what information is displayed on the report.
- 1. Print Fringe Detail
-
Specify whether to include the fringe details in the report.
Values are:
Blank: Do not print fringe details.
1: Print fringe details.
- 2. Payroll ID
-
Specify the Payroll ID to use if you are running the report from Batch Versions.
3.2.13 Setting Processing Options for Prevailing Wage History Report (R079440)
Processing options enable you to specify the default processing for programs and reports.
3.2.13.1 Process
Use these processing options to determine what information the report should process and how to display it.
- 1. Begin Date (Required)
-
Specify the starting date for the report.
- 2. End Date (Required)
-
Specify the ending date for the report.
- 3. Summarize Prevailing Wage Transactions
-
Specify whether the prevailing wage transaction records should be summarized by the employee base rate and employee fringe rate on the report. If you specify that the records should not be summarized, the report displays each prevailing wage transaction record from history.
Values are:
Blank: Do not summarize the prevailing wage transactions.
1: Summarize the prevailing wage transactions.
- 4. Print Fringe Detail
-
Specify whether to include the fringe details in the report.
Values are:
Blank: Do not print fringe details.
1: Print fringe details.
- 5. Adjustment Type
-
Specify the prevailing wage adjustment types to be processed for the report.
Values are:
Blank: Process all adjustment types.
1: Process lump sum timecard adjustments.
2: Process flat amount benefit adjustments.
3: Process historical prevailing wage transaction records that did not result in any type of adjustment.
3.2.14 Example: Calculating Fringe Rate for a Job
This example illustrates how to calculate the fringe rate for a job. The fringe rate is calculated based on the job and fringe basis DBA. The amount that is calculated is computed for each pay type because each pay type is set up with a unique multiplier that is defined in the F079425 table.
The system uses these calculations to determine the fringe rate for a job:
| Calculation Method | Calculation |
|---|---|
| Annualize Rate | (DBA Amount for Pay Type x Pay Frequency)/((Hours Per Year x (Job Gross/Total Check Gross)) x (Pay Type Gross/Job Gross)) x Multiplier |
| Timecard Hours | (DBA Amount for Pay Type/Total Pay Type Hours) x Multiplier |
In this example, the Annualize Rate method is used and the following data is set up:
-
Fringe basis DBAs
-
1005, $285
-
1008, $47
-
8022, $384.14
-
-
Timecards
-
Timecard1/Job1: 46 hours, PT1, $2162
-
Timecard2/Job2: 34 hours, PT1, $1598
-
Timecard3/Job2: 4 hours, PT100, $282
-
To calculate the minimum fringe rate for Job1 and Job2:
-
First, you calculate the fringe basis DBAs for each timecard and job:
DBA Code Timecard/Job Fringe Basis DBA 1005 Timecard1/Job1 (2162/4042) x 285 = $152.44 Timecard2/Job2 (1598/4042)x 285 = $112.67 Timecard3/Job2 (282/4042) x 285 = $19.89 1008 Timecard1/Job1 (2162/4042) x 47 = $25.14 Timecard2/Job2 (1598/4042) x 47 = $18.58 Timecard3/Job2 (282/4042) x 47 = $3.28 8022 Timecard1/Job1 (2162/4042) x 384.14 = $205.40 Timecard2/Job2 (1598/4042) x 384.14 = $151.86 Timecard3/Job2 (282/4042) x 384.14 = $26.88 -
Next, calculate the fringe rate for Job1:
DBA Code Timecard/Job Fringe Rate Calculation 1005 Timecard1/Job1 (112.67 x 26)/((2080 x (2162/4042)) x (2162/2162)) = $3.562 1008 Timecard1/Job1 (18.58 x 26)/((2080 x (2162/4042)) x (2162/2162)) = $0.587 8022 Timecard1/Job1 (151.86 x 26)/((2080 x (2162/4042)) x (2162/2162)) = $4.801 The total fringe rate for Job1 is $3.562 + $0.587 + $4.801 = $8.95.
-
Calculate the fringe rate for Job2:
DBA Code Timecard/Job Fringe Rate Calculation 1005 Timecard2/Job2 (112.67 x 26)/((2080 x (1880/4042)) x (1598/1880)) = $3.562 Timecard2/Job3 (19.89 x 26)/((2080 x (1880/4042)) x (282/1880)) = 3.562 x 1.5 = $5.343 1008 Timecard2/Job2 (18.58 x 26)/((2080 x (1880/4042)) x (1598/1880)) = $0.587 Timecard2/Job3 (3.28 x 26)/((2080 x (1880/4042)) x (282/1880)) = 0.587 x 1.5 = $0.881 8022 Timecard2/Job2 (151.86 x 26)/((2080 x (1880/4042)) x (1598/1880)) = $4.801 Timecard2/Job3 (26.88 x 26)/((2080 x (1880/4042)) x (282/1880)) = 4.801 x 1.5 = $7.202 The total fringe rate for Job2 is $3.562 + $5.343 + $0.587 + $0.881 + $4.801 + $7.202 = $22.376.
Compare the total fringe rate for Job1 and Job2 with the amount in the F069106 table for the prevailing wage DBA and job. The method of calculation used in the comparison is defined in the F079420 table.
3.3 Processing U.S. Payment Information
This section provides an overview of the payment process, lists prerequisites, and discusses how to create the flat file for automatic deposits.
3.3.1 Understanding U.S. Payments
After you process employees through pre-payroll, you can print payments for those employees. JD Edwards EnterpriseOne Payroll enables you to create these types of payment information:
-
Paychecks.
-
Payment advice slips for employees who receive automatic deposits.
-
Automatic deposit flat files to send to the banking institution.
3.3.1.1 Flat File for Automatic Deposits
When you print payments for a payroll cycle that includes at least one employee who receives payment through a direct deposit, you must create an automatic deposit bank file. Using the Create Auto Deposit Tape File program (R07235), the system automatically creates the flat file for automatic deposits. The flat file provides the bank with information from the system that the bank must have to process the automatic deposits.
The flat file that the system creates is named PayACH and is stored in the export folder. Using a text editor, review the PayACH file to verify that the information is correct and complete. If errors occur when you create the file, you can recreate it as many times as necessary until you begin the next payroll cycle, at which point the new information overrides the information in the existing file.
If the file contains errors, delete it and then recreate the file. Otherwise, copy the file to the appropriate media (such as diskette or magnetic tape) and send it to the bank. Consult the system administrator for assistance with this task.
The PayACH file contains five record types, which comply with the requirements of the National Automated Clearing House Association (NACHA). This table describes each record type that is contained in the flat file:
| Record | Description |
|---|---|
| Record 1: File Header record | This record contains the file header information, including the origin and the intended destination of the file. |
| Record 5: Company/Batch Header record | This record contains detailed information about the company and the auto deposit batch. |
| Record 6: Employee Entry Detail record | This record contains detailed information about employee bank account numbers, employee identification numbers, names, and deposit amounts. |
| Record 8: Company Batch Control record | This record contains the monetary amount totals for each company in the batch. |
| Record 9: File Control record | This record contains the totals for the entire flat file. |
3.3.2 Prerequisites
Before you complete the tasks in this section:
-
Verify that the export folder exists, where package name is the name of the software environment and release (for example, PROD733). If the export folder does not exist, you must create it. Contact the system administrator or technical support for assistance with this task.
-
Set up the conversion table that supports Unicode processing.
-
Review the processing options for the Create Auto Deposit Tape File program (R07235), and set up payment types to use the correct payment programs.
-
Process pre-payroll.
See "Processing Pre-Payroll" in the JD Edwards EnterpriseOne Applications Payroll Implementation Guide.
3.3.3 Forms Used to Create the Flat File for Automatic Deposits
| Form Name | FormID | Navigation | Usage |
|---|---|---|---|
| Work With Pay Cycle Workbench | W07210A | Payroll Workbench menu (G07BUSP11), Pay Cycle Workbench | Access the payroll ID for which you want to create the flat file. |
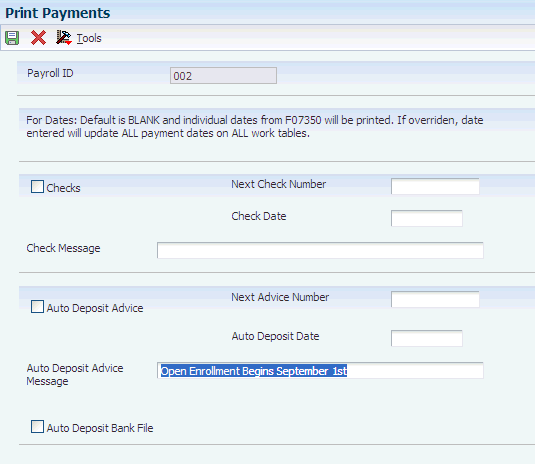
| Print Payments | W07230A | On the Work With Pay Cycle Workbench form, select the payroll ID, and then select Payments, Print Payments from the Row menu. | Create the flat file for automatic deposits. |
3.3.4 Creating the Flat File for Automatic Deposits
Access the Print Payments form.
3.4 Printing Retroactive Pay on Payment Stubs
This section includes an overview of the retroactive payment printing process and discusses how to:
-
Set up states for retroactive pay printing.
-
Set retro pay processing options for the Payroll Workbench.
-
Set retro pay processing options for the Interim Payment Workbench.
-
Change the dates for payroll processing.
3.4.1 Understanding the Retroactive Payment Printing Process
Recently, some states have changed labor legislation regarding the printing of retroactive pay on employee pay stubs and payment advice slips. Some states now require that any retroactive payments that are included in an employee's payment are printed separately from current earnings, and that the date range that is associated with those retroactive payments is also printed.
To ensure that this information prints correctly for all payments that occur in states that require this information, you must complete these steps:
-
Set up each state that requires retroactive pay to be printed separately.
-
Set the processing options for the Payroll Workbench (P07210) and the Interim Payment Workbench (P07210I).
-
Enter timecards that include work dates that are earlier than the beginning date of the current pay period.
-
Change the From Date of the current payroll cycle to include the retroactive timecards.
To set up retroactive pay information by state, you use the Paystub Retro Pay State Setup program (P07212). This program enables you to specify which states require you to print retroactive pay separately.
After you specify which states require retroactive pay to print separately, you set the processing options to specify that you want to print retroactive pay separately. The same processing option exists for both the Payroll Workbench (P07210) and the Interim Payment Workbench (P07210I). These options must be set to 1 in order for retroactive pay to print separately on employee pay stubs.
After you have set up the system to print retroactive pay correctly, you can enter timecards for retroactive pay. To be considered a retroactive timecard, the work date on the time card must be earlier than the pay period beginning date of the current payroll cycle.
After you have entered retroactive timecards, you can process them through a payroll cycle or through an interim payment process. When you process the payment through a regular payroll cycle, you must first change the date in the From field in the Dates section of the Pre-Payroll Processing form to a date that is earlier than the pay period beginning date. Changing the date enables the system to include the retroactive timecards in the payroll cycle.
|
Note: You cannot enter a date that is more than two months earlier than the actual pay period beginning date. To process timecards with earlier work dates, you must use the Interim Payment Workbench. |
During payroll processing, or interim processing, the system determines whether any timecards exist with a work date that is earlier than the original pay period beginning date. If timecards that meet this criterion exist, the system then determines whether the timecards are associated with a state that has been set up to print retroactive pay separately. If all of the criteria is met, the system prints retroactive pay information as a separate line on the employee's pay stub or payment advice.
Additionally, the system enters a date range in the description below the retroactive pay. The date range that is printed on the payment is the date that is manually entered in the From field and the ending date is one day prior to the original pay period begin date.
For example, if the current pay period is June 15 through June 30, and you want to process retroactive timecards with work dates in May, change the From field in the Dates section of the Pre-Payroll Processing form to May 1. When payments and advices are printed, all retroactive pay will be listed separately, and the description for each item is the date range of May 1 through June 14.
|
See Also: |
3.4.2 Forms Used to Print Retroactive Pay
| Form Name | FormID | Navigation | Usage |
|---|---|---|---|
| Work With Paystub Retro State Setup | W07212A | System Setup (G07BUSP4), Retro Pay State Setup | Use this form to review existing state setup or to access forms to set up additional states. |
| Paystub Retro State Setup | W07212B | Click Add on Work With Paystub Retro State Setup. | Set up states for retroactive pay printing. |
| Work With Pay Cycle Workbench | W07210A | Payroll Workbench (G07BUSP11), Pay Cycle Workbench | Select a payroll ID for which you want to change the dates. |
3.4.3 Setting Up States for Retroactive Pay Printing
Access the Paystub Retro State Setup form.
- Statutory Code
-
Enter the two-character code that specifies the state for which you are setting up retroactive payment information. Values are stored in UDC (06/SC).
- Print Retro Detail
-
Enter a code to specify whether to print retroactive pay separately for the specified state. Values are:
Y: Print retroactive pay information separately.
N: Do not print retroactive pay information separately.
3.4.4 Setting Retro Pay Processing Options for the Payroll Workbench
You use processing options to specify default processing information for a process or program.
|
Note: This task discusses only the options that pertain to printing retroactive pay. |
3.4.4.1 Print Tab
Use this option to specify whether retroactive payment information prints separately on employee payments.
- 1. Print Retro Pay Detail on the Pay Stub
-
Use this processing option to specify whether to print retroactive pay information separately on employee payments. To print this information separately, in addition to setting this option, you must also specify which states require this information to be printed separately, and you must enter timecards that are associated with one of those states and that include a work date earlier than the pay period begin date. Values are:
Blank or 0: Do not print retro pay detail on the pay stub.
1: Print retropay detail on the pay stub.
3.4.5 Setting Retro Pay Processing Options for the Interim Payment Workbench
You use processing options to specify default processing information for a process or program.
|
Note: This task discusses only the options that pertain to printing retroactive pay. |
3.4.5.1 Print Tab
Use this option to specify whether retroactive payment information prints separately on employee payments.
- 1. Print Retro Pay Detail on the Pay Stub
-
Use this processing option to specify whether to print retroactive pay information separately on employee payments. To print this information separately, in addition to setting this option, you must also specify which states require this information to be printed separately, and you must enter timecards that are associated with one of those states and that include a work date earlier than the pay period begin date. Values are:
Blank or 0: Do not print retro pay detail on the pay stub.
1: Print retropay detail on the pay stub.
3.4.6 Changing the Dates for a Payroll Cycle
Access the Pre-Payroll Processing form.
See "Processing Pre-Payroll" in the JD Edwards EnterpriseOne Applications Payroll Implementation Guide.
- From
-
Enter a date that is earlier than the original pay period begin date. You enter an earlier date to include retroactive timecards in the payroll cycle. This date cannot be more than two months earlier than the original pay period begin date. The system uses the date that you enter in this field as the beginning date in the description that prints for each retroactive pay item on an employee payment.
3.5 Reviewing Country-Specific Payroll Cycle Reports
This section provides an overview of U.S. payroll reports and discusses how to:
-
Set processing options for the Employee Social Security Register (R073665).
-
Set processing options for the Workers' Compensation Register (R073601).
-
Set processing options for the General Liability Insurance Register (R073651).
3.5.1 Understanding U.S. Payroll Reports
During the payroll cycle, you can print reports from the Payroll Workbench. These reports include data for the payroll ID that you select when you process the reports. In addition to the reports that are available for the U.S., there are other reports that can be processed for all supported countries.
3.5.1.1 Reviewing the Federal Tax Distribution Summary Report (R073170)
You use the information on the Federal Tax Distribution Summary report (R073170) to determine the federal tax burden for a payroll cycle. Generating this report during pre-payroll enables you to promptly submit federal taxes. The report lists totals of taxable wages and federal tax amounts for the current period and for month-to-date. It also lists tax amounts by company for quarter-to-date and year-to-date.
You can generate this report during a payroll cycle only. You cannot generate reports from the Report Setup form.
3.5.1.2 Reviewing the State Tax Distribution Summary Report (R073162)
You use the information on the State Tax Distribution Summary report (R073162) to determine the state tax burden for this payroll cycle. The State Tax Distribution Summary report lists totals of taxable wages and state tax amounts for the current period and month-to-date. It also lists tax amounts by company for quarter-to-date and year-to-date.
You can generate this report during a payroll cycle only. You cannot generate reports from the Report Setup form.
3.5.1.3 Reviewing Social Security and Medicare Register Reports (R073665)
The Employee Social Security Register program (R073665) produces reports that list the employee and employer portions of taxes withheld for Social Security tax and Medicare. You can generate these reports during a payroll cycle only. You cannot generate reports from the Report Setup form. This table describes each report that is created when you run the Employee Social Security Register program:
| Report | Description |
|---|---|
| Employee Social Security Register | This report lists the employee-paid portion of Social Security taxes. It includes this information:
|
| Employer Social Security Register | This report lists the employer-paid portion of Social Security taxes. It includes this information:
|
| Employee Medicare Register | This report lists the employee-paid portion of Medicare taxes. It includes this information:
|
| Employer Medicare Register | This report lists the employer-paid portion of Medicare taxes. It includes this information:
|
3.5.1.4 Reviewing the Workers Compensation Register Report (R073601)
You can generate the Workers' Compensation Register report (R073601) to review the rates paid by the company per employee for workers' compensation insurance. The rates that an employer pays for workers' compensation insurance vary by job type. In some cases, employees, rather than employers, might be required to pay workers' compensation premiums. In such situations, the reports contain the employee-paid amounts.
The report includes:
-
Employee listing by company.
-
Employee hours and gross wages.
-
Employee job type and job step.
-
Excludable and overtime wages.
-
Premium amounts for each employee.
-
Totals for each work state and company.
-
Grand totals for the report.
You can generate the report in either of these formats:
-
Detailed report, which includes each line of time entry.
-
Summary report, which consolidates the information by employee, company, tax area, workers' compensation code, job type, and job step.
The information provided in the Workers' Compensation Register report is based on the Employee Transaction History table (F0618).
You can generate this report during a payroll cycle only. You cannot generate reports from the Report Setup form.
3.5.1.5 Reviewing the General Liability Insurance Register Report
You can generate the General Liability Insurance Register report (R073651) to review the rates paid by the company per employee for general liability insurance. The employer pays one standard rate for general liability insurance for each employee. The General Liability Insurance Register report is identical to the Workers' Compensation Register report, except for the actual amounts that appear in the Workers' Compensation Amount field. The system bases the totals on the general liability rate.
The information provided in this report is based on the Employee Transaction History table (F0618).
You can generate this report during a payroll cycle only. You cannot generate reports from the Report Setup form.
3.5.2 Setting Processing Options for the Employee Social Security Register (R073665)
Processing options enable you to specify the default processing for programs and reports.
For programs, you can specify options such as the default values for specific transactions, the availability of fields on a form, and the version of the program that you want to run.
For reports, processing options enable you to specify the information that appears on reports. For example, you set a processing option to include the fiscal year or the number of aging days on a report.
Do not modify JD Edwards EnterpriseOne demo versions, which are identified by the prefix ZJDE or XJDE. Copy these versions or create new versions to change any values, including the version number, version title, prompting options, security, and processing options.
3.5.2.1 Defaults
Although processing options are set up during JD Edwards EnterpriseOne implementation, you can change processing options each time that you run a program.
- 1. Enter the FICA Maximum Wage Base
-
Use this processing option to specify the FICA maximum wage base that applies to the Employee and Employer FICA Register.
3.5.3 Setting Processing Options for the Worker's Compensation Register (R073601)
Processing options enable you to specify the default processing for programs and reports.
3.5.3.1 Employee
- 1. Select the employee number to print.
-
Use this processing option to specify the employee number that the system prints on the report. Values are:
1: Address Book number
2: Social Security number
3: Third employee number
3.5.4 Setting Processing Options for the General Liability Insurance Register (R073651)
Processing options enable you to specify the default processing for programs and reports.
3.5.4.1 General
- Select the Employee number to Print.
-
Use this processing option to specify the employee number that the system prints on the report. Values are:
1: Address Book number
2: Social Security number
3: Third employee number
3.6 Entering Tax Overrides for an Interim Payment
This section provides an overview of interim payment tax overrides and discusses how to enter tax overrides for interim payments.
3.6.1 Understanding Interim Payment Tax Overrides
When you enter interim payments, you can override employee tax information so that the interim payment includes the amounts that you want to appear on the payment. You can override tax information on the Interim Entry form, or you can access the employee's current tax exemption and credit information from the Interim Workbench and override that information to calculate the interim payment.
|
Note: When you override tax information from the Interims Workbench, the employee's permanent tax information does not change. The overridden information is used only for the calculation of the interim payment that you are entering for the employee.Also, if you are using the batch method to process interim payments, you must enter tax overrides using the Tax Overrides option from the Form menu, because the tax tabs on the Interim Entry form are disabled for batch processing. |
|
Note: You cannot override state unemployment insurance rates on an interim payment. If you want the state unemployment insurance rate (tax type C) to calculate at a rate different than the Federal rate, you must set up records for tax type C at the state level using the Unemployment Insurance Rate Revisions program (P079221). However, if you calculated state unemployment insurance on past employee payments using the wrong rate, you can enter adjustment interim payments to correct those amounts. |
To enter tax overrides, you must first complete the initial steps to enter an interim payment.
3.6.2 Entering Tax Overrides for Interim Payments
Access the Interim Entry form. Select the US Exemptions/Credits tab.
You can enter up to four tax overrides on the US Exemptions/Credits tab. To enter additional tax overrides for the interim payment, select Tax Overrides from the Form menu.
If you are using batch processing to enter interim payments, on Work With Interims Workbench, select the interim ID in the detail area, select Process Interims from the Row menu, and then select Process Single.
If you are running multiple versions of the Interim Calculation program, select Process Interims from the Row menu and then select Process Multiple.
Figure 3-7 Interim Entry form: US Exemptions/Credits tab

Description of ''Figure 3-7 Interim Entry form: US Exemptions/Credits tab''