48 Order Entry Mobile Application
This chapter discusses these topics:
-
Section 48.2, "Setting Up the Order Entry Mobile Application"
-
Section 48.3, "Creating Sales Orders Using the Order Entry Mobile Tablet Application"S
|
Important Note: Before using the mobile applications, Oracle strongly recommends that users have a complete understanding of how to use the associated processes and applications in the JD Edwards EnterpriseOne base software.For additional information about the processes and applications associated with the mobile application discussed in this chapter, see these topics in the JD Edwards EnterpriseOne Sales Order Management Implementation Guide: |
48.1 Order Entry Mobile Application Overview
You use the Order Entry mobile application to provide your sales force with a front-end order entry interface that they can use on a mobile tablet device. Using the Order Entry mobile tablet application, users can:
-
Locate items in product catalogs.
-
View item details, such as pictures, description, available quantity, and price.
-
Add items to an order by selecting from a catalog, manually typing in an item, or scanning the item.
-
Update the quantity and unit of measure.
-
View order details and subtotals.
-
Enter customer and contact information at checkout.
-
Select the payment method to complete the order.
|
Note: The Order Entry mobile application does not allow you to create work orders, configured orders, or purchase orders.The application supports stock items (line type S) only. |
This table lists the applications that are available to enter sales orders:
| Type of Application | Additional Information |
|---|---|
| Base EnterpriseOne Application | For the Order Entry mobile tablet application, there is no specific JD Edwards EnterpriseOne base program that performs the same function. This mobile application uses features and functionality from several different base applications to enable sales personnel to create orders for customers while they are away from the office.
The mobile application is based on the Sales Order Entry Inquiry and Confirmation program (P42105), which was created specifically for use with this mobile application. |
| Tablet Application | Mobile Order Entry - Tablet (M42010)
To download the application to your tablet, search on the following text in the application store:
|
Before using the Mobile Order Entry tablet application, you must perform the following setup tasks:
-
Set processing options for the Sales Order Model program (P4210).
-
Set processing options for the Sales Order Entry program (P42101).
-
Set processing options for the Sales Order Entry Inquiry and Confirmation program (P42105).
-
Set processing options for the Mobile Order Entry - Tablet program (M42010)
-
Set up the email confirmation process.
This step is required only if you are using the email confirmation feature.
-
Set up catalogs to display in the mobile application.
-
Set up a default Branch/Plant for each user of the mobile application.
-
Set up user preferences in the mobile application.
-
Set up the prepayments processing options for these programs: Sales Order Entry (P4210), Sales Order Entry (P42101), Credit Check (P42050), Print Invoices (R42565), and Sales Update (R42800).
This step is required to process the authorization information received from the third-party credit card plug-in when the payment mode is by credit card.
48.1.1 Differences and Limitations: Mobile Order Entry
Mobile applications are intended to be a simplified version of the applications that are available in the base software. In most cases, these applications provide a subset of the functionality available in the base software.
For the Order Entry mobile tablet application, there is no specific JD Edwards EnterpriseOne base program that performs the same function. This mobile application uses features and functionality from several different base applications to enable sales personnel to create orders for customers while they are away from the office.
Barcode Scanning
This application is designed to accept data entry from a barcode scanner. To use this functionality, you must create barcodes that represent a single field in the JD Edwards EnterpriseOne system. This application does not accept barcodes that include data for multiple fields.
Additionally, you must specify, in the processing options of the M42010 program, which item number field is used for scanning. You can specify the 2nd Item Number, 3rd Item Number, or Short Item Number.
For example, if you want users to be able to scan the item number with their device, and you have selected 2nd Item Number in the processing options, you must create a barcode that represents only the value in the 2nd Item Number field for that item. The barcode cannot include both the item number and quantity, for example.
You can generate barcodes using services such as those offered by Barcodes Inc.
|
Note: Oracle is not affiliated with Barcodes Inc., and does not require or recommend that you use this service to create your barcodes. |
Item Image Display
If you want images from the Item Master to display in the Order Entry mobile application, the item image must be attached to the item master as the first attachment. If the first attachment in the item master is not an image file, the Order Entry mobile application displays a default image next to the item.
Credit Card Processing
This application is designed to integrate with a third-party solution that can process credit card transactions at the point of sale. The third party referred to here is a third-party hardware device and a software plug-in written for the specific hardware device.
The third-party solution that you select must be able to perform all of the processing, including scanning the credit card, transmitting the credit card information to the credit card bank, and receiving purchase authorization from the bank. The third party must provide security to protect the credit card information. The Oracle JD Edwards EnterpriseOne system does not interact with or store the customer's credit card information.
The tablet application interfaces with the third party only to:
-
Provide information (sales order header and order totals) necessary to process the transaction.
-
Receive the authorization information (transaction date, transaction amount, and authorization code) returned from the third party.
The JD Edwards EnterpriseOne system stores the authorization information in the Prepayments Transaction table (F004201) to support processing the sales order through the sales update and accounts receivable processes.
For additional information, refer to the document "JD Edwards EnterpriseOne Mobile Sales Third Party Plug-In" on the Oracle Learning Library site.
https://apexapps.oracle.com/pls/apex/f?p=44785:24:0::::P24_CONTENT_ID,P24_PREV_PAGE:11488,1
48.2 Setting Up the Order Entry Mobile Application
Before using the Order Entry mobile tablet application, you must complete these steps:
-
Set up the email confirmation process.
This step is required only if you are using the email confirmation feature.
-
Set processing options for the Sales Order Entry program (P4210).
-
Set processing options for the Sales Order Entry program (P42101).
-
Set processing options for the Sales Order Entry Inquiry and Confirmation program (P42105).
-
Set processing options for the Mobile Order Entry - Tablet program (M42010).
-
Set User-Specific Information for the Order Entry mobile tablet application.
This step can be completed in any order, but must be completed before the user logs into the application.
-
Set the prepayments processing options for these programs: Sales Order Entry (P4210), Sales Order Entry (P42101), Credit Check (P42050), Print Invoices (R42565), and Sales Update (R42800).
This step is required to process the authorization information received from the third-party credit card plug-in when the payment mode is by credit card.
48.2.1 Setting Up the Email Confirmation Process
If you have set up the Order Entry mobile tablet application to send email confirmation messages upon checkout, you must set up the message notification process. The Order Entry mobile application publishes email confirmation messages using an Embedded BI report. The setup includes the following tasks which must be completed in the order specified:
-
Adding the R42105.rtf template.
-
Creating the report definition.
-
Associating the R42105 version with report definition.
-
Setting the processing options for the P42105 program.
For additional information about using embedded Oracle Business Intelligence, see Embedded Oracle Business Intelligence for JD Edwards EnterpriseOne.
48.2.1.1 Adding the R42105.rtf Template
To add the template:
-
Start the BI Publisher Object Repository (P95600).
-
Click Add and complete the following fields as directed:
-
Object Name: TP42105TR01
-
Object Description: Sales Order Confirmation Email Template
-
Object Type: TR RTF Template
-
Product Code: 42B
-
Product System Code: 42B
-
Object Region: Enter the country code. For example, enter US.
-
Object Language: Enter the language code. For example, enter EN.
-
-
Click OK, and the file browser window appears.
-
Select the version of the RTF template R42105.rtf that you want to use.
-
In the Effective Dates section, complete the Start Date field, leave the End Date field blank, and then click OK to save the record.
48.2.1.2 Creating the Report Definition
To create the report definition:
-
Start the BI Publisher Report Definitions (P95620).
-
Click Add and complete the following fields as directed:
-
Report Definition: RD4210501
-
Blind Submission: Select this option.
-
Description: Enter a description.
-
Product Code: 42B
-
Product System Code: 42B
-
Source Type: 1 (Batch Version)
-
Source UBE: R42105
-
Source Version: XJDE0001
-
Template Name: TP42105TR01
-
-
Click Next.
-
Select the Data Driven Delivery and E-mail Address options.
-
On the Bursting/Delivery tab, complete the following fields as directed:
-
Data Driven Delivery: Select this option.
-
E-mail Address: Select this option.
-
E-mail Address field: ./EmailAddressow_ID44
-
Language: Enter the language code. For example, enter EN
-
Data Driven Recipient: EmailAddressow_ID44
-
Data Item for Subject and Body: 42SOCONF
-
-
Click the Define Values button.
-
In the Structure Member Value field, enter /SOConfKey_ID25 and then click OK.
-
Click End to save the report definition.
48.2.1.3 Associating the R42105 Version with the Report Definition
To associate the version with the report definition:
-
From Batch Versions (P98305) inquire on R42105 and select version XJDE0001.
-
Check out the version. Use the Advanced option from the Row menu to complete this step.
-
From the Row menu, select Version Detail.
-
From the Form menu, select Report Definition.
-
In the Report Definition field, enter RD4210501 and then click OK until you return to the Work With Batch Versions form.
-
Check the version in. Use the Advanced option from the Row menu to complete this step.
48.2.2 Setting Processing Options for the Sales Order Entry Program (P4210)
This section discusses only those processing options that are specific to mobile processing. For additional information about these processing options, see Setting Processing Options for the Sales Order Entry Program (P4210).
In order for the Mobile Order Entry application to process order information, you must set the following processing options as specified.
-
On the Prepayment tab, set option 1 (Prepayment Processing) to 1 to enable prepayment processing updates to the EnterpriseOne database.
-
On the Commitment tab, set option 1 (Activate Availability Checking) to 1 enable the mobile application to perform availability checking.
After you set up the mobile version of the P4210, you then enter the version in the processing options for the P42101.
48.2.3 Setting Processing Options for the Sales Order Entry Program (P42101)
This section discusses only those processing options that are specific to mobile processing. For additional information about these processing options, see Setting Processing Options for the Sales Order Entry Program (P42101).
In order for the Mobile Order Entry application to process order information, you must set the following processing options as specified.
-
On the Versions tab, set option 1 (Sales Order Model Version) to the version of the P4210 that you set up for mobile processing.
-
On the Task Flow tab, set option 1 (Display Header or Detail) to blank. This option is required for the mobile application to function properly.
After you set up the mobile version of the P42101, you then enter the version in the processing options for the M42010.
48.2.4 Setting Processing Options for the Sales Order Entry Inquiry and Confirmation Program (P42105)
You use processing options to specify default processing information for a program.
48.2.4.1 Process
- 1. Send Sales Order Email Confirmation
-
Use this processing option to specify whether the mobile application initiates an email notification to the customer upon checkout. Values are:
Blank: Do not send confirmation.
1: Send confirmation.
- 2. Sales Order Email Confirmation Version (R42105)
-
Use this processing option to specify the version of the R42105 program that the mobile application uses when sending email confirmation messages. If you leave this option blank, the system uses version XJDE0001.
48.2.5 Setting Processing Options for the Mobile Order Entry - Tablet Program (M42010)
You use processing options to specify default processing information for a program.
48.2.5.1 Default
- 1. Default Customer Address Book Number (Required)
-
Use this processing option to specify the default customer number that is used by the mobile application. You might choose to set up a generic customer and enter that customer in this processing option. Using a generic customer enables the sales representative using the application to browse through products without entering customer details.
- 2. Select the Item Number Used for Device Scanning
-
Use this processing option to specify which item number your item bar codes are associated with for scanning purposes. Values are:
Blank: 2nd Item Number
1: Third Item Number
2: Short Item Number
48.2.5.2 Versions
- 1. Sales Order Entry Version (P42101)
-
Use this processing option to specify the version of the P42101 program that the mobile application calls. If you leave this option blank, the application uses version ZJDE0001.
- 2. Address Book Version (P01012)
-
Use this processing option to specify the version of the P01012 program that the mobile application calls. If you leave this option blank, the application uses version ZJDE0001.
- 3. Customer Master (P03013)
-
Use this processing option to specify the version of the P03013 program that the mobile application calls. If you leave this option blank, the application uses version ZJDE0001.
- 4. Contact Information (P01111)
-
Use this processing option to specify the version of the P01111 program that the mobile application calls. If you leave this option blank, the application uses version ZJDE0001.
- 5. Sales Order Entry Inquiry and Confirmation (P42105)
-
Use this processing option to specify the version of the P42105 program that the mobile application calls. If you leave this option blank, the application uses version ZJDE0001.
- 6. Order Template Revisions (P4015)
-
Use this processing option to specify the version of the P4015 program that the mobile application calls. If you leave this option blank, the application uses version ZJDE0001.
48.2.6 Setting Up Catalogs to Display in the Order Entry Mobile Application
For the Order Entry mobile tablet application to function as designed, users must create catalogs using the P4015 program before using the application. Catalogs are used to group items. Each catalog that is set up to display for the selected customer is listed, in tab format, across the top of the mobile application. Users can tap the tab to view the items in that catalog.
For instruction on setting up catalogs, see Creating Order Templates.
48.2.7 Setting Up User-Specific Information for the Order Entry Mobile Application
Before your employees can log into and use the mobile Order Entry application, each user must have a default branch/plant setup. For instructions on completing this task, see Setting Up Default Location Information.
Additionally, each user can specify their own user preferences when they install the application on their device. To set user preferences, access the settings on your mobile device, select the application that you want to configure.
For the Order Entry mobile tablet application, you use preferences to determine which scanning method you are using with the application. If you are using your device camera, the preference must be turned off. If you are using a Bluetooth device to scan items, you must turn the preference on.
If you set up a customized scanning process, the application does not use this preference.
Figure 48-1 Order Entry User Preferences
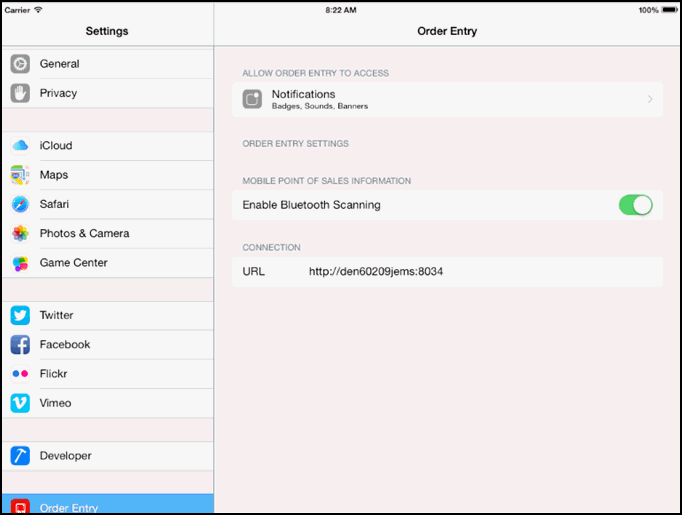
Description of ''Figure 48-1 Order Entry User Preferences''
For instructions about accessing the settings on your mobile device, see the user documentation for your device.
|
Note: Entering connection and URL information is discussed in a separate task. See Chapter 3, "Logging Into Mobile Enterprise Applications" |
48.3 Creating Sales Orders Using the Order Entry Mobile Tablet Application
The Order Entry mobile tablet application provides your sales personnel with a mobile checkout application that enables them to create sales orders while away from the office.
Before you can use the application, you must download and install the application from the application store on your device.
To open the application, tap the Order Entry icon and log in.
48.3.1 Entering a Sales Order with the Mobile Order Entry Tablet Application: Non-Scanning Method
To enter a sales order:
-
Open the application by tapping the icon on your device, and then log in. See Chapter 3, "Logging Into Mobile Enterprise Applications"
-
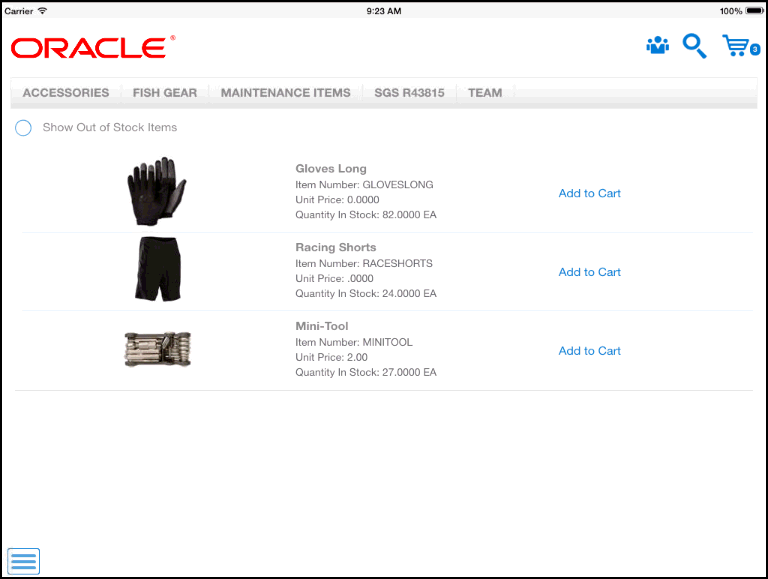
When the application opens, all of the available product catalogs are displayed at the top of the screen in tab format. You can scroll left or right through the tabs by swiping across your screen on the tabs. The tabs that are displayed when you log in are the catalog templates that are set up in the Customer Template Revisions program (P4015) for the default customer. The default customer is defined in the processing options of the mobile application.
-
To select a specific customer, and display only those catalogs associated with that customer, tap the customer button at the top right of the screen. Search for and select the customer. The application returns you to the home screen and displays the catalogs associated with the selected customer.
-
Tap one of the tabs to see the items in that catalog.
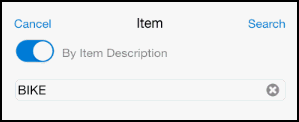
If you are not sure which tab contains the item you are searching for, tap the Search button at the top right of the screen to search for your item. Enter your search criteria, and then tap the Search button. Use the toggle button to determine whether you are searching by item number or by item description.
-
To view out of stock items, tap the Show Out of Stock Items option.
-
To view a larger image of the item, tap the image in the list.
-
To add an item to the shopping cart, tap the Add to Cart button.
For instructions on scanning items into the shopping cart, see Section 48.3.2, "Scanning Items Into a Sales Order Using the Order Entry Mobile Tablet Application"
-
On the Quantity window, specify the quantity and unit of measure, and then tap Add to Cart. Note that in order to select a unit of measure, you must have set up units of measure for that item using the Item Unit of Measure Conversions program (P41002). If no setup exists, you will not have unit of measure options in the drop down list. Also note that the Shopping Cart button at the top right of the screen displays the number of records in the shopping cart.
-
When you have finished adding items to the shopping cart, tap the Shopping Cart button at the top right of the screen.
-
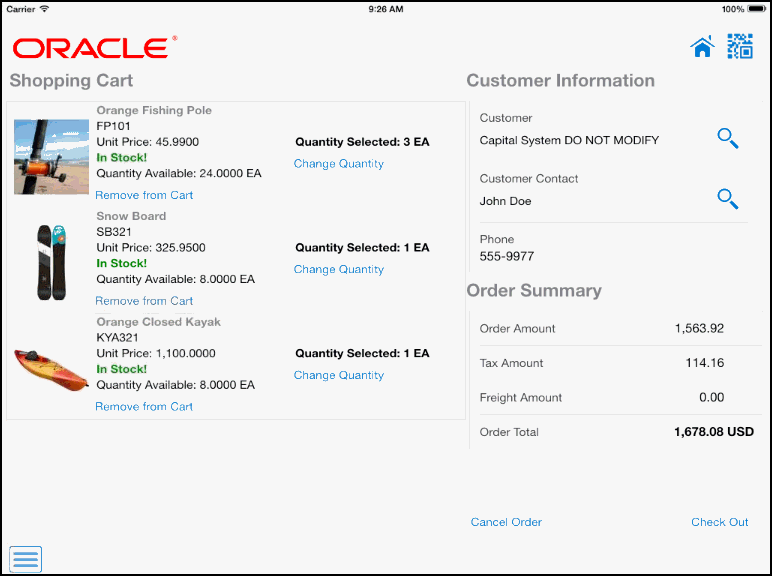
On the Shopping Cart screen, you can:
-
Remove an item from the cart by tapping the Remove from Cart button.
-
Change the item quantity by tapping the Change Quantity button. On the Quantity window, enter the new quantity information and then tap Save.
-
Change the customer by tapping the Search button next to the Customer field. Search for and select a new customer. The application returns you to the Shopping Cart screen with the new customer information.
-
Change the contact person by tapping the Search button next to the Customer Contact field. The system displays a list of available contacts for the selected customer. Select the contact you want to associate with the order. The primary contact, as defined in the customer master, is displayed by default.
-
Cancel the order by tapping the Cancel Order button.
-
-
Review and update the information in the shopping cart, and then tap the Check Out button at the bottom right.
The system performs all pricing calculations for the selected customer.
-
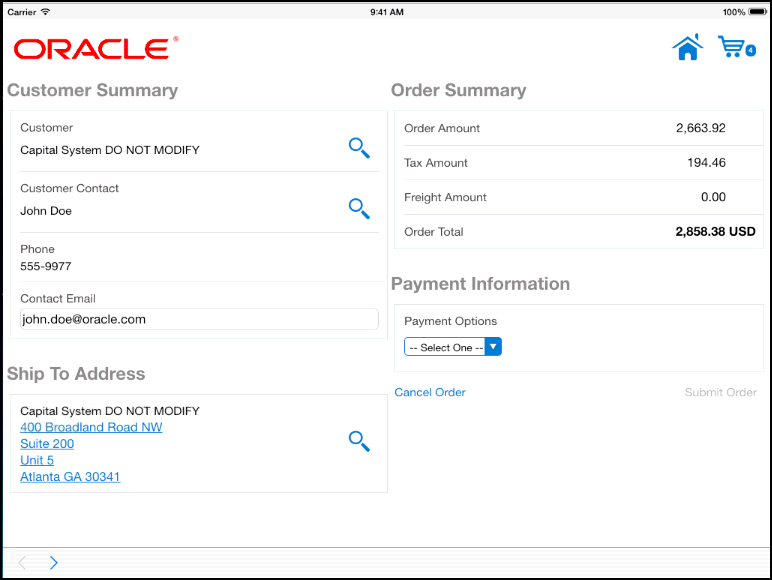
On the check out screen, you can:
-
Update the customer. If you change the customer, the system recalculates the price based on the customer setup.
-
Update the contact email address.
-
Select a new Ship To address by tapping the Search button next to the Ship To Address section. Select one of the available addresses to update the order. You must select from the available options. You cannot manually enter a ship to address.
-
-
Select one of these options from the Payment Options drop down list:
-
Check
If you select this option, you must enter the customer's check number. This check number is updated to the Sales Order Prepayments table (F004201) and is used for post-authorization processing.
Note that your processing options must be set to enable prepayments to use this option.
-
Bill Later
If you select this option, you can optionally enter the customer's purchase order number in the Reference field, if available.
-
Credit Card
This payment option is available in the drop-down list only when a third-party credit card processing device is connected to the tablet.
-
-
To submit the order tap the Submit Order button at the bottom right of the screen.
The system displays the order confirmation number, and sends a confirmation email to the email address specified in the order. Click OK to close the confirmation window.
Note:
When the payment mode is by credit card, the process that follows after you submit the order is different from other payment modes.When you tap the Submit Order button, the system transmits the sales order header information and the order totals to the third-party credit card plug-in. From this point, it is the responsibility of the third party to securely transmit the sales and credit card information to the customer's bank, and get the purchase authorized by the bank.
If the credit card processing is successful:
-
The third party plug-in returns an authorization message that is processed by the Order Entry tablet application.
-
The system updates the Prepayments Transaction table (F004201) with the authorization code, transaction date, and transaction amount.
-
The system creates the sales order and displays a confirmation message with the sales order number.
If the credit card processing is not successful:
-
The system displays an error message stating the reason. This message is transmitted by the third party plug-in.
-
The system does not create a sales order.
-
-
To log out of the application, tap the Menu button at the bottom left of the screen, and then tap Logout.
48.3.2 Scanning Items Into a Sales Order Using the Order Entry Mobile Tablet Application
This task outlines the specific steps required to scan items into the shopping cart using the Order Entry mobile tablet application. This task does not include instructions or information about updating the customer, checking out, or submitting the order. For additional information on entering sales orders using this application, see Section 48.3.1, "Entering a Sales Order with the Mobile Order Entry Tablet Application: Non-Scanning Method"
To scan items into the shopping cart:
-
Open the application by tapping the icon on your device, and then log in. See Chapter 3, "Logging Into Mobile Enterprise Applications"
-
Tap the Shopping Cart button at the top right of the page.
-
On the Shopping Cart screen, tap the QR Code button at the top right of the screen.
-
The Scan Item Number field appears at the bottom of the screen. Depending on your user preferences, complete one of the following steps:
-
If your preferences are set to enable Bluetooth scanning, and you have a Bluetooth-enabled scanning device connected to your mobile tablet, scan the barcode of the item you want to add to the shopping cart. You can also manually key in the item number in the Scan Item Number field and then tab out of the field to accept the entry.
-
If your preferences are set to disable Bluetooth scanning, the camera application on your device opens. Scan the bar code using the camera.
-
-
After you scan your item, it is added to the shopping cart. Use the Change Quantity button on the Shopping Cart screen to update the quantity information.
