11 About Implementing Discounts
This chapter describes how to set up different types of Oracle Communications Billing and Revenue Management (BRM) discounts.
For general information about discounting, see "About Discounts". For information about configuring discount modules, see "Configuring Discounting Modules and Components".
Getting Started
Before you begin setting up discounts, you need to determine the kinds of discounts you need and the conditions that should trigger the discounts. For example,
-
Do you need discounts based on time of day, billing-time discounts, or usage amounts?
-
What types of events and services will the discounts apply to? For example, will the discounts apply to recurring events or to one-time purchase events? How many discounts can apply to any given event?
-
What conditions are required to apply the discounts? For example, what level of charge or usage must be reached before the discount applies?
-
Can any discounts be shared among several accounts?
-
Will you need to perform credit checking for prepaid services?
Using Pricing Center to Configure Discounts
You configure discounts by using the Pricing Center application.
Common Setup Tasks
Every discount requires that you define the following Pricing Center discount components:
-
Defining a discount/chargeshare master. A discount master defines the EDR attributes associated with the discount. For more information, see "Filtering EDRs for Discounting".
-
Defining a discount/chargeshare rule. A discount rule defines the usage levels and the discount amount that applies to that usage. For more information, see "Defining How Discounts Are Applied".
-
Defining discount/chargeshare triggers and conditions. A discount trigger defines the conditions that must be met before a discount can be applied. For more information, see "Determining if Usage Qualifies for Discounting".
-
Defining a discount model. A discount model defines the events to discount and the rules and triggers that apply to those events. For more information, see "Grouping Discount Components into Discount Models".
-
"Defining a Discount Based on the Number of Subscriptions". A discount object is created when you define a discount. The discount object defines the type of discount, validity settings, and multiple discount handling. For more information, see "Creating Discounts".
You can create the discount components in any order, but you cannot finish configuring some components until you define others. See "Discount Configuration Dependencies".
Discount Configuration Dependencies
Some discount components require other components in their configurations. Therefore, you must define certain components before you can configure others.
Discount component dependencies:
-
Discount rules require discount masters.
-
Discount models require discount rules and triggers.
-
Discount objects require discount models.
You can define discount components that have prerequisites at any time by specifying a name and a description only, and configure them later after setting up the prerequisite components. This is convenient if you prefer to set up a discounting foundation before specifying the discount details.
Based on the component prerequisites, the following order is the most logical way to configure discounts:
-
Configure discount masters.
-
Configure discount triggers.
Note:
Discount triggers have no prerequisites. -
Configure discount rules.
-
Configure discount models.
Tip:
Optionally, you can define discount models in the next step when you define new discount objects. -
Create discount objects.
You define discount objects when you add discounts to deals. You define discount components by using the Pipeline Toolbox. Figure 11-1 shows the Pricing Center component, subcomponents, and what they specify:
Figure 11-1 Pricing Center Components Specification
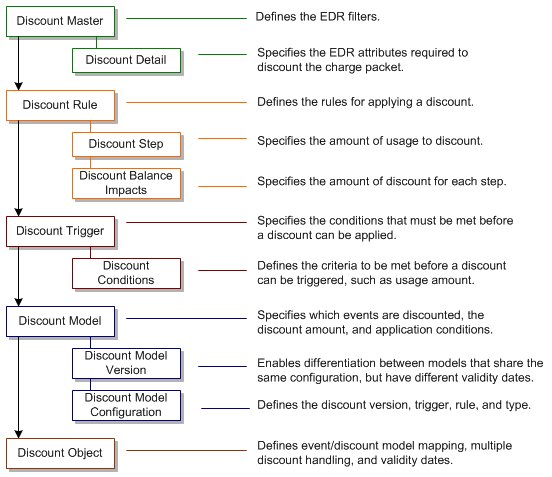
Description of ''Figure 11-1 Pricing Center Components Specification''
Example of Using Pricing Center to Configure a Free Minute Discount
The following example shows how you might configure a discount that consumes free minutes. To grant free minutes, you use a cycle event when you define the product. The discount you define determines how the free minutes are consumed.
In this example,
-
The plan grants 100 free minutes per month.
-
The discount consumes free minutes granted by the plan.
-
When calls are made, charges for free minutes are discounted and the free minutes balance is modified.
To set up a discount to consume the free minutes granted by the product:
-
Create a discount master as shown in Figure 11-2.
Figure 11-2 Discount/ChargeShare Master Creation
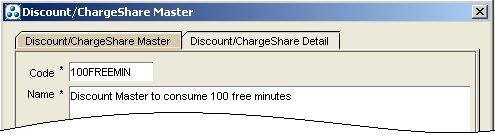
Description of ''Figure 11-2 Discount/ChargeShare Master Creation''
In the Discount/ChargeShare Detail tab, specify how to filter the EDR as shown in Figure 11-3. For this discount, the service code is TEL so only charge packets for telephone usage are discounted.
Figure 11-3 Discount/ChargeShare Filter Configuration
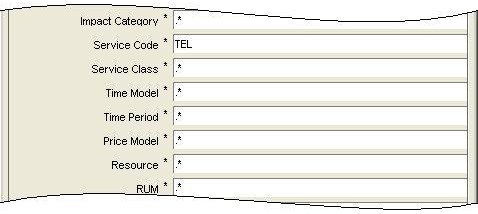
Description of ''Figure 11-3 Discount/ChargeShare Filter Configuration''
-
Define a discount trigger by entering the code and name as shown in Figure 11-4:
Figure 11-4 Discount/ChargeShare Trigger Configuration
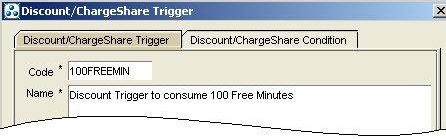
Description of ''Figure 11-4 Discount/ChargeShare Trigger Configuration''
-
Define the discount condition to check the account's balance of free minutes. For example, if the resource ID for free minute is 100010:
-
Define the condition expression as BAL(100010), where BAL is an expression that refers to the account balance. For more information, see "Using Expressions in Discount Models".
-
Define the condition operator as Less Than. You use this value because free minutes are stored as a negative value.
-
Define the condition value as 0.
This configuration, shown in Figure 11-5, means that the discount can be applied as long as there are free minutes (resource ID 1000010) available in the account balance.
Figure 11-5 Discount/ChargeShare Condition Configuration

Description of ''Figure 11-5 Discount/ChargeShare Condition Configuration''
-
-
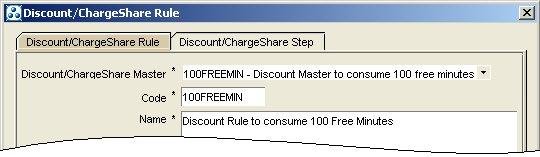
Create the discount rule:
Specify the Discount Master that you created in step 1 as shown in Figure 11-6. This associates the master with this rule.
Define the DRUM as the total quantity of minutes used for the call by entering TotalQ as the DRUM Expression. Specify Tiered as the Rule Type, and Quantity as the DRUM Type. Figure 11-7 shows these values populated.
Figure 11-7 DRUM, Rule Type and DRUM Type Configuration
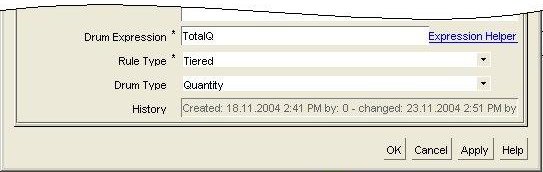
Description of ''Figure 11-7 DRUM, Rule Type and DRUM Type Configuration''
-
Create a discount step:
To make sure that free minutes are always available in the balance to cover the amount in the DRUM, define the lower threshold as 0 and the upper threshold as Bal(1000010) (the current balance of free minutes) as shown in Figure 11-8.
Figure 11-8 Discount/ChargeShare Step Creation
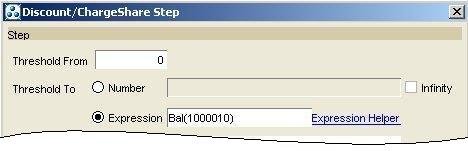
Description of ''Figure 11-8 Discount/ChargeShare Step Creation''
-
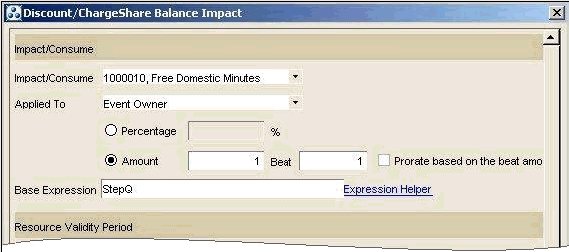
Set up two balance impacts: one to decrease the balance of free minutes used and another to discount the usage charges for those free minutes by 100%.
To decrease the balance of free minutes, define a balance impact that specifies the following values as shown in Figure 11-9:
-
Define the resource consumed as 1000010, Free Domestic Minutes.
-
Apply the discount to Event Owner.
-
Define the amount as 1 and the beat as 1. This means that for every minute used, a free minute is consumed.
-
Define the base expression as StepQ. For more information on expressions, see "Using Expressions in Discount Models".
Figure 11-9 Discount/ChargeShare Free Minutes Balance Impact Configuration
Description of ''Figure 11-9 Discount/ChargeShare Free Minutes Balance Impact Configuration''
To discount the usage charge for the free minutes used, define the second balance impact by specifying the following values as shown in Figure 11-10:
-
Define the currency resource consumed, for example, 840, US Dollar.
-
Apply the discount to Event Owner.
-
Define the percentage as 100%.
-
Define the base expression as StepC. For more information on expressions, see "Using Expressions in Discount Models".
Figure 11-10 Discount/ChargeShare US Dollar Balance Impact Configuration

Description of ''Figure 11-10 Discount/ChargeShare US Dollar Balance Impact Configuration''
-
Using RUMs with Discounts
For real-time discounts, an EDR can have multiple charge packets associated with the same ratable usage metric (RUM).
For pipeline discounts, discounts take place within a single charge packet, which is associated with a single RUM. An EDR can have several charge packets if more than one RUM applies.
Within a single charge packet, only discounts that apply to the associated RUM are eligible. For example, there are two discounts: one that discounts calls (duration) and one that discounts messages (bytes sent). If the RUM in the charge packet is Duration, only the discount for duration is applied.
When two discounts apply to the same RUM for a single charge packet, both discounts are considered. The order in which they are processed is based on the discount's priority, which you set when creating the discount. Whether subsequent discounts after the first are applied to the entire charge or only the remaining undiscounted charge depends on the type of discount. See "About Cascading, Parallel, and Sequential Discounts".
To apply a discount based on the RUM, you filter EDRs by specifying the RUM in the discount master.
Important:
When you filter EDRs based on a RUM, use the same RUM in your rating configuration to make sure the quantity that is passed in the EDR is compatible with quantity that is discounted.Following are three examples of discounts based on RUMs. The first example has two discounts for free minutes, the second example has discounts for free minutes and free bytes, and the third has discounts for free currency and free bytes. For all free minutes discounts, the RUM is set to Duration.
Example of Free Off-Peak Minutes and Free Anytime Minutes discounts
In this example, two cascading discounts apply to the same charge packet in this order:
-
Free Off-Peak Minutes: the RUM is Duration. This discount has the highest priority.
-
Free Anytime Minutes: the RUM is Duration.
The discounting module receives a charge packet for a 100-minute call that meets the conditions for both of these discounts. The account has 50 free off-peak minutes and 200 free anytime minutes.
-
The Free Off-Peak Minutes discount is applied first because it has the highest priority. All 50 free off-peak minutes are consumed, assuming that the call occurs during off-peak hours.
-
The Free Anytime Minutes discount is applied second and 50 free anytime minutes are consumed, leaving a balance of 150 free anytime minutes that are available for the next EDR.
Example of Free Minutes and Free Bytes discounts
In this example, two discounts apply to two separate charge packets:
-
Free Minutes: the RUM is Duration.
-
Free Bytes (sent or received): the RUM is Received or Sent.
The discounting module receives an EDR that meets the conditions for both of these discounts. The EDR contains a charge packet for 100 minutes used and another charge packet for 1000 bytes of data sent. The account has 50 minutes available from the Free Minutes discount, and 1024 bytes available from the Free Bytes discount.
-
When the charge packet with a RUM of Duration is rated, discounting finds the discount that filters EDRs based on Duration and applies the Free Minute discount. The 50 free minutes are consumed.
-
When the charge packet with a RUM of Sent or Received is rated, discounting finds the Free Bytes discount and 1000 of the free bytes are consumed.
Example of Free Currency and Free Bytes discounts
In this example, two cascading discounts apply to the same charge packet in this order:
-
Free Euros (as non-currency units): applies to all RUMS, so this discount can apply to any charge. This discount has the highest priority.
-
Free Minutes: the RUM is Duration.
A charge packet is received for a 100-minute call with a charge of 10 euros. The account has 5 euro units available from the Free Euros discount, and 100 minutes available from the Free Minute discount.
-
The Free Euros discount is applied first because it has the highest priority. The 5 free euros are consumed by the first 50 charged minutes of the call (because the 100-minute call is 10 euros, 5 euros of discount cover 50 minutes). That means 50 minutes remain to which the next discount can apply.
-
The Free Minutes discount is applied next. The 50 free minutes are consumed by the remaining 50 charged minutes of the call, leaving a balance of 50 free minutes that are available for the next EDR.
In this case, even though the balance impacts are applied to different resources, both discounts apply to the same quantity, minutes, so there is no conflict. To implement this type of discount, set the Free Euros discount to apply to any RUM by using an asterisk wildcard when specifying the RUM group, or set the Free Euros discount to apply to the same RUM (Duration) used by the other discount.
Setting Up Cycle-Event Discounts
To set up a cycle-event discount, use Pricing Center to define a discount model, including all necessary components such as versions, configurations, masters, rules, and so on. See "Common Setup Tasks".
When you define the discount in the Discount Attributes dialog box:
-
Select Subscription in the Discount type drop-down list.
-
Select the appropriate type of cycle event to discount in the Event list under Map an Event to a Discount Model. For example, to apply a discount on monthly fees, select Monthly Cycle Forward Event. To apply a discount on a flexible cycle fee, select the cycle forward event associated with that cycle.
Note:
If a cycle forward event type does not exist for the flexible cycle you wish to discount, you can configure one. See "About Flexible Cycles" in BRM Configuring and Running Billing.
Setting Up Billing-Time Discounts
A billing-time discount is based on an aggregated balance, for example, the total usage for the month or the number of months a customer has been a subscriber. The discount balance impacts are applied when billing is run. For more information, see "About Billing-Time Discounts".
To apply a billing-time discount, you set up the following components:
-
Aggregation counter resources. Non-currency resources that track the aggregated amount, for example, the total minutes used.
If you discount a currency balance based on the aggregated amount of a non-currency resource, you need two non-currency aggregation counters: one that tracks the currency charges and another that tracks the usage. For example, to apply 20% off all charges when the number of minutes used exceeds 500, you set up one counter that stores the aggregated minutes used and another counter that stores the aggregated charges. The discount evaluates the minutes used to determine whether to apply the discount, and then calculates the discount on the total charges counter.
Note:
When defining an aggregation counter resource for a billing-time discount, ensure that the resource validity period is set to the billing cycle start and end dates, and the Credit Limit and Credit Floor are set to None. For more information, see the discussion of setting resource validity period, and credit limits and thresholds in Pricing Center Help. -
Two discounts:
-
A usage discount that updates the aggregation counter resource. For example, if the billing-time discount is based on total monthly charges, create a discount that updates the aggregation counter when charges are applied. See "Defining Discounts that Update Aggregation Counters".
To update more than one aggregation counter, use two balance impacts. For example, you can increment a total charges counter and a minutes used counter.
-
A billing-time discount that calculates and applies a discount based on the amount in the aggregation counter, for example, 10% off all usage for the month, or 1000 bonus points for every year of subscription. The calculated discount is applied to the appropriate account balance, such as the currency balance or bonus points balance. See "Defining Billing-Time Discounts".
-
Defining Discounts that Update Aggregation Counters
The following are some specific values to consider when defining a discount that updates an aggregation counter:
-
Discount trigger
Any event that can impact the aggregation counter should trigger the discount; therefore, the condition in the trigger should have no restrictions. You can configure this in two ways:
-
By creating a trigger with no condition. This always applies the discount.
-
By creating a condition that is always passed. For example, use these values:
Condition Expression = 1
Condition Operator = Greater than
Condition Value = 0
-
-
Discount rule
-
DRUM
Because you always want to apply the balance impact, enter a DRUM value that always falls within the step threshold. For example, enter 1 in the DRUM Expression and make the step threshold unlimited.
-
Rule type
The DRUM always falls within the step threshold so the rule type can be either tiered or threshold.
-
Step
The entire amount in the DRUM should fall within the step so make the step threshold unlimited (0 to infinity).
-
Balance impact
If the billing-time discount is based on usage, the aggregation counter needs to be incremented an amount equal to the usage. To do this, use the following values:
- Impact/Consume = Counter_balance_resource_ID
- Amount = 1; Beat = 1
- Base Expression = TotalC if you are tracking total charges or TotalQ if you are tracking a quantity such as minutes used or bytes sent.
If the billing-time discount is based on a non-usage value, such as the number of subscription months, use the following values in the balance impact:
- Impact/Consume = Counter_balance_resource_ID
- Amount = The amount by which to increment the aggregation counter. This is typically 1.
- Base Expression = 1
-
Defining Billing-Time Discounts
The following are some specific values to consider when defining the discount that is applied when billing is run:
-
Discount trigger
A billing-time discount should be triggered when the amount in the aggregation counter meets the minimum necessary to apply the discount. Therefore, reference the aggregation counter in the condition expression, and enter the required minimum usage as the condition value. Whether the value should be less than or greater than the condition expression depends on whether the aggregation counter is tracked as a negative or positive amount. For example, a balance that tracks charges can be a positive amount and a balance of free minutes can be a negative amount. If there is no minimum amount required, the condition value is 0.
For example, if the billing-time discount applies 1 bonus point for every 10 minutes of usage, the condition can specify that there is at least 10 minutes in the aggregation counter, which can be defined as:
- Condition Expression = Bal(aggregation_counter_resource_ID)
- Condition Operator = Greater than or equal
- Condition Value = 10
For more information, see "Determining if Usage Qualifies for Discounting".
-
Discount rule
-
DRUM
Reference the account's aggregation counter that contains the aggregated amount by using the discount expression BAL(aggregation_counter_resource_ID).
For more information, see "Defining the Usage Amount to Consider for Discounting".
-
Rule type
Billing-time discounts typically have a Threshold rule type because the discount is generally calculated for the entire amount in the aggregation counter. The threshold amount determines which discount balance impact is applied. You define the threshold levels in the discount step.
-
Step
A billing-time discount can have one or more steps. To select from several possible discounts based on the amount in the aggregation counter, use multiple steps. For example, you can offer a 10% discount if the counter is under 300 or a 20% discount if the counter is over 300. For more information, see "How Thresholds Define the Amount of Discount Applied".
-
Balance impact
A balance impact can be applied to a currency or non-currency resource balance. If you want to apply multiple discounts, you can define multiple balance impacts. For example, you can define a balance impact to grant 10% off, and another balance impact to grant bonus points.
To give a percentage off on a currency balance, use following values in the balance impact:
- Impact/Consume = Currency_resource_ID
- Percentage = The percentage amount. Enter this as a negative amount, for example -20%.
- Base Expression = Bal(total_usage_counter_resource_ID)
To give a fixed currency discount, use the following values:
- Impact/Consume = Currency_resource_ID
- Amount = The fixed amount discount
- Base Expression = 1
To grant a non-currency resource discount such as free minutes or bonus points, use the following values:
- Impact/Consume = Non-currency_resource_ID
- Amount = The quantity to grant. If you are granting a resource in increments, enter the incremental value. For example, to grant 1 bonus point for every 10 minutes of usage, enter 1.
- Base Expression = Bal(total_usage_counter_resource_ID) if the grant is not incremental, or Bal(total_usage_counter_resource_ID)/increment_amount if the resource is granted in increments. For example, if the aggregation counter tracks minutes and has a resource ID of 100002, to grant 1 bonus point for every 10 minutes of usage, enter Bal(10002)/10.
To grant a fixed quantity of non-currency resource, for example, 500 bonus points when usage exceeds $300.00, use these values:
- Impact/Consume = Non-currency_resource_ID
- Amount = The quantity to grant
- Base Expression = 1
For more information, see "Defining the Threshold Balance Impacts".
-
Specifying whether Billing-Time Discounts are Inherited by Member Services in Subscription Groups
By default, billing-time discounts owned by a subscription service in a subscription group are automatically inherited by those member services that share the subscription service's balance group. When the discount is applied at billing time, it is applied individually to each member service. (For information about subscription service groups, see "Managing Customers' Subscription-Level Services" in BRM Managing Customers.)
If a subscription service owns a billing-time discount that grants a percentage off of subscription fees, the total discount can be greater than intended when the discount is inherited. For example, a subscription group includes one subscription service and ten member services that inherit a billing-time discount. The discount provides .05% off on the group's aggregated charges. If the aggregated charges total $1000.00 when billing is run, the discount grants $5.00 off to each member service that inherits the discount, and $5.00 off to the subscription service. The total discount is $55.00, which is an actual discount of .055% off the aggregated charges.
You can configure BRM to prevent member services from inheriting billing-time discounts owned by the subscription services by setting an inheritance parameter in the BRM Connection Manager (CM) configuration file:
-
Open the CM pin.conf file in BRM_Home/sys/cm. BRM_Home is the directory where you installed BRM components.
-
Search for the following line:
- fm_subscription btd_inheritance = 1 -
Set the value of the btd_inheritance entry to 0.
The default is 1, which means billing-time discounts are inherited.
-
Stop and restart the CM. See "Starting and Stopping the BRM System" in BRM System Administrator's Guide.
Defining when Billing-Time Discounts Are Applied
BRM performs accounting operations, such as applying cycle fees, rollover, and billing-time discounts, at the end of every accounting cycle. You can configure BRM to apply billing-time discounts at the end of the billing cycle instead of the accounting cycle. You might do this, for example, when the billing cycle spans multiple accounting cycles and a billing-time discount is based on the aggregated usage for the billing cycle.
To configure BRM to apply billing-time discounts at the end of the billing cycle, you modify a field in the subscription instance of the /config/business_params object.
You modify the /config/business_params object by using the pin_bus_params utility. For information on this utility, see "pin_bus_params" in BRM Developer's Guide.
Note:
This configuration applies only to regular billing, not to Bill Now and on-demand billing.To apply billing-time discounts at the end of the billing cycle:
-
Use the following command to create an editable XML file from the subscription instance of the /config/business_params object:
pin_bus_params -r BusParamsSubscription bus_params_subscription.xml
This command creates the XML file named bus_params_subscription.xml.out in your working directory. If you do not want this file in your working directory, specify the path as part of the file name.
-
Search the XML file for following line:
<BillTimeDiscountWhen>disabled</BillTimeDiscountWhen>
-
Change disabled to enabled.
Caution:
BRM uses the XML in this file to overwrite the existing subscription instance of the /config/business_params object. If you delete or modify any other parameters in the file, these changes affect the associated aspects of the BRM subscription configurations. -
Save the file and change the file name from bus_params_subscription.xml.out to bus_params_subscription.xml.
-
Use the following command to load this change into the /config/business_params object:
pin_bus_params bus_params_subscription.xml
You should execute this command from the BRM_Home/sys/data/config directory, which includes support files used by the utility. To execute it from a different directory, see "pin_bus_params" in BRM Developer's Guide.
-
Read the object with the testnap utility or the Object Browser to verify that all fields are correct.
See "Using testnap" in BRM Developer's Guide for general instructions on using testnap. See "Reading Objects by Using Object Browser" in BRM Developer's Guide for information on how to use Object Browser.
-
Stop and restart the Connection Manager (CM). See "Starting and Stopping the BRM System" in BRM System Administrator's Guide.
Calculating Billing Time Discounts Based on Validity Dates
By default, billing-time discounts are calculated based on the available balances with validity dates that both start and end in the current billing cycle. For example, if the billing cycle is March 1 to April 1, the available balances include only those sub-balances that both start and end between March 1 and April 1. The balance does not include any sub-balances with a validity start date before March 1 or with a validity end date after April 1.
However, you can configure BRM to calculate billing-time discounts based on the available balances that are valid for a portion of the billing cycle. For example, if the billing cycle is March 1 to April 1, the balance on which to apply the discount could include the following:
-
A sub-balance that is valid from February 15 to March 15
-
A sub-balance that is valid from March 10 to March 20.
-
A sub-balance that is valid from March 20 to April 20.
You configure BRM to calculate billing-time discounts based on balances that are valid for a portion of the billing cycle by modifying a field in the activity instance of the /config/business_params object.
Note:
This configuration applies only to regular billing, not to Bill Now and on-demand billing.To calculate billing-time discounts based on balances that are valid during a portion of the billing cycle:
-
Use the following command to create an editable XML file from the activity instance of the /config/business_params object:
pin_bus_params -r BusParamsActivity bus_params_activity.xml
This command creates the XML file named bus_params_activity.xml.out in your working directory. If you do not want this file in your working directory, specify the path as part of the file name.
-
Search the XML file for following line:
<BillingTimeDiscountBasedOnPeriod>0</BillingTimeDiscountBasedOnPeriod>
-
Change 0 to 1.
Caution:
BRM uses the XML in this file to overwrite the existing activity instance of the /config/business_params object. If you delete or modify any other parameters in the file, these changes affect the associated aspects of the BRM subscription configurations. -
Save the file and change the file name from bus_params_activity.xml.out to bus_params_activity.xml.
-
Use the following command to load this change into the /config/business_params object:
pin_bus_params bus_params_activity.xml
You should execute this command from the BRM_Home/sys/data/config directory, which includes support files used by the utility. To execute it from a different directory, see "pin_bus_params" in BRM Developer's Guide.
-
Read the object with the testnap utility or the Object Browser to verify that all fields are correct.
See "Using testnap" in BRM Developer's Guide for general instructions on using testnap. See "Reading Objects by Using Object Browser" in BRM Developer's Guide for information on how to use Object Browser.
-
Stop and restart the Connection Manager (CM). See "Starting and Stopping the BRM System" in BRM System Administrator's Guide.
Example of Granting 50 Frequent Flyer Miles for Every Hour of Phone Calls
This discount example grants 50 frequent flyer miles for every hour of phone calls made by the subscriber that owns the discount. There are two discounts to configure:
-
Count Minutes discount increments a counter resource that tracks minutes used when the subscriber makes phone calls. The counter resource is named Minutes Used and its resource ID is 1000015.
-
Frequent Flyer Miles discount grants frequent flyer miles at billing time based on the total minutes used in the counter resource. The Frequent Flyer Miles resource ID is 1000003.
Frequent flyer miles are granted for each whole hour. Partial hours are not counted. The maximum number of frequent flyer miles that can be accrued is 50,000.
Along with the typical discount configurations required when setting up a discount (see "Common Setup Tasks"), you enter the following values specific to this discount example:
Count Minutes Discount
Discount trigger:
-
Condition Expression = 1
-
Condition Operator = Greater than
-
Condition Value = 0
This condition always passes so the discount is always processed.
-
Discount rule:
-
DRUM Expressions = 1
-
DRUM Type = Quantity
-
Rule Type = Tiered or Threshold
-
-
Discount Step:
-
Threshold From = 0
-
Threshold To = infinity
-
Ignore the proration settings. They apply only to cycle fee discounts.
-
Impact/Consume = 1000015, Minutes Used
-
Amount = 1
-
Beat = 1
-
Base Expression = TotalQ
where, TotalQ refers to the total quantity used in the charge packet. Amount and Beat are both 1 to add a minute of usage to the counter for every minute in the charge packet.
-
-
-
Impact: Current cycle
You impact the current cycle to count the minutes used for this cycle.
-
Discount object
-
Discount Type = Subscription
-
Applied To = /service/telco/gsm
-
Multiple discounts per event = Parallel
Map the following events to the discount model for this discount:
-
Real Time Telco GSM Session
-
Delayed Telco GSM Session
-
-
Frequent Flyer Miles Discount
-
Discount trigger
-
Condition 1: The subscriber has not reached the maximum number of frequent flyer miles allowed (50,000):
- Condition Expression = Bal(1000003) (The Frequent Flyer Miles balance)
- Condition Operator = Less than
- Condition Value = 50,000
If the maximum allowed has been reached, the subscriber must reduce the number of miles by using some or all of them before this discount can be applied.
-
Condition 2: The number of minutes used is at least 60. If the user did not make at least 60 minutes of calls, no frequent flyer miles are granted:
- Condition Expression = Bal(1000003) (The Frequent Flyer Miles balance)
- Condition Operator = Greater than or equal to
- Condition Value = 60
-
-
Discount rule:
-
DRUM Expressions = 1
-
DRUM Type = Quantity
-
Rule Type = Threshold
-
-
Discount Step:
-
Threshold From = 0
-
Threshold To = infinity
-
Ignore the proration settings. They apply only to cycle fee discounts.
-
Impact/Consume = 1000015, Frequent Flyer Miles
-
Applied To = Event Owner
-
Amount = 50
50 frequent flyer miles are granted for every hour of usage.
-
Beat = 0
-
Base Expression = Bal(1000015)/60
To calculate the number of hours, the balance of minutes used (1000015) is divided by 60, the number of minutes in an hour.
-
Impact: Date range; Start = 1/1/05, End = Never
These granted frequent flyer miles never expire, but you can specify an end date if you want. A start date is specified to allow all miles to be stored in the same sub-balance. (Resources with different validity periods are stored in separate sub-balances.) This is not required, but is more efficient.
-
-
-
Discount object
-
Discount Type = Subscription
-
Applies To = /service/telco/gsm
This discount applies to GSM telephone service only.
-
Multiple discounts per event = Parallel
-
Map the Billing Time Discount Event to the discount model for this discount.
-
Sample Rating for Frequent Flyer Miles Discount
This section describes how the billing-time example above is rated.
-
The subscriber purchases a wireless plan. The Minutes Used and Frequent Flyer Miles balances are both 0.
-
The subscriber makes a 30 minute call. The Count Minutes discount is triggered by the call event. Because the condition in the trigger always passes when the discount is evaluated, discounting adds 30 units to the Minutes Used account balance.
-
During the month, the subscriber continues to make calls, and the counter is updated with each call. At the end of the month, the subscriber has made 450 minutes of calls.
-
When billing is run, the Frequent Flyer Miles discount is triggered by the billing event. The discount is evaluated because both conditions in the trigger pass: the subscriber made more than 60 minutes of calls, and the balance of frequent flyer miles is less than the maximum of 50,000.
-
The Frequent Flyer Miles discount divides the balance of minutes used by 60 to get 7.5 hours, and then adds 50 units to the frequent flyer miles balance for each whole hour, resulting in a balance of 350 miles.
Setting Up Shared Discounts
Accounts that sponsor other accounts can share discounted resources.
This section describes how to set up three kinds of shared discounts: discount sharing, charge sharing, and snowball discounts.
Setting Up Discount Sharing
In discount sharing, members of a discount sharing group benefit from the discounts of the group owner:
-
Currency discounts: If the shared discount is currency based (for example, a 5% discount on a monthly cycle fee), a currency discount is granted to the balance of the member who generated the discounted event. The group owner sees no balance impact from this event.
-
Non-currency discounts: If the shared discount is not currency based (for example, a discount of 30 free minutes on long distance calls), both the owner and member have a balance impact. When a member generates a discounted event and the discount is applied, the discount impacts the shared non-currency resources of the group owner. A corresponding currency discount is granted to the balance of the member who generated the event.
Non-currency-based shared discounts are also used to aggregate service usage when the owner of a discount sharing group receives a discount based on the aggregated usage of the group members. When a member generates a usage event and the discount is applied, the discount impacts the aggregation counter of the group owner. See "About Using Discounts to Aggregate Usage".
To set up discount sharing:
-
Define the shared discounts including all necessary components such as versions, configurations, masters, and so on. See "Common Setup Tasks".
When creating the discount balance impacts associated with the discount rule:
-
For currency discounts, choose Event Owner in the Applies To field of the Discount/ChargeShare Balance Impact dialog box. The event owner is the account that generated the event.
-
For non-currency discounts, create two balance impacts:
A balance impact that reduces the shared resource of the discount owner. Choose Discount Owner in the Applies To field of the Discount/ChargeShare Balance Impact dialog box.
A balance impact that discounts the usage fee for the free resources used by the discount sharing group member. Choose Event Owner in the Applies To field of the Discount/ChargeShare Balance Impact dialog box.
-
-
Create a discount object in which you map an event type to the discount model you created. For more information, see "Defining a Discount Based on the Number of Subscriptions".
-
Create a discount sharing group by defining the group owner, the group members, and a list of the discounts that will be shared by the group. You create discount sharing groups by using Customer Center. See "Create Discount Sharing Groups".
For information about how BRM handles discount sharing groups, see "About Discount Sharing Groups" in BRM Managing Accounts Receivable.
Setting Up Charge Sharing
When you set up charge sharing, members of a charge sharing group have some of their charges sponsored by the charge sharing group owner. For example, a business can sponsor 100% of the GSM charges for employee calls made during normal working hours.
Setting up charge sharing is similar to setting up discounting. (See "Discounting Process Overview".) You set up components that work together to determine when and in what ways a particular charge is shared.
-
A top-level object, called a chargeshare, is similar to a discount object. It includes a name and other basic information, along with validity dates. The chargeshare also includes a usage map that links particular event types to chargeshare models.
-
A chargeshare model functions in the same way as a discount model. It filters to determine whether an event qualifies for charge share, checks conditions to determine whether a particular chargeshare model applies, and applies chargeshare rules to determine the actual charge sharing amounts and balance impacts. Chargeshare models and discount models share many of the same components, including masters, rules, and triggers.
In contrast to discounts, however, chargeshares are not purchasable items included in deals. They are linked to accounts and services via charge sharing groups.
To set up charge sharing, do the following:
-
Define a chargeshare model, including all necessary components such as versions, configurations, masters, and so on.
-
For each step in the chargeshare model, create two balance impacts for the currency resource:
-
A balance impact for charge sharing group members. This typically reduces the charge. For this balance impact, choose Event Owner in the Applies To field of the Discount/ChargeShare Balance Impact dialog box.
-
A balance impact for the charge sharing group owner. This balance impact typically increases the charge. For this balance impact, choose ChargeShare Owner in the Applies To field of the Discount/ChargeShare Balance Impact dialog box.
Important:
Both balance impacts must impact the same currency resource and must be for the same amount or percentage.
-
-
Create a chargeshare object in which you map an event type to the chargeshare model you created. You can configure the chargeshare to include additional event type to chargeshare mapping.
-
Create a charge sharing group by defining the group owner, group members, and a list of the sponsored charges that will be shared by the group. See "About Charge Sharing Groups" in BRM Managing Accounts Receivable.
Setting Up Snowball Discounts
You can configure a billing-time discount as a snowball discount. A snowball discount allows distribution of group discounts to discount sharing group members. A snowball discount can be distributed evenly among all accounts or based on the amount of usage for each account.
To create a snowball discount:
-
Create an aggregation counter resource to track the usage for all accounts. (See "Setting Up Resources" in BRM Setting Up Pricing and Rating.) Add this resource to the plans that are purchased by the owner and members of the discount sharing group.
-
Define two shared discounts. Set up their components as described in "Common Setup Tasks", following these guidelines:
-
Set up a usage discount that updates the aggregation counter when the accounts or services in the discount group generate usage. When you add this discount to a plan, map the discount model to the usage event for which the discount applies, for example, the Telco GSM session event. Each member in the discount sharing group should own this discount.
-
Set up a billing-time discount that applies the discount based on the amount in the aggregation counter. When you add the discount to a plan, check the Snowball option and map the discount model to the billing-time event (Billing Time Discount Event).
-
-
Set up a discount sharing group by defining the group owner, group members, and a list of the discounts that will be shared by the group. See "Create Discount Sharing Groups".
-
Specify how the discount is distributed in the pin_snowball_distribution file and load the file by running the load_pin_snowball_distribution utility. See "Defining How Snowball Discounts Are Distributed".
The distribution you specify in the pin_snowball_distribution file becomes the default distribution. You can customize this behavior by modifying the policy opcode PCM_OP_SUBSCRIPTION_POL_SNOWBALL_DISCOUNT.
-
If the discount is to be distributed unevenly, for example, if each member gets a percentage of the discount based on its own usage, configure sub-balance contributors. Specify the contributors in the pin_sub_bal_contributor file and load the file by running the load_pin_sub_bal_contributor utility. For information about configuring sub-balances, see "About Configuring Sub-Balances" in BRM Setting Up Pricing and Rating. For instructions on configuring the pin_sub_bal_contributor file, see "Configuring Sub-Balances" in BRM Setting Up Pricing and Rating.
Defining How Snowball Discounts Are Distributed
To specify how snowball discounts are distributed, edit the pin_snowball_distribution file, and then run the load_pin_snowball_distribution utility to load the contents of the file into the /config/snowball_distribution object in the BRM database.
You set two values in the pin_snowball_distribution file:
-
The name of the discount (defined when you set up the discount)
-
The record ID
-
If set to zero, the discount is distributed evenly among all members of the discount sharing group.
-
If set to greater than zero, this value is taken to be the contributing account's resource ID and the discount is distributed based on how much each account contributed to the amount in the aggregated balance. The resource ID identifies the resource in the member account that contributes to the aggregated balance.
-
Note:
If the record ID is greater than zero, you must configure sub-balance contributors to enable BRM to track each account's contribution. For more information, see "About Configuring Sub-Balances" in BRM Setting Up Pricing and Rating.For example, the following entries in the pin_snowball_distribution file specify that snowball one is distributed evenly and snowball two is distributed based on the amount each account contributed to the total usage counter (resource ID 1000501) at the end of the billing cycle.
snowball one : 0
snowball two : 1000501 # Total usage counter resource
Important:
The load_pin_snowball_distribution utility needs a configuration (pin.conf) file in the directory from which you run the utility. See "Creating Configuration Files for BRM Utilities" in BRM System Administrator's Guide.Caution:
The load_pin_snowball_distribution utility overwrites existing snowball distribution rules. If you are updating snowball distribution rules, you cannot load new snowball distribution rules only. You must load complete sets of snowball distribution rules each time you run the load_pin_snowball_distribution utility.To configure snowball distribution rules:
-
Edit the pin_snowball_distribution file in BRM_Home/sys/data/pricing/example. The pin_snowball_distribution file includes instructions.
-
Save the pin_snowball_distribution file.
-
Use the following command to run the load_pin_snowball_distribution utility:
load_pin_snowball_distribution pin_snowball_distribution
If you do not run the utility from the directory in which the file is located, you must include the complete path to the file, for example:
load_pin_snowball_distribution BRM_Home/sys/data/pricing/example
Tip:
If you copy the pin_snowball_distribution file to the directory from which you run the load_pin_snowball_distribution utility, you do not have to specify the path or file name. The file must be named pin_snowball_distribution. -
Stop and restart the Connection Manager (CM). See "Starting and Stopping the BRM System" in BRM System Administrator's Guide.
To verify that the network elements were loaded, you can display the /config/snowball_distribution object by using the Object Browser, or use the robj command with the testnap utility. See "Discounting Process Overview" and "Reading an Object and Writing Its Contents to a File" in BRM Developer's Guide.
For more information, see "load_pin_snowball_distribution".
Setting Up Discounts that Consume Resource Grants
You can create discounts that reduce (consume) the amount of a non-currency resource granted by plans at the time the grant is applied. This is different than consuming granted resources when subscribers use their services. A discount that consumes a resource grant applies to the events that grants the resource, such as cycle fee and purchase events.
By default, discounts can consume a non-currency resource from any sub-balance that contains that resource, consuming the sub-balance with the earliest start date first. However, when a discount consumes a resource at the time the resource is granted, the consumption is restricted to that particular grant only; the discount does not impact any other sub-balances for that resource, even when existing sub-balances have earlier start times. For an example of this discount, see "Example of Consuming a Resource Grant".
For information about the order in which non-currency resources are typically consumed, see "Specifying the Order in Which Resource Sub-Balances Are Consumed" in BRM Setting Up Pricing and Rating.
To create a discount that consumes a resource at the time the resource is granted, configure the discount to consume the resource that is granted and map the discount model to the event that grants the resource, such as the monthly cycle forward event.
Example of Consuming a Resource Grant
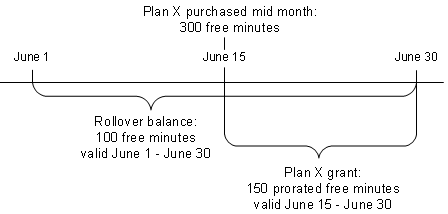
This example shows how a discount consumes the free minutes granted Plan X when the plan is purchased, and does not impact other free-minute balances.
In this example, a subscriber purchases Plan X in mid cycle on June 15. Plan X grants 300 free minutes, which are prorated for the month, resulting in a grant of 150 free minutes valid from June 15 through June 30.
On June 15, at the time the subscriber purchases Plan X, the subscriber's account also includes:
-
A cycle fee discount that reduces (consumes) free minutes by 10%.
-
A balance of 100 free rollover minutes that are valid from June 1 to June 30.
Figure 11-11 illustrates the subscriber's free minute resource balances.
Figure 11-11 Subscriber's Free Minutes Resource Balances
Description of ''Figure 11-11 Subscriber's Free Minutes Resource Balances''
On June 15, when Plan X grants 150 free minutes, the cycle-fee discount is applied. The discount reduces the grant amount by 10% (15 minutes), resulting in a final grant of 135 free minutes. The discount does not impact the rollover balance of 100 free minutes. Figure 11-12 illustrates the subscriber's free minute resource balances after the discount is applied.
Figure 11-12 Subscriber's Free Minutes Resource Balances after Discount
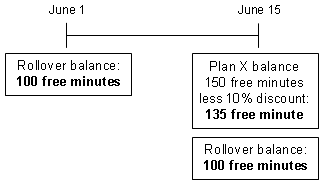
Description of ''Figure 11-12 Subscriber's Free Minutes Resource Balances after Discount''
Note:
This example assumes the subscriber has not used any rollover minutes between June 1 and June 15.Setting Up Volume-Based Discounts
Volume-based discounts are granted based on threshold values that define levels of usage. Volume-based discounts are generally granted as billing-time discounts or cycle fee discounts.
To set up volume-based discounts, see the following sections:
To learn more about volume-based discounts, see "About Volume-Based Discounts".
Setting Up Discounts Based on Number of Subscriptions
To set up discounts based on the number of subscriptions, perform the tasks described in the following sections:
-
Setting Up a Discount Sharing Group for the Number-of-Subscriptions Discount
-
(Optional) Configuring and Defining Exclusion Rules.
Configuring BRM to Track the Number of Subscriptions
To enable BRM to track the number of subscriptions, you need to uncomment an entry in the Connection Manager (CM) configuration file:
-
Open the Connection Manager (CM) pin.conf file in BRM_Home/sys/cm.
-
Uncomment the following line in the file:
- fm_subscription non_currency_lc 1000101
-
Stop and restart the CM. See "Starting and Stopping the BRM System" in BRM System Administrator's Guide.
Defining a Discount Based on the Number of Subscriptions
How you set up this discount depends on:
-
The amount of discount you want to offer.
-
Which resources you will grant or impact.
-
Whether the discount is a billing-time discount or a cycle fee discount.
If you want the number-of-subscriptions discount to be a billing-time discount, you also need to set up an aggregation discount to aggregate the service usage fees. For more information, see "Setting Up Billing-Time Discounts".
To set up a discount based on number of subscriptions, use Pricing Center to define the discount components (discount master, triggers, rules, and model) as described in "Common Setup Tasks". When defining the discount components, follow these guidelines:
-
In the Discount/ChargeShare Rule dialog box, specify the following values:
-
Enter Bal(1000101) in the Drum Expression field on the Discount/ChargeShare Rule tab. This specifies the Line Counter balance that contains the total number of subscriptions.
-
Select Threshold in the Rule Type field on the Discount/ChargeShare Rule tab.
-
Select Quantity in the Drum Type field.
-
In the Discount/ChargeShare Step tab, create a step for each subscription level to discount by specifying the lower and upper limits of the threshold in the Threshold From field and Threshold To field.
For example, to set up three levels: 0 to 100 subscriptions, 101 to 200 subscriptions, and 201 or more subscription, set up three steps:
Step 1: Threshold From = 0, Threshold To = 100
Step 2: Threshold From = 101, Threshold To = 200
Step 3: Threshold From = 201, Threshold To = Infinity
-
-
In the Balance Impact dialog box for each step:
-
Select Event Owner in the Applied To field.
-
In the Base Expression field, specify the balance that contains the aggregated service fees; for example, Bal(aggregation_counter_resource_ID).
-
Setting Up Plans for the Number-of-Subscriptions Discount
To set up price plans that offer discounts based on the number of subscriptions, use Pricing Center to perform the following tasks:
Setting up Subscription Services
Each child account must purchase a plan that includes a subscription service. Create a subscription service group in every plan that will be purchased by a child account in the account group. You create subscription service groups in the Plan Attributes tab of the Plan Attributes dialog box. See "About Subscription Services" in BRM Managing Customers.
Adding the Line Counter Resource
You add the Line Counter resource to the plan that includes the number-of-subscriptions discount. This is the plan that is purchased by the parent account. The number of active subscriptions is then stored in the parent account's Line Counter balance.
In the Track Balances tab of the Plan Attributes dialog box, select the account's balance group and add the Line Counter resource in the Credit Limits area.
Important:
The Line Counter resource must be associated with only one plan in the parent account.For more information, see "About Setting Limits and Thresholds" in BRM Managing Accounts Receivable.
Adding the Discount to Plans and Deals
After you define the discount components (the discount master, triggers, rules, and model), you create the discount by adding it to your price list.
Insert a new discount in the price list and follow these guidelines when configuring the discount in the Discount Attributes dialog box:
-
Select Subscription in the Discount Type field.
-
Select Account in the Applies To field. You can apply the discount to a service or an account.
-
In the Map an Event to a Discount Model section:
-
Map the discount to the billing-time event (Billing Time Discount Event) to make it a billing-time discount, or to a cycle fee event to make it a cycle fee discount.
-
Select the discount model you set up for the number-of-subscriptions discount from the list of discount models.
-
For more information, see "Defining a Discount Based on the Number of Subscriptions".
You can then add the number-of-subscriptions discount to a deal in the Deal Attributes dialog box. Add the discount to the deal that will be purchased by the corporate parent account.
Creating an Account Hierarchy
Set up a hierarchical account group. If you are offering corporate discounts, make the corporate account the parent and add a child account to the group for each employee that has a subscription.
Note:
The parent account can also be the child of another account.You create account hierarchies by using Customer Center. See "Creating Hierarchical Groups" in BRM Managing Accounts Receivable.
Setting Up a Discount Sharing Group for the Number-of-Subscriptions Discount
You set up a discount sharing group to share the number-of-subscriptions discount. When the discount is shared, it is granted to each account in the discount sharing group.
Make the account group's parent account the owner of the discount sharing group. Add the owner's number-of-subscriptions discount as the shared discount. Add the subscription services in the child accounts as members of the discount sharing group.
Important:
The discount sharing group must include all child accounts' subscription services in the account group to ensure the number of active subscription services is accurately counted.At the end of the cycle, each child account receives a discount on its fees based on the total number of subscriptions counted.
You set up discount sharing groups by using Customer Center. See "Create Discount Sharing Groups".
Setting Up Discounts Based on Contract Days
Important:
Support for discounts based on contract days is included in Advanced Discounting Manager; an optional feature that requires a separate license.To provide a discount based on the cumulative number of contract days, the charges to discount need to be associated with the contract days counter (CDC) and contract days counter for discount (CDCD) resources.
To do this, you create a real-time discount that aggregates the cycle fee charges into a non-currency total charge counter. The other main configuration task is creating a billing-time discount that discounts the customer's charge balance, using the total charge counter created in the real-time discount. Basically, you are using:
-
CDC as the discount ratable usage metric (DRUM) for usage fee discounts.
-
CDCD as the DRUM for billing-time discounts.
This bases the discount tier for the billing-time discount on CDCD, and then applies the discount to the currency charges.
To set up discounts based on contract days:
-
Enable the discount based on contract days feature. See "Enabling Support for Discounts Based on Contract Days".
-
Use BRM Pricing Center to complete these procedures:
After completing the above tasks, associate the discount objects with a deal at the subscription service level, associate the deal with a plan, and so on. See "Grouping Discount Components into Discount Models" and "Grouping Discount Components into Discount Models" in BRM Managing Accounts Receivable.
You can configure BRM to count or exclude the day in which a subscription service changes status. See "Specifying whether to Count the Days on which Subscription Status Changes".
Enabling Support for Discounts Based on Contract Days
By default, support for discounts based on contract days is disabled in BRM. You can enable this feature by modifying the subscription instance of the /config/business_params object.
To enable support for discounts based on the number of contract days:
-
Use the following command to create an editable XML file from the subscription instance of the /config/business_params object:
pin_bus_params -r BusParamsSubscription bus_params_subscription.xmlThis command creates the XML file named bus_params_subscription.xml.out in your working directory. If you do not want this file in your working directory, specify the path as part of the file name.
-
Search the XML file for following line:
<DiscountBasedOnContractDaysFeature>disabled</DiscountBasedOnContractDaysFeature> -
Change disabled to enabled.
Caution:
BRM uses the XML in this file to overwrite the existing subscription instance of the /config/business_params object. If you delete or modify any other parameters in the file, these changes affect the associated aspects of the BRM subscription configurations. -
Save the file and change the file name from bus_params_subscription.xml.out to bus_params_subscription.xml.
-
Use the following command to load this change into the /config/business_params object:
pin_bus_params bus_params_subscription.xmlYou should execute this command from the BRM_Home/sys/data/config directory, which includes support files used by the utility. To execute it from a different directory, see "pin_bus_params" in BRM Developer's Guide.
-
Read the object with the testnap utility or the Object Browser to verify that all fields are correct.
See "Using testnap" in BRM Developer's Guide for general instructions on using testnap. See "Reading Objects by Using Object Browser" in BRM Developer's Guide for information on how to use Object Browser.
-
Stop and restart the Connection Manager (CM). See "Starting and Stopping the BRM System" in BRM System Administrator's Guide.
Configuring BRM to Track the Number of Contract Days
To enable BRM to track the number of contract days, you need to uncomment entries in the Connection Manager (CM) configuration file:
-
Open the Connection Manager (CM) pin.conf file in BRM_Home/sys/cm.
-
Uncomment the following lines in the file:
- fm_subscription   non_currency_cdc  1000099
- fm_subscription   non_curr_cdcd     1000100
-
Stop and restart the CM. See "Starting and Stopping the BRM System" in BRM System Administrator's Guide.
Creating a Real-Time Aggregation Discount
To create a discount to aggregate customer fees and usage:
-
Create a discount master using the default values.
-
Create a discount rule:
-
From the Pipeline Toolbox, select Discount/ChargeShare Rule.
-
Select the following values:
Expression: TotalQ
Rule Type: Threshold
Drum Type: Quantity
-
-
Create a discount step:
-
In the Discount/ChargeShare Step tab of the Discount/ChargeShare Rule dialog box, click New. The Discount/ChargeShare Step dialog box opens.
-
Select the following values:
Threshold From: 0
Threshold To: infinite
Prorate Purchase: Full Discount
Prorate Cancel: Full Discount
-
-
Define balance impacts for the discount step, specifying the following values:
-
Grant/Consume: TotalCharges
-
Applied To: Event Owner
-
Percentage: 100
-
Base Expression: StepC
-
Grant: Current Cycle (under Resource Validity Period)
-
-
Create the discount trigger:
-
From the Pipeline Toolbox, select Discount/ChargeShare Trigger. The Discount/ChargeShare Trigger box opens.
-
Specify the following values:
Condition Expression: 1.0
Condition operator: Greater than
Condition Value: 0
-
-
Create the discount model:
-
From the Pipeline Toolbox, select Discount Model. The Discount Model window opens.
-
Specify the names of the discount version, triggers, and rules you defined in steps 1 through 5.
-
Select the appropriate discount setting in relation to the other discounts you offer.
-
-
Create the discount share object, and map the Delayed Session Event to the model created in step 6.
Creating a Billing-Time Discount
To create a billing-time discount for a service based on the contract days counter:
-
Create a discount master using the default values.
-
Create a discount rule:
-
From the Pipeline Toolbox, select Discount/ChargeShare Rule.
-
Select the following values:
Drum Expression: BAL(CDCD resource_ID)
Rule Type: Tier
Drum Type: Quantity
-
-
Create a discount step:
-
Threshold From: 1
-
Threshold To: 11
-
Prorate Purchase: Full Discount
-
Prorate Cancel: Full Discount
-
-
Define balance impacts for the discount step, specifying the following values:
-
Grant/Consume: Currency
-
Applied To: Event Owner
-
Percentage: type the percentage of discount
For example, entering -10 specifies a 10% discount to be subtracted from the total charge.
-
Base Expression: BAL(TotalCharges)
-
Grant: Current Cycle (under Resource Validity Period)
-
-
Create steps for all the discounts rates you want to offer.
For example:
-
11-30 for 15% off
-
31-100 for 20% off
-
101-MAX for 25% off
-
-
Create the discount trigger:
-
From the Pipeline Toolbox, select Discount/ChargeShare Trigger. The Discount/ChargeShare Trigger dialog box opens.
-
Specify the following values:
Condition Expression: 1.0
Condition operator: Greater than
Condition Value: 0
-
-
Create the discount model:
-
Specify the names of the discount version, triggers, and rules you defined in steps 1 through 6.
-
Select the appropriate discount setting in relation to the other discounts you offer.
-
Associate this discount object with a deal at the subscription service level, the deal with a plan, and so on.
Specifying whether to Count the Days on which Subscription Status Changes
The timestamp for creation, activation, inactivation, and closure for a subscription service is recorded as midnight. You can configure BRM to include or exclude the days on which the subscription service status changes. The default is to include the days.
-
Open the Connection Manager (CM) pin.conf file in BRM_Home/sys/cm.
-
Uncomment the following lines in the file and, if necessary, change their value: 1 to include the day of the status change or 0 to exclude the day.
-
The day a subscription is created:
- fm_subscription cdc_line_create_day_include 1 -
The day a subscription changes status from inactive to active or from closed to active:
- fm_subscription time_stamp_cdc 1 -
The day a subscription is canceled or suspended:
- fm_subscription cdc_line_cancel_day_include 1
-
-
Stop and restart the CM. See "Starting and Stopping the BRM System" in BRM System Administrator's Guide.
For general information about editing the configuration file, see "Using Configuration Files to Connect and Configure Components" in BRM System Administrator's Guide.
Setting Up Discounts Based on Monthly Fees and Usage
Important:
Support for discounts based on monthly fees and usage is included in Advanced Discounting Manager; an optional feature that requires a separate license.To enable discounts based on the monthly fees and usage of all accounts in an account group, you associate the parent service of the discount share group with the aggregation counter, and the child service with the copy of the aggregation counter and the child-level aggregation counter.
To set up discounts based on the monthly fees and usage, perform the following tasks:
-
Set up the required discounts in Pricing Center:
These procedures are summarized in this section and described fully in "Grouping Discount Components into Discount Models".
To be able to apply discounts based on an account group's monthly fees and usage, you must also perform the following tasks:
-
Create a plan that includes subscription services.
See "Managing Customers' Subscription-Level Services" in BRM Managing Customers.
-
Create an account hierarchy in a customer management application, such as Customer Center.
See "Creating and Managing Hierarchical Account Groups" in BRM Managing Accounts Receivable.
-
Purchase plans for the parent and child accounts.
-
Create a discount sharing group in a customer management application, such as Customer Center.
Configuring BRM to Track Monthly Fees and Usage
To use discounts based on monthly fees and usage, you need to enable BRM to track the total monthly fees and usage. See "Setting Up Discounts Based on Monthly Fees and Usage".
Uncomment the non_currency_mfuc entry in the Connection Manager (CM) configuration file.
-
Open the Connection Manager (CM) pin.conf file in BRM_Home/sys/cm.
-
Uncomment the following line in the file:
- fm_subscription non_currency_mfuc 1000097 -
Stop and restart the CM. See "Starting and Stopping the BRM System" in BRM System Administrator's Guide.
Configuring the NET_EM Module
To correctly copy the value of the MFUC to the CMFUC, the number of real-time pipelines must be greater than or equal to the number of threads specified for the pin_billd application in its configuration (pin.conf) file.
If the NET_EM module does not have enough pipelines, follow these steps to configure the correct number of pipelines:
-
Use the wirelessRealtime.reg registry file to configure the NET_EM module as follows:
-
In the DiscountOpcode and ReRatingOpcode sections, change the NumberofRTPipelines entries from 2 to 7.
-
Change the number of threads in the ThreadPool section from 2 to 14.
-
Increase the number of discounting pipeline blocks in the file from 2 to 7. The pipeline names should be consecutively numbered from DiscountPipeline0 to DiscountPipeline6.
-
Increase the number of rerating pipeline blocks in the file from 2 to 7. The pipeline names should be consecutively numbered from ReratingPipeline0 to ReratingPipeline6.
-
-
Use these SQL statements to modify the Pipeline Manager database:
INSERT INTO IFW_PIPELINE ( PIPELINE, NAME, EDRC_DESC, ENTRYBY, MODIFIED, RECVER ) VALUES ('ReratingPipeline2', 'Wireless Sample Re-rating Realtime', 'ALL_RATE', 0 ,1, 1);

INSERT INTO IFW_PIPELINE ( PIPELINE, NAME, EDRC_DESC, ENTRYBY, MODIFIED, RECVER ) VALUES ('ReratingPipeline3', 'Wireless Sample Re-rating Realtime', 'ALL_RATE', 0 ,1, 1);

INSERT INTO IFW_PIPELINE ( PIPELINE, NAME, EDRC_DESC, ENTRYBY, MODIFIED, RECVER ) VALUES ('ReratingPipeline4', 'Wireless Sample Re-rating Realtime', 'ALL_RATE', 0 ,1, 1);

INSERT INTO IFW_PIPELINE ( PIPELINE, NAME, EDRC_DESC, ENTRYBY, MODIFIED, RECVER ) VALUES ('ReratingPipeline5', 'Wireless Sample Re-rating Realtime', 'ALL_RATE', 0 ,1, 1);

INSERT INTO IFW_PIPELINE ( PIPELINE, NAME, EDRC_DESC, ENTRYBY, MODIFIED, RECVER ) VALUES ('ReratingPipeline6', 'Wireless Sample Re-rating Realtime', 'ALL_RATE', 0 ,1, 1);
For more information, see "NET_EM" and "Configuring the NET_EM Module for Real-Time Processing" in BRM System Administrator's Guide.
Creating a Usage Discount to Aggregate All Cycle Fees to the Parent Service Counter
To set up the monthly fee and usage counter to aggregate all cycle fees:
-
Create a discount master, accepting all of the default values in the Discount/ChargeShare Detail dialog box.
-
In the Discount/ChargeShare Rule dialog box, enter these values:
-
For Code, type the name.
-
For Drum Expression, select TotalC.
-
For Rule Type, select Threshold.
-
For Drum Type, select Charge.
-
-
Create a discount step using these values:
-
Threshold From: 0
-
Threshold To: 0
-
Prorate Purchase: Full Discount
-
Prorate Cancel: Full Discount
-
-
In the Discount/ChargeShare Step dialog box, click Actions to open the Discount/ChargeShare Balance Impact dialog box, and enter these values:
-
For Grant/Consume, select 1000097 MFUC. This is the resource for the parent service counter.
-
For Applied To, select ChargeShare Owner.
-
For Percentage, type 100.
-
For Base Expression, type: StepC.
-
For Grant: Current Cycle.
-
-
Create the discount trigger.
For the discount sharing group, use default values so that the charge packet is always considered. From the Pipeline Toolbox, select Discount/ChargeShare Trigger. When, the Discount/ChargeShare Trigger box opens, enter these values.
-
Condition Expression: 1.0
-
Condition operator: Greater than
-
Condition Value: 0
-
-
Create a discount model for the model, the trigger, and the rule that you created in steps 1 through 5.
-
Create the discount object, including:
-
Mapping a cycle forward discount event to the discount model to aggregate the monthly cycle forward fees in MFUC.
-
Mapping the session event to the discount model to aggregate the usage charges in MFUC.
-
Creating a Billing-Time Discount to Copy the Parent Service Counter to the Child Service Counter
This procedure copies the parent monthly fee and usage counter (MFUC) to the child monthly fee and usage counter (CMFUC).
-
Create a discount master, accepting all of the default values in the Discount/ChargeShare Detail dialog box.
-
Create a discount rule using these values:
-
Drum Expression: BAL(1000097)
-
Rule Type: Threshold
-
Drum Type: Quantity
-
-
Create a discount step using these values:
-
In the Discount/ChargeShare Step tab of the Discount/ChargeShare Rule dialog box, click New. The Discount/ChargeShare Step dialog box opens.
-
Select the following values:
Threshold From: 0
Threshold To: 0
Prorate Purchase: Full Discount
Prorate Cancel: Full Discount
-
-
Define balance impacts for the discount step, specifying the following values (this copies the aggregation of MFUC to CMFUC at the child service level):
-
Grant/Consume: CMFUC
-
Applied To: Event Owner
-
Percentage: 100%
-
Base Expression: BAL (MFUC)
-
Grant: Current cycle (under Resource Validity Period)
-
-
Create a discount trigger using these values:
-
Condition Expression: 1.0
-
Condition operator: Greater than
-
Condition Value: 0
-
-
Complete a discount model for the entries the model, the trigger, and the rule that you created in steps 1 through 5.
-
Create the discount object, including a billing-time discount for the discount model to copy the MFUC (the parent service-level counter) to CMFUC (the child service-level counter).
Creating a Usage Discount to Aggregate Monthly Fee and Usage on the Child Service Level
To create a real-time discount that stores the monthly fee and usage charges for all the services of each child or user account:
-
Create a discount master, accepting all of the default values in the Discount/ChargeShare Detail dialog box.
-
In the Discount/ChargeShare Rule dialog box, enter these values:
-
For Drum Expression, select: TotalC.
-
For Type, select either Threshold or Tier.
This setting determines whether the DRUM can overlap a threshold or must fall entirely within it.
-
For Drum Type, select Charge.
This setting determines whether the DRUM and the threshold values are based on monetary charges or on quantities, such as bytes.
-
-
Create a discount step using these values:
-
Threshold From: 0
-
Threshold To: 0
-
Prorate Purchase: Full Discount
-
Prorate Cancel: Full Discount
-
-
In the Discount/ChargeShare Step dialog box, click Actions to open the Discount/ChargeShare Balance Impact dialog box, and enter these values:
-
For Grant/Consume, select CHAGC.
-
For Applied To, select Event Owner.
-
For Percentage, type 100.
-
For Base Expression, type: StepC.
-
For Grant: Current Cycle.
-
-
Create a discount trigger using these values:
-
Condition Expression: 1.0
-
Condition operator: Greater than
-
Condition Value: 0
-
-
Create a discount model for the model, the trigger, and the rule that you created in steps 1 through 5.
-
Create the discount object, including:
-
Mapping a cycle forward event to the discount model to aggregate cycle fees to the child service level counter.
-
Mapping a usage event to the discount model to aggregate usage fees to child service level counter.
-
Creating a Billing-Time Discount for Discounting
The discounts created in the previous procedures are for non-currency resources. This discount can be purchased by discount group users.
-
Create a discount master.
-
In the Discount/ChargeShare Detail dialog box, enter the date range and other criteria for granting the discount.
-
Create a discount rule using these values:
-
Drum Expression: BAL(1000098) (The resource for CMFUC.)
-
Rule Type: Threshold
-
Drum Type: Charge
-
-
Create a discount step using these values:
-
Threshold From: 0
-
Threshold To: Type the upper limit, for example, 15000.
-
Prorate Purchase: Full Discount
-
Prorate Cancel: Full Discount
-
-
Define balance impacts for the discount step, specifying these values:
-
Grant/Consume: select the currency you want to associate with the discount, for example: 840, US Dollar.
-
Applied To: Event Owner
-
Percentage: Type the discount for this threshold range.
-
Base Expression: TotalC
-
Resource Validity Period: Available resource (under Consume)
-
-
Create a discount trigger using these values:
-
Condition Expression: 1.0
-
Condition operator: Greater than
-
Condition Value: 0
-
-
Complete a discount model for the entries the model, the trigger, and the rule that you created in steps 1 through 6.
-
Create the discount object, including a billing-time discount for the discount model to grant discounts based on the discount steps.
-
Bundle this purchasable discount object with a product in a deal, created at the service level.
-
Add this deal to a plan, which can be purchased by subscriber accounts.
For more information about plans, see "Strategies for Creating Plans" in BRM Setting Up Pricing and Rating.
Setting Up Discounts Based on Query Values
You can create discounts based on query values. See "About Discounts" based on query values for introductory information. You use iScripts to implement query-based discounts. The iScripts retrieve data, either from the BRM database via opcode calls or from the EDR.
Note:
Although discounts based on query values are billing-time discounts, they are configured differently from normal billing-time discounts. They do not require the use of aggregation counters.To use iScripts for discounts, you specify one or more iScript file names in the registry for DAT_Discount. Each iScript file can include one or more functions that return values to be used in the discount.
To use iScript functions in discounts, you perform the following tasks:
-
Write one or more iScripts that retrieve the data you want to use for discounting. See "Writing iScripts for Query-Based Discounts".
Note:
BRM includes an iScript to support most-called-number discounts. See "Discounts Based on Most-Called Numbers". -
Define the iScript in the DAT_Discount module registry. See "Configuring the DAT_Discount Module for Query-Based Discounts".
-
If the discount will be implemented in a batch pipeline, ensure that the pipeline includes a connection pool. See "DAT_ConnectionPool".
-
If necessary, modify the pipeline input mapping and EDR container to support the data returned by your iScript functions. See "Setting Up Pipeline Price List Data" in BRM Setting Up Pricing and Rating.
Note:
The data returned by the sample most-called-number iScript has already been mapped into the EDR container. -
Configure a discount model that includes one or more expressions with EVAL tokens referring to the iScript. See "Understanding the EVAL Token" and "Example Discount Configuration".
-
Define a discount object that maps the discount model to a billing-time discount event and the appropriate service. See "Example Discount Configuration".
BRM includes a sample iScript for most-called-number discounts based on call duration, total cost, and total occurrences. You can use this iScript as is or modify it for your business needs. See "Discounts Based on Most-Called Numbers" for more information.
BRM also includes a sample iScript for discounts based on past usage. See "Example of Implementing Discounts Based on Past Usage".
Writing iScripts for Query-Based Discounts
An iScript for a query-based discount must include one or more named functions that can be referenced by an EVAL token in a discount expression. These named functions can retrieve data in two ways:
-
With opcode calls. When the pipeline processes an EDR, the iScript calls one or more opcodes that retrieve and aggregate data from the BRM database. The data returned by the opcodes can be used directly or mapped into the EDR container to be retrieved by another EVAL token. You can use standard opcodes, customized policy opcodes, or newly-created custom opcodes to retrieve the information used for discounting. You use iScript flist extension functions to manipulate data sent to and returned from opcodes. See "Calling Opcodes from iScript Functions".
-
From the EDR. The iScript retrieves data that has been added to the EDR by customized opcodes. For example, you can modify a policy opcode that is triggered during billing-time discount processing to search for or aggregate data. The data returned by the opcode can be mapped into the EDR container. The iScript retrieves this data and uses it for discount calculations. You use standard iScript functions to retrieve the EDR data. See "Creating iScripts and iRules" in BRM Developer's Guide.
To create iScripts for query-based discounts, you can use the standard iScript functions, except for those described in iScript control structures. These special functions are not supported by the DAT_Discount module. See "Creating iScripts and iRules" in BRM Developer's Guide for more information.
In addition to the standard iScript functions, you use extension functions to manipulate flist data for query-based discounts. See "Loading External Modules for Extension Functions".
You can include query functions in multiple iScript files configured in a single DAT_Discount module. See "Configuring the DAT_Discount Module for Query-Based Discounts" for information about including iScript files in the module registry.
If you modify an iScript after the pipeline has been started, you can use a semaphore command with the DAT_Discount module to reload the iScript. See "DAT_Discount".
Loading External Modules for Extension Functions
The iScripts that you write for query-based discounts require the use of extension functions in two external modules that you load separately:
-
EXT_FList, which includes functions for manipulating flists. See "Flist Manipulation Functions" in BRM Developer's Reference.
-
EXT_Opcode, which includes functions for calling opcodes and opening a CM connection from a batch pipeline. See "Opcode Calling Functions" in BRM Developer's Reference.
To use functions from these module in an iScript, you must explicitly load them by including the following statements in the first lines of the iScript file:
Use EXT_FList;
Use EXT_Opcode;
Opening a CM Connection
Before an opcode can be called from an iScript, there must be a connection through which the opcode is called and data is returned. How this connection is established depends on whether the discounting module is running in a batch or real-time pipeline:
-
In a real-time pipeline, a CM context exists already in the EDR object. This pre-existing connection is used automatically for opcode calls. You use the opcodeExecuteInternal function to call opcodes in this case.
-
In a batch pipeline, you must use the opcodeGetConnection function to establish a CM connection. You can then use opcodeExecute to call opcodes. The iScript must call opcodeGetConnection before calling opcodeExecute.
The opcodeGetConnection function obtains a connection from the connection pool you specify as a parameter. The connection pool must already have been configured in the pipeline registry. See "DAT_ConnectionPool".
Calling Opcodes from iScript Functions
You use the opcodeExecute and opcodeExecuteInternal functions to call opcodes from iScripts. These functions do the same thing and have the same syntax: you specify the opcode number and any necessary flags in the function's parameters. You use them in different situations, however:
-
You use opcodeExecuteInternal in iScripts with discounting modules in real-time pipelines. The function uses the already existing context to communicate with the CM.
-
You use opcodeExecute in iScripts with discounting modules in batch pipelines. You must call the opcodeGetConnection function first to open a CM connection. See "Opening a CM Connection".
When you execute opcodes from iScripts, you must pass an input flist in the call to the opcode. To build the opcode flist, you use the flist extension iScript functions. For more information about the flist extension functions, see the following:
-
"Creating iScripts and iRules" in BRM Developer's Guide
-
"Flist Manipulation Functions" in BRM Developer's Reference
-
"Opcode Calling Functions" in BRM Developer's Reference.
For example, to search for events for a specific account, you can create an flist for the PCM_OP_SEARCH opcode by using flist extension functions to set the search template and arguments.
The output flist returned by the opcode call can be accessed by the iScript using the flist extension functions. The return of the function that includes the opcode call should always be a decimal value.
See "iScript Example" for an example of calling an opcode.
Handling Errors in Opcodes Called from iScripts
If the opcode called returns an error, the error information can be accessed from the error buffer by using the fListGetErrorText function. The iScript function that included the opcode call should return INVALID_DECIMAL.
See "iScript Example" for sample error-handling code.
iScript Example
In this example, the getLastSixMonthsCharge function returns the total cost of calls during the last six months. The iScript includes examples of error handling and using the flist extension functions to manipulate flist data.
This iScript is for use with a real-time pipeline, so it does not include the opcodeGetConnection function to establish a CM connection.
See "Example of Implementing Discounts Based on Past Usage" for information about using this iScript.
use EXT_FList;
use EXT_Opcode;

//Global Variables

Bool DEBUG = false;

function Decimal getLastSixMonthsCharge
{
  logPipeline("getLastSixMonthsCharge() " +"\n");

  String s1 = "";
  String s2 = "";
  fListCreateNew();

  //Add the poid, flags and template to the flist
  fListSetPoid( "PIN_FLD_POID", "0.0.0.1 /search -1 0" );
  fListSetLong( "PIN_FLD_FLAGS", 256 );
  fListSetString( "PIN_FLD_TEMPLATE", "Select X from /item where F1 = V1 AND F2 >= V2 " );

  //Arg1 is the service object.
  String svcID = edrString(DETAIL.CUST_A.DL.DISCOUNT_OWNER_ID, 0, 0);
  String svcType = edrString(DETAIL.CUST_A.DL.DISCOUNT_OWNER_TYPE,0, 0);
  if(DEBUG == true){
     logPipeline("Service Type:\n" +svcType +" "+svcID +"\n");
  }
  //The service Id is in the format 1_12345. Need to separate the
  //database and the poid id.
  String ListArray[];
  Long nbElem = strSplit( ListArray, svcID, "_" );

  String svcObjStr = "0.0.0."+ListArray[0]+" "+svcType+" "+ListArray[1]+" 0";
  fListPushElem( "PIN_FLD_ARGS", 1 );
  fListSetPoid( "PIN_FLD_SERVICE_OBJ", svcObjStr);
  fListPopElem();

  //Arg2 is the effective_t. This is current date - 6 Months
  Date now = sysdate();
  Date past = dateAdd(now,0,-6,0,0);
  fListPushElem( "PIN_FLD_ARGS", 2 );
  fListSetDate( "PIN_FLD_EFFECTIVE_T", past );
  fListPopElem();

  //set the results array
  Decimal iTotal = 0.0;
  fListPushElem( "PIN_FLD_RESULTS",  0  );
  fListSetDecimal( "PIN_FLD_ITEM_TOTAL", iTotal);
  fListPopElem();

  if(DEBUG == true) {
     String fStr = fListToString();
     logPipeline("Printing the INPUT FLIST:\n");
     logPipeline(fStr);
  }

  //Execute the opcode PCM_OP_SEARCH
  if(opcodeExecuteInternal(7, 0) == false )
  {
    // Opcode failed
    fListGetErrorText( s1, s2 );
    logPipeline("PCM_OP_SEARCH failed: " + s1 + " " + s2 + "\n");
    return INVALID_DECIMAL;
  }

  if(DEBUG == true) {
     fListGetErrorText( s1, s2 );
     logPipeline("PCM_OP_SEARCH done: " + s1 + " " + s2 + "\n");

     String fRStr = fListToString();
     logPipeline("Printing the RETURN FLIST:\n");
     logPipeline(fRStr);
  }

  //Loop through the results and aggregate the item total
  Long resultCount = fListNumElem("PIN_FLD_RESULTS");
  Long i;
  Decimal tempTotal = 0.0;
  Decimal itemTotal = 0.0;

  for ( i = 0; i < resultCount; i = i + 1 )
  {
    tempTotal = fListDecimal ("PIN_FLD_RESULTS", i, "PIN_FLD_ITEM_TOTAL");
    itemTotal = itemTotal + tempTotal;

  }

  if(DEBUG == true) {
     logPipeline("getLastSixMonthsCharge() return:\n" +decimalToStr(itemTotal) +"\n");
  }
  return itemTotal;
}
Configuring the DAT_Discount Module for Query-Based Discounts
To configure the DAT_Discount module for query-based discounts, you specify the names of one or more iScript files in the module registry. These iScript files contain the functions for queries triggered by EVAL tokens in discount models.
When the module is initialized during pipeline startup, the iScript files defined in the registry are passed to the iScript interpreter for compilation. You can use a semaphore command to reload the iScript if you modify a file after pipeline startup. See "DAT_Discount" for more information.
You specify the iScript file names in the EvalScriptFiles registry entry.
The following registry example includes two iScript files:
DiscountModelDataModule
{
ModuleName = DAT_Discount
   Module
   {
      ...
      #Customizable iScript files supporting EVAL function
      EvalScriptFiles
      {
         ScriptFile1=./iScript/CustomEval1.isc
         ScriptFile2=./iScript/CustomEval2.isc
      }
      ...
   }
...
}
Example Discount Configuration
This section includes an example of using Pricing Center to configure a query-based billing-time discount for international calls to the U.S. This example is based on the use of an EVAL token to invoke an iScript that returns the cost of calls to the U.S.
For detailed information about configuring discounts in Pricing Center, see Pricing Center Help and "Getting Started".
-
Create a discount master, leaving all fields at their default values.
-
Create a discount rule with the following characteristics:
-
DRUM Expression: 1
-
Rule Type: Tiered
-
DRUM Type: Charge
-
-
Create a discount step for the new rule with the following characteristics:
-
Threshold Range: 0 to infinity
-
Prorate Purchase: Prorate Discount
-
Prorate Cancel: Prorate Discount
-
-
Create a balance impact for the new step with the following characteristics:
-
Impact/Consume: 978 (Euro)
-
Applied To: Event Owner
-
Percentage: -10%
-
Base Expression: EVAL(getInterUSCost)
-
Resource Validity Period: Current Cycle
-
Leave other fields at their default values
-
-
Create a discount trigger.
-
Create a discount condition for the new trigger with the following characteristics:
-
Condition Expression: 1.0
-
Condition Operator: Greater than
-
Condition Value: 0
-
-
Create a discount model.
-
Create a discount model version for the new model with the following characteristics:
-
Version: 1
-
Valid from: enter a validity date
-
Status: Active
-
-
Create a discount model configuration for the new version with the following characteristics:
-
Discount Version: select the version you created
-
Discount Trigger: select the trigger you created
-
Discount Rule: select the rule you created
-
Multiple discounts per event: Parallel
-
-
Create a discount object with the following characteristics:
-
Applies to: /service/telco/gsm/telephony
-
Map an Event to a Discount Model: select the Billing Time Discount event and the discount model you created
-
Leave all other fields at their default values
-
-
Include the discount in a deal and plan that applies to /service/telco/gsm/telephony.
Discounts Based on Most-Called Numbers
BRM includes iScripts and other components that enable you to implement discounts based on a subscriber's most-called numbers. Most-called-number discounts can be based on the total duration of calls, total charge for calls, or total times a number is dialed.
Implementing a most-called-number discount requires the use of the following components:
-
The PCM_OP_RATE_POL_PRE_RATING policy opcode. This opcode searches for and aggregates most-called-number information from the BRM database.
-
A sample provisioning tag definition that you can customize to define criteria for the type of most-called-number discount you want to use. This provisioning tag defines a /profile/mostcalled object that PCM_OP_RATE_POL_PRE_RATING uses to determine how to construct the list of most-called numbers.
-
An iScript ("ISC_GetMostCalledInfo.isc") that retrieves data from the EDR that was returned by the customized policy opcode.
-
The discount_event.xml file, which defines the flist-to-EDR container mapping for the INP_Realtime module.
-
Sample pricing data in the GSMPricePlan.ipl price list file.
BRM also includes a sample iScript that you can use as the basis of discounts based on a subscriber's usage for the previous six months. See "Example of Implementing Discounts Based on Past Usage".
Most-Called-Number Discount Workflow
This section provides an overview of how BRM processes most-called-number discounts.
-
At billing time, if the account owns a most-called-number discount, Subscription Manager generates an event of type /event/billing/cycle/discount/mostcalled. Subscription Manager calls the PCM_OP_ACT_USAGE, which in turn calls the PCM_OP_RATE_POL_PRE_RATING policy opcode. The input to the opcodes includes the /event/billing/cycle/discount/mostcalled object.
-
PCM_OP_RATE_POL_PRE_RATING uses the POID of the /purchased_discount object to find the /profile/mostcalled object associated with the discount. This profile includes information about the criteria used to determine most-called numbers. It also includes information about how many numbers will be included in the list.
-
PCM_OP_RATE_POL_PRE_RATING uses the criteria in the /profile/mostcalled object to construct a search template that finds most-called-number information.
-
Based on the data returned by search, PCM_OP_RATE_POL_PRE_RATING creates a most-called-number list. The list includes four items of information:
-
A semicolon-delimited list of the most-called numbers. The length of the list depends on the contents of the PIN_FLD_COUNT field in the /profile/mostcalled object.
-
The total duration of all calls to the most-called numbers.
-
The total charges of all calls to the most-called numbers.
-
The total number of calls to the most-called numbers.
-
-
The opcode adds the data to the flist for the /event/billing/cycle/discount/mostcalled object. The data is stored in a substruct with fields corresponding to the four items of data returned by the opcode.
-
The flist is passed to the input module of the real-time discounting pipeline. The data is mapped into the following fields in the EDR container:
-
DETAIL.MOST_CALLED.LIST
-
DETAIL.MOST_CALLED.QUANTITY
-
DETAIL.MOST_CALLED.AMOUNT
-
DETAIL.MOST_CALLED.COUNT
-
-
When the EDR, now containing the most-called-number information, is processed by the discounting module, the EVAL token in the base expression of the discount model calls a function in the GetMostCalledInfo iScript to retrieve the total duration, cost, or number of calls.
-
The data retrieved by the specified function is substituted into the discount expression and becomes part of the discount calculation.
Implementing Most-Called-Number Discounts
You must complete the following tasks to implement most-called-number discounts using the customized components supplied with this feature:
-
If you plan to use the sample price plan (GSMPricePlan.ipl) to implement the discount, create the sample pricing data in the pipeline database.
-
Configure DAT_Discount in the real-time pipeline to use the "ISC_GetMostCalledInfo.isc" iScript file. See "Configuring the DAT_Discount Module for Query-Based Discounts".
-
Implement a MOST_CALLED provisioning tag. You must configure the provisioning tag to determine whether the list of most-called numbers is based on cost, duration, or occurrences. See "Using Provisioning Tags for Most-Called-Number Discounts".
-
In Pricing Center, configure a usage discount based on most-called numbers:
-
Create a discount model that includes a base expression with an EVAL token. The token must refer to the function in "ISC_GetMostCalledInfo.isc" that corresponds to the type of most-called-number discount you configured in the MOST_CALLED provisioning tag.
The GSMPricePlan.ipl sample price list file includes a most-called number discount. This file is located in the Pricing Center/Sample_Price_Plans/Optional_Manager_Plans directory.
-
Create a discount object that maps the discount model to the /event/billing/cycle/discount/mostcalled event and the appropriate service, such as /service/telco/gsm/telephony. Configure the discount object to include the MOST_CALLED provisioning tag.
-
-
Include the discount in a plan that can be purchased by a subscriber.
Using Provisioning Tags for Most-Called-Number Discounts
The most-called-number discounts use the MOST_CALLED provisioning tag to create profiles. These profiles determine the criteria by which the PCM_OP_RATE_POL_PRE_RATING policy opcode determines the list of most-called numbers.
To define the MOST_CALLED provisioning tag, you append its definition to the pin_config_provisioning_tags.xml file and load the file using the load_config_provisioning_tags utility. See "Working with Provisioning Tags" in BRM Setting Up Pricing and Rating for more information.
This feature includes a sample XML file, BRM_Home/sys/data/config/pin_config_provisioning_tags_mostcalled.xml. The file includes a definition of a MOST_CALLED provisioning tag that you can edit. You add this definition to the pin_config_provisioning_tags.xml file.
When you define the MOST_CALLED provisioning tag, there are four options you can set in addition to the standard information required for all provisioning tags:
-
The number of items in the most-called-number list. This value determines how many numbers are affected by the discount. For example, you can define the discount to apply to the five most-called numbers or the ten most-called numbers. The maximum is 22 numbers. You enter this as a value for the PIN_FLD_COUNT parameter.
-
The impact category or categories to which the discount applies. For example, you can determine that the discount applies only to calls made on the Orange network. You enter the impact category as a value for the PIN_FLD_IMPACT_CATEGORY parameter. To enter multiple impact categories, separate values with a semicolon.
-
The event type to consider when searching for data on most-called numbers. You enter the event type as a value for the PIN_FLD_EVENT_TYPE parameter. Only /event/delayed/session/telco is supported.
-
The criterion by which the list of most-called numbers is calculated. You enter this option as a value for the PIN_FLD_CRITERION parameter. There are three possible values:
-
OCCURRENCES: The list is defined based on the number of calls.
-
DURATION: The list is based on call duration.
-
COST: The list is based on the cost of calls.
-
The following excerpt from the XML file shows a MOST_CALLED provisioning tag configured for a cost-based discount that applies to the Orange impact category, the five most-called numbers, and GSM calls.
<OpcodeParamElement>
   <OpcodeParamName>PIN_FLD_INHERITED_INFO.PIN_FLD_MOST_CALLED_INFO.PIN_FLD_COUNT
   </OpcodeParamName>
   <OpcodeParamValue>5</OpcodeParamValue>
</OpcodeParamElement>

<OpcodeParamElement>
   <OpcodeParamName>PIN_FLD_INHERITED_INFO.PIN_FLD_MOST_CALLED_INFO.PIN_FLD_IMPACT_CATEGORY
   </OpcodeParamName>
   <OpcodeParamValue>ORANGE</OpcodeParamValue>
</OpcodeParamElement>

<OpcodeParamElement>
   <OpcodeParamName>PIN_FLD_INHERITED_INFO.PIN_FLD_MOST_CALLED_INFO.PIN_FLD_CRITERION
   </OpcodeParamName>
   <OpcodeParamValue>COST</OpcodeParamValue>
</OpcodeParamElement>

<OpcodeParamElement>
   <OpcodeParamName>PIN_FLD_INHERITED_INFO.PIN_FLD_MOST_CALLED_INFO.PIN_FLD_EVENT_TYPE
   </OpcodeParamName>
   <OpcodeParamValue>/event/delayed/session/telco/gsm</OpcodeParamValue>
</OpcodeParamElement>
Example Most-Called-Number Discount
A 10% discount on most-called numbers is included in a sample price plan provided with BRM. To use the sample, open the GSMPricePlan.ipl file in Pricing Center. This file is located in the Pricing Center/Sample_Price_Plans/Optional_Manager_Plans directory.
The following example illustrates an additional most-called discount that you can implement. This example provides a 10% discount on the most-called numbers (based on duration) when the total duration of calls to those numbers is greater than 200 minutes.
The example configuration is similar to that of the MostCalled GSM Discount included in the sample price plan, except that it adds an EVAL token to the condition expression in the discount condition. This token invokes the getMostCalledDuration function to retrieve duration information so that it can be compared to the condition value.
This procedure assumes that you have created a provisioning tag called MOST_CALLED_DURATION that specifies DURATION in the PIN_FLD_CRITERION parameter. See "Using Provisioning Tags for Most-Called-Number Discounts".
-
Create a discount master, leaving all fields at their default values.
-
Create a discount rule with the following characteristics:
-
DRUM Expression: 1
-
Rule Type: Tiered
-
DRUM Type: Charge
-
-
Create a discount step for the new rule with the following characteristics:
-
Threshold Range: 0 to infinity
-
Prorate Purchase: Prorate Discount
-
Prorate Cancel: Prorate Discount
-
-
Create a balance impact for the new step with the following characteristics:
-
Impact/Consume: 978 (Euro)
-
Applied To: Event Owner
-
Percentage: -10%
-
Base Expression: EVAL(getMostCalledCost)
-
Resource Validity Period: Current Cycle
-
Leave other fields at their default values
-
-
Create a discount trigger.
-
Create a discount condition for the new trigger with the following characteristics:
-
Condition Expression: EVAL(getMostCalledDuration)
-
Condition Operator: Greater than
-
Condition Value = 12000
-
-
Create a discount model.
-
Create a discount model version for the new model with the following characteristics:
-
Version: 1
-
Valid from: enter a validity date
-
Status: Active
-
-
Create a discount model configuration for the new version with the following characteristics:
-
Discount Version: select the version you created
-
Discount Trigger: select the trigger you created
-
Discount Rule: select the rule you created
-
Multiple discounts per event: Parallel
-
-
Create a discount object with the following characteristics:
-
Applies to: /service/telco/gsm/telephony
-
Map an Event to a Discount Model: select the MostCalled Billing Time Discount event and the discount model you created
-
Detail Discount Info tab: Select the MOST_CALLED_DURATION provisioning tag
-
Leave all other fields at their default values
-
-
Include the discount in a deal and plan that applies to /service/telco/gsm/telephony.
Example of Implementing Discounts Based on Past Usage
BRM includes a sample iScript file called ISC_GetLastSixMonthCharg.isc that you can use to provide discounts based on past usage. The iScript is intended to be used with a a billing-time discount that is processed in a real-time pipeline.
The iScript includes a function, getLastSixMonthCharge, that retrieves an account's total charges for a specific service during the previous six months. It creates a template for PCM_OP_SEARCH, which finds all the matching bill items. The function then aggregates the total charges and returns a decimal value. To implement a discount, you specify this function in an EVAL token.
The following example discount configuration uses the data returned by getLastSixMonthCharge as the basis of a 20% discount.
-
Create a discount master, leaving all fields at their default values.
-
Create a discount rule with the following characteristics:
-
DRUM Expression: 1
-
Rule Type: Tiered
-
DRUM Type: Charge
-
-
Create a discount step for the new rule with the following characteristics:
-
Threshold Range: 0 to infinity
-
Prorate Purchase: Prorate Discount
-
Prorate Cancel: Prorate Discount
-
-
Create a balance impact for the new step with the following characteristics:
-
Impact/Consume: 978 (Euro)
-
Applied To: Event Owner
-
Percentage: -20%
-
Base Expression: EVAL(getLastSixMonthCharge)
-
Resource Validity Period: Current Cycle
-
Leave other fields at their default values
-
-
Create a discount trigger.
-
Create a discount condition for the new trigger with the following characteristics:
-
Condition Expression: 1.0
-
Condition Operator: Greater than
-
Condition Value: 0
-
-
Create a discount model.
-
Create a discount model version for the new model with the following characteristics:
-
Version: 1
-
Valid from: enter a validity date
-
Status: Active
-
-
Create a discount model configuration for the new version with the following characteristics:
-
Discount Version: select the version you created
-
Discount Trigger: select the trigger you created
-
Discount Rule: select the rule you created
-
Multiple discounts per event: Parallel
-
-
Create a discount object with the following characteristics:
-
Applies to: /service/telco/gsm/telephony
-
Map an Event to a Discount Model: select the Billing Time Discount event and the discount model you created
-
Leave all other fields at their default values
-
-
Include the discount in a deal and plan that applies to /service/telco/gsm/telephony.
Sample iScripts for Query-Based Discounts
This section describes sample iScripts for query-based discounts.
ISC_GetMostCalledInfo.isc
This iScript includes three functions to retrieve total cost, total duration, and total occurrences values from the EDR container. These values are used to calculate most-called-number discounts. All three functions return decimal values.
You insert the return values of the functions into discounts by specifying the function names in the EVAL token. See "Understanding the EVAL Token". The three functions are:
-
getMostCalledCost
-
getMostCalledDuration
-
getMostCalledOccurrences
You implement these functions by specifying the file name in the EvalScriptFiles registry entry for DAT_Discount. When the iScript is loaded and compiled, the functions are available to the EVAL token in discount expressions.
The file is located in the iScriptLib/iScriptLib_Samples directory.
Registry example
DiscountModelDataModule
{
ModuleName = DAT_Discount
   Module
   {
      ...
      #Customizable iScript files supporting EVAL function
      EvalScriptFiles
      {
         iScriptFile = ./iScriptLib/iScriptLib_Samples/ISC_GetMostCalledInfo.isc
      }
      ...
   }
...
}
ISC_GetLastSixMonthCharge.isc
This is a sample iScript that retrieves the total charges for a specific service in an account during the last six months. You can use this iScript to implement a billing-time discount on usage during this period.
The iScript includes the getLastSixMonthsCharge function. You insert the return values of this function into discounts by specifying the function name in the EVAL token. See "Understanding the EVAL Token".
The file is located in the iScriptLib/iScriptLib_Samples directory.
See "Example of Implementing Discounts Based on Past Usage" for more information.
Registry example
DiscountModelDataModule
{
ModuleName = DAT_Discount
   Module
   {
      ...
      #Customizable iScript files supporting EVAL function
      EvalScriptFiles
      {
         iScriptFile = ./iScriptLib/iScriptLib_Samples/ISC_GetLastSixMonthCharge()
      }
      ...
   }
...
}
Implementing Discount Validity Rules
When a discount is activated or canceled in the middle of a cycle, discount validity rules govern whether the discount is granted for the whole cycle, a part of the cycle, or no part of the cycle in which it is activated or canceled. For more information, see "About Applying Discounts Activated or Canceled in Mid-Cycle".
To implement discount validity rules, you must do the following:
-
Set discount validity rules when you add discounts to plans by using Pricing Center. You specify a separate set of discount validity rules for usage discounts and for cycle discounts. See "About Discount Validity Rules" and "Creating Discounts".
-
If you use a batch-rating pipeline, configure the batch pipeline for discount validity rules. See "Configuring the Batch Rating Pipeline for Discount Validity Rules".
-
Set the proration rules in discount models so that they do not override discount validity rules. See "Discount Validity Rule Dependencies".
-
Run a utility to change the status of expired discounts to canceled. See "Changing the Status of Discounts Canceled in Mid-Cycle".
-
Rerate events to apply or back out usage discounts. For more information, see "Rerating Usage Events when Discount Validity Rules Apply".
Configuring the Batch Rating Pipeline for Discount Validity Rules
If you set the validity rule for usage discounts to grant the discount for the entire cycle in which it is activated (Valid from middle of cycle: Full discount), you must also set the UseLatestProductAndDiscount entry to True in the DAT_AccountBatch module registry. When set to True, the batch pipeline retrieves products and discounts based on their activation date instead of their purchase date. This ensures that delayed events are properly rated when their start date is earlier than the discount's purchase date.
See "DAT_AccountBatch".
Discount Validity Rule Dependencies
You set discount validity rules when you add discounts to plans in Pricing Center. These validity rules apply to usage discounts (discounts on usage events) and to cycle discounts (discounts on cycle events). You set these rules in the Detailed Discount Info tab of the Discount Attributes dialog box.
There are also cycle-event proration settings at the discount model level, in discount rules. These apply to cycle-fee discounts only.
To apply the cycle-fee discount validity rules that you set when adding discounts to plans, you must set the cycle event proration setting in the discount rule to Prorate Discount. When setting up discount rules, select Prorate Discount for the cycle event purchase and cancel proration settings in the Discount/ChargeShare Step tab of the Discount/ChargeShare Rule dialog box.
If you specify a value other than Prorate Discount in the discount rule, that value overrides the discount validity rules set at the discount level.
Note:
To prorate fixed cycle-event discounts, before starting the real-time pipeline, you must set the ProrateFixedDiscount registry entry to True in the FCT_Discount module registry. See "FCT_Discount".Managing Discount End Dates during Mid-Cycle Cancellations
When the discount validity rule is set to Full Discount and a discount is canceled in the middle of a cycle, BRM, by default, cancels the discount at the end of the accounting cycle. You can optionally configure BRM to cancel the discount immediately.
To specify how BRM sets the discount end date during mid-cycle cancellations, use the CancelFullDiscountImmediate parameter in the subscription instance of the /config/business_params object:
-
When the parameter is disabled, BRM sets the discount end date to the accounting end date. This is the default.
-
When the parameter is enabled, BRM sets the discount end date to the cancellation date.
To configure how BRM manages discount end dates during mid-cycle cancellations when the discount validity rule is set to Full Discount:
-
Go to BRM_Home/sys/data/config, which includes the support files used by the pin_bus_params utility.
-
Use the following command to create an editable XML file from the business_params_subscription instance of the /config/business_params object:
pin_bus_params -r BusParamsSubscription bus_params_subscription.xml
This command creates the XML file named bus_params_subscription.xml.out in your working directory. If you do not want this file in your working directory, specify the path as part of the file name
-
Search the file for the following line:
<CancelFullDiscountImmediate>disabled</CancelFullDiscountImmediate>
-
Set the parameter to the appropriate value:
-
enabled to set the discount end date to the cancellation date.
-
disabled to set the discount end date to the accounting end date.
BRM uses the XML in this file to overwrite the existing subscription instance of the /config/business_params object. If you delete or modify any other parameters in the file, these changes affect the associated aspects of the BRM subscription configurations.
-
-
Save the file as bus_params_subscription.xml.
-
Use the following command to load this updated file into the /config/business_params object:
pin_bus_params bus_params_subscription.xml
-
Read the object with the testnap utility or Object Browser to verify that all fields are correct.
-
Stop and restart the CM.
Changing the Status of Discounts Canceled in Mid-Cycle
When a discount's validity rule is set to Full discount for discounts that are canceled in the middle of a cycle, BRM sets the discount to expire at the end of the cycle, but its status remains active.
To change the status of expired discounts from active to canceled, you must run the pin_discount_cleanup utility with the -m parameter.
You can run this utility daily or add it to the pin_bill_day utility to be run automatically. For more information, see "pin_discount_cleanup".
Rerating Usage Events when Discount Validity Rules Apply
For usage discounts (discounts that apply to usage events), you need to run rerating to apply or back out the discounts in these circumstances:
-
When you grant a full discount for discounts that are:
-
Activated in the middle of a cycle
-
Activated and canceled in the same cycle
Rerate the usage events for the accounting cycle in which the discount is activated. This ensures the discount is applied to events that occurred between the cycle start time and the discount purchase time. For example, if a discount is purchased on 1/15 and its activation time is set to 1/1, rerating ensures the discount is applied to events that occurred between 1/1 and 1/15.
-
-
When you grant no discount for discounts that are:
-
Canceled in the middle of a cycle
-
Activated and canceled in the same cycle
Rerate the usage events for the accounting cycle in which the discount is canceled. This ensures the discounts that were applied to events between the cycle start time and the cancellation time are backed out.
-
Validity rules for discounts on usage events also apply to discounts that aggregate usage for the purpose of applying billing-time discounts. Rerating usage events adjusts aggregation amounts accordingly.
For information on rerating, see "About Rerating Events" in BRM Setting Up Pricing and Rating.
Setting Up Discount Exclusion Rules
Exclusion rules establish a mutually exclusive relationship between discounts and also between a discount and a plan.
You define exclusion rules in Pricing Center. You can also view the discounts or plans that already have exclusion rules set.
For information on setting up exclusion rules for usage discounts, see "Setting Up Exclusion Rules for Usage Discounts".
Configuring and Defining Exclusion Rules
Before you can use exclusion rules, you must do the following:
-
Configure the /config/business_params storable class object to support exclusion rules.
-
Define an exclusion rule in Pricing Center.
Configuring Exclusion Rules
You can set up dependencies between two discounts or between a discount and a plan. Setting up an exclusion rule in Pricing Center enables the feature, but does not specify the dependency type. When you set up an exclusion rule in Pricing Center, the /config/business_params object is called by PCM_OP_SUBSCRIPTION_VALIDATE_DISCOUNT_DEPENDENCY.
Before you can set up exclusion rules, you need to set certain values in the /config/business_params storable class object. By default, exclusion rules are disabled in BRM. You can enable this feature by modifying a field in the billing instance of the /config/business_params object. You use the pin_bus_params utility to perform this task.
To enable and specify discount exclusion rules:
-
Use the following command to create an editable XML file from the billing instance of the /config/business_params objects:
pin_bus_params -r BusParamsBilling bus_params_billing.xmlThis command creates the XML file named bus_params_billing.xml.out in your working directory. If you do not want this file in your working directory, specify the full path as part of the file name.
-
Search the XML file for following line:
<ValidateDiscountDependency>disabled</ValidateDiscountDependency> -
Change disabled to any of the following:
-
discToDiscExcl: Enable discount-to-discount exclusion rules.
-
discToPlanExcl: Enable discount-to-plan exclusion rules.
-
enableBothExcl: Enable both discount-to-discount and discount-to-plan exclusion rules.
-
disableDiscToPlanExclAndNoPurTimeValidation: Disable exclusion rules between price plans and discounts system wide. When this flag is set, at purchase time no dependency validations are performed.
-
enableBothExclAndNoPurTimeValidation: Enable both discount-to-discount and discount-to-plan exclusion rules, and do not support dependency validations at purchase time.
-
returnOnFirstExcl: Return the first mutually exclusive discounts or discount/price plan if BRM finds any such conflicts.
Caution:
BRM uses the XML in this file to overwrite the existing billing instance of the /config/business_params object. If you delete or modify any other parameters in the file, these changes affect the associated aspects of the BRM billing configuration.
-
-
Save the file and rename it from bus_params_billing.xml.out to bus_params_billing.xml.
-
Use the following command to load the change into the /config/business_params object:
pin_bus_params bus_params_billing.xmlYou should execute this command from the BRM_Home/sys/data/config directory, which includes support files used by the utility. To execute it from a different directory, see "pin_bus_params" in BRM Developer's Guide.
-
Read the object with the testnap utility or the Object Browser to verify that all fields are correct.
See "Using testnap" in BRM Developer's Guide for general instructions on using testnap. See "Reading Objects by Using Object Browser" in BRM Developer's Guide for information on how to use Object Browser.
-
Stop and restart the Connection Manager (CM). See "Starting and Stopping the BRM System" in BRM System Administrator's Guide.
-
(Multischema systems only) Run the pin_multidb script with the -R CONFIG parameter. For more information, see "pin_multidb" in BRM System Administrator's Guide.
Setting Up Exclusion Rules for Usage Discounts
After you have configured for standard exclusion rules (see "Configuring Exclusion Rules"), you must perform the following tasks to be able to apply exclusion rules for usage discounts:
-
For the batch pipeline only, set the ReadPlans registry entry in the Customer Data module. See "Configuring the DAT_AccountBatch module".
-
For both the real-time and batch pipelines, set the PortalConfigDataModule registry entry in the Discount Data module. See "DAT_Discount".
Configuring the DAT_AccountBatch module
To support discount-to-plan exclusion in a batch pipeline, before starting the pipeline, set the ReadPlans registry entry in the DAT_AccountBatch module to True.
For more information, see "DAT_AccountBatch".
Configuring the DAT_Discount module
To enable mutual exclusion in both the real-time and batch pipelines, configure the "DAT_Discount" module to retrieve business parameter settings from the "DAT_PortalConfig" module by using the PortalConfigDataModule entry.
For more information, see "Using Business Parameter Settings from the BRM Database" in BRM System Administrator's Guide.
Defining Exclusion Rules for Plans and Discounts
You can define exclusion rules between a plan and a discount in two ways:
-
By defining an exclusion rule for a plan, which prohibits certain discounts from being owned by an account if the plan is also owned.
-
By defining an exclusion rule for a discount, which prohibits any specified plans from being owned by an account if the discount is also owned.
Either way creates an exclusion rule between a discount and a plan. When you prohibit a plan from being used with a discount, that also prohibits any deals, services, or other discounts owned by that plan from being used with that discount. In the same way, when you prohibit a discount from being used by a plan, the exclusion rule you set also prohibits any discounts, services, or deals associated with that plan from being used with that discount. The method you use depends on your situation and whether you are most interested in controlling the plan or the discount.
You can also define an exclusion rule between two discounts, which excludes one from being applied when both are already owned or prohibits the two of them from being purchased in the same deal. See "Setting Up Discount Exclusion Rules".
Updating Discount Data
If you change discount pricing data, to make the changes take effect, you must refresh the Pipeline Manager data. To do this, use the Reload semaphore file entry for the DAT_Discount module. See "Reloading Data into a Pipeline Manager Module" in BRM System Administrator's Guide and "DAT_Discount".
When you reload discount data, Pipeline Manager retrieves discount model information from the Pipeline Manager database and account balance information from the BRM database. If any new non-currency resources are specified in the discount model, Pipeline Manager reloads the balance data for those resources. While Pipeline Manager is reloading discount data, event processing is suspended until reloading is complete.