Managing Account Resources

This section describes the following topics:

Before you can complete these tasks, you must have completed the Cloud User tasks, as described in Creating and Managing Exalogic vDC Resources.

Logging In as a Cloud User

Log in to the Exalogic Control console as a Cloud User that you created in Creating the Cloud Admin User.

Updating a Server Template

To update the server template that you previously uploaded in your Account, complete the following steps:

  1. Log in to the Exalogic Control console as a Cloud User.
  2. In the navigation pane on the left, click vDC Accounts. Under vDC Accounts, click the name of your Account (example: Dept1).

    The Dept1 Account dashboard is displayed.

  3. Click the Server Templates tab.

    A list of Server Templates available in your Account is displayed.

  4. Select the Server Template (for example, Template1) that you previously uploaded to your Account.
  5. Click the pencil icon to update the template.

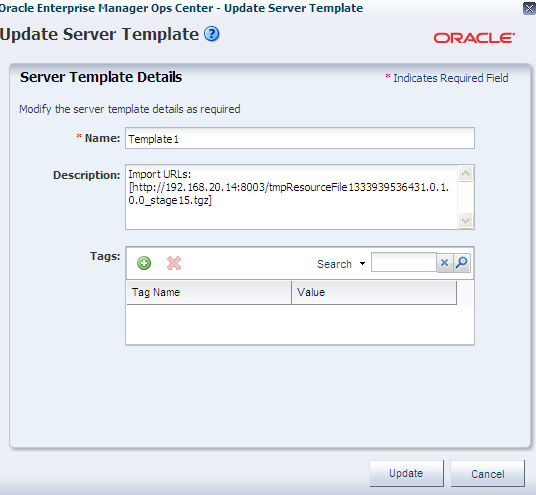
    The Update Server Template screen is displayed, as shown in Figure 10-12.

    Figure 10-12 Update Server Template

    Description of Figure 10-12 follows
    Description of "Figure 10-12 Update Server Template"
  6. Modify the template details, as necessary.
  7. Click Update.

Deleting a Server Template

To delete the Server Template that you previously uploaded in your Account, complete the following steps:

  1. Log in to the Exalogic Control console as a Cloud User.
  2. In the navigation pane on the left, click vDC Accounts. Under vDC Accounts, click the name of your Account (Dept1). The Dept1 Account dashboard is displayed.
  3. Click the Server Templates tab. The list of Server Templates available in your Account is displayed.
  4. Select the Server Template (for example, Template1) that you previously uploaded to your Account.
  5. Click the X icon to delete the template. A confirmation message is displayed.
  6. Click OK to confirm.

Updating a vServer

To update a vServer, complete the following steps:

  1. Log in to the Exalogic Control console as a Cloud User.
  2. In the navigation pane on the left, click vDC Accounts. Under vDC Accounts, click the name of your Account (Dept1). The Dept1 Account dashboard is displayed.
  3. Click the vServers tab. vServers created and running in your Account are listed.
  4. Select the vServer (for example, vserverl) that you previously created in your Account.
  5. Click the pencil icon to update the vServer. The Update vServer wizard is displayed.
  6. Modify vServer details, as necessary and click Next.
  7. Modify vServer attributes, the number of vCPUs and memory size of the vServer.

    Note:

    You can update the vCPU and memory size only when the vServer is in shutdown or shutdown/detached status.

  8. Click Update to finish.

Deleting a vServer

To delete a vServer, complete the following steps:

  1. Log in to the Exalogic Control console as a Cloud User.
  2. In the navigation pane on the left, click vDC Accounts. Under vDC Accounts, click the name of your Account (Dept1). The Dept1 Account dashboard is displayed.
  3. Click the vServers tab. vServers running or stopped in your Account are listed.
  4. If the vServer (for example, vserver1) is running, click the Stop vServer icon (red icon) to stop the vServer. Wait till the job succeeds in the Jobs pane.
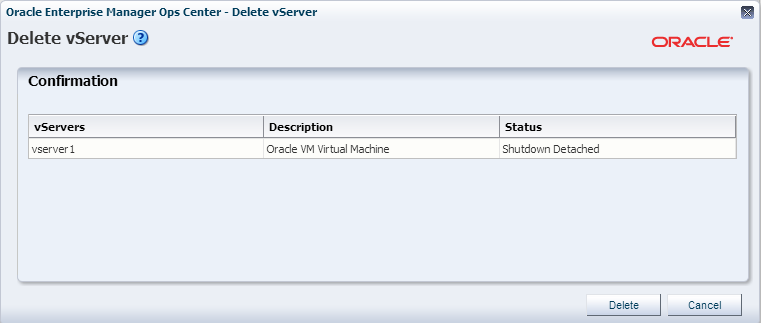
  5. Select vserver1, and click the X icon. The Delete vServer screen is displayed, as shown in Figure 10-13.

    Figure 10-13 Delete vServer Screen

    Description of Figure 10-13 follows
    Description of "Figure 10-13 Delete vServer Screen"

    This screen also displays the name of the vServer, its description and status.

  6. Click Delete to confirm.

Updating a Private vNet

To update a private vNet that you previously created in your Account, complete the following steps:

  1. Log in to the Exalogic Control console as a Cloud User.
  2. In the navigation pane on the left, click vDC Accounts. Under vDC Accounts, click the name of your Account (Dept1). The Dept1 Account dashboard is displayed.
  3. Click the Networks tab. In the Private vNets section, the list of private vNets available in your Account is displayed.
  4. Select the private vNet (for example, vnet1) that you previously created in your Account.
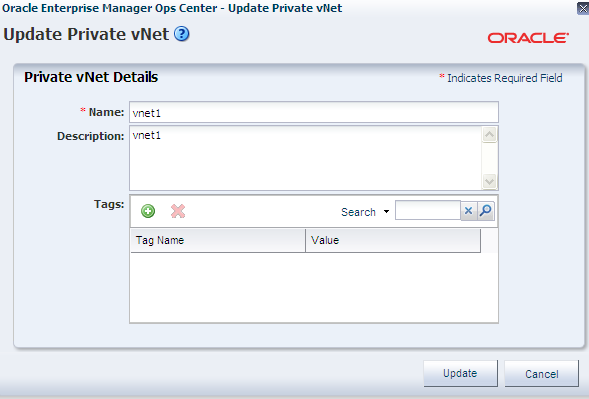
  5. Click the pencil icon to update the private vNet. The Update Private vNet screen is displayed, as shown in Figure 10-14.

    Figure 10-14 Update Private vNet

    Description of Figure 10-14 follows
    Description of "Figure 10-14 Update Private vNet"
  6. Modify private vNet details, as necessary.
  7. Click Update to finish.

Deleting a Private vNet

To delete a private vNet, do the following:

Note:

With this procedure, you can delete a vNet even if it is associated with vServers. So before attempting to delete a private vNet, make sure that the vNet not associated with any vServer.

  1. Log in to the Exalogic Control console as a Cloud User.
  2. In the navigation pane on the left, click vDC Accounts. Under vDC Accounts, click the name of your Account (Dept1).

    The Dept1 Account dashboard is displayed.

  3. Click the Networks tab.

    In the Private vNets section, the list of private vNets available in your Account is displayed.

  4. Select the private vNet (for example, vnet1) that you want to delete.
  5. Ensure that the private vNet (vnet1) is not associated with any vServer.
  6. Click the X icon to delete the private vNet.

    A confirmation screen is displayed.

  7. Click Delete.

Allocating Virtual IPs for an Account

Before creating vServers with a static IP address, you must allocate IP addresses for your account as follows:

  1. Log in to the Exalogic Control console as a Cloud User.
  2. From the navigation pane on the left, click vDC Accounts.
  3. Under vDC Accounts, click the name of your account.

    The Account dashboard for your account is displayed.

  4. Click the Networks tab.

    The private vNets and public networks available to your account are displayed.

  5. Select the network for which you want to allocate IP addresses.
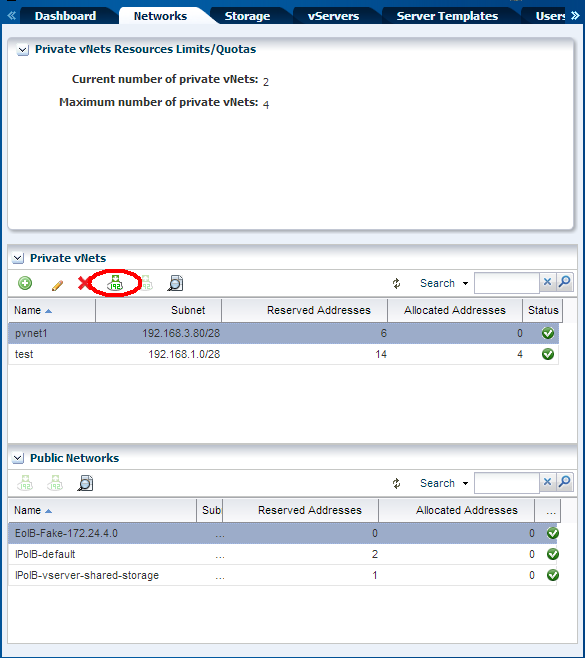
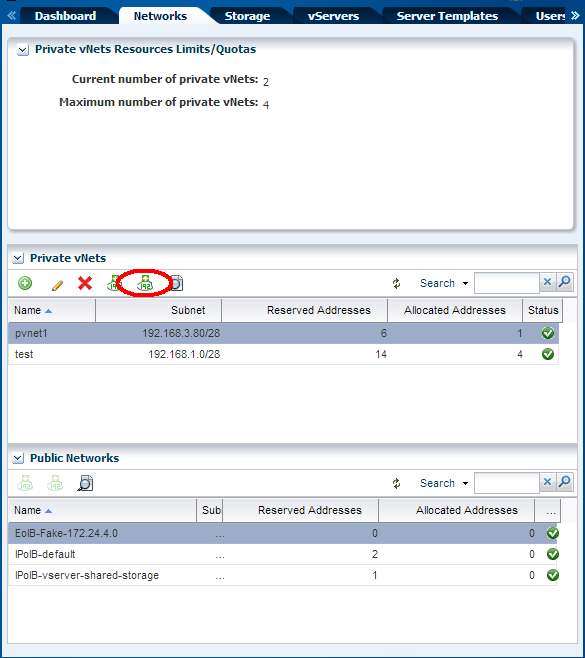
  6. Click the Launch Allocate vIP Wizard button as shown in Figure 10-15.

    Figure 10-15 Launch Allocate vIP Wizard Button

    Description of Figure 10-15 follows
    Description of "Figure 10-15 Launch Allocate vIP Wizard Button"

    The Allocate vIP Addresses Wizard is displayed.

  7. In the Number of vIPs field, enter the number of IP addresses you want to reserve for static assignments to vServers.

    The IP addresses that you have allocated are displayed.

  8. Click the Allocate vIP button.
  9. Click OK.

    The IP addresses are now available while creating a vServer with a static IP address as described in step 16 of Creating vServers.

    Note:

    You can click the View Allocated IP Addresses button to see IP addresses that you can allocate when creating vServers with static IP addresses.

Deallocating Virtual IPs for an Account

IP addresses that are no longer necessary for use as static IP addresses for an account can be deallocated as follows:

  1. Log in to the Exalogic Control console as a Cloud User.
  2. From the navigation pane on the left, click vDC Accounts.
  3. Under vDC Accounts, click the name of your account.

    The Account dashboard for your account is displayed.

  4. Click the Networks tab.

    The private vNets and public networks available to your account are displayed.

  5. Select the network for which you want to deallocate IP addresses.
  6. Click the Launch Deallocate vIP Wizard button as shown in Figure 10-16

    Figure 10-16 Launch Deallocate vIP Wizard Button

    Description of Figure 10-16 follows
    Description of "Figure 10-16 Launch Deallocate vIP Wizard Button"

    The Deallocate vIP Addresses Wizard is displayed.

  7. Select the IP addresses that you want to deallocate.

    You can use the Ctrl key to select multiple IP addresses.

  8. Click the Deallocate vIP button.

    The IP addresses that you have deallocated are displayed.

  9. Click OK.

    The IP addresses that you deallocated are now unavailable for static allocation to vServers.

Updating a Distribution Group

To update a Distribution Group that you previously created in your Account, complete the following steps:

  1. Log in to the Exalogic Control console as a Cloud User.
  2. In the navigation pane on the left, click vDC Accounts. Under vDC Accounts, click the name of your Account (Dept1). The Dept1 Account dashboard is displayed.
  3. Click the vServers tab. Distribution Groups available in your Account are listed.
  4. Ensure that the Distribution Group (Dept1-distrgrp11) is not associated with any running vServers.
  5. Select the Distribution Group (for example, Dept1-distgrp1) that you previously created in your Account.
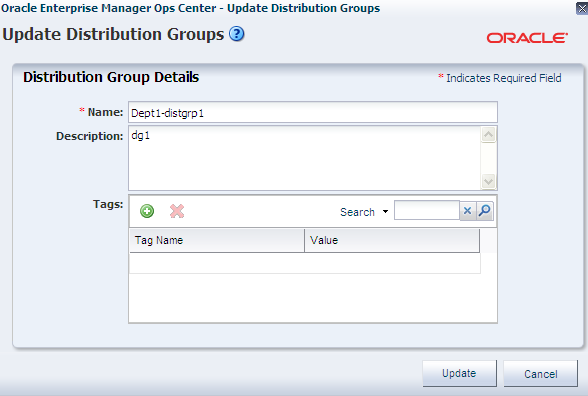
  6. Click the pencil icon to update the Distribution Group. The Update Distribution Groups screen is displayed, as shown in Figure 10-17.

    Figure 10-17 Update Distribution Groups

    Description of Figure 10-17 follows
    Description of "Figure 10-17 Update Distribution Groups"
  7. Modify Distribution Group details, as necessary.
  8. Click Update to finish.

Deleting a Distribution Group

To update a Distribution Group that you previously created in your Account, complete the following steps:

  1. Log in to the Exalogic Control console as a Cloud User.
  2. In the navigation pane on the left, click vDC Accounts. Under vDC Accounts, click the name of your Account (Dept1). The Dept1 Account dashboard is displayed.
  3. Click the vServers tab. Distribution Groups available in your Account are listed.
  4. Select the Distribution Group (for example, Dept1-distgrp1) that you previously created in your Account.
  5. Click the X icon to delete the Distribution Group.

    Note:

    You can delete a Distribution Group only if it does not have assigned vServers.

  6. If the Distribution Group does not have assigned vServers, click Delete to confirm.

Updating a Volume

To update a volume that you previously created in your Account, complete the following steps:

  1. Log in to the Exalogic Control console as a Cloud User.
  2. In the navigation pane on the left, click vDC Accounts. Under vDC Accounts, click the name of your Account (Dept1). The Dept1 Account dashboard is displayed.
  3. Click the Storage tab.
  4. Click the Volumes tab. Volumes in your Account are listed.
  5. Select the volume (for example, Volume1) that you previously created in your Account.
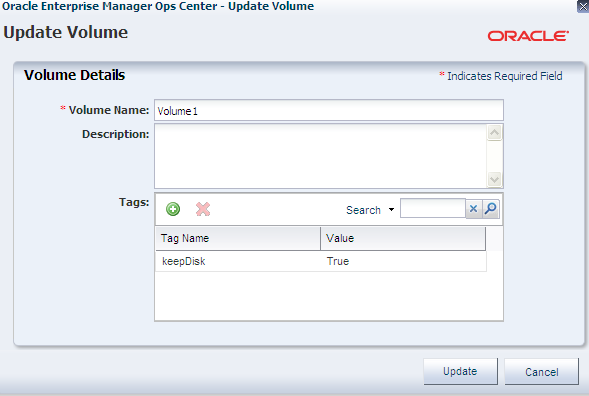
  6. Click the pencil icon to update the volume. The Update Volume screen is displayed, as shown in Figure 10-18.
  7. Modify volume details, as necessary.
  8. Click Update to finish.

Deleting a Volume

To delete a volume that you previously created in your Account, complete the following steps:

  1. Log in to the Exalogic Control console as a Cloud User.
  2. In the navigation pane on the left, click vDC Accounts. Under vDC Accounts, click the name of your Account (Dept1). The Dept1 Account dashboard is displayed.
  3. Click the Storage tab.
  4. Click the Volumes tab. Volumes in your Account are listed.
  5. Ensure that the Volume (Volume1) is not attached to any vServer.
  6. Select the volume (for example, Volume1) that you previously created in your Account.
  7. Click the X icon to delete the volume. The Update Volume screen is displayed.
  8. Click Delete to finish.

Updating a Snapshot

To update a volume Snapshot that you previously created in your Account, complete the following steps:

  1. Log in to the Exalogic Control console as a Cloud User.
  2. In the navigation pane on the left, click vDC Accounts. Under vDC Accounts, click the name of your Account (Dept1). The Dept1 Account dashboard is displayed.
  3. Click the Storage tab.
  4. Click the Snapshots tab. Snapshots in your Account are listed.
  5. Select the Snapshot (for example, Vol1_snapshot) that you previously created in your Account.
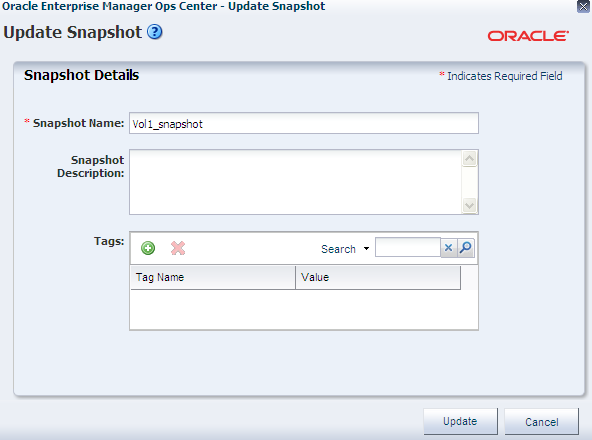
  6. Click the pencil icon to update the Snapshot. The Update Snapshot screen is displayed, as shown in Figure 10-19.

    Figure 10-19 Update Snapshot

    Description of Figure 10-19 follows
    Description of "Figure 10-19 Update Snapshot"
  7. Modify Snapshot details, as necessary.
  8. Click Update to finish.

Deleting a Snapshot

To delete a volume Snapshot that you previously created in your Account, complete the following steps:

  1. Log in to the Exalogic Control console as a Cloud User.
  2. In the navigation pane on the left, click vDC Accounts. Under vDC Accounts, click the name of your Account (Dept1). The Dept1 Account dashboard is displayed.
  3. Click the Storage tab.
  4. Click the Snapshots tab. Snapshots in your Account are listed.
  5. Select the Snapshot (for example, Vol1_snapshot) that you previously created in your Account.
  6. Click the X icon to delete the Snapshot. A confirmation screen is displayed.
  7. Click Delete to confirm.