Administering the Exalogic vDC and Setting Up the Infrastructure

This section contains the following topics:

Logging In as Cloud Admin User

Log in to the Exalogic Control console as the Cloud Admin user. For more information about this user role, see Creating the Cloud Admin User.

Examining the Default vDC

Examine the default Virtual Data Center (vDC) in your Exalogic machine by doing the following:

  1. Log in to the Exalogic Control console as the Cloud Admin user.
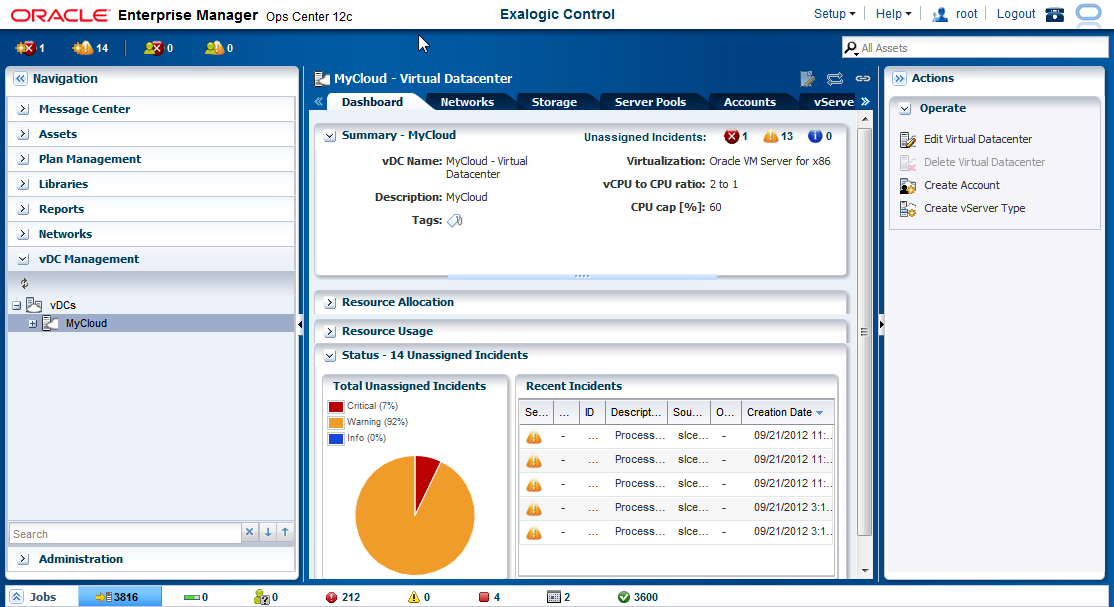
  2. In the navigation pane on the left, click vDC Management. Under vDCs, click the name of the default vDC in your Exalogic machine. The vDC dashboard is displayed.

    Note:

    An Exalogic machine has one default vDC only.

  3. View the vDC dashboard, which is shown in Figure 9-1.
  4. Examine the networks in the default vDC by clicking the Networks tab. You can view the network configuration and network allocation by clicking Network Configuration and Network Allocation tabs, respectively.

    The Network Configuration page shows the network infrastructure, public external networks, and application-internal (private) networks in the vDC. The Network Allocation page shows the allocation of public IP addresses and virtual networks (vNets) in the vDC.

  5. View the storage information by clicking Storage on the top navigation bar. You can view information about storage infrastructure in the vDC.
  6. Examine the Oracle VM Server pools in the vDC by clicking Server Pools on the top navigation bar.

    Note:

    The server pools are configured in the Exalogic machine by Exalogic Control, by default.

  7. Examine the default vServer types by clicking vServer Types on the top navigation bar. For information about creating new vServer types, see Creating vServer Types.
  8. Examine incidents in the vDC by clicking the Incidents tab in the top navigation bar. In this tab, you can view both incidents and alerts for the entire vDC.
  9. Examine any current or historical jobs by clicking the Jobs tab on the top navigation bar.

Creating vServer Types

Certain default, system-defined vServer types are available in the Exalogic vDC, as described in vServer Types..

Users with the Cloud Admin role can create additional vServer types, as follows:

  1. Log in to the Exalogic Control BUI as the Cloud Admin user.
  2. In the navigation pane on the left, click vDC Management. Under vDCs, click the name of your vDC. The vDC dashboard is displayed.
  3. In Actions pane on the right, click Create vServer Type.

    The Create vServer Type wizard starts.

  4. Enter the name, description, and tags for the new vServer type, as necessary. For example, enter SUPER_LARGE in the Name field.
  5. Click Next.

    The Configure vServer Type screen is displayed.

  6. Specify the memory and number of vCPUs in the Memory Size (GB) and Number of vCPUs fields.

    The maximum memory that you can assign to a vServer Type is the memory size of the largest compute node on the Exalogic machine, minus a small amount that is reserved for system use.

    For example, on a machine that contains only X2-2 nodes, the Create vServer Type wizard shows 95 GB as the maximum selectable memory, but the maximum memory that you should assign is 91 GB. Similarly, on a machine that contains X3-2 nodes, the wizard shows 255 GB as the maximum, but you can create vServer types with memory size up to 246 GB.

    Note:

    When a vServer is created or restarted, if none of the nodes can meet the resource requirements of the vServer, the creation or restart will fail.

  7. After specifying the memory size and number of vCPUs, click Next.

    The Summary screen is displayed.

  8. Review the summary, and click Finish.
  9. Verify the newly created vServer type by clicking the vServer Types tab on the top navigation pane. The newly created vServer type is listed under vServer Types.

Creating External EoIB Networks

As the Exalogic Systems Admin, you can create external EoIB networks to isolate public traffic for different Cloud Accounts in the Exalogic vDC.

Before creating an external EoIB network using Exalogic Control, collect the following information from your network administrator:

  • IP addresses for the new network you are creating

  • VLAN ID for the EoIB fabric for which you want to create a network

The following example procedure describes how to create an external EoIB network in Exalogic Control:

  1. Log in to Oracle Exalogic Control BUI as the ELAdmin user.

  2. In the navigation pane on the left, click Networks. Select the default domain on the navigation pane.

  3. Click Define Network on the Actions pane.

    The Define Network wizard starts.

  4. Enter the following information:

    • In the Network IP (CIDR Format) field, enter an IP address for the network in the Classless Inter-Domain Routing (CIDR) format. For example, enter 206.13.1.48/25.

      Note:

      A CIDR address includes the standard 32-bit IP address, and it indicates how many bits are used for the network prefix. For example, in the CIDR address 206.13.1.48/25, the /25 value indicates that the first 25 bits are used to identify the unique network. The remaining bits are available to identify the specific host.

      Ensure that the network you specify in the Network IP (CIDR Format) field is not used by another EoIB network. Do not attempt to create more than one EoIB network using the same VLAN ID.

    • In the Gateway field, enter the corresponding gateway address. For example, 206.13.1.100.

    • Do not modify the default MTU value, which is 1500.

    • In the Network Name field, enter a name. For example, public_eoib1.

    Click Next.

    The Assign Fabric screen is displayed.

  5. Select the fabric named Exalogic EoIB Fab....

    In the VLAN ID field, enter the VLAN ID for the fabric. Use the VLAN ID provided by your network administrator. If the default VLAN ID for the EoIB fabric is untagged, enter -1.

    Click Next.

    The Specify Managed Address Ranges screen is displayed.

  6. Based on the IP address and subnet you specified in the step 4, specify the range of IP addresses that may be used by vServers.

    Click + to specify an address range and any exclusions. Define the IP address that your network administrator has provided to you. For example, enter 206.13.01.125 in the From IP Address field.

    Note:

    You can change the ranges even after the network is created.

    After specifying the range and exclusions, click Next.

    The Specify Static Routes screen is displayed. Do not enter or change any values.

    Click Next.

    The Specify Network Services screen is displayed.

  7. If you want to access vServers associated with this network from outside the Exalogic rack using their host names, do the following:

    1. In the DNS Domain Name field, enter the domain name of the DNS server.

    2. In the DNS Servers field, enter a DNS server. If you want to add multiple DNS servers, click the plus (+) button.

    Note:

    Do not enter or change any other values.

    Click Next.

    The Summary screen is displayed.

  8. Review the summary, and click Finish.

    After the network is created, the new external EoIB network, such as public_eoib1, is listed under Networks in the navigation pane. Verify the network by clicking its name.

Specifying Managed IP Address Ranges for Networks

To specify the IP addresses that Exalogic Control must manage for a given network, complete the following steps:

  1. Log in to the Exalogic Control BUI a user with the Exalogic Systems Admin role.
  2. In the Networks accordion, select the required network under the default domain.
  3. In the Actions pane, click Edit Managed IP Ranges.

    The Edit Managed IP Address Ranges dialog box is displayed.

  4. Add or remove IP addresses ranges, as required:
    • To add an IP address range, click + in the toolbar, and specify a range.

      • Make sure that the new IP address range is within the network. For example, if the IP address of the network is 192.168.168.0 and the netmask is 255.255.248.0, the new IP address range must be within the range 192.168.168.1–192.168.175.254.

      • If any of the IP addresses in the range is in use already, they must be excluded from the range of addresses managed by Exalogic Control. Examples include IP addresses on IPoIB-default that are allocated to Exalogic hardware and software components during ECU, and EoIB IP addresses that are in use outside the Exalogic rack in the customer's data center.

        To do this, click + in the toolbar, add the IP addresses that you want to exclude, and select the check box in the Exclude Managed IP Range column.

    • To remove an IP address range, select the range to be removed, and click X in the toolbar.

  5. Click Update.

Establishing Cloud Accounts

This section contains the following topics:

Creating Accounts

To create an account, complete the following steps:

  1. Log in to the Exalogic Control BUI as a user with the Cloud Admin role.
  2. In the navigation pane on the left, expand vDC Management.
  3. Under vDCs, select the name of the default vDC in your Exalogic machine and click Accounts.

    The Accounts page is displayed.

  4. Click the + button in the toolbar.

    The Create Account wizard starts.

  5. Enter a name and description for the new account.
  6. Click Next.

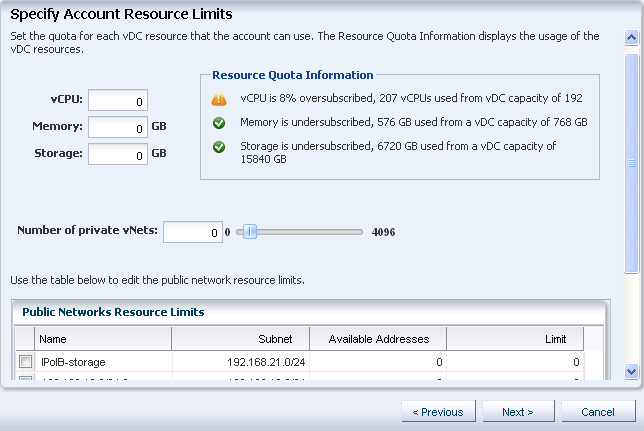
    The Specify Account Resource Limits screen is displayed.

    Note:

    Account resource limits represent the sum total of resources available to all users executing in the context of that account.

    Figure 9-2 Specify Account Resource Limits

    Description of Figure 9-2 follows
    Description of "Figure 9-2 Specify Account Resource Limits"
  7. Enter appropriate values in the following fields:
    • vCPU: Enter an integer value. For example, enter 20.

    • Memory: Enter a value in GB. For example, 100 GB.

    • Storage: Enter the storage size in GB. For example, enter 2000 GB.

    • Number of private vNets: Enter a numeric value from 0 to 4096 to specify the number of private vNets that the account can use. For example, enter 15.

      Tip:

      The Resource Quota Information section on the screen displays the available resources.

    • Under Public Networks Resource Limits, the public networks available in the vDC are listed.

      From the list, select the Public Networks that must be accessible by users of this account. In the Limit column, specify the limit that defines the number of IP addresses to be allocated from the available addresses. If you do not specify the limit, you cannot create vServers later.

      Note:

      • If guest vServers must be connected to an Exadata machine, you must assign the IPoIB-default network.

      • If guest vServers must have access to shares on the ZFS storage appliance, you must assign the IPoIB-vserver-shared-storage network.

  8. Click Next.

    The Assign Users screen is displayed.

    A list of users with the Cloud User role is displayed. Select the Cloud Users that should be assigned to the account. For example, assign User1.

    Note:

    You can add Cloud Users to the account even after the account creation, as described in Adding Users to an Account.

  9. Click Next. The Summary screen is displayed.
  10. Review the summary, and click Finish to create the account.

    The new accounts is listed under Accounts in the navigation pane on the left.

Adding Users to an Account

You can add Cloud Users to the account and give them the privileges to use the resources allocated to an account. You can add the Cloud Users while you create an account or after creating an account.

To add Cloud Users after creating the account, complete the following steps:

  1. Log in to Exalogic Control as the Cloud Admin user.
  2. In the navigation pane on the left, click vDC Management. Under vDCs, click the name of the default vDC in your Exalogic machine. Click Accounts. Alternatively, click the Accounts tab on the top navigation bar.

    The Accounts page is displayed.

  3. Select the account, such as Dept1.
  4. Click Add Users on the Actions pane.

    The Add Users wizard is displayed. The screen lists the available Cloud Users and already assigned Cloud Users to the account are displayed.

  5. Select the users that should be assigned to the account and move them to the Assigned Users.Click Next to view the summary.
  6. View the summary, and click Finish to add the user to the account.

Assigning Networks to an Account

As the Cloud Admin user, you can assign networks (for example, an external EoIB network) to an account, by doing the following:

  1. Log in to Exalogic Control as the Cloud Admin user.
  2. In the navigation pane on the left, click vDC Management. Under vDCs, click the name of the default vDC in your Exalogic machine. Select the account listed under Accounts in your default vDC.
  3. Right-click and choose Update Account.

    The Update Account wizard is displayed.

  4. On the Specify Account Details screen, click Next.

    The Specify Account Resource Limits screen is displayed.

  5. On this screen, select the check box corresponding to the required network (say, an external EoIB network) from the list in the Public Networks Resource Limits section.

    In the Limit field, specify the number of IP addresses to be allocated from the available addresses.

    Note:

    • If guest vServers must be connected to an Exadata machine, you must assign the IPoIB-default network.

    • If guest vServers must have access to shares on the ZFS storage appliance, you must assign the IPoIB-vserver-shared-storage network.

    • If a network does not have enough IP addresses to meet the requirements of the account, a user with the Exalogic Systems Admin role must first add IP address ranges to the network, as described in Specifying Managed IP Address Ranges for Networks.

    Click Next.

    The Summary screen is displayed.

  6. Review the summary, and verify that it includes assigned networks under Newly assigned Public networks.
  7. Click Finish.

Examining the vDC

After performing the above Cloud Administration tasks, examine the Virtual Data Center (vDC) in your Exalogic machine as follows:

  1. Log in to Exalogic Control as the Cloud Admin user.
  2. In the navigation pane on the left, click vDC Management. Under vDCs, click the name of the default vDC in your Exalogic machine. The vDC dashboard is displayed.
  3. Examine the accounts in the vDC by selecting the Accounts tab. You can view the newly created accounts.

    Starting from release 2.0.6.0.0 of the Exalogic Elastic Cloud Software, the Exalogic Control browser user interface displays a consolidated view of the resources—vCPUs, storage, and memory—allocated to each account, as shown in Figure 9-3.

    Figure 9-3 View of Resources Allocated to Accounts

    Description of Figure 9-3 follows
    Description of "Figure 9-3 View of Resources Allocated to Accounts"
  4. Examine the networks in the default vDC by clicking the Networks tab. You can view the network configuration and network allocation by clicking Network Configuration and Network Allocation tabs, respectively.

    The Network Configuration page shows the network infrastructure, public external networks, and application internal networks in the vDC. The Network Allocation page shows the allocation of public IP addresses and virtual networks (vNets) in the vDC.

Verifying the vDC

After Cloud Users have performed their actions, the Cloud Admin user can verify and monitor the new private vNets and the storage availability in the vDC. The Cloud Admin user can also verify the CPU, memory, and storage allocation and usage metrics.
  1. Log in to Exalogic Control as the Cloud Admin user.
  2. In the navigation pane on the left, click vDC Management. Under vDCs, click the name of the default vDC in your Exalogic machine.

    The Dashboard tab is displayed. The Resource Allocation section of the Dashboard tab presents graphical views of the CPU, memory, and storage resources allocated to the accounts in the vDC. The Resource Usage section shows the usage of the CPU, memory, and storage resources.

  3. Examine the private vNets in the vDC by clicking the Networks tab on the top navigation pane. You can view all private vNets, under Application Internal Networks.
  4. Examine the storage usage and availability in the vDC by clicking the Storage tab on the top navigation pane. You can view information about vServers' root disks, block storage, and storage allocation.

Logging Out of Exalogic Control

Log out of Exalogic Control after completing the above tasks. The Logout link is in the right hand top corner of the Exalogic Control BUI.