Transaction Setup
This chapter covers the following topics:
- Overview of Transaction Setup
- Control Options and Restrictions
- Transaction Source Types
- Defining and Updating Transaction Source Types
- Transaction Actions
- Transaction Types
- Defining and Updating Transaction Types
- Defining Transaction Reasons
- Defining Account Aliases
- Defining Consumption Transaction Rules
- Setting Transaction Processing Profile Options
- Transaction Processing Mode
- Launching Transaction Managers
- Transaction Managers
Overview of Transaction Setup
You must set certain controls and options before performing inventory transactions. These include:
-
Setting transaction profile options: These establish the method of transaction processing to occur while you wait, on a periodic basis, or concurrently while you work. See: Setting Transaction Processing Profile Options.
-
Launching transaction managers: Transaction managers execute a variety of transaction processes. They run at periodic intervals you specify until you delete them with the concurrent manager. See: Launching Transaction Managers.
-
Setting control options and restrictions: You can specify whether an item is under lot, serial, or revision control. If control is enabled, you must enter a valid lot number, serial number, or revision number to receive or issue the item. See: Control Options and Restrictions.
-
Defining subinventory and locator defaults: You can specify default shipping and receiving subinventories and locators for your items.
-
Converting units of measure: If you want to perform material transactions in units of measure other than the primary unit of measure of an item, you must define unit of measure conversions. See: Converting Units of Measure.
-
Defining transaction source types: A transaction source type is the type of entity against which Oracle Inventory charges a transaction. Along with a transaction action, it uniquely identifies the type of transaction you perform. See: Defining and Updating Transaction Source Types.
-
Defining transaction types: A transaction type is the combination of a transaction source type and a transaction action. It is used to classify a particular transaction for reporting and querying purposes. See: Defining and Updating Transaction Types.
-
Defining transaction reasons: These are standard codes you use to classify your transactions. See: Defining Transaction Reasons.
-
Defining account aliases: These are easily recognized names or labels representing a general ledger account number. You can view, report, and reserve against an account alias. See: Defining Account Aliases.
-
Defining your shipping network: You can move material between two organization by means of inter-organization transfers. To define your shipping network you establish the relationships and accounting information that exists between a shipping (from) organization that ships inventory to a destination (to) organization. See: Defining Inter-Organization Shipping Network.
-
Defining shipping methods: You must define shipping methods if you want to set lead times for these methods in the Inter-org Shipping Methods window. See: Defining Shipping Methods.
-
Defining the parameters for gathering movement statistics. Inventory uses this information to validate entry of statistical movement transactions and to properly report the information. See: Defining Movement Statistics Parameters
-
Defining economic zones. You define the economic zones in which you conduct your business and associate these zones with specific countries. See: Defining Economic Zones.
-
Defining intercompany relations between two operating units in a multi-organization environment. These operating units are the Shipping organization and the Selling organization. See: Defining Intercompany Relations.
Related Topics
Overview of Inventory Transactions
Control Options and Restrictions
You must set the following options and restrictions before performing inventory transactions:
Locator Control
You can use locator control if you divide your subinventories into physical areas such as aisle, rack, or bin locations. You can turn on locator control for the whole organization, for a specific subinventory, or a particular item.
During a material transaction, Oracle Inventory checks the locator control options you have specified. If locator control is enabled, you must enter a valid locator into which to receive or from which to issue the item you are transacting. See: Defining Organization Parameters, Defining Items, and Defining Subinventories.
Lot Control
You can enable lot control for specific items in your inventory and optionally assign expiration dates to them. If you enable lot control for an item, you must assign lot numbers when you receive the item into inventory. Thereafter, when you transact this item, you must provide a lot number when receiving the item. See: Lot Control, and Defining Items.
Serial Number Control
You can enable serial number control for specific items in your inventory to track individual units. If you enable serial number control for an item, you must provide a serial number when you transact it. See: Serial Number Control, and Defining Items.
Revision Quantity Control
You can define and enforce revision quantity control for any item to track quantities by revision. If you enable revision quantity control for an item, you must provide a revision number when you transact it. See: Defining Items.
Subinventory and Locator Restrictions
If a number of your items have fixed locators where you stock them, you can restrict the subinventories and locators they are transacted to and from by defining a list of valid subinventories and locators for your item. See: Assigning Subinventories to an Item, and Assigning Items to a Subinventory.
Then use the Items windows to enable the item attributes restricting the item to a list of subinventories and locators, all Inventory transaction windows ensure that you transact the item to and from a subinventory and locator included in the restricted list. See: Defining Items and Defining Subinventories.
Defining Default Subinventories and Locators
If you want your Oracle applications products to default subinventories and locators during shipping and receiving transactions, use the Item Transaction Defaults window to define default shipping and receiving subinventories and locators for your items. If you have already defined a restricted list of subinventories and locators for your item, you must choose a default subinventory and locator from that list.
Oracle Order Management displays the default shipping subinventory and locator when you perform a shipment transaction where the OE:Reservations system profile option is set to No. Oracle Purchasing displays the default receiving subinventory and locator when you perform a receipt transaction for the item. You can always override the defaults. See: Defining Item Transaction Defaults.
Note: The Item Transaction Defaults window defaults the subinventory only for non-reservable items. Pick release defaults to this subinventory only for non-reservable items.
Converting Units of Measure
If you want to perform material transactions in units of measure other than the primary unit of measure of an item, you must define unit of measure conversions. Oracle Inventory tracks transaction quantities for your items in both the primary unit of measure and the transaction unit of measure. See: Defining Unit of Measure Conversions.
Transaction Source Types
A transaction source type is the type of entity against which Oracle Inventory charges a transaction. Along with a transaction action, it uniquely identifies the type of transaction you perform. Oracle Inventory provides the following predefined transaction source types:
-
Account
-
Account Alias
-
Cycle Count
-
Internal Order
-
Internal Requisition
-
Inventory
-
Job or Schedule
-
Layer Cost Update
-
Move Order
-
Periodic Cost Update
-
Physical Inventory
-
Project Contract
-
Purchase Order
-
RMA (Return Material Authorization)
-
Sales Order
-
Standard Cost Update
You can define additional transaction source types in the Transaction Source Types window. You can then use these user-defined transaction source types and predefined transaction actions to define a new transaction type. This user-defined transaction type is now a customized form of tracking transactions with which you can group and sort reports and inquiries. When you perform a transaction, you specify a transaction type and a source. For example, for a PO receipt transaction, the transaction source type is Purchase Order and the actual PO number is the source.
Related Topics
Defining and Updating Transaction Source Types
Defining and Updating Transaction Source Types
Oracle Inventory predefines a list of transaction source types for you. You can add more source types to this list or update the predefined types, however, you cannot delete the predefined types. You can add source types for miscellaneous transactions, inter-organization and subinventory transfers, and account transactions.
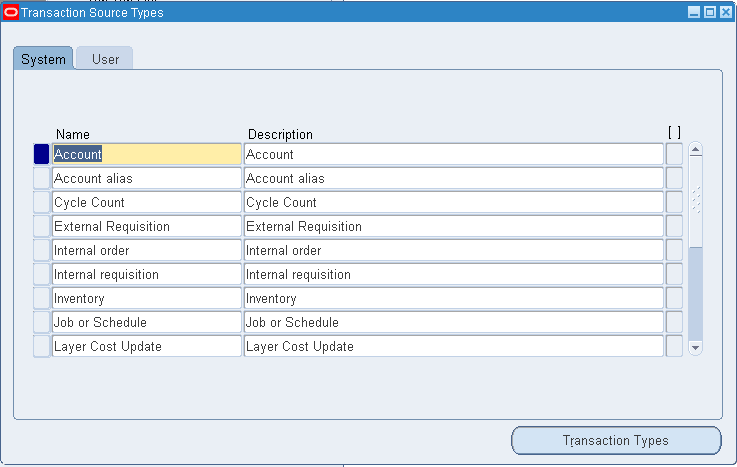
To update a system-defined transaction source type
-
Navigate to the Transaction Source Types window.
-
Select the System Defined tabbed region.
-
Update the name or description for a source type.
-
Save your work.
To create a user-defined transaction source type
-
Select the User Defined tabbed region.
-
Enter a unique name for the transaction source type.
-
Select a validation type:
None: Do not validate the source against a predefined list of values.
Value Set: Validate the source against a predefined list of values.
-
If you select Value Set in the Type field, navigate to the Context field and select a valid context field value associated with the Transaction Source descriptive flexfield.
Important: Values for this field are defined for the Transaction Source descriptive flexfield in the Descriptive Flexfield Segments window. See: Descriptive Flexfield Segments Window, Oracle Applications Flexfields Guide and Overview of Values and Value Sets, Oracle Applications Flexfileds Guide.
-
Save your work.
To make a user-defined source type inactive:
-
Select the User Defined tabbed region.
-
Enter the date on which the source type becomes inactive.
As of this date, you can no longer use the source type.
To delete a user-defined source type:
-
You can delete a source type if it is not associated with a transaction type.
To navigate to the Transaction Types window
-
Choose the Transaction Types button. See: Defining and Updating Transaction Types.
Related Topics
Transaction Actions
A transaction action is a generic type of material movement or cost update with no specificity regarding the source of the transaction. Along with a transaction source type, a transaction action identifies a transaction type. Oracle Inventory provides the following transaction actions:
-
Issue from stores
-
Subinventory transfer
-
Direct organization transfer
-
Cycle count adjustment
-
Physical inventory adjustment
-
Intransit receipt
-
Intransit shipment
-
Cost update
-
Receipt into stores
-
Delivery adjustments
-
WIP assembly scrap
-
Assembly completion
-
Assembly return
-
Negative component issue
-
Negative component return
-
Staging Transfer
-
Ownership Transfer
-
Logical Issue
-
Logical Delivery Adjustment
-
Retroactive Price Adjustment
-
Logical Receipt
-
Delivery Adjustment
-
Lot Split
-
Lot Merge
-
Lot Translate
-
Lot Update Quantity
-
Logical Expense Requisition Receipt
-
Planning Transfer
-
Ownership Transfer
-
Logical Intercompany Sales
-
Logical Intercompany Receipt
-
Logical Intercompany Receipt Return
-
Logical Intercompany Sales Return
-
Container Pack
-
Container Unpack
-
Container Split
-
Cost Group Transfer
Related Topics
Defining and Updating Transaction Types
Defining and Updating Transaction Source Types
Transaction Types
A transaction type is the combination of a transaction source type and a transaction action. It is used to classify a particular transaction for reporting and querying purposes. Oracle Inventory also uses transaction types to identify certain transactions to include in historical usage calculations for ABC analysis or forecasting.
The following table presents predefined transaction types:
| Txn Type | Txn Type Desc | Txn Action | Txn Source Type |
|---|---|---|---|
| Return to Vendor | Return to vendor from stores | Issue from Stores | Purchase Order |
| Transfer to Regular | Transfer to Regular | Ownership Transfer | Purchase Order |
| Logical Return to Vendor | Logical Return to Vendor | Logical Issue | Purchase Order |
| Logical PO Receipt Adjustment | Logical PO Receipt Adjustment | Logical Delivery Adjustment | Purchase Order |
| Retroactive Price Update | Retroactive Price Update | Retroactive Price Update | Purchase Order |
| Purchase order receipt | Receive Purchase Order | Receipt into stores | Purchase order |
| PO Rcpt Adjust | Delivery adjustments on a PO receipt | Delivery adjustments | Purchase Order |
| Sales order issue | Ship confirm external sales order | Issue from stores | Sales order |
| Logical Sales Order Issue | Logical sales order issue | Issue from stores | Sales Order |
| Sales Order Pick | Staging transfer on a sales order | Staging Transfer | Sales Order |
| Account Issue | Issue material against account | Issue from stores | Account |
| Account receipt | Receive material against account | Receipt into stores | Account |
| Move Order Issue | Transact Account Issue Move Order | Issue from stores | Move order |
| Move Order Transfer | Transact Subinventory Transfer Move Order | Subinventory Transfer | Move order |
| WIP assembly return | Return assembly from stores to WIP | Assembly return | Job or schedule |
| WIP cost update | Update cot of WIP Item | Cost update | Job or schedule |
| WIP component issue | Issue components from stores to WIP | Issue from stores | Job or schedule |
| WIP component return | WIP component return transaction | Receipt into stores | Job or schedule |
| WIP assembly completion | Complete Assemblies from WIP to Stores | Assembly completion | Job or schedule |
| WIP estimated scrap | WIP estimated scrap transactions | WIP scrap transaction | Job or schedule |
| WIP return from scrap | Return assemblies scrapped to WIP | WIP scrap transaction | Job or schedule |
| WIP Lot Split | Lot Split | Lot Split | Job or Schedule |
| WIP Lot Merge | Lot Merge | Lot Merge | Job or Schedule |
| WIP Lot Bonus | WIP Lot Bonus | Lot Translate | Job or Schedule |
| WIP Lot Quantity Update | WIP lot quantity update | Lot Update Quantity | Job or Schedule |
| WIP assembly scrap | Scrap assemblies from WIP | WIP assembly scrap | Job or schedule |
| Account alias issues | Issue material against account alias | Issue from stores | Account alias |
| Account alias receipts | Receive material against account alias | Receipt into stores | Account alias |
| Internal requisition intransit receipt | Delivery of intransit material source by internal requisition. | Intransit receipt | Internal requisition |
| Logical Expense Requisition Receipt | Logical expense requisition receipt | Intransit Receipt | Internal requisition |
| Internal requisition delivery adjustment | Delivery adjustments on intransit receipt sourced by internal requisition. | Delivery adjustments | Internal requisition |
| Internal order issue | Ship confirm internal order issue | Issue from stores | Internal order |
| Internal order subinventory transfer | Subinventory transfer sourced by internal order | Subinventory transfer | Internal order |
| Internal order direct organization transfer | Direct transfer between two organizations on an internal order | Direct organization transfer | Internal order |
| Internal order intransit shipment | Ship to intransit sourced by internal order | Intransit shipment | Internal order |
| Internal order pick | Staging transfer on an internal order | Staging transfer | Internal order |
| Cycle count transfer | Cycle count subinventory transfer | Subinventory transfer | Cycle count |
| Cycle count adjustments | Record cycle count adjustments | Cycle count adjustment | Cycle count |
| Physical inventory transfer | Physical count subinventory transfer | Subinventory transfer | Physical inventory |
| Physical inventory adjustment | Physical inventory adjustment transactions | Physical inventory adjustment | Physical inventory |
| Standard cost update | Update standard cost information | Cost update | Standard cost update |
| RMA Receipt | Return material authorization | Receipt into stores | RMA |
| RMA return | Return material authorization | Issue from stores | RMA |
| Logical RMA receipt | Logical RMA receipt | Logical receipt | RMA |
| Field service usage | Field service usage | Issue from stores | Inventory |
| Inventory subinventory transfer | Transfer material between subinventories | Subinventory transfer | Inventory |
| Inventory direct organization transfer | Direct transfer between two organizations | Direct organization transfer | Inventory |
| Inventory intransit receipt | Receive from intransit | Intransit receipt | Inventory |
| Inventory intransit shipment | Ship to intransit sourced from inventory | Intransit shipment | Inventory |
| Miscellaneous issue | Perform miscellaneous issue of material | Issue from stores | Inventory |
| Miscellaneous receipt | perform receipt of miscellaneous material | Receipt into stores | Inventory |
| Average cost update | update average cost information | Cost update | Inventory |
| WIP negative component issue | Issue negative component to WIP | Negative component issue | Job or schedule |
| WIP negative component return | Return negative component from WIP | Negative component return | Job or schedule |
| Project borrow | Borrow from project in project manufacturing | Subinventory transfer | Inventory |
| Project payback | Payback to project in project manufacturing | Subinventory transfer | Inventory |
| Project Transfer | Transfer to project in project manufacturing | Subinventory transfer | Inventory |
| Backflush transfer | Backflush subinventory transfer | Subinventory transfer | Inventory |
| Planning transfer | Planning Transfer | Planning transfer | Inventory |
| Transfer to consigned | Transfer to consigned inventory | Ownership transfer | Inventory |
| Logical intercompany sales order issue | Logical intercompany sales order issue | Logical intercompany sales | Inventory |
| Logical intercompany procurement return | Logical intercompany procurement receipt return | Logical intercompany receipt return | Inventory |
| Logical intercompany receipt return | Logical intercompany receipt return | Logical intercompany receipt return | Inventory |
| Logical intercompany sales return | Logical intercompany sales return | Logical intercompany sales return | Inventory |
| Field service recovery | Field service recovery | Receipt into stores | Inventory |
| Shipment receipt adjustment | Adjustment to receipt of intransit delivery | Delivery adjustment | Inventory |
| Inventory lot split | Lot split | Lot split | Inventory |
| Inventory lot merge | Lot merge | Lot merge | Inventory |
| inventory lot translate | Lot translate | Lot translate | Inventory |
| Container pack | Container pack | Container pack | Inventory |
| Container unpack | Container unpack | Container unpack | Inventory |
| Container split | Container split | Container split | Inventory |
| Cost group transfer | Cost group transfer | Cost group transfer | Inventory |
| Periodic cost update | Update periodic cost | Cost update | Periodic cost update |
| Layer cost update | Layer cost update | Cost update | Layer cost update |
| Project contract issue | Project contract issue | Issue from stores | Project contract |
Use the Transaction Types window to define additional transaction types to customize transaction entry. A user-defined transaction type is a combination of a user-defined transaction source type and a predefined transaction action. For example, if you frequently donate items to charity, you might want to define a transaction source type called "Charity" and a transaction type called "Issue to Charity". In this case, the transaction action would be Issue from Stores. You would then use the Miscellaneous Transactions window to actually issue an item to charity, using the "Issue to Charity" transaction type. You would also specify the actual charity to which you are issuing, such as Goodwill, and the expense account that specifies the source (Goodwill).
You must specify a transaction type when you perform a miscellaneous receipt or issue, a subinventory transfer, a WIP transaction, or an inter-organization transfer. Therefore, when you create a user-defined transaction type, you can only choose one of the following transaction actions and transaction source types:
Transaction Actions
-
Issue from stores
-
Subinventory transfer
-
Direct organization transfer
-
Intransit shipment
-
Cost update
-
Receipt into stores
-
Negative component issue
-
Negative component return
-
Staging transfer
-
WIP assembly scrap
-
Assembly completion
-
Assembly return
Transaction Source Types
-
Job or Schedule
-
Account
-
Account Alias
-
Inventory
-
User-defined
-
Move Order
Oracle Inventory provides transaction reporting and querying capabilities by transaction type.
Related Topics
Defining and Updating Transaction Types
Defining and Updating Transaction Types
You define transaction types by combining transaction actions and transaction source types. You define transaction source types in the Transaction Source Types window. Oracle Inventory provides the list of transaction actions.
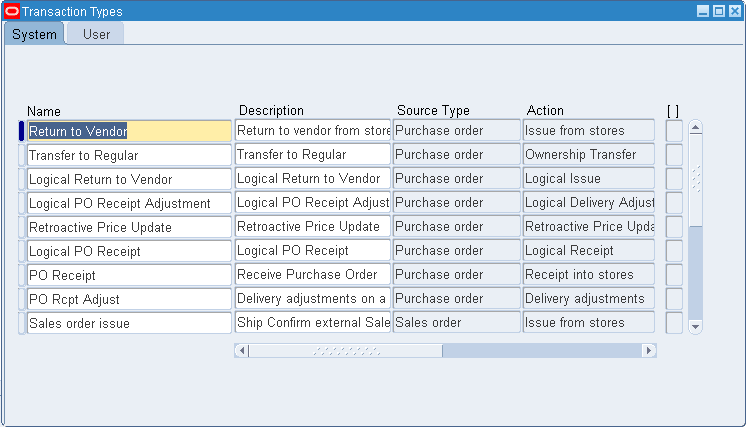
To create a user-defined transaction type
-
Navigate to the Transaction Types window.
-
Select the User Defined tabbed region.
-
Enter a unique name for the transaction type.
-
Enter a transaction source type.
This field does not appear if you navigate from the Transaction Source Types window.
-
Select a transaction action. The combination of the transaction source type and the transaction action limits the transaction type.
-
Check Project to enable this transaction type for project use.
-
Check Status Control to enable material status control for this transaction type.
-
Select the location required check box to require the Location field on the transaction windows and Create Move Order window. You can select this check box if the transaction Source Type is Inventory or Move order and the transaction action is issues from stores, receipt from stores, or issue from stores. You cannot change this parameter if there are pending transactions for this transaction type.
-
Save your work.
To update a system-defined transaction type
-
Select the System Defined tabbed region.
-
Update the name or description for a transaction type. You cannot modify the source type information.
-
Check Status Control to enable material status control for this transaction type.
-
Save your work.
To make a user-defined transaction type inactive:
-
Enter the date on which the transaction type becomes inactive.
As of this date, you can no longer use the transaction type in a transaction.
To enable Shortage Alerts and Shortage Notifications:
You can choose to receive an online shortage alert, a workflow based notification, or both fro system-defined and user-defined transaction types that have the transaction actions of:
-
Receipt into Stores
-
Intransit Receipt
-
Direct Organization Transfer
-
Assembly Completion
-
Negative Component Issue
-
Check the box to select which transaction action types will generate material shortage alerts and notifications. See: Material Shortage Alerts and Shortage Notifications.
Related Topics
Defining and Updating Transaction Source Types
Defining Transaction Reasons
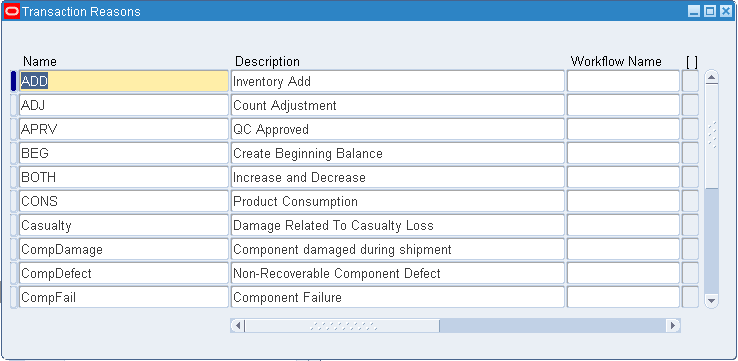
A transaction reason is a standard means of classifying or explaining the reason for a transaction. Transaction reasons can be used in all transaction forms.
You can use these standard transaction reasons with any type of material transaction. Oracle Inventory provides transaction reporting and inquiring capabilities by transaction reason.
To define a transaction reason
-
Navigate to the Transaction Reasons window.
-
Enter a unique name for the transaction reason.
For example, you could define the following reasons to classify adjustment transactions you enter during your cycle count or physical inventory: Theft, Misplaced items, and Damaged items.
-
Enter a reason description in the Description field.
-
If desired enter select a Workflow Name from the list of values.
-
If you entered a workflow name, select a workflow process from the list of values.
-
Select a Reason Type from the list of values. The available choices are as follows:
Note: In order to record a task exception in Oracle Warehouse Management, you must set up a transaction reason in Oracle Inventory and link it to Reason Type.
-
Load
-
Drop
-
Receiving
-
Replenishment
-
Cycle Count
-
Shipping
-
Update Status
-
QA Update Status
Note: The Replenishment reason type is disabled
-
-
If you selected Picking as the Reason Type, select a Reason Context from the list of values. The available choices are as follows:
-
Curtail Pick: End the pick after picking a few LPNs or Lots and load the contents.
-
LPN Exception: Pick partial quantity of the scanned fully consumable LPN.
-
Pick None: End the pick without picking anything.
-
Pick Over: Pick more than the requested quantity.
-
Pick Partial: Split the pick and allow confirmation of less than the requested quantity. You must still pick the entire quantity, but can pick in stages.
-
Pick Short: Specify a quantity less than the requested quantity, and back order the rest of the required quantity.
-
Change Source Locator: Change the location from which the material is picked.
-
Change UOM: Change the transaction unit of measure for the task.
-
-
Save your work.
-
Close the window when complete.
To make a transaction reason inactive:
-
Enter the date on which the transaction reason becomes inactive.
As of this date, you can no longer assign the reason to a transaction.
Related Topics
Explaining Pick Load Setup, Oracle Warehouse Management User's Guide
Task Exceptions, Oracle Warehouse Management User's Guide
Defining Account Aliases
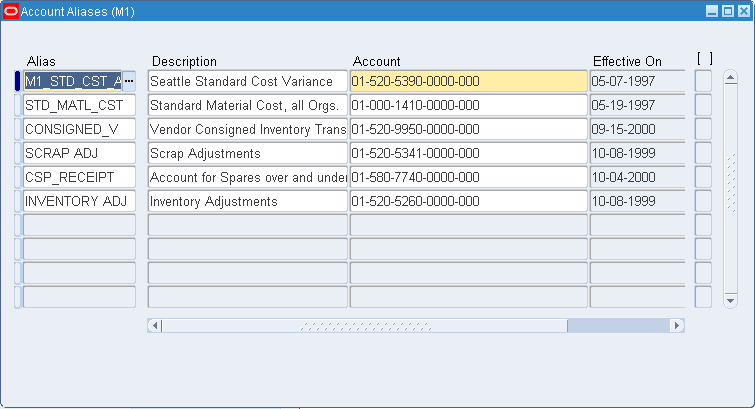
An account alias is an easily recognized name or label representing a general ledger account number. You can view, report, and reserve against an account alias. During a transaction, you can use the account alias instead of an account number to refer to the account.
To define an account alias
-
Navigate to the Account Aliases window.
-
Enter a unique account alias name derived from concatenated segments of the account alias name key flexfield.
-
Enter the general ledger account to which you charge all transactions that use this account alias. You can change this account only if the account alias has not been referenced.
-
Enter the effective date on which the account alias is enabled. Date must be greater than or equal to the current date.
-
Save your work.
To make an account alias inactive:
-
Enter the date on which the account alias becomes inactive. As of this date, you can no longer use the account alias. Date must be greater than or equal to both the effective date and the current date.
Related Topics
Defining Key Flexfield Segments, Oracle Applications Flexfield Guide
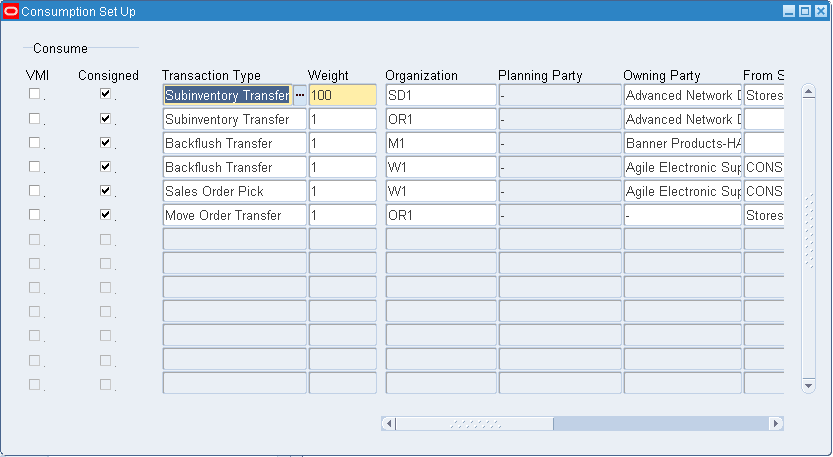
Defining Consumption Transaction Rules
Use the consumption setup window to designate which transaction to use when consuming either consigned or VMI inventory.
To define consumption rules
-
Navigate to the Consumption Setup window.
-
Select a value in the Transaction Type field, such as issue or transfer type.
-
Optionally, select values in the Organization, Planning Party, and Owning Party fields.
-
If the organization selected is using subinventory or locator control, select values in the applicable fields for From Subinventory, Form Locator, To Subinventory, To Locator.
-
Optionally, you can enter a value in the Item field.
-
Select the Consume Consigned check box to perform consumption when the specified transaction type executes.
-
Enter the Weight value.
The weight value allows you to set the processing order. For example, if three transactions satisfy the transaction criteria, the system processes the transaction with the highest weight.
-
Enter the Organization if necessary.
-
Enter the Planning Party if necessary.
-
Enter the Owning Party if necessary.
-
Enter the From Subinventory if necessary.
-
Enter the From Locator if necessary
-
Enter the To Subinventory if necessary.
-
Enter the To Locator if necessary
-
Enter the Item number if necessary.
Related Topics
Transferring Consigned and VMI Material
Setting Transaction Processing Profile Options
Oracle Inventory provides you with the following transaction processing profiles:
-
Enter Replenishment Count
-
Inter-Organization Transfer
-
Miscellaneous Issue and Receipt
-
Transaction Processing Mode
-
Transfer Between Subinventories
-
Update Average Cost
-
Server Side On-line Processing
-
Allow Expense to Asset Transfer
-
Project Miscellaneous Transaction Expenditure Type
-
RPC Timeout
-
Restrict Receipt of Serials
-
Transaction Date Validation
-
Use New Trx Manager for Processing
-
Override negative for Blackflush
-
Quantity Tree Timeout for Lock
-
Maximum Number of Quantity Trees
-
Cycle Count Approvals
-
Cycle Count Entries
Transaction Processing Mode
You can set processing control globally for all transactions or you can choose different options for each type of transaction. You establish the method of transaction processing by choosing one of the following options when you set up your TP:INV Transaction Processing Mode profile:
Form Level Processing
If you choose Form level processing for the Transaction Processing Mode profile you can set up different processing controls for each type of transaction.
On-line Processing
If you use On-line processing, you can choose whether transactions are processed on the server or client side by setting the Server Side On-line Processing profile. The default value is server side processing.
Inventory Remote Procedure Manager
Server side on-line processing uses the Inventory Remote Procedure Manager to allow a transaction initiated on the client to process on the server. System managers maintain the Remote Procedure Manager. See: Administer Concurrent Managers Window, Oracle Applications System Administrator's Guide.
If you receive an error message saying that the manager is not available, you either need to restart the manager or increase the number of processes the work shift can handle. You update a manager's work shift process using the Concurrent Managers window. See: Concurrent Managers Window, Oracle Applications System Administrator's Guide.
An error message saying that no manager is defined may indicate that you have added a new data group and have not added a new Remote Procedure Manager for it. Inventory is installed with one Remote Procedure Manager for the Standard data group. (See: Data Groups Window, Oracle Applications System Administrators Guide.) If you add a new data group, you must define a new Remote Procedure Manager for it, referencing the same library and the same worker information as the seeded Remote Procedure Manager for the Standard data group.
Recommended Use
If you have many material transactions to process, it is recommended that you use Concurrent processing or Background processing to save on time you might spend idle while Inventory locks the transaction window and processes transactions. These processing options provide quick turnaround depending on how you configured your concurrent manager and how frequently you have specified your transaction manager to wake up. Even if Inventory does not fully process your transactions, you can always transact against them because Inventory updates all available to transact quantities after a transaction undergoes form validation. However, Inventory does not display unprocessed transactions in transaction reports and inquiries.
You can also use the transaction manager to process transactions entered in the open transaction interface via custom entry forms or data collection devices, such as bar code readers.
Related Topics
Launching Transaction Managers
Oracle Inventory Profile Options
Open Transaction Interface, Oracle Manufacturing Implementation Manual
Launching Transaction Managers
The transaction managers execute the following processes: material transaction, demand reservation, move transaction, resource cost transaction, remote procedure call, and material cost transaction. They run until you cancel the corresponding concurrent request. They control the number of transaction workers, processing intervals, and number of transactions processed by each worker during each interval. For descriptions of the available managers see: Transaction Managers.
You must start the material cost transaction manager to cost material transactions. This manager processes costing of all material transactions. You must also start the move transaction manager so that assemblies received from an outside processing supplier can be moved to the next operation.
You do not have to launch these transaction managers if you decide to process all your transactions on-line and do not use the transaction interface.
The use of multiple transaction workers enables parallel processing of transactions. This is especially helpful when processing a large batch of transactions.
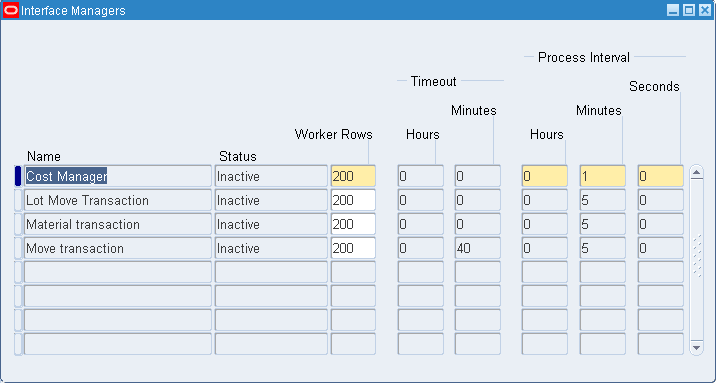
To view and update the transaction managers
-
Navigate to the Interface Managers window. All existing transaction managers and their current status are displayed.
-
Enter the maximum number of rows to assign to the worker.
-
For WIP Move Transactions only: Specify the processing timeout in hours and minutes. After this time the move transaction manager no longer processes pending transactions and marks them as an error.
-
Save your work.
To launch a transaction manager
-
Select a transaction manager in the Interface Managers window.
-
Choose Launch Manager from the Tools menu.
The Launch Inventory Managers window appears displaying the transaction manager you choose as the process to be submitted.
Note: If the transaction manager is already active, Oracle Inventory displays a warning before displaying the new window.
-
Choose Submit.
To see your changes reflected in the Interface Managers window
-
Requery the Interface Managers window.
Related Topics
Submitting a Request, Oracle Applications User's Guide
Defining Managers and their Work Shifts, Oracle Applicatoins System Administrator's Guide
Open Transaction Interface, Oracle Manufacturing Implementation Manual
Transaction Managers
Material Transactions
The material transaction manager immediately executes a material transaction after you save your changes in a transaction window. By starting the transaction manager, you can determine how to execute transactions: immediately through immediate concurrent request submissions, or through periodic concurrent request submissions. You define this transaction mode for individual transaction windows in the Personal Profile Values window.
See: Setting Transaction Processing Profile Options.
Move Transaction
The move transaction manager processes move transactions in Oracle Work in Process and move transactions you import from devices such as portable bar code readers or your custom data entry forms using the Open Move Transaction Interface.
Resource Cost Transactions
The resource cost transaction manager processes resource transactions in Oracle Work in Process and resource transactions you import from barcode readers, payroll systems, time cards, routing sheets, and custom data entry forms using the Open Resource Transaction Interface.
Material Cost Transaction
The material cost transaction manager costs material transactions in Oracle Inventory and Oracle Work in Process in the background.
Related Topics
Launching Transaction Managers
Setting Transaction Processing Profile Options
Defining Managers and their Work Shifts, Oracle Applications System Administrator's Guide