Workflow Processes
This chapter describes the Oracle Workflow processes that are used in the Oracle Projects solution.
This chapter covers the following topics:
- Integrating with Oracle Workflow
- Oracle Project Costing Workflows
- Oracle Project Foundation Workflows
- Oracle Project Management Workflows
- Oracle Project Portfolio Analysis Workflow
- Oracle Project Resource Management Workflows
Integrating with Oracle Workflow
Oracle Projects provides the ability to integrate with Oracle Workflow to automate some activities.
Using the powerful abilities of Oracle Workflow, you can create, view, and modify business processes that determine the workflows. Workflow automatically routes approvals and notifies appropriate users of current approval status. The approval process updates statuses as approvals are obtained or denied.
You decide what is the approval chain and what business rules must be met before a transaction can be approved.
Oracle Projects provides default processes for each workflow. You can modify the default processes and create additional processes to accommodate the needs of your business, using the Oracle Workflow Builder.
Workflows in Oracle Projects
Oracle Projects provides the following workflows that you can customize for your business needs. Some of the workflows are for internal purposes and cannot be modified.
The workflows are organized in this chapter by product:
Oracle Project Costing
-
PA Step Down Allocations
Oracle Project Foundation
-
PA: Mass Pipeline Projects Update Workflow
-
PA: Oracle Projects Library Workflow
-
PA: Project Workflow
Oracle Project Management
-
PA: Budget Workflow
-
PA: Budget Integration Workflow
-
PA: Change Request Workflow
-
PA: Deduction Workflow
-
PA: Issue and Change Workflow
-
PA: Issue and Change Action Workflow
-
Project Budget Account Generation Workflow
-
PA: Project Execution Workflow
-
PA: Performance Notification Workflow
-
PA: Status Report Workflow
-
PA: Task Approval Workflow
-
PA: Workplan Workflow
Oracle Project Portfolio Analysis
-
Project Portfolio Analysis Workflow
Oracle Project Resource Management
-
PA: Advertisements Workflow
-
PA: Apply Team Template Workflow
-
PA: Candidate Notification Process
-
PA: CRM Workaround Workflow
-
PA: HR Related Updates Workflow
-
PA: Mass Assignment Approval Workflow
-
PA: Mass Assignment Transaction Workflow
-
PA: Overcommitment Notification Process Workflow
-
PA: Project Assignments Workflow
Customizing Workflow Messages
When you customize a workflow, we recommend that you customize the workflow item processes and the loop counters, but not the messages. Instead of modifying a workflow message, you should create a new message. The reasons are explained below:
-
When you create a process definition, Oracle Workflow Builder assigns a new version number to an activity if you make changes to it. It saves the new version of the activity to the database without overwriting older versions of the activity. In Oracle Workflow, activities also have effective dates so that at any time, only one version of the activity is in effect.
If a process is running, Oracle Workflow uses the version of the activity that was in effect when the process was initiated. It does not switch versions of the activity midway through the process. Since a process itself is an activity, a process definition always remains constant until the process instance completes.
-
Oracle Workflow Builder does not maintain version information for objects such as item types, item type attributes, messages, and lookup types. For these objects, their latest definition always applies, so you must consider whether a change to any of these objects is backwards compatible. If the modification affects existing processes, you should create a new object rather than edit the existing object.
Related Topics
Oracle Workflow User's Guide
Oracle Workflow Administrator's Guide
Oracle Workflow Developer's Guide
Oracle Project Costing Workflows
Oracle Project Costing provides several workflows to automate and manage allocations and allocated costs. In addition, Oracle Project Costing provides a workflow to enable control of supplier payments.
Overview of Oracle Project Costing Workflows
Oracle Project Costing provides the following workflows.
| Workflow Name | Description |
|---|---|
| PA: Step Down Allocations Workflow | Automates AutoAllocations and includes processes that generate and release allocations, distribute and summarize allocated costs, and customize these processes for reporting |
| Send AR Notification workflow | Notifies project manager when a receipt is applied to a project invoice in Oracle Receivables. For customer invoices linked to supplier invoices on pay when paid payment holds, the notification enables project managers to review and release holds on supplier invoices. |
PA: Step Down Allocations Workflow
You use the Step-Down Allocations workflow to automate AutoAllocations.
The PA Step Down Allocations workflow (item type) automates the execution of step-down autoallocation sets to do the following:
-
Create allocation runs
-
Generate the allocation transactions
-
Release the allocation transactions (if the rule is set up to release automatically) or require approval from a specific person before the process proceeds
-
Distribute costs
-
Update the project summary amounts
The filename of this workflow is paauto.wft.
You can use AutoAllocations in a standalone installation of Oracle Projects. If you want to include both Oracle Projects rules and Oracle General Ledger batches in the same autoallocation set, Oracle General Ledger must be integrated with Oracle Projects.
Implementing the PA: Step Down Allocations Workflow
Note: Do not customize any aspect of the workflow other than the ones listed here. Oracle does not support any other customizations.
You can customize the following processes:
Customize the PA_AUTO_ALLOC_WF_PKG (defined in the files PAPAALCB.pls and PAPAALCS.pls). This package contains the PL/SQL template of procedures and functions that you modify to customize the GL AutoAllocation Process.
The customizable processes return the result types shown in the following table:
| Result Type | The process |
|---|---|
| COMPLETE.PASS | Is complete |
| COMPLETE.FAIL | Has failed and has been terminated |
You can also customize the timeout attribute to set the amount of time that a user has to respond to a notification. See: Timeout attribute.
For information on opening and modifying Oracle Workflow processes, see: Oracle Workflow Developer’s Guide.
Unsupported Processes
The following processes in the PA Step Down Allocations workflow are unsupported:
-
PA Allocation Rollback Process
-
PA Distribute Cost Rollback Process
-
PA Update Projects Summary Rollback Process
PA: Step Down Allocations Processes
This workflow applies only to step-down allocations, not parallel allocations. The PA Step Down Allocation workflow (item type) directs the flow of autoallocations through the system.
In Oracle Workflow Builder, the processes are listed in alphabetical order. In this section, however, the processes are grouped by purpose and flow.
The PA Auto Allocation Process is the primary process for Projects AutoAllocations. This process calls the PA Step Down Allocation Process.
The PA Step Down Allocation Process manages the Oracle Projects allocations run. The PA Step Down Allocations workflow includes the following processes:
-
-
PA Allocation Generation Process
-
PA Allocation Release Process
-
PA Customizable Allocation Process
-
-
-
PA Distribute Cost Process
-
PA Customizable Distribute Cost Process
-
-
-
PA Update Projects Summary Process
-
PA Customizable Summarization Process
-
PA Auto Allocation Process
This is the main process for AutoAllocations. This process calls the process PA Step Down Allocation Process,
In the diagram shown below, the process activity nodes are numbered for reference in the descriptions that follow. The numbered circles are not part of the process diagram.
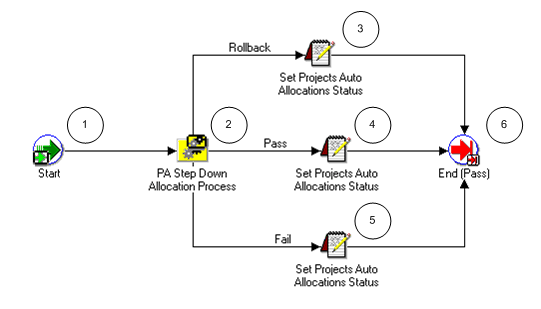
PA Auto Allocation Activities
The following information describes each activity in the PA Auto Allocation process, listed by function name:
Start (Node 1): This is a standard activity that marks the start of the process.
PA Step Down Allocation Process (Node 2)This is the main process for Oracle Projects step-down allocations.
-
If the process is successful, it branches to node 4.
-
If the process fails, it branches to node 5.
Set Projects Auto Allocations Status (Rollback) (Node 3): This process is for allocation rollbacks (not supported in this release).
Set Projects Auto Allocations Status (Pass) (Node 4): This process sets the status of the auto allocations set to Pass.
Set Projects Auto Allocations Status (Fail) (Node 5): This process sets the status of the auto allocations set to Fail.
End (Pass) (Node 6)This activity terminates the process and returns the result Pass.
PA Step Down Allocation Process
This is the main process for step-down allocations.
In the diagram shown below, the process activity nodes are numbered for reference in the descriptions that follow. The numbered circles are not part of the process diagram.
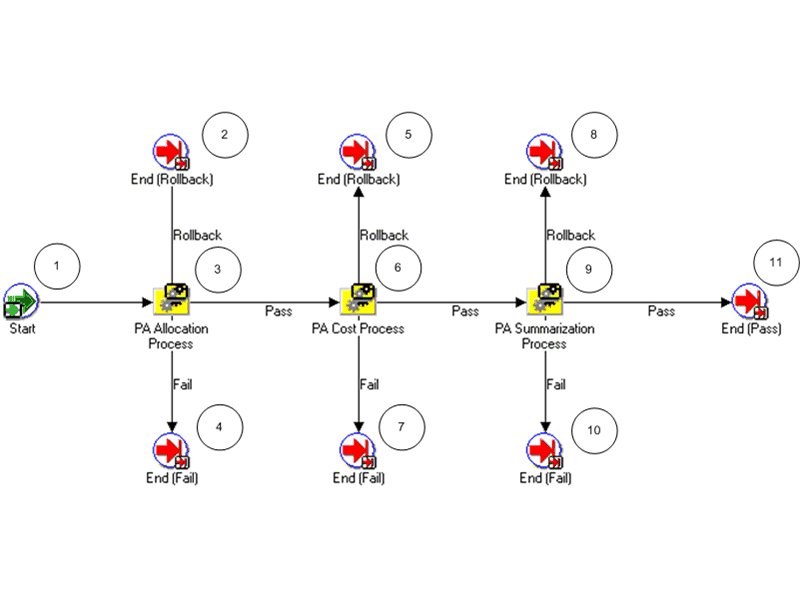
PA Step Down Allocation Activities
The following information describes each activity in the PA Step Down Allocation process, listed by function name
Start (Node 1): This is a standard activity that marks the start of the process.
End (Rollback) (Nodes 2, 5, and 8): This is for allocation rollbacks (not supported in this release).
PA Allocation Process (Node 3): This process manages the allocations run.
-
If the process is successful, it branches to node 6.
-
If the process fails, it branches to node 4.
PA Cost Process (Node 6): This node calls the PA Cost process.
-
If the process is successful, it branches to node 9.
-
If the process fails, it branches to node 7.
PA Summarization Process (Node 9): This node calls the PA Summarization process.
-
If the process is successful, it branches to node 11.
-
If the process fails, it branches to node 10.
End (Fail) (Nodes 4, 7, and 10): This activity terminates the process and returns the result Fail.
End (Pass) (Node 11): This activity terminates the process and returns the result Pass.
PA Allocation Process
This process manages the allocations run.
In the diagram shown below, the process activity nodes are numbered for reference in the descriptions that follow. The numbered circles are not part of the process diagram.
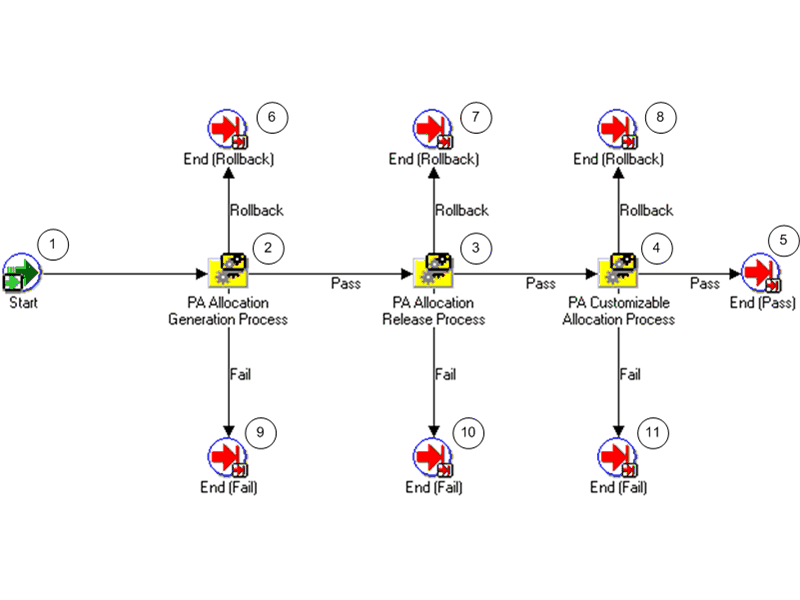
PA Allocation Activities
The following information describes each activity in the PA Allocation process, listed by function name:
Start (Node 1): This is a standard activity that marks the start of the process.
PA Allocation Generation Process (Node 2): This activity submits the PA Allocation Generation Process.
-
If the process is successful, it branches to node 3.
-
If the process fails, it branches to node 9.
PA Allocation Release Process (Node 3): This activity submits the PA Allocation Release Process.
-
If the process is successful, it branches to node 4.
-
If the process fails, it branches to node 10.
PA Customizable Allocation Process (Node 4): This activity submits the PA Customizable Allocation Process.
-
If the process is successful, it branches to node 5.
-
If the process fails, it branches to node 11.
End (Pass) (Node 5): This activity terminates the process and returns the result Pass.
End (Rollback) (Nodes 6, 7, and 8): This is for allocation rollbacks (not supported in this release).
End (Fail) (Nodes 9, 10, 11): This activity terminates the process and returns the result Fail.
PA Allocation Generation Process
This process submits an allocation run.
In the diagram shown below, the process activity nodes are numbered for reference in the descriptions that follow. The numbered circles are not part of the process diagram.
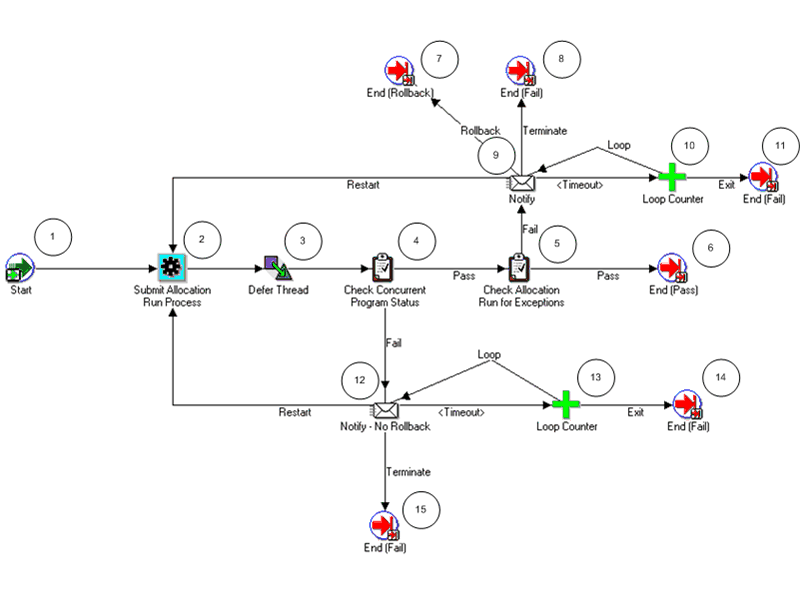
PA Allocation Generation Activities
The following information describes each activity in the PA Allocation Generation process, listed by function name:
Start (Node 1): This is a standard activity that marks the start of the process.
Submit Allocation Run Process (Node 2): This activity submits the allocation run. Based on the defer thread, this activity branches to node 4, Check Concurrent Program Status.
Check Concurrent Program Status (Node 4): This activity checks the status of the concurrent program Submit Allocation Run Generation.
-
If the allocation has completed, the process branches to node 5.
-
If the release has not completed, the process branches to node 12.
Check Allocation Run for Exceptions (Node 5): This activity checks the completed allocation run for any exceptions.
-
If there are exceptions, the process branches to node 9.
-
If there are no exceptions, the process branches to node 6.
Notify (Node 9): This activity sends a notification that the concurrent program has not completed.
-
If a restart response is received, the process branches back to node 2.
-
If a rollback response is received, the process branches to node 7.
-
If the notification times out, the process branches to node 11.
-
If a terminate response is received, the process branches to node 8.
Notify - No Rollback (Node 12): This activity sends a notification that the allocation run had exceptions.
-
If a terminate response is received, the process branches to node 15.
-
If the notification times out, the process branches to node 14.
End (Pass) (Node 6): This activity terminates the process and returns the result Pass.
End (Rollback) (Node 7): This is for allocation rollbacks (not supported in this release).
End (Fail) (Nodes 8, 11, 14, and 15): This activity terminates the process and returns the result Fail.
PA Allocation Release Process
This process releases an unreleased allocation run.
In the diagram shown below, the process activity nodes are numbered for reference in the descriptions that follow. The numbered circles are not part of the process diagram.
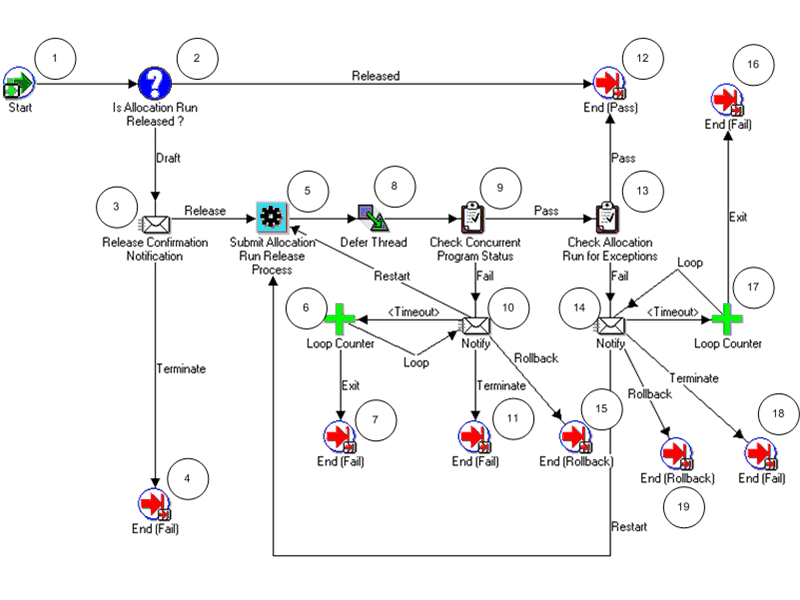
PA Allocation Release Activities
The following information describes each activity in the PA Allocation Release process, listed by function name:
Start (Node 1): This is a standard activity that marks the start of the process.
Is Allocation Run Released? (Node 2): This process tests whether the allocation run has been released.
-
If the run has been released, the process branches to node 12.
-
If the run has not been released (is in draft form), the process branches to node 3.
Release Confirmation Notification (Node 3): This process sends a notification asking for confirmation of the release.
-
If the release is confirmed, the process branches to node 5.
-
If the release is not confirmed, the process branches to node 4.
Submit Allocation Run Release Process (Node 5): This activity submits the allocation run release. Based on the defer thread, this activity branches to node 9.
Check Concurrent Program Status (Node 9): This activity checks the status of the concurrent program Submit Allocation Run Release.
-
If the allocation has completed, the process branches to node 13.
-
If the allocation has completed, the process branches to node 10.
Notify (Node 10): This activity sends a notification that the concurrent program has not completed.
-
If the notification times out, the process branches to node 7.
-
If a restart response is received, the process branches back to node 5.
-
If a terminate response is received, the process branches to node 11.
-
If a rollback response is received, the process branches to node 15.
End (Pass) (Node 12): This activity terminates the process and returns the result Pass.
Check Allocation Run for Exceptions (Node 13): This activity checks the completed allocation run for any exceptions.
-
If there are exceptions, the process branches to node 14.
-
If there are no exceptions, the process branches to node 12.
Notify (Node 14): This activity sends a notification that the allocation run had exceptions.
-
If a rollback response is received, the process branches to node 19.
-
If a terminate response is received, the process branches to node 18.
-
If the notification times out, the process branches to node 16.
End (Fail) (Nodes 4, 7, 11, 16, and 18): This activity terminates the process and returns the result Fail.
End (Rollback) (Nodes 15 and 19): This is for allocation rollbacks (not supported in this release).
PA Customizable Allocation Process
You can customize this process for reporting, checking data, or similar tasks.
In the diagram shown below, the process activity nodes are numbered for reference in the descriptions that follow. The numbered circles are not part of the process diagram.
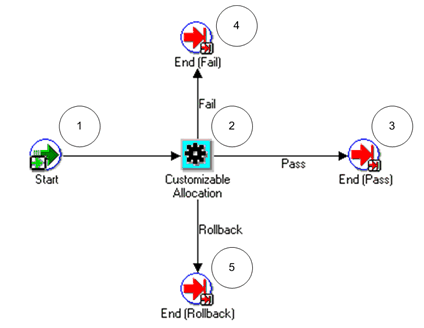
PA Customizable Allocation Activities
The following information describes each activity in the PA Customizable Allocation process, listed by function name:
Start (Node 1): This is a standard activity that marks the start of the process.
Customizable Allocation (Node 2): This is a customizable node.
End (Pass) (Node 3): This activity terminates the process and returns the result Pass.
End (Fail) (Node 4): This activity terminates the process and returns the result Fail.
End (Rollback) (Node 5): This is for allocation rollbacks (not supported in this release).
PA Cost Process
This process distributes allocated costs by calling two subprocesses, PA Distribute Cost Process and PA Customizable Distribute Cost Process. The PA Customizable Distribute Cost Process can restart the PA Distribute Cost Process.
In the diagram shown below, the process activity nodes are numbered for reference in the descriptions that follow. The numbered circles are not part of the process diagram.
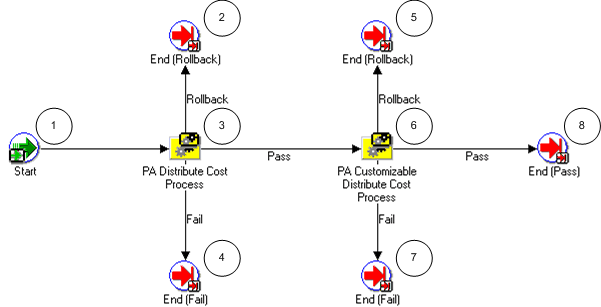
PA Cost Activities
The following information describes each activity in the PA Cost process, listed by function name:
Start (Node 1): This is a standard activity that marks the start of the process.
PA Distribute Cost Process (Node 3):
-
If this process is successful, it branches to node 6.
-
If the process fails, it branches to node 4.
PA Customizable Distribute Cost Process (Node 6): This node calls the PA Customizable Distribute Cost process.
-
If this process is successful, it branches to node 8.
-
If the process fails, it branches to node 7.
End (Rollback) (Nodes 2 and 5): This is for allocation rollbacks (not supported in this release).
End (Fail) (Nodes 4 and 7): This activity terminates the process and returns the result Fail.
End (Pass) (Node 8): This activity terminates the process and returns the result Pass.
PA Distribute Cost Process
This process distributes the costs for the expenditures generated by the allocation run.
In the diagram shown below, the process activity nodes are numbered for reference in the descriptions that follow. The numbered circles are not part of the process diagram.
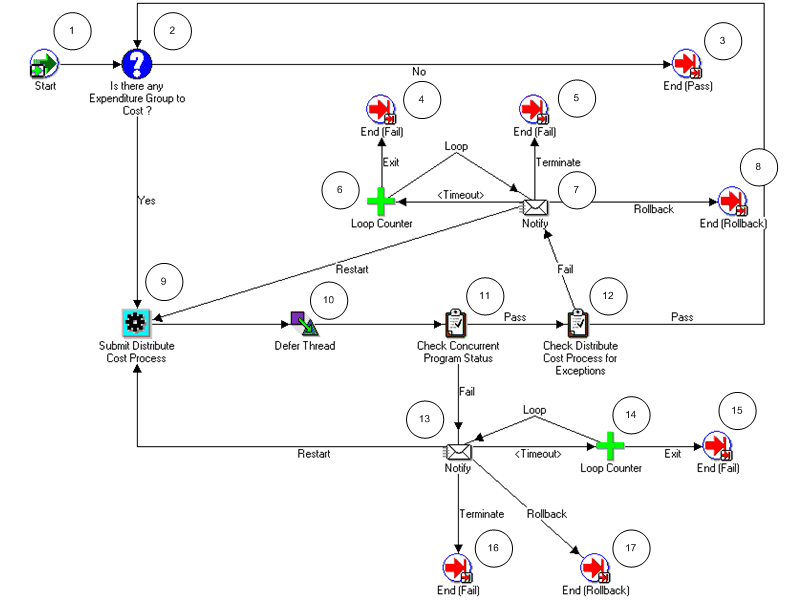
PA Distribute Cost Activities
The following information describes each activity in the PA Distribute Cost process, listed by function name:
Start (Node 1): This is a standard activity that marks the start of the process.
Is There Any Expenditure Group to Cost? (Node 2): This process tests whether there is an expenditure group that needs to be costed.
-
If there is no expenditure group to cost, the process branches to node 3.
-
If there is an expenditure group to cost, the process branches to node 9
End (Pass) (Node 3): This activity terminates the process and returns the result Pass.
Notify (Nodes 7): This activity sends a notification that the concurrent program has not completed.
-
If a restart response is received, the process branches back to node 9.
-
If a rollback response is received, the process branches to node 8.
-
If the notification times out, the process branches to node 4.
-
If a terminate response is received, the process branches to node 5.
Submit Distribute Cost Process (Node 9): This activity submits the distribute cost process. Based on the defer thread, this activity branches to node 11.
Check Concurrent Program Status (Node 11): This activity checks the status of the concurrent program Submit Distribute Cost Process.
-
If the allocation has completed, the process branches to node 12.
-
If the release has not completed, the process branches to node 13.
Notify (Node 13): This activity sends a notification that the concurrent program has not completed.
-
If a restart response is received, the process branches back to node 9.
-
If a rollback response is received, the process branches to node 17.
-
If the notification times out, the process branches to node 15.
-
If a terminate response is received, the process branches to node 16.
End (Rollback) (Nodes 8 and 17): This is for allocation rollbacks (not supported in this release).
End (Fail) (Nodes 4, 5, 15, and 16): This activity terminates the process and returns the result Fail.
PA Customizable Distribute Cost Process
You can customize this process for tasks such as the following:
-
Reporting
-
Checking data
-
Running the process PRC: Generate Cost Accounting Events
-
Running the process PRC: Create Accounting to create accounting in Oracle Subledger Accounting, transfer subledger journal entries from Oracle Subledger Accounting to Oracle General Ledger, and post journal entries in Oracle General Ledger
-
Restarting the PA Distribute Costs Process
In the diagram shown below, the process activity nodes are numbered for reference in the descriptions that follow. The numbered circles are not part of the process diagram.
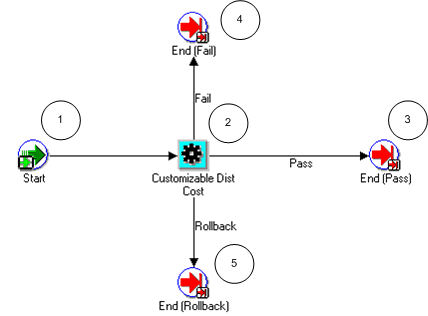
PA Customizable Distribute Cost Activities
The following information describes each activity in the PA Customizable Distribute Cost process, listed by function name:
Start (Node 1): This is a standard activity that marks the start of the process.
Customizable Distribute Cost: This is a customizable node.
End (Pass) (Node 3): This activity terminates the process and returns the result Pass.
End (Fail) (Node 4): This activity terminates the process and returns the result Fail.
End (Rollback) (Node 5): This is for allocation rollbacks (not supported in this release).
PA Summarization Process
This process summarizes allocated costs by calling two subprocesses, PA Update Projects Summary Process and PA Customizable Summarization Process. The PA Customizable Summarization Process can restart the PA Update Projects Summary Process.
In the diagram shown below, the process activity nodes are numbered for reference in the descriptions that follow. The numbered circles are not part of the process diagram.
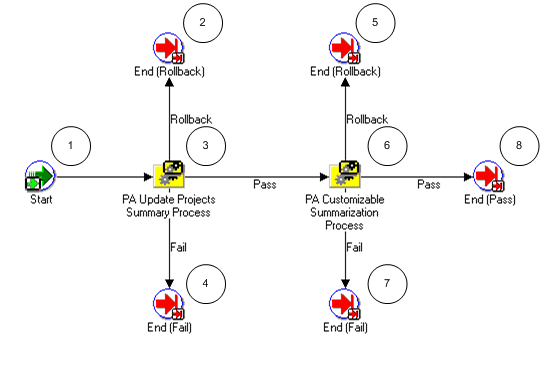
PA Summarization Activities
The following information describes each activity in the PA Summarization process, listed by function name:
Start (Node 1): This is a standard activity that marks the start of the process.
PA Update Projects Summary Process (Node 3)
-
If the process is successful, it branches to node 6.
-
If the process fails, it branches to node 4.
PA Customizable Summarization Process (Node 6): This node calls the PA Customizable Summarization process.
-
If the process is successful, it branches to node 8.
-
If the process fails, it branches to node 7.
End (Rollback) (Nodes 2 and 5): This is for allocation rollbacks (not supported in this release).
End (Fail) (Nodes 4 and 7): This activity terminates the process and returns the result Fail.
End (Pass) (Node 8): This activity terminates the process and returns the result Pass.
PA Update Projects Summary Process
This process summarizes the costs for the expenditures generated by the allocation run.
In the diagram shown below, the process activity nodes are numbered for reference in the descriptions that follow. The numbered circles are not part of the process diagram.
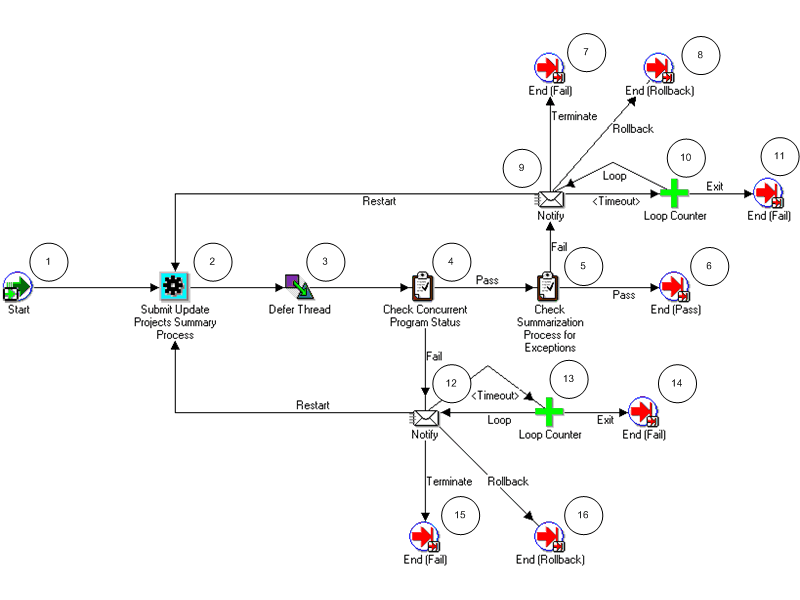
PA Update Projects Summary Activities
The following information describes each activity in the PA Update Projects Summary process, listed by function name:
Start (Node 1): This is a standard activity that marks the start of the process.
Submit Update Projects Summary Process (Node 2): This activity submits the summary process. Based on the defer thread, this activity branches to node 4.
Check Concurrent Program Status (Node 4): This activity checks the status of the concurrent program Submit Update Projects Summary Process.
-
If the allocation has completed, the process branches to node 5.
-
If the release has not completed, the process branches to node 12.
Check Summarization Process for Exceptions (Node 5): This activity checks the completed summarization process for any exceptions.
-
If there are exceptions, the process branches to node 9.
-
If there are no exceptions, the process branches to node 6.
End (Pass) (Node 6): This activity terminates the process and returns the result Pass.
Notify (Node 9): This activity sends a notification that the concurrent program has not completed.
-
If a restart response is received, the process branches back to node 2.
-
If a rollback response is received, the process branches to node 8.
-
If the notification times out, the process branches to node 11.
-
If a terminate response is received, the process branches to node 7.
Notify (Node 12): This activity sends a notification that the concurrent program has not completed.
-
If a restart response is received, the process branches back to node 2.
-
If a rollback response is received, the process branches to node 16.
-
If the notification times out, the process branches to node 14.
-
If a terminate response is received, the process branches to node 15.
End (Rollback) (Nodes 8 and 16): This is for allocation rollbacks (not supported in this release).
End (Fail) (Nodes 7, 11, 14, and 15): This activity terminates the process and returns the result Fail.
PA Customizable Summarization Process
You can customize this process for reporting, restarting the PA Update Projects Summary Process, checking the data, or similar tasks.
In the diagram shown below, the process activity nodes are numbered for reference in the descriptions that follow. The numbered circles are not part of the process diagram.
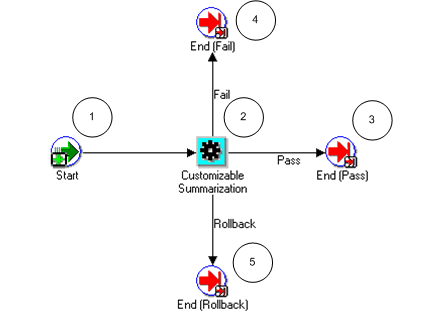
PA Customizable Summarization Activities
The following information describes each activity in the PA Customizable Summarization process, listed by function name:
Start (Node 1): This is a standard activity that marks the start of the process.
Customizable Summarization (Node 2): This is a customizable node.
End (Pass) (Node 3): This activity terminates the process and returns the result Pass.
End (Fail) (Node 4): This activity terminates the process and returns the result Fail.
End (Rollback) (Node 5): This is for allocation rollbacks (not supported in this release).
Timeout Attribute
The timeout attribute sets the amount of time that a user has to respond to a notification. The default value is 1440 minutes (24 hours). The workflow timeout attribute executes three times. (For example, if the timeout value is 1440 minutes, the actual time that elapses before the step-down autoallocation stops is 4320 minutes, equivalent to 72 hours.)
If the person notified by the workflow does not respond after the attribute executes three times, the step-down autoallocation stops.
For information on backing up and modifying the Timeout attribute, see: Oracle Workflow Guide.
Related Topics
AutoAllocations, Oracle Projects Costing User Guide, Oracle Project Costing User Guide
Setting Up Step-Down AutoAllocation, Oracle General Ledger Implementation Guide
Case Study of Incremental Allocations
Send AR Notification Workflow
If your project is Pay When Paid enabled and you choose to receive pay when paid notifications, the Send AR Notification workflow informs project managers every time a receipt is applied in Oracle Receivables to an Oracle Projects customer invoice. You can enable the AR Receipt Notification check box either for a project type or as part of revenue and billing information when setting up your project.
The notification contains information on the projects invoice in Oracle Receivables for which payment is received, the payment amount, the project for this customer invoice, and linked supplier invoices that are on pay when paid hold. From the notification, you can click on the Open Supplier Summary link to access the Supplier Summary page for the project. The filename of this workflow is PAPWPARN.wft.
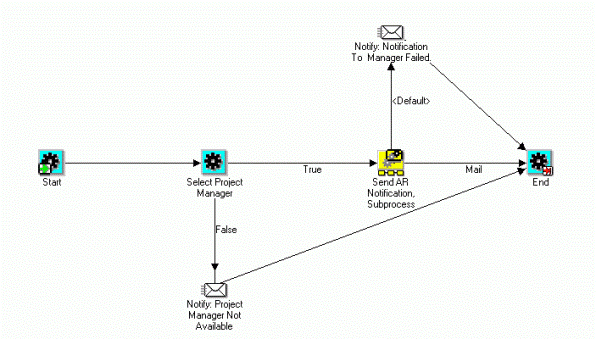
This workflow contains the following functions
-
Start. This is a standard activity that marks the start of the process.
-
Select Project Manager. This activity selects the manager for the project by calling the Select Project Manager procedure in the Send AR Notification Workflow client extension (pa_ce_ar_notify_wf.Select_Project_Manager). You can customize this client extension to enter a recipient other than the default recipient of project manager. If a project manager is found, the process moves to the next function, or it moves to the last function of End
-
Send AR Notification Subprocess. This activity sends a workflow notification by email to the selected project manager about receipts applied in Oracle Receivables on project invoices.
-
End. This activity terminates the process.
The following diagram illustrates the Send AR Notification subprocess described above.
Related Topics
Oracle Workflow Developer’s Guide
Project Types Window Reference
Revenue and Billing Information, Oracle Projects Fundamentals
Oracle Project Foundation Workflows
Oracle Project Foundation provides workflows to integrate with Oracle Sales, enhance existing workflows, and for status change approvals.
Overview of Oracle Project Foundation Workflows
Oracle Project Foundation provides the following workflows:
| Workflow Name | Description |
|---|---|
| PA: Mass Pipeline Projects Update Workflow | Integrates Oracle Projects with Oracle Sales |
| PA: Oracle Projects Library Workflow | Contains common functions that can be used to enhance other workflows |
| PA: Project Workflow | Routes project status changes to one or more destinations for approval |
PA: Mass Pipeline Projects Update Workflow
The PA: Mass Pipeline Projects Update workflow is used for integration of Oracle Projects with Oracle Sales. The workflow sends notifications to project managers and staffing owners of any change in status of sales opportunities. The filename of this workflow is PAYPRJNT.wft.
PA: Mass Pipeline Projects Update Processes
This workflow includes the PA: Mass Pipeline Projects Update process.
PA: Mass Pipeline Projects Update
This process informs the project manager and the staffing owner about change in status of a sales opportunity.
In the diagram shown below, the process activity nodes are numbered for reference in the descriptions that follow. The numbered circles are not part of the process diagram.
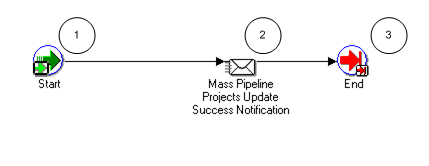
PA: Mass Pipeline Projects Update Activities
The following information describes each activity in the PA: Mass Pipeline Projects Update process, listed by function name:
Start (Node 1): This is a standard activity that marks the start of the process.
Mass Pipeline Projects Update Success Notification (Node 2): This activity sends a notification to the project managers and the staffing owners informing them that the status of an opportunity has changed.
End (Node 3): This activity terminates the process.
Related Topics
Integrating with Oracle Sales, Oracle Projects Fundamentals
PA: Oracle Projects Library Workflow
The PA: Oracle Projects Library workflow is a library of common functions that you can use to modify or enhance other provided workflows. The filename of this workflow is PAPROJWF.wft.
PA: Project Workflow
You use the PA: Project Workflow to route project status changes to one or more destinations for approval. The filename for this workflow is PAPROJWF.wft.
The following diagram shows a typical flow of status changes for a project:
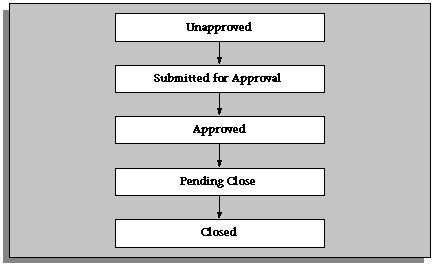
The project statuses names are user-defined, and the statuses you create for your business may be different from those given in the diagram above. You may have some projects that require several status changes, while other projects (those with a short duration, for example) may have fewer status changes, and may not require approval. Oracle Projects enables you to implement the status flow you require for each project, and to use the PA: Project workflow to automate the approvals and processes involved with each status.
Implementing the PA: Project Workflow
To make this workflow active, you must do the following:
-
For project status, select the Enable Workflow check box. For each of these project statuses, specify the Success Project Status and Failure Project Status.
-
For project type, select the Use Workflow for Project Status Changes check box. For more information, see Project Types, Oracle Projects Implementation Guide.
-
If required, you can modify the project workflow process to perform the routing, notifications, and processes that you require for each status change.
You can optionally use the Project Workflow client extension to further customize project workflow rules. See: Project Workflow Extension, Oracle Projects APIs, Client Extensions, and Open Interfaces Reference.
PA: Project Workflow Processes
The workflow includes the following processes:
-
Project
-
Project Approval Subprocess
Project Process
Oracle Projects provides a default project workflow process, called PA: Project Workflow.
The default process routes approval of a project status change to the supervisor of the status change submitter. The default project workflow process does not need to be modified in order to run without error. You may customize the process or create a new one, using the Oracle Workflow Builder. For more information on how to use the Oracle Workflow Builder, see the Oracle Workflow Guide.
In the diagram shown below, the process activity nodes are numbered for reference in the descriptions that follow. The numbered circles are not part of the process diagram.
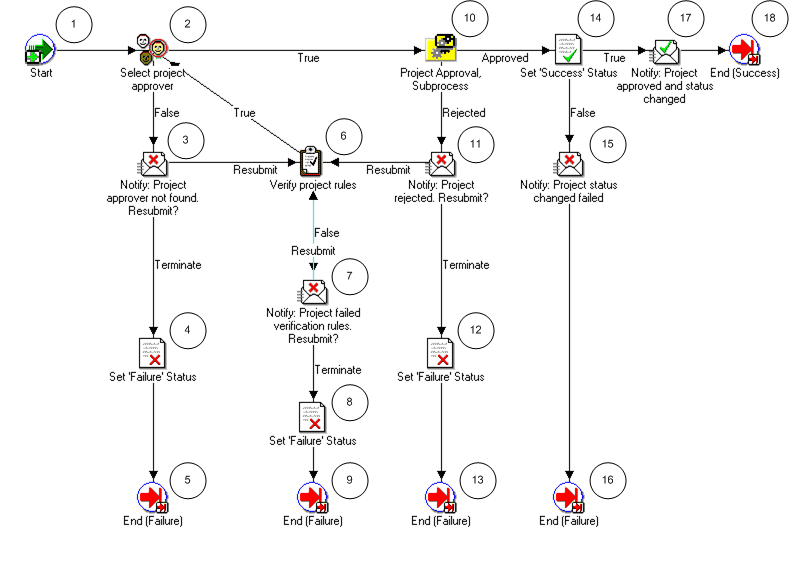
Project Workflow Activities
The following information describes each activity in the Project workflow process, listed by function name:
Start (Node 1): This is a standard activity that marks the start of the process.
Select Project Approver (Node 2): This activity selects the approver for the project by calling the Select Project Approver procedure in the Project Workflow client extension (PA_CLIENT_EXTN_PROJECT_WF.SELECT_PROJECT_APPROVER). The approver in the default procedure is the supervisor of the submitter of the workflow.
This activity has two possible outcomes.
-
If a project approver is found, the process branches to Node 10.
-
If a project approver is not found, the process branches to Node 3.
Notify Project Approver Not Found (Node 3): This activity notifies the submitter of the project that no project approver was found. The submitter can optionally resubmit the project or terminate the submission.
-
If the project is resubmitted, the process branches to Node 6.
-
If the submission is terminated, the process branches to Node 4.
Set Failure Status (Nodes 4, 8, and 12): This activity sets the project status to the Failure Status indicated in the Project Statuses window. The process branches to an End (Failure) node.
End (Failure) (Nodes 5, 9, 13, and 16): This activity terminates the process and returns the result Failure.
Verify Project Rules (Node 6): This activity verifies that the project satisfies the requirements for approval by calling the Verify Project Status Change procedure in the Project Workflow client extension (PA_CLIENT_EXTN_PROJ_STATUS.VERIFY_PROJECT_STATUS_CHANGE).
-
If the verification rules are satisfied, the process branches to Node 2.
-
If the verification rules are not satisfied, the process branches to Node 7.
Notify: Project Failed Verification Rules (Node 7): This activity notifies the submitter that the project failed the verification rules. The submitter may resubmit the project for approval or terminate the submission.
-
If the project is resubmitted, the process branches to Node 6.
-
If the submission is terminated, the process branches to Node 8.
Project Approval Subprocess (Node 10): This activity runs the Project Approval Subprocess. See: Project Approval Subprocess.
-
If the Project Approval Subprocess succeeds, the process branches to Node 14.
-
If the Project Approval Subprocess fails, the process branches to Node 11.
Notify: Project Rejected (Node 11): This activity notifies the submitter that the status change for the project was rejected.
-
If the submitter chooses to resubmit the project, the process branches to Node 6.
-
If the submitter terminates the submission, the process branches to Node 12.
Set Success Status (Node 14): This activity sets the project status to the Success Status indicated in the Project Statuses window.
-
If the project status is successfully changed, the process branches to Node 17.
-
If the status change is unsuccessful, the process branches to Node 15.
Notify: Project Status Change Failed (Node 15): This activity notifies the submitter that the project status change failed. The status change can fail if the project was changed after it was approved, so that it no longer complies with the project verification rules. An Oracle database error can also cause the failure.
Notify: Project Approved and Status Changed (Node 17): This activity notifies the submitter that the project was approved and the project status was changed.
End (Success) (Node 18): This activity terminates the process and returns the result Success.
Project Approval Subprocess
The Project Approval Subprocess is called by the default PA: Project Workflow process.
In the diagram shown below, the process activity nodes are numbered for reference in the descriptions that follow. The numbered circles are not part of the process diagram.
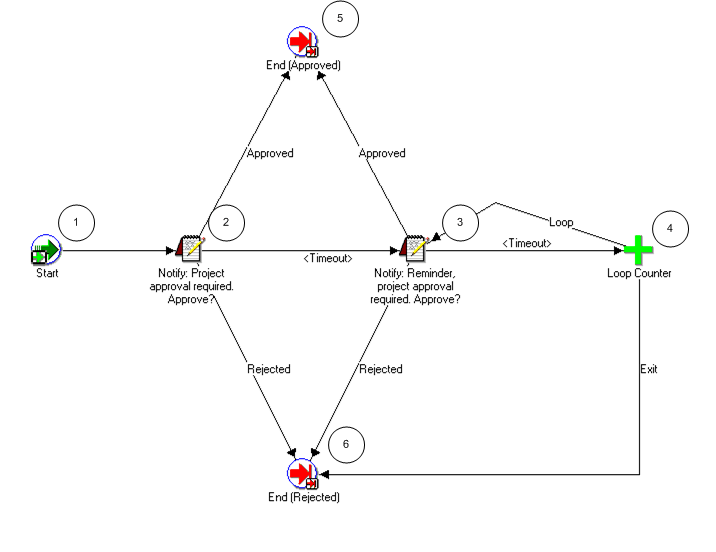
Project Approval Subprocess Activities
The following information describes each activity in the Project Approval Subprocess, listed by function name:
Start (Node 1): The following information describes each activity in the Project Approval Subprocess, listed by function name:
Notify: Project Approval Required (Node 2): This activity notifies the project approver that approval is required for the project status change.
-
If the project approver approves the project, the subprocess branches to Node 5.
-
If the project approver rejects the project, the subprocess branches to Node 6.
-
If the activity times out, the subprocess branches to Node 3. The default time for the activity to time out is two days. You can use the Oracle Workflow Builder to change the timeout value to suit your business needs.
Notify: Reminder, Project Approval Required (Node 3): This activity sends a reminder notification to the project approver.
-
If the project approver approves the project, the subprocess branches to Node 5.
-
If the project approver rejects the project, the subprocess branches to Node 6.
-
If the activity times out, the subprocess branches to the Loop Counter (Node 4).
Loop Counter (Node 4): This activity counts the number of times the subprocess has branched to this node.
-
If the count has reached the Loop Limit (a constant that is set in this node), the subprocess branches to Node 6.
-
If the count has not reached the Loop Limit, the subprocess returns to Node 3.
The loop counter defaults to a limit of 1. (You can change the default value of the loop counter.)
After the activity reaches the Loop Limit, the process sends one more reminder. If there is no response, the loop counter stops counting and branches to node 6.
End (Approved) (Node 5): This activity ends the subprocess and returns the result Approved.
End (Rejected) (Node 6): This activity ends the subprocess and returns the result Rejected.
Project Workflow Example
The following diagram illustrates project status flow where the project workflow is used for three status changes during the lifecycle of a project:
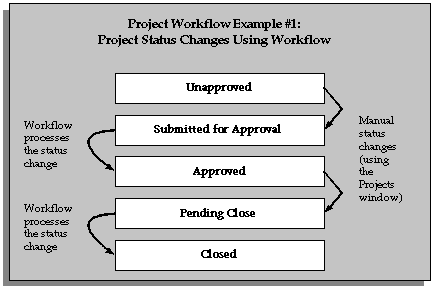
A user manually sets the status to Submitted for Approval. This initiates the workflow process is, which if successful, the status is updated to Approved.
A user manually sets the status to Pending Close. This initiates the workflow process, which if successful, the status is updated to Closed.
Oracle Project Management Workflows
Oracle Project Management provides workflows to manage and transmit information about budgets, issues, change orders, project execution, and status reporting.
Overview of Oracle Project Management Workflows
Oracle Project Management provides the following workflows:
| Workflow Name | Description |
|---|---|
| PA: Budget Workflow | Manages budget approvals |
| PA: Budget Integration Workflow | For bottom-up integrated budgets: Validates the submitted budget version, creates baseline version, generates accounting events, creates accounting in final mode in Oracle Subledger Accounting, and validates budget amounts against the Oracle General Ledger budget. For top-down integrated budgets: Validates the submitted budget version, creates baseline version, validates existing approved transaction amounts (at resource, resource group, task, top task and project levels) against the project budget, generates accounting events, creates accounting in final mode in Oracle Subledger Accounting, validates budget amounts against the General Ledger Funding Budget, and validates existing approved transaction amounts (at account level) against the project budget. For non-integrated budgets with budgetary controls: Validates the submitted budget version, creates baseline version, and validates existing approved transaction amounts against the project budget. |
| PA: Change Request Approval | Routes change request approval |
| PA: Deduction Workflow | Routes deduction approval workflow |
| PA: Issue and Change Workflow | Routes control items approvals |
| PA: Issue and Change Action Workflow | Sends issue and change action notifications |
| Project Budget Account Generation Workflow | Automates account generation and assignment process |
| PA: Project Execution Workflow | Coordinates the Task Execution Workflows that you create to perform tasks |
| PA: Performance Notification Workflow | Sends performance notifications |
| PA: Status Report Workflow | Routes status report approvals |
| PA: Task Approval Workflow | Routes approval of tasks created in a change document. |
| PA: Workplan Workflow | Sends workplan status notifications |
PA: Budget Workflow
Budget statuses progress in the following order:
-
Working
-
Submitted
-
In Process
-
Baselined
When you submit the draft budget for approval, the PA: Budget workflow is initiated. The filename of this workflow is PABUDGWF.wft.
Implementing the PA: Budget Workflow
To use the workflow for approving budgets and approving forecasts, you must perform the following steps:
-
For budget types, enable the "Use Workflow for Budget Status Change" check box. For more information, see: Budget Types.
-
For financial plan type, enable the "Use Workflow for Status Changes" check box. For more information, see: Financial Plan Types.
-
For project type, enable the "Use Workflow for Project Status Change" check box.
-
Modify the Budget Workflow process to perform the routing, notifications, and processes that you require for each status change.
You can optionally use the Budget Workflow client extension to further customize the PA: Budget Workflow. See: Budget Workflow Extension, Oracle Projects APIs, Client Extensions, and Open Interfaces Reference.
Oracle Projects also supplies a budget verification extension. PA Budget Workflow calls this extension before it:
-
Initiates the budget approval process
-
Changes the budget status
This ensures that the verification rules for the status change are met, even if changes have been made to the budget during the approval process.
PA: Budget Workflow Processes
The workflow includes the following processes:
-
Budget
-
Budget Approval Subprocess
Budget Process
Oracle Projects provides a default budget workflow process, called the PA Budget workflow.
You can alter, delete, or move any of the activities in the default budget workflow process to obtain the desired results for your installation. You may customize the process or create a new one, using the Oracle Workflow Builder. For more information on how to use the Oracle Workflow Builder, see the Oracle Workflow Guide.
In the diagram shown below, the process activity nodes are numbered for reference in the descriptions that follow. The numbered circles are not part of the process diagram.
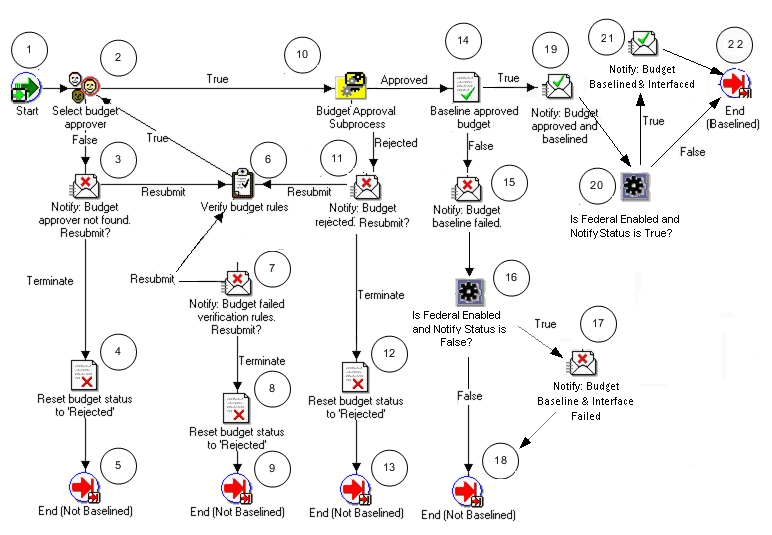
Budget Workflow Activities
The following information describes each activity in the PA: Budget Workflow process, listed by function name:
Start (Node 1): This is a standard activity that marks the start of the process.
Select Budget Approver (Node 2): This activity selects the approver for the budget by calling the Select Budget Approver procedure in the Budget workflow client extension (PA_CLIENT_EXTN_BUDGET_WF.SELECT_BUDGET_APPROVER). The approver in the default procedure is the immediate supervisor of the person who submitted the budget. This activity has the following two possible outcomes:
-
If a budget approver is found, the process branches to Node 10.
-
If a budget approver is not found, the process branches to Node 3.
Notify Budget Approver Not Found (Node 3): This activity notifies the submitter of the budget that no budget approver was found. The submitter can optionally resubmit the budget or terminate the submission.
-
If the budget is resubmitted, the process branches to Node 6.
-
If the submission is terminated, the process branches to Node 4.
Reset Budget Status to Rejected (Nodes 4, 8, and 12): This activity sets the budget status to Rejected. The process branches to an End (Not Baselined) node.
End (Not Baselined) (Nodes 5, 9, 13, and 18): This activity terminates the process and returns the result Not Baselined.
Verify Budget Rules (Node 6): This activity verifies that the budget satisfies the requirements for approval by calling the Verify Budget Rules procedure in the Budget workflow client extension (PA_CLIENT_EXTN_BUDGET_WF.VERIFY_BUDGET_RULES). The default procedure does not include any requirements.
-
If the verification rules are satisfied, the process branches to Node 2.
-
If the verification rules are not satisfied, the process branches to Node 7.
Notify: Budget Failed Verification Rules (Node 7): This activity notifies the submitter that the budget failed the verification rules. The submitter may resubmit the budget for approval or terminate the submission.
-
If the budget is resubmitted, the process branches to Node 6.
-
If the submission is terminated, the process branches to Node 8.
Budget Approval Subprocess (Node 10): This activity runs the Budget Approval Subprocess. See: Budget Approval Subprocess.
-
If the Budget Approval Subprocess succeeds, the process branches to Node 14.
-
If the Budget Approval Subprocess fails, the process branches to Node 11.
Notify: Budget Rejected (Node 11): This activity notifies the submitter that the budget was rejected.
-
If the submitter chooses to resubmit the budget, the process branches to Node 6.
-
If the submitter terminates the submission, the process branches to Node 12.
Baseline Approved Budget (Node 14): This activity sets the budget status to Baseline.
-
If the budget baseline is successful, the process branches to Node 19.
-
If the budget baseline is unsuccessful, the process branches to Node 15.
Notify: Budget Baseline Failed (Node 15): This activity notifies the submitter that the budget baseline failed. The baseline can fail if the budget was changed after it was approved, so that it no longer complies with the budget verification rules. An Oracle database error can also cause the failure.
Is Federal Enabled And Notify Interface Status is False? (Node 16): This activity checks whether the profile option FV: Federal Enabled is set to Yes at the site level. If yes, the activity calls the Federal Integration client extension to insert the budget lines into the open interface tables FV_BE_INTERFACE_CONTROL and FV_BE_INTERFACE.
-
If the extension fails, then the process branches to Node 17.
-
If the extension executes with no errors, or if the profile option FV: Federal Enabled is not set to Yes at the site level, then the process branches to Node 18.
Notify: Budget Baseline and Interface Failed (Node 17): This activity notifies the submitter that the budget baseline failed because the Federal Integration client extension returned an error status.
Notify: Budget Approved and Baselined (Node 19): This activity notifies the submitter that the budget was approved and a baseline budget is created.
Is Federal Enabled And Notify Status is True? (Node 20): This activity checks if the value of the profile option FV: Federal Enabled is set to Yes at the site level. If it is it set to Yes, the process branches to node 21. Otherwise, the process branches to node 22.
Notify: Budget Approved and Baselined (Node 21): This activity notifies the budget approver that the budget baseline was successfully created.
End (Baselined) (Node 22): This activity terminates the process and returns the result Baseline.
Budget Approval Subprocess
The Budget Approval subprocess is called by the default PA Budget Workflow process.
In the diagram shown below, the process activity nodes are numbered for reference in the descriptions that follow. The numbered circles are not part of the process diagram.
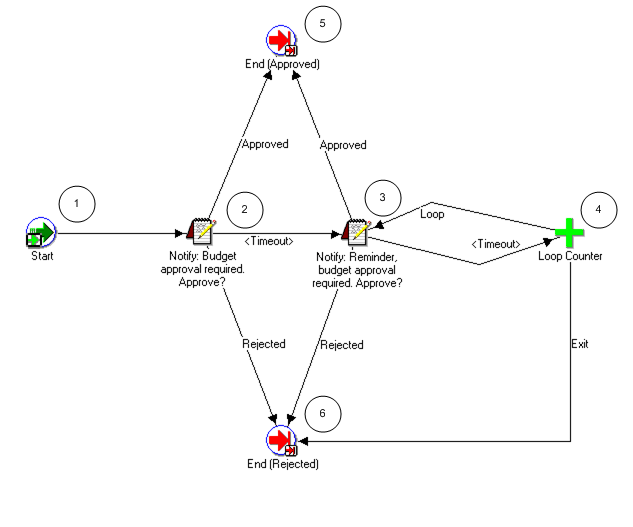
Budget Approval Subprocess Activities
The following information describes each activity in the Budget Approval subprocess, listed by function name:
Start (Node 1): This is a standard activity that marks the start of the process.
Notify: Budget Approval Required (Node 2): This activity notifies the budget approver that approval is required for the budget status change.
-
If the budget approver approves the budget, the subprocess branches to Node 5.
-
If the budget approver rejects the budget, the subprocess branches to Node 6.
-
If the activity times out, the subprocess branches to Node 3.
Notify: Reminder, Budget Approval Required (Node 3): This activity sends a reminder notification to the budget approver.
-
If the budget approver approves the budget, the subprocess branches to Node 5.
-
If the budget approver rejects the budget, the subprocess branches to Node 6.
-
If the activity times out, the subprocess branches to the Loop Counter (Node 4).
Loop Counter (Node 4): This activity counts the number of times the subprocess has branched to this node.
-
If the count has reached the Loop Limit (a constant that is set in this node), the subprocess branches to Node 6.
-
If the count has not reached the Loop Limit, the subprocess returns to Node 3.
The loop counter defaults to a limit of 1. (You can change the default value of the loop counter.)
After the activity reaches the Loop Limit, the process sends one more reminder. If there is no response, the loop counter stops counting and branches to node 6.
End (Approved) (Node 5): This activity ends the subprocess and returns the result Approved.
End (Rejected) (Node 6): This activity ends the subprocess and returns the result Rejected.
Related Topics
Submitting a Draft, Oracle Project Management User Guide
Budget Workflow Extension, Oracle Projects APIs, Client Extensions, and Open Interfaces Reference
Budget Verification Extension, Oracle Projects APIs, Client Extensions, and Open Interfaces Reference
PA: Budget Integration Workflow
When a project uses budgetary controls, the budget baseline process launches the PA: Budget Integration workflow.
The PA: Budget Integration workflow performs the following tasks:
-
For bottom-up integrated budgets:
-
Validates the submitted budget version and changes the budget version status to In Progress
-
Creates baseline version
-
Generates accounting events
-
Creates accounting in final mode for the accounting events in Oracle Subledger Accounting
-
Validates budget amounts against an Oracle General Ledger budget
Note: If the budget fails funds validation, then the workflow removes the accounting entries it created form Oracle Subledger Accounting and updates the submitted budget version to Rejected status.
-
Sends a workflow notification to the user when the baseline process is complete
-
-
For top-down integrated budgets:
-
Validates the submitted budget version and changes the budget version status to In Progress
-
Creates baseline version
-
Validates existing approved transaction amounts (at resource, resource group, task, top task and project levels) against the project budget
-
Generates accounting events
-
Creates accounting in final mode for the accounting events in Oracle Subledger Accounting
-
Validates budget amounts against the General Ledger Funding Budget
-
Validates existing approved transaction amounts (at account level) against the project budget
Note: If the budget fails either funds validation, then the workflow removes the accounting entries it created from Oracle Subledger Accounting and updates the submitted budget version to Rejected status.
-
Sends a workflow notification to the user when the baseline process is complete
-
-
For non-integrated budgets with budgetary controls:
-
Validates the submitted budget version
-
Creates baseline version
-
Validates existing approved transaction amounts against the project budget
-
Note: The PA: Budget Integration workflow generates and processes accounting events only for top-down and bottom-up integrated budgets. It does not generate and process accounting events for non-integrated budgets.
Note: You run the process PRC: Transfer Journal Entries to GL to transfer the journal entries to Oracle General Ledger. When you submit the process PRC: Transfer Journal Entries to GL, you can optionally choose to have the process post the journal entries. Otherwise, you can manually post the journal entries in Oracle General Ledger.
The baseline process updates funds balances in Oracle General Ledger. The process PRC: Transfer Journal Entries to GL does not affect funds balances.
For additional information, see: Transfer Journal Entries to GL, Oracle Projects Fundamentals
The filename of this workflow is PAWFBUI.wft.
Important: This is a system-defined workflow that cannot be modified.
Implementing the PA: Budget Integration Workflow
To make this workflow active, you must do the following:
-
Enable budgetary controls for the project
-
Ensure that the workflow background process is running to process the submitted deferred workflow
PA: Budget Integration Workflow Processes
The workflow includes the PA Budget Integration process.
PA: Budget Integration Process
This workflow process enables you to create baseline budgets when budget integration is used.
In the diagram shown below, the process activity nodes are numbered for reference in the descriptions that follow. The numbered circles are not part of the process diagram.
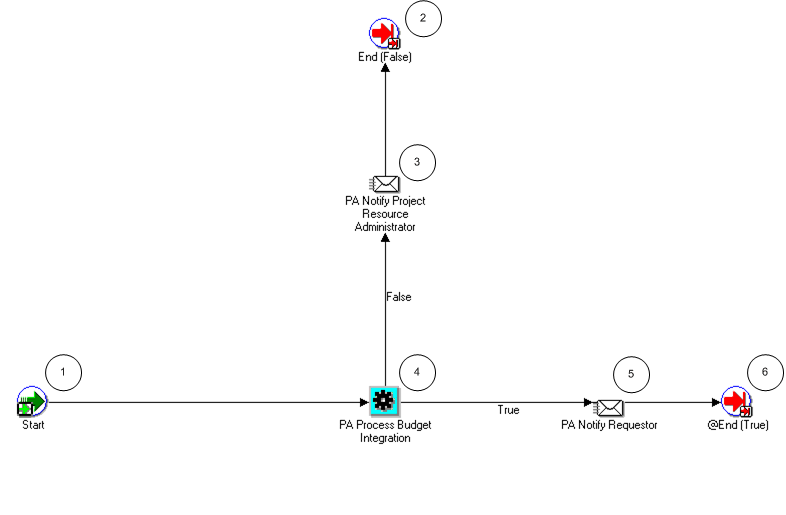
PA: Budget Integration Process Activities
The following information describes each activity in the PA: Budget Integration process, listed by function name:
Start (Node 1): This is a standard activity that marks the start of the process.
PA Notify Project Resource Administrator (Node 3): This activity sends a notification to the PASYSADMIN that the budget integration has not been processed successfully.
PA Process Budget Integration (Node 4): This activity performs edits and calls the funds checking processes for integrated budgets.
-
If the budget passes the funds check, the process branches to Node 3.
-
If the budget does not pass the funds check, the process branches to Node 5.
PA Notify Requestor (Node 5): This activity sends a notification to the person who started the workflow that the budget integration has been processed successfully.
End (Nodes 2 and 6): This activity terminates the process.
PA: Change Request Approval Workflow
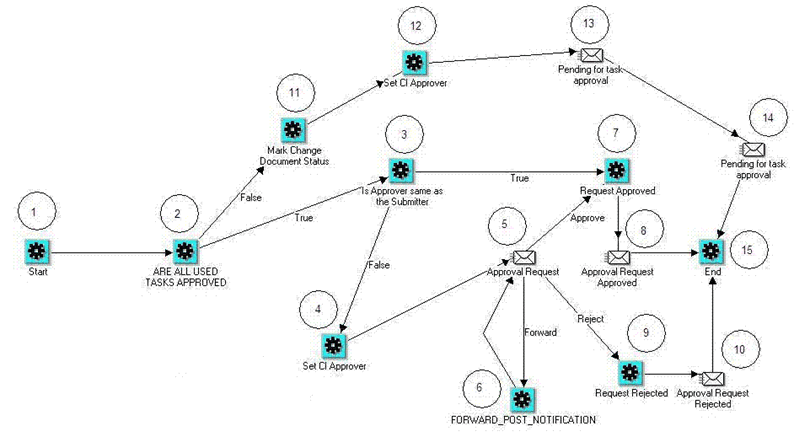
The PA: Change Request Approval Workflow is the approval of change request. Whenever you submit a change request for approval, this workflow sends an email notification to the approver of the change request. Based on this notification, the approver can either approve or reject the change request.
In the diagram, the process activity nodes are numbered for reference in the descriptions that follow.
The following information describes each activity in the PA: Change Request Approval workflow process.
Start (Node 1): This is a standard activity that marks the start of the workflow process.
Are All Tasks Approved (Node 2): This activity check if all the tasks in the change request are in approved status or not.
-
If all the tasks are approved, then the process branches to Node 3.
-
If there are tasks that are not approved, then the process branches to Node 11.
Is Approver Same as Submitter (Node 3): This activity checks if the approver is the same person who has requested for approval.
-
If the approver is same person who has requested for approval, then the process branches to Node 7.
-
If the approver is different from the person who has requested for approval, then the process branches to Node 4.
Set CI Approver (Node 4): This activity sets the approver of the change request.
Approval Request (Node 5): This activity send and FYI notification to the approver to approve the change request.
If the approver rejects the approval, then process branches to Node 9.
FORWARD_POST_NOTIFICATION (Node 6): This is invoked if the receiver of the notification chooses to forward it to another user.
Request Approved (Node 7): This activity approves the change request.
Approval Request Approved (Node 8): This activity sends a notification to the person who has requested for approval of the change request that it has been approved.
Request Rejected (Node 9): This activity rejects the approval request.
Approval Request Rejected (Node 10): This activity sends an e-mail notification to the person who has submitted the approval request that the change order has been rejected.
Mark Change Document Status (Node 11): This activity updates the status of the change document to Submitted.
Set CI Approver (Node 12): This activity identifies the approver of the Control Item, task, the approval of which is pending.
Pending for Task Approval (Node 13 and Node 14): This activity sends an e-mail notification to the person who has submitted the task for approval and the approver of the change document that the approval of the change document is pending approval of the task.
End (Node 15): This activity terminates the workflow process.
PA: Deduction Workflow
The PA: Deduction workflow is a deduction approval workflow. Whenever you submit a deduction for approval this workflow sends and email notification to the approver.
In the diagram shown below, the process activity nodes are numbered for reference in the descriptions that follow. The numbered circles are not part of the process diagram.
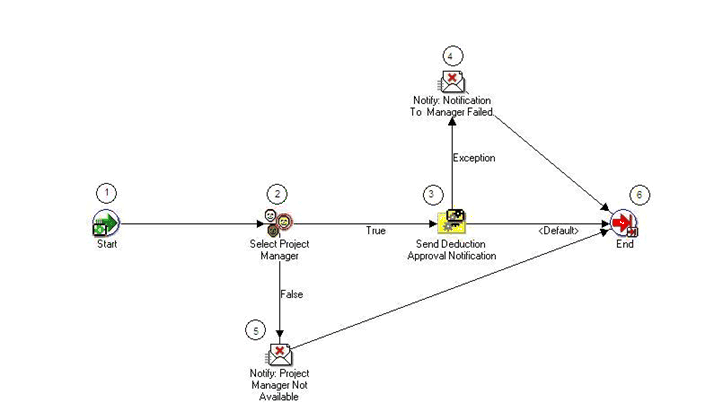
The following information describes each activity in the PA: Deduction workflow.
Start (Node 1): This is a standard activity that marks the start of the workflow process.
Select Project Manager (Node 2): This activity stores the project manager that user has selected. The project manager acts as the approving authority for the deduction.
-
If the user has selected a project manager, then the process branches to Node 3.
-
If project manager is not available, then the process branches to Node 5.
Send Deduction Approval Notification (Node 3): This activity sends a notification to the project manager that the deduction has been approved.
Notify: Notification to Manager Failed (Node 4): The notification has failed.
Notify: Project Manager Not Available (Node 5): This activity sends a notification, to the requestor, that the project manager is not available, and the workflow terminates.
End (Node 6): This activity terminates the workflow process.
Send Deduction Approval Notification Process
-
If notification is successfully sent, then the process branches to Node 6.
-
If there is an exception, then the process branches to Node 4 and a notification is sent to the project manager.
PA: Issue and Change Workflow
The PA: Issue and Change workflow is an approval workflow for control items. Whenever ownership of a control item changes, this workflow sends an FYI notification to the new owner. The filename of this workflow is PAWFCISC.wft.
Implementing the PA Issue and Change Workflow
To make this workflow active, you must do the following:
-
Enable this workflow for a control item status
-
Enter the workflow name (PA: Issue and Change Workflow) and the process name (PA: Control Item Process Approval)
You can optionally use the Issue and Change Workflow client extension to further customize the PA Issue and Change workflow. See: Issue and Change Workflow Extension, Oracle Projects APIs, Client Extensions, and Open Interfaces Reference.
PA Issue and Change Workflow Processes
This workflow includes the following processes:
-
PA: Control Item Owner Change FYI
-
PA: Control Item Process Approval
PA: Control Item Owner Change FYI
When the owner of a control item is changed, this process sends an FYI notification to the new owner.
In the diagram shown below, the process activity nodes are numbered for reference in the descriptions that follow. The numbered circles are not part of the process diagram.
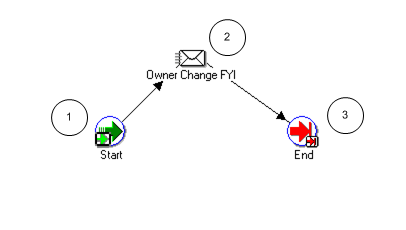
PA: Control Item Owner Change FYI Activities
The following information describes each activity in the PA: Control Item Owner Change FYI process, listed by function name:
Start (Node 1): This is a standard activity that marks the start of the process.
Owner Change FYI (Node 2): This activity sends an FYI notification of the change of ownership to the new owner of the control item.
End (Node 3): This activity terminates the process.
PA: Control Item Process Approval
This process checks for the approver of a submitted control item in the following ways:
-
If the approver is the same person who submitted the control item, this process approves the control item and sends an FYI notification to the approver.
-
If the approver is not the same person who submitted the control item, this process uses the Set Control Item Approver procedure in the Issue and Change Workflow client extension to determine the approver, and sends a notification to the approver.
The approver can approve, reject, or forward the notification.
Note: The process PA: Control Item Process Approval is launched only if the workflow is enabled for the control item status.
In the diagram shown below, the process activity nodes are numbered for reference in the descriptions that follow. The numbered circles are not part of the process diagram.
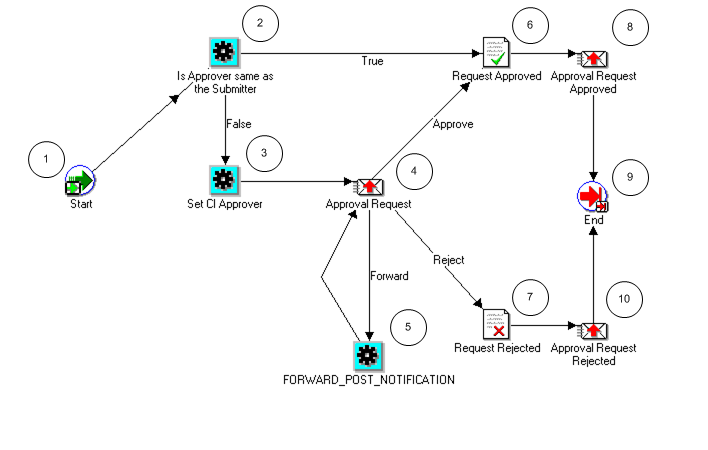
PA: Control Item Process Approval Activities
The following information describes each activity in the PA: Control Item Approval process, listed by function name:
Start (Node 1): This is a standard activity that marks the start of the process.
Is Approver Same as the Submitter (Node 2): This activity determines if the submitter of the control item approval process is also the approver.
-
If the approver is the same person as the submitter, the process branches to Node 6.
-
If the approver is not the same person as the submitter, the process branches to Node 3.
Set CI Approver (Node 3): This activity calls the Set Control Item Approver procedure in the Issue and Change Workflow client extension (PA_CONTROL_ITEMS_WF_CLIENT.SET_CI_APPROVER) to determine the approver of the control item. The default approver is the Project Manager.
Approval Request (Node 4): This activity sends a notification to the approver requesting approval of the control item.
-
If the approver approves the control item, the process branches to Node 5.
-
If the approver rejects the control item, the process branches to Node 7.
Forward Post Notification (Node 5): This activity is called when an approval notification is forwarded to an approver who is not the submitter. It checks to see if the approver is a valid user. If the approver is a valid user, the notification is sent to the approver. If not, the request is rejected.
Request Approved (Node 6): This activity changes the status of the control item to Approved.
Request Rejected (Node 7): This activity changes the status of the control item to Rejected.
Approval Request Approved (Node 8): This activity sends a Control Item Approved FYI notification to the control item owner.
Approval Request Rejected (Node 10): This activity sends a Control Item Rejected FYI notification to the control item owner.
End (Node 9): This activity terminates the process.
PA: Issue and Change Action Workflow
You can use the PA: Issue and Change Action workflow to generate e-mail notifications for all user actions. The filename of this workflow is PAWFCIAC.wft.
The e-mail notification contains details regarding project information, change orders, and actions. From the notification, you can select View Issue/Change Order to view a read-only version of the issue or change document. The Request region shows comments entered by the person who initiated the notification.
To assign an action to another user, the user selects Take Action and logs in.
PA: Issue and Change Action Workflow Processes
This workflow includes the following processes:
-
PA: Action Assignment with Signoff
-
PA: Action Assignment without Signoff
-
PA: Action Close FYI
The first two processes request the user to take one of the following actions as relevant to the process:
-
Close the issue or change action (while closing the action a user can signoff the action if the action requires a signoff)
-
Keep the issue or change action open and update with any information included with the response
-
Reassign the issue or change action
If the user responds from the Take Action page, the notification is closed and no further action can be taken directly from it.
PA: Action Assignment with Signoff
This process is called when an action is created that requires a signoff. The process sends a response-required notification to the assignee.
In the diagram shown below, the process activity nodes are numbered for reference in the descriptions that follow. The numbered circles are not part of the process diagram.
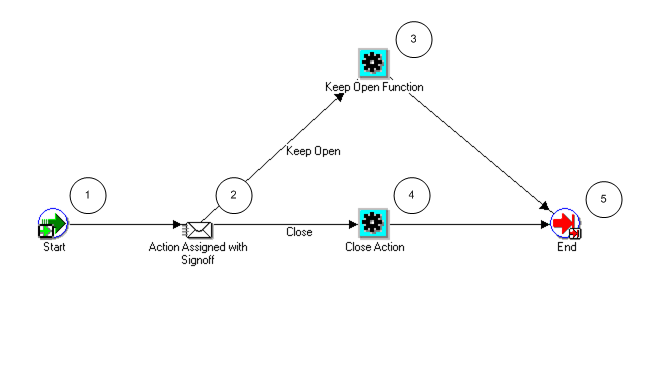
PA: Action Assignment with Signoff Activities
The following information describes each activity in the PA: Action Assignment with Signoff process, listed by function name:
Start (Node 1): This is a standard activity that marks the start of the process.
Action Assigned with Signoff (Node 2): This activity sends a notification to the action assignee that the action is assigned with a signoff. The user can respond by selecting Keep Open or Close.
-
If the action assignee selects Keep Open, the process branches to Node 3.
-
If the action assignee selects Close, the process branches to Node 4.
Keep Open Function (Node 3): This activity is called when user selects Keep Open. It records any user comments.
Close Action (Node 4): This activity is called when the user selects Close Action. It records any user comments and changes the status of the action to Closed.
End (Node 5): This activity terminates the process.
PA: Action Assignment without Signoff
This process is called when an action is created that does not require a signoff. It sends a response-required notification to the assignee.
In the diagram shown below, the process activity nodes are numbered for reference in the descriptions that follow. The numbered circles are not part of the process diagram.
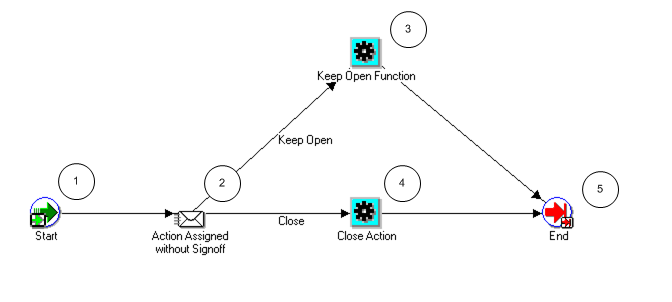
PA: Action Assignment Without Signoff Activities
The following information describes each activity in the PA: Action Assignment Without Signoff process, listed by function name:
Start (Node 1): This is a standard activity that marks the start of the process.
Action Assigned without Signoff (Node 2): This activity sends an Action Assigned Without Signoff notification to the action assignee.
-
If the action assignee selects Keep Open, the process branches to Node 3.
-
If the action assignee selects Close, the process branches to Node 4.
Keep Open Function (Node 3): This activity is called when user selects Keep Open. It records user any comments.
Close Action (Node 4): This activity is called when user selects Close Action. It records any user comments and changes the status of the action to Closed.
End (Node 5): This activity terminates the process.
PA: Action Closed FYI
This process sends an FYI notification to the owner of an action when the action is closed. If the action was reassigned at any time, the notification is also sent to all previous owners.
In the diagram shown below, the process activity nodes are numbered for reference in the descriptions that follow. The numbered circles are not part of the process diagram.
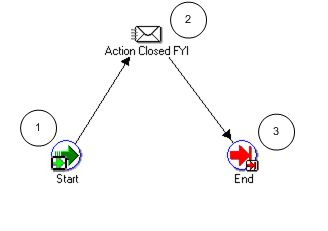
PA: Action Closed FYI Activities
The following information describes each activity in the PA: Action Closed FYI process, listed by function name:
Start (Node 1): This is a standard activity that marks the start of the process.
Action Closed FYI (Node 2): This activity sends an FYI notification that the action has been closed.
End (Node 3): This activity terminates the process.
Project Budget Account Generation Workflow
The Project Budget Account Generation workflow enables you to automate the account generation and assignment process. The filename of this workflow is PABDACWF.wft.
You can use the Budget Account Details window to review and optionally override the accounts generated by the Project Budget Account Generation workflow. For more information, see: Reviewing and Overriding Budget Account Details for Integrated Budgets, Oracle Project Management User Guide, Oracle Project Management User Guide.
Implementing the Project Budget Account Generation Workflow
This workflow runs when one of the following occurs:
-
A user manually selects the Generate Budget Accounting option from the Tools menu of the Budgets window.
-
A user submits an integrated budget and it creates a baseline version.
-
A user runs the year-end rollover process for a top-down integrated budget to carry forward the unspent project budget encumbrance amount from the year that is ending into the next year.
When you activate the workflow from the Tools menu, an account is generated or regenerated for all the defined budget lines. When the workflow is activated during budget submission, accounts are only generated for budget lines that do not already have an assigned account.
Note: Do not update the account for the budget line if the budget line is associated with transactions. Updating the account causes the baseline process to fail.
You must customize the Project Budget Account Generation workflow to generate accounts based on your business needs. Oracle Projects provides predefined parameters to simplify the customization process. You can use the predefined parameters to derive accounts based on project organizations, expenditure organizations, and tasks, or based on the resource groups and resources used for budget entry. For a complete list of the parameters, see: Project Budget Account Generation Workflow Parameters.
For more information about customizing Account Generator workflows, see: Using the Account Generator in Oracle Projects, and the Oracle Applications Flexfields Guide.
Account Generation for Top-Down Budget Integration and Oracle Subledger Accounting
For top-down budget integration, the Project Budget Account Generation workflow generates the default encumbrance account.
When you create a budget baseline or run the process PRC: Year End Budget Rollover, Oracle Projects generates accounting events and creates accounting for the events in Oracle Subledger Accounting. Oracle Projects predefines setup in Oracle Subledger Accounting to accept default encumbrance accounts from Oracle Projects and transfer them to Oracle General Ledger without change. If you define your own detailed accounting rules in Oracle Subledger Accounting, then Oracle Subledger Accounting overwrites default accounts, or individual segments of accounts, that Oracle Projects derives using the Project Budget Account Generation Workflow.
Important: You must define the Reserve for Encumbrance Account that Oracle Subledger Accounting uses to create balancing encumbrance recovery accounting entries. You use the Accounting Setup Manager in Oracle General Ledger to specify the Reserve for Encumbrance Account for your ledger. For more information, see the discussions about the Accounting Setup Manager in the Oracle Financials Implementation Guide and the Oracle General Ledger Implementation Guide.
Important: If you update account derivation rules for budgets in Oracle Subledger Accounting, then you must carefully consider the affect of the updates on existing integrated budgets. The baseline process fails if a revised account derivation rule overwrites accounts for budget lines that are associated with transactions.
Account Generation for Bottom-Up Budget Integration and Oracle Subledger Accounting
For bottom-up budget integration, the Project Budget Account Generation workflow generates the default cost or revenue budget account.
When you create a budget baseline, Oracle Projects generates accounting events and creates accounting for the events in Oracle Subledger Accounting. Oracle Projects predefines setup in Oracle Subledger Accounting to accept default budget accounts from Oracle Projects and transfer them to Oracle General Ledger without change. If you define your own detailed accounting rules in Oracle Subledger Accounting, then Oracle Subledger Accounting overwrites default accounts, or individual segments of accounts, that Oracle Projects derives using the Project Budget Account Generation Workflow.
Important: If you update account derivation rules for budgets in Oracle Subledger Accounting, then you must carefully consider the affect of the updates on existing integrated budgets. The baseline process fails if a revised account derivation rule overwrites accounts for budget lines that are associated with transactions.
Project Budget Account Generation Workflow Process
This workflow includes the Generate Default Account process.
Generate Default Account Process
You use the process to generate accounts.
In the diagram shown below, the process activity nodes are numbered for reference in the descriptions that follow. The numbered circles are not part of the process diagram.
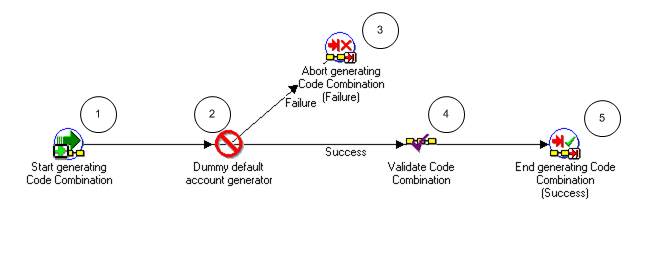
Generate Default Account Process Activities
The following information describes each activity in the Generate Default Account process, listed by function name:
Start Generating Code Combination (Node 1): This is a standard activity that marks the start of the process.
Dummy Default Account Generator (Node 2): This activity can be replaced by your defined procedure for account generation.
-
If the account generation succeeds, your procedure should branch to Node 4.
-
If the account generation fails, your procedure should branch to Node 3.
Abort Generating Code Combination (Node 3): This activity ends the process as an error if a code combination was not generated.
Validate Code Combination (Node 4): This activity checks to see if the generated code combination is valid.
End Generating Code Combination (Node 5): This activity terminates the process.
Account Generation Example
The following example uses Fremont Corporation to show a sample strategy for customizing the Project Budget Account workflow. This strategy reduces the maintenance required for customization.
Fremont Corporation: Background
Fremont Corporation uses bottom-up budgeting for revenue reporting and top-down budgeting for controlling costs. They define their organization-level budgets in Oracle General Ledger and use Oracle Projects budget integration to integrate their project budgets with the defined GL budgets.
In this example, Fremont uses a four-segment accounting flexfield to represent their chart of accounts. The segments are: Company, Cost Center, Account, and Future Use.
Account Generation Business Rules
To generate accounts for integrated project budget lines, Fremont Corporation uses the following business rules:
-
Company: Project owning organizations are used to derive the company segment.
-
Cost Center
-
Cost: Project budget expenditure organizations are used to derive the cost center segment
-
Revenue: Project budget revenue organizations are used to derive the cost center segment
-
-
Account
-
Cost: Project budget expenditure categories are used to derive the account segment
-
Revenue: Project budget revenue categories are used to derive the account segment
-
-
Future Use: The future use segment is always assigned a value of 000.
Note: Fremont Corporation enters budget amounts using a two-level resource list. Budget amounts are entered by organization and expenditure/revenue category.
Business Rule Implementation
To implement their business rules, Fremont Corporation defines the AutoAccounting lookup sets listed below. They customize the Project Budget Account Generation workflow to use the lookup sets to assign values to each account segment. This approach reduces the effort required to customize the Project Budget Account Generation workflow in the future. As new organizations and expenditure categories are created, the new values can be added to the defined lookup sets.
Owning Organization/Company Lookup Set
The following table shows Fremont Corporation’s lookup set for the owning organization/company:
| Intermediate Value | Segment Value |
|---|---|
| Administration | 1 |
| Engineering | 2 |
| Construction | 3 |
| Services | 4 |
Expenditure Organization/Cost Center Lookup Set
The following table shows Fremont Corporation’s lookup set for the expenditure organization / cost center:
| Intermediate Value | Segment Value |
|---|---|
| Consulting | 420 |
| Administration | 520 |
| Executive Office | 710 |
| Finance | 720 |
| Information Services | 830 |
Revenue Organization/Cost Center Lookup Set
The following table shows Fremont Corporation’s lookup set for the revenue organization / cost center:
| Intermediate Value | Segment Value |
|---|---|
| Consulting | 420 |
| Administration | 520 |
| Executive Office | 710 |
| Information Services | 830 |
Expenditure Category/Account Lookup Set
The following table shows Fremont Corporation’s lookup set for the expenditure category/account:
| Intermediate Value | Segment Value |
|---|---|
| Supplies | 7490 |
| Computer Services | 7520 |
| Construction | 7560 |
| Consulting | 7570 |
| Labor | 7580 |
| Expenses | 7640 |
Revenue Category/Account Lookup Set
The following table shows Fremont Corporation’s lookup set for the revenue category/account:
| Intermediate Value | Segment Value |
|---|---|
| Support Revenue | 4120 |
| Consulting Revenue | 4130 |
| Training Revenue | 4140 |
| Miscellaneous Revenue | 4150 |
Account Generation Test
To test the customization for the Project Budget Account workflow, Fremont generates accounts for the project budget illustrated in the following table:
| Expenditure Organization | Expenditure Category | Jan-01 Amount |
|---|---|---|
| Consulting | ||
| Administration | ||
| Information Services |
Project Budget Account Generation Workflow Parameters
The following table shows the parameters that are available in the Project Budget Account Generation workflow:
| Parameter | Description | Budget Entry Level: Project | Budget Entry Level: Top Task | Budget Entry Level: Task | Resource List: Resource Group | Resource List: Resource Member |
|---|---|---|---|---|---|---|
| Budget Type | The type of budget being accounted | Yes | Yes | Yes | NA | NA |
| Budget Version ID | The internal identifier of the budget version | Yes | Yes | Yes | NA | NA |
| Budget Entry Level | Project, top task or lowest task | Yes | Yes | Yes | NA | NA |
| Resource List | Flag indicating if the budget is categorized by a resource list (Y/N) | Yes | Yes | Yes | NA | NA |
| Resource Group Type | Resource type of the group assigned to the budget line. This attribute is available only if the resource list has two levels. | NA | NA | NA | Yes | NA |
| Resource Type | Resource type of the resource list member | NA | NA | NA | NA | Yes |
| Project ID | The internal identifier of the project | Yes | Yes | Yes | NA | NA |
| Project Number | User-defined project number | Yes | Yes | Yes | NA | NA |
| Project Organization | The project owing organization | Yes | Yes | Yes | NA | NA |
| Project Organization ID | Internal identifier of project organization | Yes | Yes | Yes | NA | NA |
| Project Type | Project type | Yes | Yes | Yes | NA | NA |
| Top Task ID | Internal identifier of top task | No | Yes | Yes | NA | NA |
| Top Task Number | The number of the top task | No | Yes | Yes | NA | NA |
| Task Service Type | Service type of the task | No | Yes | Yes | NA | NA |
| Task Organization | The task owing organization | No | Yes | Yes | NA | NA |
| Task Organization ID | Internal identifier of task owning organization | No | Yes | Yes | NA | NA |
| Task ID | Internal identifier of the task | No | Yes | Yes | NA | NA |
| Task Number | User-defined number of the task | No | Yes | Yes | NA | NA |
| Resource List Member ID | Internal identifier of the resource list member | NA | NA | NA | Yes | Yes |
| Person ID | Internal identifier of budgeted for person | NA | NA | NA | No | Employee |
| Employee Number | Employee number of budgeted person | NA | NA | NA | No | Employee |
| Expenditure/ Revenue Category | Category of budgeted cost or revenue amount | NA | NA | NA | Expenditure /Revenue Category | Expenditure /Revenue Category |
| Expenditure/ Event Type | Type of budget cost amount or revenue event | NA | NA | NA | No | Expenditure /Event Type |
| Job ID | Internal identifier of job | NA | NA | NA | No | Job |
| Job Name | Name of job | NA | NA | NA | No | Job |
| Job Group ID | Internal identifier of job group specified for the resource list | NA | NA | NA | No | Job |
| Job Group Name | Name of job group specified for the resource list | NA | NA | NA | No | Job |
| Job Organization ID | Internal identifier of expenditure, non-labor resource or event organization | NA | NA | NA | Organization | Organization |
| Organization Name | Name of expenditure, non-labor resource or event organization | NA | NA | NA | Organization | Organization |
| Organization Type | HRMS type of expenditure, non-labor resource or event organization | NA | NA | NA | Organization | Organization |
| Supplier ID | Internal identifier of supplier | NA | NA | NA | No | Supplier |
| Supplier Name | Supplier name | NA | NA | NA | No | Supplier |
Related Topics
Integrating with Oracle Subledger Accounting, Oracle Projects Fundamentals
Subledger Accounting for Costs
Subledger Accounting for Revenue and Billing
Implementing Budget Integration, Oracle Projects Implementation Guide
Oracle Subledger Accounting Implementation Guide
PA: Project Execution Workflow
Task Execution Workflows are user-defined workflow processes that help project managers automate work related to task management and completion. The Project Execution Workflow coordinates the Task Execution Workflow processes that you create to carry out a task. The filename of this workflow is PAPRJEX.wft.
The Project Execution and Task Execution Workflows collectively provide the following basic features:
-
Separate workflows for individual tasks: Different tasks may require different task execution workflow processes. Project managers can define and associate separate workflows to individual tasks.
-
Automatic task administration: You can define Task Execution Workflows that can automatically carry out various task functions and associate those workflows with specific tasks. For example, you could design a workflow process that automatically creates a purchase order on the task start date.
-
Default workflows for task types: You can associate a Task Execution Workflow with a task type, resulting in the default association of that workflow to tasks of that task type.
-
Flexible lead time for task workflow execution: Project managers can arrange for Task Execution Workflows to begin after task start dates by defining an amount of workflow start lead time. For example, a project manager could arrange for the Task Execution Workflow to begin two days after the start date of the task with which it is associated.
Important: This is a system-defined workflow that cannot be modified.
Implementing the PA: Project Execution Workflow
To use the Project Execution workflow, you must enable Task Execution workflow functionality and progress collection for your workplan structure.
If you enable workplan versioning, the system starts the Project Execution workflow when your workplan is published. The Project Execution workflow process starts the Task Execution workflow processes for your tasks on their scheduled start dates.
If you do not enable workplan versioning, you must manually start the Project Execution workflow by selecting “Start Task Execution Workflow” action on the Update Work Breakdown Structure page.
You can manually start the Project Execution workflow at any time during the project life cycle. The Project Execution workflow stops when the project status is set to Closed.
PA: Project Execution Workflow Processes
The workflow includes the PA: Project Execution process.
PA: Project Execution Process
Oracle Projects enables you to define Task Execution Workflow processes and assign them to specific tasks or task types. Task Execution Workflow processes can automate various task functions. For more information, see: Using Task Execution Workflow Processes, Oracle Project Management User Guide, Oracle Project Management User Guide.
In the diagram shown below, the process activity nodes are numbered for reference in the descriptions that follow. The numbered circles are not part of the process diagram.
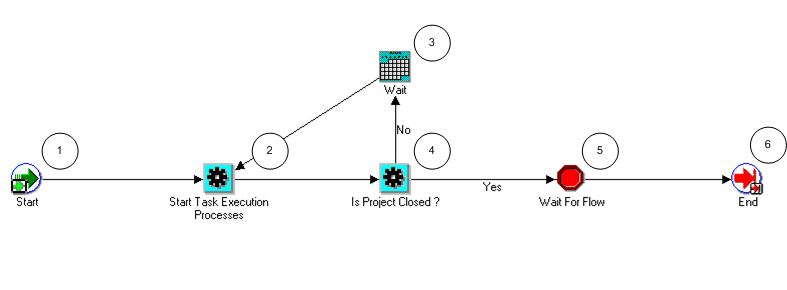
PA: Project Execution Process Activities
The following information describes each activity in the PA: Project Execution process, listed by function name:
Start (Node 1): This is a standard activity that marks the start of the process.
Start Task Execution Processes (Node 2): This process starts the task workflow process.
Wait (Node 3): This activity pauses for one day before continuing.
Is Project Closed? (Node 4): This activity checks to see if the project is closed.
-
If the process is closed, the process branches to Node 5.
-
If the process is not closed, the process branches to Node 3.
Wait For Flow (Node 5): This activity pauses the processes until the Task Execution workflow is complete.
End (Node 6): This activity terminates the process.
Related Topics
Oracle Workflow User’s Guide
Oracle Workflow Administrator’s Guide
Oracle Workflow Developer’s Guide
PA: Performance Notification Workflow
The PA: Performance Notification workflow sends performance notifications to team members and project stakeholders. The notifications can contain information on exceptions, key performance area statuses, issues, and change documents. You can configure the notification format using the Projects Page Layout model. For more information, see Configuring Automated Status Report Notifications, Oracle Projects Implementation Guide.
The PA: Performance Notification workflow is triggered from the PRC: Generate Performance Scores and Notifications concurrent program if the Generate Notification parameter is set to Yes. The filename of this workflow is PAEXNOWF.wft.
PA: Performance Notification Workflow Processes
This workflow includes only the Performance Notification process:
Performance Notification Process
This process sends an FYI notification containing the automatic status report attached to the project or the project template for exception reporting.
In the diagram shown below, the process activity nodes are numbered for reference in the descriptions that follow. The numbered circles are not part of the process diagram.
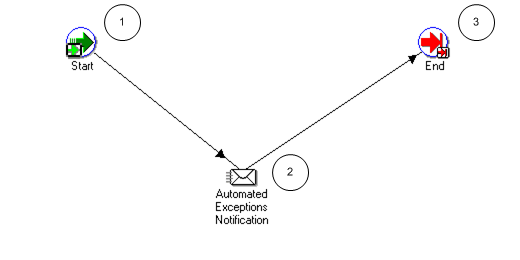
Performance Notification Activities
The following information describes each activity in the Performance Notification process, listed by function name:
Start (Node 1): This is a standard activity that marks the start of the process.
Automated Exceptions Notification (Node 2): This activity sends an FYI notification to team members and non-team members included in the access list for the status report.
End (Node 3): This activity terminates the process.
PA: Status Report Workflow
The PA: Status Report workflow is launched when you submit a status report for approval. This workflow enables you to send reminder notifications based on the status report reminder rules. For more information, see Project Status Report Reminder Rules, Oracle Projects Implementation Guide.
The filename of this workflow is PAWFPPRA.wft.
Implementing the PA: Status Report Workflow
To make this workflow active, you must do the following:
-
Enable this workflow for a status report
-
Set the approval options as required at the project level
You can optionally use the Project Status Report Workflow client extension to further customize the PA Status Report workflow. See: Project Status Report Workflow Extension, Oracle Projects APIs, Client Extensions, and Open Interfaces Reference.
PA: Status Report Workflow Processes
The workflow includes the following processes:
-
PA: Status Report Reminder
-
PA: Status Report Approval
-
Status Report Approval Subprocess
-
PA: Status Report Notification
-
PA: Missing Status Report Notification
PA: Status Report Reminder
This process sends a status report reminder notification to the user.
In the diagram shown below, the process activity nodes are numbered for reference in the descriptions that follow. The numbered circles are not part of the process diagram.

PA: Status Report Reminder Activities
The following information describes each activity in the PA: Status Report Reminder process, listed by function name:
Start (Node 1): This is a standard activity that marks the start of the process.
Notify: report reminder (Node 2): This activity sends a notification to the submitter reminding them to submit or publish the report.
End (Node 3): This activity terminates the process.
PA: Status Report Approval
This process sends a status report submitted notification to the approver. The approver can select one of the following:
-
Approve: The status is changed to Approved, and a notification is sent to the submitter that the status report has been approved. Or
-
Reject: The status is changed to Rejected, and a notification is sent to the submitter that the status report has been rejected.
In the diagram shown below, the process activity nodes are numbered for reference in the descriptions that follow. The numbered circles are not part of the process diagram.
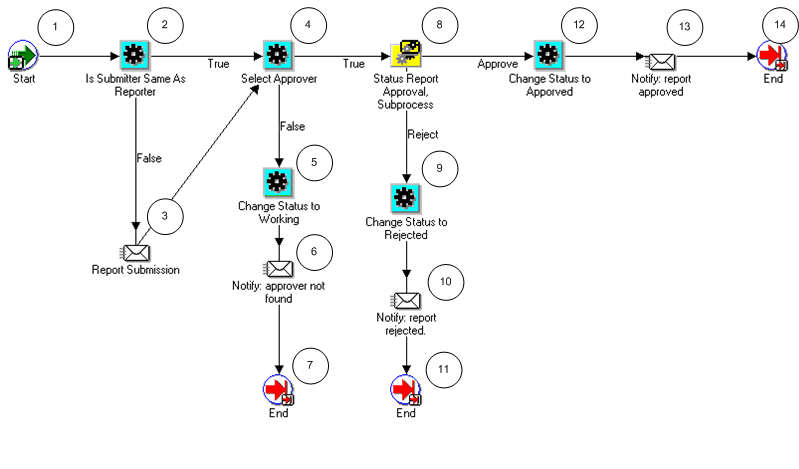
PA: Status Report Approval Activities
The following information describes each activity in the PA: Status Report Approval process, listed by function name:
Start (Node 1): This is a standard activity that marks the start of the process.
Is Submitter Same as Reporter (Node 2): This activity determines if the submitter of the status report approval process is also the approver.
-
If the submitter is the same person as the approver, the process branches to Node 4.
-
If the submitter is not the same person as the approver, the process branches to Node 3.
Report Submission (Node 3): This activity sends an FYI notification to the submitter that the status report has been submitted.
Select Approver (Node 4): This activity calls the Set Report Approver procedure in the Status Report Approval client extension (PA_REPORT_WORKFLOW_CLIENT.SET_REPORT_APPROVER) to determine the approver of the status report. The default approver is the person who is entered as the approver in the status report setup details for the project.
-
If an approver is found, the process branches to Node 8.
-
If no approver is found, the process branches to Node 5.
Change Status to Working (Node 5): This activity changes the status of the status report to Working.
Notify: approver not found (Node 6): This activity sends a notification to the submitter informing them that the status report approver has not been specified.
Status Report Approval subprocess (Node 8): This activity runs the Status Report Approval Subprocess. See: Status Report Approval Subprocess.
-
If the approver approves the status report, the process branches to Node 12.
-
If the approver rejects the status report, the process branches to Node 9.
Change Status to Rejected (Node 9): This activity changes the status of the status report to Rejected.
Notify: report rejected (Node 10): This activity sends a notification to the submitter informing them that the status report has been rejected. The submitter then reworks on it and resubmits it for approval.
Change Status to Approved (Node 12): This activity changes the status of the status report to Approved.
Notify: report approved (Node 13): This activity sends a notification to the submitter informing them that the status report has been approved and can be published.
End (Nodes 7, 11, and 14): This activity terminates the process.
Status Report Approval Subprocess
The Status Report Approval subprocess is called by the default PA Status Report Approval Workflow process. This process sends notifications and reminders to status report approvers.
In the diagram shown below, the process activity nodes are numbered for reference in the descriptions that follow. The numbered circles are not part of the process diagram.
.gif)
Status Report Approval Subprocess Activities
The following information describes each activity in the PA: Status Report Approval subprocess, listed by function name:
Start (Node 1): This is a standard activity that marks the start of the process.
Notify: Report approval required, approve? (Node 2): This activity approval-required notification to the status report approver.
-
If the approver approves the status report, the subprocess branches to Node 7.
-
If the approver rejects the status report, the subprocess branches to Node 8.
-
If the activity times out, the subprocess branches to Node 3. The default time for the activity to time out is two days. You can use Oracle Workflow Builder to change the time out value to suit your business needs.
Notify: Reminder, report approval required (Node 3): This activity sends an approval reminder notification to the status report approver.
-
If the approver approves the status report, the subprocess branches to Node 7.
-
If the approver rejects the status report, the subprocess branches to Node 8.
-
If the activity times out, the subprocess branches to the Loop Counter (Node 4).
Loop Counter (Node 4): This activity counts the number of times the subprocess has branched to this node.
-
If the count has reached the loop limit (a constant that is set in this node), the subprocess branches to Node 8.
-
If the count has not reached the loop limit, the subprocess returns to Node 3.
Forward Post Notification (Node 5): This activity is called when an approval notification is forwarded to an approver who is not the submitter. It checks to see if the approver is a valid user. If the approver is a valid user, the notification is sent to the approver. If not, the request is rejected.
Forward Post Notification 2 (Node 6): This activity is called when an approval notification is forwarded to an approver who is not the submitter. It checks to see if the approver is a valid user. If the approver is a valid user, the notification is sent to the approver. If not, the request is rejected.
End (Approve) (Node 7): This activity terminates the subprocess and returns the result Approved.
End (Reject) (Node 8): This activity terminates the subprocess and returns the result Rejected.
PA: Status Report Notification
This process sends notifications when the status of a status report is changed.
In the diagram shown below, the process activity nodes are numbered for reference in the descriptions that follow. The numbered circles are not part of the process diagram.
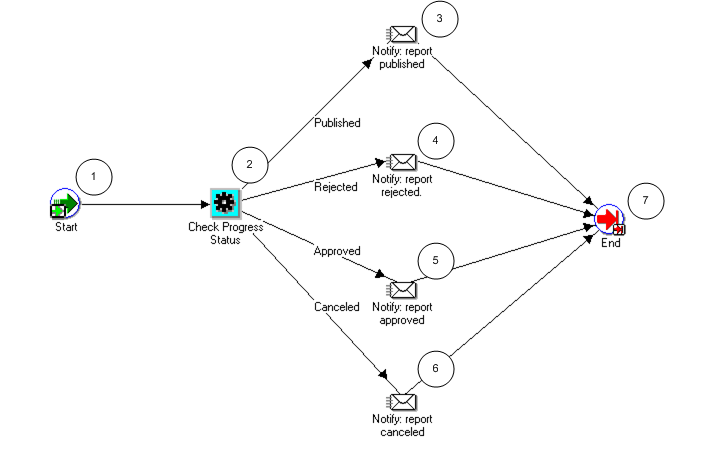
PA: Status Report Notification Activities
The following information describes each activity in the PA: Status Report Notification process, listed by function name:
Start (Node 1): This is a standard activity that marks the start of the process.
Check Progress Status (Node 2): This activity checks the status of the status report.
-
If the new status is Published, the process branches to Node 3.
-
If the new status is Rejected, the process branches to Node 4.
-
If the new status is Approved, the process branches to Node 5.
-
If the new status is Canceled, the process branches to Node 6.
Notify: report published (Node 3): This activity sends a notification to the members of the access list when the status report is published.
Notify: report rejected (Node 4): This activity sends a notification to the members of the access list when the status report is rejected.
Notify: report approved (Node 5): This activity sends a notification to the members of the access list when the status report is approved.
Notify: report canceled (Node 6): This activity sends a notification to the members of the access list when the status report is canceled.
End (Node 7): This activity terminates the process.
PA: Missing Status Report Notification
This workflow sends a notification that a status report has not been submitted for the period.
In the diagram shown below, the process activity nodes are numbered for reference in the descriptions that follow. The numbered circles are not part of the process diagram.

PA: Missing Status Report Notification Activities
The following information describes each activity in the PA: Missing Status Report Notification process, listed by function name:
Start (Node 1): This is a standard activity that marks the start of the process.
Notify: missing report reminder (Node 2): This activity sends a notification informing the recipient that the status report has not been submitted for this period.
End (Node 3): This activity terminates the process.
Related Topics
Overview of Project Status Reporting, Oracle Project Management User Guide, Oracle Project Management User Guide
PA: Task Approval Workflow
When you create a task using the Change Management flow, then you must get the task approved before the change request, that contains the task, can be approved. Whenever you submit a task for approval, this workflow sends an email notification to the approver. Based on the notification, the approver can perform one of these tasks:
-
Mark the task as chargeable.
-
Mark the task as billable.
-
Mark the task as chargeable and billable.
-
Reject the approval request.
In the diagram shown below, the process activity nodes are numbered for reference in the descriptions that follow. The numbered circles are not part of the process diagram.
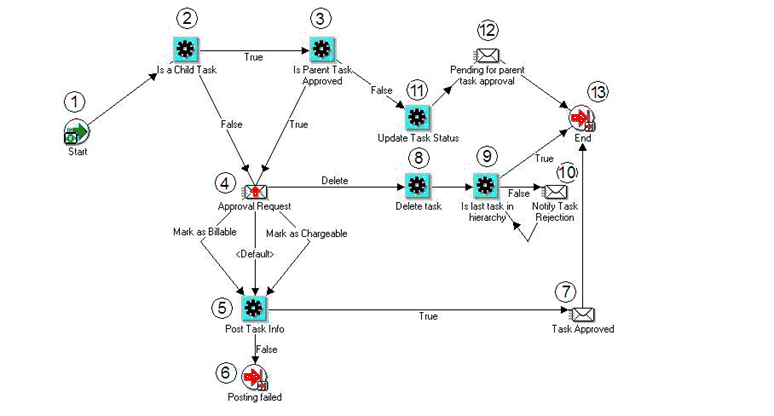
The following information describes each activity in the PA: Task Approval workflow process.
Start (Node 1): This is a standard activity that marks the start of the workflow process.
Is a Child Task (Node 2): This activity determines if the task is a parent task or a child task.
-
If the task is a child task, then process branches to Node 3.
-
If the task does not have child tasks, then process branches to Node 4.
Is Parent Task Approved (Node 3): This activity determines if the task’s parent task is approved.
-
If the parent task is approved, then the process branches to Node 4.
-
If the parent task is not approved, then the process branches to Node 11.
Approval Request (Node 4): This activity sends a notification, to the approver, for approval of the task.
-
If the request is approved, then the process branches to Node 5.
-
The approver can mark the task as Billable.
-
The approver can mark the task as Chargeable.
-
The approver can mark the task as Billable and Chargeable.
-
-
If the request is rejected, then the process branches to Node 8.
Post Task Info (Node 5): This activity posts the task information to the users who requested for approval of the task and process the associated change document.
-
If the posting failed, then the process branches to Node 6.
-
If successfully posted, then the process branches to Node 7.
Posting Failed (Node 6): This activity marks the end of the workflow process.
Task Approval (Node 7): This activity sends a task approver mail to the requestor.
Delete Task (Node 8): If the approval request was rejected in Node 4, then this activity deletes the task and all references it has.
Is last task in hierarchy (Node 9): This activity checks if the task has any more child tasks. If the task has child tasks then the process sends a notification to the approval requestor that the task has been deleted. This process continues till the process does not find any child tasks in the hierarchy.
-
If this task does not have any child tasks, then the process branches to Node 13.
-
If this task has child tasks, then the process branches to Node 10.
Notify Task Rejection (Node 10): This activity sends a notification to the person who has requested for approval of the parent task that the task has been deleted.
Update Task Status (Node 11): If the parent task is not approved in Node 3, then this activity updates the status of the task as Pending.
Pending for Parent Task Approval (Node 12): This activity sends a notification to the person who has requested for approval of the task that the approval of the task is pending approval of its parent task.
End (Node 13): This activity terminates the workflow process.
PA: Workplan Workflow
Whenever the status of a workplan changes, the PA: Workplan Workflow is launched. This workflow sends a notification to the program manager when a workplan for a linked project is published. The filename of this workflow is PAWFPPWP.wft.
Implementing the PA: Workplan Workflow
To make this workflow active, you must enable the approver-required check box and provide an approver.
You can optionally use the Workplan Workflow client extension to further customize the PA Workplan workflow. See: Workplan Workflow Extension, Oracle Projects APIs, Client Extensions, and Open Interfaces Reference.
PA: Workplan Workflow Processes
The Workplan workflow includes the following processes:
-
PA: Workplan Approval
-
PA: Workplan Approval Subprocess
-
PA: Workplan Errors
-
PA: Workplan Notification
PA: Workplan Approval
This is the main workplan approval process. This process manages the approvals of a workplan.
In the diagram shown below, the process activity nodes are numbered for reference in the descriptions that follow. The numbered circles are not part of the process diagram.
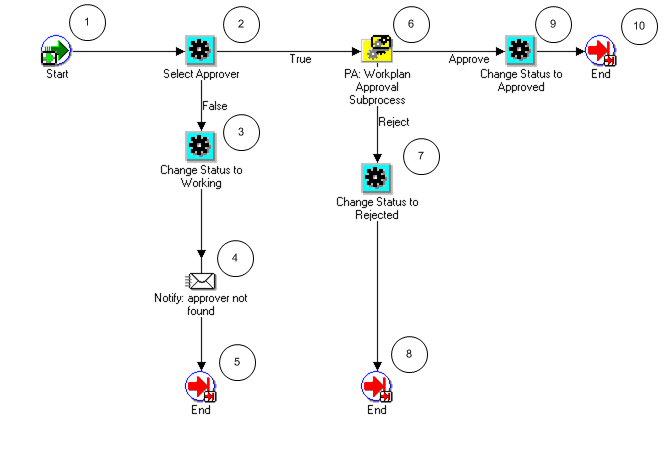
PA: Workplan Approval Activities
The following information describes each activity in the PA: Workplan Approval process, listed by function name:
Start (Node 1): This is a standard activity that marks the start of the process.
Select Approver (Node 2): This activity determines the approver for the workflow process.
-
If an approver is found, the process branches to Node 6.
-
If an approver is not found, the process branches to Node 3.
Change Status to Working (Node 3): If no approver can be determined by the above activity, the status of the workplan is changed back to Working.
Notify: approver not found (Node 4): This activity sends a notification that an approver has not been found for the approval process.
PA: Workplan Approval Subprocess (Node 6): This subprocess manages the approval notifications.
-
If the approver approves the workplan, the process branches to Node 9.
-
If the approver rejects the workplan, the process branches to Node 7.
Change Status to Approved (Node 7): After the approver approves the workplan, this activity changes the workplan status to Approved.
Change Status to Rejected (Node 9): After the approver rejects the workplan, this activity changes the workplan status to Rejected.
End (Nodes 5, 8, and 10): This activity terminates the process.
PA: Workplan Approval Subprocess
This process sends notifications and reminders to workplan approvers.
In the diagram shown below, the process activity nodes are numbered for reference in the descriptions that follow. The numbered circles are not part of the process diagram.
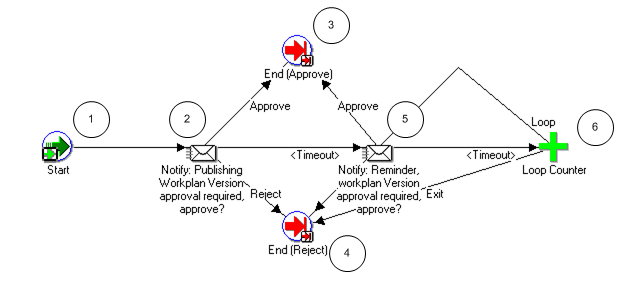
PA: Workplan Approval Subprocess Activities
The following information describes each activity in the PA: Workplan Approval subprocess, listed by function name:
Start (Node 1): This is a standard activity that marks the start of the process.
Notify: Publishing Workplan Version approval required, approve? (Node 2): This activity sends an approval-required notification to the workplan approver.
-
If the approver approves the workplan, the subprocess branches to Node 3.
-
If the approver rejects the workplan, the subprocess branches to Node 4.
-
If the activity times out, the subprocess branches to Node 5. The default time for the activity to time out is two days. You can use Oracle Workflow Builder to change the time out value to suit your business needs.
Notify: Reminder Workplan Version approval required, approve? (Node 5): This activity sends an approval reminder notification to the workplan approver.
-
If the approver approves the workplan, the subprocess branches to Node 3.
-
If the approver rejects the workplan, the subprocess branches to Node 4
-
If the activity times out, the subprocess branches to the Loop Counter (Node 6).
Loop Counter (Node 6): This activity counts the number of times the subprocess has branched to this node.
-
If the count has reached the loop limit (a constant that is set in this node), the subprocess branches to Node 4.
-
If the count has not reached the loop limit, the subprocess returns to Node 5.
End (Approve) (Node 3): This activity terminates the subprocess and returns the result Approved.
End (Reject) (Node 4): This activity terminates the subprocess and returns the result Rejected.
PA: Workplan Errors
If the workplan publishing fails, this process sends a notification to the receiver that the workplan publishing has failed.
In the diagram shown below, the process activity nodes are numbered for reference in the descriptions that follow. The numbered circles are not part of the process diagram.

PA: Workplan Errors Process Activities
The following information describes each activity in the PA: Workplan Errors process, listed by function name:
Start (Node 1): This is a standard activity that marks the start of the process.
Select Error Receiver (Node 2): This activity determines who should receive the error notifications.
Notify: Workplan publish error (Node 3): If workplan publishing fails, this activity sends a notification to the receiver.
End (Node 4): This activity terminates the process.
PA: Workplan Notification
You use this process to notify users of any change in the workplan status.
In the diagram shown below, the process activity nodes are numbered for reference in the descriptions that follow. The numbered circles are not part of the process diagram.
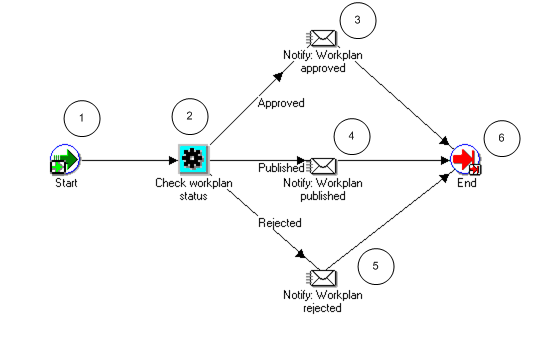
PA: Workplan Notification Activities
The following information describes each activity in the PA: Workplan Notification process, listed by function name:
Start (Node 1): This is a standard activity that marks the start of the process.
Check workplan status (Node 2): This activity checks for the status of the workplan.
-
If the new status is Approved, the process branches to Node 3.
-
If the new status is Published, the process branches to Node 4.
-
If the new status is Rejected, the process branches to Node 5.
Notify: Workplan approved (Node 3): This activity sends a notification that the workplan is approved.
Notify: Workplan published (Node 4): This activity sends a notification that the workplan is published.
Notify: Workplan rejected (Node 5): This activity sends a notification that the workplan is rejected.
End (Node 6): This activity terminates the process.
Related Topics
Workplan and Progress Management, Oracle Project Management User Guide
Oracle Project Portfolio Analysis Workflow
Oracle Project Portfolio Analysis provides a default planning cycle status change workflow process called Project Portfolio Analysis Workflow.
Overview of Oracle Project Portfolio Analysis Workflow
The Project Portfolio Analysis workflow routes actions for a planning cycle to plan participants. Participants who receive notifications include the defined project proposers, portfolio analysts, and portfolio approvers. The filename of this workflow is fpawfpjp.wft.
Project Portfolio Analysis Workflow Processes
This workflow includes the following process:
-
PJP Initiate Planning Cycle Process
-
PJP User Force Collection
-
PJP Close Planning Cycle
-
PJP Main Workflow Process
-
PJP Submit Plan
-
PJP Approve Plan
PJP Initiate Planning Cycle Process
When a user initiates the planning cycle, this process sends a notification to the project owners and updates the current planning cycle status is updated to In Collection.
In the diagram shown below, the process activity nodes are numbered for reference in the descriptions that follow. The numbered circles are not part of the process diagram.
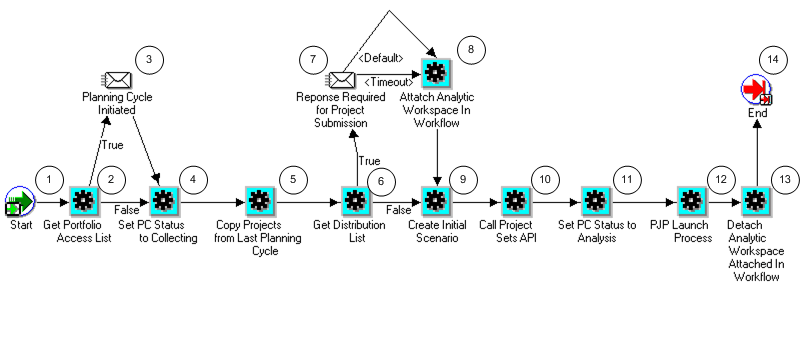
PJP Initiate Planning Cycle Activities
The following information describes each activity in the PJP Initiate Planning Cycle process, listed by function name:
Start (Node 1): This is a standard activity that marks the start of the process.
Get Portfolio Access List (Node 2): This activity obtains the portfolio access list.
-
If the planning cycle has been initiated, the process branches to Node 3.
-
If the planning cycle has not been initiated, the process branches to Node 4.
Planning Cycle Initiated (Node 3): This activity sends notifications that the planning cycle has been initiated.
Set PC Status to Collecting (Node 4): This activity changes the planning cycle status to In Collection.
Copy Projects From Last Planning Cycle (Node 5): This activity makes the projects from the previous planning cycle as eligible candidates for a new planning cycle.
Get Distribution List (Node 6): This activity obtains the list of people who will be asked to submit current or new projects.
-
If a distribution list is found, the process branches to Node 7.
-
If a distribution list is not found, the process branches to Node 9.
Response Required for Project Submission (Node 7): This activity tracks responses from the users who were notified in the above step. After collecting all the responses, workflow proceeds to the next step.
Attach Analytic Workspace in Workflow (Node 8): This activity attaches the multidimensional database engine to the workflow. This is PJP’s analytical engine and also where all the data resides.
Create Initial Scenario (Node 9): This activity creates the planning cycle’s initial scenario. All the projects that need to be analyzed are collected and placed in the initial scenario.
Call Project Sets API (Node 10): This activity updates the planning cycle’s project set with all the projects submitted for Analysis. This is the same set of projects as in the initial scenario.
Set PC Status to Analysis (Node 11): This activity changes the planning cycle status to In Analysis.
PJP Launch Process (Node 12): This activity launches the next workflow process.
Detach Analytic Workspace in Workflow (Node 13): This activity removes the PJP workspace for processing data.
End (Node 14): This activity terminates the process.
PJP User Force Collection Process
This process collects projects into the initial scenario (starts at node 8 in the previous workflow process). The project collection happens when one of the following events occur:
-
All responses from the project managers (whoever were notified) are received
-
Due date specified is reached
-
User triggers a force collection event
If events 1 or 2 occur, the PJP Initiate Planning Cycle process will run to completion, and the PJP User Force Collection process will not be invoked.
If event 3 occurs, then the PJP Initiate Planning Cycle process will stop at node 7 (in the PJP Initiate Planning Cycle process diagram) and the PJP User Force Collection process is launched.
In the diagram shown below, the process activity nodes are numbered for reference in the descriptions that follow. The numbered circles are not part of the process diagram.
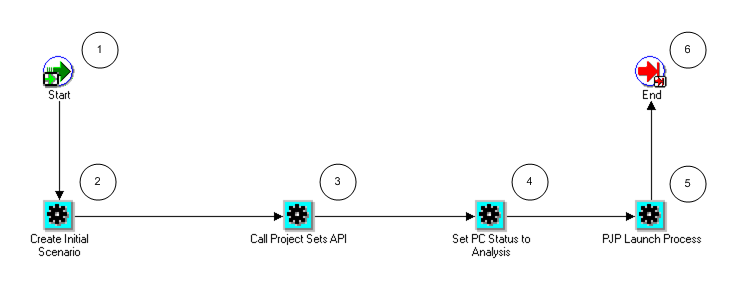
PJP User Force Collection Activities
The following information describes each activity in the PJP User Force Collection process, listed by function name:
Start (Node 1): This is a standard activity that marks the start of the process.
Create Initial Scenario (Node 2): This activity creates the planning cycle’s initial scenario. All the projects that need to be analyzed are collected and placed in the initial scenario.
Call Project Sets API (Node 3): This activity updates the planning cycle’s project set with all the projects submitted for Analysis. This is the same set of projects as in the initial scenario.
Set PC Status to Analysis (Node 4): This activity changes the planning cycle status to In Analysis.
PJP Launch Process (Node 5): This activity launches the PJP process.
End (Node 6): This activity terminates the process.
PJP Close Planning Cycle Process
After the close action is performed, this process updates the current planning cycle status to Closed.
In the diagram shown below, the process activity nodes are numbered for reference in the descriptions that follow. The numbered circles are not part of the process diagram.
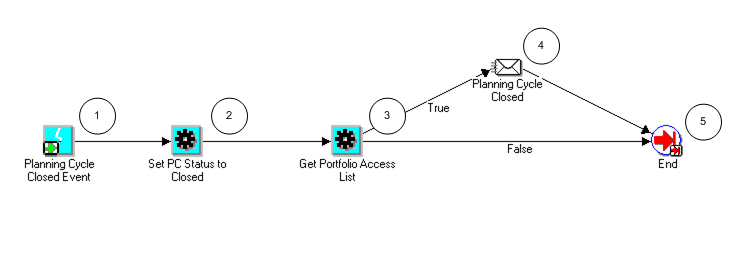
PJP Close Planning Cycle Activities
The following information describes each activity in the PJP Close Planning Cycle process, listed by function name:
Planning Cycle Closed Event (Node 1): This is a standard activity that marks the start of the process.
Set PC Status to Closed (Node 2): This activity changes the planning cycle status to Closed.
Get Portfolio Access List (Node 3): This activity obtains the portfolio access list.
-
If a portfolio access list is found, the process branches to Node 4.
-
If a portfolio access list is not found, the process branches to Node 5.
Planning Cycle Closed (Node 4): This activity sends notifications to portfolio analysts and portfolio approvers informing them that the planning cycle is closed.
End (Node 5): This activity terminates the process.
PJP Main Workflow Process
This is the main workflow process containing PJP Submit Plan nodes and PJP Approve Plan process as nodes.
In the diagram shown below, the process activity nodes are numbered for reference in the descriptions that follow. The numbered circles are not part of the process diagram.
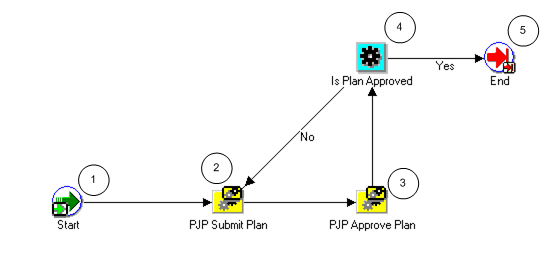
PJP Main Workflow Activities
The following information describes each activity in the PJP Main Workflow process, listed by function name:
Start (Node 1): This is a standard activity that marks the start of the process.
PJP Submit Plan (Node 2): This activity runs the PJP Submit Plan process.
PJP Approve Plan (Node 3): This activity runs the PJP Approve Plan process.
Is Plan Approved (Node 4): This activity determines if the plan is approved.
-
If the plan is approved, the process branches to Node 5.
-
If the plan is not approved, the process returns to Node 2.
End (Node 5): This activity terminates the process.
PJP Submit Plan Process
When the current plan is submitted for approval, the current plan status is updated to Submitted.
In the diagram shown below, the process activity nodes are numbered for reference in the descriptions that follow. The numbered circles are not part of the process diagram.
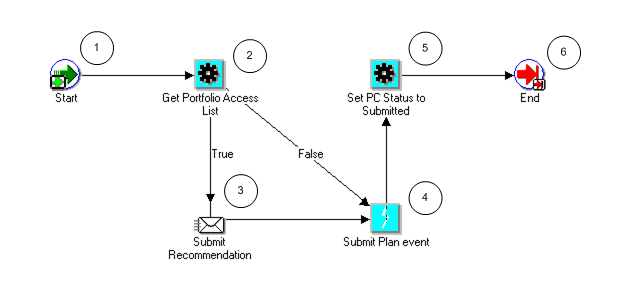
PJP Submit Plan Activities
The following information describes each activity in the PJP Submit Plan process, listed by function name:
Start (Node 1): This is a standard activity that marks the start of the process.
Get Portfolio Access List (Node 2): This activity obtains the portfolio access list.
-
If a portfolio access list is found, the process branches to Node 3.
-
If a portfolio access list is not found, the process branches to Node 4.
Submit Recommendation (Node 3): This activity sends notifications to portfolio analysts and approvers requesting them to submit recommendation.
Submit Plan Event (Node 4): This activity submits the plan event.
Set PC Status to Submitted (Node 5): This activity changes the planning cycle status to Submitted.
End (Node 6): This activity terminates the process.
PJP Approve Plan Process
After the portfolio plan is approved, the funding approval status of projects in Oracle Project Management is updated according the suggested funding approval status set in the approved scenario. After the plan is approved, project proposers receive planning cycle status Approved notifications.
After the portfolio plan is approved, the funding approval status of projects in Oracle Project Management is updated according the suggested funding approval status set in the approved scenario. After the plan is approved, project proposers receive planning cycle status Approved notifications.
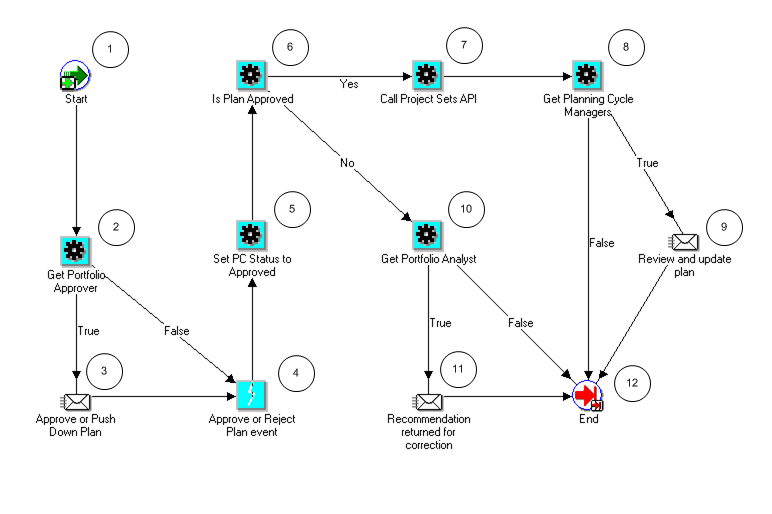
PJP Approve Plan Activities
The following information describes each activity in the PJP Approve Plan process, listed by function name:
Start (Node 1): This is a standard activity that marks the start of the process.
Get Portfolio Approver (Node 2): This activity checks for the portfolio approvers and analysts for the plan.
-
If portfolio approvers or analysts for the plan are found, the process branches to Node 3.
-
If portfolio approvers or analysts for the plan are not found, the process branches to Node 4.
Approve or Push Down Plan (Node 3): This activity sends notifications to approvers requesting them to either approve or reject the plan.
Approve or Reject Plan Event (Node 4): This event either approves or rejects the plan.
Set PC Status to Approved (Node 5): This activity changes the planning cycle status to Approved.
Is Plan Approved (Node 6): This activity determines if the plan is approved.
-
If the plan is approved, the process branches to node 7.
-
If the plan is not approved, the process branches to node 10.
Call Project Sets API (Node 7): This activity updates the planning cycle’s project set with all the projects submitted for Analysis. This is the same set of projects as in the initial scenario.
Get Planning Cycle Managers (Node 8): This activity obtains a list of the planning cycle managers.
-
If planning cycle managers are found, the process branches to node 9.
-
If planning cycle managers are not found, the process branches to node 12.
Review and Update Plan (Node 9): This activity sends notifications to project managers requesting them to review and update the plan.
Get Portfolio Analyst (Node 10): This activity identifies the portfolio analyst.
-
If the portfolio analyst is found, the process branches to node 11.
-
If the portfolio analyst is not found, the process branches to node 12.
Recommendation Returned for Correction (Node 11): This activity sends notifications to the portfolio analyst requesting them to correct and resubmit their recommendation.
End (Node 12): This activity terminates the process.
Oracle Project Resource Management Workflows
Oracle Project Resource Management provides workflows that are used for team templates, advertisements, candidate notifications, single and mass assignments, and HR related updates.
Overview of Oracle Project Resource Management Workflows
Oracle Project Resource Management provides the following workflows:
| Workflow Name | Description |
|---|---|
| PA: Advertisements Workflow | Sends advertisement notifications |
| PA: Apply Team Template Workflow | Applies a team template to a project |
| PA: Candidate Notification Process | Sends notifications of candidate statuses |
| PA: CRM Workaround Workflow | Brings future dated employees and contingent workers into the CRM Foundation application |
| PA: HR Related Updates Workflow | Synchronizes Oracle HRMS data with Oracle Project Resource Management data |
| PA: Mass Assignment Approval Workflow | Routes approvals for mass assignments |
| PA: Mass Assignment Transaction Workflow | Creates assignments when a mass assignment request is submitted |
| PA: Overcommitment Notification Process Workflow | Sends notifications when a resource is overcommitted |
| PA: Project Assignments Workflow | Routes approvals for single assignments |
PA: Advertisements Workflow
The PA: Advertisements workflow sends notifications informing users of either a new requirement or a removed requirement. The filename of this workflow is PARADVWF.wft.
PA: Advertisements Workflow Processes
This workflow includes the following processes:
-
PA: Advertisement Notification Process
-
PA: Remove Advertisement Notification Process
PA: Advertisement Notification Process
This process sends notifications that a requirement is available.
In the diagram shown below, the process activity nodes are numbered for reference in the descriptions that follow. The numbered circles are not part of the process diagram.
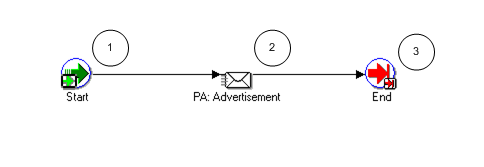
PA: Advertisement Notification Process Activities
The following information describes each activity in the PA: Advertisement Notification process, listed by function name:
Start (Node 1): This is a standard activity that marks the start of the process.
PA: Advertisement (Node 2): This activity sends a notification to all the recipients (as determined by the advertisement rule) informing them about a requirement that is available to be staffed. The message contains the requirement details.
End (Node 3): This activity terminates the process.
PA: Remove Advertisement Notification Process
This process sends notifications that a requirement is no longer available.
In the diagram shown below, the process activity nodes are numbered for reference in the descriptions that follow. The numbered circles are not part of the process diagram.
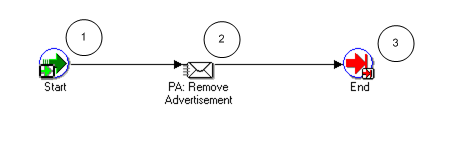
PA: Remove Advertisement Notification Process Activities
The following information describes each activity in the PA: Remove Advertisement Notification process, listed by function name:
Start (Node 1): This is a standard activity that marks the start of the process.
PA: Remove Advertisement (Node 2): This activity sends a notification to all the recipients (as determined by the advertisement rule) informing them that a requirement has been removed.
End (Node 3): This activity terminates the process.
Related Topics
Advertisements and Advertisement Rules, Oracle Project Resource Management User Guide, Oracle Project Resource Management User Guide
PA: Apply Team Template Workflow
The Apply Team Template workflow enables you to copy requirements from one or more team templates to a project. The filename of this workflow is PARAPTEM.wft.
Apply Team Template Workflow Processes
This workflow includes the PA: Apply Team Template process.
PA: Apply Team Template Process
This process sends success or failure notifications upon copying requirements from a team template to a project.
In the diagram shown below, the process activity nodes are numbered for reference in the descriptions that follow. The numbered circles are not part of the process diagram.
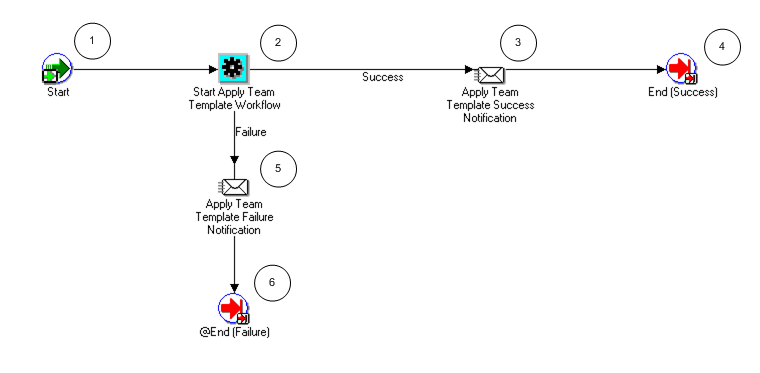
PA: Apply Team Template Process Activities
The following information describes each activity in the PA: Apply Team Template process, listed by function name:
Start (Node 1): This is a standard activity that marks the start of the process.
Start Apply Team Template Workflow (Node 2): This activity copies requirements from the team template to a project.
-
If the application of the team template is successful, the process branches to Node 3.
-
If the application of the team template is not successful, the process branches to Node 5.
Apply Team Template Success Notification (Node 3): This activity sends a success notification to the users informing them that the roles have been copied. The notification provides details of the team template and the project.
End (Success) (Node 4): This activity terminates the process and returns the result Success.
Apply Team Template Failure Notification (Node 5): This activity sends a failure notification to the users informing them that the roles could not be copied. The notification provides details of the team template, project, and errors encountered.
End (Failure) (Node 6): This activity terminates the process and returns the result Failure.
Related Topics
Team Templates, Oracle Projects Implementation Guide
PA: Candidate Notification Process
The PA: Candidate Notification Process enables you to send notifications whenever a candidate status changes. You can send notifications to the resource managers, staffing managers, or setup a role to receive specific notifications.
The filename of this workflow is PARCANDD.wft.
When a candidate is nominated for a requirement, the candidate’s status is specified in the PA: Default Starting Candidate Status profile option. This status sends a notification to the resource, the resource manager, and their staffing manager informing them of the nomination. The person who nominated the candidate does not receive a notification.
Implementing the PA: Candidate Notification Process Workflow
You can use the Candidate Notification Workflow Extension to customize the PA: Candidate Notification process. For details about the extension, see: Oracle Projects APIs, Client Extensions, and Open Interfaces Reference.
PA: Candidate Notification Workflow Processes
This workflow includes the following processes:
-
Candidate Declined Process
-
Candidate FYI Notification Process
-
Candidate Nominated Process
Candidate Declined Process
When a resource is declined as a candidate on a project, the status of the candidate is changed to Declined. This status initiates a notification process.
An active candidate nomination on a requirement is automatically declined if one of the following occurs:
-
A requirement is canceled.
-
The resource is no longer a valid Oracle Projects resource due to reasons such as HR termination, transfer to a non-expenditure project organization, or the resource’s organization is no longer a valid project expenditure organization.
Note: If the PA: HR Related Updates Workflow is enabled, a notification is sent to the resource and the resource manager informing them about the declined candidate nomination.
In the diagram shown below, the process activity nodes are numbered for reference in the descriptions that follow. The numbered circles are not part of the process diagram.
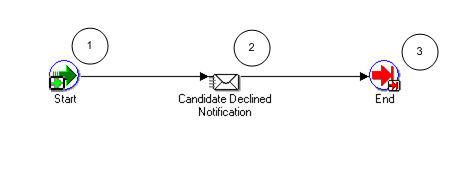
Candidate Declined Process Activities
The following information describes each activity in the Candidate Declined process, listed by function name:
Start (Node 1): This is a standard activity that marks the start of the process.
Candidate Declined Notification (Node 2): This activity sends a notification that a candidate has been declined.
End (Node 3): This activity terminates the process.
Candidate FYI Notification Process
This process sends an FYI notification to the users whenever a candidate status changes.
In the diagram shown below, the process activity nodes are numbered for reference in the descriptions that follow. The numbered circles are not part of the process diagram.
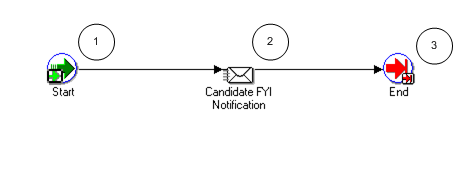
Candidate FYI Notification Process Activities
The following information describes each activity in the Candidate FYI Notification process, listed by function name:
Start (Node 1): This is a standard activity that marks the start of the process.
Candidate FYI Notification (Node 2): This activity sends an FYI notification that a candidate status has changed.
End (Node 3): This activity terminates the process.
Candidate Nominated Process
This process sends notification to the users when a candidate is nominated.
In the diagram shown below, the process activity nodes are numbered for reference in the descriptions that follow. The numbered circles are not part of the process diagram.
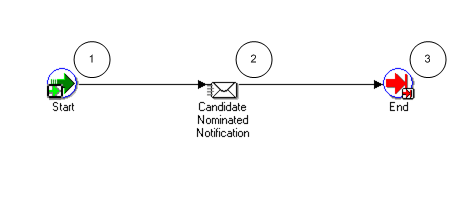
Candidate Nominated Process Activities
The following information describes each activity in the Candidate Nominated process, listed by function name:
Start (Node 1): This is a standard activity that marks the start of the process.
Candidate Nominated Notification (Node 2): This activity sends a notification that a candidate is nominated.
End (Node 3): This activity terminates the process.
Related Topics
Candidate Nomination and Approval, Oracle Project Resource Management User Guide , Oracle Project Resource Management User Guide
PA: CRM Workaround Workflow
The PA: CRM Workaround workflow enables you to assign a calendar in the CRM Foundation application to future dated employees (when their start date becomes current) and to contingent workers. The filename for this workflow is PACRMUPD.wft.
Implementing the PA: CRM Workaround Workflow
You need to define the PASYSADMIN user. The PASYSADMIN user will receive notifications sent by the PA: CRM Workaround workflow process. For information on defining users, see System Administration Setup Tasks, Oracle Applications System Administrator’s Guide – Configuration.
PA: CRM Workaround Workflow Processes
This workflow includes one process: Process to Perform CRM Workaround for Future Dated Resources.
Process to Perform CRM Workaround for Future Dated Resources
This process enables users to bring future dated employees and contingent workers into the CRM Foundation to assign a calendar to each resource.
In the diagram shown below, the process activity nodes are numbered for reference in the descriptions that follow. The numbered circles are not part of the process diagram.
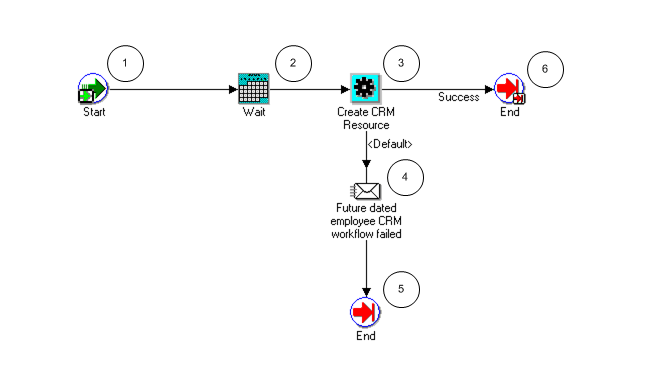
Process to Perform CRM Workaround for Future Dated Resources Activities
The following information describes each activity in the Process to Perform CRM Workaround for Future Dated Resources process, listed by function name:
Start (Node 1): This is a standard activity that marks the start of the process.
Wait (Node 2): This activity waits until the assignment start date for a future dated person before the next activity begins.
Create CRM Resource (Node 3): This activity creates the resource in the CRM tables.
-
If the activity is successful, the process branches to Node 6.
-
If the activity is not successful, the process branches to Node 4.
Future dated employee CRM workflow failed (Node 4): This activity sends a notification to the PASYSADMIN user that the workflow process has completed with an error. The message gives details of the future dated person who has failed to be created as a resource in CRM.
End (Nodes 5 and 6): This activity terminates the process.
Related Topics
Defining People, Oracle Projects Implementation Guide
Integrating with Oracle Human Resources, Oracle Projects Fundamentals, Oracle Projects Fundamentals
PA: HR Related Updates Workflow
Oracle Project Resource Management acquires resource information from the Oracle HRMS people tables. The resource information is obtained by using the PA: HR Related Updates workflow processes or by manually running the PRC: Maintain Project Resources process.
The PA: HR Related Updates workflow enables you to synchronize people data between Oracle HRMS and Oracle Projects to support requirements, assignments, and utilization. The information relates to the following attributes: people, assignments, jobs, and organizations. The workflow ensures that updates made to these attributes in Oracle HRMS are visible in Oracle Projects.
Implementing the PA: HR Related Updates Workflow
You need to define the PASYSADMIN user. The PASYSADMIN user will receive notifications sent by the PA: HR Related Updates workflow processes. For information on defining users, see System Administration Setup Tasks, Oracle Applications System Administrator’s Guide – Configuration.
PA: HR Related Updates Workflow Processes
This workflow includes the following processes:
-
Process to Perform Changes to Persons’ Addresses
-
Process to Perform Assignment Changes
-
Process to Perform Changes to the Job Level
-
Process to Perform Full Name Changes of a Person
-
Process to Perform Job Billability Changes
-
Process to Perform Operating Unit Changes for an Organization
-
Process to Perform Project Organization Changes
-
Process to Perform Project Job Relationship Changes
Process to Perform Changes to Persons’ Addresses
This process synchronizes changes in a person’s address between Oracle HRMS and Oracle Projects.
In the diagram shown below, the process activity nodes are numbered for reference in the descriptions that follow. The numbered circles are not part of the process diagram.
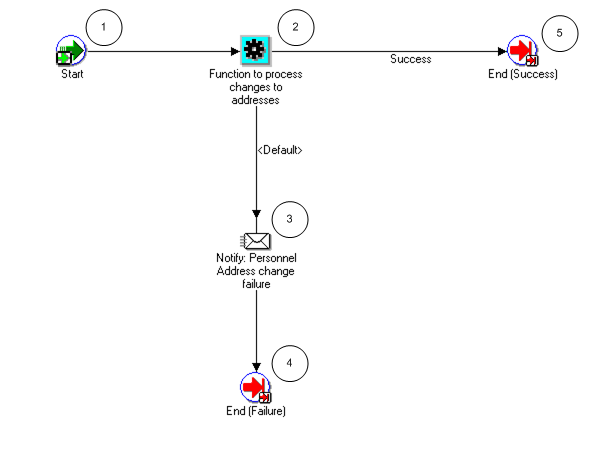
Process to Perform Changes to Persons’ Addresses Activities
The following information describes each activity in the Process to perform changes to persons’ addresses process, listed by function name:
Start (Node 1): This is a standard activity that marks the start of the process.
Function to process changes to addresses (Node 2): This activity updates a person’s address in Oracle Projects with the latest address entered in Oracle HRMS.
-
If the update is successful, the process branches to Node 5.
-
If the update is not successful the process branches to Node 3.
Notify: Personnel Address change failure (Node 3): This activity sends a notification to the PASYSADMIN user that the address update has failed. The notification contains details of the person’s address and the errors encountered.
End (Node 4 and 5): This activity terminates the process.
Process to Perform Assignment Changes
This process synchronizes changes in a person’s assignments between Oracle HRMS and Oracle Projects.
In the diagram shown below, the process activity nodes are numbered for reference in the descriptions that follow. The numbered circles are not part of the process diagram.
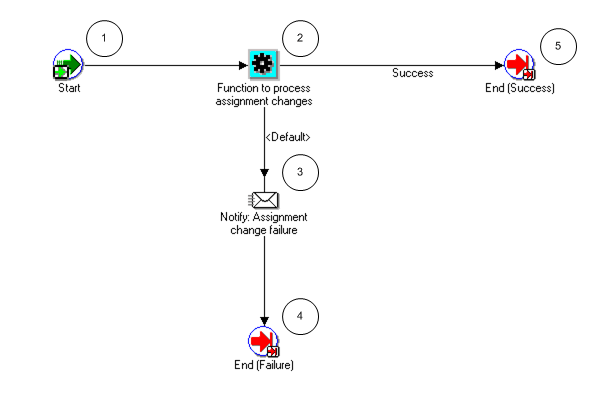
Process to Perform Assignment Changes Activities
The following information describes each activity in the Process to Perform Assignment Changes process, listed by function name:
Start (Node 1): This is a standard activity that marks the start of the process.
Function to process assignment changes (Node 2): This activity updates a person’s assignment in Oracle Projects with the latest assignment specified in Oracle HRMS.
-
If the update is successful, the process branches to Node 5.
-
If the update is not successful the process branches to Node 3.
Notify: Assignment change failure (Node 3): This activity sends a notification to the PASYSADMIN user that the assignment update has failed. The notification contains details of the person whose assignment has failed, the assignment dates, and the errors encountered.
End (Node 4 and 5): This activity terminates the process.
Process to Perform Changes to the Job Level
This process synchronizes changes in job levels between Oracle HRMS and Oracle Projects.
In the diagram shown below, the process activity nodes are numbered for reference in the descriptions that follow. The numbered circles are not part of the process diagram.
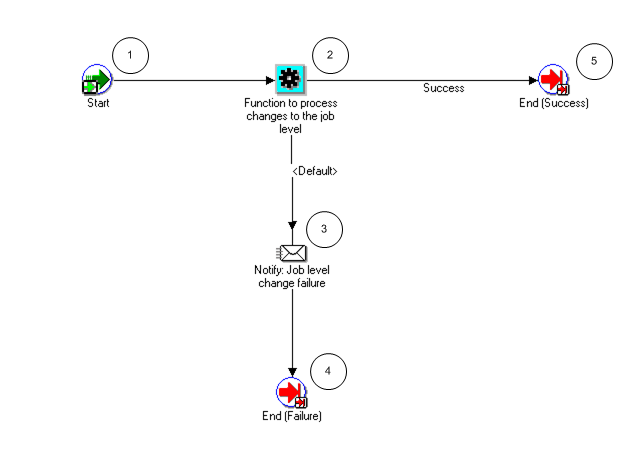
Process to Perform Changes to the Job Level Activities
The following information describes each activity in the Process to Perform Changes to the Job Level process, listed by function name:
Start (Node 1): This is a standard activity that marks the start of the process.
Function to process changes to the job level (Node 2): This activity updates the job levels in Oracle Projects with the latest job levels specified in Oracle HRMS. The jobs of all the persons at this job level are updated.
-
If the update is successful, the process branches to Node 5.
-
If the update is not successful, the process branches to Node 3.
Notify: Job Level change failure (Node 3): This activity sends a notification to the PASYSADMIN user that the job level update has failed. The notification contains job details and the errors encountered.
End (Node 4 and 5): This activity terminates the process.
Process to Perform Full Name Changes of a Person
This process synchronizes changes in a person’s name between Oracle HRMS and Oracle Projects.
In the diagram shown below, the process activity nodes are numbered for reference in the descriptions that follow. The numbered circles are not part of the process diagram.
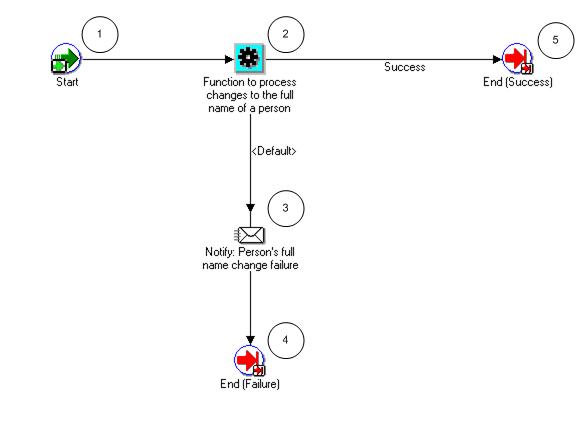
Process to Perform Full Name Changes of a Person Activities
The following information describes each activity in the Process to Perform Full Name Changes of a Person process, listed by function name:
Start (Node 1): This is a standard activity that marks the start of the process.
Function to process changes to the full name of a person (Node 2): This activity updates a person’s full name in Oracle Projects with the person’s latest full name specified in Oracle HRMS.
-
If the update is successful, the process branches to Node 5.
-
If the update is not successful, the process branches to Node 3.
Notify: Person’s full name change failure (Node 3): This activity sends a notification to the PASYSADMIN user that the full name update has failed. The notification contains details of the person and the errors encountered.
End (Node 4 and 5): This activity terminates the process.
Process to Perform Job Billability Changes
This process synchronizes changes in a job’s billable flag between Oracle HRMS and Oracle Projects.
In the diagram shown below, the process activity nodes are numbered for reference in the descriptions that follow. The numbered circles are not part of the process diagram.
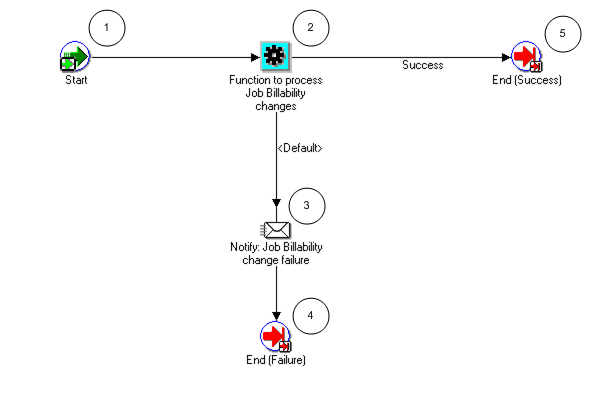
Process to Perform Job Billability Changes Activities
The following information describes each activity in the Process to Perform Job Billability Changes process, listed by function name:
Start (Node 1): This is a standard activity that marks the start of the process.
Function to process Job Billability changes (Node 2): This activity updates the job billable flag (for all the people with the specified job) in Oracle Projects with the latest job data for the billable flag in Oracle HRMS.
-
If the update is successful, the process branches to Node 5.
-
If the update is not successful, the process branches to Node 3.
Notify: Job Billability change failure (Node 3): This activity sends a notification to the PASYSADMIN user that the job billability update has failed. The notification contains the job details and the errors encountered.
End (Node 4 and 5): This activity terminates the process.
Process to Perform Operating Unit Changes for an Organization
This process synchronizes changes in an organization’s default operating unit between Oracle HRMS and Oracle Projects.
In the diagram shown below, the process activity nodes are numbered for reference in the descriptions that follow. The numbered circles are not part of the process diagram.
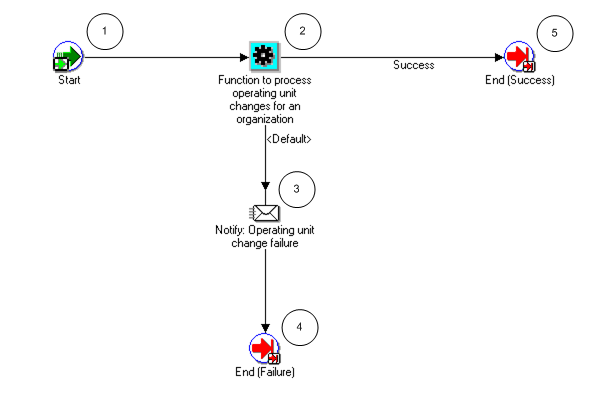
Process to Perform Operating Unit Changes for an Organization Activities
The following information describes each activity in the Process to Perform Operating Unit Changes for an Organization process, listed by function name:
Start (Node 1): This is a standard activity that marks the start of the process.
Function to process operating unit changes for an organization (Node 2): This activity updates the operating unit for the organization in Oracle Projects with the latest organization data specified in Oracle HRMS.
-
If the update is successful, the process branches to Node 5.
-
If the update is not successful, the process branches to Node 3.
Notify: Operating Unit change failure (Node 3): This activity sends a notification to the PASYSADMIN user that the operating unit update has failed. The notification contains details of the organization and the errors encountered.
End (Node 4 and 5): This activity terminates the process.
Process to Perform Project Organization Changes
This process maintains organization data in Oracle Projects when an organization is added or removed from an organization hierarchy used in Oracle HRMS projects.
In the diagram shown below, the process activity nodes are numbered for reference in the descriptions that follow. The numbered circles are not part of the process diagram.
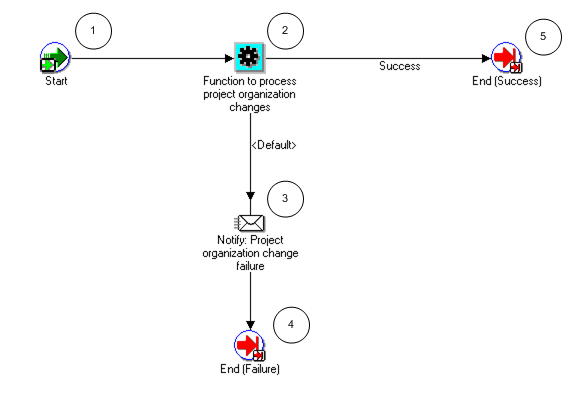
Process to Perform Project Organization Changes Activities
The following information describes each activity in the Process to Perform Project Organization Changes process, listed by function name:
Start (Node 1): This is a standard activity that marks the start of the process.
Function to process project organization changes (Node 2): This activity updates the organization usage and inactive dates for the organization in Oracle Projects.
-
If the update is successful, the process branches to Node 5.
-
If the update is not successful, the process branches to Node 3.
Notify: Project Organization change failure (Node 3): This activity sends a notification to the PASYSADMIN user that the project organization update has failed. The notification also contains organization details and the errors encountered.
End (Node 4 and 5): This activity terminates the process.
Process to Perform Project Job Relationship Changes
This process maintains job levels when job relationships data changes. The job levels are derived from job mappings. For more information, see: Jobs and Job Levels, Oracle Projects Implementation Guide.
In the diagram shown below, the process activity nodes are numbered for reference in the descriptions that follow. The numbered circles are not part of the process diagram.
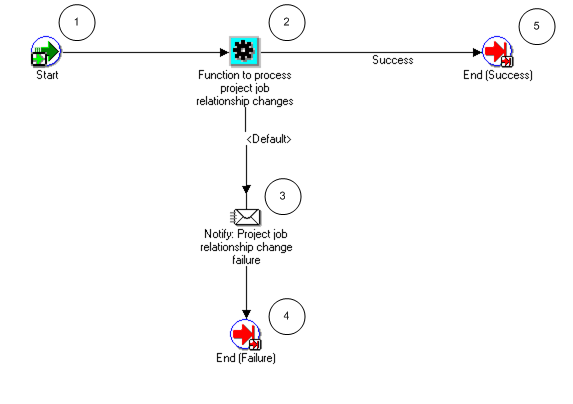
Process to Perform Project Job Relationship Changes Activities
The following information describes each activity in the Process to Perform Project Job Relationship Changes process, listed by function name:
Start (Node 1): This is a standard activity that marks the start of the process.
Function to process project job relationship changes (Node 2): This activity updates the job levels, for all people with that job, with the job level data for the new job mappings.
-
If the update is successful, the process branches to Node 5.
-
If the update is not successful, the process branches to Node 3.
Notify: Project job relationship change failure (Node 3): This activity sends a notification to the PASYSADMIN user that the job relationship update has failed. The notification also contains the from and to job details and the errors encountered.
End (Node 4 and 5): This activity terminates the process.
Related Topics
Maintain Project Resources, Oracle Projects Fundamentals, Oracle Projects Fundamentals
PA: Mass Assignment Approval Workflow
The PA: Mass Assignment Approval workflow enables managers to approve multiple assignments. The workflow sends a success, failure, or overcommitment notification. The filename of this workflow is PARMAAPW.wft.
The default time for the mass assignment approval notification to time out is 14 days. You can use the Oracle Workflow Builder to modify the time out value or the notification message to suit your business needs.
-
The PA: Project Assignments workflow manages approvals for a single assignment, while the PA: Mass Assignment Approval workflow manages approvals for multiple assignments.
-
The transfer price amount is displayed only on PA: Project Assignment Approval notifications, not on PA: Mass Assignment Approval notifications.
PA: Mass Assignment Approval Workflow Processes
This workflow includes the following processes:
-
PA: Mass Transaction Error Process
-
PA: Mass Assignment Approval Resource Notification Process
-
PA: Mass Assignment Approval Submission Notification Process
-
PA: Mass Assignment Approval Submission Submitter Notification Process
-
PA: Mass Assignment Creation Approval Notification Process
-
PA: Mass Assignment Creation Approval Submitter Notification Process
-
PA: Mass Assignment Update Approval Notification Process
-
PA: Mass Assignment Update Approval Submitter Notification Process
-
PA: Mass Process Approval Result Process
PA: Mass Transaction Error Process
This process informs users of errors that have occurred while processing the mass assignment transactions.
In the diagram shown below, the process activity nodes are numbered for reference in the descriptions that follow. The numbered circles are not part of the process diagram.
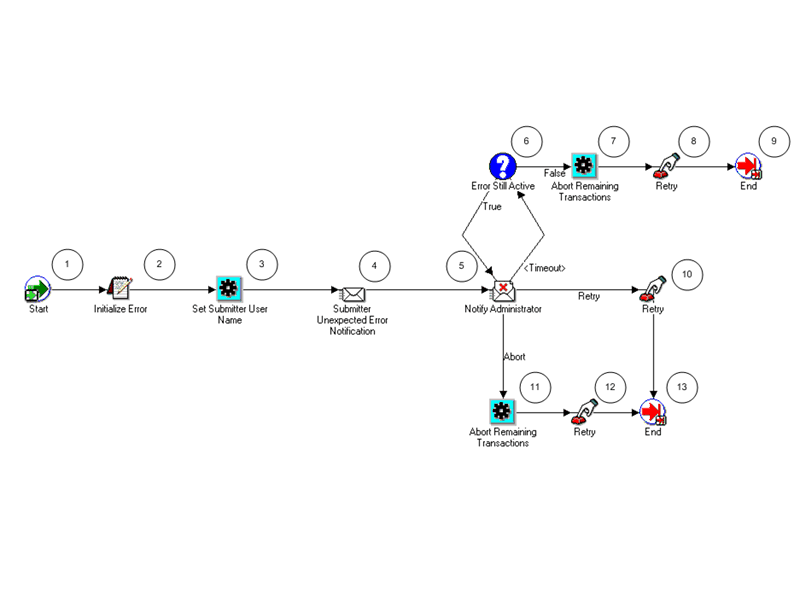
PA: Mass Transaction Error Process Activities
The following information describes each activity in the PA: Mass Transaction Error process, listed by function name:
Start (Node 1): This is a standard activity that marks the start of the process.
Initialize Error (Node 2): This activity initializes the error.
Set Submitter User Name (Node 3): This activity determines the assignment submitter.
Submitter Unexpected Error Notification (Node 4): This activity notifies the submitter of the unexpected error in the approval process.
Notify Administrator (Node 5): This activity notifies administrators about errors in the process. The administrator can perform actions specified in the notification.
-
If the activity times out, the process branches to Node 6. The default time for the activity to time out is two days. You can use Oracle Workflow Builder to change the time out value to suit your business needs.
-
If the administrator selects Retry in the notification, the process branches to Node 10.
-
If the administrator selects Abort in the notification, the process branches to Node 11.
Error Still Active (Node 6): This node determines if the error is still active.
-
If the error is still active, the process returns to Node 5.
-
If the error is not active, the process branches to Node 7.
Abort Remaining Transactions (Nodes 7 and 11): This activity aborts the remaining transactions after the process encounters an error.
Retry (Nodes 8, 10, and 12): After the process encounters an error, this activity resets and reinitiates the process.
End (Nodes 9 and 13): This activity terminates the process.
PA: Mass Assignment Approval Resource Notification Process
This process sends notifications that an assignment has been approved.
In the diagram shown below, the process activity nodes are numbered for reference in the descriptions that follow. The numbered circles are not part of the process diagram.
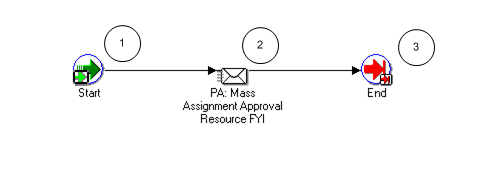
PA: Mass Assignment Approval Resource Notification Process Activities
The following information describes each activity in the PA: Mass Assignment Approval Resource Notification process, listed by function name:
Start (Node 1): This is a standard activity that marks the start of the process.
PA: Mass Assignment Approval Resource FYI (Node 2): This activity sends an FYI notification to the users whenever an assignment is approved or rejected.
End (Node 3): This activity terminates the process.
PA: Mass Assignment Approval Submission Notification Process
This process sends notifications when the assignments have been submitted for approval.
In the diagram shown below, the process activity nodes are numbered for reference in the descriptions that follow. The numbered circles are not part of the process diagram.
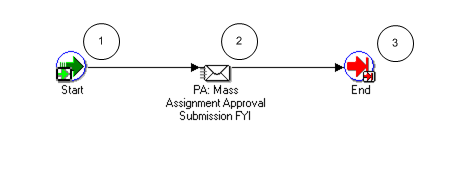
PA: Mass Assignment Approval Submission Notification Process Activities
The following information describes each activity in the PA: Mass Assignment Approval Submission Notification process, listed by function name:
Start (Node 1): This is a standard activity that marks the start of the process.
PA: Mass Assignment Approval Submission FYI (Node 2): This activity sends FYI notifications to the submitter informing them that the assignments have been submitted for approval.
End (Node 3): This activity terminates the process.
PA: Mass Assignment Approval Submission Submitter Notification Process
This process sends notifications to the submitter informing them of the number of rejected assignments and their details.
In the diagram shown below, the process activity nodes are numbered for reference in the descriptions that follow. The numbered circles are not part of the process diagram.
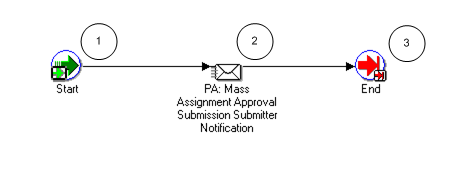
PA: Mass Assignment Approval Submission Submitter Notification Process Activities
The following information describes each activity in the PA: Mass Assignment Approval Submission Submitter Notification process, listed by function name:
Start (Node 1): This is a standard activity that marks the start of the process.
PA: Mass Assignment Approval Submission Submitter Notification (Node 2): This activity sends a notification to the submitter with details of the rejected assignments.
End (Node 3): This activity terminates the process.
PA: Mass Assignment Creation Approval Notification Process
This process sends notifications informing users of the total number of approved and rejected assignments and their details.
In the diagram shown below, the process activity nodes are numbered for reference in the descriptions that follow. The numbered circles are not part of the process diagram.
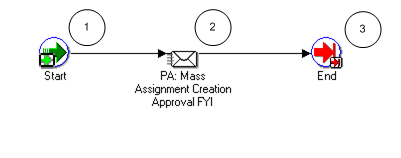
PA: Mass Assignment Creation Approval Notification Process Activities
The following information describes each activity in the PA: Mass Assignment Creation Approval Notification process, listed by function name:
Start (Node 1): This is a standard activity that marks the start of the process.
PA: Mass Assignment Creation Approval FYI (Node 2): This activity sends an FYI notification to the users informing them of the assignments that have been approved or rejected.
End (Node 3): This activity terminates the process.
PA: Mass Assignment Creation Approval Submitter Notification Process
This process sends a notification informing the submitter of the number of approved and rejected assignments during the mass assignment creation flow.
In the diagram shown below, the process activity nodes are numbered for reference in the descriptions that follow. The numbered circles are not part of the process diagram.
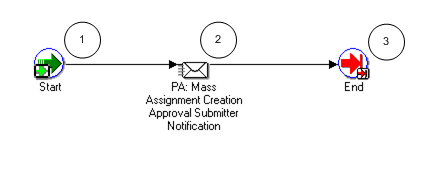
PA: Mass Assignment Creation Approval Submitter Notification Process Activities
The following information describes each activity in the PA: Mass Assignment Creation Approval Submitter Notification process, listed by function name:
Start (Node 1): This is a standard activity that marks the start of the process.
PA: Mass Assignment Creation Approval Submitter Notification (Node 2): This activity sends a notification to the submitter of the created mass assignments that have been approved or rejected.
End (Node 3): This activity terminates the process.
PA: Mass Assignment Update Approval Notification Process
This process sends notifications when updates to assignments are ready for approval.
In the diagram shown below, the process activity nodes are numbered for reference in the descriptions that follow. The numbered circles are not part of the process diagram.

PA: Mass Assignment Update Approval Notification Process Activities
The following information describes each activity in the PA: Mass Assignment Update Approval Notification process, listed by function name:
Start (Node 1): This is a standard activity that marks the start of the process.
PA: Mass Assignment Update Approval FYI (Node 2): This activity sends an FYI notification to the users informing them of the updated assignments that have been approved and rejected.
End (Node 3): This activity terminates the process.
PA: Mass Assignment Update Approval Submitter Notification Process
This process sends notifications when updates made to assignments have been approved or rejected.
In the diagram shown below, the process activity nodes are numbered for reference in the descriptions that follow. The numbered circles are not part of the process diagram.
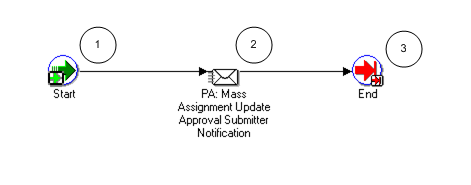
PA: Mass Assignment Update Approval Submitter Notification Process Activities
The following information describes each activity in the PA: Mass Assignment Update Approval Submitter Notification process, listed by function name:
Start (Node 1): This is a standard activity that marks the start of the process.
PA: Mass Assignment Update Approval Submitter Notification (Node 2): This activity sends a notification to the submitter informing them of the updated assignments that have been approved or rejected.
End (Node 3): This activity terminates the process.
PA: Mass Process Approval Result Process
This process executes the assignment approval flow.
In the diagram shown below, the process activity nodes are numbered for reference in the descriptions that follow. The numbered circles are not part of the process diagram.
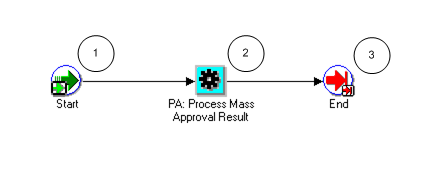
PA: Mass Process Approval Result Process Activities
The following information describes each activity in the PA: Mass Process Approval Result process, listed by function name:
Start (Node 1): This is a standard activity that marks the start of the process.
PA: Process Mass Approval Result (Node 2): This process executes the assignment approval flow.
End (Node 3): This activity terminates the process.
Related Topics
PA: Project Assignments Workflow, Oracle Projects Implementation Guide
PA: Mass Assignment Transaction Workflow
The PA: Mass Assignment Transaction workflow creates and updates multiple assignments. It also sends success, failure, and resource overcommitment notifications. The filename of this workflow is PARMATRX.wft.
PA: Mass Assignment Transaction Workflow Processes
This workflow includes the following processes:
-
PA Mass Asgmt Transaction Workflow Process
PA Mass Asgmt Transaction Workflow Process
The process creates and updates multiple assignments.
In the diagram shown below, the process activity nodes are numbered for reference in the descriptions that follow. The numbered circles are not part of the process diagram.
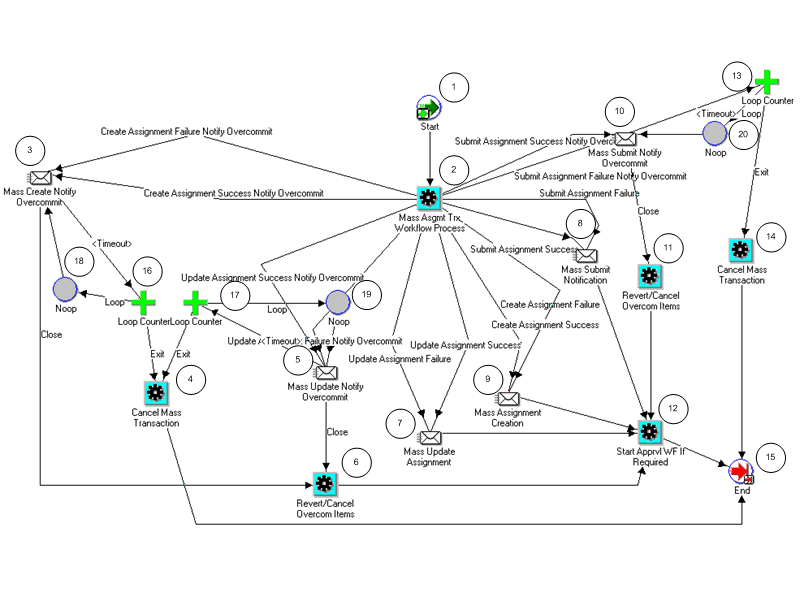
PA Mass Asgmt Transaction Workflow Process Activities
The following information describes each activity in the PA Mass Asgmt Transaction Workflow process, listed by function name:
Start (Node 1): This is a standard activity that marks the start of the process.
Mass Assignment Transaction Workflow Process (Node 2): This activity initiates the mass assignment transaction workflow process.
-
If the mass assignments creation succeeds and there are overcommitments, the process branches to Node 3.
-
If the mass assignments creation fails and there are overcommitments, the process branches to Node 3.
-
If the mass assignments update succeeds and there are overcommitments, the process branches to Node 5.
-
If the mass assignments update fails and there are overcommitments, the process branches to Node 5.
-
If the mass assignments update succeeds and there are no overcommitments, the process branches to Node 7.
-
If the mass assignments update fails and there are no overcommitments, the process branches to Node 7.
-
If the mass assignments creation succeeds and there are no overcommitments, the process branches to Node 9.
-
If the mass assignments creation fails and there are no overcommitments, the process branches to Node 9.
-
If the mass assignments submission succeeds and there are overcommitments, the process branches to Node 10.
-
If the mass assignments submission fails and there are overcommitments, the process branches to Node 10.
-
If the mass assignments submission succeeds and there are no overcommitments, the process branches to Node 8.
-
If the mass assignments submission fails and there are no overcommitments, the process branches to Node 8.
Mass Create Notify Overcommit (Node 3): This activity sends notifications that the mass assignments have been created. The notifications contain details of the number of successful resource assignments, number of assignments resulting in resource overcommitments, and project information.
-
If the notifications are sent successfully, the process branches to Node 6.
-
If the activity times out, the process branches to the Loop Counter (Node 16).
Loop Counter (Node 16): This activity counts the number of times the process has branched to this node.
-
If the count has reached the loop limit (a constant that is set in this node), the subprocess branches to Node 4.
-
If the count has not reached the loop limit, the subprocess returns to the sending node (Node 3).
Cancel Mass Transaction (Nodes 4 and 14): This activity cancels the mass transactions.
Mass Update Notify Overcommit (Node 5): This activity sends notifications that mass assignments have been updated. The notification contains details of the number of successful or failed roles for assignments, number of assignments resulting in resource overcommitments, and project information.
-
If the notifications are sent successfully, the process branches to Node 6.
-
If the activity times out, the process branches to the Loop Counter (Node 17).
Loop Counter (Node 17): This activity counts the number of times the process has branched to this node.
-
If the count has reached the loop limit (a constant that is set in this node), the subprocess branches to Node 4.
-
If the count has not reached the loop limit, the subprocess returns to the sending node (Node 5).
Revert/Cancel Overcom Items (Node 6 and 11): This activity either cancels or reverts an assignment to it’s previously approved state, depending on what the submitter chooses to do (from the View Conflicts page) for an assignment that is overcommitted.
Mass Update Assignment (Node 7): This activity sends notifications that the assignments have been updated.
Mass Submit Notification (Node 8): This activity sends notifications that the mass assignments have been submitted. The notifications contain details of assignments that could not be submitted for approval and assignments resulting in resource overcommitments.
Mass Assignment Creation (Node 9): This activity sends notifications about the mass assignment creation. The notifications contain details of successful resource assignments, unassigned resources, and assignments resulting in resource overcommitments.
Mass Submit Notify Overcommit (Node 10): This activity sends notifications that the mass assignment has been submitted. The notifications contain the number of successful or failed roles for assignments, number of assignments resulting in resource overcommitments, and project information.
The message contains a link to the assignments in conflict, and if the submitter had chosen to be notified of conflicting assignments, then the user has to take an action on the View Conflicts page, before the notification can be closed – this activity ensures that an action is taken or else returns an error.
-
If the notifications are sent successfully, the process branches to Node 6.
-
If the activity times out, the process branches to the Loop Counter (Node 13).
Start Apprvl WF If Required (Node 12): This activity initiates the appropriate PA: Mass Assignment Approval workflow process.
Loop Counter (Node 13): This activity counts the number of times the process has branched to this node.
-
If the count has reached the loop limit (a constant that is set in this node), the subprocess branches to Node 14.
-
If the count has not reached the loop limit, the subprocess returns to the sending node (Node 10).
End (Node 15): This activity terminates the process.
Noop (Nodes 18, 19, and 20): This activity acts as a placeholder that performs no action. You can use this activity anywhere you want to place a node without performing an action. You can change the display name of this activity when you include it in a process.
PA: Overcommitment Notification Process Workflow
The PA: Overcommitment Notification Process workflow notifies project managers and staffing owners of project requirement conflicts and resource capacity overcommitments. The filename of this workflow is PAROVCNT.wft.
PA: Overcommitment Notification Processes
This workflow includes the following processes:
-
Project Manager Missing Process
-
Project Manager Warning Process
-
Self Overcommitment Warning Process
Project Manager Missing Process
This process sends notifications on projects that have conflicting assignments and that have not been assigned a project manager.
In the diagram shown below, the process activity nodes are numbered for reference in the descriptions that follow. The numbered circles are not part of the process diagram.
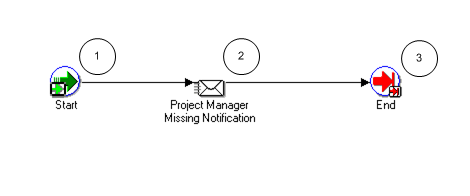
Project Manager Missing Process Activities
The following information describes each activity in the Project Manager Missing process, listed by function name:
Start (Node 1): This is a standard activity that marks the start of the process.
Project Manager Missing Notification (Node 2): This activity sends a notification to the project managers and the staffing owners that a project manager has not been assigned for a specific project, which has conflicting assignments.
End (Node 3): This activity terminates the process.
Project Manager Warning Process
This process sends warnings about projects that have conflicting assignments.
In the diagram shown below, the process activity nodes are numbered for reference in the descriptions that follow. The numbered circles are not part of the process diagram.
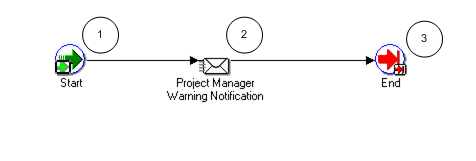
Project Manager Warning Process Activities
The following information describes each activity in the Project Manager Warning process, listed by function name:
Start (Node 1): This is a standard activity that marks the start of the process.
Project Manager Warning Notification (Node 2): This activity notifies the project managers and staffing owners that there are conflicting assignments in certain projects. The notification contains a URL to view the conflicting assignments.
End (Node 3): This activity terminates the process.
Self Overcommitment Warning Process
This process sends notifications when resource capacities are overcommitted.
In the diagram shown below, the process activity nodes are numbered for reference in the descriptions that follow. The numbered circles are not part of the process diagram.

Self Overcommitment Warning Process Activities
The following information describes each activity in the Self Overcommitment Warning process, listed by function name:
Start (Node 1): This is a standard activity that marks the start of the process.
Self Overcommitment Warning Notification (Node 2): This activity notifies the project managers and staffing managers about resources whose working capacities are overcommitted. The notification contains details about the project that has the resource overcommitment.
End (Node 3): This activity terminates the process.
Related Topics
Overcommitments, Oracle Project Resource Management User Guide, Oracle Project Resource Management User Guide
Staffing Project Requirements, Oracle Project Resource Management User Guide, Oracle Project Resource Management User Guide
PA: Project Assignments Workflow
The PA: Project Assignments workflow begins when a resource assignment is created and is submitted for approval. The approvers for this process include the staffing manager and the resource manager. When the assignment is approved or rejected, FYI notifications are sent to the resource, the resource manager, the staffing manager, and the project manager.
Actions invoke changes in the assignment approval status. The following table describes how the default assignment approval workflow changes the status based on actions:
| Action | Status Change: |
|---|---|
| Assignment is created | Working |
| Assignment is submitted for approval | Submitted |
| Assignment is approved | Approved |
| Assignment is canceled | Canceled |
| Assignment is rejected | Rejected |
| Assignment is changed | Working |
| Assignment is resubmitted, and the changes do not require approval | Approved |
| Assignment is resubmitted, and the changes require approval | Submitted |
| Rejected assignment is changed | Requires Resubmission |
The following table describes the assignment changes that require an approval:
| Assignment Changes | Requires Approval because |
|---|---|
| Change in duration | This change affects the resource schedule and resource availability. |
| Change in work type | This change affects billability or utilization percentage. |
| Change in transfer price rate override values | This change affects the following transfer price attributes: rate override, currency override, basis override, and applied percent override. |
The filename of this workflow is PARASGMT.wft.
Implementing the PA: Project Assignments Workflow
You can use the Assignment Approval Changes Extension and the Assignment Approval Notification Extension to customize the PA: Project Assignments workflow. For details about the client extensions, see: Oracle Projects APIs, Client Extensions, and Open Interfaces Reference.
PA: Project Assignments Workflow Processes
This workflow includes the following processes:
-
PA: Project Assignment Approval
-
PA Assignment Approval Notification
-
PA Assignment Approval Subprocess
-
PA Assignment Cancellation Notification
-
PA Assignment Rejection Notification
-
PA: Mass Assignment Approval Required Process
PA: Project Assignment Approval
This process starts the approval process for an assignment and sends notifications for errors encountered.
In the diagram shown below, the process activity nodes are numbered for reference in the descriptions that follow. The numbered circles are not part of the process diagram.
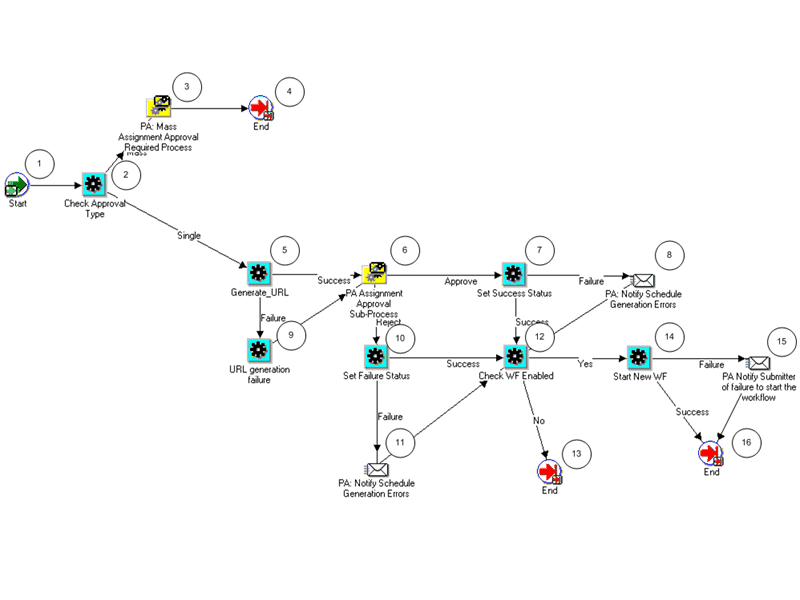
PA: Project Assignment Approval Activities
The following information describes each activity in the PA: Project Assignment Approval process, listed by function name:
Start (Node 1): This is a standard activity that marks the start of the process.
Check Approval Type (Node 2): This activity checks if the approval process is for a single assignment or a mass assignment.
-
If it is a mass assignment approval, the process branches to Node 3.
-
If it is a single assignment approval, the process branches to Node 5.
PA: Mass Assignment Approval Required Process (Node 3): This activity runs the PA: Mass Assignment Approval Required Process.
Generate URL (Node 5): This activity creates links for pages, which enable the user to view details of the submitted assignments, details of resources, and details of any assignments in conflict.
-
If there are no errors, the process branches to Node 6.
-
If there are errors, the process branches to Node 9.
PA: Assignment Approval Subprocess (Node 6): This activity runs the PA: Assignment Approval Subprocess.
-
If the assignment is approved, the process branches to Node 7.
-
If the assignment is not approved, the process branches to Node 10.
Set Success Status (Node 7): This activity updates the assignment’s approval status to Approved.
-
If the assignment update succeeds, the process branches to Node 12.
-
If the assignment update does not succeed, the process branches to Node 8.
PA: Notify Schedule Generation Errors (Nodes 8 and 11): This activity sends a notification that an error has occurred while updating resource schedules during the assignment approval process.
URL Generation Failure (Node 9): This activity sets the error message indicating that links could not be generated.
Set Failure Status (Node 10): This activity updates the assignment’s approval status to Rejected.
-
If the assignment update succeeds, the process branches to Node 11.
-
If the assignment update does not succeed, the process branches to Node 12.
Check WF Enabled (Node 12): This activity checks if the workflow is enabled for a given assignment approval status.
-
If the workflow is enabled, the process branches to Node 14.
-
If the workflow is enabled, the process branches to Node 13.
Start New WF (Node 14): This activity launches a new workflow process.
-
If the workflow launch succeeds, the process branches to Node 16.
-
If the workflow launch does not succeed, the process branches to Node 15.
PA: Notify Submitter of failure to start the workflow (Node 15): This activity sends a notification to the project manager that the system was unable to complete the assignment approval request.
End (Nodes 4, 13 and 16): This activity terminates the process.
PA Assignment Approval Notification
This process sends notifications that the assignment has been approved.
In the diagram shown below, the process activity nodes are numbered for reference in the descriptions that follow. The numbered circles are not part of the process diagram.
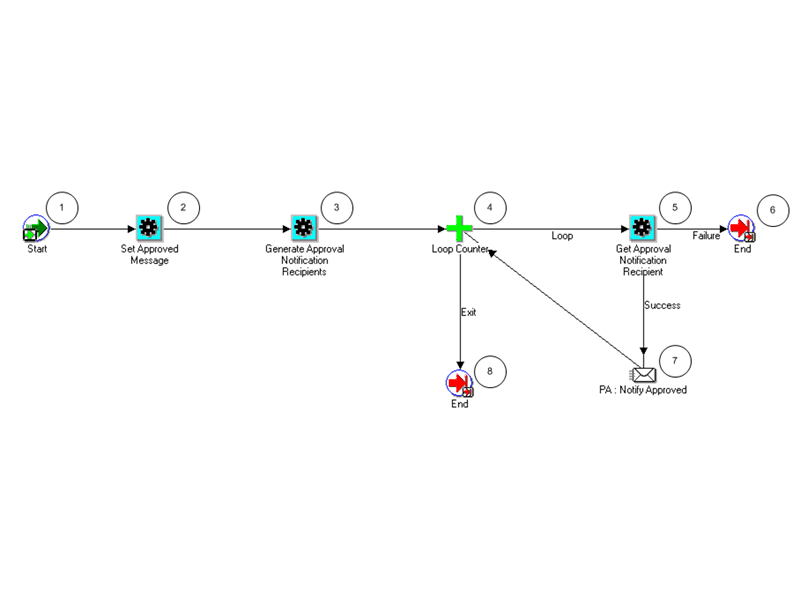
PA: Assignment Approval Notification Activities
The following information describes each activity in the PA: Assignment Approval Notification process, listed by function name:
Start (Node 1): This is a standard activity that marks the start of the process.
Set Approved Message (Node 2): This activity sets subject, description, and attributes for the notification.
Generate Approval Notification Recipients (Node 3): This activity creates a list of recipients that will receive the approval notifications.
Loop Counter (Node 4): This activity loops through the list of recipients and sends a notification to each one.
-
If the count has reached the loop limit (a constant that is set in this node), the process branches to Node 8.
-
If the count has not reached the loop limit, the process branches to Node 5.
Get Approval Notification Recipient (Node 5): This activity obtains the next recipient for sending the approval notifications.
-
If a next recipient is found, the process branches to Node 7.
-
If a next recipient is not found, the process branches to Node 6.
PA: Notify Approved (Node 7): This activity sends a notification to the recipient with the assignment details.
End (Nodes 6 and 8): This activity terminates the process.
PA Assignment Approval Subprocess
This process is used to process the assignment approval.
In the diagram shown below, the process activity nodes are numbered for reference in the descriptions that follow. The numbered circles are not part of the process diagram.
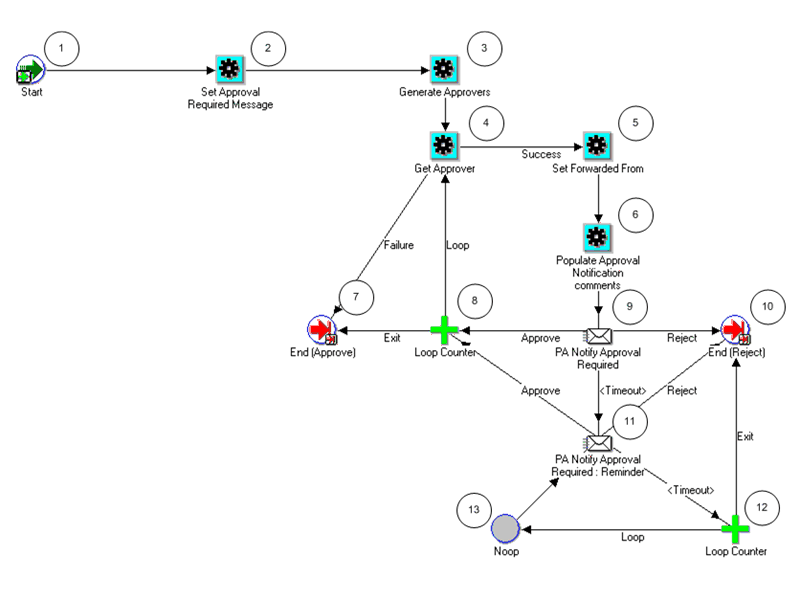
PA: Assignment Approval Subprocess Activities
The following information describes each activity in the PA: Assignment Approval Subprocess, listed by function name:
Start (Node 1): This is a standard activity that marks the start of the process.
Set Approval Required Message (Node 2): This activity sets subject and description for the notification.
Generate Approvers (Node 3): This activity creates a list of approvers that will receive the approval notifications.
Get Approver (Node 4): This activity gets the next approver from the list of approvers.
-
If there are no more approvers, the process branches to Node 7.
-
If there is another approver, the process branches to Node 5.
Set Forwarded Form (Node 5): This activity determines from whom the notification has been forwarded.
Populate Approval Notification comments (Node 6): This activity sets the approval notification comments.
End (Approve) (Node 7): This activity terminates the subprocess and returns the result Approved.
Loop Counter (Node 8): This activity is used to loop through the list of approvers and send an approval notification to each one.
-
If the count has reached the loop limit (a constant that is set in this node), the process branches to Node 7.
-
If the count has not reached the loop limit, the process returns to Node 4.
PA: Notify Approval Required (Node 9): This activity sends notification to the current approver that a response is required. This notifies the recipient to approve the approval request, with links to the assignment details and resource schedule. It also handles the case where the approver has reassigned the notification.
-
If the notification is not acted upon in a certain timeframe, the process branches to Node 11.
-
If the notification is approved, the process branches to Node 8 for the next approver.
-
If the notification is rejected, the process branches to Node 10.
End (Reject) (Node 10): This activity terminates the subprocess and returns the result Rejected.
PA: Notify Approval Required: Reminder (Node 11): This activity sends approval-required reminder notifications.
-
If the request is approved, the subprocess branches to Node 8.
-
If the request is rejected, the subprocess branches to Node 10.
-
If the request times out, the subprocess branches to Node 12.
Loop Counter (Node 12): This activity is used to send multiple approval-required reminder notifications to an approver.
-
If the count has reached the loop limit (a constant that is set in this node), the process branches to Node 10.
-
If the count has not reached the loop limit, the process returns to Node 13.
Noop (Node 13): This activity acts as a placeholder that performs no action. You can use this activity anywhere you want to place a node without performing an action. You can change the display name of this activity when you include it in a process.
PA Assignment Cancellation Notification
This process sends notifications that the assignment has been canceled.
In the diagram shown below, the process activity nodes are numbered for reference in the descriptions that follow. The numbered circles are not part of the process diagram.
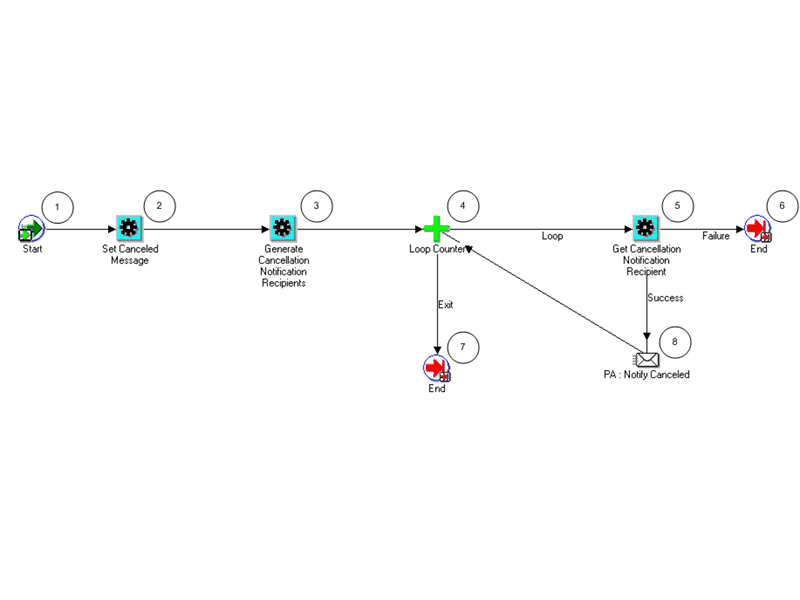
PA: Assignment Cancellation Notification Activities
The following information describes each activity in the PA: Assignment Cancellation Notification process, listed by function name:
Start (Node 1): This is a standard activity that marks the start of the process.
Set Canceled Message (Node 2): This activity sets subject and description for the notifications.
Generate Cancellation Notification Recipients (Node 3): This activity creates a recipients list that will receive the cancellation notifications.
Loop Counter (Node 4): This activity is used to loop through the list of recipients and send a notification to each one.
-
If the count has reached the loop limit (a constant that is set in this node), the process branches to Node 7.
-
If the count has not reached the loop limit, the process branches to Node 5.
Get Cancellation Notification Recipient (Node 5): This activity obtains the next recipient for sending the cancellation notifications.
-
If a recipient is found, the process branches to Node 8.
-
If a recipient is not found, the process returns to Node 6.
PA: Notify Canceled (Node 8): This activity sends a notification to the recipient that the assignment is canceled.
End (Nodes 5 and 7): This activity terminates the process.
PA Assignment Rejection Notification
This process sends notifications that the assignment has been rejected.
In the diagram shown below, the process activity nodes are numbered for reference in the descriptions that follow. The numbered circles are not part of the process diagram.
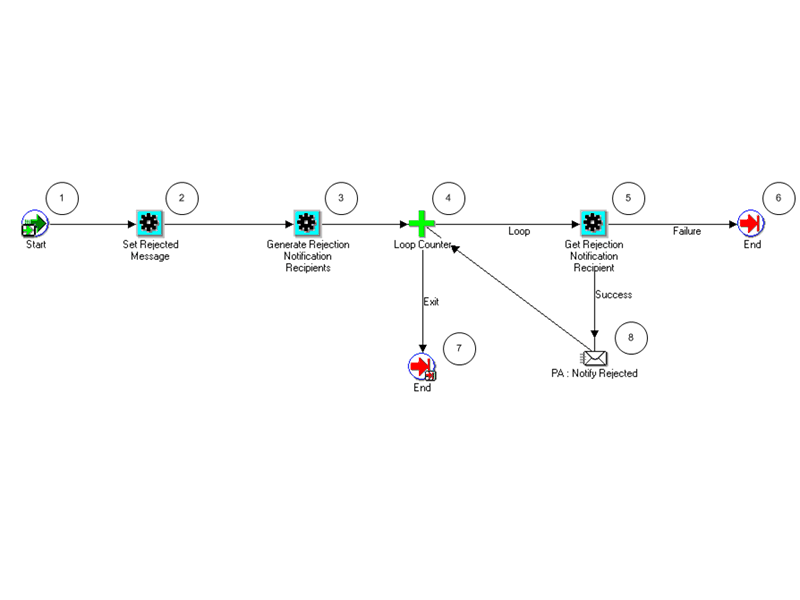
PA: Assignment Rejection Notification Activities
The following information describes each activity in the PA: Assignment Rejection Notification process, listed by function name:
Start (Node 1): This is a standard activity that marks the start of the process.
Set Rejected Message (Node 2): This activity sets subject and description for the notifications.
Generate Rejection Notification Recipients (Node 3): This activity creates a recipients list that will receive the assignment rejection notifications.
Loop Counter (Node 4): This activity is used to loop through the list of recipients and send a notification to each one.
-
If the count has reached the loop limit (a constant that is set in this node), the process branches to Node 7.
-
If the count has not reached the loop limit, the process branches to Node 5.
Get Rejection Notification Recipient (Node 5): This activity obtains the next recipient for sending the rejection notifications.
-
If a recipient is found, the process branches to Node 8.
-
If a recipient is not found, the process returns to Node 6.
PA: Notify Rejected (Node 8): This activity sends a notification to the recipient that the assignment has been rejected.
End (Node 6 and 7): This activity terminates the process.
PA: Mass Assignment Approval Required Process
This process sends notifications that approval is required for mass assignments.
In the diagram shown below, the process activity nodes are numbered for reference in the descriptions that follow. The numbered circles are not part of the process diagram.
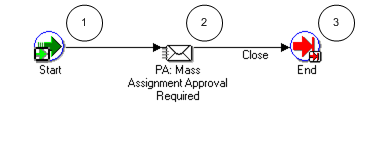
PA: Mass Assignment Approval Required Activities
The following information describes each activity in the PA: Mass Assignment Approval Required process, listed by function name:
Start (Node 1): This is a standard activity that marks the start of the process.
PA: Mass Assignment Approval Required (Node 2): This activity sends notifications to approvers asking them to approve the mass assignment.
End (Node 3): This activity terminates the process.
Related Topics
Assignment Approval, Oracle Project Resource Management User Guide
