Managing Leases
This chapter details the tasks you must perform to abstract leases and administer them effectively using Oracle Property Manager.
This chapter covers the following topics:
- Overview of Lease Administration
- Understanding the Lease Abstraction Process
- Abstracting Leases
- Assigning Space to Customers
- Creating Milestones
- Payments and Billings Overview
- Setting Up Payments
- Setting Up Billing
- Normalizing Payments or Billings
- Approving and Canceling Approval of Schedules
- Prepaying Rent Payments or Billings
- Reviewing Leases
- Modifying Leases
- Leases Windows
Overview of Lease Administration
You can automate your lease administration processes by using the lease management features included in the Leases window. You can also manage the calculation of rent amounts and the creation of schedules for invoices. You can set up milestones that correspond to required decisions and actions you need to take at specific times. Milestones help you keep track of these decisions and actions and handle them on a timely basis.
The Leases window and the schedule creation feature will help you to expedite many lease management tasks, such as:
-
Abstracting the lease and related documents to identify basic information about the terms of the lease, as well as information about the parties to the lease.
-
Staying informed about decisions you have to make and tasks you have to perform on a timely basis.
-
Setting up and authorizing payment schedules, and exporting schedules to Oracle Payables.
-
Setting up and authorizing billing schedules, and exporting invoices to Oracle Receivables.
-
Keeping track of any additional information relevant to the lease.
If any of the terms of the original lease that you abstracted are later modified, you can use the Leases window to update your lease information. You can modify your lease information in two ways:
-
Enter an amendment. You use the Amendment feature to record any amendments you have made to the lease. For example, when you create a lease amendment to terminate a lease early, you can update your information in Property Manager with the Amendment feature. The amendment feature allows you to keep a history of modifications made to the original lease agreement, along with information such as the user responsible and the amendment dates.
-
Edit your lease information. If you simply need to correct an error you made while entering information, and you do not need to create a lease amendment, you can use the Edit feature to update your lease information.
Understanding the Lease Abstraction Process
When you abstract a lease, you identify critical information in the lease document and in other related documents, such as conveyance documents, insurance policies, and service provider contracts. You then enter this information in the Leases window of Oracle Property Manager using the various tabbed regions in the Lease window. Later, you can easily query the information, review it, and act on it.
Sources of Lease Information
Some of the information you enter in the Leases window does not come directly from your lease documents, but rather from the business processes used by your organization.
-
Your lease documents provide information about the location being leased, the parties to the lease, the terms of the lease, and ancillary contractual agreements.
-
Your business processes and standards determine items such as lease naming conventions, account numbers for payments or remittances, and the names of users who are responsible for performing lease-related activities.
Note: Ancillary agreements are contracts between either the landlord or the tenant and a third party. Such agreements can include insurance policies, maintenance contracts, and contracts with other service providers. The lease and the ancillary agreements may require you to make different types of payments in addition to rent, such as insurance, taxes, or operating expenses.
Lease Terms and Processes
The Leases window includes an upper region, where you enter information that describes and identifies the lease, and a group of tabbed regions, each of which is dedicated to a specific lease term or element of lease information.
The information you enter in the Leases window will:
-
Identify the lease with a unique name and number.
-
Describe the type, class, and current status of the lease.
-
Describe the terms of the lease and the significant elements of related documents.
-
Initiate or continue a payment or billing process.
Related Topics
Tabbed Regions Reference for Lease, Edit Lease, and Amend Lease Windows
Lease Description
This section describes the unique and general attributes of a lease, such as name, number, type, and class.
Unique Lease Attributes
Unique lease attributes identify one specific lease. You enter these attributes when you first begin to abstract the lease:
-
Name of lease: If you follow a consistent naming procedure when you create lease names, you will be able to readily identify the locations that each lease refers to.
Tip: The lease name can be the same as the building name you enter when you set up the location. If you abbreviate the building name to create the lease name, choose an abbreviation that clearly refers back to the building name.
-
Number of lease: Oracle Property Manager can be configured to handle lease numbers in one of two ways, depending upon how it is implemented. Either the system automatically assigns a lease number to each new lease, or you enter a lease number each time you set up a new lease. If you enter the lease number, use a consistent lease numbering system. Property Manager does not enable you to assign the same number to two leases.
General Lease Attributes
There are some attributes that you can apply to any lease. The general lease attributes are as follows:
Operating Unit
Each lease is created for a specific operating unit. Once you save a lease, you cannot change the operating unit, even if the lease has an approval status of Draft. Note that you can associate term templates, locations, or master leases (in case of a sublease) with the lease only if they belong to the same operating unit.
Type of Lease
The lease type describes how the rental amount is calculated. Three common types of leases are the gross lease, the net lease, and the percentage lease. The lease type is for informational purposes only and does not affect functionality.
The lease type is a user-defined lookup that describes how the rental amount is calculated. Common lease types are:
-
Gross lease: The lessee (tenant) pays a fixed rent. The lessor (landlord) pays other expenses, including taxes, insurance, and operating expenses. Most residential and commercial office leases are gross leases.
-
Net lease: The lessee pays the rent as well as some or all of the operating costs, including maintenance, taxes, insurance, and utilities. Most residential ground leases and commercial building leases are net leases.
Abstracted By
The name of the person who enters lease information in Property Manager.
Lease Class
The lease class indicates your role as it is defined in the lease you are abstracting. In each lease you can have one of two possible lease roles: tenant or landlord. The lease class that you select also determines whether you will use the Payments feature or the Billings feature. See: Payments and Billings Overview.
-
Choose the Expense lease class if you are the tenant in the lease. The Expense lease class enables the Payments feature, which is used by tenants to make payments to landlords and suppliers. The location to which the lease is assigned must have a tenure of Mixed, Managed, Leased, or Owned.
-
Choose the Revenue lease class if you are the landlord in the lease. The Revenue lease class enables the Billings feature, which is used by landlords to bill tenants and customers. The location to which the lease is assigned must have a tenure of Mixed, Managed, or Owned.
-
Choose the Sublease lease class if you are subleasing the property to a subtenant. The Sublease lease class, like the Revenue lease class, enables the Billings feature.
You can have more than one sublease for the same location. The second sublease (sub-sublease). A sub-sublease has a lease class of Sublease, and has both a primary lease and an over lease (sublease) associated with it. Therefore, a sub-sublease can have a sublease associated with it.
Note: Depending on the setting of the Default Landlord/Tenant View system option, the default value of Lease Class will be either Revenue or Expense. See Defining Property Manager System Options, Oracle Property Manager Implementation Guide.
Master Lease Name
A Master Lease is a lease that you have previously abstracted in Oracle Property Manager. It covers the same property that is covered by the lease you are currently subleasing. In the Master Lease, however, your role is that of tenant, while in the current lease, your role is that of landlord. You designate a master lease only if you are subleasing the property to a subtenant. To do this, you must choose Sublease as the Lease Class.
Note: When you choose the Sublease class and enter the name of a Master Lease, you are a party to two leases. In one lease your role is tenant, and in the other lease your role is lessor. You enter the expense lease into Oracle Property Manager first, then enter the revenue lease. When you do this, the expense lease becomes the master lease in reference to the revenue lease.
Approval Status of Lease
A lease can have either Draft or Final approval status. The approval status of the lease determines what actions you can take regarding two areas of the lease abstraction process: making changes to the lease, and generating payments and billings.
-
Changes to the lease: If the lease is in draft status, you can modify, delete, or add to the existing lease information. If the lease is in final status, you cannot make changes to the lease unless you perform an edit or create a lease amendment.
-
Payment and billing schedules: When you enter payment or billing terms in the Leases window and change the lease approval status from Draft to Final, you initiate the process that creates scheduled payments or scheduled billings. See Approval Rules for Schedules.
Lease Statuses
The lease status describes the position of the lease in the lease life cycle. Oracle Property Manager provides the following lease statuses:
-
Active: Signifies that the lease is within the agreed lease term.
-
Holdover: Signifies that the tenant retains possession of leased property after the lease expires. The landlord, by accepting rent, agrees to the tenant's continued occupancy.
-
Lease Ordered: Signifies that the landlord and tenant have committed to the general terms of a lease. However, they have not finalized the lease because of certain open issues. You can make or receive one time non-normalized payments, such as security deposits.
-
Month-to-Month: Signifies that the tenant leases the property for one month at a time. You can create a new lease in this status. However, this status is used most commonly when a lease expires and the landlord and tenant have not finalized a new agreement to continue the tenancy.
-
Signed: Signifies that the landlord and tenant have signed the lease. However, certain pending issues may prevent you from finalizing the lease. As in the case of the Lease Ordered status, you can make or receive one time non-normalized rent payments.
-
Terminated: Signifies that the lease agreement has ended.
Using the Lease Ordered and Signed Lease Statuses
Use the Lease Ordered (LOF) and Signed (SGN) lease statuses to schedule payments or billings and transfer transactions to Oracle Payables or Oracle Receivables before you finalize the lease. To finalize the lease, you must also change the Approval Status of the lease.
When you save a lease with a status of LOF or SGN, Oracle Property Manager creates schedules and items for all one-time non-normalized terms.
Note: Accounting guidelines state that you cannot normalize payment or billing terms until you finalize a lease. Accordingly, Oracle Property Manager does not normalize terms while a lease is in SGN or LOF lease status.
Oracle Property Manager runs the Schedules and Items concurrent program each time you create one-time payment or billing terms. After you save your work, the limitations for modifying terms in a finalized lease apply to modifying these one-time lease terms. See Lease Modifications, Oracle Property Manager User Guide.
In other respects, the lease functions as a draft lease. Therefore, you can freely edit other lease attributes, including the lease commencement date and the attributes of the other lease terms.
Important: If you change the lease commencement date, Oracle Property Manager does not automatically change the dates for any of the lease terms.
Using the Month-to-Month and Holdover Lease Statuses
Use the Month-to-Month (MTM) and Holdover (HLD) lease statuses to extend a lease on a monthly basis. When you create a new lease in MTM or HLD lease status or move a draft lease to one of these leases statuses, you specify a lease termination date. When you finalize the lease, Oracle Property Manager uses this date as the extension end date. Note that you must denormalize all normalized terms before changing the lease status.
Lease Elements
Lease elements are the significant points of information in the lease itself, and in ancillary or third-party agreements associated with the lease. Lease elements provide the information you need to perform the administrative tasks necessary to implement the lease terms and the ancillary agreements. You enter information about lease elements in the tabbed regions of the Leases Window.
Milestones
Most of the tabbed regions in the Leases window include the Milestones feature, which enables you to keep track of decisions and events that take place during the course of the lease. Milestones can be set up in these tabbed regions:
-
Details
-
Insurance
-
Options
-
Payments/Billings
Lease Details
The lease details you abstract include:
-
User Responsible. This is the person in your organization who is assigned responsibility for the lease you are abstracting.
-
Account Defaults: The GL accounts to be charged for payments or used for remittances. For expense leases, these include the expense, liability, and accrued liability account. For revenue leases and subleases, these include the revenue, receivable, and accrued asset accounts.
-
Proration Rule: Timing used to prorate lease costs over a shorter period of time, for example, if the lease starts mid-month. The options are 365 days per year, 360 days per year, or days per month. The option you choose can vary depending on the lease and your accounting practices.
-
Key Lease Dates: These include execution, commencement, and termination dates of the lease itself, and of ancillary contractual agreements.
-
Term Template: You can specify a predefined term template. The term template defaults payment and billing term information created for a lease.
Note: Once you assign a term template to a lease, Oracle Property Manager continues to use it for default term information, even after the term template is set as inactive. However, you can disassociate a term template from a lease or replace it with another one whenever required.
Contacts
In the Contacts region you keep track of the name, role, and site of companies with whom you do business as part of administering the lease. You enter information about these companies in the Contacts window, where you can record additional information such as company addresses, and the names and phone numbers of company employees whom you might need to contact.
You can use Oracle Mobile to query contact information defined in Oracle Property Manager. This contact information is conveniently categorized into various logical search criteria.
Using Oracle Mobile Property Manager, space planners and facilities managers can perform a variety of functions that would ordinarily require the use of paper or heavy lap tops, which are difficult to maintain and carry while inspecting property. Space planners and facilities managers can use Oracle Mobile Property Manager to perform tasks such as directly accessing contact information for a given lease or notifying the system of vacant office space as they inspect the property.
Locations
When you enter information about a lease, you can describe the location that the lease covers by entering location information in the Location tabbed region of the Leases window. If the lease covers more than one location you can enter information for all leased locations.
Note: You cannot associate a location with a lease unless both belong to the same operating unit.
Keep the following points in mind when associating locations to a lease:
-
You must set up at least one location (the primary location) for reporting purposes.
-
A single location can be associated with multiple leases, as long as their occupancy dates do not overlap.
-
If a location such as a building is associated with an expense lease, then that specific building and all of its associated floors and offices can be subleased.
-
You cannot sublease a location that is not on the original master lease. You can associate the same location across multiple leases for overlapping occupancy dates, if the system option Multiple Tenancy Lease has been set to Yes. See System Options in Oracle Property Manager, Oracle Property Manager Implementation Guide.
Note: You must set up a location before you can enter lease information in the Lease window. For information on setting up locations, see: Managing Property.
A location is automatically assigned to a customer when you add a location, with a customer, to a revenue lease. See: Assigning Space to Customers.
Insurance
You can enter information about any insurance policies that cover the leased location in the Insurance tabbed region. In the Coverage Amount fields you can enter the amount of insurance that is legally required, if any, and enter separately the amount of insurance that was actually purchased under the specified policy. In the Dates region, you can enter information such as the insurance policy effective dates, the policy number, and the company that is supplying the policy.
Rights and Obligations
Rights are entitlements granted by the landlord to the tenant. Right types are defined by the system administrator in the Lookups window. The following are examples of rights:
-
Right to assign or sublease: entitles the tenant to sublease the property or assign their rights.
-
Roof rights: entitles the tenant to install antennae and satellite dishes on a specific part of the roof.
-
Right of first refusal to adjoining space: requires the landlord to disclose the availability of property next to the tenant's space. This gives the tenant the opportunity to rent this adjoining space or refuse the offer before offering this space to other potential tenants.
Obligations outline which party is responsible for performing or paying for specific services, costs, or duties. You can enter information about these services and obligations in this tabbed region. Examples of such services and obligations include:
-
Building security
-
Parking
-
Maintenance
-
Management
-
Repairs
-
Heating
Options
The lease may specify options that the tenant or landlord can exercise at different times during the course of the lease. You enter information about these options in the Options tabbed region. Some common lease options are:
-
Purchase of the property by the tenant.
-
Extension of the lease period.
-
Modifications to the leased property.
-
Expansion of the lease to cover additional space.
Payments
If you are a tenant, you can create payment items and schedules for the various payments you have to make in connection with your property. These can be payments of rent you make to the landlord, or payments you make to any of your suppliers.
Note: You can also do straightlining of your terms (according to FASB-13 standards) by checking the Normalize check box. You cannot enter an estimated payment amount for normalized payment terms. If you check the Normalize check box, the Estimated Amount field is disabled. Also, you cannot create a normalized payment term that lies outside the lease term. You can create non-normalized payment terms outside the lease term. You can also associate a leased location to a payment term.
Billings
If you are a landlord, you can create billing items and schedules to keep track of the rents and other payments that are made to you.
Note: You can also do straightlining of your terms (according to FASB-13 standards) by checking the Normalize check box. You cannot enter an estimated billing amount for normalized billing terms. If you check the Normalize check box, the Estimated Amount field is disabled. Also, you cannot create a normalized billing term that lies outside the lease term. You can create non-normalized billing terms outside the lease term. You can also associate a leased location to a billing term.
Notes
Your lease abstract can include any explanatory notes that you want to accompany the lease information. For example:
-
If by leasing office space you acquire the right to a parking space, you can record that information in Notes.
-
If you are a landlord with a holdover tenant, you can indicate that the tenant is a holdover in Notes.
You can define different note types that cover most of the common note types specific to your business enterprise.
Related Topics
Contacts Overview, Oracle Property Manager Implementation Guide
Tabbed Regions Reference for Lease, Edit Lease, and Amend Lease Windows
Abstracting Leases
You use the Leases window to enter the information you have abstracted from the lease. When you navigate to the Leases Window and choose the New button, the Lease (New) window displays an upper region with fields for the basic information that will identify the lease, and a tabbed region with tabs for entering specific information about the contents of the lease.
Setting Up Leases
Before you can abstract information for individual leases, you should enter lease setup information. Lease setup information includes:
-
Agents: The contacts, customers (tenants), and suppliers (landlords) associated with each lease.
-
Locations: The locations for which the lease is created.
-
Milestones: The significant events in the life cycle of the lease.
-
Term Templates: The default billing and payment term information that you can associate with multiple leases.
Creating contacts, term templates, milestones, and milestone templates is not mandatory. However, by entering complete lease setup information, you improve efficiency and consistency.
For detailed instructions, see the Oracle Property Manager Implementation Guide.
Creating Leases
To create a lease:
-
From the Navigator, choose Leases and Documents: Enter Leases and Documents to display the Leases window.
The Find Leases window appears.
-
Click New to display the Lease (New) window.
-
Select the operating unit.
-
In the Name field, enter a unique name for the lease.
-
Enter the lease number if Oracle Property Manager does not assign one. Oracle Property Manager assigns lease numbers automatically if you set the Automatic Lease Number Generation system option to Yes. See System Options in Oracle Property Manager, Oracle Property Manager Implementation Guide.
-
Select the Type of lease. Lease types, such as Net and Gross, indicate whether the tenant is responsible for the payment of any fees, such as taxes and maintenance fees, in addition to rent. The type field is a user-defined lookup. See Lookups, Oracle Property Manager Implementation Guide.
-
Select the Lease Class. If you are the tenant in the lease you are abstracting, select the Expense lease class. If you are the landlord, select the Revenue lease class. If you are subleasing the property to another tenant, select the Sublease class.
-
Select the Master Lease name if you have selected Sublease as the Lease Class.
Note: If the lease you are setting up is either Expense class or Revenue class, the Master Lease field is disabled.
-
Verify that the Approval Status field value is Draft.
Note: The Approval Status field has two possible values: Draft and Final.
-
A draft lease is one for which you have not completed the abstraction process.
-
A finalized lease is one for which you have completed the abstraction process and have no additional information to enter.
The default value of the Approval Status field is Draft. If you leave the Draft status of the lease unchanged until you have completed the abstraction process, you will not have to amend or edit the lease if you need to change or add lease information. Change the lease status from Draft to Final after you have abstracted information about the lease and entered it in the tabbed regions of the Leases window. Finalizing a lease automatically generates payment/billing schedules. See: Entering Lease Elements.
-
-
Verify that the Lease Status field value is Active, the default value. The selections available include the following:
-
Active
-
Month to Month
-
Holdover
-
Terminated
See: Lease Description for more information on the Lease Status field.
-
Related Topics
Tabbed Regions Reference for Lease, Edit Lease, and Amend Lease Windows
Lease Window Reference
The Lease and Edit Lease windows include the same headers and tabbed regions. For details on the tabbed regions of this window, see Tabbed Regions Reference for Lease, Edit Lease, and Amend Lease Windows.
Operating Unit: Select the operating unit to which the lease belongs.
Abstracted By: The name of the person who enters lease information in Oracle Property Manager.
Class: Indicates your role as it is defined in the lease you are abstracting. The lease class that you select also determines whether you will use the Payments feature or the Billings feature. See: Entering Payment Information and Entering Billing Information.
-
Select the Expense lease class if you are the tenant. The Expense lease class enables the Payments feature. The location to which the lease is assigned must have a tenure of Mixed, Managed, Leased, or Owned.
-
Select the Revenue lease class if you are the landlord. The Revenue lease class enables the Billings feature. The location to which the lease is assigned must have a tenure of Mixed, Managed, or Owned.
-
Select the Sublease lease class if you are subleasing the property to a subtenant. The sublease class enables the Billings feature. You can have up to two subleases for a lease. For example, a landlord leases to tenant 1. Tenant 1 subleases to tenant 2. Tenant 2 subleases to tenant 3 (this is a sub-sublease).
Important: When you select the Sublease class for the lease you are abstracting, your role in that lease is landlord, and the lease is between you and the subtenant.
Note: When you sublease a property, you are a party to two leases: the lease in which you are a tenant, and the lease in which you are a landlord. You abstract the lease in which your role is tenant first, then you abstract the lease in which your role is landlord. The first lease, in which you are the tenant, is then known as the master lease in reference to the second lease, in which your role is landlord.
Master Lease: The name of the original lease between you and the landlord, in which you are the tenant. You designate a master lease when you have chosen Sublease as the Lease Class of your current lease.
Note: The lease which you want to designate as the master lease must first be entered, finalized, and saved as a unique lease in Oracle Property Manager.
Name: The name of the lease. Create a lease name that conforms to your organization's naming standards.
Number: The number that identifies the lease. If Oracle Property Manager does not automatically assign it, enter a unique lease number.
Approval Status: Indicates if your lease information is in draft or final form.
-
Draft: the default lease status when you first open the Leases window. As long as the lease is in Draft status, you can change the information you have entered, and enter additional information, without having to amend or edit the lease. When you save a lease in Draft status, Oracle Property Manager saves all the information that you entered, but does not generate any payment or billing schedules.
-
Final: If you have entered payment or billing items in the tabbed region of the Leases window, you will generate scheduled payments or scheduled billings when you finalize and save the lease. After you change the status to Final and save the lease, you must either create an Amendment or perform an Edit to make most changes to your lease information. You can change the lease name and lease number without creating an edited or amended version of the lease.
Change the status from draft to final when you have finished abstracting the lease, including the information in the relevant tabbed regions.
Type: Indicates how rent is calculated. Some common lease types are percentage, gross, and net leases. The lease type is informational and does not affect functionality.
Lease Status: Lease status determines the relationship between the lessor and lessee. The selections available for lease status include the following:
-
Month-to-Month: A tenancy whereby a lessee retains possession of leased property after the lease has expired after which the tenant leases the property for one month at a time.
-
Holdover: A tenancy whereby a lessee retains possession of leased property after the lease has expired and the landlord, by continuing to accept rent, agrees to the tenant's continued occupancy as defined by state law.
-
Terminated: A lease status of Terminated occurs after the lease end date. This status also applies if you use the amend process to terminate a lease prior to the lease end date.
-
Active: A lease status of Active applies to leases that are within their lease term range. The default status is Active.
-
Lease Ordered: Signifies that the landlord and tenant have committed to the general terms of a lease. However, they have not finalized the lease because of certain open issues. You can make or receive one time non-normalized payments, such as security deposits.
-
Signed: Signifies that the landlord and tenant have signed the lease. However, certain pending issues may prevent you from finalizing the lease. As in the case of the Lease Ordered status, you can make or receive one-time non-normalized rent payments.
Customer: Name of the customer. This field is enabled only when you select Sublease or Revenue as the lease class.
Related Topics
Entering Lease Elements
Lease Elements include lease-related information such as key lease dates, tenancy, landlord and tenant rights and obligations, insurance, payment or billing details, notes, and options that you enter in the various tabs of the Lease window.
Before you enter information in the tabbed regions, you must enter the required information in the upper regions of the Leases window. See Abstracting Leases.
To enter lease information:
-
Details Tabbed Region. Enter the name of the person who is responsible for administering the lease in the User Responsible field. Enter the necessary Oracle Payables or Oracle Receivables accounts. Select the appropriate proration rule. Enter the execution, commencement, and termination dates of the lease in the Key Dates Region. See Details Tabbed Region.
-
Contacts Tabbed Region. Enter the Role, Company Name, and Site of the contact. You can enter this information only after you have set up contacts. See Contacts Tabbed Region.
-
Locations Tabbed Region. Enter location information for the building, floor, or office that you are assigning to the lease. You can enter this information only after you set up locations. You can enter estimated and actual occupancy dates, the usage purpose of the leased location. See Locations Tabbed Region.
-
Rights and Obligations Tabbed Region. Enter any rights and obligations specified in the lease. Generally, the rights entered here have no financial consequences. Obligations outline which party is responsible for performing or paying for specific services, costs, or duties. Generally, the obligations entered here have financial consequences. See Rights and Obligations Tabbed Region.
-
Insurance Tabbed Region. Enter information on insurance policies and amounts on the location. See Insurance Tabbed Region.
-
Payments Tabbed Region. (For Lease Class: Expense) Enter all payment terms you want to set up. You must set up suppliers before entering payment terms. See Entering Payment Information.
-
Billings Tabbed Region. (For Lease Classes: Sublease or Revenue) Enter all billing terms you want to set up. You must set up customers before entering billing terms. See Entering Billing Information.
-
Options Tabbed Region. Enter information on any options that are specified in the lease. See Options Tabbed Region.
-
Notes Tabbed Region. Enter any notes that you want to add to your lease information. See Notes Tabbed Region.
-
Save your work.
Important: Tabbed regions that include information on critical dates include a Milestone button. Use the Milestone button to assign a person to be responsible for completing a particular action associated with the lease. See Creating Milestones
Tabbed Regions Reference for Lease, Edit Lease, and Amend Lease Windows
The Lease, Edit Lease, and Amend Lease windows include these tabbed regions:
You choose the Lease, Edit Lease, or Amend Lease window to enter lease information depending upon whether you are setting up a new lease, editing an existing lease, or adding an amendment to an existing lease.
Not all Fields the tabbed regions are editable:
-
Details tab: You cannot edit the Key Lease dates after the lease has been finalized.
-
Payments and Billings tabs: On the Payment tab, you can edit only Location, End Date, Supplier Name and Site, Invoice Grouping Name. On the Billing Tab, you can edit the Location, End Date, Customer Name, Bill To Site, Ship To Site, Payment Term, and Transaction Type.
Note: The Payments and Billings Tab window references are available here:
Details Tabbed Region
Key Lease Dates: Execution: The lease date as stated in the lease. If no lease date is stated, the date the lease was signed may also be the execution date.
Key Lease Dates: Commencement: The date that the lease begins.
Key Lease Dates: Termination: The date that the lease ends. You can change the termination date only through the amend process. You can terminate a lease early if there are not any approved schedules after the termination date. When you extend a lease, the system changes the end date of all terms from the old termination date to the new termination date. When the lease status is changed to Active or Terminated, this field becomes required and the Extension End Date Field becomes display only.
Expense Account: This field is visible only for payments. The General Ledger expense account. This field is required for normalized terms.
Liability Account: This field is visible only for payments. The General Ledger liability account. This field is required for normalized terms.
Accrued Liability Account: This field is visible only for payments. The General Ledger accrued liability account. This field is required for both normalized and non-normalized terms.
Revenue Account: This field is visible only for billings. Requirements for this field depend on the value of the Accounting Option system option.
Receivable Account: This field is visible only for billings. Requirements for this field depend on the value of the Accounting Option system option.
Accrued Asset Account: This field is visible only for billings. Requirements for this field depend on the value of the Accounting Option system option.
For more information on the implications of the Accounting Option system option, see Setting Up Accounting Distributions for Billings and System Options in Oracle Property Manager, Oracle Property Manager Implementation Guide.
Lease Term: The duration of the lease in terms of years, months, and days.
Note: Property Manager calculates the duration of the lease based on the commencement and termination dates that you enter. So, you can enter either the Commencement Date and the Termination Date or the Commencement Date and the Lease Term. The other fields will be updated automatically. If you change the Commencement Date, the Termination Date will be changed automatically, but not vice versa.
User Responsible: The name of the person responsible for administering the lease.
Proration Rule: Enter the timing you want to use for prorating rent amounts when a lease begins or ends in the middle of a period. For example, a lease has a monthly rent of $3000. If you choose 365 Days/Year, for fifteen days of a 30 day month, the rent is $1479.45 and if you choose Days/Month, the rent is $1,500. Property Manager has three proration rules.
-
365 Days/Year: Yearly rent/no. of days (365) = daily rent
For example, a lease has a monthly rent of $3000. If you choose 365 Days/Year, for fifteen days of a 30 day month, the rent is $1479.45 ($36,000/365 x 15 = 1479.45).
-
360 Days/Year: Yearly rent/no. of days (360) = daily rent
For example, a lease has a monthly rent of $3000. If you choose 360 Days/Year, for fifteen days of a 30 day month, the rent is $1500 ($36,000/360 x 15 = 1500).
-
Days/Month: Monthly rent/days per month = daily rent
For example, a lease has a monthly rent of $3000. If you choose Days/Month, for fifteen days of a 30 day month, the rent is $1500 ($3000/30 x 15 = 1500).
Note: Property Manager counts days starting with and including the start date, so January 15 until January 31 is 17 days, not 16.
Invoice Grouping Name: Enter the name of the invoice grouping rule you want to use for grouping the payment or billing items that belong to the lease terms. This is an optional field, and the default value is blank.
Term Template: Select the term template to be used for the lease.
Functional Currency: This field is display only. The functional currency value is based on the primary ledger you have selected in the Ledger system option. See System Options in Oracle Property Manager, Oracle Property Manager Implementation Guide.
Extension End Date: This field is enabled only when the lease status is Month-to-Month or Holdover. The extension end date cannot be less than the lease termination date.
Contacts Tabbed Region
The values you enter in the Contacts region fields come from information you enter when you set up contacts. Contact information cannot be edited here. See Setting Up Contacts, Oracle Property Manager Implementation Guide.
Role: The function that a particular company has in connection with the property. Some examples of company roles are Landlord, Broker, and Property Manager.
Company Name: The name of a service provider company that is associated with the property.
Site: The specific location of the company from which it performs the named role. The contact site can also be the company's bill-to address.
Active: Indicates if a particular contact is active. You may want to indicate that a contact is no longer active if, for example, the company was replaced with a different company during the course of the lease.
Locations Tabbed Region
Type: The type of location covered by the lease, such as Building, Floor, or Office.
Code: The location code assigned by Oracle Property Manager when you set up the location.
Primary: If a lease covers more than one location, you can use this check box to indicate which location is the primary location for this lease. A primary location can also be the location to which mail should be sent. There can be more than one primary location for a lease.
Usage: The anticipated use of the leased space, for example retail space or office space.
Assigned Percent Area: The percentage of a location covered by the lease. For example, if you are renting five floors of a 10-floor building, you can enter 50% as the Assigned Percent Area. For revenue or subleases, Oracle Property Manager assigns the percentage specified in this field as the Assigned Percent Area when creating customer space assignments.
Estimated Occupancy Date: The first date when you expect the location to be occupied.
Actual Occupancy Date: The first date when the location is occupied. You can associate more than one lease with a single location provided the occupancy dates do not overlap. To allow overlapping lease dates for a single location, set the Multiple Tenancy Lease system option to Yes. See System Options in Oracle Property Manager, Oracle Property Manager Implementation Guide.
Expiration Date: The date the occupancy ends. The Location Expiration Date would typically be the same as the Lease Expiration Date, and by default is set to equal the Lease Expiration Date. However, you may edit this value to have the occupancy end before or after the lease ends.
Note: You may be able to sublease a location even if this check box is not checked.
Recovery Type: This field is enabled for billing leases and is a user defined lookup attribute that describes the usability of a particular space by a certain type of tenant, such as Major, Specialty, Freestanding, Kiosk, or Food Court. See Recovery Field References.
Recovery Space Standard: This field is enabled for billing leases and is the classification, usually Internal or External, of a location used in the recovery process. See Recovery Field References.
Financial Obligation End Date: This field is enabled for billing leases. and is the date that the obligation to provide the service ends. See Obligations Tabbed Region.
Customer Name: This field is enabled for revenue leases. See Billings Tabbed Region.
Note: A location is automatically assigned to a customer when you add a location, with a customer, to a revenue lease. See: Assigning Space to Customers.
Bill to Site: This field is enabled for revenue leases. See Billings Tabbed Region.
Location Rentable Area: The rentable area of the leased location as defined in the Location window as of the occupancy actual start date. This field is display only.
Location Usable Area: The usable area of the leased location as defined in the Location window as of the occupancy actual start date. This field is display only.
Location Assignable Area: The assignable area of the leased location defined in the Location window as of the occupancy actual start date. This field cannot be null and is display only.
Lease Rentable Area: The rentable area of the leased location per the agreement between the lessee and lessor. This value may be different than that of the location rentable area.
This field is editable even in a finalized lease. If the value is changed, the lease load factor and variance fields are updated. In addition, if the Area Type value within the Payments or Billings tabbed regions is Lease Rentable Area, any new term created will be based on the new changed value of the lease rentable area, although existing payment or billing terms will not be affected.
If you set the Default Location Area for Leases system option to Yes, the field displays the location rentable area by default. See System Options in Oracle Property Manager, Oracle Property Manager Implementation Guide. The value of this field cannot be negative. It is not a required field.
Lease Usable Area: The usable area of the leased location per the agreement between the lessee and lessor. This value may be different than that of the location usable area.
The value of the lease usable area may be input directly or will be calculated by the system if both the lease rentable area and the lease load factor are entered. The user may enter the lease rentable area and either a lease load factor or the lease usable area. The system will calculate the other.
This field can be changed, even in a finalized lease. If it is changed, the lease load factor and variance fields are updated. In addition, if the Area Type value within the Payments or Billings tabbed regions is Lease Usable Area, any new term created will be based on the new changed value of the lease rentable area, although existing payment or billing terms will not be affected.
If you set the Default Location Area for Leases system option to Yes, the field displays the location usable area. See System Options in Oracle Property Manager, Oracle Property Manager Implementation Guide.
The value of this field cannot be negative. It is not a required field.
Lease Assignable Area: The assignable area of the leased location per the agreement between the lessee and lessor. This value may be different than that of the location assignable area.
This field can be changed, even in a finalized lease. If it is changed, the variance field is updated. In addition, if the Area Type value within the Payments or Billings tabbed regions is Lease Assignable Area, any new term created will be based on the new changed value of the lease assignable area, although existing payment or billing terms will not be affected.
If you set the Default Location Area for Leases system option to Yes, the field displays the location usable area by default. See System Options in Oracle Property Manager, Oracle Property Manager Implementation Guide. The value of this field cannot be negative. It is not a required field.
Rentable Area Variance: This field calculates the variance between the lease rentable area and the location rentable area as a percentage. If the area fields have not been populated, the variance is null. This field is display only and is calculated as follows:
(Location Rentable Area - Lease Rentable Area) / Lease Rentable Area) * 100
Usable Area Variance: This field calculates the variance between the lease usable area and the location usable area as a percentage. If the area fields have not been populated, the variance is null. This field is display only and is calculated as follows:
(Location Usable Area - Lease Usable Area) / Lease Usable Area) * 100
Assignable Area Variance: This field calculates the variance between the lease assignable area and the location assignable area as a percentage. If the area fields have not been populated, the variance is null. This field is display only and is calculated as follows:
(Location Assignable Area - Lease Assignable Area) / Lease Assignable Area) * 100
Location Load Factor: Property Manager calculates this display only field as of the occupancy start date using the following formula:
Location Load Factor = Location Rentable Area /Location Usable Area - 1
Lease Load Factor: The lease load factor per the agreement between the lessee and lessor. This value could be different than that of the location load factor. It is defined as follows:
Lease Load Factor = Lease Rentable Area/ Lease Usable Area - 1
You may enter the value directly or allow the system to calculate it based on the value entered for Lease Usable Area. The user may enter the lease rentable area and either a lease load factor or the lease usable area. The system will calculate the other. The system will not modify the lease rentable area. You can update this field even in finalized leases.
Load Factor Variance: This field calculates the variance between the lease load factor and the location load factor as a percentage. If the Lease Load Factor or Location Load Factor is null, the variance is null. This field is display only and is calculated as follows:
(Location Assignable Area - Lease Assignable Area) / Lease Assignable Area) * 100
Region: The name of the region in which the property is located, if you assigned the property to a region when you set up the location. This field is display only.
Office Park: The name of the office park, if you assigned the property to an office park when you set up the location. This field is display only.
Building/Land: The name of the building associated with the location code. This field is display only.
Floor/Parcel: The name of the floor associated with the location code. This field is display only.
Office/Section: The name of the office associated with the location code. This field is display only.
Related Topics
Insurance Tabbed Region
Type: The type of insurance. Some examples of insurance types are fire, liability, and personal injury.
Insurer Name: The name of the insurance company as stated in the insurance policy.
Policy Number: The insurance policy number.
Active check box: Indicates if a particular insurance policy is active. You may want to indicate that a policy is no longer active if, for example, the policy was replaced with one from a different company during the course of the lease.
Dates: Start: The date that insurance coverage under this policy begins.
Dates: Expiration: The date that insurance coverage under this policy ends.
Coverage Amount: Required: The cost of the insurance coverage required by law for this type of risk.
Coverage Amount: Purchased: The cost of the insurance coverage actually purchased under this policy.
Rights and Obligations Tabbed Region
Rights region
Num: Line number for the right.
Type: Type of right that you are listing. For example, right to sublease or roof rights. The appropriate person in your group defines the right types that your company uses in the Lookups window.
Grant Code: Indicates whether the lease specifically bestows the right upon the tenant.
Reference: The paragraph in the lease that references the terms of this right.
Comments: Enter comments about the right for your own reference. For example, you might want to indicate if the language is ambiguous or unusual.
Obligations region
Num: Row number of the obligation. Assigned by Property Manager after you save the record.
Type: Category of the responsibility. The appropriate person in your organization maintains the list of valid values in the Lookups window. For example, your company might define the Maintenance type for gardening and painting and the Expense type for heating and electricity.
Service Provider Name: If a service provider, such as a gardener or security firm will provide services for this obligation, select the name of the provider. If the service provider is not on the list, then ask the appropriate person in your organization to set it up in the Service Providers window.
Common Area: Indicates who is responsible for the common area in a rented space.
Start Date: The date that the obligation to provide the service begins.
End Date: The date that the obligation to provide the service ends.
Reference: Enter the paragraph or section in the original lease that describes the obligation so you can easily reference it.
Responsibility Type: The specific obligation. Indicates the person or job type responsible for a particular task, for example, landlord, tenant, or contractor.
Financial Responsibility: If a cost is associated with this obligation, the party responsible for paying it.
Maintenance Responsibility: If the obligation is for maintenance, enter the party responsible for supervising or coordinating work with the service provider. For example, if the landlord schedules and oversees the work of the landscape service provider, enter Landlord.
Active: check box This is a display-only field and shows if the service provider is still active. Service provider active status is maintained by the appropriate person in your organization in the Service Providers window.
Responsibility %: If a cost is associated with this obligation, the percentage that the responsible party is obligated to pay. If there is more than one responsible party, create a record for each party for this obligation and assign the appropriate percentage to each record.
Comments: Add any comments for your reference.
Related Topics
Lease Window and Edit Lease Window Reference
Options Tabbed Region
Num: The number assigned to the option by Property Manager.
Option Type: The type of option. Some examples of option types are renewal, purchase, and early termination. This list is maintained in the Lookups window by the appropriate person in your organization.
Start Date: The first date the option can be exercised.
End Date: The last date the option can be exercised.
Term: The system displays the length of the term in the time units that your company uses. For example, if your company uses years and the Start Date is Jan 1, 2001, and the End Date is Jan 1, 2002, then the system will enter 1 in this field.
Reference: Enter the paragraph in the original lease that describes the option so you can easily reference it.
Status: The current status of the option, for example, Exercised, Not Exercised, or No Action. You can update the status of an option by amending or editing the lease.
Notice Given check box: If the option requires notice from one party to the other, check this check box to indicate that the notice was given.
Option Size: The amount of additional space you are adding by exercising the option, if the option is for expansion of the leased space. For example, if the option size is 1000 square feet, enter 1000 here and square feet in the UOM field.
Exercise Begins/Ends: First and last dates that notifications can be sent to the landlord. This value defaults to the Milestones Action Begin and Action Due dates respectively.
Action Taken Date: Date that an action was taken on an option. For example, the date that a tenant notifies the landlord that he will exercise the option.
UOM: Units of measurement for additional space you are adding by exercising the option, if the option is for expansion of the leased space.
Cost: The cost of the option, if it is exercised. Examples are $2 per square foot, or 95% of fair market value.
Currency: Currency in which the option cost is denominated. The currency of the lease defaults.
Area Change: Area that will be increased or decreased related to an expansion, contraction, or must take option right.
Notes Tabbed Region
You can enter Notes whether the status of the lease is Draft or Final.
Type: Select the type of note from lookups.
Date: The date that you enter your notes.
User: The user name of the user who enters the note. This field is display only.
Description: Any notes about the lease.
Assigning Space to Customers
Oracle Property Manager automatically creates customer space assignments using information you enter when creating lease tenancies. For example, the tenancy’s assigned percentage area determines the assigned area. The following system options affect how Oracle Property Manager creates tenancies and customer space assignments:
-
Multiple Tenancy Lease: Determines whether you can create concurrent space assignments for a location through multiple leases
-
Allow Tenancy Overlap within Lease: Determines whether you can simultaneously assign a location to multiple customers on a single lease
-
Automatic Space Distribution: If you set the other system options to Yes, the Automatic Space Distribution system option determines whether Oracle Property Manager automatically assigns space proportionally to all tenancies of a location or allows you to enter a value for assigned percentage area.
The table below illustrates the impact of the Multiple Tenancy Lease and the Automatic Space Distribution system options on tenancies and space assignments. The table describes situations where a tenancy, created through another lease, already exists for overlapping dates.
| Multiple Tenancy Lease | Automatic Space Distribution | Impact |
|---|---|---|
| No | Yes | You cannot create a new tenancy with the specified dates. |
| No | No | You cannot create a new tenancy with the specified dates. |
| Yes | Yes | Oracle Property Manager redistributes location area equally to all space assignments for the location. The tenancy's assigned percentage area reflects the space assigned to the customer. You cannot modify this value. |
| Yes | No | Oracle Property Manager uses the assigned percentage area you specify for the tenancy as the percentage area for the customer space assignment. However, it presents an error if the total assigned percentage area exceeds 100 percent. |
The impact of the system option Allow Tenancy Overlap within Lease is similar to the impact of Multiple Tenancy Lease. However, the limitations of setting the Multiple Tenancy Lease system option to No apply to tenancy overlaps within a lease rather than between leases.
Entering Assigned Percentage Area for a Tenancy
The following rules apply when you enter an assigned percentage area for a tenancy:
-
The default assigned percentage area is 100. You can modify this value.
-
One tenancy record may result in multiple customer space assignments based on location area and existing space assignments. For example, if you update the area of a location midway through a tenancy, Oracle Property Manager ends the existing customer space assignment and creates a new one from the provided As of Date.
-
The assigned percentage area applies to the duration of the tenancy. Therefore, if assigned percentage area varies through the tenancy period, you must create separate tenancies with different assigned percentage area values. Oracle Property Manager creates separate space assignments for each tenancy.
-
The total percentage assigned cannot exceed 100%. If the location is fully assigned, you can create a tenancy with zero assigned percentage area. Note that the total percentage assigned for a location can be different for different periods.
Related Topics
Setting Up Property Manager, Oracle Property Manager User Guide
Space Management, Oracle Property Manager User Guide
Creating Milestones
Some lease administration processes require you to make decisions and take actions at specific times during the course of the lease. In Oracle Property Manager you can set up milestones that correspond to these required actions. You can then keep track of the decisions and actions that are required, and handle them on a timely basis. If you have installed Oracle Alert, you can set up an automatic notification system that will inform users of milestones according to a schedule you create in Oracle Property Manager.
Milestone information includes the type of milestone, the name of the user responsible for acting on the milestone, the date by which the action must be taken, and the schedule according to which user notification will take place.
You can create milestones for each element of the lease that requires you to take some action during the life of the lease. Each of these lease elements has its own tabbed region in the Leases window.
-
Details Milestones can alert you to an upcoming lease termination date.
-
Insurance Milestones can indicate when an insurance payment is due, and when an insurance policy needs to be renewed.
-
Options Milestones can notify you that the period of time during which you can exercise an option is nearing.
-
Payments Milestones can remind you to set up payment items and scheduled payments, and to export schedule payments to your accounts payable application.
-
Billings Milestones can remind you to create invoices and scheduled billings, and to export billings to your Accounts Receivables application.
Related Topics
Setting Up Milestone Templates, Oracle Property Manager Implementation Guide
Milestone Types Overview
You can define different types of milestones to address the various lease events that will require action. Milestone types are user-defined lookups. After you enter these milestone types in the Lookups window, you can use the tabbed regions of the Leases window to associate milestones with a specific lease feature or aspect of the lease. Some common milestone types are:
-
Insurance, for renewal of policies and payment of premiums.
-
Lease options, for renewal or early termination of the lease.
-
Lease payment and billing terms, for the timely creation and payment of invoices.
Setting Up Milestones
-
In the Lookups window define values for milestone types and primary users. See: Lookups, Oracle Property Manager Implementation Guide.
To set up milestones:
Note: If you are currently entering lease information in an active Leases window, proceed to Step 3.
-
Navigate to the Leases window.
-
Perform a query to retrieve the lease for which you want to enter milestones.
-
Navigate to the tabbed region for the lease element for which you want to set up milestones. You can set up milestones in these tabbed regions:
-
Details
-
Insurance
-
Options
-
Payments/Billings
-
-
Choose the Milestones button.
-
If you have previously set up a milestone template that includes the milestone types and users that you want to associate with this lease element, select the Template Name.
Note: If the milestone template you entered includes all the milestone types and users you want to enter, proceed to Step 8.
-
Select the milestone type you want to associate with this lease element.
-
Select the name of the user who will be responsible for taking action on the associated milestone type.
-
In the Action Due Date field, enter the date by which the action required by the milestone must be taken.
-
If the Lead Days field is blank, enter the estimated number of days that will be required to complete the specified milestone type.
-
If the Frequency field is blank, enter the number of days that you want to elapse from one user notification to the next.
-
Repeat Steps 6 through 10 if you need to enter additional milestone types and users.
-
Save your work. The start date is automatically calculated by the system based on the Action Due Date and the Lead Days.
Lease Milestones Window Reference
Oracle Property Manager includes a Milestones feature in these Leases windows tabbed regions:
-
Details
-
Insurance
-
Options
-
Payments
-
Billings
When you choose the Milestones button in any of these tabbed regions, the Milestones window for that specific tabbed region opens, and displays these fields:
Action Due Date: The date by which the required action for the milestone must be completed.
Lead Days: The estimated number of days it will take to complete the required action for this milestone. The milestone notification will be sent this many days before the Action Due Date.
Responsible User: The user name of the person responsible for taking action on the milestone.
Type: The type of Milestone, from the Milestone lookups.
Frequency: The number of days between milestone notifications. Entering "1" in this field generates a notification every day. Entering "2" generates a notification every other day.
Note: To generate automatic notification of milestones, Oracle Alert or a similar notification system must be installed.
Begin Date: The first date that a notification regarding this milestone will be generated. Oracle Property Manager calculates the Notification Date as the Action Due Date minus the number of Lead Days. This field is display only.
Payments and Billings Overview
Oracle Property Manager includes two features that you use to manage financial transactions for your property. You manage payment schedules to suppliers with the payments feature, and you manage billing schedules to customers with the billings feature. You set up both types of transactions in Property Manager, then you export the transaction information to Oracle Payables or Oracle Receivables as shown in the following table:
| Function | Payments | Billings |
|---|---|---|
| Application that Property Manager Integrates With | Oracle Payables | Oracle Receivables |
| Trading Partner Type | Supplier | Customer |
| Transaction Examples | - Rent to Landlord - Taxes - Operating expenses - Insurance |
- Rent from Tenant |
| Transaction Identifier | Invoice number | Transaction number |
| Lease Class | Expense | Revenue or Sublease |
| Interface Mechanism | Payables Open Interface | Receivables Auto Invoice |
Note: The lease class that you select determines whether the payments feature or the billings feature is enabled. You enable the payments feature by selecting the Expense lease class. You enable the billings feature by selecting either the Revenue or the Sublease lease class.
Each of these features enables you to set up financial transactions that can occur at any time during the life of the lease. The transactions can take place one time only, or they can be recurring transactions that take place according to a schedule that you determine. For example:
-
One-time-only transactions can include security deposits and certain types of operating expenses.
-
Recurring transactions can include rent and taxes. You can create terms with frequencies of monthly, quarterly, semi-annual, and annual.
This discussion includes the following topics:
Related Topics
The Payments and Billings Processes
When you are setting up payment and billing information, each step in the process is a separate task. After you complete a step, you can immediately continue on to the next step, or you can stop the process at that point, and return to the next step at a later time. You can set up the terms and schedules for payments or billings when you first abstract the lease, or at any time thereafter.
Note: Before creating payments and billing, you must set up suppliers and customers.
The process of creating payments or billings consists of four basic steps:
-
You enter the terms of the transaction in the Payments or Billings tabbed region of the Leases window. See Entering Payment Information and Entering Billing Information.
-
After you finalize a lease or set the lease status to Signed or Lease Ordered, Oracle Property Manager creates a payment or billing schedule. The schedule consists of individual payments or billings for the lease, grouped by schedule date.
Important: Oracle Property Manager creates schedules and items only for all one time non-normalized terms when leases are in Signed or Lease Ordered status.
-
You authorize schedules in the Authorize Payments or Authorize Billings window. See Authorized Schedules.
-
You export payment or billing items to Oracle Payables or Oracle Receivables, using the Export Payments to Payables or Export Billings to Receivables window. You cannot export terms that belong to unapproved schedules. See: Exporting Payment Items to Oracle Payables and Exporting Billing Items to Oracle Receivables.
Note: You can also prepay or defer a payment or billing item. See: Prepayments and Deferred Payments and Billings.
Entering Payment and Billing Terms
You enter the terms of the transaction in the Payments or Billings tabbed region of the Leases window. Oracle Property Manager uses the information you enter to generate payment or billing schedules.
Note: You can enter term information directly in the Payment or Billing Schedules Details window. For more information, see: Authorized Schedule Events.
Your sources for transaction term information are:
-
The lease
-
Documents covering ancillary agreements related to the lease, such as insurance policies and contracts with contacts
-
Your organization's business processes, which will determine what values you enter in certain fields, such as:
-
The account number to be charged for the payment or credited for the billing.
-
The purpose you assign to the transaction.
In the Payments or Billings tabbed region of the Leases window you enter detailed information about the transactions you are setting up. This information includes:
-
-
The term template to be used for the transaction. This field is not required and any terms defaulted into the lease can be modified. If a term template has been defined at the Lease Details level, the same term template is defaulted in this field. You can change the term template at the payment level as well.
-
The location of the transaction. You can enter any valid location.
-
The purpose of the transaction. You can enter the same purpose in more than one transaction. For example, you may enter two payment terms that both have rent as their purpose, if the first term covers a different time period than the second term. This is a user-defined lookup.
-
The type of transaction. The transaction type indicates the origin of the payment or billing item. For example, for the Rent payment purpose the payment type may be base, direct, escalation, or abatement. This is a system-defined lookup.
-
The Frequency with which payments or billings are to be made. You can set up recurring payments or billings by entering a frequency value of monthly, quarterly, semiannually, or annually.
You also use the Frequency field to set up a one-time-only payment or billing. When you set a term's frequency to one time, Oracle Property Manager requires that you enter the same start and end dates for the term.
-
Whether or not the payment/billing is normalized.
-
The Schedule Day on which schedules should be created. You can enter a number between 1 and 28. The number you enter is the day of the month on which schedules will be created. The schedule day you enter defaults to the transaction date in Oracle Receivables and the invoice date in Oracle Payables.
-
The Area Type used in the of the term details. See: Using Area Type
-
The Start Date and End Date of the transaction period. For normalized terms the transaction period start date cannot be earlier than the commencement date of the lease and the transaction period end date cannot be later than the termination date of the lease. This restriction does not apply to terms that are not normalized. The start date and end date default to the lease commencement and lease termination dates.
-
The name of the Supplier, and the Supplier Site, to whom the payment is made, or the name of the Customer and Customer Site to whom the billing is made. This information comes from the list of suppliers in Oracle Payables, or the list of customers in Oracle Receivables.
-
The amount of each scheduled payment or billing. If you know the exact amount of the payment or billing, you can enter it as the actual amount. If you do not know the exact amount, you can enter an estimated amount. For example, when you are scheduling payments for taxes or utilities, you may be able to estimate the amount of the payment based on previous payments. Later, when you know the actual amount, you can enter it. You cannot enter estimated amounts for normalized terms. You can also enter an annual/area amount. If you enter an annual/area amount, Property Manager calculates the actual amount.
Related Topics
Payments and Billings Overview
Tabbed Regions Reference for Lease, Edit Lease, and Amend Lease Windows
Using Area Type in Term Details
The value in the Area Type field determines the source of the value for the Area field in the Payment or Billing Term window. The value in the Area field is then used in conjunction with the Annual/Area field to calculate the actual amount. See Locations Tabbed Region.
The Area Type field contains a drop down list with eight available values. Six of the eight drop-down values refer to fields on the Locations tab of the lease, and when the user selects one of these, the system populates the Area field with the value in the corresponding field on the locations tab. If the value in the corresponding field is null, the user is prompted by the system to populate the field in the Locations tab first before selecting that value. These six values are:
-
Lease Rentable Area
-
Lease Assignable Area
-
Lease Usable Area:
-
Location Rentable Area: The default value of the Area Type field.
-
Location Assignable
-
Location Usable Area
Note that the Location Rentable Area, the Location Assignable Area, and the Location Usable Area can change over time. When one of these three values is selected for Area Type, the Area field is populated with its value as of the start date of the payment term. The remaining two dropdown values are described below:
-
Other: Selecting a value of Other indicates that you want to manually enter a value in the Area field of the Term Details window. You can directly update the value in the Area field only if the value of Other was selected in the Area Type field.
-
Null: Selecting a value of null is used if the term is not based on an area measure. Values cannot be entered into the Area or Annual/Area fields.
If there is no location tied to the term, the default value for Area Type will be Null. If there is a location, the default value is Location Rentable Area.
Specifying Area Type with No Location Area
If the value selected in the Area Type field is Lease Rentable Area, Lease Usable Area, or Lease Assignable Area, and the system does not find a value for the corresponding area field in the Locations tabbed region, you will be prompted to enter a value for the corresponding area field in the Locations tabbed region before proceeding. To save entries you have already made, select the value of Other and save the record. Then go to the Locations tabbed region and enter a value for the corresponding lease area. Then return to the Term Details window via the Payment or Billings tabbed region and select the desired value for area type.
If the value of the Area Type field is changed again, the system will not do any validations and will allow the change. The system will only ensure that the value change in the Area Type field is reflected in the Area and Annual/Area fields. The change is not reflected in the actual amount of a finalized or draft lease.
Changing Area Type in Draft and Final Leases
Draft Leases
In a draft lease, after the payment or billing term has been entered and saved, you can change the value of the Area Type field. This will change the Area and Annual/Area field amounts. If you change the value of the Area Type field to Other, the value in the Area field will be erased, and the Annual/Area field will become null. If the Area Type field is changed to Null, the Annual/Area and the Area fields become blank or null. No changes will occur to the actual amount of a billing or payment term as a result of changes in the Area Type field or corrections to the area of locations. For a draft lease, a change in the location area of a space definition will not affect the previously created terms or their associated area values. The terms created after a change in the location area of a space definition reflect the new changed area value.
Final Leases
In a final lease, the Area Type fields are updateable, and changes to the value of the Area Type field will only change the Annual/Area field. A change in the area of a location will be reflected in any new terms created in the Payment or Billings tabbed region. The terms created before the change will still display the previously created area values.
Currency Conversion for Billing and Payment Term Amounts
You can enter billing or payment amounts for lease terms in currencies other than your functional currency. Oracle Property Manager converts entered amounts based on the conversion rate type specified in the Currency Conversion Type system option. If you do not specify a conversion rate type in the system option, Oracle Property Manager uses the conversion rate type associated with the functional currency and enabled in the Reporting Currencies window. If the functional currency conversion rate type and the conversion rate type specified in the system option are different, Oracle Property Manager uses the rate type specified in the system option.
In addition, the daily rates for the conversion rate type specified in the system option must be available for the transactional currency used in the billing or payment term in order for you to approve a billing or payment schedule.
For example, the functional currency for Company A is Pounds Sterling (GBP). The Currency Conversion Type system option is set to Corporate. A billing term is added to a lease with a transactional currency of Euro (EUR). The lease is monthly and effective from January 1, 2002 to December 31, 2002. The lease is finalized and twelve billing schedules are generated. The Daily Rates table does not contain any conversion rates for Euros and Pounds Sterling for any dates in 2002. You will not be able to approve the billing schedule for January or any other month in 2002.
Setting Up Currency Conversion
To setup currency conversion:
-
Specify the conversion rate type in the Currency Conversion Type system option.
Note: If you do not specify a rate type in the profile option, you must add the functional currency and conversion rate type in the Reporting Currencies window.
-
Enable the transactional currency, if not already enabled. Enter the currency code and conversion rate type, in the Reporting Currencies window.
Entering Conversion Rates Manually
To enter conversion rates manually
-
Select User for the conversion rate type specified in the Currency Conversion Type system option.
-
When adding a term to a new lease or editing or amending an existing lease, enter the actual amount for the new term and the currency. In the Rate field, enter the conversion rate.
Payment Schedule Details and Billing Schedule Details
Property Manager displays both the transactional and functional currency amounts for a billing or payment transaction in the Billings or Payment Schedule Details window. The total amount for the schedule is always displayed in the functional currency. In the Billing Items or Payment Items region of the window, the transactional and functional currency amounts for each schedule item are both displayed. The amount displayed in the Actual field is in the transactional currency and the Accounted field shows the functional currency amount. The transactional currency and conversion rate are also shown for each item. The following standard reports show transactions (billing or payment items for a lease) in both transactional and functional currencies: Rent Schedule Details Report, Receivables Detail Report, Receivables Summary Report, Rent Schedule Export Report, and the Lease Abstract Report.
Converting Currency Amounts
When you enter a payment or billing item in a currency other than the functional currency, Property Manager compares the transaction date to the system date to determine the rate to use to convert actual amounts to functional currency amounts for payment or billing schedule items.
-
If the transaction date of the schedule item is the system date or earlier, Property Manager calculates the accounted amount using the currency conversion rate in effect on the date of the transaction.
-
If the transaction date of the schedule item is after the system date, Property Manager calculates the accounted amount using the currency conversion rate in effect on the system date.
Property Manager converts item amounts from transactional to functional currency, based on the rules above, when you generate payment or billing schedules. You will see the functional currency amount displayed in the Accounted field in the Payment Schedule Details or Billing Schedule Details window. The accounted amount is subject to change, if the conversion rates change, until the payment or billing schedule is approved. Upon approving a schedule, the accounted amount is recalculated based on the transaction date and system date at that time and can no longer change.
For example, Lease B is created with one payment term.
-
The lease begins on January 1, 2002 and ends December 31, 2002.
-
Rent is $500 Australian (AUD) dollars a month.
-
The functional currency is US dollars (USD).
-
The conversion rate type is Daily.
-
The system date is January 15, 2002.
-
The daily rates for converting Australian dollars (AUD) to US dollars (USD) are:
-
0.51 on January 1, 2002
-
0.52 on January 15, 2002
-
0.53 on February 15, 2002
The lease is created and finalized on January 1, 2001. The draft payment schedule details show the following accounted amounts:
-
-
For the JAN-2002 schedule, the accounted amount is $255 USD ($500 * 0.51). The conversion rate effective on the transaction date is used to calculate the accounted amount because the transaction date is earlier than the system date.
-
For the FEB-2002 schedule, the accounted amount is $260 USD. The conversion rate effective on the system date, 0.53 as of January 15, 2002, is used to calculate the accounted amount because the transaction date is later than the system date.
Payment and Billing Schedules
Oracle Property Manager creates schedules for all payment or billing terms when you change the approval status of the lease to Final or when you save a one-time non-normalized payment or billing term when the lease has a lease status of Signed or Lease Ordered. Oracle Property Manager uses the Schedules and Items concurrent program to generate a payment schedule or billing schedule. You can view the schedule in the Authorize Payments or Authorize Billings window.
If the automatically generated concurrent program fails for some reason, you can submit the Schedules and Items concurrent program manually. For more information, see Schedules and Items.
Schedules
A schedule represents the items payable to landlords or recoverable from tenants on a specific date, for a lease. For example, if an expense lease contains two terms with a frequency of Monthly, Schedule Day as 1, Duration as three years, and amounts of $500 each, Oracle Property Manager creates 36 schedules for the first day of every month with two terms each, for a total amount of $1,000.
Oracle Property Manager creates schedules and their constituent items by running the Schedules and Items concurrent program under the following conditions:
-
You finalize a lease, or modify a finalized lease to add a term
-
You create a non-normalized one-time payment or billing term for a lease that is in Lease Ordered or Signed status
-
You approve variable rent, rent increase, operating expense, or recoveries terms
When you first finalize a lease or save term information when a lease is in Lease Ordered or Signed status, Oracle Property Manager creates one or more draft schedules. You can then approve schedules and transfer constituent items to Oracle Receivables or Oracle Payables as appropriate.
When you add or modify a term in the main lease through a lease edit or amendment, or when you transfer a term from a rent increase, variable rent, or operating expenses agreement, Oracle Property Manager searches for draft schedules corresponding to the schedule dates of the term and behaves as follows:
-
If draft schedules exist for the lease, Oracle Property Manager inserts the related items into the existing schedules.
-
If no draft schedules exist, Oracle Property Manager creates new draft schedules for the items, even if approved schedules exist for that schedule date.
Important: If approved schedules already exist for the schedule date of a recoveries term, Oracle Property Manager searches for the next available schedule date.
Determining the Schedule Date
Oracle Property Manager determines schedule dates based on the value provided for the term’s schedule day. If you specify a term template, Oracle Property Manager uses the template’s schedule day. Otherwise, default values for schedule day depend on where you create the term, as described below:
-
Main lease term: The default value for schedule day is 1. However, you can specify any whole number between 1 and 28.
-
Rent increase term: The default value is the schedule day for the base term if you are allocating rent increase. Otherwise, the selected term template determines the default schedule day.
-
Variable rent term: The default schedule day is the invoice due day, or the number of days after the invoice period, which you specify when creating variable rent agreements.
-
Recoveries term: The default schedule day is 31. Consequently, Oracle Property Manager uses the last day of the month when calculating the schedule date.
-
Operating expense term: The term start date determines the default schedule day.
Approval Rules for Schedules
When Oracle Property Manager first generates the schedule, its status is Draft. You approve a schedule by changing its status to Approved and saving your work. The approval takes effect when you save your work. You can change the payment/billing terms for an item in an approved schedule. This change is incorporated into all items, belonging to the term, that are not exported.
Once you have approved a schedule, you can no longer change the schedule date for that schedule. You can change the status of an approved schedule back to draft status, as long none of the items belonging to that schedule have been exported. If you change a schedule to Draft status, you can change the transaction date.
If you place a schedule on hold, you cannot approve it. You must deselect the On Hold check box and change the status to approve it.
A schedule must contain an actual amount before you can approve it. If there is an estimated amount, Oracle Property Manager populates the Actual Amount field with this amount, and you can approve the schedule.
You can approve a schedule even if there are earlier schedules that are in draft status or are on hold. In other words, if the schedule for 01-Jan-01 has a status of draft, you can still approve the schedule for 01-Feb-01. You can create a new payment or billing term even if there are approved schedules that post date the start date of this term.
Authorized Schedules
When you authorize a payment or billing schedule, you are approving all of the individual items it contains for export to Oracle Payables or Oracle Receivables. You cannot export items if you have not authorized the schedule of which they are a part. Before you authorize a schedule, you can change the supplier or customer name and site, and the account, of any items that the event contains.
Note: You can also create new Payment or Billing Items through the Payment or Billing Schedules Details window.
You can then click the Term Details button to make changes to the term to which the item belongs. These changes are reflected when you export transactions. You can also defer any of the individual items in the schedule to the next schedule. See Deferred Payments and Billings.
To authorize a schedule, the schedule must contain an actual amount. If you have not entered an actual amount, Oracle Property Manager inserts the estimated amount into the Actual Amount field on the Payments or Billings tabbed region. You can change this default actual amount if the payment or billing is not normalized.
You display schedules in the Authorize Payments or Authorize Billings window. To select different groups of schedules, you enter search criteria in either the Find Payment Schedules or Find Billings Schedules window. Criteria on which you can base a search include:
-
Operating Unit
-
Lease
-
Schedule date
-
Transaction date or period name
Related Topics
Payments and Billings Overview
Searching for Information, Oracle Applications User's Guide
Payment and Billing Line Items
Within a schedule there are line items. A payment or billing item is the basic unit of the financial transaction process. It is a record of individual payment or billing items that you set up in a transaction term and that you can export to Oracle Payables or Oracle Receivables. The Payment Schedule Details window and the Billing Schedule Details window display all of the items that make up a single payment or billing schedule by schedule date. The upper region of the window shows information that identifies and pertains to the entire schedule. The lower region shows detailed information that pertains to each payment or billing item.
You can also create a new item in the Payment/Billing Schedule Details window. This item must always have a frequency of one-time, and cannot be normalized. You can the choose the Term Details button and enter term information.
The Transaction Date in Oracle Receivables and the Invoice Date in Oracle Payables are the same as the Schedule Date in Property Manager. If you want to change the Transaction Date in the Payment/Billing Schedule Details window, you can override the default value by entering another date that falls within the same period.
In the Payment/Billing Schedule Details window you can defer individual payment items to the next schedule. In the Billing Schedule Details window you can defer individual billing items to the next schedule. See: Deferring Payment Items and Deferring Billing Items.
You can also approve the entire schedule by selecting Approved in the Payment Status field in the upper region of the window.
Payment/Billing Item Amount
To calculate the amount of each individual item, Oracle Property Manager refers back to the amount you entered in the Actual Amount field in the payment or billing term. Based on that amount, Oracle Property Manager calculates a daily amount that it then multiplies by the number of days in the interval that you specified in the Frequency field. This calculation produces the schedule item amount. This is needed when calculating prorated rent.
By calculating the item amount in this way, Oracle Property Manager can accommodate any of the various frequency intervals that you want to use, over a term period of any length that you choose. For example, you may want to make semiannual payments over a payment term period that lasts ten months instead of a year. In that case the amount of the first payment will be calculated to cover six months, and the amount of the second payment will be calculated to cover four months.
When calculating payment or billing items for lease terms that have a frequency of annual, semi-annual, or quarterly, Property Manager calculates the amounts based on the start date of the term. For example, the lease term start date is January 15, 2002, the end date is December 31, 2002 the frequency is semi-annual and the amount is $1,000. The proration rule is 365 Days/Year. Property Manager calculates the amount due as follows: $1,000 due JAN-02 and $931.51 due JUL-02
| Schedule Date | Base Rent | Account Expense | Adjustment | Deferred Liability |
|---|---|---|---|---|
| JAN-02 | $1000.00 | $160.96 | ($839.04) | ($839.04) |
| FEB-02 | 0 | $160.96 | $160.969 | ($678.08) |
| MAR-02 | 0 | $160.96 | $160.96 | ($517.12) |
| APR-02 | 0 | $160.96 | $160.96 | ($356.16) |
| MAY-02 | 0 | $160.96 | $160.96 | ($195.20) |
| JUN-02 | 0 | $160.96 | $160.96 | ($34.24) |
| JUL-02 | $931.51 | $160.96 | ($770.55) | ($804.79) |
| AUG-02 | 0 | $160.96 | $160.96 | ($643.83) |
| SEP-02 | 00 | $160.96 | $160.96 | ($482.87) |
| OCT-02 | 0 | $160.96 | $160.96 | ($321.91) |
| NOV-02 | 0 | $160.96 | $160.96 | ($160.95 |
| DEC-02 | 0 | $160.96 | $160.96 | 0 |
Related Topics
Integration With Oracle Payables and Receivables.
Payments and Billings Overview
Deferring Payments and Billings
You can defer individual payment and billing items from one schedule to the next if the Payment Status of the payment or billing schedule is Draft. If the status of the event is Approved, you cannot defer any items it contains.
Deferring a payment or billing item does not change any of the item's terms, including the original transaction date. The deferred item, with its original transaction date, will appear as an item in the next schedule, and the amount of the item will be added to the new schedule's total amount.
To defer a transaction item to a subsequent schedule, in the Payment Schedule Details or Billing Schedule Details window highlight the specific item you want to defer and choose the Defer button.
Note: When you finalize and save financial transaction terms, in the Enter Leases window, Oracle Property Manager automatically creates a monthly schedule for every month from the commencement to the termination of the lease. If you want to defer an item from the final monthly schedule hat Property Manager created to an event that is later than the termination of the lease, you must first manually create the new schedule by choosing the New button in the Authorize Payments or Authorize Billings window. After you create the new schedule, you can treat it as any other transaction event.
Related Topics
Payments and Billings Overview
Contracting Payment or Billing Terms
You can use the Amend Lease or Edit Lease windows to contract a term to any date equal to or after the start date of the term. Before contracting a term, you must cancel approval of all schedules that you have approved but not exported.
When you contract a term, Oracle Property Manager deals with the schedules for the term as follows:
-
Draft schedules: Deletes all draft schedules for schedule periods after the new end date of the term.
-
Approved schedules: Does not delete approved schedules. Oracle Property Manager creates a single new item for the term to reverse the amounts already approved for schedule periods after the new end date. Oracle Property Manager creates this adjusting item in the last draft schedule. If there is no draft schedule, Oracle Property Manager creates a new draft schedule in the last schedule period (for the new term end date), on the same schedule day.
Important: When you contract a normalized term, Oracle Property Manager renormalizes the term and reverses normalized items from approved schedules to ensure that correct entries are passed for accrual accounts.
Related Topics
Editing or Amending a Normalized Payment or Billing
Integrating with Oracle Payables and Oracle Receivables
All payment and billing items that you approve can be exported to either Oracle Payables or Oracle Receivables. To display approved items in the Export to Payables or Export to Receivables window, enter search criteria in the Find window. You can display different groups of approved items, for example:
-
All transaction items for one lease.
-
All transaction items for multiple leases that occur within a specified schedule or due date range.
-
All transaction items for multiple leases that have the same period name, purpose, supplier name, or customer name.
-
All transaction items that have an amount that falls within a specified amount range.
By default, each authorized schedule will be set up for export in either the Export to Payables or Export to Receivables window. You specify schedules that you do not want to export by deselecting the Export check box.
You can display transaction items that have been exported to Oracle Payables or Oracle Receivables by checking the Exported box in the Find Payments window and then entering search criteria. The Payments Exported to Payables or Billings Exported to Receivables window then displays only payment or billing items that meet the search criteria and have been exported to Oracle Payables or Oracle Receivables. You can view payments or billings exported to Payables or Receivables by choosing the Transactions button on the Payments Exported to Payables or Billings Exported to Receivables window.
If you enter Projects information in the Term Details window, you cannot enter General Ledger account information since either the Projects rule or the General Ledger rule should determine the General Ledger account. For expense leases, if you enter Projects information, you cannot enter either General Ledger account information or the distribution set name. If you enter the distribution set name, you cannot enter either Projects or General Ledger account information.
For subleases and revenue leases, General Ledger accounting information should be verified based on the Accounting Option system option.
-
All Terms: If you set the Accounting Option system option to All Terms, the General Ledger accounting information is required. For normalized terms, you must specify one General Ledger account for each account class (Receivable, Revenue, and Accrued Asset). For non-normalized terms, you must specify a Revenue and Receivable account.
-
Normalized Terms Only: If you set the Accounting Option system option to Normalized Terms Only, the General Ledger accounting information is required only for normalized terms. You must specify a Receivable, Revenue, and Accrued Asset account for normalized terms. No General Ledger Account information is required for non-normalized terms. However, if you enter a Receivable account, you must also enter a Revenue account. Likewise, if you enter a Revenue account, you must also enter a Receivable account.
-
None: If you set the Accounting Option system option to None, General Ledger accounting information is required. If you choose to enter any accounting information for normalized terms, you must enter all three accounts (Receivable, Revenue, and Accrued Asset). If you choose to enter any accounting information for non-normalized terms, you must enter both a Revenue and Receivable account.
Note: If these accounts have been defined in the Details tabbed region on the Lease window, when you navigate to the Accounts Distribution tabbed region, Property Manager automatically defaults these accounts to the term.
Payment and Billing Item Numbers
After you export a payment or billing item to Oracle Payables or Oracle Receivables, the system creates a unique number that is assigned to the item.
-
When you export a payment item to Oracle Payables using the Payables Open Interface Import, the system creates an invoice number that is assigned to the payment item. The invoice number is displayed in the Payments Exported to Payables window.
-
When you export a billing item to Oracle Receivables, the system creates a transaction number that is assigned to the billing item. The transaction number is displayed in the Billings Exported to Receivables window.
Related Topics
Payments and Billings Overview
Expense and Revenue Recognition Process
This section explains how you can use Oracle Property Manager to recognize lease-related revenue and expense by transferring normalized distribution lines to Oracle General Ledger.
This section contains the following topics:
Transferring Normalized Expense and Revenue to Oracle General Ledger
Viewing Information in Oracle Subledger Accounting
Related Topics
Transfer Normalized Lines to GL
Accounting for Tenants
Oracle Property Manager uses the following General Ledger (GL) account classes when defining normalized payment terms:
-
Expense
-
Liability
-
Accrued Liability
For details, see Setting Up Accounting Distributions for Payments.
You can use the Transfer Normalized Lines to GL concurrent program to transfer expense lines to Oracle Subledger Accounting. The accounts that are affected in this process are Expense and Accrued Liability.
Important: You do not transfer normalized expense amounts to Oracle Payables. However, you must pass liability accounting lines through Oracle Payables before transferring them to Oracle Subledger Accounting.
Example
Consider a 12-month lease, with the first month being rent-free. The rent is $1000 per month. Real estate rules (FASB 13) require that this rent be normalized (or straight-lined) across the entire lease term.
The table below illustrates the monthly amounts for the tenant. The key for the table is:
-
Bal - Balance
-
Liab - Liability
-
Exp - Expense
-
Accr - Accrued
| Period | Liab (CR) | Liab (Bal) | Exp (DR) | Exp (Bal) | Accr Liab (DR) | Accr Liab (CR) | Accr Liab (Bal) |
|---|---|---|---|---|---|---|---|
| JAN-02 | 0 | 0 | 916.67 | 916.67 | 0 | 916.67 | (916.67) |
| FEB-02 | 1000 | (1000) | 916.67 | 1833.34 | 83.33 | 0 | (833.34) |
| MAR-02 | 1000 | (2000) | 916.67 | 2750.01 | 83.33 | 0 | (750.01) |
| APR-02 | 1000 | (3000) | 916.67 | 3666.68 | 83.33 | 0 | (666.68) |
| MAY-02 | 1000 | (4000) | 916.67 | 4583.35 | 83.33 | 0 | (583.35) |
| JUN-02 | 1000 | (5000) | 916.67 | 5500.02 | 83.33 | 0 | (500.02) |
| JUL-02 | 1000 | (6000) | 916.67 | 6416.69 | 83.33 | 0 | (416.69) |
| AUG-02 | 1000 | (7000) | 916.67 | 7333.36 | 83.33 | 0 | (333.36) |
| SEP-02 | 1000 | (8000) | 916.67 | 8250.03 | 83.33 | 0 | (250.03) |
| OCT-02 | 1000 | (9000) | 916.67 | 9166.70 | 83.33 | 0 | (166.7) |
| NOV-02 | 1000 | (10,000) | 916.67 | 10,083.37 | 83.33 | 0 | (83.37) |
| DEC-02 | 1000 | (11,000) | 916.63* | 11,000 | 83.37 | 0 | 0 |
| Total | (11,000) | 11,000 | 0 |
* Oracle Property Manager applies rounding differences to the amounts calculated for the last period.
For the month of JAN-02
Because the cash amount is $0, you do not create an invoice in Oracle Payables. You can transfer the distribution lines for the month of JAN-02 directly to Oracle Subledger Accounting using the Transfer Normalized Lines to GL concurrent program. The following table shows the accounting entries that are created in Oracle Subledger Accounting.
| Account | Debit | Credit |
|---|---|---|
| Expense | 916.67 | |
| Accrued Liability | 916.67 |
For the month of FEB-02
You must process the liability amount through Oracle Payables and the expense lines through Oracle Subledger Accounting. As illustrated in the following table, the header in Oracle Payables shows a liability of $1000 and an accrued liability of $1000, indicating a credit of $1000 to the Liability account and a debit of $1000 to the Accrued Liability account.
| Invoice Header | Liability = $1000 |
|---|---|
| Distribution Line 1 | Accrued Liability = 1000 |
The distribution lines passed by Oracle Property Manager to Oracle Subledger Accounting are as illustrated in the following table:
| Account | Debit | Credit |
|---|---|---|
| Expense | 916.67 | |
| Accrued Liability | 916.67 |
Accounting Rules
-
You must approve the schedule before passing the account line to Oracle Subledger Accounting. For details, see Approval Rules for Schedules and Approving Payment Schedules.
-
In cases where you have to pass a liability line to Oracle Payables, you must export the liability line to Oracle Payables before you can submit the Transfer Normalized Lines to GL concurrent program. See Exporting Payment Items to Oracle Payables.
Accounting for Landlords
Oracle Property Manager uses the following GL account classes when defining normalized billing terms:
-
Revenue
-
Receivable
-
Accrued Asset
For details, see Setting Up Accounting Distributions for Billings.
You can use the Transfer Normalized Lines to GL concurrent program to transfer revenue lines to Oracle Subledger Accounting. See Transfer Normalized Lines to GL.
Important: You do not transfer normalized revenue amounts to Oracle Receivables. However, you must pass receivable lines through Oracle Receivables before transferring them to Oracle Subledger Accounting.
Example
You have a 12-month lease, and the first month is rent-free. The rent is $1000 per month. Real estate rules (FASB 13) require that this rent be normalized (or straight-lined) across the entire lease term.
The table below illustrates the monthly amounts for the tenant. The key for this table is:
-
Bal - Balance
-
Rec - Receivable
-
Rev - Revenue
-
Accr - Accrued
| Period | Rec (DR) | Rec (Bal) | Rev (CR) | Rev (Bal) | Accr Asset (DR) | Accr Asset (CR) | Accr Asset (Bal) |
|---|---|---|---|---|---|---|---|
| JAN-02 | 0 | 0 | 916.67 | (916.67) | 916.67 | 0 | 916.67 |
| FEB-02 | 1000 | 1000 | 916.67 | (1833.34) | 0 | 83.33 | 833.34 |
| MAR-02 | 1000 | 2000 | 916.67 | (2750.01) | 0 | 83.33 | 750.01 |
| APR-02 | 1000 | 3000 | 916.67 | (3666.68) | 0 | 83.33 | 666.68 |
| MAY-02 | 1000 | 4000 | 916.67 | (4583.35) | 0 | 83.33 | 583.35 |
| JUN-02 | 1000 | 5000 | 916.67 | (5500.02) | 0 | 83.33 | 500.02 |
| JUL-02 | 1000 | 6000 | 916.67 | (6416.69) | 0 | 83.33 | 416.69 |
| AUG-02 | 1000 | 7000 | 916.67 | (7333.36) | 0 | 83.33 | 333.36 |
| SEP-02 | 1000 | 8000 | 916.67 | (8250.03) | 0 | 83.33 | 250.03 |
| OCT-02 | 1000 | 9000 | 916.67 | (9166.70) | 0 | 83.33 | 166.70 |
| NOV-02 | 1000 | 10,000 | 916.67 | (10,083.37) | 0 | 83.33 | 83.37 |
| DEC-02 | 1000 | 11,000 | 916.63* | (11,000) | 0 | 83.37 | 0 |
| Total | 11,000 | (11,000) | 0 |
* Oracle Property Manager applies rounding differences to the amounts calculated for the last period.
For the month of JAN-02
Because the cash amount is $0, you do not create a transaction in Oracle Receivables. You can transfer the distribution lines for the month of JAN-02 to Oracle Subledger Accounting using the Transfer Normalized Lines to GL concurrent program. The following table displays the accounting entries created in Oracle Subledger Accounting.
| Account | Debit | Credit |
|---|---|---|
| Revenue | 916.67 | |
| Accrued Asset | 916.67 |
For the month of FEB-02
You must process the receivable amount through Oracle Receivables and the revenue lines through Oracle Subledger Accounting. As illustrated in the following table, the header in Oracle Receivables shows a receivable amount of $1000 and a line of $1000 for accrued assets, indicating a debit of $1000 to the Receivable account and a credit of $1000 to the Accrued Asset account.
| Invoice Header | Receivable = $1000 |
|---|---|
| Distribution Line 1 | Accrued Asset = 1000 |
The distribution lines passed by Oracle Property Manager to Oracle Subledger Accounting are as illustrated in the following table:
| Account | Debit | Credit |
|---|---|---|
| Revenue | 916.67 | |
| Accrued Asset | 916.67 |
Accounting Rules
-
You must approve the schedule before passing the accounting line to Oracle Subledger Accounting. For details, see Approval Rules for Schedules and Approving Billing Schedules.
-
In cases where a receivable line needs to be passed to Oracle Receivables, you must export the receivable line to Oracle Receivables before you can submit the Transfer Normalized Lines to GL concurrent program. See Exporting Billing Items to Oracle Receivables.
Transferring Normalized Expense and Revenue to Oracle General Ledger
The following diagram illustrates how accounting information flows from Oracle Property Manager to Oracle General Ledger through Oracle Subledger Accounting.

Step 1: Transfer Normalized Lines to Oracle Subledger Accounting
You transfer normalization-related information from Oracle Property Manager to Oracle Subledger Accounting by running the Transfer Normalized Lines to GL concurrent program. You can decide whether to transfer accounting information for revenue leases, expense leases, or both. You can also specify that you want to run the program for a range of leases, or for particular suppliers or customers. For details, see Transfer Normalized Lines to GL.
Step 2: Create Journal Entries
You create journal entries by running the Create Accounting concurrent program. You can run the Create Accounting concurrent program from Oracle Property Manager. See Submitting Requests.
When running the Create Accounting program, you can specify whether you want to process journal entries for a particular ledger, and whether you wish to transfer them to Oracle General Ledger. For details, see Create Accounting Program, Oracle Subledger Accounting Implementation Guide.
Step 3: Transfer Journal Entries to Oracle General Ledger
The Submit Journal Entry concurrent program transfers journal entries from Oracle Subledger Accounting to Oracle General Ledger. Depending on how Oracle General Ledger and Oracle Subledger Accounting are set up, the Submit Journal Entry program can run automatically when you run the Create Accounting concurrent program. For setup-related details, see Oracle General Ledger, Oracle Property Manager Implementation Guide and Oracle Subledger Accounting, Oracle Property Manager Implementation Guide.
Viewing Information in Oracle Subledger Accounting
Once you have transferred normalized accounting information to Oracle Subledger Accounting, you can use the Subledger Accounting submenu of the Leases and Documents menu to query for and view information related to accounting events, journal entries and journal entry lines.
For a detailed description of the process of viewing accounting information in Oracle Subledger Accounting, see Inquiries, Oracle Subledger Accounting Implementation Guide.
Subledger Drilldown View
From Oracle General Ledger, you can drill down to subledger details from the Account Inquiry, Enter Journals, or View Journals windows for journals that have specific journal sources assigned to them. For example, if a journal source is Oracle Property Manager, you can drill down to the transaction details in Oracle Property Manager.
When you drill down from Oracle General Ledger, the Oracle Property Manager Expense window will open for expenses or the Oracle Property Manager Revenue window will open for revenue items. When the window opens, the following information is displayed:
-
Rent Purpose
-
Rent Type
-
Account
-
Entered Currency
-
Entered Debit
-
Entered Credit
-
Debit (USD)
-
Credit (USD)
-
Supplier or Customer
-
Supplier or Customer Site
Customizing the Drilldown Windows
The drilldown window is a folder. You can easily customize the information that is displayed in the window, as described in the Oracle Applications User's Guide.
See: Customizing the Presentation of Data in a Folder, Oracle Application User's Guide.
Following is a list of all the hidden columns that you may choose to display:
-
Accounting Date
-
Currency Conversion Type
-
Currency Conversion Date
-
Currency Conversion Rate
Following is a list of all the columns that can be sorted:
-
Rent Purpose
-
Rent Type
-
Line Type
For the columns above, sorting can be done by ascending or descending order.
Setting Up Payments
You can set up payments that you export to Oracle Payables. Oracle Payables uses the payment information to create and pay invoices.
This discussion includes the following topics:
Entering Payment Information
-
Set up the suppliers to whom you want to make payments.
-
Enter lease details in the Leases window. Select Expense as the lease class.
Entering Payment Terms
To enter payment terms:
-
In the Term Template field in the Payments tabbed region, select the term template from the list of values. If you selected a term template in the Details tabbed region, the Term Template field defaults to the term template you selected in the Details tabbed region. You can change the default value.
-
In the Payments tabbed region, select the location.
-
Select the purpose of the payment and the type of payment.
-
Select the frequency of payments. If you select One Time for the frequency, the start date and end date must be identical.
-
If you want to normalize the payments, select the Normalize check box and ensure that the payment start and end dates for the normalized term are within the start and end dates of the lease. For more information on normalizing payments, see Normalizing Payments or Billings.
-
Enter the schedule day. This is the day of the month for which schedules should be created. The schedule day must be between 1 and 28.
-
Enter the area type. See: Using Area Type
-
The start and end dates of the payment term defaults to the lease commencement and lease termination dates. For payments that are not normalized, the start date can be earlier and the end date can be later than the commencement and termination dates of the lease. For normalized payments, the start and end dates must be within the commencement and termination dates of the lease.
-
Select the supplier name and supplier site. This information is maintained in Oracle Payables.
-
Enter the estimated amount of the payment if you do not know the actual amount. When you authorize the schedule in the Authorize Payments window, the estimated amount defaults to the actual amount.
Note: You cannot enter an estimated amount for a normalized payment.
-
Enter the actual amount of the payment. If you are setting up recurring payments, this is the amount of each individual payment. You must enter this amount if you do not enter an amount in the Annual/Area field, or if there is no location specified for the term. If you enter the actual amount, Property Manager calculates the annual/area amount.
Note: For information about converting payment amounts to your functional currency, see Currency Conversion for Billing and Payment Term Amounts.
-
Enter a target date if the type of payment is Prepayment. The target date is the date of a later scheduled payment event against which the prepayment will be applied.
-
Optionally enter the annual amount. If no location is specified, this field is disabled.
-
Enter the annual/area amount. You must enter this amount if you do not enter an amount in the Actual Amount field. If you enter the annual/area amount, Property Manager calculates the actual amount.
Copying Payment Terms
To copy a payment term:
-
Navigate to the Payments tabbed region of the Lease window using one of the following paths:
Leases and Documents - Main Lease - Enter Leases and Documents
-
In the Payments tabbed region, select a new row under the payment term template to be copied.
-
From the menu, select the following:
Edit - Duplicate - Record Above
Note: This action will copy the payment term above into the new row. All fields are copied from the old term except the Name and Amount fields. Each field can be modified to suit the new payment term.
Payments Tabbed Region Reference
Date From/To: Date range used to filter payment records.
Term Template: The term template to be used for the transaction. Terms that are defaulted into the lease can be modified.
Location: Enter any of the locations defined in the Locations tabbed region.
Purpose: The reason for the payment.
Type: The type of payment which is being made.
Note: When the type of payment is Prepayment, the Start Date and the End Date must be identical.
Frequency: How often the scheduled payment is to be made.
Normalize check box: Check this option if this payment should be normalized. Normalization spreads the cost over the life of the lease to accurately reflect its expense or revenue over the whole contract period. For more information on normalizing payments, see Normalizing Payments or Billings.
Natural Breakpoint Basis: Check box denoting whether or not the main lease term forms part of the natural breakpoint basis that Oracle Property Manager uses to calculate the natural breakpoints for variable rent.
Schedule Day: The day of the month for which schedules should be created. The value must be between 1 and 28.
Start Date: The first date of the period covered by the payment. For non-normalized terms, you can enter a start date that is earlier than the lease commencement date, but you will receive a warning message.
End Date: The last date of the period covered by the payment. For non-normalized terms, you can enter an end date that is later than the lease termination date, but you will receive a warning message.
Source: Source of the term.
Agreement Name: Name of the operating expense agreement. When users create estimated payment terms in the lease, they can associate an operating expense agreement with the payment term using this field.
Supplier Name: The name of the supplier. Supplier names are set up in the Enter Suppliers window.
Supplier Site: The location of the supplier. Supplier sites are set up in the Enter Suppliers window.
Customer Name: This field is enabled in the Billings feature. See Billings Tabbed Region.
Bill to Site: This field is enabled in the Billings feature. See Billings Tabbed Region.
Ship to Site: This field is enabled in the Billings feature. See Billings Tabbed Region.
Estimated Amount: The amount of the payment, estimated before the payment is actually made. You can use this field for payment types that you estimate in advance of making the actual payment, such as taxes and operating expenses. For normalized terms, you cannot enter an amount in this field.
Actual Amount: The actual amount of the payment to be made. If you enter an amount here, Property Manager calculated the annual/area amount.
Target Date: The date for which the payment is being made. For example, if a security deposit is paid in January, and the payment is intended to cover the last month's rent that is due the following December, the Target Date would be 01-DEC (YYYY).
Note: The Target Date field is only enabled when the Type of payment is Prepayment.
Annual Amount: This amount is calculated as actual amount x frequency. If no location is specified, this field is disabled.
Area: The rentable area, defaulted from the rentable area associated with the primary location. This field is view only.
Annual/Area: This is a user-entered or calculated field indicating annual/rentable area. If you enter an amount here, Property Manager calculates the actual amount. This field is disabled if there is no location associated with a term.
Invoice Grouping Name: Enter the name of the invoice grouping rule you want to use for grouping the payment items that belong to the lease payment terms. This is an optional field, and the default value is blank.
Entering Payment Term Details
When creating payment terms, you need to enter detailed payment term information in the Term Details window. This information includes supplier information, payment terms, tax information, distribution set, and account distribution information.
Providing Accounting Information
You can provide accounting information for a payment term in different ways depending on whether or not the term is normalized.
For non-normalized terms, you can specify
-
A distribution set
-
Project details
-
Accounting information in the Accounts Distribution tabbed region of the Term Details window
For normalized terms, the distribution set and project-related fields are disabled, so you must specify the appropriate accounts for Expense, Liability, and Accrued Liability in the Account Distribution tab of the Term Details window.
For details on account defaulting, see Setting Up Default Accounts, Oracle Property Manager Implementation Guide.
See Also
Setting Up Accounting Distributions for Payments
Entering Term Details
To enter term details:
Note: You can use a term template to provide default values in the Term Details window.
-
Choose the Open button on the Payments tabbed region of the Lease window.
-
In the Pay tabbed region, enter the supplier name and supplier site. The supplier number defaults from the supplier name.
-
Optionally, enter the payment term. If nothing is specified here, Property Manager uses the default terms specified for the supplier to calculate the due date.
-
Optionally, enter the distribution set. For normalized terms, this field is disabled, however, you do need to define all three General Ledger accounts (Liability, Expense, and Accrued Liability).
-
Optionally, in the Tax Inclusive field, specify whether the term amount includes tax. For details, see Pay Tabbed Region.
-
Optionally, enter the tax input classification. This field helps determine the tax distributions in Oracle Payables.
-
Optionally, enter project information: project name, task, expenditure item date, organization, and expenditure type. For normalized terms, these fields are disabled.
-
Save your work.
Setting Up Accounting Distributions for Payments
You can specify accounting information in the Accounts Distributions tabbed region of the Term Details window. The accounting information you provide in the associated term template is displayed here by default. However, you can change the information as required.
Important: The order in which Oracle Property Manager considers accounting distribution information is as follows:
-
Term level
-
Lease level
-
Term Template level
To set up accounting distributions for payments:
-
From the Term Details window, navigate to the Accounts Distribution tabbed region.
-
Specify the account classes and GL accounts.
Important: All the accounts you enter must belong to the same legal entity. Oracle Property Manager will display an error if you enter accounting codes that belong to different legal entities. For details, see Derivation of Legal Entity.
-
For normalized terms, specify at least one General Ledger account for each account class (Expense, Liability, and Accrued Liability).
-
For non-normalized terms, specify at least one General Ledger account and one for the Expense account class. If a liability account is not defined at the payment term level, Property Manager uses the default liability account setup for the supplier and supplier site in Payables.
Note: For non-normalized terms, at a minimum you need to define the Expense account. If you used a term template at the Lease Details level, the accounts you entered in the Details tabbed region override any accounts defaulted from the term template. See: Payment and Billing Term Templates, Oracle Property Manager Implementation Guide.
-
-
Save your work.
Derivation of Legal Entity
Legal entity is one of the mandatory grouping attributes that Oracle Property Manager uses to group payable invoices. See Grouping Payable Invoices and Payment Item Grouping Rules, Oracle Property Manager Implementation Guide.
Oracle Property Manager derives the legal entity from the information you provide for the payment term. The legal entity is set to the first item listed below that is available:
-
The legal entity associated with the supplier site
-
The legal entity derived from the accounting distributions
-
The default legal entity for the operating unit
Payment Term Details Window Reference
Purpose: The reason for the payment. Defaulted from the Payment/Billing tabbed region on the Lease window. This field is required.
Rent Type: The type of payment being made, for example, base rent. This information is defaulted from the Payment/Billing tabbed region on the Lease window. This field is required.
Frequency: How often the scheduled payment is to be made. This information is defaulted from the Payment/Billing tabbed region on the Lease window. This field is required.
Estimated: The estimated amount of the payment/billing. This information is defaulted from the Payment/Billing tabbed region on the Lease window.
Actual: The actual amount of the payment to be made. This field is required if there is no value in the Annual/Area field. This information is defaulted from the Payment/Billing tabbed region on the Lease window.
Normalize check box: Indicates whether the payment/billing is normalized. This information is defaulted from the Payments/Billings tabbed region.
Location Code: The location code assigned by Oracle Property Manager when you set up the location. This information is defaulted from the Payments/Billings tabbed region.
Start Date: The first date of the period covered by the payment. This information is defaulted from the Payment/Billing tabbed region on the Lease window. This field is required.
End Date: The last date of the period covered by the payment. This information is defaulted from the Payment/Billing tabbed region on the Lease window. This field is required.
Target Date: The date for which the payment is being made. This information is defaulted from the Payment/Billing tabbed region on Lease window. This field is required.
Schedule Day: The day of the month for which schedules should be created. The schedule day must be after the last approved schedule, and must be a value between 1 and 28. This information is defaulted from the Payment/Billing tabbed region on Lease window. This field is required.
Annual: The annualized actual amount, calculated as actual amount x frequency. This information is defaulted from the Payment/Billing tabbed region on Lease window. This field is view only.
Area: Defaults from the rentable area associated with the primary location. This field is view only.
Annual/Area: This is a user-entered or calculated field indicating Actual/rentable area. If you enter an amount here, Property Manager calculates the actual amount. This information is defaulted from the Payment/Billing tabbed region on Lease window.
Invoice Grouping Name: Enter the name of the invoice grouping rule you want to use for grouping the payment items that belong to the lease payment terms. This is an optional field, and the default value is blank. This field is only displayed for expense leases.
Pay Tabbed Region
Supplier: The name of the supplier. Defaulted from the Payment/Billing tabbed region on the Lease window. This field is required.
Supplier Number: The supplier number.
Supplier Site: The location of the supplier. Defaulted from the Payment/Billing tabbed region on the Lease window. This field is required.
Payment Term: Select the payment term from the list of values. This field applies only to expense leases.
Distribution Set: Select the distribution set from the list of values.
Tax Inclusive: Enter a value in this field to indicate if the term amount includes tax. Possible values are: Yes, No, and Use System Default.
-
Yes: Indicates that the term amount includes tax.
-
No: Indicates that the term amount does not include tax
-
Use System Default: Indicates that Oracle Payables must decide whether or not the term amount includes tax based on tax-related setups for the supplier.
Consider the example of a payment term for a monthly rent of $700 that is taxable at a rate of 6%.
If you set Tax Inclusive to No, you should enter a term amount of $700. Oracle Payables will calculate tax as $42 and create an invoice for $742. The invoice will have two lines: $700 for rent and $42 for tax.
If you set Tax Inclusive to Yes, you should enter a term amount of $742. Oracle Payables will then calculate the tax amount (based on the rate) as $42 and the rent as $700. The invoice amount will be the same: $742, with the rent and tax detailed at the item level.
If you set Tax Inclusive to Use System Default, the term amount you enter will be either $700 or $742 depending on how the supplier is set up in Oracle Payables.
Tax Input Classification: Select the tax input classification from the list of values.
Project: The project associated with the lease term. For non-normalized terms, you can specify a project as the source of accounting information instead of specifying account distribution information or a distribution set. See Entering Payment Term Details.
Task: The project task name.
Expenditure Type: The expenditure type associated with the project.
Expenditure Item Date: The expenditure item date associated with the project.
Expenditure Organization: The expenditure organization name. If this information exists in Oracle Projects, the value in this field is defaulted automatically.
Accounts Distributions Tabbed Region
Num: This number is system-generated, and indicates the number of lines you entered.
Class: For expense leases, the possible values are: Expense, Liability, and Accrued Liability. You need to enter one expense and one liability account. This field is required if you have set up Oracle Property Manager to perform all of the accounting, or if the Normalized check box is checked on the Leases window.
-
For normalized terms, you must specify one General Ledger account for each of the three classes.
-
For non-normalized terms, you must specify a General Ledger account for the Expense class and the Liability class.
GL Account: Select the General Ledger account from the list of values. This field is required if you have set up Oracle Property Manager to do all of the accounting, or if the Normalized check box is selected on the Leases window
%: Enter a percentage between 0 and 100. This field is required if you have Property Manager set up to do all of the accounting, or if the Normalized check box is checked on the Leases window.
Amount: This value is system calculated.
Account Name: The name of the General Ledger account.
Creating Payment Schedules
After you have entered the required information in the Payments tab of the Lease window, you can create payment schedules as follows:
-
For leases in Signed or Lease Ordered status, click Save. Oracle Property Manager creates payment schedules and items if the term represents a one-time non-normalized payment. After creating the schedules, you cannot alter the one-time non-normalized terms even though the lease still has an Approval Status of Draft.
-
For leases in other lease statuses, set the approval status to Final. Oracle Property Manager creates payment schedules and items for all the lease terms.
To create payment schedules:
-
In the Approval Status field in the upper region of the Leases window select Final and save your work. Oracle Property Manager automatically creates payment schedules for the lease payment terms you entered.
Note: After you have changed the approval status to Final and saved your work, you can make changes to the lease information either by editing the lease or by creating a lease amendment. See: Making Changes and Additions to the Lease.
Approving Payment Schedules
When you approve a payment schedule, all of the individual payment items in that event are approved.
Prerequisites:
-
Enter lease payment terms in the Payments tabbed region of the Leases window.
-
Create a payment schedule by changing the status of the lease to Final and saving your work.
To approve a payment schedule:
-
In the Authorize Payments window, select the specific payment schedule that you want to approve. Choose the Details button to open the Payment Schedule Details window.
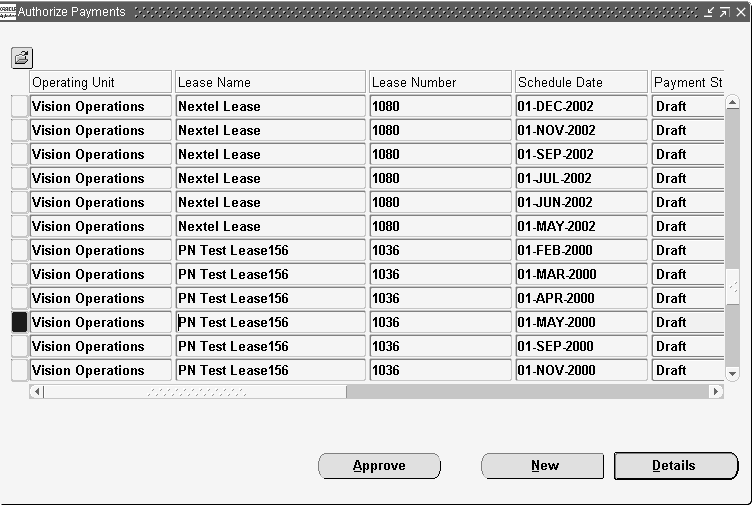
-
Optionally add any comments, such as special payment instructions. The comments you enter here will appear on the Rent Schedule Detail report.
-
Change the payment status of the payment schedule from Draft to Final.
Note: If any schedules have been placed on hold, you will not be able to approve them. Also, the schedule must contain an actual amount or an estimated amount, which defaults to the actual amount. Otherwise, you will not be able to approve the schedule.
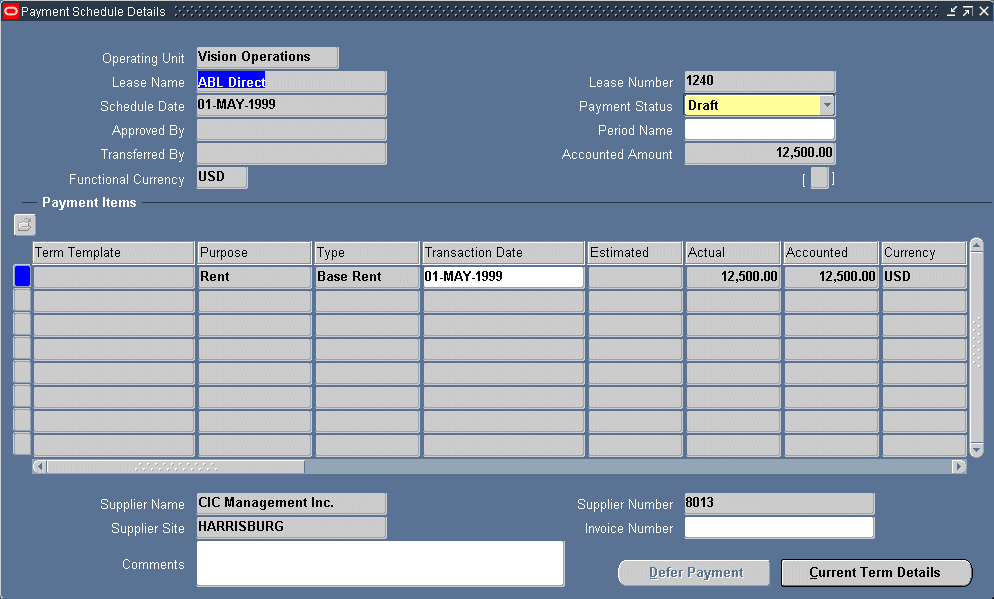
-
Save your work.
Note: If the details of a payment or billing term is changed through the Edit Lease, Amend Lease, or Terms Details window, you are prompted with the following message:
If you change the rate for this payment/billing term, it will affect all it's items that belong to unapproved schedules. If you change any other details for this term, it will affect all unexported items belonging to this term. Do you want to proceed? You can choose either Yes or Cancel.
Grouping Payable Invoices
Use the Invoice Grouping functionality to include multiple payment items on one invoice. This can eliminate the redundancy of creating a transaction for each payment item and greatly decrease the number of payment transactions exported to Oracle Payables. If you export payment items without using this feature, it results in the export of each individual payment item as an individual invoice.
Note: In order for a payment item grouping to take place, the payment grouping rule must be created in Oracle Property Manager and specified for the desired grouping level before exporting the payments to Oracle Payables.
You can create grouping rules to allow grouping of payment items based on various invoice attributes, such as supplier, transaction date, purpose, type, and others. You can apply grouping rules at various application levels to further tailor the grouping characteristics.
You can group Oracle Property Manager payment items based on the combination of mandatory and optional grouping attributes. The mandatory grouping attributes are always included in payable grouping rules. You can add optional attributes with the mandatory attributes to create new grouping rules. To be included in a group transaction, a payment item must match all of the mandatory attributes as well as any of the optional attributes included in the grouping rule.
Note: Oracle Property Manager can only group payment items that use the same liability account number. If all the payment items that are to be grouped on an invoice do not have the same liability account CCID, the payment items will be exported individually, and no grouping will be performed.
For information on setting up and using grouping rules, see Payment Item Grouping Rules, Oracle Property Manager Implementation Guide.
Exporting Payment Items to Oracle Payables
You can export any individual payment item that is included in an approved payment schedule.
Prerequisite:
-
Create suppliers.
-
Approve all payment schedules that include payment items that you want to export.
To export payment items to Oracle Payables:
-
Navigate to the Export Payments to Payables window by selecting Leases and Documents: Payments: Export to Payables.
Note: You can export payment items to Oracle Payables by using the Submit Request window to run the Export Payment Items to AP concurrent program. See Export Payment Items to AP.
-
In the Find Payments window enter search criteria to retrieve the specific payment items that you want to approve. The criteria available are the following:
-
Operating Unit
-
Lease Name
-
Number
-
Schedule Dates (range)
-
Due Date (range)
-
Payment Purpose
-
Period Name
-
Amount (range)
-
Supplier Name
-
Invoice Number
-
Exported check box
-
-
Choose the Find button to open the Export Payments to Payables window.
-
In the Export Payments to Payables window every payment item for which the Export check box is checked will be exported.
Note: Uncheck the Export check box for any payment item that you do not want to export.
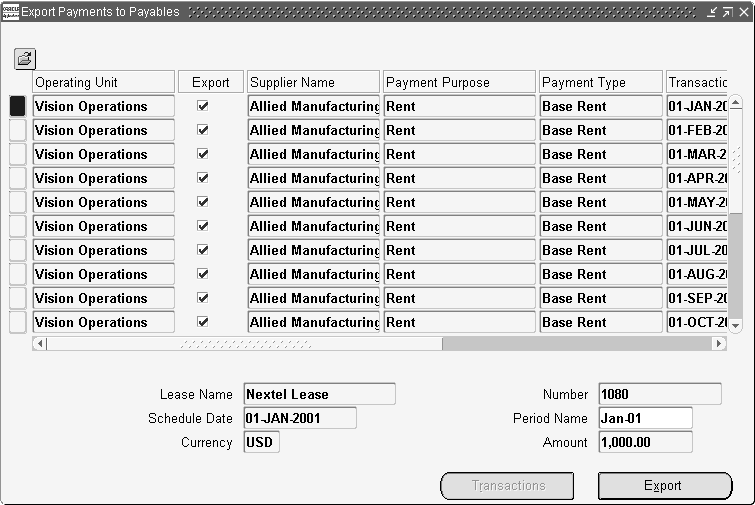
-
Click the Export button to export all payment items with checked Export check boxes. Oracle Property Manager runs a concurrent program to export the payment information to Oracle Payables interface tables. See Export Payment Items to AP.
-
Oracle Property Manager assigns a unique invoice number to each exported payment item. To view the payment item invoice number navigate back to the Export Payments to Payables window.
-
From Oracle Payables, run the Payables Open Interface Import program to import Property Manager transactions into Oracle Payables. See: Submitting the Payables Open Interface Import Program, Oracle Payables User Guide.
-
From the Payments Exported to Payables window, choose the Transactions button to view the invoices generated in Oracle Payables.

Related Topics
Approving Payment Schedule Events
Deferring Payment Items
If a payment schedule event is in Draft status you can defer the included payment items from that event to the next payment schedule.
Prerequisite:
-
Create a payment schedule. See: Creating Payment Schedules.
To defer payment items:
-
In the Find Payment Schedules enter search criteria to retrieve the specific payment schedules that include the payment items that you want to defer. Choose the Find button to open the Authorize Payments window.
-
In the Authorize Payments window, select the specific payment schedule that includes the payment items that you want to defer. Choose the Details button to open the Payment Schedule Details window.
-
Select the payment item that you want to defer.
-
Choose the Defer Payment button.
-
Save your work.
Note: When early terminating a lease with payments deferred to the next period, a message appears notifying you that there are outstanding deferred payments and early termination is not allowed in the period for which payments are already authorized.
Related Topics
Lease Window and Edit Lease Window Reference
Tabbed Regions Reference for Lease, Edit Lease, and Amend Lease Windows
Normalizing Payments or Billings
Setting Up Billing
You can enter billing information in Oracle Property Manager that you export to Oracle Receivables. Oracle Receivables uses this information to create invoices and record payments.
Related Topics
Payments and Billings Overview
Entering Billing Information
-
In Oracle Receivables, set up the customers for whom you want to generate billings. See Creating a Customer, Oracle Receivables User Guide.
-
In Oracle Property Manager enter lease details in the Leases window. Select either Revenue or Sublease as the Lease Class. See: Abstracting a Lease.
Entering Billing Terms
To enter billing terms:
-
Navigate to the Leases window. Choose the Billings tabbed region.
-
In the Term Template field in the Billings tabbed region, select the term template from the list of values. If you selected a term template in the Details tabbed region, the Term Template field defaults to the term template you selected in the Details tabbed region. You can change this default value.
-
In the Billings tabbed region, select the location.
-
Select the purpose of the billing and the type of billing.
-
Select the frequency of billings. If you select One Time for the frequency, the start date and end date must be identical.
-
If you want to normalize your billings, check the Normalize check box and ensure that the payment start and end dates for the normalized term are within the start and end dates of the lease. For more information on normalizing billings, see Normalizing Payments or Billings.
-
Enter the schedule day. This is the day of the month for which schedules should be created. The schedule day must be between 1 and 28.
-
Enter the Area Type. See Using Area Type.
-
The start date and end dates of the billing term defaults to the lease commencement and lease termination dates. For billings that are not normalized, the start date can be earlier than the commencement date of the lease and the end date can be later than the termination date of the lease. For normalized billings, the start and end dates must be within the commencement and termination dates of the lease.
-
Select the Customer Name, Bill to Site, and Ship to Site. This information is maintained in Oracle Receivables.
-
Enter the estimated amount of the billing if you do not know the actual amount. When you authorize the schedule in the Authorize Billings window, the estimated amount defaults to the actual amount.
Note: You cannot enter an estimated amount for a normalized billing.
-
Enter the actual amount of the billing. If you are setting up recurring billings, this is the amount of each individual billing. You must enter this amount if you do not enter an amount in the Annual/Area field or if there is no location specified for the term. If you enter the actual amount, Property Manager calculates the annual/area amount.
Note: For information about converting billing amounts to your functional currency, see: Currency Conversion for Billing and Payment Term Amounts.
-
You must enter a target date if the type of billing is Prepayment. The target date is the date of a later scheduled billing event against which the prepayment will be applied.
-
Optionally enter the annual amount. If no location is specified, this field is disabled.
-
Enter the annual/area amount. You must enter this amount if you do not enter an amount in the Actual Amount field. If you enter the annual/area amount, Property Manager calculates the actual amount.
Copying Billing Terms
To copy a billing term:
-
Navigate to the Billings tabbed region of the Lease window using one of the following paths:
Leases and Documents - Main Lease - Enter Leases and Documents
-
In the Billings tabbed region, select a new row under the billing term template to be copied.
-
From the menu, select the following:
Edit - Duplicate - Record Above
Note: This action will copy the billing term above into the new row. All fields are copied from the old term except the Name and Amount fields. Each field can be modified to suit the new billing term.
Billings Tabbed Region
Date From/To: Date range used to filter billing records.
Term Template: The term template to be used for the transaction. Terms that are defaulted into the lease can be modified.
Location: Enter any of the locations defined in the Locations tabbed region.
Purpose: The purpose for which the payment is made.
Type: The type of payment which is being billed.
Note: When the type of payment is Prepayment, the Start Date and the End Date must be identical.
Frequency: The period over which payments are due.
Note: If the type of payment is Prepayment, the Frequency must be One Time.
Normalize: check box: Check this option if this billing should be normalized. Normalization spreads the cost over the life of the lease to accurately reflect its expense or revenue over the whole contract period. For more information on normalizing payments, see Normalizing Payments or Billings.
Natural Breakpoint Basis: Check box denoting whether or not the main lease term forms part of the natural breakpoint basis that Oracle Property Manager uses to calculate the natural breakpoints for variable rent.
Schedule Day: The day of the month for which schedules should be created. The value must be between 1 and 28.
Start Date: The date of the beginning of the billing schedule. For non-normalized terms, you can enter a start date that is earlier than the lease commencement date, but you will receive a warning message.
End Date: The date the final payment is due. For non-normalized terms, you can enter an end date that is later than the lease termination date, but you will receive a warning message.
Source: Source of the term.
Supplier Name: This field is enabled in the Payments feature. See Payments Tabbed Region.
Supplier Site: This field is enabled in the Payments feature. See Payments Tabbed Region.
Customer Name: The name of the payer. You can enter customer information in the Customers windows.
Customer Bill to Site: The customer location to which bills are sent.
Ship to Site: The customer location where merchandise is sent.
Estimated Amount: The estimated amount of the payment due. For normalized terms, you cannot enter an amount in this field.
Actual Amount: The amount of the payment received.
Target Date: The date for which the received payment is being made. For example, if a payment for a security deposit is received in January, and the payment is intended to cover the last month's rent in December, the Target Date would be 01-DEC (YYYY).
Note: The Target Date field is only enabled when the type of payment is Prepayment.
Annual Amount: The view only annual amount for the billing. This amount is calculated as actual amount x frequency. If no location is specified, this field has no value.
Area: The rentable area, defaulted from the rentable area associated with the location specified for a term. This field is view only.
Annual/Area: This is a user-entered or calculated field indicating annual/rentable area. If you enter an amount here, Property Manager calculates the actual amount. This field is disabled if there is no location associated with a term.
Entering Billing Term Details
When creating billing terms, you need to enter detailed billing term information in the Term Details window. This information includes customer information, payment terms and methods, account distributions, PO numbers, and tax information. It also includes such information as transaction type, invoice and accounting rules, salesperson, Projects information, and accounts distribution information.
Entering Term Details
To enter term details:
Note: You can default the values on the Term Details window by using a term template.
-
Choose the Open button on the Billings tabbed region of the Lease window.
-
In the Bill tabbed region, enter the customer name and customer bill-to site. Oracle Property Manager automatically displays the customer number based on the customer name.
-
In the Bill tabbed region, enter the ship-to site.
-
Enter the payment term.
Important: Depending on how you have set up Oracle Receivables, the payment term you specify here might be overwritten by the payment term associated with the customer profile when you export billing information.
-
Optionally, enter the payment method and PO Number.
-
Optionally, select the Tax Inclusive check box. For the implications of selecting this check box, see Bill Tabbed Region.
-
Enter the tax output classification. This field is required if you select the Tax Inclusive check box.
-
Enter the transaction type.
-
Optionally enter the invoice rule and accounting rule. You must enter information in both of these fields or in neither field. These fields are disabled for normalized terms.
-
Optionally enter the salesperson. This field is required if the Require Salesperson check box is checked on the System Options window in Oracle Receivables. The values in the LOV are drawn directly from the same field in Oracle Receivables.
-
Optionally enter Projects information in flexfields. The five optional Projects fields you can define are: Project Name, Task, Expenditure Item Date, Organization, and Expenditure Type. These fields are sent to Oracle Receivables as information only.
-
Save your work.
Setting Up Accounting Distributions for Billings
You can specify accounting information in the Accounts Distributions tabbed region of the Term Details window. The accounting information you provide in the associated term template is displayed here by default. However, you can change the information as required.
Important: The order in which Oracle Property Manager considers accounting distribution information is as follows:
-
Term level
-
Lease level
-
Term template level
To set up accounting distributions for billings:
-
In the Billings tabbed region of the Lease window, choose the Open button.
-
From the Term Details window, navigate to the Accounts Distribution tabbed region.
-
3. Specify the account classes and GL accounts according to the value set for the Accounting Option system option.
You can set the Accounting Option system option to the following three values:
-
All Terms
-
Normalized Terms Only
-
None
The following table illustrates the accounting information you must provide for non-normalized terms depending on how you have set up the Accounting Option system option.
Accounting Option Receivable Revenue Accrued Asset All Terms Required Required Not Required Normalized Terms Only Not Required Not Required Not Required None Not Required Not Required Not Required Note: If you choose to enter any accounting information when the Accounting Option system option is set to Normalized Terms Only or None, you must specify both a Receivable and Revenue account.
The following table illustrates the accounting information you must provide for normalized terms depending on the setup of the Accounting Option system option.
Accounting Option Receivable Revenue Accrued Asset All Terms Required Required Required Normalized Terms Only Required Required Required None Not Required Not Required Not Required Note: If you choose to enter any accounting information when the Accounting Option system option is set to None, you must specify all three accounts.
-
-
Save your work.
For details on account defaulting for billing terms, see Setting Up Default Accounts, Oracle Property Manager Implementation Guide.
Derivation of Legal Entity
Legal entity is one of the mandatory grouping attributes used to group billing invoices. See Grouping Receivable Invoices and Billing Item Grouping Rules, Oracle Property Manager Implementation Guide.
Oracle Property Manager derives the legal entity from the information you provide for the billing term. The legal entity is set to the first item listed below that is available:
-
The legal entity associated with the customer's Bill To site
-
The legal entity associated with the transaction type
-
The legal entity associated with the transaction source
-
The default legal entity for the operating unit
Billing Term Details Window Reference
For information on fields in the Rent, and Dates and Metrics regions, see Payment Term Details Window Reference.
Bill Tabbed Region
Customer Name: The name of the customer. This field is required.
Customer Number: The customer number.
Bill to Site: The customer location to which bills are sent.
Ship to Site: The customer location.
Payment Term: Select the payment term from the list of values. This field applies only to revenue leases and subleases.
Payment Method: Select the payment method from the list of values. This field is required.
PO Number: Specify the PO Number associated with the billing term.
Tax Inclusive check box: Use this check box to indicate if the billing term amount includes tax. If you select this check box, you must specify a tax output classification.
Tax Output Classification: Select the relevant tax output classification to be used for calculating the tax amount from the list of values. This field is required if you select the Tax Inclusive check box.
Transaction Type: Select the transaction type from the list of values.
Invoice Rule: Select the invoice rule from the list of values. This field is required if you enter information in the Accounting Rule field. Otherwise, this field is optional. This field is disabled for normalized terms.
Accounting Rule: Select the accounting rule from the list of values. This field is required if you enter information in the Invoice Rule field. Otherwise, this field is optional. This field is disabled for normalized terms.
Salesperson: Enter the salesperson from the list of values.
Accounts Distributions Tabbed Region
Num: This number is system-generated, and indicates the number of lines you entered.
Class: For revenue leases and subleases, the possible values are: revenue, asset, receivable, and accrual. You need to enter a revenue, asset, and receivable account. This field is required if you have set up Oracle Property Manager to perform all of the accounting, or if the Normalized check box is checked on the Leases window.
In addition to terms, requirements are also dependent on the value of the Accounting Option system option. See Setting Up Accounting Distributions for Billings.
GL Account: Select the General Ledger account from the list of values. This field is required if you have set up Oracle Property Manager to do all of the accounting, or if the Normalized check box is selected on the Leases window
%: Enter a percentage between 0 and 100. This field is required if you have Property Manager set up to do all of the accounting, or if the Normalized check box is checked on the Leases window.
Amount: This value is system calculated.
Account Name: The name of the General Ledger account.
Creating Billing Schedules
After you have entered the required information in the Billings tab of the Lease window, you can create billing schedules as follows:
-
For leases in Signed or Lease Ordered status, click Save. Oracle Property Manager creates billing schedules and items if the term represents a one-time non-normalized billing. After creating the schedules, you cannot alter the one-time non-normalized terms even though the lease still has an Approval Status of Draft.
-
For leases in other statuses, set the approval status to Final. Oracle Property Manager creates billing schedules and items for all the lease terms.
To create billing schedules:
-
In the Approval Status field in the upper region of the Leases window select Final and save your work. Oracle Property Manager automatically creates billing schedules for the lease billing terms you entered.
Note: After you have changed the approval status to Final and saved your work, you can make changes to the lease information either by editing the lease or by creating a lease amendment. See: Making Changes and Additions to the Lease.
Approving Billing Schedules
When you approve a billing schedule, all of the individual billing items in that schedule are approved.
Prerequisites:
-
Enter lease billing terms in the Billings tabbed region of the Leases window. See: Entering Billing Information.
-
Create a billing schedule by changing the status of the lease to Final and saving your work.
To approve a billing schedule:
-
Navigate to the Find Billing Schedules window.
-
In the Find Billing Schedules window, enter search criteria to retrieve the specific billing schedules that you want to approve. Choose the Find button to open the Authorize Billings window.
-
In the Authorize Billings window, select the specific billing schedule that you want to approve.
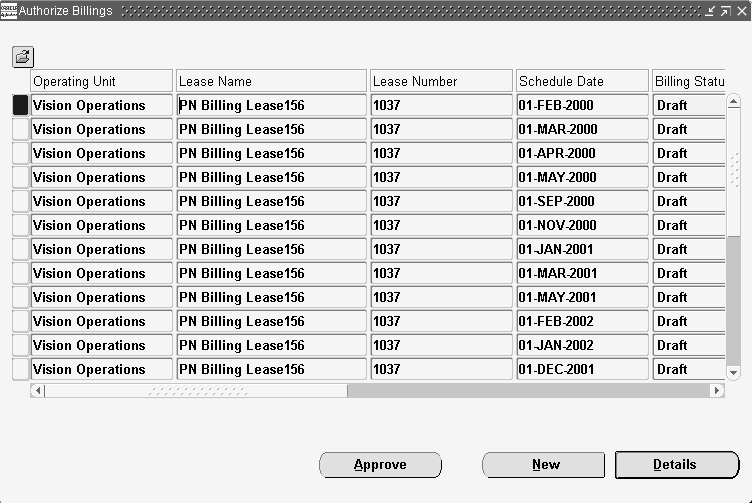
-
Change the billing status of the billing schedule from Draft to Final. You can also approve schedules from the Billing Schedule Details window.
-
In the Billing Schedule Details window, optionally add any comments, for example, special billing instructions. The comments you enter here will appear on the Rent Schedule Detail report.
-
The system defaults the Oracle Receivables period based on the schedule date. If the period is closed, the system defaults to the next open Receivables period using the name format: MM-YYYY.
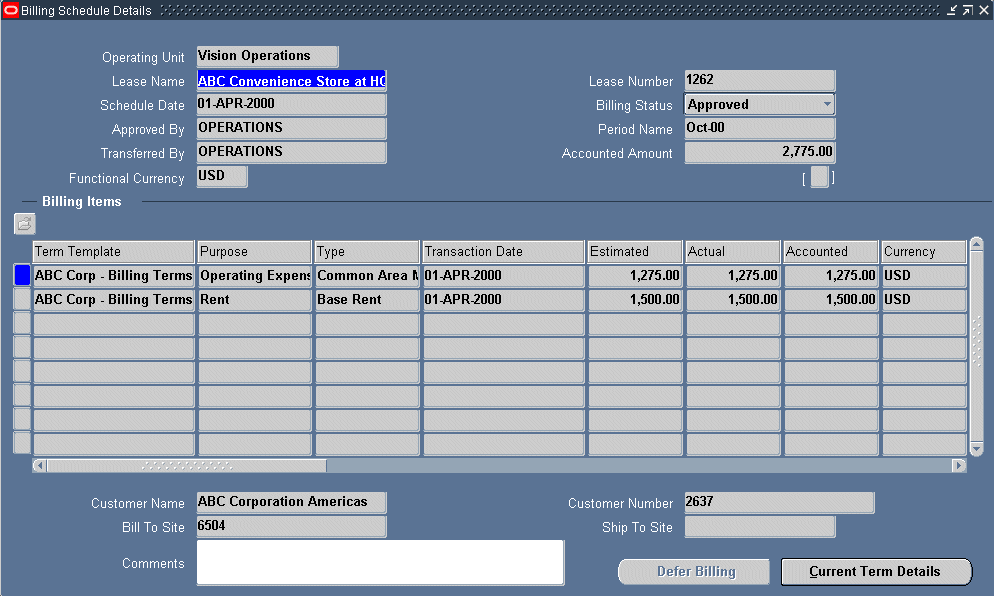
-
Save your work.
Note: If you change the details of a payment or billing term through the Edit Lease, Amend Lease, or Terms Details window, you are prompted with the following message:
If you change the rate for this payment/billing term, it will affect all it's items that belong to unapproved schedules. If you change any other details for this term, it will affect all unexported items belonging to this term. Do you want to proceed? You can choose either Yes or Cancel.
Grouping Receivable Invoices
Use the Invoice Grouping feature to include multiple billing items on one invoice. This can eliminate the redundancy of creating a transaction for each billing increase and greatly decrease the number of billing transaction exported to Oracle Receivables. If you export transaction items without using this feature, it results in the export of each individual billing item as an individual invoice.
Note: In order for a receivable grouping logic to apply, the grouping rule must be created in Oracle Receivables and associated with the transaction source named Property Manager Batch Source before exporting billing items from Oracle Property Manager.
You can create grouping rules to allow grouping of billing items based on various invoice attributes, such as customer, transaction date, purpose, type, and others.
For information on creating and using Receivable Invoice Grouping Rules, see Billing Item Grouping Rules, Oracle Property Manager Implementation Guide.
Related Topics
Importing Transaction Information Using AutoInvoice, Oracle Receivables User Guide
Exporting Billing Items to Oracle Receivables
You can export any individual billing item that is included in an approved billing schedule.
When exporting items with normalized terms to Oracle Receivables, ensure that the Revenue Account Allocation field in the Property Manager Batch Source is set to Amount. The Property Manager Batch Source is defined in the Transaction Sources window in Oracle Receivables. The Amount value is seeded in Oracle Property Manager.
For terms that are not normalized, the Revenue Account Allocation field can be set to either Amount or Percent. If invoice and accounting rules are specified, Property Manager sends a percentage to the Oracle Receivables interface table. If invoice and accounting rules are not specified, Property Manager sends both percentages and amounts to the Oracle Receivables interface table.
Prerequisite:
-
Approve all billing schedules that include billing items that you want to export. See: Approving Billing Schedule Events.
To export billing items to Oracle Receivables:
Note: When exporting a negative dollar amount to Oracle Receivables, the GL Account specified in the Billing Term Template window should be credited with the negative amount.
-
Navigate to the Export Billings to Receivables window by selecting Leases and Documents: Billings: Export to Receivables.
Note: You can export billing items to Oracle Receivables by running the Export Billing Items to AR concurrent program from the Submit Request window. See: Export Billing Items to AR.
-
In the Find Billings window enter search criteria to retrieve the specific billing items that you want to approve. The criteria available are the following:
-
Operating Unit
-
Lease Name
-
Number
-
Schedule Dates (range)
-
Transaction Dates (range)
-
Payment Purpose
-
Period Name
-
Amount (range)
-
Customer Name
-
Exported check box
-
-
Choose the Find button to open the Export Billings to Receivables window.
-
In the Export Billings to Receivables window, every billing item for which the Export check box is checked will be exported.
Note: Uncheck the Export check box for any billing item that you do not want to export.
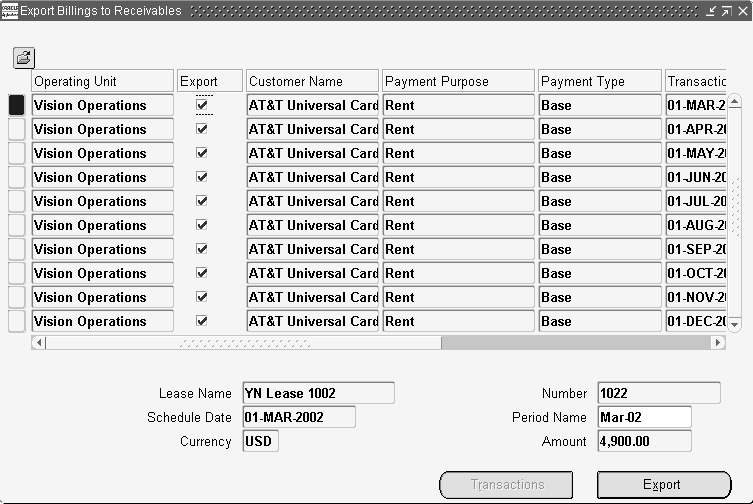
-
Click the Export button to export all billing items with selected Export check boxes. Oracle Property Manager runs a concurrent program to transfer billing information to Oracle Receivable interface tables. See: Export Billing Items to AR.
-
In Oracle Receivables, run the Autoinvoice Master Import program to import transactions into Oracle Receivables.
-
Oracle Receivables assigns a unique transaction number to each exported billing item. To view the billing item transaction number navigate back to the Export Billings to Receivables window.
-
From the Billings Exported To Receivables window choose the Transactions button to view the transactions generated by Oracle Receivables.
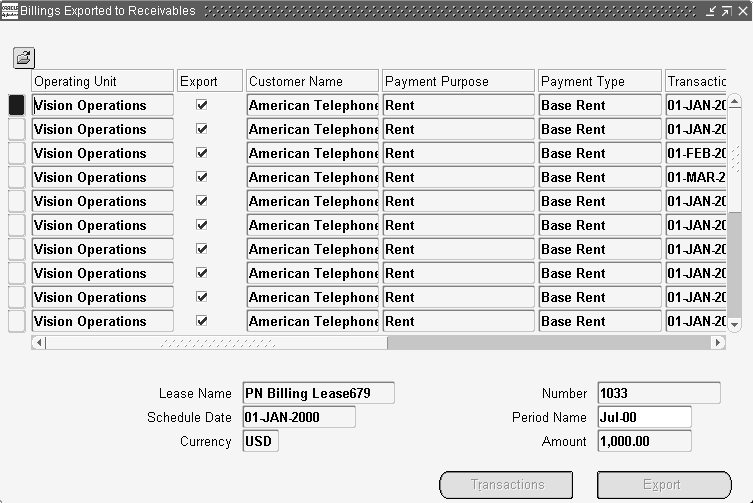
Deferring Billing Items
If a billing schedule is in Draft status you can defer the included billing items from that event to the next billing schedule.
Prerequisite:
-
Create a billing schedule. See: Creating Billing Schedules and Events.
To defer a billing item:
-
Navigate to the Find Billing Schedules window by selecting Billings: Authorize from the Navigator.
-
In the Find Billing Schedules enter search criteria to retrieve the specific billing schedules that include the billing items that you want to defer. Choose the Find button to open the Authorize Billings window.
-
In the Authorize Billings window, select the specific billing schedule that includes the billing items that you want to defer. Choose the Details button to open the Billing Schedule Details window.
-
Select the billing item that you want to defer.
-
Choose the Defer Billing button.
-
Save your work.
In the figure below the August billing item has been deferred to September.
Normalizing Payments or Billings
Landlords and tenants whose companies are publicly traded need to comply with FASB-13 standards for accounting of leases. According to these rules, companies need to normalize or calculate the average rent payments/billings over the term of the lease. These normalized amounts need to be reported as revenue/expense, along with accrued revenue/liability, so that the investment community can accurately analyze the company's financials.
If you have a lease for which payment/billing amounts vary over the lease term, you can use Property Manager to normalize a lease for you and renormalize it if you amend the lease. Normalization, also known as straight-lining, spreads the cost of rent payments/billings and rent abatements over the life of a lease to more accurately record the lease expense or revenue during the time it was incurred.
Rent normalization is used to comply with FASB-13 standards. Landlords can vary rent amounts over the life of a lease term for the following reasons:
-
Provide an incentive for the lessee
-
Reflect the anticipated effects of inflation
-
Ease the lessee's near term cash flow requirements
Using the rent normalization feature provides you with detailed monthly deferred liability and accrued asset amounts that can be accessed by accounting and finance departments to accurately calculate and estimate company-level revenue and expenses.
Only those lease terms for which the Normalize check box is checked can be normalized.
Only actual amounts can be specified for normalized terms.
All normalized terms must lie within the lease term. In other words, the start date of a normalized term cannot be earlier than the lease commencement date, and the normalized payment/billing term end date cannot be later than the lease termination date.
When you enter a lease, you check the Normalize check box for a payment, billing, or abatement if you want it to be included in the normalization calculations. Refer to the accounting rules used by your organization to confirm which payments/billings you are allowed to normalize.
Important: Enter all terms, and be certain which terms you want to normalize.
Note: You cannot have normalized payment terms for a lease with a lease status of Month-to-Month or Holdover.
After you finalize and save the lease, Property Manager creates a payment or billing schedule. In the View Requests window you can then review the payment/billing schedule and the normalized amounts, or you can run the Normalized Rent Schedule Report.
If Property Manager needs to prorate a normalized amount, for example, if your payments are monthly and the lease begins mid-month, Property Manager uses the proration rule you selected in the Details window to prorate the cash amount. The normalized average for that month is also prorated.
Property Manager transfers revenue and expense distribution lines directly to Oracle General Ledger.
To calculate the average (normalized) amount for a term, Oracle Property Manager adds up all the cash items for that term over the entire lease term, and divides this sum with the number of months between the lease start and end dates.
If the lease starts or ends mid-month, the proration rule specified at the Lease Details level is used to calculate the number of months.
Example 1 of Rent Normalization: One Schedule Day for all Terms
This example uses the following terms:
-
Lease begins mid-month on 15 January, 2001 and ends mid-month on 14 January, 2002.
-
Rent for the first quarter is $100; rent for the second quarter is $200; rent for the third quarter is $300, rent for the fourth quarter is $400; rent for the fifth quarter is $500.
-
Rent abatement of $10 is given only in the first month.
-
Rent is scheduled to be paid in full at the beginning of every month.
-
Proration rule is Days/Month.
The following table illustrates rent normalization calculations. Note that in the table:
-
Adj, the heading for Column F, stands for Adjustment.
-
Column B minus Column C equals Column D.
-
Column E equals the sum total cash rent divided by twelve months. This column shows the average expense/revenue associated with the lease that needs to be reported.
-
Column E minus Column D equals Column F.
-
Column G contains a running total of Column F. Column F shows deferred liability. From the payment perspective, it is the amount that the tenant owes that will be paid later on as the lease progresses.
The adjustment is the amount in addition to the cash that the expense/revenue needs to be adjusted if the system passes only the cash amount to Oracle Payables or Oracle Receivables.
-
Column H contains the rentable area of the property on the lease.
-
Note that for the first month (15 January, 2001 to 31 January, 2001), the tenant owes rent for 17 days. This is calculated as 100 * (17/31) = $54.84.
For the last period (01 January, 2001 to 14 January, 2002), the tenant owes 500 * (14/31) = $225.81.
-
For the first month, the prorated normalized amount is 133.75 (the normalized amount of 243.90 is prorated based on 17 days in January using the Days/Month proration rule.
The prorated normalized amount for the last month is 110.148 (the normalized amount of 243.90 is prorated based on 14 days in January using the Days/Month proration rule.
-
The proration rule is Days/Month.
| Schedule Date (A) | Base Rent (B) | Rent Abatement (C) | Total Cash Rent (D) | Account Expense (E) | Adj (F) | Deferred Liability (G) | Rentable Size (H) |
|---|---|---|---|---|---|---|---|
| 15-JAN-01 | $54.84 | $10 | $44.84 | $144.89 | $100.05 | $100.05 | 3429 |
| 01-FEB-01 | $100.00 | 0 | $100.00 | $264.22 | $164.22 | $264.27 | 3429 |
| 01-MAR-01 | $100.00 | 0 | $100.00 | $264.22 | $164.22 | $428.49 | 3429 |
| 01-APR-01 | $200.00 | 0 | $200.00 | $264.22 | $64.22 | $492.71 | 3429 |
| 01-MAY-01 | $200.00 | 0 | $200.00 | $264.22 | $64.22 | $556.93 | 3429 |
| 01-JUN-01 | $200.00 | 0 | $200.00 | $264.22 | $64.22 | $621.15 | 3429 |
| 01-JUL-01 | $300.00 | 0 | $300.00 | $264.22 | ($35.78) | $585.37 | 3429 |
| 01-AUG-01 | $300.00 | 0 | $300.00 | $264.22 | ($35.78) | $549.59 | 3429 |
| 01-SEP-01 | $300.00 | 0 | $300.00 | $264.22 | ($35.78) | $513.81 | 3429 |
| 01-OCT-01 | $400.00 | 0 | $400.00 | $264.22 | ($135.78) | $378.03 | 3429 |
| 01-NOV-01 | $400.00 | 0 | $400.00 | $264.22 | ($135.78) | $242.25 | 3429 |
| 01-DEC-01 | $400.00 | 0 | $400.00 | $264.22 | ($135.78) | $106.47 | 3429 |
| 01-JAN-02 | $225.81 | 0 | $225.81 | $244.68 | ($106.49) | $0.02 | 3429 |
Example 2 of Rent Normalization: Different Schedule Days For Different Terms
This example uses the following terms:
-
Lease begins mid-month on 15 January, 2001 and ends mid-month on 14 January, 2002.
-
Rent for the first quarter is $100; rent for the second quarter is $200; rent for the third quarter is $300, rent for the fourth quarter is $400; rent for the fifth quarter is $500.
-
The schedule day for the first four payment terms is 1. The schedule day for the last payment term is 2.
| Schedule Date | Base Rent | Rent Abatement | Total Cash Rent | Account Expense | Adjustment | Free Rent Liability |
|---|---|---|---|---|---|---|
| 01-JAN-01 | $55.89 | $0.00 | $55.89 | $137.45 | $81.56 | $81.56 |
| 02-JAN-01 | $0.00 | $0.00 | $0.00 | $10.70 | $10.70 | $92.26 |
| 01-FEB-01 | $100.00 | $0.00 | $100.00 | $245.93 | $145.93 | $238.19 |
| 02-FEB-01 | $0.00 | $0.00 | $0.00 | $19.15 | $19.15 | $257.34 |
| 01-MAR-01 | $100.00 | $0.00 | $100.00 | $245.93 | $145.93 | $403.27 |
| 02-MAR-01 | $0.00 | $0.00 | $0.00 | $19.15 | $19.15 | $422.42 |
| 01-APR-01 | $200.00 | $0.00 | $200.00 | $245.93 | $45.93 | $468.35 |
| 02-APR-01 | $0.00 | $0.00 | $0.00 | $19.15 | $19.15 | $487.50 |
| 01-MAY-01 | $200.00 | $0.00 | $200.00 | $245.93 | $45.93 | $533.43 |
| 02-MAY-01 | $0.00 | $0.00 | $0.00 | $19.15 | $19.15 | $552.58 |
| 01-JUN-01 | $200.00 | $0.00 | $200.00 | $245.93 | $45.93 | $598.51 |
| 02-JUN-01 | $0.00 | $0.00 | $0.00 | $19.15 | $19.15 | $617.66 |
| 01-JUL-01 | $300.00 | $0.00 | $300.00 | $245.93 | ($54.07) | $563.59 |
| 02-JUL-01 | $0.00 | $0.00 | $0.00 | $19.15 | $19.15 | $582.74 |
| 01-AUG-01 | $300.00 | $0.00 | $300.00 | $245.93 | ($54.07) | $528.67 |
| 02-AUG-01 | $0.00 | $0.00 | $0.00 | $19.15 | $19.15 | $547.82 |
| 01-SEP-01 | $300.00 | $0.00 | $300.00 | $245.93 | ($54.07) | $493.75 |
| 02-SEP-01 | $0.00 | $0.00 | $0.00 | $19.15 | $19.15 | $512.90 |
| 01-OCT-01 | $400.00 | $0.00 | $400.00 | $245.93 | ($154.07) | $358.83 |
| 02-OCT-01 | $0.00 | $0.00 | $0.00 | $19.15 | $19.15 | $377.98 |
| 01-NOV-01 | $400.00 | $0.00 | $400.00 | $245.93 | ($154.07) | $223.91 |
| 02-NOV-01 | $0.00 | $0.00 | $0.00 | $19.15 | $19.15 | $243.06 |
| 01-DEC-01 | $400.00 | $0.00 | $400.00 | $245.93 | ($154.07) | $88.99 |
| 02-DEC-01 | $0.00 | $0.00 | $0.00 | $19.15 | $19.15 | $108.14 |
| 01-JAN-02 | $0.00 | $0.00 | $0.00 | $113.20 | $113.20 | $221.34 |
| 02-JAN-02 | $230.14 | $0.00 | $230.14 | $8.81 | ($221.33) | $0.00 |
Related Topics
Normalized Rent Schedule Report
Editing or Amending a Normalized Payment or Billing
Approving and Canceling Approval of Schedules
You can select and approve (or cancel approval of) groups of payment or billing schedules by using the Approve or Cancel Approval of Schedules concurrent program. See Approve or Cancel Approval of Schedules.
Setting Exceptions
In the Authorize Payments or Authorize Billings window, you can review, modify, and exclude scheduled billings before running the Approve or Cancel Approval of Schedules concurrent program. To exclude a schedule, set it as an exception by selecting the On Hold check box.
On Hold Status Rules
Rules for placing schedules on hold include the following:
-
You cannot cancel approval of a schedule or place it on hold if you have exported any of its items.
-
You cannot approve a schedule that has a status of On Hold.
-
If you have approved a schedule but not exported any items within it, you can change the status of this schedule from Approved to Draft. After changing the status to Draft, you can select the On Hold check box.
Validation
If any record fails validation, the Lease Name, Number, Schedule Date, and the potential cause of the failure are noted in the request's output and log file. The remaining schedules that pass validation are approved. If the concurrent program completes as normal, you can see the approved records by requerying the Authorize Payment or Authorize Billings window.
Approval and Cancellation of Lease Schedules
You take the following steps while approving schedules.
Review Lease Schedules
To review lease schedules and place selected schedules on hold:
-
In the Navigator window, choose Leases and Documents: Payments: Authorize or Leases and Documents: Billings: Authorize.
-
Find the schedules you want to review as potential approval exceptions.
-
Optionally, you can prevent approval of a schedule by selecting the On Hold check box.
-
Save your work.
Run the Approve or Cancel Approval of Schedules Program and Review the Result
For details on how to run the concurrent program for approving schedules and view the results, see Approve or Cancel Approval of Schedules .
Canceling Approval of Schedules
You might have to cancel approval of schedules once they have been approved. The process of canceling approval of schedules is similar to that of approving schedules. Run the Approve or Cancel Approval of Schedules concurrent program and select Unapprove in the Action parameter in the Parameters window. For more information, see: Approve or Cancel Approval of Schedules.
Related Topics
The Payments and Billings Processes
Approve Payment Schedule Events
Approve Billing Schedule Events
Prepaying Rent Payments or Billings
You can record rent prepayments for both payments and billings. You enter separate payment terms for prepayments. The start date and end date are the same. You enter a target date, which is the rent payment date that the prepayment pays.
For the prepayment, you need to enter the General Ledger accounts: expense, liability, and accrued liability for paying leases, and revenue, receivable, and accrued asset for billing leases. You then enter payment terms for the lease to create a recurring lease payment schedule just as you would if you had not made a prepayment.
After you enter a prepayment, Oracle Property Manager automatically creates a payment item for the target date. This amount of the payment item is the negative amount of the prepayment, and the payment item uses the same account as the prepayment. On the payment date, you export to Payables both the negative amount payment item and the regularly scheduled rent payment item. Exporting these payment items creates unpaid invoices in Oracle Payables. Make sure that the supplier site is not set to Pay Alone in the Supplier Sites window. If the sum for the period is zero, then Oracle Payables creates no payment. However, even if Oracle Payables creates no payment, it records accounting for the two invoices: the prepaid expense account is relieved and the rent expense is applied in the correct period.
For example, you are the tenant, rent payments are $6000 per month, and the lease term is from January 1 to June 30. On January 1 you pay the first and last month's rent. You create a $6000 payment item for the prepayment with the start date and end date both January 1, and the target date of June 1. You then create a payment schedule for the lease term from January 1 through June 30, with payments of $6000 per month. Because you entered a target date for the prepayment item, Oracle Property Manager automatically creates a payment item for -$6000 for the target date, June 1. The following table shows the payment schedules you set up and the payment schedule Oracle Property Manager automatically generates.
| Month | Payment Schedule - Prepayment | Payment Schedule - Lease | Payment Schedule - Automatic |
|---|---|---|---|
| January | $6000 | $6000 | |
| February | $6000 | ||
| March | $6000 | ||
| April | $6000 | ||
| May | $6000 | ||
| June | $6000 | $-6000 |
Accounting for Prepayments
When Property Manager generates the negative payment for the target date, it uses the same prepaid expense account as the prepayment. This ensures that the prepaid expense account is relieved on the target date.
The payment for the target date, which was generated by the recurring payment schedule, charges the expense account on the target date.
Using the above example, Oracle Property Manager generates payments to your landlord of: $12,000 in January, and $6000 from February through May. The accounting for January will be a $6000 debit to the prepaid expense account, a $6000 debit to the rent expense account, and a $12,000 credit to the cash account.
Payments in February through May will each debit the rent expense account $6000 and credit the cash account $6000. In June, you export the items to Oracle Payables, which creates invoices that are accounted, but since the balance is zero, no payment is made.
The negative invoice (credit memo) relieves the prepaid expense account, and the rent invoice debits the expense account $6000.
The two remaining accounting entries net to zero in either the liability or cash account, depending on the accounting method you use.
From the perspective of the tenant, the accounting for prepayments is shown in the following table:
| Account | Debit | Credit |
|---|---|---|
| Prepaid | X | |
| Cash | X |
On the target date, Property Manager submits the negative of the prepaid amount. Because a regular rent schedule has been set up, on the same date, the rent expense account is also debited, creating the correct journal entries, as shown in the following table:
| Account | Debit | Credit |
|---|---|---|
| Prepaid | X | |
| Expense | X |
Normalizing Prepayments
Property Manager normalizes all payment items on a lease that have the Normalize check box checked. In the above example, if you normalize all payment items, Property Manager normalizes the sum of the six payment items ($36,000) and divides them over the lease term (January 1 until June 30). The normalized amounts charge the expense account $6000 per month during the lease term. You can view these amounts in the Normalized Rent Schedule report.
Entering Prepayments
You can record rent prepayments for both payments and billings. For example, the tenant might prepay the first or last month's rent.
To manage a prepayment:
-
Enter the prepayment payment/billing terms:
-
Choose the payment/billing type of prepayment.
-
Enter One Time in the Frequency field and use the same Start Date and End Date.
-
If you are normalizing the rent payments, check the Normalize check box for the prepayment payment item. You cannot normalize a prepayment if the start date or end date of the prepayment is outside the lease term.
-
Enter the schedule day, which is the date on which the schedule should occur.
-
Enter a target date, which is the rent payment date that the prepayment will prepay.
Property Manager will create a payment item to offset the prepayment on the target date.
-
-
Enter payment terms for the term of the lease to create a recurring payment schedule. This payment schedule should include a payment for the target date.
-
On the target date export all payments to Oracle Payables or Oracle Receivables, even if the sum of the payments is zero. This ensures that the accounting is correct.
Related Topics
Normalized Rent Schedule Report
Reviewing Leases
You can inquire on a lease to review basic information for the lease. You can also view any amendments, transaction history, or payments/billings.
To review lease information:
-
View your lease by navigating to the Find Leases window and entering search criteria to retrieve the lease you want to view.
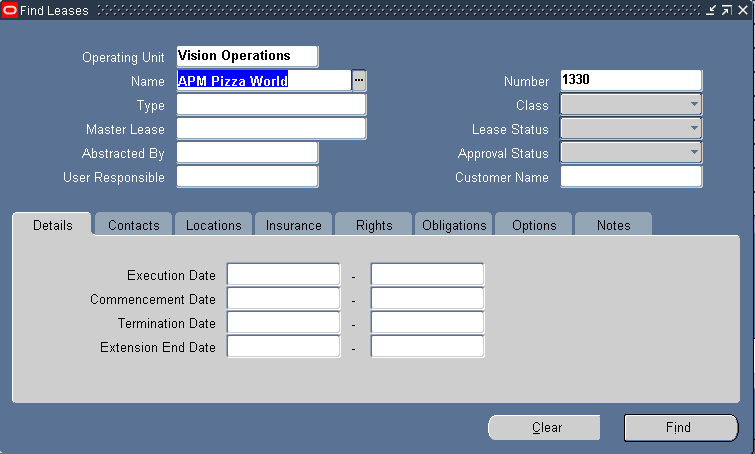
When you press the Find button, the Leases window displays all of the leases that meet your search criteria. At the bottom of the window are four buttons that enable you to view different information about the lease you select.
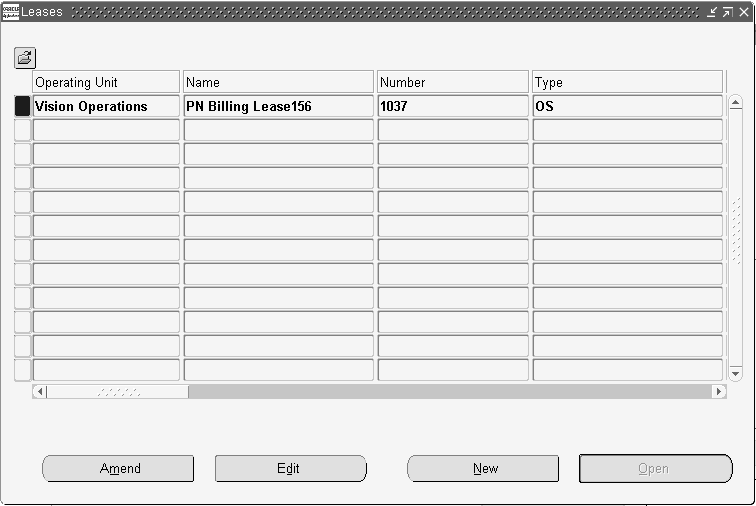
-
In the Leases window view information for the lease by choosing a button, as shown in the following table:
Choose this button... To view... Transactions Information on all transactions, both amendments and edits, that have been done on the lease. Amendments Information on all the amendments that have been created. Edits Information on all the edits that have been done. Open General lease information, including information that was entered in the tabbed regions of the Leases window. You can view lease information as of a particular date by entering a date in the Date Effective field. The default for this field is the current date.
Related Topics
Searching for Information, Oracle Applications User's Guide
Modifying Leases
You can change information in the Leases window as long as the approval status of the lease is Draft. Once you have changed the approval status of the lease to Final and saved the lease, you must use one of these two methods to modify Lease window information:
-
Amend the lease information. Use the Amend feature when the lease has been amended and you have to update your lease information to include the lease amendment.
The Amend feature is similar to the Edit feature in that a lease amendment may be created to cover changes or additions to the terms of the lease. However, when you create a lease amendment in Property Manager, the amendment will have its own name and number, distinct from the lease name and number.
-
Edit the lease information. Use the Edit feature to correct errors you might have made entering lease information, and to enter additional information after the lease is finalized.
This discussion includes the following topics:
Related Topics
Editing or Amending a Normalized Payment or Billing
Making Changes and Additions to a Lease
This section provides a series of tables that specify the fields you can modify in the Edit Lease and Amend Lease windows.
Amend Lease and Edit Lease windows
The following table specifies the fields you can modify in the header region of the Amend Lease and Edit Lease windows.
| Field | Amend | Edit |
|---|---|---|
| Operating Unit | No | No |
| Name | No | Yes |
| Number | No | Yes |
| Type | No | No |
| Class | No | No |
| Master Lease | No | No |
| Abstracted By | No | No |
| Approval Status | No | No |
| Lease Status | Yes | No |
| Primary Location | Yes | No |
| Customer | No | Yes |
Details Tabbed Region
The following table specifies the fields you can modify in the Details tabbed region of the Amend Lease and Edit Lease windows.
| Field | Amend | Edit |
|---|---|---|
| Execution (Key Lease Dates region) | No | No |
| Commencement (Key Lease Dates region) | No | No |
| Termination (Key Lease Dates region) | Yes | No |
| Expense or Revenue (Account Defaults region) | Yes | Yes |
| Liability or Receivable (Account Defaults region) | Yes | Yes |
| Accrued Liability or Accrued Asset (Account Defaults region) | Yes | Yes |
| Lease Term | Yes | No |
| Term Template | Yes | Yes |
| User Responsible | No | Yes |
| Functional Currency | No | No |
| Proration Rule | No | No |
| Invoice Grouping Name | Yes | Yes |
Locations Tabbed Region
You can modify all the fields in the Locations tabbed regions of the Amend Lease and Edit Lease windows. The following fields are not relevant for expense leases.
-
Recovery Type
-
Recovery Space Standard
-
Financial Obligation End Date
Also, note that changing the location code does not affect the Area and Annual/Area fields. Oracle Property Manager populates the new location you define in the Location field for all new payment or billing terms created.
Contacts, Insurance, Rights and Obligations, and Options Tabbed Regions
You can modify all the fields in the Insurance, Rights and Obligations, and Options tabbed regions of the Amend Lease and Edit Lease windows.
Payments and Billings Tabbed Region
The following table specifies the fields, common to the Payments and Billings tabbed regions of the Amend Lease and Edit Lease window, which you can modify.
| Field | Amend | Edit |
|---|---|---|
| Term Template | No | No |
| Location | Yes | Yes |
| Purpose | No | No |
| Natural Breakpoint Basis | Yes | Yes |
| Type | No | No |
| Frequency | No | No |
| Normalize | No | No |
| Schedule Day | No | No |
| Start Date | No | No |
| End Date | Yes | Yes |
| Estimated Amount | No | No |
| Annual/Area | No | No |
| Accounts Distribution | Yes | Yes |
The following table lists the fields, specific to the Payments tabbed region and the payment Term Details window, which you can modify.
| Item | Amend | Edit |
|---|---|---|
| Agreement Name | No | No |
| Invoice Grouping Name | Yes | Yes |
| Supplier Name | Yes | Yes |
| Supplier Number | Yes | Yes |
| Supplier Site | Yes | Yes |
| Payment Term | Yes | Yes |
| Distribution Set | No | No |
| Tax Input Classification* | Yes | Yes |
| Tax Inclusive | Yes | Yes |
| Project | No | No |
| Task | No | No |
| Expenditure Type | No | No |
| Expenditure Item Date | No | No |
| Expenditure Organization | No | No |
* Changes to Tax Input Classification Codes are reflected in all the items that you have not exported.
The following table lists the fields, specific to the Billings tabbed region and the billing Term Details window, which you can modify.
| Item | Amend | Edit |
|---|---|---|
| Customer Name | Yes | Yes |
| Customer Number | Yes | Yes |
| Bill To Site | Yes | Yes |
| Ship To Site | Yes | Yes |
| Payment Terms | Yes | Yes |
| Payment Method | Yes | Yes |
| PO Number | Yes | Yes |
| Tax Inclusive | Yes | Yes |
| Tax Output Classification* | Yes | Yes |
| Transaction Type | Yes | Yes |
| Invoice Rule | No | Yes |
| Accounting Rule | No | Yes |
| Salesperson | Yes | Yes |
* Changes to Tax Output Classification Codes are reflected in all the items that you have not exported.
Notes Tabbed Region
The following table specifies the fields you can modify in the Notes tabbed region of the Amend Lease and Edit Lease windows.
| Item | Amend | Edit |
|---|---|---|
| Type | Yes | Yes |
| Date | Yes | Yes |
| User | No | No |
Amending a Lease
You create an amendment to your lease information in Oracle Property Manager when the tenant and landlord have executed an amendment to the lease. An amendment usually describes agreements between the landlord and tenant that are not in the original lease. These agreements may cover changes to the original lease terms, or they may cover new lease terms that do not appear in the lease itself.
For example, if the original lease did not include a provision covering payment of insurance, and the landlord and tenant agree that the tenant will pay for liability insurance, they can create an amendment that reflects the new agreement. You can then update your Oracle Property Manager information using the Amendment feature.
When you create an amendment in Oracle Property Manager you name the amendment, and identify its execution, commencement, and termination dates. Choose a name for the amendment that will indicate its connection to the lease. For example, if the name of the location is National Trade Center, and the name of the lease is NTC, you could name the amendment NTC-a.
Depending upon how Oracle Property Manager is implemented at your site, either you or Oracle Property Manager will assign a number to the lease amendment. You enter an execution date, a commencement date, and a termination date for the amendment. The dates for the amendment must fall within the range of dates defined for the lease. You also enter the name of the person who abstracted the amendment, and the name of the person to whom the amendment is assigned.
Note: The information that identifies the amendment applies only to the amendment itself, not to the original lease.
Making Lease Amendments
To amend a lease:
-
In the Find Leases window, perform a query to display the lease that you want to amend.
-
Select the lease that you want to amend and then choose the Amend button to display the Amend Lease window.
-
Change previously entered information and add new lease terms as necessary.
Note: You can add new payment or billing terms if the start and end dates of the new term fall within the commencement and termination dates of the lease, and no approved payment schedule already covers the same period as the payment or billing term. You can add payment or billing terms as long as the start date post dates the last approved schedule.
-
Save your work.
Changing the Lease Status
This section describes the implications of using the amend function to change the status of a lease.
Changing Lease Status from Active to Month-to-Month
When you change the lease status from Active to Month-to-Month, the Extension End Date field becomes required and the Termination Date field is disabled. The extension end date cannot be earlier than the lease termination date. When you save the changes, payment schedules and billing items are created for the new period that has been added.
When the lease status changes from Active to Month-to-Month, not-normalized payment or billing terms are extended only if the extension does not overlap with an approved schedule. Otherwise, a new not-normalized item is created. The schedule day for the new term would be the same as the original term.
For existing normalized terms with an end date that is the same as the lease termination date, Property Manager creates a new term with the Normalized check box unchecked.
Note: Property Manager does not allow normalized terms to be created when the lease status is changed to Month-to-Month or Holdover, in compliance with FASB 13.
Example of Changing Lease Status from Active to Month-to-Month
Scenario 1
You have an active, finalized, expense lease with commencement and termination dates of 01-JAN-02 and 31-DEC-02. This lease has three payment terms, as shown in the following table:
| Term | Start Date | End Date | Normalized | Amount | Frequency | Term Type |
|---|---|---|---|---|---|---|
| 1 | 01-JAN-02 | 31-DEC-02 | Yes | $1000 | Monthly | Base Rent |
| 2 | 01-JAN-02 | 31-DEC-02 | No | $3000 | Quarterly | Operating Expenses |
| 3 | 01-JAN-02 | 31-OCT-02 | No | $500 | Monthly | Maintenance Charge |
Using the amendment function, you change the lease status from Active to Month-to-Month, and enter an extension end date of 03-31-03. Assuming all schedules in 2002 have been approved, Property Manager updates the lease status to Month-to-Month and creates new payment terms and corresponding schedules and items as shown in the following table:
| Term | Start Date | End Date | Normalized | Amount | Frequency | Term Type |
|---|---|---|---|---|---|---|
| 1 | 01-JAN-02 | 31-DEC-02 | Yes | $1000 | Monthly | Base Rent |
| 2 | 01-JAN-02 | 31-MAR-03 | No | $3000 | Quarterly | Operating Expenses |
| 3 | 01-JAN-02 | 31-OCT-02 | No | $500 | Monthly | Maintenance Charge |
| 4 | 01-JAN-03 | 31-MAR-03 | No | $1000 | Monthly | Base Rent |
The above table shows the changes in the payment terms of the lease. Term 4, not normalized, was created as a result of the lease status change. This term is the same as term 1, except that this new term is not normalized. The end date of term 2 changed from 31-DEC-02 to 31-MAR-03. Term 3 was not selected because the end date of this term did not coincide with the original lease termination date.
If the lease is amended and the extension end date changed from 31-MAR-03 to 15-APR-03, and none of the schedules have been approved, the changes shown in the following table occur:
| Term | Start Date | End Date | Normalized | Amount | Frequency | Term Type |
|---|---|---|---|---|---|---|
| 1 | 01-JAN-02 | 31-DEC-02 | Yes | $1000 | Monthly | Base Rent |
| 2 | 01-JAN-02 | 15-APR-03 | No | $3000 | Quarterly | Operating Expenses |
| 3 | 01-JAN-02 | 31-OCT-02 | No | $500 | Monthly | Maintenance Charge |
| 4 | 01-JAN-03 | 15-APR-03 | No | $1000 | Monthly | Base Rent |
In the above table, Property Manager did not pick up terms 1 and 3, since their end dates did not coincide with the old extension end date of 31-MAR-03.
Changing Lease Status from Month-to-Month to Active
When changing from Month-to-Month status to Active status, the billing terms, rent index, and variable rent, as well as any tenancies must be set up or extended. You are required to change the lease termination date. The Extension End Date field is disabled.
Changing the Lease Status from Lease Ordered or Signed
You can change the lease status from LOF or SGN to another status freely in either of the following cases:
-
You change lease status from LOF to SGN and vice versa
-
You have not created payment or billing terms
If terms exist, the implications depend on the new lease status. If you are terminating the lease, the following rules apply:
-
If you contract the lease, Oracle Property Manager deletes draft schedules.
-
If you have approved schedules, you must finalize the lease before terminating it. Oracle Property Manager then creates schedules and items for recurring terms.
When moving the lease to any other lease status, you must finalize the lease first. Oracle Property Manager then creates schedules and items for existing lease terms.
Changing the Lease Status to Month-to-Month or Holdover
When changing the lease status of a finalized lease to MTM or HLD, you must provide an extension end date. This date must be later than the previous end date of the lease. Thus, you extend a lease when you change the lease status from Active or Terminated to MTM or HLD. See also, Extending or Expanding Leases.
Extending Leases in Month-to-Month or Holdover Lease Status
After a finalized lease is in MTM or HLD status, you can either manually extend the lease every month or run the concurrent program PN - Month to Month Rollforward Process. This concurrent program acts as follows:
-
Extends leases to the specified date. The concurrent program catches up with extensions that you skipped in previous extensions by extending all selected leases to the same date.
-
Extends rent increase and variable rent agreements, if required
-
Prorates term amounts and creates appropriate items for non-monthly terms
-
Records amendments so that you can track lease history
For more information, see Month to Month Rollforward.
Changing the Lease Status from Month-to-Month or Holdover to Active
When you change the lease status to Active from MTM or HLD, you must provide a new lease termination date. If the new termination date is the same as the extension end date, Oracle Property Manager takes no further action. Else, Oracle Property Manager behaves as follows:
-
If the new termination date is earlier than the extension end date, Oracle Property Manager treats this modification as a lease contraction. See Contracting Leases.
-
If the new termination date is later than the extension end date, Oracle Property Manager treats this modification as a lease expansion. See Extending or Expanding Leases.
Note: If you create a new normalized term or normalized terms existed before you originally changed the lease status to MTM or HLD, Oracle Property Manager normalizes the new terms or the child terms of the old normalized terms. It does not renormalize existing terms. See Normalizing Terms During Lease Expansion.
Extending or Expanding Leases
You can lengthen the life of a lease by either expanding or extending it, as follows:
-
Lease expansion: You expand a lease when you amend the lease termination date to a date later than the previous end date of the lease.
-
Lease extension: You extend a lease when you change the lease status to Month-to-Month or Holdover.
When you expand or extended a lease, Oracle Property Manager deals with associated tenancies, terms, and variable rent and rent increase agreements based on the following rules:
-
Oracle Property Manager extends tenancies and customer space assignments only if you have set the profile option PN: Change Tenancy Dates When Lease Dates Change to Yes.
-
Oracle Property Manager extends tenancies and associated customer space assignments, recurring main lease terms, and variable rent and rent increase agreements only if their termination dates coincide with the previous end date of the lease. Note that the effective end date can either be the lease termination date or the extension end date.
For information on extending variable rent agreements, see Extending and Contracting Agreements.
Extending Terms
You can select to extend terms when extending or expanding leases. In case of lease extensions, Oracle Property Manager automatically extends non-normalized terms that end on the current lease end date. Oracle Property Manager does not extend any normalized terms ending on the current lease end date. Instead, it creates a new child term beginning a day after the end date of the existing term and ending on the extension end date. The new term is a copy of the existing normalized term in all respects except that it is not normalized. Oracle Property Manager considers the original normalized term as the parent of the new non-normalized term.
Normalizing Terms During Lease Expansion
Normalization is not required when extending leases. However, when you expand a lease, Oracle Property Manager ordinarily renormalizes normalized terms. If you add normalized terms when expanding a lease, Oracle Property Manager normalizes them from the amendment commencement date or the last approved schedule date (if that is later) to the new lease termination date.
Renormalization of Existing Terms
When you expand a lease that already has normalized terms, rent increase terms, or both, you can select to renormalize all existing normalized terms to the new lease termination date. If you select not to renormalize all terms, you must enter a cutoff date. Oracle Property Manager does not normalize terms whose previous normalization end date is earlier than the cutoff date.
If the amended lease has approved schedules, Oracle Property Manager renormalizes across all available draft schedules in the lease. It does not include approved schedules for renormalization. You can use the cutoff date to efficiently handle normalization for different extension and renewal scenarios.
Replacement of Non-Normalized Child Terms
When you extend a lease, Oracle Property Manager creates non-normalized child terms to continue any existing normalized terms. If you subsequently expand a lease when changing the lease status back to Active, Oracle Property Manager extends these terms by creating new normalized terms.
Contracting Leases
You can contract a draft lease as required. However, you must create a lease amendment when contracting finalized leases.
Contracting Draft Leases
When you change the termination date of a draft lease to an earlier date, Oracle Property Manager acts as follows:
-
Contracts tenancies and associated customer space assignments to the new termination date if you set the profile option PN: Change Tenancy Dates When Lease Dates Change to Yes
-
Contracts associated variable rent agreements to the new termination date
Oracle Property Manager does not modify main lease terms or rent increase, operating expense, and recoveries agreements.
Contracting Finalized Leases
The profile option PN: Allow Early Termination Before Last Approved Schedule determines the earliest date to which you can contract finalized leases. If you set the profile option to Yes, you can contract a lease to any date equal to or after the start date of the lease. If you set the profile option to No, Oracle Property Manager determines the earliest possible termination date for the lease based on approved schedules.
Important: Before contracting a lease, you must cancel approval of all schedules that you have approved but not exported to Oracle Receivables or Oracle Payables.
When you contract a finalized lease, Oracle Property Manager may also contract terms, tenancies, and agreements, as described in the table below.
| Lease Component | Description |
|---|---|
| Variable rent agreements | See Extending and Contracting Agreements. |
| Rent increase agreements | See Contracting Rent Increase Agreements. |
| Terms | When you contract a lease, Oracle Property Manager contracts terms to the new lease termination date or to other dates depending on how you set the profile option PN: Allow Early Termination Before Last Approved Schedule. See description below. |
| Tenancies | When you contract a lease, Oracle Property Manager performs the following tasks if you set the profile option PN: Change Tenancy Dates When Lease Dates Change to Yes:
|
Allowing Contraction Before the Last Approved Schedule
If lease contraction is not constrained by the existence of approved schedules, you can contract leases to any date equal to or after the lease start date. During lease contraction, Oracle Property Manager amends constituent terms depending on their original end dates, as described in the graphic and text below. The graphic represents a lease and its constituent terms before and after contraction.
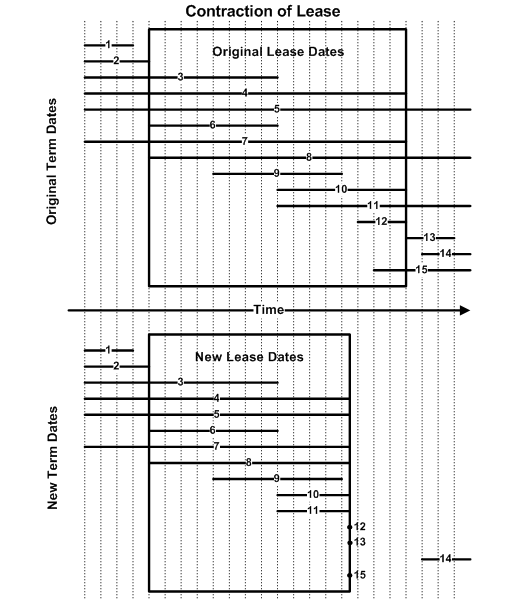
Terms ending before the new termination date: For such terms (for example, terms 1, 2, 3, 6, and 9 in the graphic), Oracle Property Manager does not change the term dates or create adjustments during lease contraction. Oracle Property Manager renormalizes normalized terms except those whose existing normalization end dates are before the new lease termination date. Such terms exist because you previously extended or expanded the lease and elected not to renormalize these terms. See Extending or Expanding Leases.
Terms beginning after original termination date: For such terms (for example, term 14 in the graphic), Oracle Property Manager does not change the term dates or create an adjustment during lease contraction. Note that a term starting after the lease termination date cannot be normalized. Therefore, renormalization is unnecessary.
Terms beginning before new termination date and ending after: For such terms (for example, terms 4, 5, 7, 8, 10, and 11 in the graphic), Oracle Property Manager sets the term end date to the new lease termination date and creates new adjusting items. It renormalizes normalized terms.
Term beginning after new termination date (but not after old termination date): For such terms (for example, terms 12, 13, and 15 in the graphic), Oracle Property Manager sets the term start and end dates to the new lease termination date. Oracle Property Manager also sets the term amount to zero and creates adjusting items.
Renormalization
If renormalization is required, Oracle Property Manager renormalizes across all available draft schedules. It does not include approved schedules in renormalization. If there are no existing draft schedules for renormalization, Oracle Property Manager creates a draft schedule in the last period of the lease and makes any renormalization adjustments in that schedule.
Disallowing Contraction Before the Last Approved Schedule
If lease contraction is constrained by the existence of approved schedules, you must select a lease termination date that is after the date of the last approved schedule. Thus, you may have to select a date later than the true lease termination date. You must then manually create adjustments for approved schedules.
In addition, Oracle Property Manager contracts terms using their item end dates rather than the new lease termination date. The item end date is the end date of the period for which a term’s item is a payment. Consider the example provided below. The following table describes the terms for a lease:
| Term | Frequency | Term Length |
|---|---|---|
| Term 1 | Monthly | January 1, 2006 to December 31, 2009 |
| Term 2 | Monthly | January 1, 2006 to April 15, 2007 |
| Term 3 | Quarterly | January 1, 2006 to December 31, 2009 |
| Term 4 | Semiannual | January 1, 2006 to December 31, 2009 |
All terms have a schedule day of 1 and the current schedule date is April 1, 2007. Therefore, the item end dates for the terms are as follows:
-
Term 1: For monthly terms, the item end date is normally the last day of the month, that is: April 30, 2007
-
Term 2: Because the term ends before the last day of the schedule period, the term end date is also the item end date: April 15, 2007
-
Term 3: For quarterly terms, the item end date is the last day of the quarter, that is: June 30, 2007
-
Term 4: For semiannual terms, the item end date is the last day of the half year, that is: December 31, 2007
Contracting Leases with No Normalized Terms
If the lease you are contracting has no normalized terms, the earliest date to which you can contract it is the last day of the month containing the last approved schedule. For example, if you have approved lease schedules for April 2007, the earliest date to which you can contract the lease is April 30, 2007.
When you contract a lease, Oracle Property Manager deletes draft schedules beyond the new termination date. It deals with terms as follows:
-
Monthly terms whose item end dates are later than the new termination date: Oracle Property Manager contracts terms to the new termination date.
-
Non-monthly terms whose item end dates are later than the new termination date: Oracle Property Manager contracts terms to the last approved item end date. Consider the following example (with the terms described above):
New lease termination date: April 30, 2007
Date of last approved schedule: April 1, 2007
If the schedule date for the last approved schedule is April 1, 2007, the new term end dates for monthly and quarterly terms would be as follows:
-
Term 1 (monthly): March 31, 2007
-
Term 3 (quarterly): June 30, 2007
-
Contracting Leases with Normalized Terms
When contracting leases with any normalized terms, the earliest possible termination date is the later of the following:
-
The last day of the month containing the last approved schedule
-
The latest item end date from any approved schedule
When you contract a lease, Oracle Property Manager deletes draft schedules beyond the new termination date and contracts all terms to the new lease termination date. In addition, it renormalizes all normalized terms to the new lease termination date.
Consider the following example of a lease active from January 1, 2006 to December 31, 2009. The lease has two normalized terms, both valid between January 1, 2006 and December 31, 2009, as described in the following table:
| Term | Frequency | Schedule Day | Last Approved Schedule | Item End Date |
|---|---|---|---|---|
| Term 1 | Monthly | 1 | May 1, 2007 | May 31, 2007 |
| Term 2 | Quarterly | 2 | April 2, 2007 | July 1, 2007 |
Here, the last approved schedule is dated May 1. However, the item end date for the last approved item is July 1. Therefore, you cannot contract the lease to a date earlier than July 1.
Related Topics
Editing or Amending a Normalized Payment or Billing
Viewing Transactions and History
Transactions
Each amendment that you do is a separate transaction. Property Manager keeps a record of all transactions that are done for every lease. This record is linked to the lease, so that when you view lease information, you can also view any amendments. The transaction record can provide you with an audit trail of changes and additions that were made to a lease.
The upper region of the Transactions window displays a summary of all transactions for an individual lease. It shows the type of transaction (amendment), the date of the transaction, and the name of the user who did the transaction.
The tabbed regions of the Transactions window are linked to the transaction records in the upper region. When you select a transaction record, each tabbed region shows the changes, if any, that were made as part of the selected transaction.
To view transaction information
-
In the Navigator window, choose Leases and Documents:Main Lease:View Lease History.
-
Query the leases for which you want to view transaction information.
-
On the Leases window, select the lease for which you want to view transaction information.
-
Choose the Transactions button to bring up the Transactions window.
History
If you make a change to any of the terms in a tabbed region, Property Manager will keep track of the previous terms as well as the current terms. When you choose the History button in the Transactions window, Property Manager displays the information in the selected tabbed region that was effective immediately prior to the current information.
To view transaction history information
-
Navigate to the Transactions window.
-
Select the transaction for which you want to view history information.
-
Choose the History button to bring up the Lease Details History window.
Related Topics
Amend Lease Window Reference
In the header of the Amend Lease window you enter information that identifies and defines the lease amendment.
Note: For information on the tabbed regions of this window, see Tabbed Regions Reference for Lease, Edit Lease, and Amend Lease Windows.
Name: The name of the amendment. You can name amendments according to the naming conventions used by your organization.
Number:This field is display only. Oracle Property Manager assigns the amendment number automatically.
Execution Date: The date that the amendment is executed, as stated in the amendment. If no execution date is stated in the amendment, the date the amendment was signed may also be the execution date.
Commencement Date: The date that the lease amendment begins.
Termination Date: The date that the lease amendment ends.
Term: Property Manager calculates the duration of the lease amendment in days, based on the commencement and termination dates that you enter. This field is display only.
Abstracted By: The name of the person who creates the amendment to the lease.
Assigned To: The name of the person to whom responsibility for the amendment is assigned.
Related Topics
Editing a Lease
You edit a lease to make changes or additions because of an error or omission that was made when the lease information was originally entered. The following are a few points to keep in mind while editing leases:
-
When you edit a lease, the new information becomes part of the lease information. Unlike lease amendments, edits are not identified by a name or number.
Important: If you change the lease name or number using the edit function, you can track the history of those changes in the Lease Details History window. The Lease Details History window shows the both the before and after lease name and number of the lease before and after the change. See Viewing Transactions and History.
-
As is the case with lease amendments, all Draft schedules are renormalized when you edit a lease.
-
You cannot change the lease status using the Edit function.
Making Lease Edits
To edit a lease:
-
In the Find Leases window, perform a query to find the lease that you want to edit.
-
Select the lease that you want to edit, and then choose the Edit button to display the Edit Lease window.
-
Select the tabbed region that contains the fields to which you want make changes or additions.
-
Change previously entered information and add new lease terms as necessary.
Note: You can add new payment or billing terms if the start and end dates of the new term fall within the commencement and termination dates of the lease, and no approved payment schedule already covers the same period as the payment or billing term. You can add payment/billing terms as long as the start date precedes the last approved schedule.
-
Save your work.
Related Topics
Tabbed Regions Reference for Lease, Edit Lease, and Amend Lease Windows
Editing or Amending a Normalized Payment or Billing Term
Editing or Amending a Normalized Payment or Billing
Oracle Property Manager normalizes new lease terms and renormalizes any existing lease terms that are changed, when you make changes to the lease using either the edit or amend functions.
-
When you add a new normalized payment or billing term using the edit function, the normalization start date is the commencement date of the lease.
-
When you add a new term using the amend function, the new payment or billing term is normalized based on the commencement date of the amendment.
-
When you change the end date of an existing normalized term, Oracle Property Manager renormalizes the term. Renormalization occurs across all draft schedules in the lease. Approved schedules are not included in renormalization.
Example of Rent Normalization for New Term Added by Amendment
The original lease has one payment term.
-
Lease is from January 01, 2001 to December 31, 2001 with rent ($100) scheduled for full payment at the beginning of every month.
-
The proration rule is Days/Month.
The following table illustrates the rent normalization calculations.
| Schedule Date | Base Rent | Total Cash Rent | Acct Expense | Adjustment | Deferred Liability |
|---|---|---|---|---|---|
| 01-JAN-2001 | $100.00 | $100.00 | $100.00 | 0 | 0 |
| 01-FEB-2001 | $100.00 | $100.00 | $100.00 | 0 | 0 |
| 01-MAR-2001 | $100.00 | $100.00 | $100.00 | 0 | 0 |
| 01-APR-2001 | $100.00 | $100.00 | $100.00 | 0 | 0 |
| 01-MAY-2001 | $100.00 | $100.00 | $100.00 | 0 | 0 |
| 01-JUN-2001 | $100.00 | $100.00 | $100.00 | 0 | 0 |
| 01-JUL-2001 | $100.00 | $100.00 | $100.00 | 0 | 0 |
| 01-AUG-2001 | $100.00 | $100.00 | $100.00 | 0 | 0 |
| 01-SEP-2001 | $100.00 | $100.00 | $100.00 | 0 | 0 |
| 01-OCT-2001 | $100.00 | $100.00 | $100.00 | 0 | 0 |
| 01-NOV-2001 | $100.00 | $100.00 | $100.00 | 0 | 0 |
| 01-DEC-2001 | $100.00 | $100.00 | $100.00 | 0 | 0 |
Scenario 1
The lease is amended to add a new payment term.
-
The amendment commencement date is April 01, 2001.
-
The additional rent is $50.00 a month.
-
The term is normalized, monthly, and between July 01, 2001 and December 31, 2001.
-
None of the schedules are approved.
Term 2 is normalized from the commencement date of the amendment, April 01, 2001.
Term 1, the original lease term, is renormalized from the lease commencement date, January 01, 2001.
The following table displays the normalized rent amounts.
| Schedule Date | Base Rent | Amendment Rent | Total Cash Rent | Acct Expense | Adjustment | Deferred Liability |
|---|---|---|---|---|---|---|
| 01-JAN-2001 | $100.00 | 0 | $100.00 | $100.00 | 0 | 0 |
| 01-FEB-2001 | $100.00 | 0 | $100.00 | $100.00 | 0 | 0 |
| 01-MAR-2001 | $100.00 | 0 | $100.00 | $100.00 | 0 | 0 |
| 01-APR-2001 | $100.00 | 0 | $100.00 | $133.33 | $33.33 | $33.33 |
| 01-MAY-2001 | $100.00 | 0 | $100.00 | $133.33 | $33.33 | $66.66 |
| 01-JUN-2001 | $100.00 | 0 | $100.00 | $133.33 | $33.33 | $99.99 |
| 01-JUL-2001 | $100.00 | $50.00 | $150.00 | $133.33 | ($16.67) | $83.32 |
| 01-AUG-2001 | $100.00 | $50.00 | $150.00 | $133.33 | ($16.67) | $65.65 |
| 01-SEP-2001 | $100.00 | $50.00 | $150.00 | $133.33 | ($16.67) | $49.98 |
| 01-OCT-2001 | $100.00 | $50.00 | $150.00 | $133.33 | ($16.67) | $33.31 |
| 01-NOV-2001 | $100.00 | $50.00 | $150.00 | $133.33 | ($16.67) | $16.64 |
| 01-DEC-2001 | $100.00 | $50.00 | $150.00 | $133.33 | ($16.67) | ($0.03) |
Scenario 2
Now assume that the first four payment schedules have a status of Approved when term 2 is added to the original lease by amendment.
-
The amendment commencement Date is April 01, 2001.
-
The additional rent is $50.00 a month.
-
The term is normalized and starts on July 01, 2001 and ends on December 31, 2001.
-
Approved payment schedules are 01-JAN-01, 01-FEB-01, 01-MAR-01, AND 01-APR-01.
Term 2 is normalized starting from the date of the first available draft payment schedule, or May 31, 2001. Term 1, the original lease term, is renormalized from the date of the first available draft payment schedule, May 01, 2001. The normalized lease amounts are as follows:
| Schedule Date | Base Rent | Amendment Rent | Total Cash Rent | Acct Expense | Adjustment | Deferred Liability |
|---|---|---|---|---|---|---|
| 01-JAN-2001 | $100.00 | 0 | $100.00 | $100.00 | 0 | 0 |
| 01-FEB-2001 | $100.00 | 0 | $100.00 | $100.00 | 0 | 0 |
| 01-MAR-2001 | $100.00 | 0 | $100.00 | $100.00 | 0 | 0 |
| 01-APR-2001 | $100.00 | 0 | $100.00 | $100.00 | 0 | 0 |
| 01-MAY-2001 | $100.00 | 0 | $100.00 | $137.50 | $37.50 | $37.50 |
| 01-JUN-2001 | $100.00 | 0 | $100.00 | $137.50 | $37.50 | $75.00 |
| 01-JUL-2001 | $100.00 | $50.00 | $150.00 | $137.50 | ($12.50) | $62.50 |
| 01-AUG-2001 | $100.00 | $50.00 | $150.00 | $137.50 | ($12.50) | $50.00 |
| 01-SEP-2001 | $100.00 | $50.00 | $150.00 | $137.50 | ($12.50) | $37.50 |
| 01-OCT-2001 | $100.00 | $50.00 | $150.00 | $137.50 | ($12.50) | $25.00 |
| 01-NOV-2001 | $100.00 | $50.00 | $150.00 | $137.50 | ($12.50) | $12.50 |
| 01-DEC-2001 | $100.00 | $50.00 | $150.00 | $137.50 | ($12.50) | 0 |
Example of Rent Normalization for Term Changed by Editing
The original lease has one payment term.
-
Lease begins on January 01, 2001 and ends on December 31, 2001.
-
Lease has one term, $100 per month and normalized.
-
Rent is scheduled to be paid in full at the beginning of every month.
The lease term is then reduced by three months, through edit, to end 30 September, 2001
The following table illustrates the rent normalization calculations for the lease after edit.
| Schedule Date | Base Rent | Total Cash Rent | Account Expense | Adjustment | Deferred Liability |
|---|---|---|---|---|---|
| 01-JAN-2001 | $100.00 | $100.00 | $75.00 | ($25.00) | ($25.00) |
| 01-FEB-2001 | $100.00 | $100.00 | $75.00 | ($25.00) | ($50.00) |
| 01-MAR-2001 | $100.00 | $100.00 | $75.00 | ($25.00) | ($75.00) |
| 01-APR-2001 | $100.00 | $100.00 | $75.00 | ($25.00) | ($100.00) |
| 01-MAY-2001 | $100.00 | $100.00 | $75.00 | ($25.00) | ($125.00) |
| 01-JUN-2001 | $100.00 | $100.00 | $75.00 | ($25.00) | ($150.00) |
| 01-JUL-2001 | $100.00 | $100.00 | $75.00 | ($25.00) | ($175.00) |
| 01-AUG-2001 | $100.00 | $100.00 | $75.00 | ($25.00) | ($200.00) |
| 01-SEP-2001 | $100.00 | $100.00 | $75.00 | ($25.00) | ($225.00) |
| 01-OCT-2001 | 0 | 0 | $75.00 | $75.00 | ($150.00) |
| 01-NOV-2001 | 0 | 0 | $75.00 | $75.00 | ($75.00) |
| 01-DEC-2001 | 0 | 0 | $75.00 | $75.00 | 0 |
Leases Windows
Oracle Property Manager includes four windows you can use for entering and displaying lease information.
-
Leases window. You can use the Leases window to set up a new lease, and to view multiple leases. The information in the Leases window is identical to the information in the header and Details tabbed region of the Lease window.
-
Lease window. The Lease window displays detailed information from a single lease. The information in the header and the Details tabbed region of the Lease window is identical to the information in the Leases window, so you can also use the Lease window to set up a new lease.
-
Edit Lease window. The Edit Lease window includes the same information that is in the Lease window. However, you use the Edit Lease window to enter changes and additions to lease information that you entered and saved previously.
Note: The Lease window and the Edit Lease window include the same fields, but each window is used for a different purpose. You use the Lease window to enter lease terms for new leases. You use the Edit Lease window to make changes or additions to information in existing leases. The information in the headers of these windows cannot be changed after the lease has been finalized and saved, with the exception of the lease name and lease number. You can change the lease name and lease number using the Edit function after a lease has been finalized. For details on the tabbed regions of this window, see Tabbed Regions Reference for Lease, Edit Lease, and Amend Lease Windows.
-
Amend Lease window. Use this window to enter information from a lease amendment.
Note: The Lease, Edit Lease, and Amend Lease windows include the same tabbed regions. To create accurate lease records, use each of these windows for its designated purpose. For information on the tabbed regions of these windows, see: Tabbed Regions Reference for Lease, Edit Lease, and Amend Lease Windows.
Related Topics
Tabbed Regions Reference for Lease, Edit Lease, and Amend Lease Windows
Lease Milestones Window Reference