Packet Filtering Tab
The Packet Filtering tab displays a panel, shown in FIGURE 5-34, for configuring packet-filtering rules. Use packet filtering to control traffic using a particular service, traffic intended for a particular service, or traffic coming from a particular address.
Figure 5-34 Packet Filtering Tab
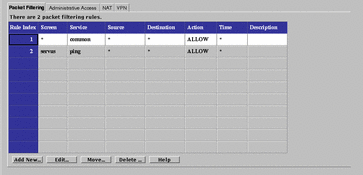
SunScreen uses ordered packet filtering. The Screen assumes that the first rule that matches a packet is the rule that governs the disposition of the packet.
If the packet does not match any rule, the Screen uses its default action to determine the disposition of the packet.
Note -
The default action is set when defining the interfaces. A default action can be set for each interface, but not for the entire Screen. Typically, the default action is to only drop the packet. Other options are available. See "Interface".
TABLE 5-35 describes the available fields in the Packet Filtering tab.
Table 5-35 fields on the Packet Filtering Tab|
Field |
Description |
|---|---|
|
Rule Index |
(Optional) Assigns a number to a rule. When editing or adding a new rule, by default, this field displays a number one greater than the last rule (indicating this rule will be placed at the bottom of the list). If you type a lower number, the new rule is inserted into the specified position in the list, and the rules currently in the configuration are renumbered. |
|
Screen |
(Optional) Specifies the Screen for which you want the rule to apply. Type a specific Screen name in this field if you use centralized management and want a rule to apply to a specific Screen. |
|
Service |
Identifies the network service or service group to which this rule applies. Network services and service groups are described in Appendix C, Services and State Engines. |
|
Source |
The value to which the source address of a packet is compared. If an asterisk (*) appears, any source address meets the criteria of the rule. |
|
Destination |
The value to which the destination address of a packet is compared to determine whether the rule should apply. If an asterisk (*) appears, any destination address meets the criteria of the rule. |
|
Action |
Displays the action for the rule and permits setting the logging behavior. The options are:
|
|
Time |
Specifies the time of day for the rule. |
|
Description |
(Optional) Provides a brief description of the Administrative Access rule. |
To edit every field, except the Rule Index field, on the Packet Filtering tab, click it to display the choice list. The changes in the fields for a rule are reflected in the Common Objects panel, except for the Action field, which displays a dialog box for that rule and policy. Set the logging options for the action in the dialog box for that action. The particular dialog box that appears depends on the action selected.
ALLOW Action
FIGURE 5-35 shows the Policy Rule Index dialog box for the ALLOW action.
Figure 5-35 Policy Rule Index Dialog Box for ALLOW action

TABLE 5-36 describes the controls in Policy Rule Index dialog box for ALLOW action.
Table 5-36 Controls for ALLOW Action
-
PROXY_HTTP - Presents the dialog box shown in FIGURE 5-36.
Figure 5-36 PROXY_HTTP Dialog Box for ALLOW action
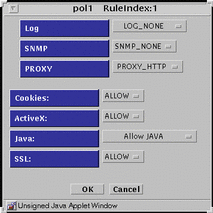
TABLE 5-37 lists the flags for the HTTP proxy.
Table 5-37 HTTP Proxy Flags
-
PROXY_FTP - Presents the dialog box shown in FIGURE 5-37.
Figure 5-37 PROXY_FTP Dialog Box for ALLOW action
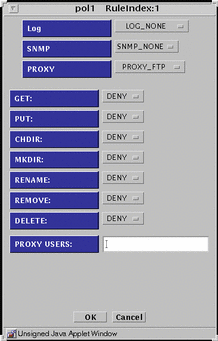
TABLE 5-38 lists the settings available for the flags for the FTP proxy.
Table 5-38 FTP Proxy Flags|
Flag |
Function |
|---|---|
|
GET |
Allow or disallow use of the FTP get command |
|
PUT |
Allow or disallow use of the FTP put command |
|
CHDIR |
Allow or disallow use of the FTP chdir command |
|
MKDIR |
Allow or disallow use of the FTP mkdir command |
|
RENAME |
Allow or disallow use of the FTP rename command |
|
REMOVE |
Allow or disallow use of the FTP remove_dir command |
|
DELETE |
Allow or disallow use of the FTP delete command |
|
PROXY USERS |
Choose the proxy user or the group of proxy users that you want for this rule. You can have only one proxy user or one group of proxy users in this field. You define these proxy users in the proxy user common object. |
-
PROXY_SMTP - Presents the dialog box shown in FIGURE 5-38.
Figure 5-38 PROXY_SMTP Dialog Box for ALLOW action
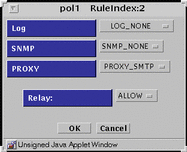
The only flag for the SMTP proxy is to allow or disallow relayed mail.
-
PROXY_Telnet - Presents the dialog box shown in FIGURE 5-39.
Figure 5-39 PROXY_Telnet Dialog Box for ALLOW action
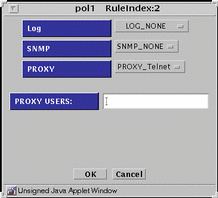
For the PROXY USER field, type the proxy user or the group of proxy users that you want for this rule from the choice list. Specify only one proxy user or one group of proxy users in this field. Define these proxy users in the proxy user common object.
DENY Action
FIGURE 5-40 shows the Policy Rule Index dialog box for DENY action
Figure 5-40 Policy Rule Index Dialog Box for DENY Action
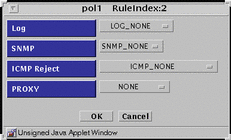
TABLE 5-39 describes the controls in Policy Rule Index dialog box for DENY action.
Table 5-39 Controls for DENY Action
-
PROXY_HTTP - Presents the same dialog box shown in Figure 5-40 save that PROXY_HTTP appears in the PROXY field. There are no flags to set.
-
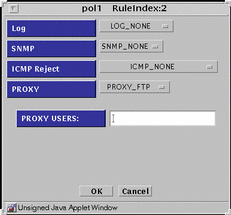
PROXY_FTP - Presents the dialog box shown in FIGURE 5-41.
Figure 5-41 PROXY_FTP Dialog Box for DENY action
-
PROXY_SMTP - Presents same dialog box shown in Figure 5-40 save that PROXY_SMTP appears in the PROXY field. There are no flags to set.
-
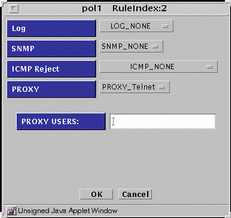
PROXY_Telnet - Presents the dialog box shown in FIGURE 5-42.
Figure 5-42 PROXY_Telnet Dialog Box for DENY action
ENCRYPT Action
FIGURE 5-43 shows the Policy Rule Index dialog box for ENCRYPT action.
Figure 5-43 Policy Rule Index Dialog Box for ENCRYPT Action
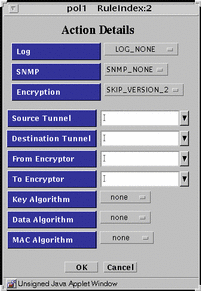
TABLE 5-40 describes the controls in Policy Rule Index dialog box for ENCRYPT action.
Table 5-40 Controls For ENCRYPT Action
SECURE Action
FIGURE 5-44 shows the Policy Rule Index dialog box for SECURE action
Figure 5-44 Policy Rule Index Dialog Box for SECURE Action
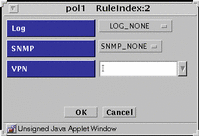
TABLE 5-41 describes the controls in Policy Rule Index dialog box for SECURE action.
Table 5-41 Controls for SECURE Action
- © 2010, Oracle Corporation and/or its affiliates
