


Note - This feature may or may not be available on your system, depending on your licensing agreement.
A group operation is a task instance that is applied to an object group and is (optionally) scheduled for execution. The key feature in this functionality is the Group Operations window (FIGURE 15-2). This window enables you to create and edit group operations. The main components of these group operations are:
- An object group with an optional filter
- A task, which could be one of the following types:
- Module
- Data Property
- MCP Parcel (Module Configuration Propagation)
From the Group Operations window, you can create, modify, delete, and save these components.
As you scroll down and highlight each existing group operation, a summary of each main component is displayed under the Group, Filter, and Task Summary sections.
The following are described in this chapter:
Start by selecting Group Operation from the console Tools menu (FIGURE 15-1).
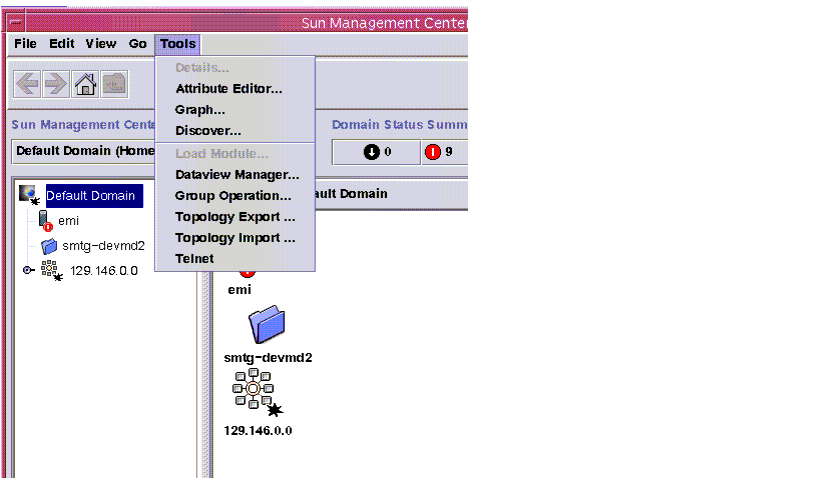
FIGURE 15-1 Console Window With The New Tools Menu
The main Group Operations window (FIGURE 15-2) is displayed by choosing Tools ‰ Group Operation in the Sun Management Center console window (FIGURE 15-1).
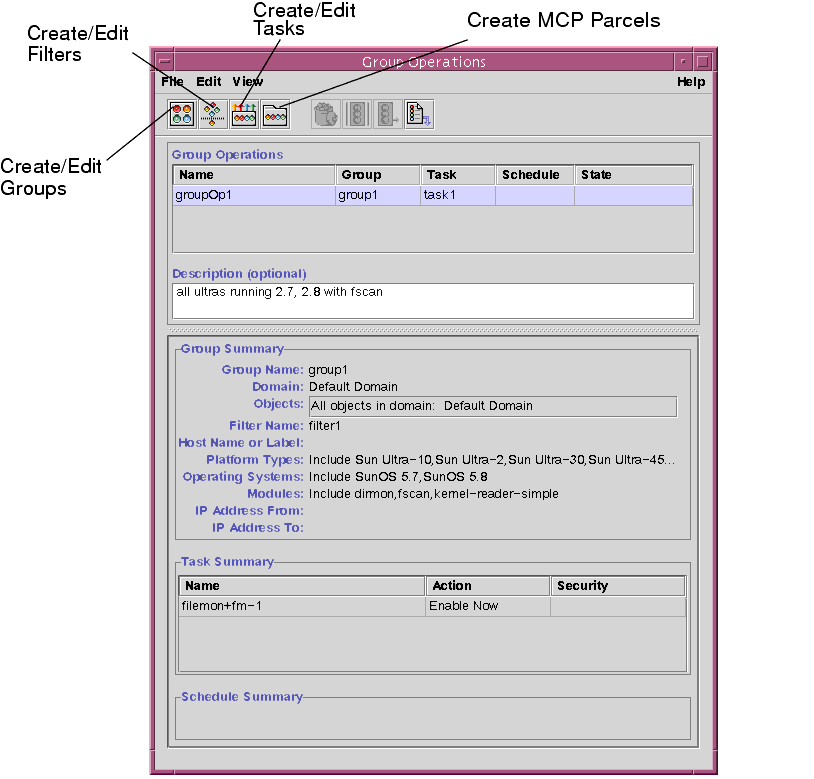
FIGURE 15-2 Main Group Operations Window
The Group Operations Window
This table at the top (FIGURE 15-2) displays:
- The group operation name
- A pull-down menu that lists existing groups (with optional filters)
- A pull-down menu that lists existing tasks
- Schedule information
- State (of the group operation)
Under the optional Description field, there are two read-only areas, Group Summary and Task Summary. To display the information in these two sections, select a group operation at the top of this window. For example, you can see the platform type, the operating system, and the modules that comprise a group operation.
The following tables describe the submenu options that are found under the following options on the menu bar:
TABLE 15-1 File Menu Options
Menu Item
|
Description
|
|---|
|
New
|
Enables you to create a new group, filter, task, or MCP parcel.
|
|
Suspend
|
Enables you to suspend the execution of a group operation.
|
|
Resume
|
Enables you to resume the execution of a group operation.
|
|
Save
|
Enables you to save this group operation to the server, with or without a schedule.
|
|
Close
|
Enables you to close the Group Operations window.
|
TABLE 15-2 Edit Menu Options
Menu Item
|
Description
|
|---|
|
Delete
|
Is enabled only when one or more completed group operations is selected.
Can only delete a group operation if the group operation:
is inactive
has been suspended
When an operation is deleted, a confirmation window is displayed.
|
|
Modify Group
|
Enables you to modify an existing group operation.
|
|
Modify Filter
|
Enables you to modify an existing filter.
|
|
Modify Task
|
Enables you to modify an existing task.
|
TABLE 15-3 View Menu Option
Menu Item
|
Description
|
|---|
|
View Log
|
Enables you to see the View Log window.
|
TABLE 15-4 Help Menu Options
Menu Item
|
Description
|
|---|
|
Help
|
Enables you to display the help documentation.
|
To create a group operation, you must first create a:
- Group with an optional filter
- Task
General Procedures
 |
To Create an Object Group
|
| |
1. |
In the main Group Operations window (FIGURE 15-2), click in the row under the Name column, that reads, "Click to enter name..." |
| |
2. |
Enter a group operations name. |
| |
3. |
Press the Return button or click in the next cell. |
| |
|
Your cursor will now be in the blank cell under the Group column. |
| |
4. |
Click on the pull-down menu and choose from the list of existing groups. |
| |
|
If the pull-down menu is empty or you do not see a group name that you want to use, you must create a new object group. |
| |
5. |
To create a new object group, proceed with one of the following: |
- Choose File ‰ New ‰ Group.
- Click the Create/Edit Group button from the toolbar.
| |
To Create a Task
|
| |
1. |
In the main Group Operations window (FIGURE 15-2), click in the empty row under the Task column. |
| |
2. |
Click on the pull-down menu and choose from the list of existing tasks. |
| |
|
If the pull-down menu is empty or you do not see a task name that you want to use, you must create a new task. |
| |
3. |
To create a new task, proceed with one of the following: |
- Choose File ‰ New ‰ Task.
- Click the Create/Edit Task button from the toolbar.
The Create/Edit Groups Task window is displayed (FIGURE 15-6). For additional information on creating and editing tasks, see "To Create a Task."
| |
To Set a Schedule
|
| |
1. |
Click in the empty cell under the Schedule column. |
| |
2. |
Use the pull-down menu to select one of the following: |
- Activate Upon Save
- Set Schedule
If you select Activate Upon Save, the group operation will be activated once you click File ‰ Save in the main Group Operations window. If you select Set Schedule, the Set Schedule window (FIGURE 15-3) is displayed.
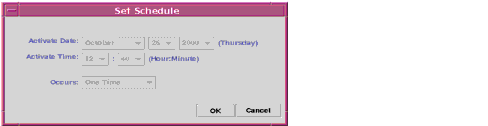
FIGURE 15-3 Set Schedule window
| |
3. |
From the Set Schedule window, you can use the various pull-down menus to set the date, time, and frequency of occurrence for your group operation. |
| |
To Set the State of the Operation
|
Note - This column is read-only, so you cannot set anything.
| |
1. |
Click in the empty cell under the State Column. |
| |
2. |
Use the pull-down to select one of the following group operation states: |
- Queued
- Running
- Suspended
- Failed
- Succeeded
- Active
- Inactive
- Missed Schedule
- Run & Failure
- Failure & Suspended
- Success & Suspended
Detailed Procedures
| |
To Create an Object Group
|
| |
1. |
In the Create/Edit Groups window, under the Group column, click in the cell that says, "Click to enter name..." |
| |
|
For additional information on the buttons and columns in this window, see TABLE 15-5 and TABLE 15-6. |
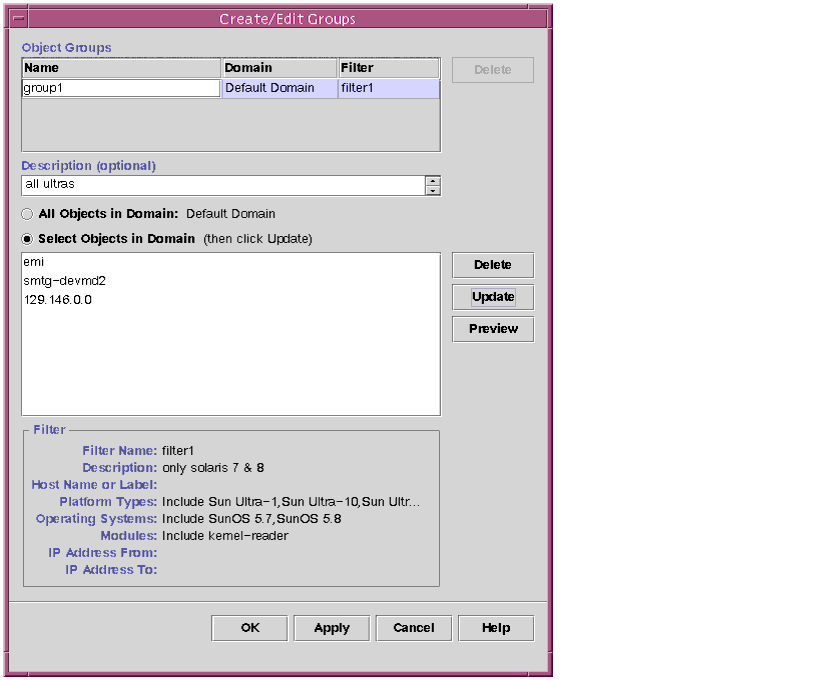
FIGURE 15-4 Create/Edit Groups Window
| |
3. |
Select one of the following buttons and click the Update button. |
This means the object group refers to the entire domain.
- "Select Objects in Domain"
The objects that are preselected in the main console topology area will be displayed in the list after the Update button is clicked. This list comprises objects that do not have a filter applied to them. To see the list of objects after a filters has been applied to them, click the Preview button.
Note - You cannot choose domains, because it is a read-only field. The Domain field will be automatically filled in with the current domain name.
| |
4. |
Click in an empty cell under the Filter column and use the pull-down menu to choose a filter name. |
| |
|
If this menu is empty or there is no filter you want to use, create a new filter. For additional information on creating and editing a filter, see "To Create a Filter" and "To Edit a Filter." |
| |
5. |
Enter an optional description in the Description field. |
| |
6. |
Click the OK button to save this group. |
TABLE 15-5 Buttons on the Create/Edit Group Window
Button
|
Description
|
|---|
|
Delete
|
Located at the top of the Create/Edit Group window, this button enables you to delete a row, which consists of the entire group object, the domain, and the filter.
|
|
Delete
|
Located next to the field that contains the list of objects in the Domain, this button enables you to delete specific objects from your list of selected objects.
|
|
Update
|
Enables the selections made in the main topology area to be added to your group and entered into this window.
|
|
Preview
|
Applies the optional filter to the current object group. The contents of the above list are shown in a new dialog with changes to reflect the filtering operation.
|
|
OK
|
Enables you to save the newly created group.
|
|
Cancel
|
Enables you to cancel the current operation.
|
|
Help
|
Enables you to display the online help documentation.
|
TABLE 15-6 Columns on the Create/Edit Group Window
Column Name
|
Description
|
|---|
|
Name
|
Enables you to click into this cell and add a new object group name.
|
|
Domain
|
Automatically populated by the current domain name (read-only).
|
|
Filter
|
Enables you to use the pull-down menu, which displays a list of existing filters.
|
| |
To Edit an Object Group
|
| |
1. |
In the Create/Edit Group window, highlight a group. |
| |
2. |
Make all necessary changes. |
| |
To Delete an Object Group
|
| |
1. |
Highlight the group you would like to delete. |
| |
2. |
Click the Delete button located near the top of the Create/Edit Groups window. |
| |
To Create a Filter
|
| |
1. |
In the Create/Edit Filters window (FIGURE 15-5), under the Name column, click in the cell that says, "Click to enter name..." |

FIGURE 15-5 Create/Edit Filter Window
| |
2. |
Click your left mouse button and enter your filter name. |
| |
3. |
Enter an optional description in the Description field. |
| |
4. |
Set filters by activating any, or all, of the following options: |
| |
|
To activate these options, click in the checkbox and use the pull-down menu to select an item from the displayed list. |
- Host or Object Label
- Platform Types (Include/Exclude)
- This pull-down menu has all possible platform types. This criterion selects only hosts which have at least one of the specified platform types.
- Operating Systems (Include/Exclude)
- This pull-down menu lists all possible operating systems. This criterion selects only hosts which have at least one of the specified operating systems.
- Modules (Include/Exclude)
- This pull-down menu has all possible modules. This criterion selects only objects which have at least one of the specified modules loaded.
- IP Addresses (Include/Exclude)
- The fields next to this option enable you to enter a range of IP addresses. This criterion selects only hosts which have an IP address in the specified range.
TABLE 15-7 Buttons on the Create/Edit Filters Window
Button
|
Description
|
|---|
|
Include/Exclude
|
-
The Include button specifies that the host must match one of the items in the list.
-
The Exclude button means the host cannot match any item in the list.
|
|
Delete
|
Enables you to delete an included item from the list.
|
|
OK
|
Enables you to save the newly created filter.
|
|
Cancel
|
Enables you to close the current operation.
|
|
Help
|
Enables you to display the online help documentation.
|
| |
5. |
Click the Save button. |
| |
To Edit a Filter
|
| |
1. |
In the Create/Edit Filters window, highlight the filter you want to modify from the list. |
| |
3. |
Click the OK/Save button to save your changes. |
| |
To Delete a Filter
|
| |
1. |
In the Create/Edit Filters window, highlight the filter you want to delete. |
| |
2. |
Click the Delete button located next to the Name field. |
| |
|
A deletion confirmation window is displayed, which reminds you that deleting the task is a permanent action. |
| |
3. |
Click the OK button to confirm the deletion. |
Tasks
There are three types of tasks that will be described in this section:
- Module task
- Data Property task
- MCP Parcel Task
| |
To Create a Task
|
| |
1. |
In the Create/Edit Task window, under the Name column, click in the cell that says, "Click to enter name..." |
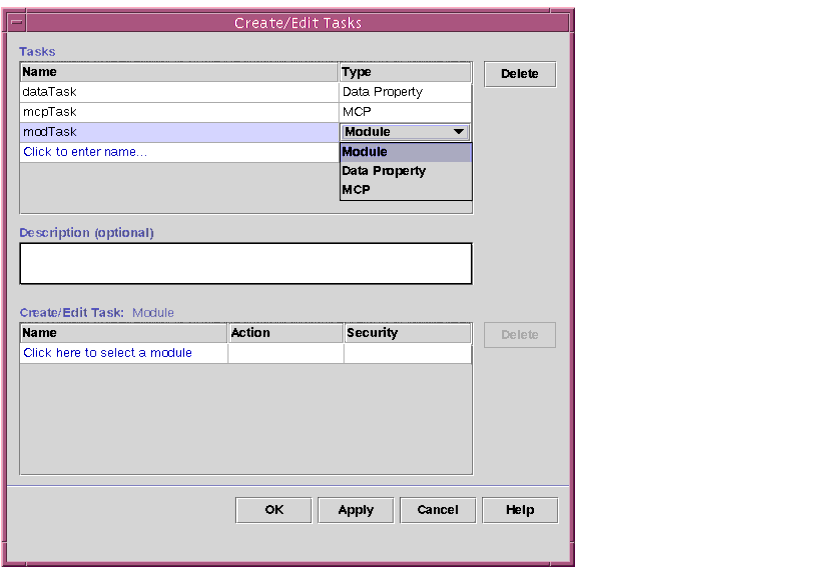
FIGURE 15-6 Create/Edit Tasks Window
| |
3. |
Under the Type column use the pull-down menu to choose whether the task type will be a module, a data property, or MCP. |
Module Task
FIGURE 15-7 Create/Edit Module Task Window
| |
|
If you choose Module, the information in TABLE 15-8 will be displayed under the Create/Edit section:
TABLE 15-8 Module Properties Task - Table Columns
Column
|
Description
|
|---|
|
Action
|
The pull-down menu displays the type of action to be applied to the module. The following options are provided:
None
Load
Unload
Disable
Enable
Set Schedule
|
|
Security
|
Enables you to set any security values for the module.
|
|
| |
To Create a Module Task
|
| |
1. |
In the Create/Edit Task window, use the pull-down menu under the Type column, and choose Module. |
| |
|
After choosing Module, notice that the Create/Edit Task table at the bottom of the window (FIGURE 15-8) will contain the items found in TABLE 15-8. |
FIGURE 15-8 Create/Edit Task Window - Module Task Option
| |
2. |
In the Module column, choose a module from the pull-down list. |
| |
3. |
In the Action column, chose the type of module action from the pull-down menu. If you select Set Schedule For..., the Attribute Editor window is displayed with the Schedule tab activated. For additional information on the Attribute Editor, see Chapter 9. |
| |
4. |
Click in the Security column to display the Attribute Editor window with the Security tab activated. |
| |
|
Settings that are made here will be reflected as a checkmark in the Security column. Make your changes in the Attribute Editor window and click the OK button. For additional information on the Attribute Editor, see Chapter 9. |
| |
5. |
In the Create/Edit Task window, click the OK button to save your changes. |
| |
To Edit a Module Task
|
| |
1. |
In the Create/Edit Tasks window, highlight the task you want to modify. |
| |
2. |
Make the necessary changes. |
| |
3. |
Click the OK button to save your changes. |
Data Property Tasks
| |
To Create a Data Property Task
|
| |
1. |
In the Create/Edit Tasks window, use the pull-down menu under the Type column, and choose Data Property (FIGURE 15-9). |

FIGURE 15-9 Create/Tasks Window - Data Property Option
TABLE 15-9
Column
|
Description
|
|---|
|
Name
|
When you click in this row, the Data Property Selection window (FIGURE 15-10) is displayed. To display a data property table in the right pane of the split pane, navigate down in the hierarchy tree and click the mouse button on a managed object name.
|
|
Alarm
|
Enables you to display the Attribute Editor window, with the Alarm tab activated.
|
|
Action
|
Enables you to display the Attribute Editor window, with the Action tab activated.
|
|
Refresh
|
Enables you to display the Attribute Editor window, with the Refresh tab activated.
|
|
History
|
Enables you to display the Attribute Editor window, with the History tab activated.
|
Data Properties Task - Table Columns
| |
|
After choosing Data Property, the Create/Edit Task table at the bottom of the window will contain the items found in TABLE 15-9. If you click in any of the four right cells, the Attribute Editor window is displayed with that item's tab activated. For additional information on the Attribute Editor, see Chapter 9. |
| |
2. |
Click in the first empty cell under the Data Property column. |
| |
3. |
Under the Additional Specifiers section, enter a module instance name in the Module Instance field. |
| |
4. |
Click the OK or Apply button to save your changes. |
| |
|
This newly created data property task will appear in the table in the lower portion of the Create/Edit Tasks window (FIGURE 15-9). |
The Data Property Selection Window
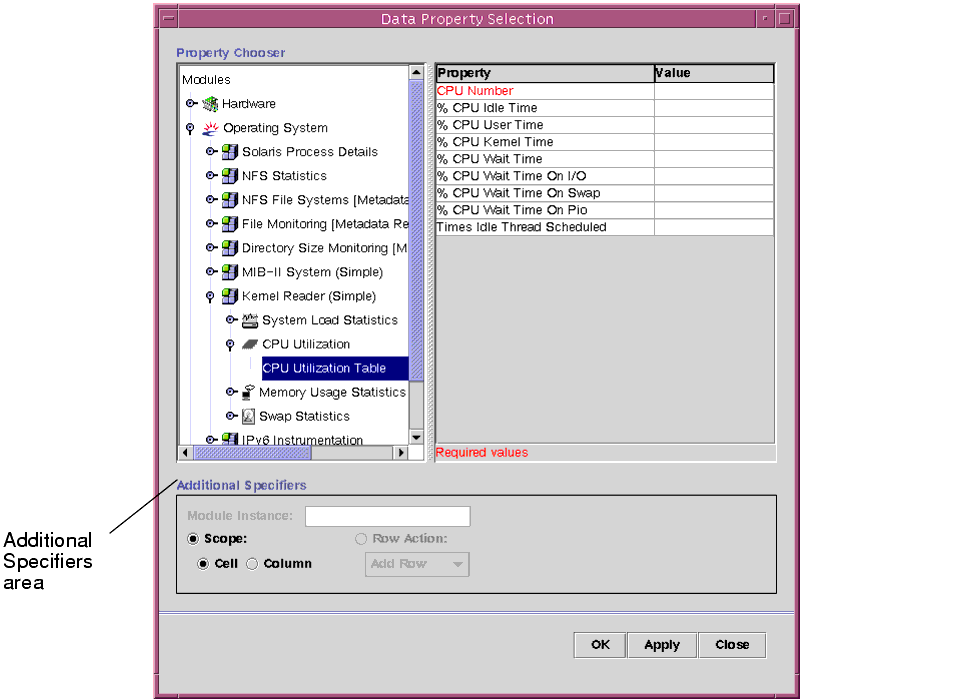
FIGURE 15-10 Data Property Selection Window
The use of this window is similar to the Host Details window. To navigate through this window, click on the expansion/compression icons in the hierarchy until you find a specific managed object. When you double-click on this managed object, the table will be displayed in the right frame. There are three types of data property tables that will be displayed:
| |
To Edit Data Property Tables
|
Simple Scalar, Noneditable Table
| |
1. |
In the Create/Edit Tasks window (FIGURE 15-9), under the Name column in the lower part of this window, click on a managed object. |
| |
|
The Update Data Property window will be displayed (FIGURE 15-11). |
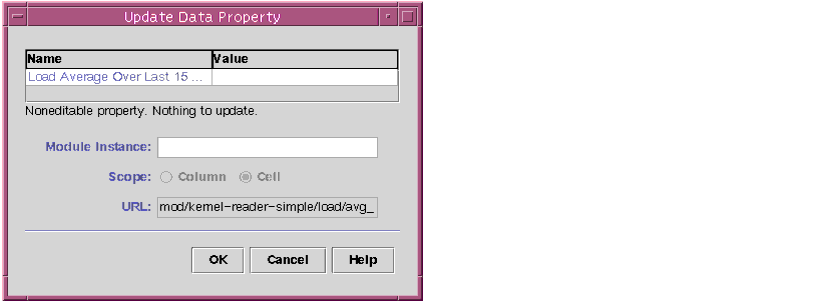
FIGURE 15-11 Update Data Property Window for a Simple, Scalar Data Property Table
| |
2. |
Since this table is a scalar, noneditable table, click the OK button. |
| |
|
This type of managed object is noneditable, so the field under Name is grey. |
Simple, Scalar Table With Editable Values
| |
1. |
In the Create/Edit Tasks window (FIGURE 15-9), under the Name column in the lower part of this window, click on a managed object. |
| |
|
The Update Data Property window will be displayed (FIGURE 15-12). |
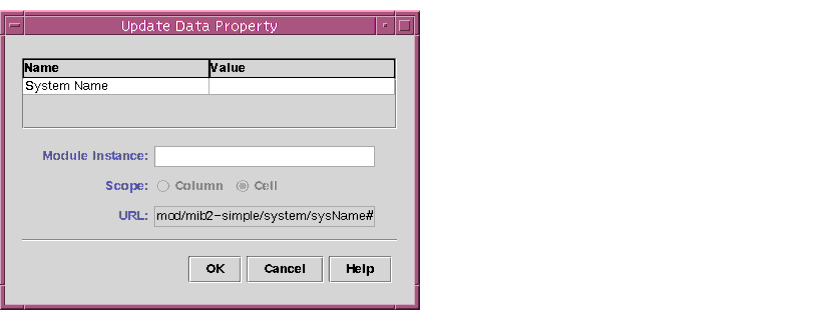
FIGURE 15-12 Update Data Property Window for a Simple, Scalar Data Property Table With
Editable Values
| |
2. |
Enter a value or edit an existing value. |
| |
3. |
Click either the OK button to save your changes. |
Vector Tables
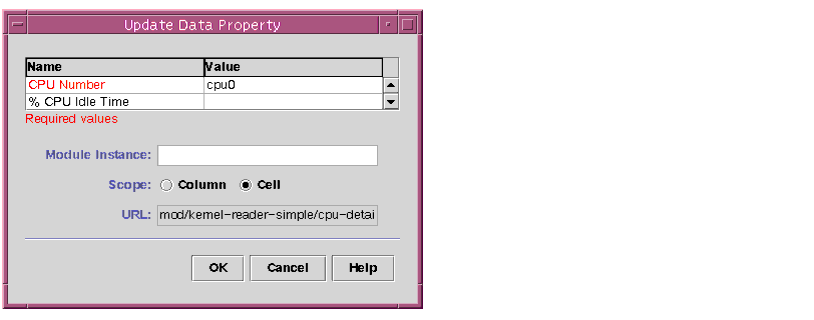
FIGURE 15-13 Update Data Property Window for a Vector Data Property Table
| |
1. |
In the Create/Edit Tasks window (FIGURE 15-9), under the Name column in the lower part of this window, click on a managed object. |
| |
|
The Update Data Property window is displayed (FIGURE 15-13). |
| |
2. |
Modify the data property. |
In the Data Property Chooser window (FIGURE 15-10), under the Additional Specifier section, use the following options for vector tables:
Module Instance Name
In this data property table type, you have to enter additional information. For example, if you have chosen a multi-instance module, you must provide a name for this instance. The Module Instance field is located at the bottom of the Data Property Selection window under the Additional Specifiers section.
Scope
Here, the scope of the task (FIGURE 15-10) on this data property must be specified as either a column or a cell. For example, in the CPU Utilization module, if the Column button is chosen, the task will apply to all CPUs. But, if the Cell button is selected, you will be required to enter an index value, such as a CPU number. To alert you that a field is for required values, the text accompanying this field will be displayed in red.
In a vector data property table, you can modify the following:
- Editable values
- Required values
- Module instance name
- Scope
Row Action
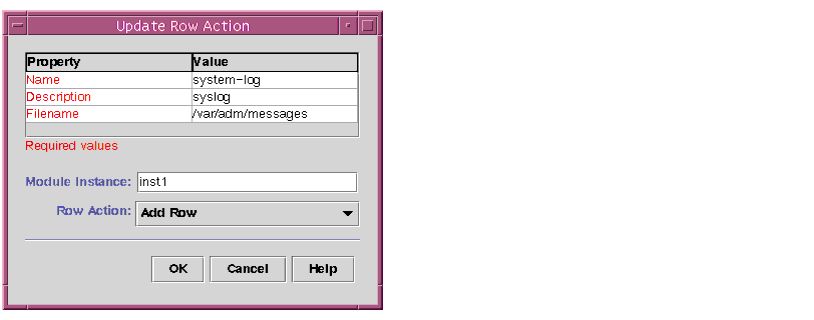
FIGURE 15-14 Update Row Action Window
If the module allows the addition of rows, you can the select the Row Action button (FIGURE 15-10), and use the pull-down menu to choose one of the following options:
- Add row
- Modify row
- Delete row
For example, if you selected Add Row, the Update Row Action window (FIGURE 15-14) is display will list the required field and the values that you would enter (as you would find in the Add Row window). For additional information on adding rows, see Chapter 7.
| |
3. |
Click the OK button to save your changes. |
| |
|
You will be returned to the Create/Edit Task window. Since you have completed your selections from the Data Property Chooser window, there will now be checkmarks under the corresponding columns. |
| |
To Delete a Task
|
| |
1. |
In the Create/Edit Task window, highlight the task you want to delete. |
| |
2. |
Click the Delete button, which is located next to the Name and Type columns. |
| |
|
The Delete confirmation window is displayed, which reminds you that deleting the task is a permanent action. |
| |
3. |
Click the OK button to confirm the deletion. |
Module Configuration Propagation Tasks
| |
To Create an MCP Parcel
|
| |
1. |
Proceed with one of the following: |
- In the main Group Operations window, choose File ‰ New ‰ MCP Parcel.
- In the toolbar of the main Group Operations window, click the MCP Parcel icon.
| |
|
In this window, click your left mouse button in the first cell under the Name column, which says, "Click to enter new parcel name...." |
| |
|
For information on the buttons in the Create MCP Parcel window, see TABLE 15-10. |
| |
2. |
Enter the parcel name. |
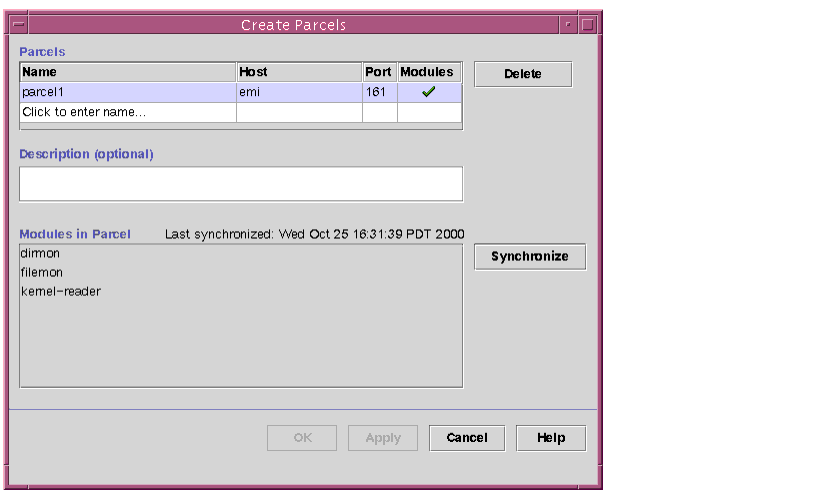
FIGURE 15-15 Create MCP Parcels Window
TABLE 15-10
Button
|
Description
|
|---|
|
Delete
|
Enables you to delete an existing parcel.
|
|
Synchronize
|
Enables you to copy any changes in the configuration files (changes that have been made since the last propagation) of the reference host out to all the target hosts. Ensures that the target hosts are in sync with the reference host.
|
|
OK
|
Enables you to save the parcel.
|
|
Apply
|
Enables you to save the current parcel and continue with another.
|
|
Cancel
|
Enables you to cancel the current operation.
|
|
Help
|
Enables you to access the online help documentation.
|
Buttons on the Create MCP Parcel Window
TABLE 15-11 Fields on the Create MCP Parcel Window
Field
|
Description
|
|---|
|
Name
|
Enables you to enter the name of your MCP Parcel.
|
|
Host
|
Enables you to enter your reference host name.
|
|
Port Number
|
Enables you to enter the port number of the reference host.
|
|
Module
|
Enables you to select modules for the parcel. (A checkmark appears in the cell if the parcel is complete.)
|
|
Modules in Parcel
|
Lists all the modules contained in a parcel.
|
| |
3. |
Click in the first empty cell under the Host column and enter a host name. |
| |
|
This is the host whose configuration files will be used to propagate out to the target hosts in your group. |
| |
4. |
Click in the first empty cell under the Port column and enter a port number. |
| |
|
This is the port number that the agent is running for the reference host. |
| |
5. |
Click in the first empty cell under the Module column. |
| |
|
The Specify Modules in Parcel window (FIGURE 15-16) is displayed. |
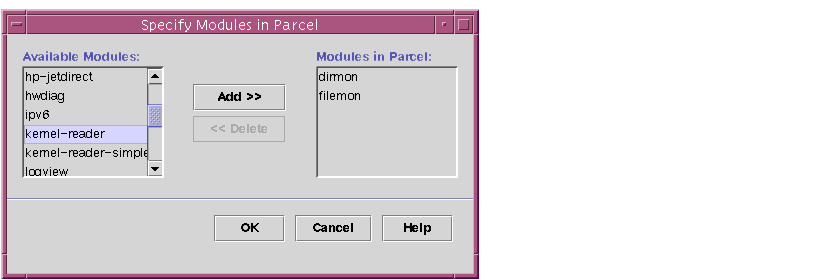
FIGURE 15-16 Specify Modules in Parcel Window
| |
6. |
Under the Available Modules column, select a module name and click the Add button. |
The module name you chose will now appear under the Modules in Parcel column. You can add as many modules as you wish. To delete a module from the Modules in Parcel list, highlight the module's name and click the Delete button.
| |
|
In the Create MCP Parcel window (FIGURE 15-15), a checkmark is displayed in the cell under the Module column to indicate that a complete parcel has been created. Once this parcel is complete, the color of this row will change from white to light grey, which indicates that this is row is selectable but not editable. |
Caution -  MCP Parcels cannot be edited. You must delete the existing parcel and create a new one.
To see a list of all the modules in a parcel, highlight a row under the Parcels section.
| |
8. |
Enter an optional description in the Description field. |
| |
9. |
Click the OK or Apply button to save this parcel. |
| |
To Delete an MCP Parcel
|
| |
1. |
In the Create MCP Parcels window, click the Delete button. |
| |
|
A deletion confirmation window is displayed, which reminds you that deleting the parcel is a permanent action. |
| |
2. |
Click the OK button to confirm the deletion. |
| |
To Create an MCP Task
|
| |
1. |
In the Create/Edit Task window, use the pull-down menu under the Type column, and choose MCP Task (FIGURE 15-6). |
| |
|
The Create/Edit Tasks window is displayed (FIGURE 15-17). In the bottom of this window, under the Create/Edit Task: MCP section, there is a pull-down menu that lists all previously created parcels. |
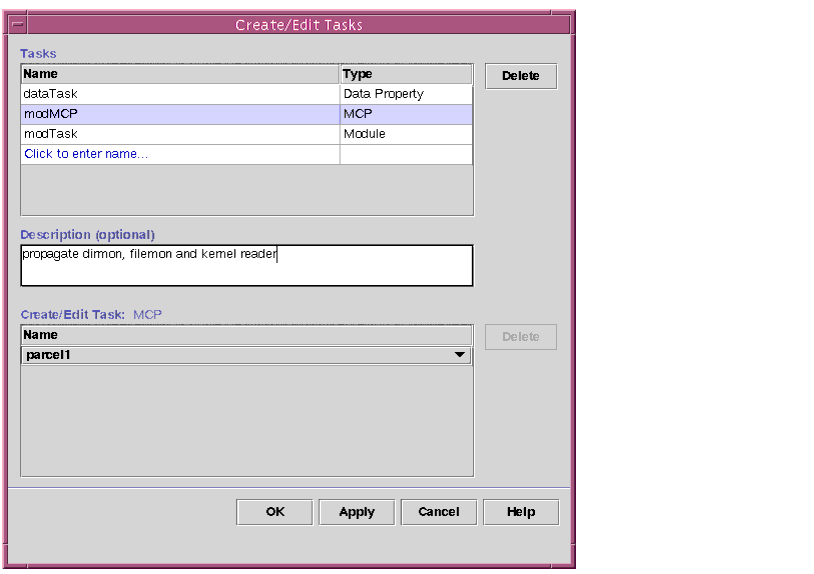
FIGURE 15-17 The Create/Edit Tasks window
| |
2. |
Click this pull-down menu and select a parcel. |
| |
3. |
Click the OK/Apply button to save your changes. |
| |
To Edit an MCP Task
|
 |
In the Create/Edit Task window, click on the pull-down menu under the Create/
Edit Task: MCP section and choose a different parcel.
|