| C H A P T E R 2 |
|
System Transactions |
Sun MTP provides a set of transactions for system control and access to the Development System. These transactions are known as system transactions.
This chapter includes the following topics:
The following transactions are used for control and debugging:
The following transactions are used internally by Sun MTP. See Security for Sun MTP System Transactions.
|
Intersystem communications (ISC) remote scheduler transaction |
|
The following transactions provide direct access to parts of the Development System If transaction security is enabled, access to these transactions should be restricted because end users do not need to use any of the direct access transactions. See Administering Transaction Security.
|
Development System main menu. Only available from locally connected terminals. Not available on TN3270 connections. |
|
|
Note - If you are using Micro Focus Animator, CodeWatch, or a C/C++ debugger, use the CEDF transaction to turn off the source debugger before executing any other system transaction. |
Use the CBCH transaction to execute batch programs or shell scripts immediately from the online environment for any program type. This transaction overrides the normal priority calculation used to automatically execute batch programs or shell scripts, and starts them as if they are a foreground transaction.
where program is the absolute or relative path name of the batch program or shell script to start. The batch program or shell script executes out of the directory defined by the KIXSYS environment variable. If a relative path is entered, it is relative to the $KIXSYS directory.
|
Note - You cannot execute batch programs or shell scripts with the CBCH transaction if the system is set to BATCH state with CEMT SET. See Setting the System State. |
CBCH can be used with the CEDF transaction using the Animator option to debug batch COBOL programs. To debug a batch program, you must invoke the program in a batch shell script using the -D parameter of unikixvsam, the COBOL runtime system. For more information about batch programming and debugging, refer to the Sun Mainframe Transaction Processing Software Developer's Guide.
The CEDF transaction is briefly described in CEDF - Execute Debug Facility and in more detail in the Sun Mainframe Transaction Processing Software Developer's Guide.
Use the CEBR transaction to browse temporary storage and to retrieve and insert data into intrapartition queues.
To start, type the CEBR transaction; no parameters are accepted. To terminate the transaction, press PF3.
When the transaction starts, it defaults the initial temporary storage queue to CEBRxxxx, where xxxx is equal to the terminal identifier of the terminal issuing the request.
The following figure shows the default CEBR screen.
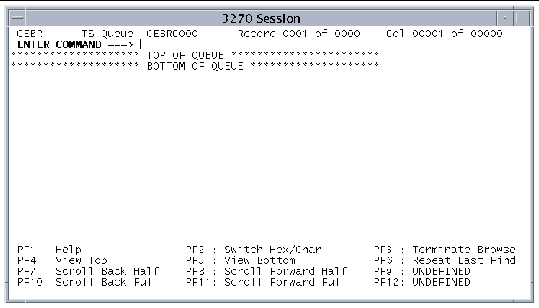
After CEBR starts, it accepts commands both on a command line and by using the PF keys. The information displayed on the screen depends on the data written to the viewed queue.
CEBR accepts the following commands on the command line:
These function keys are active while in the CEBR transaction:
|
Switches the display from character to hexadecimal or from hexadecimal to character. |
|
|
Searches for the next occurrence of the previous find command. |
|
The CECI transaction enables you to interactively execute CICS commands from a 3270 terminal window in a manner similar to that allowed by the IBM CICS CECI transaction.
|
 Type the transaction identifier CECI on a blank transaction screen.
The Commands screen is displayed, listing the supported CICS commands.
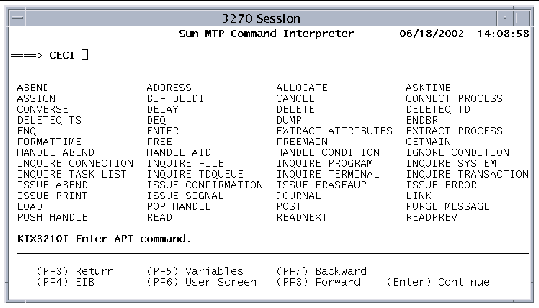
The following function keys are active on the CECI Commands screen:
This section describes the CECI screens and how to use them to define and execute commands.
The CECI Commands screen displays the Sun MTP-supported commands. On this screen you can:
When the Syntax screen is displayed, it lists the command you selected on the Commands screen or that you entered when you executed the CECI transaction at a blank transaction screen. The STATUS indicator on line 19 of the screen displays: Command Syntax Check.
This section describes how to create and execute a command from CECI. It also points to sections that describe other screens you can use as you build and execute commands. See also the information in the following sections, which describe how CECI manages arguments and the program control you can expect from certain commands.
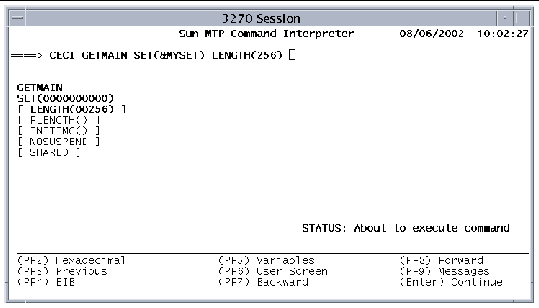
The following figure shows the Syntax screen after you select the GETMAIN command. Note that the status is Command syntax check.
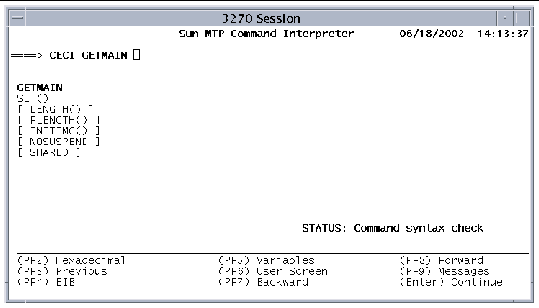
The Syntax screen uses the following symbols:
|
Options in the option list appear in bold after you type them on the command line. The command line is also in bold. |
The following function keys are active on the CECI Syntax screens:
|
Toggles the display from character/decimal (the default) to hexadecimal. When labeled Char/Decimal, changes the display from hexadecimal to character/decimal. |
|
|
Displays the screen captured by CECI after you execute a command that sends 3270 data to a terminal screen. See User Screen. |
|
|
Displays the Messages screen, which lists any diagnostic messages issued by the translator. See Messages Screen. |
|
|
Displays the next screen of the Syntax sequence, eventually executing the command. See the procedures to create and execute a command. |
|
1. On the Commands Screen, type a command such as GETMAIN, and press Enter.
The Syntax Screen is displayed with the CECI GETMAIN command. Note that the STATUS is Command syntax check.
a. Type one or more options and arguments on the command line.
You can press Enter after each option or wait until typing all the options.
b. While creating the command, you can press PF5 to display the Variables screen where you can define or view variables, such as &MYSET.
See Variables Screen for more information about defining variables.
c. While creating the command, press PF2 to toggle between hexadecimal and character/decimal display of variable values.
d. Repeat these procedures as many times as necessary to build the complete command.
e. When you finish creating the command, press Enter.
FIGURE 2-4 shows a complete command.
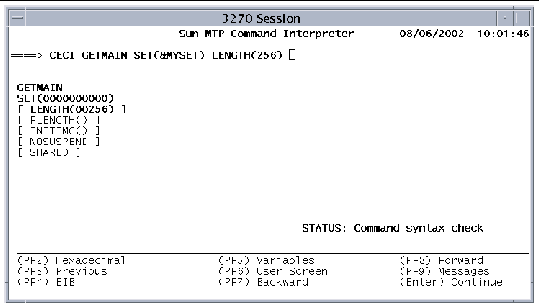
a. When the command line is complete, press Enter again to pass the command to the translator.
If the translation is successful, the STATUS field on the Syntax screen changes to About to execute command. Note that the options you selected appear in bold. See FIGURE 2-5.
b. Press PF9 to view any messages generated by the translator.
4. At this point, you can either:
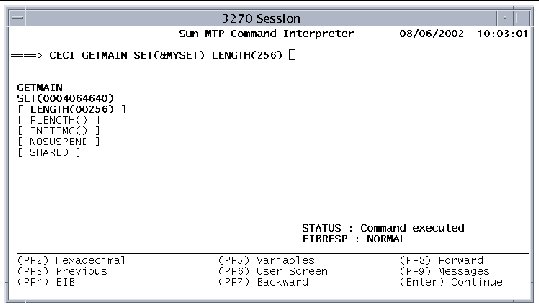
5. After the command executes, you can:
You can view the Syntax and Variables screens in character (default) and hexadecimal modes. Press PF2 to toggle the display mode. When you are in hexadecimal mode on the Variables screen, a display mode indicator is displayed in the lower right corner of the screen.
In hexadecimal mode you can define or view variables that contain bytes of data whose hexadecimal value does not correspond to an ASCII printable character.
In character mode, CECI displays bytes whose values do not correspond to a printable character, such as a period (.). In character mode, you cannot update such a variable byte with a period. To replace a variable byte whose hexadecimal value represents a non-printable character with a period, switch to hexadecimal mode and insert the ASCII code for a period (x'2d').
The following figure shows the Variables screen in hexadecimal display mode.
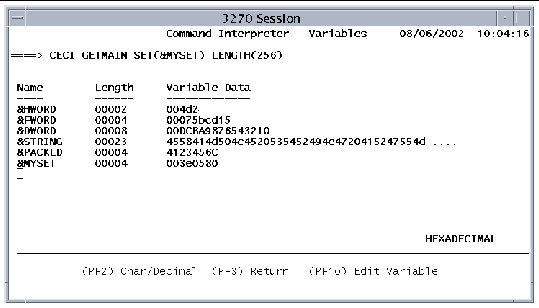
On a screen that allows hexadecimal display mode, the PF2 key is labeled as follows:
|
Toggles the display from character/decimal (the default) to hexadecimal mode. |
|
|
Toggles the display from hexadecimal to character/decimal mode. |
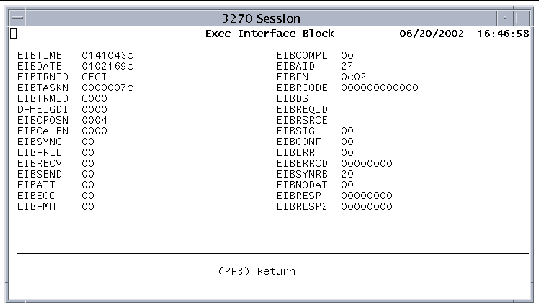
You can view data in the EIB at any time during a CECI session by pressing PF4 on the Commands or Syntax screens. FIGURE 2-8 shows the EIB screen.
Press PF3 to return to the previous screen.
CECI allows you to define variables to use as option arguments in the command syntax. Because the lifetime of the variables you define is equal to the duration of the CECI session, you can use them to carry forward data returned from the execution of one command to subsequent commands.
After you define a variable, you can use it in a command line. When the command syntax is expanded, the value of the variable is substituted for the variable name. Any change to a variable value during execution of the command is reflected on the Syntax and Variables screens.
An example of each variable type is defined when CECI is initialized. You can view the examples by pressing PF5 on the Commands or Syntax screens. The following figure shows a Variables screen (in character/decimal mode) that has the five pre-defined variables and a user-defined variable named &MYSET.
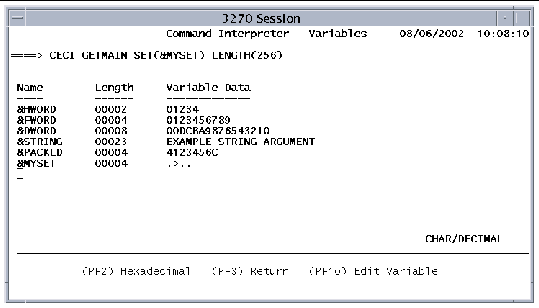
The following function keys are active on the Variables screen:
|
Toggles the display from character/decimal (the default) to hexadecimal. |
|
|
Returns to the previous screen. If you press PF3 without pressing Enter, any changes you made on the Variables screen are lost. |
|
|
Opens the Edit Variables screen, described in Edit Variable Screen. |
|
|
You can press the Enter key after making any change on the Variables screen or you can press it once at the end of the Variables screen session to process all changes. |
On the Variables screen, you can define, delete, and modify CECI variables.
1. Position the cursor at the start of the next available Name field.
2. Type the variable name, which can be a maximum of 9 characters: A-Z, a-z,
0-9, and must start with an ampersand (&) character.
3. Tab to the Length column and type the abbreviation for the type or a numeric length.
If you specify an abbreviation, the length is inserted automatically. TABLE 2-1 defines the variable types.
1. Type over the variable name field with blanks.
You can delete any variable, including those supplied with Sun MTP.
1. Type over any field with the new value.
|
Note - When adding or modifying variables whose lengths are greater than 40 bytes (20 bytes when the display mode is hexadecimal), you must use the Edit Variable screen described in Edit Variable Screen. |
The following table defines the variable types.
The Edit Variable screen enables you to edit user-defined variables in full screen mode. You can edit all variable types on this screen. You must use this screen to edit Buffer variables whose lengths are greater than the 40-byte limitation of the Variables screen (20 bytes when the display mode is hexadecimal).
1. On the Variables screen, position the cursor on a line containing the variable to edit.
2. Press PF10 to display the Edit Variable screen.
4. Press Enter to accept the change.
5. Press PF3 to return to the Variables screen.
The following figure shows the Edit Variable screen.
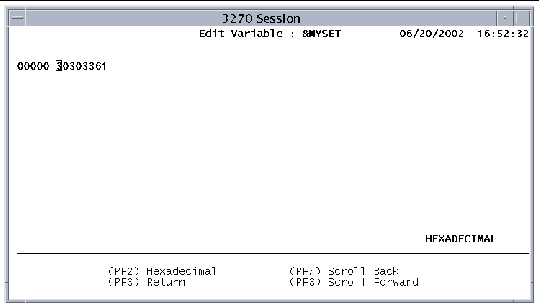
The following function keys are active on the Edit Variable screen:
|
Toggles the display from character/decimal (the default) to hexadecimal. When labeled Decimal/Char, switches the screen from hexadecimal to character/decimal. |
|
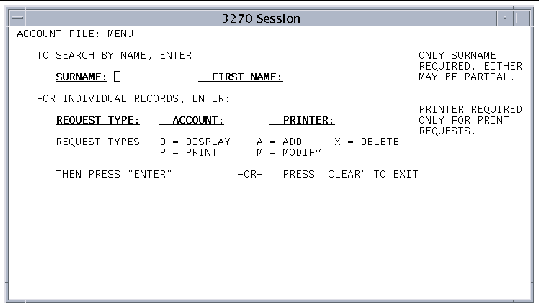
After you execute a command, such as SEND MAP, that sends 3270 data to the terminal screen, CECI captures the screen. You can display the screen by pressing PF6 on either the Commands or Syntax screens. Press any key to return to the previous screen.
The following figure shows the User screen captured after executing the following command string:
|
Note - The ACCTMNU BMS map is in the ACCTSET BMS mapset in the Sun MTP Primer region. |
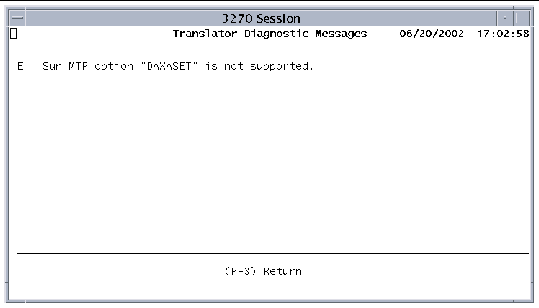
Before executing a command, CECI invokes a translator that checks the syntax of the command line. If the translator detects an error, it displays the following message on the Syntax screen:
You can view diagnostic messages by pressing PF9.
The Translator Diagnostic Messages screen shown in FIGURE 2-12 shows the message generated by the following incorrect command:
Notice the misspelling of DATASET as DAXASET.
Press PF3 to return to the previous screen.
When data is flowing into an option field, CECI can dynamically allocate the storage for that variable. This means you do not have to define all variables on the Variables screen.
|
Note - Dynamically allocated variables are transient and the data received is not available for use on subsequent commands. Also, you cannot edit these variables on the Edit Variable screen. |
Before CECI can dynamically allocate storage for a receiver variable, you must specify the option on the command line. The option must be terminated by an empty pair of parentheses, as illustrated in this example:
When this command executes, CECI dynamically allocates a receiver variable for the INTO() option.
Another way to pass data without creating a CECI variable is by specifying option arguments as literals.
This section describes the program control policy for CECI with the LINK, XCTL, and ABEND commands.
CECI is a conversational transaction and, by default, all commands executed within any CECI session are contained within a single Logical Unit of Work (LUW). You can manage LUWs within a single CECI session by using the SYNCPOINT and ROLLBACK commands.
The CEDA transaction is used to dynamically manipulate resource definitions. Its options are described in the following subsections.
For more information about managing resources dynamically, refer to the Sun Mainframe Transaction Processing Software Configuration Guide.
|
Note - For most attribute values, the text you type is converted to uppercase. The exceptions to this are the values for GROUP, DESCRIPTION, JVMCLASS, and SHLIB, which support mixed case. |
The CEDA DEFINE option allows you to define a resource. In the current release, mapsets, programs, and transactions are supported.
CEDA DEFINE GROUP(group-name)
[MAPSET(mapset-name)[attribute(value)] ... |
PROGRAM(program-name) [attribute(value)]... |
TRANSACTION(transaction-name) [attribute(value)]]
The supported MAPSET attributes are:
|
Description of the mapset; up to 58 characters. Text can be mixed case. |
|
Example: To define the mapset, INVADD01, that is in the CMP1INV group, type the following on a blank transaction screen:
The supported PROGRAM attributes are:
[LANGUAGE([ASSEMBLER|C|COBOL|PLI])]
|
Description of the program; up to 58 characters; optional. Text can be mixed case. |
|
|
Name of the programming language. If not specified, the default is COBOL. |
|
[EXECUTIONSET(FULLAPI|DPLSUBSET)]
|
If the REMOTESYSTEM name is the same as the local system name, then EXECUTIONSET specifies to run the DPL program in the local system as if it were a remote system. See Chapter 6 for additional information. |
|
|
Name of the program in the remote Sun MTP or CICS system. If REMOTENAME is not specified and REMOTESYSTEM is specified, then Sun MTP assumes PROGRAM name. See Chapter 6 for additional information. program-name is limited to eight characters. |
|
|
Name of the remote Sun MTP or CICS system to which, if specified, Sun MTP will ship a distributed program link (DPL) request. The 4-character system-name must be in TCT-System Entries table. |
|
|
Name of the transaction under which the remote system attaches the requested program. See Chapter 6 for additional information. |
Java virtual machine (JVM ) attribute:
|
Name of the main class of the Java program; maximum of 256 characters. Class name can be mixed case. |
Example: To define the inventory add program, INVPGM1, that is in the CMP1INV group, type the following on a blank transaction screen:
|
Note - If the command is too long to fit on one line, it wraps automatically; no continuation character is needed. |
The supported TRANSACTION attributes are:
|
Description of the transaction; up to 58 characters; optional. Text can be mixed case. |
|
|
Program name. Lowercase characters are treated as uppercase. |
|
|
Indicates whether transactions shipped to a remote system are locally queued if the remote system is unavailable. Default is NO. |
|
|
Name of the program in the remote Sun MTP or CICS system. If REMOTENAME is not specified and REMOTESYSTEM is specified, then Sun MTP assumes PROGRAM name. See Chapter 6 for additional information. program-name is limited to eight characters. |
|
|
Name of the remote Sun MTP or CICS system to which, if specified, Sun MTP will ship a distributed program link (DPL) request. The 4-character system-name must be in TCT-System Entries table. |
[TRANCLASS(transaction-class)]
|
Name of the transaction class to which the transaction is assigned. |
|
Indicates whether a transaction dump will be produced if the transaction terminates abnormally. Default is YES. |
The following attributes are specific to Sun MTP and are not part of the IBM CICS set:
|
Default screen size or the alternate screen size. DEF: Default screen size of 24 lines and 80 columns for Model 2 3270 terminal types ALT: Alternate screen sizes of 27 lines and 132 columns for Model 5 3270 terminal types, or 43 lines and 80 columns for Model 4 3270 terminal types |
|
|
Indicates whether accounting is on or off for this transaction. YES: Accounting is on for this transaction, if the Accounting field in the SIT is set to Y NO: Accounting is off for this transaction DEF: (Default) Accounting is controlled by the SIT Accounting field and the MCT |
|
|
Journal file identifier for this transaction; a number from 1 to 99. If accounting is set to N, this field is ignored. If file ID is not specified in the JCT, the journal file name is created by concatenating JRNL with the file ID value, creating, for example, a journal file named JRNL05. |
|
|
YES: Transaction is a back-end DTP program and performs ISC functions. NO: Transaction is not a back-end DTP program. It can still perform outbound ISC functions, but does not run as expected if started by a remote Sun MTP or CICS region. |
|
|
Key that initiates this program as a transaction. If this field is blank, no key initiates this program as a transaction. Valid values are: |
|
|
A number from 1 to 64 specifying a transaction security level. This value corresponds to a bit value set in the Security Key area of the SNT associated with the user at the terminal that entered the transaction. If external security management is enabled (KIXSEC=YES), the value in Trans Sec is ignored. The Security Key is set for a user by the SNT when the user signs on explicitly with CSSN (CESN), or implicitly when Sun MTP starts and a match is found between the user ID and a user ID in the SNT. By default, each user is only allowed to enter transactions with a security level of 1. All system transactions are set initially to a transaction security level of 1, which allows all users to access them. Raise the security level for critical transactions, such as CSMT, CEMT and other transactions that are used to configure the Sun MTP environment to prevent unauthorized users from accessing them. See Chapter 7 for information about Sun MTP security. |
The DELETE option deletes a resource.
CEDA DELETE ALL | [MAPSET(mapset-name) | PROGRAM(program-name) | TRANSACTION(transaction-name)] GROUP(group-name)
Example: To delete the INVADD01 mapset that is in the CMP1INV group, type the following command on a blank transaction screen:
The DISPLAY option displays one or more resources.
CEDA DISPLAY ALL | [MAPSET(mapset-name) | PROGRAM(program-name) | TRANSACTION(transaction-name)] GROUP(group-name)
Example: To display all resources in the CMP* group, type the following on a blank transaction screen:
The INSTALL option enables you to add or replace a resource definition into the region while the region is running.
CEDA INSTALL GROUP(group-name)
[MAPSET(mapset-name)]
[PROGRAM(program-name)
[TRANSACTION(transaction-name)]
Example: To install all the resources in the CMP1INV group, type the following command on a blank transaction screen:
Use the CEDF transaction to access the Sun MTP Debug Facility or to select a source debugger. The Debug Facility is used for debugging EXEC CICS statements embedded in COBOL, C, and PL/I programs. CEDF provides a wide range of options for setting breakpoints, those locations where control is interrupted and passed to the Transaction Server for debugging purposes. CEDF allows debugging for single or multiple terminal sessions, as well as debugging for routed transactions.
For more information about the CEDF transaction, debugging, and breakpoint processing, refer to the Sun Mainframe Transaction Processing Software Developer's Guide.
Use the CEMT transaction to perform system maintenance tasks, including:
To execute CEMT, enter the transaction identifier and its arguments in the upper left corner of the screen and press Enter.
CEMT INQ|SET|PERFORM arguments
|
Make inquiries. See INQ (I) Option. |
|
|
Control the operating environment. See SET (S) Option. |
|
|
Perform a system activity. See PERFORM (P) Option. |
|
The INQ option, which you can abbreviate as I, displays the current status of the specified tasks or queues.
CEMT I[NQ] [TASK ALL | (taskno)] |
[TRANID (tranid)] |
[FACILITY (facid)] |
[ACTIVE] |
[SUSPENDED] |
[TERM] |
[DEST] |
[CONN] |
[TDQUEUE | ALL] |
[PROG[RAM] (prog-name) LIB[rary]] |
[TDQUEUE (queue-id) | ALL] |
[TRANCLASS (class-name) | ALL]
The following commands display status:
|
All terminals and background processes currently logged on. Defaults to ALL. |
|
|
Only the task with the specified task number. Use the TASK ALL option to determine task numbers. |
|
|
Only the tasks executing the specified transaction identifier. |
|
|
Only the tasks with the specified facility identifier, which is a terminal identifier for terminal-initiated tasks and a transaction identifier for start- or trigger-initiated tasks. |
|
|
All tasks currently suspended pending availability of a resource. |
|
|
A specified transient data queue, where queue-id is a 4-character value that identifies the queue. |
|
|
Name of the current shared library. If the program has a shared library, the transaction displays the name of the library, for example: CEMT transaction terminated ShrLib = libc |
|
|
Displays the max active, current max active (number of transaction processors assigned to this class), number of messages or transactions received, the current queue depth, and the maximum queue depth. See FIGURE 4-5 for a sample display. |
|
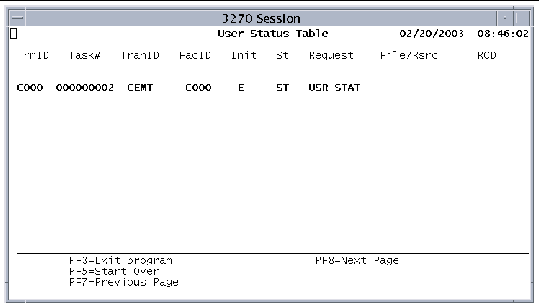
When you execute the CEMT INQ transaction for tasks, such as CEMT INQ TASK ALL, the User Status Table is displayed.
 [ D ]
[ D ]
The User Status Table contains the following fields:
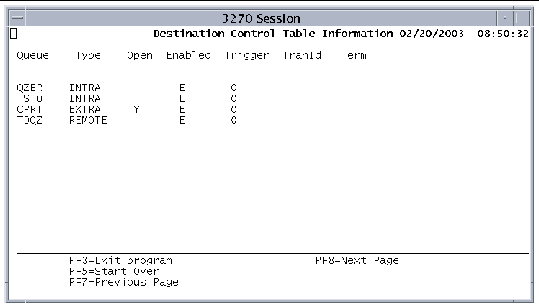
When you execute the CEMT INQ transaction for transient data queues, such as CEMT INQ TDQUEUE ALL, the Destination Control Table information screen is displayed.
 [ D ]
[ D ]
The Destination Control Table Information screen contains the following fields:
The SET option, abbreviated as S, enables you to manage aspects of a region. The parameters that follow the SET option determine the action taken.
To load a new copy of a program or mapset, submit the following transaction:
The next time the program or map is referenced, commands like LOAD, LINK, SEND MAP, and XCTL perform their functions on the new version.
The CEMT . . . NEWCOPY transaction is preferred over the CINI transaction for introducing new programs or mapsets.
When using CEMT . . . NEWCOPY to load a program, all programs are flushed. The next request for the program is loaded from the appropriate directory. Therefore, any program in the directory that has been updated since the region started or since the last CINI or CEMT transaction for a program was issued is read into memory the next time it is referenced.
The following example illustrates how CEMT behaves with programs:
1. The $KIXPROGS directory contains PROG1 version 1 and PROG2 version 1. When a user requests PROG1 and PROG2, they are loaded in the local memory of the transaction processor.
2. The administrator updates PROG2 to version 2.
3. If the administrator executes CEMT SET PROGRAM (PROG1) NEWCOPY, the transaction processors are restarted. This means all the programs are removed from the processor memory. The result is that even though the request for a new copy was for one program, the user will see all the programs as new copies, for example PROG1 version 1 and PROG2 version 2.
When loading a mapset, CEMT . . . NEWCOPY copies only the new mapset from the $KIXMAPS directory to either the $KIXSYS/_kix_reserved_maps directory or to the directory specified by the _KIX_RESERVED_MAPS environment variable. Refer to the Sun Mainframe Transaction Processing Software Configuration Guide for a description of $_KIX_RESERVED_MAPS.
The following example illustrates how CEMT behaves with mapsets:
1. The $KIXMAPS directory contains MAP1 version 1 and MAP2 version 2. When an application requests mapset MAP1, it is copied into the $KIXSYS/_kix_reserved_maps directory and loaded into shared memory.
2. The administrator updates MAP1 to create version 2.
3. If an administrator executes CEMT SET PROGRAM (MAP1) NEWCOPY, MAP1 version 1 is removed from shared memory and deleted from the $KIXSYS/_kix_reserved_maps directory. Then MAP1 version 2 is copied into the $KIXSYS/_kix_reserved_maps directory and loaded into shared memory.
Unlike CICS, the check for RESCOUNT is not made when issuing a CEMT . . . NEWCOPY for a program.
Exercise care when changing the version of a program in the production system. If one of the transaction processors is restarted because a program aborts (for example, trying to access memory outside the limits of the local process), the changed version of the program is loaded only for that transaction processor. This means that the new transaction processor will use the new version of the program, while other transaction processors will still have the old version of the program in process local memory.
To dyamically load a new copy of a shared library or shared object while a region is running, or to remove the designated program from processing, use the following transactions.
CEMT SET PROGRAM prog-name LIBRARY lib-name
Loads a new copy of the named shared library or shared object, up to 16 characters.
CEMT SET PROGRAM prog-name LIBRARY blankreset
Removes the designated program from shared library/object processing. The keyword blankreset sets the Program Processing Table (PPT) shared library field for the program to blanks.
|
Note - You must spell the keyword blankreset exactly as shown or the keyword is used as a new shared library/object name. |
After you execute either CEMT transaction, you must execute a CINI transaction to initialize the new shared library/object and internal tables.
For more information about shared libraries and shared objects, refer to the Sun Mainframe Transaction Processing Software Developer's Guide.
To dynamically enable or disable a program or transaction, use the following transactions:
CEMT SET PROGRAM prog-name [DISABLED|ENABLED]
CEMT SET TRANSACTION tranid [DISABLED|ENABLED]
You can abbreviate DISABLED with a D and ENABLED with E.
When the CEMT SET TRANSACTION DISABLED command is used, existing transactions run to completion before being disabled.
The following transaction allows you to specify whether a transaction dump should be done if the task executing the transaction terminates abnormally.
CEMT SET TRANSACTION tranid [TRANDUMP|NOTRANDUMP]
To terminate tasks, use either transaction:
Purges the task with the specified task number (taskno). Use the CEMT INQ TASK ALL transaction to determine task numbers.
Manage transient data queues with these transactions, which enable you to:
All data queues are enabled at startup and may be disabled dynamically. Runtime modifications are not written to disk. Therefore, when the region shuts down, the queue status and trigger level return to their original status as defined in the DCT.
CEMT SET TDQUEUE (queue-id) [OPEN | CLOSED]
Opens or closes the specified queue. Applies only to extrapartition queues.
queue-id is a 4-character value that identifies the queue.
CEMT SET TDQUEUE (queue-id) [ENABLED | DISABLED]
Enables or disables the specified queue. Applies to all types of transient data queues. queue-id is a 4-character queue identifier.
Combinations of OPEN or CLOSED and DISABLED are not allowed.
Combinations of OPEN or CLOSED and ENABLED are allowed.
You cannot open or close a disabled queue.
You cannot disable an open queue.
Reading from, writing to, or deleting a disabled queue causes the transaction to abort and returns a disabled condition.
CEMT SET TDQUEUE (queue-id) [TRIGGERLEVEL (integer)]
Number of output requests to allow before a transaction is initiated. The level is any integer from 0 to 32767. Applies only to intrapartition queues. queue-id is a 4-character queue identifier.
You can issue the transactions with or without parentheses surrounding the variables for the queue ID and trigger level. For example:
CEMT SET TDQUEUE (queue-id) TRIGGERLEVEL (integer)
CEMT SET TDQUEUE queue-id TRIGGERLEVEL integer
To execute a command again, you must clear the screen and retype the CEMT SET TDQUEUE transaction instead of pressing the Enter key again.
You can control 3270 devices with these CEMT SET TERMINAL transactions. The trmid variable is a 4-character terminal ID known to the application and defined in the 3270 Devices screen of the Terminal Control Table (TCT).
|
Note - You can use these transactions only if the SNA server is installed and the 3270 device is defined in the TCT. |
CEMT SET TERMINAL trmid INSERVICE
Logs the terminal onto the region with the specified terminal ID.
CEMT SET TERMINAL trmid OUTSERVICE
Logs the specified terminal off the region.
You can control intersystem connections with the following CEMT SET CONNECTION transactions. The sysid variable is a 4-character remote system ID known to the region and defined in the System Entries screen of the TCT.
CEMT SET CONNECTION sysid INSERVICE
Sets the connection to the specified remote system in service.
CEMT SET CONNECTION sysid OUTSERVICE
Sets the connection to the specified remote system as out of service. No ISC functions can use this connection.
You can dynamically change the maximum active transaction processors for a class. Parameters are validated for correctness and consistency before any action is taken. For example, changing MAXACTIVE to a value larger than the number of configured transaction processors is not permitted.
CEMT SET TRANCLASS class-name1 MAXACTIVE value [[USE] class-name2]
Changes the maximum active transaction processors for the specified class. The optional USE clause allows you to specify the class from which transaction processors are added or subtracted. If you do not specify the USE clause, transaction processors are added to or subtracted from the KIXDFLT class.
See Chapter 4 for information about setting up and using transaction classes.
Set the system state with the following transactions:
Sets the system state to NORMAL.
Sets the system state to BATCH.
Sets the system to the QUIESCE state.
Sets the system to the SHUTDOWN state in which executing transactions are allowed to complete.
CEMT SET SYSTEM SHUT[DOWN] IMM[EDIATELY]
Sets the system to a SHUTDOWN IMMEDIATE state in which executing transactions are not allowed to complete.
The following table illustrates the conditions and restrictions that are placed on the region for the various system states and for shutdown.
| 1 A user with an Operator Class set to SYS can perform this action. Refer to the section on the Sign-on Table in the Sun Mainframe Transaction Processing Software Reference Guide. | |||
| 2 Users cannot execute batch programs with the CBCH transaction if the system is in BATCH state. | |||
| 3 Any user with the appropriate transaction security key can perform these system transactions: CEMT, CSMT, and CPLT. | |||
The PERFORM option, abbreviated as P, is used to:
CEMT P[ERFORM] SHUT[DOWN] [IMM[EDIATE]]
SECURITY REBUILD
Sets the region to the SHUT state. No new activities are allowed. TABLE 2-2 shows the activities allowed when the region is in this state.
CEMT PERFORM SHUTDOWN IMMEDIATE
Shuts down the entire region immediately. Every user session and transaction is terminated. Transactions in process are rolled back and recovery processes are activated.
Clears the cache memory area where the results of access requests are stored.
The CINI transaction forces each transaction server in the system to terminate and restart as soon as it completes the currently executing transaction, clearing all programs out of local memory and all mapsets from shared memory and deleting all mapsets from the $KIXSYS/_kix_reserved_maps (or $_KIX_RESERVED_MAPS) directory. When you issue a CINI transaction, programs are loaded from $KIXPROGS and mapsets from $KIXMAPS, when requested by the user. A copy of the mapsets is also placed in the $KIXSYS/_kix_reserved_maps directory.
The CINI transaction has no arguments.
Transaction routing allows terminals connected on one system to run transactions in another system. Sun MTP uses the CRTE transaction to route transactions. See Transaction Routing for information about using the CRTE transaction.
Use the CSMT transaction to terminate a user's session or to shut down the region. Type the transaction identifier with its arguments in one of the following formats:
Terminates the user's session.
Shuts down the region for all users.
|
Note - For CSMT SHUT,YES to work correctly, do not include a space between the comma and YES. |
When transaction security is in effect, the CSMT transaction should be secured to prevent users from accidentally shutting down the system while other users are signed on. If this transaction is secured, terminate a user session with the CSSF GOODNIGHT or CSSF LOGOFF commands. See CSSN/CSSF - Sign-On/Off.
Use the CSPG transaction to display multiple pages of data at a terminal using CICS BMS. The pages of data are created using either the SEND TEXT ACCUM or the SEND MAP ACCUM command. When all data has been created, a SEND PAGE command is issued. If there are multiple pages of data, the CSPG transaction is started to control the display of the data.
When CSPG starts, the first page of data is displayed. By entering a command in the first unprotected field on the screen or by using a PF key, you can page forward, page backward, display a specific page, or quit.
P/[+n | -n | n | P | N | L | C]
Before you can use PF keys to control paging, you must define them in the System Initialization Table (SIT). The following PF keys are defined by default:
There are several sign-on/sign-off transactions:
Signs on to the region with a user ID and password, and allows you to change your password.
Signs on to the region with an operator name and password.
Signs off, and optionally, terminates the client.
The CESN and CSSN transactions use the SNT to validate the user's ID and password. User programs can access the SNT fields with the EXEC CICS ASSIGN command.
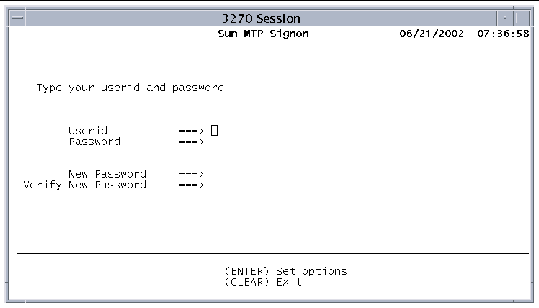
Type CESN alone or with data. If you type CESN alone, the screen in FIGURE 2-15 is displayed.
Security issue: When external security management is enabled (KIXSEC=YES), you cannot use the CESN transaction without a password. See Chapter 9.
 [ D ]
[ D ]
When you type, the Password and New Password values are not displayed. To change the password, type the new password in both New Password fields. The Userid, Password, and New Password values are one to eight characters in length. The password is case-sensitive. Refer to the Sun Mainframe Transaction Processing Software Reference Guide for information about setting the password type.
|
Note - If you use the CESN transaction from a terminal that is already signed on, the previous user is signed off immediately. |
If you choose to enter all data with the CESN transaction identifier, use the format:
CESN USERID=userid,PS=password,[NEWPS=newpassword]
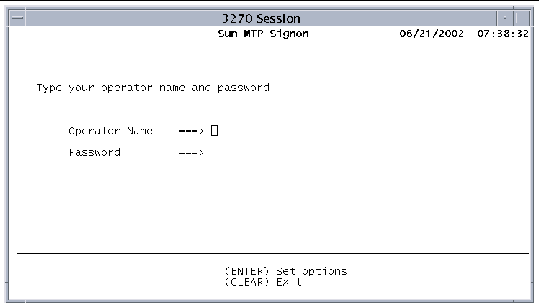
Type CSSN alone or with a password. If you only type CSSN, the screen in FIGURE 2-16 is displayed.
Security issue: When external security management is enabled (KIXSEC=YES), you cannot use the CSSN transaction without a password. See Chapter 9 for more information.
 [ D ]
[ D ]
The password is case-sensitive; it must match the entry in the SNT.
If you are unable to log in and are working on an X terminal, press Ctrl-C to terminate the client; PF3 is not active on the signon screen.
If you choose to enter all data with the CSSN transaction identifier, use the format:
CSSN NAME=operator-name,PS=password
To log off, type one of the following transactions:
Signs off the user session and terminates the client.
You can customize the supplied CSSN/CESN transaction. A sample COBOL program, CSSNCESN.cl2, is located in the $UNIKIX/src/trans directory.
|
1. Define the transaction in the Program Control Table (PCT).
Refer to the Sun Mainframe Transaction Processing Software Reference Guide for more information about the PCT.
2. Copy the CSSNCESN.cl2 program from $UNIKIX/src/trans to your $KIXPROGS directory.
3. Modify and compile the program.
Your transaction is executed instead of the standard one.
Copyright © 2004, Sun Microsystems, Inc. All rights reserved.