x25tool Menu Items
File
Save
Save changes to the default configuration files. When you click on Save, a window displays a list of settings (IP Configuration, Link #, PAD Host Database, etc.) and you can choose which settings you want to save to the default configuration. By default, all modified items are listed under Save.
Save as
Save changes to a named configuration. You might want to keep a backup, for example, or create a template configuration suitable for your particular network.
As with the Save option, you can choose which information to save to the configuration files.
Load from
This lets you load different configuration information into x25tool from a previously saved configuration.
Load running
This lets you load configuration information related to links, routing, and NUI mapping, from the X.25 session currently running into x25tool.
Exit
Exit x25tool.
Edit
Add Link
When you select Add Link, a list of configuration templates is displayed. Choose the template that most closely matches your configuration needs (e.g. TELENET, TRANSPAC, or TYMNET) or choose the Default. The Link Editor window will appear. You can then add a new link and configure it.
Modify Link
Lets you modify the link that is currently selected in the Links Configuration list by bringing up the Link Editor window. (Alternatively, you can double-click on the link to bring up the Link Editor window.) You can then modify the selected link.
Delete Link
Deletes the link that is currently selected in the Links Configuration list.
Note -
The link must not be running when you delete it. See "Stop Link", for more information.
Copy Link
Copies the link configuration information for the link that is currently selected in the Links Configuration List. You can only copy configuration information for one link.
Paste Link
Pastes the most recently copied configuration information of a single link into the Link Editor window.
Link Editor
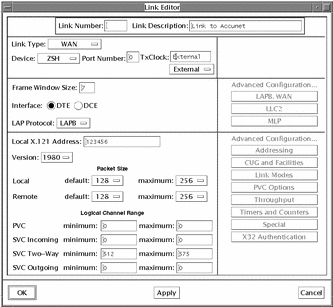
When you choose Edit => Add to add a link, or Edit => Modify to modify an existing link, (see "Add Link" and "Modify Link" for more information), the Link Editor pop-up window will appear. The Link Editor window contains the options you need to configure the link.
The Link Editor is divided into three rows which correspond to the three lowest layers of the OSI seven-layer model. The top row contains the layer one physical parameters; the middle row contains the layer two frame parameters, and the bottom row contains layer three packet parameters.
The Link Editor window is also arranged so that the left side contains the more basic parameters used to configure a link. In most cases, these parameters are all you need, but the buttons on the right side of the Link Editor will take you to the Advanced Configuration windows. You can use the parameters in these windows to further fine-tune the link configuration.
Figure 4-5 Link Editor Window

Network
Start X.25
Starts the Solstice X.25 network.
Stop X.25
Stops all the daemons associated with the X.25 system software.
Statistics X.25
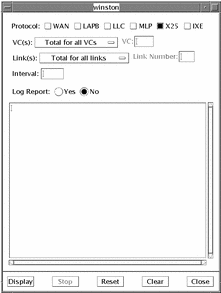
Gathers and displays statistics on traffic. When you select this option, a pop-up window will appear. The options displayed in this window let you determine the kind of statistical information to be generated:
Figure 4-6 Network X.25 Statistics Window

- Protocol
-
Select the protocol(s) you want to generate statistics for: WAN, LAPB, LLC, MLP, X.25, or IXE.
- VC(s)
-
Select one of the following: Total for all VCs; Per-VC, all VCs; Per-VC, single VC; or Per-VC, range of VCs.
Note -Statistics for the VC (virtual circuit) are reported only if X.25 is one of the protocols selected.
- VC or VC Range
-
If you set VC(s) to Per-VC, you will need to specify the VC number. If you select Per-VC, range of VCs, you will need to enter the range of VCs to be used for gathering the statistics.
- Link(s)
-
Select one of the following: Total for all links; Per-link, all links; Per-link, single link; Per-link, range of links
- Link Number or Link Range
-
If you set Link(s) to Per-link, single link, you will need to specify the link number. If you select Per-link, range of links, you will need to enter the range of links to be used for gathering the statistics.
- Interval
-
This field is optional. If you enter a value, the updated statistics will be continuously re-displayed after the interval specified. Interval values are in seconds.
- Log Report
-
If you select Yes, you will be prompted to give a file name for storing the statistics. If you select No, the statistics are displayed in the statistics window, only.
To generate a report, click on the protocols you want statistics for, specify the link(s) and VC(s) to test, and the interval. Then click on Display. Following is an example of how the statistics are reported:
GLOBAL STATISTICS FOR X25
           -------------------------------------
           Packet type              TX        RX
           -------------------------------------
                        Call        20        20
                 Call accept        20        20
                       Clear         0         0
               Clear Confirm         0         0
                     Restart         5         5
             Restart confirm         0         0
                         RNR         0         0
                          RR      2431      2430
                      Resets         0         0
              Reset confirms         0         0
                  Diagnostic         0         0
                  Interrupts         0         0
                Registration         0         0
                 Reg confirm         0         0
              Packets(total)      4250      4212
                Bytes(total)    483584    483640
           -------------------------------------
           Running totals
           -------------------------------------
           Tot no of VCs established           2
           Connections refused                 0
           Connections currently open          2
           Max connections open                2
A separate block of statistics is reported for each protocol selected.
Start Link
Starts the currently selected link without affecting the Solstice X.25 software as a whole. All counters and timers associated with the link protocol are reset to their initial values.
Stop Link
Stops an individual link without affecting the Solstice X.25 software as a whole. All counters and timers associated with the link protocol are reset to their initial values.
Once the link has been stopped, the LAPB will not respond to any incoming frames until the link is restarted using the Start Link option.
Reset Link
Resets an individual link to its initial state without affecting the Solstice X.25 software as a whole. All counters and timers associated with the link protocol are reset to their initial values.
Link(s) status
Displays the status of the internal state of the LAPB for the configured links. When the link is operating normally, i.e. the SABM/UA handshake has successfully completed, the state for both LAPB and Packet is displayed as NORMAL.
When used on a MLP link, the highest status of the different SLPs is displayed.
For more information on link status, see Chapter 11, Troubleshooting.
Note -
The link status option does not work with LLC2 links.
Options
Start X.25 automatically when booted
The X.25 network will automatically start the next time you reboot the machine.
Don't start X.25 automatically when booted
The X.25 network will not automatically start when you reboot the machine. If you want to bring up the network later, then you must select Network => Start X.25.
Start SNMP Agent automatically
This starts the SNMP agent when you start X.25 or reboot the machine. The SNMP agent allows access to the MIB through SNMP (the Simple Network Management Protocol). For more information on the SNMP agent, see Appendix E, Using the Solstice X.25 SNMP Agent.
Don't start SNMP Agent Automatically
The SNMP agent will not be started when you start X.25 or reboot the machine.
Static mode
When x25tool is set to static mode, any changes you make will not be applied to the currently running configuration. However, if you save the changes to the default configuration files, they will come into effect the next time you stop and restart the Solstice X.25 software.
Dynamic mode
When x25tool is set to dynamic mode, any change you make will affect existing X.25 connections, and may disrupt users, so use caution. Changes to the dynamic configuration are made in the kernel and are lost the next time you restart the Solstice X.25 software, unless you save the changes.
Services
The following Service options are described in more detail in Chapter 6, Configuring Solstice X.25 Services and Chapter 7, Parameter Reference.
IP
Configure X.25 to run IP above it. There are two IP windows: the IP Interface Configuration window, and the Remote Host to X.25 Address Map window.
PAD
Configure the PAD Hosts Database with information to make it easier for users to make PAD calls to a remote host.
The PAD Daemon Listen Database window lets you determine how incoming calls will be handled.
The PAD Printer lets you install a printer over an X.25 network so that users logged in from a remote terminal can still print to their local printer.
NUI Mapping
Configure the Network User Identifier parameters to create a mapping between the Network User Identifiers and facilities.
Routing
If you have multiple links, use the parameters in this window to configure the address information in a Call Request packet. This determines which link Solstice X.25 will use for outgoing calls.
X.25 Call Filtering
Use X.25 Call Filtering to define which incoming calls will be authorized.
Boards
Definition
This pop-up window contains a list of physical serial port boards. Click on Add to add a board, or click on a board already displayed in the list, then select Modify.
When you click on Apply or OK, the changes are stored in a file and the Device list for the Link Editor is updated to reflect any additions or modifications.
The items contained in the definition window are:
Symbolic Name
This is what you want to call the board.
Path Name
This is the path for the device driver, for example, /dev/zshdrv is the location for the Aurora board driver.
Board type
Set to either WAN or LAN.
Number of lines
This is the number of lines that the board will support.
MRU (in bytes)
The size of the largest frame (Maximum Receive Unit) that can be received by the board.
Comment
Type in any additional information you want to include, for example, "Onboard Serial Port".
Help
On-line help for x25tool is available in HTML format. It is specifically structured to help you quickly find the answers to questions about x25tool. For example, if you are not sure what sort of information to type in the Local X.121 Address field in the Link Editor window, you can use on-line help to find out.
The first time you use on-line help, you need to specify which browser to use. To do this, click on Help and select Properties. Then type in the path and name of the browser and click on OK.
Alternatively, you can specify the browser in your .login file by adding the following line:
setenv X25HTMLBROWSER = /pathname/browsername
Then, to bring up the on-line help, just click on Help => Help. This starts the browser and brings you to the main help menu. You can then follow the hyperlinks to the information you need.
- © 2010, Oracle Corporation and/or its affiliates
