Table of Contents
When MySQL Workbench is first started you will presented with the Home screen. There are two main sections of the Home screen:
Workbench Central
Workspace
MySQL Workbench 5.2 introduced the Home screen. MySQL Workbench 5.1 simply displays the MySQL Model workspace rather than the Home screen. Note that 5.1 does not support the SQL Editor and Server Administration functionality of 5.2.
These can be seen in the following screenshot:
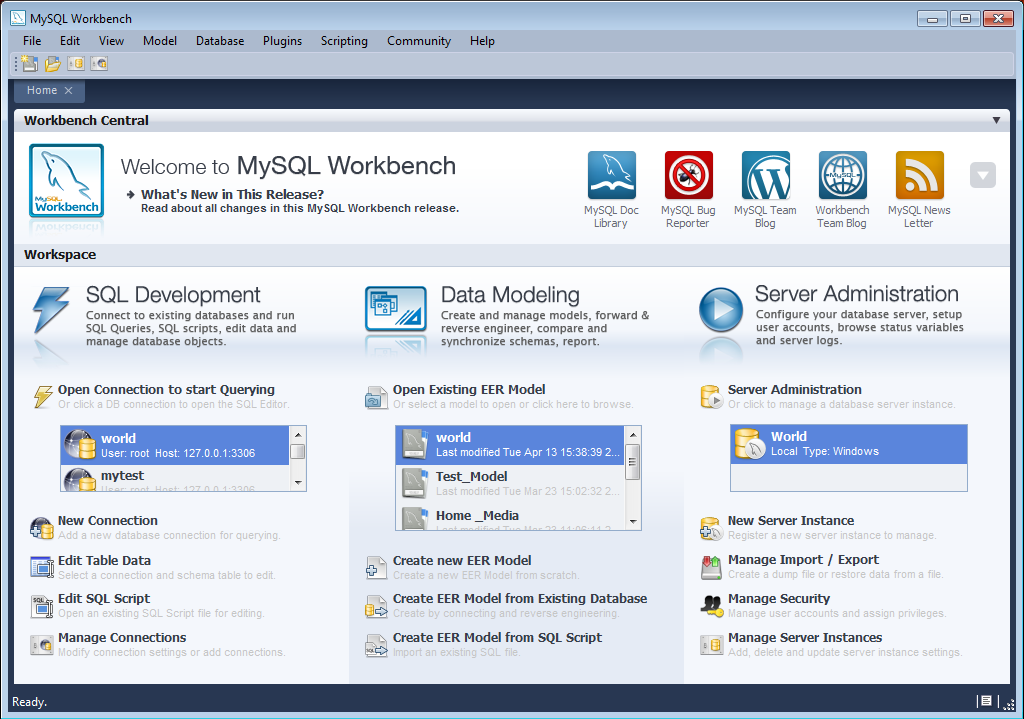
Workbench Central enables you to keep up to date with MySQL Workbench news, events and resources. You can read the developer blogs, find out what's new in the release, access the forums, check for updates and file a bug report.
Workbench Central includes the following facilities:
What's new: A list of bug fixes and changes.
MySQL Doc Library: Built in documentation.
MySQL Bug Reporter: Links to the MySQL bug system, where you can report bugs.
MySQL Team Blog: Currently links to Workbench team blog.
Workbench Team Blog: Links to Workbench team blog.
MySQL Newsletter: Currently links to the MySQL Developer forum.
The Workspace is designed to allow you to quickly get to the task you would like to carry out. For convenience it is divided into three main areas, in alignment with MySQL Workbench functionality:
SQL Development
Data Modelling
Server Administration
For further information on SQL Development see Chapter 6, SQL Development.
For further information on Data Modeling see Chapter 7, Data Modeling.
For further information on Server Administration see Chapter 8, Server Administration.
From version 5.2.10, the MySQL Workbench application features a fixed minimum window size of 1024x768. You will not be able to manually reduce the size of the application to less than this resolution.
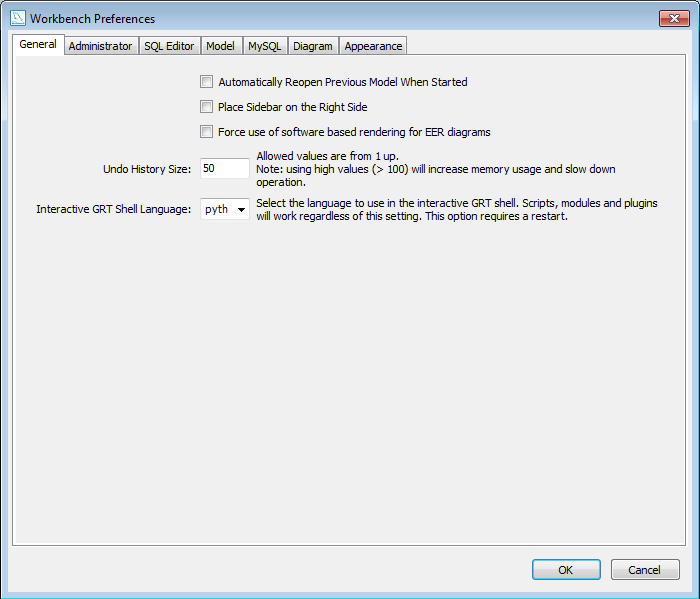
The menu sets MySQL Workbench defaults. Choosing the menu item opens the following dialog box:
The following list describes the dialog box tabs:
: The delete and undo history options
: Configuration for tools used by the Administrator functionality
: Configuration of the SQL Editor
: Default object names
:
: EER diagram settings
: Change colors and fonts used by various Workbench components
A more detailed discussion of these options follows.
The General tab allows you to set the following options:
Automatically Reopen Previous Model When Started - check this if you want the model you previously worked on to be automatically reopened when you start MySQL Workbench.
Place Sidebar on the Right Side - by default the Sidebar is placed on the left-hand side of the MySQL Workbench application. Select this option to place it on the right-hand side.
Force use of software rendering for EER diagrams - MySQL Workbench will use OpenGL for rendering when available. However, due to faulty drivers, problems do occasionally occur. These issues can be resolved by selecting the software rendering option here.
Undo History Size - you can limit the size of the undo history here. Set this value to 0 to have an unlimited undo history.
Auto-save model interval - An open model that has not been saved will automatically be saved after this period. On loading a model file, MySQL Workbench will notify the user if the file was not previously saved correctly, due to a crash or power failure. MySQL Workbench can then attempt to recover the last auto-saved version. Note that for automatic recovery to be available for a new file, it will have to have been saved at least once by the user.
Interactive GRT Shell Language - you can select the language to be used in the GRT shell by chosing a language from the drop down listbox Interactive GRT Shell Language. Currently there is a choice between Lua and Python. Python is the recommended option.
This section provides configuration options that affect the Administrator functionality in MySQL Workbench.
Enables you to set paths to the mysqldump tool, and the mysql tool. If these are left blank the defaults will be used. This panel also enables you to set the directory for export dump files.
This section provides configuration options that affect the SQL Editor functionality in MySQL Workbench.
There are three main groups of parameters that can be set here:
SQL properties
Query Editor
Query Results
SQL Properties
SQL properties that can be set include the
SQL_MODE, case sensitivity of identifiers, and
the SQL delimiter used (by default this is $$).
The document property SqlMode defines
SQL_MODE for all operations affecting SQL
parsing at the document scope. The purpose of this option is to
preserve the consistency of SQL statements within the document.
The property has the following function:
Sets the
SQL_MODEDBMS session variable to the value stored in theSqlModeproperty of the document when performing reverse engineering, forward engineering or synchronization operations.Honors the
SQL_MODEvalues defined inSqlModeso that SQL parsing is correct.
Only a subset of all possible SQL_MODE values
affect the MySQL Workbench SQL parser. These values are:
ANSI_QUOTES,
HIGH_NOT_PRECEDENCE,
IGNORE_SPACE,
NO_BACKSLASH_ESCAPES,
PIPES_AS_CONCAT. Other values do not affect the
MySQL Workbench SQL parser and are ignored.
If the value of SqlMode is not set then the
default value of the SQL_MODE session variable
defined by the server stays unchanged during operations with the
server. However, the MySQL Workbench SQL parser will behave as if
SQL_MODE is also not set. This may potentially
lead to inconsistencies in SQL syntax stored in the document. If
you choose to not set the SqlMode property,
ensure that the default SQL_MODE variable
defined by the server does not contain any values from the
following list: ANSI_QUOTES,
HIGH_NOT_PRECEDENCE,
IGNORE_SPACE,
NO_BACKSLASH_ESCAPES,
PIPES_AS_CONCAT.
The SqlMode property is defined in two
locations: globally and at document scope. Every document upon its
creation copies the value of the global property into the property
defined for the document. The property value defined at document
scope always has higher priority over the one defined globally.
Query Editor
The query editor properties that can be set include the following:
Show Live Schema Overview - This option allows a simplification of the user interface by removing the Overview tab from the SQL Editor. This is also extremely useful if schemata have a large number of tables, or there is a large number of schemata in a model. In each of these cases load times would be greatly increased as the tables and schemata are enumerated and drawn.
Show Schema Contents in Schema Tree - enumerating, populating and drawing large numbers of items can significantly increase loading times. For this reason this facility can be switched off for models containing large numbers of schemata and tables.
Show Metadata Schemata - by default metadata schemata are not displayed. If required to view, for example to troubleshoot or check metadata information, they can be displayed by selecting this option.
Continue on SQL Script Error - should an error occur while executing a script, this option will allow you to continue executing the remainder of the script.
Forbid UPDATE and DELETE statements without a WHERE clause - this option enables the
SQL_SAFE_UPDATESoption for the sesson, preventingUPDATEandDELETEstatements from being executed if aWHEREclause is not present. This can avoid potentially dangerous situations where a command could accidentally update or delete all rows in a table.Max syntax error count - large complex scripts can contain many errors. Further, a syntax error early on can lead to many subsequent syntax errors. For these reasons it is possible to limit the number of errors displayed using this option, the default being 100 error messages.
Progress status update interval - When executing long running queries over a slow connection you would need to increase this value, to prevent excess load on the connection.
DBMS connection keep-alive interval - When executing long running queries over a slow connection you would need to increase this value to prevent the connection being lost.
Query Results
Limit Rows - queries can sometimes result in an excessive number of rows being returned as a result. This can heavily load the connection, and take time to display in MySQL Workbench. To prevent this you can set a more moderate value here.
Limit Rows Count - specify the maximum number of result rows to return.
Max. Field Value Length to Display - to avoid display problems due to excessive field length, it is possible to set the maximum field length to display (in bytes).
Treat BINARY/VARBINARY as non-binary character string - Binary byte string values are not displayed by default in the results grid, but are instead marked as BLOB values. These can then be viewed or edited with the BLOB editor. Non-binary character string values are displayed in the results grid, and can be edited in the grid cell or using the BLOB editor. Note that if this option is turned on, data truncation may result. This is because binary byte string values may contain null bytes as part of their valid data. For non-binary character strings a null byte terminates the string.
Enable Data Changes Commit Wizard - In the SQL Editor, when editing table data and then clicking the button, a wizard is launched to step you through applying you changes. This gives you a chance to review the SQL that will be applied to the live server to make the requested changes. If the option is deselected, then the changes will simply be applied to the server, without the wizard being displayed, and without a chance to review the changes that will be made.
This section provides configuration options that affect the Modeling functionality in MySQL Workbench.
Use the When Deleting Physical Model Figures in
Diagram frame to determine the behavior when deleting
objects from the EER diagram canvas. Choose Ask
and whenever you delete an object you will be asked whether you
wish to remove the object from an EER diagram only or also from
the catalog. The Keep Database Object in
Catalog is the safest option. You also have the option
of deleting the object from both the EER diagram and the catalog.
If you choose the Ask option a confirmation
dialog box will only open when you are deleting an object from
an EER Diagram. When deleting in the MySQL Model view there is
no confirmation dialog window
and the delete action always removes the object from the
catalog.
There are a variety of ways of deleting an object from an EER
canvas; using the eraser tool, choosing a
pop-up menu option, using the delete key, and by choosing the
delete option under the menu. In each
case, the action performed by the delete key is determined by the
option chosen from the When Deleting Physical Model
Figures in Diagram frame.
Use the model tab to set the default value for various object names and the primary key data type. A listing of those items with their default values follows:
Primary Key Column Name: id%table%
Primary Key Column Type: INT
Column Name: %table%col
Column Type: VARCHAR(45)
Foreign Key Name: fk%stable_%dtable%
Foreign Key Column Name: %table%_%column%
ON UPDATE: NO ACTION
ON DELETE: NO ACTION
Associative Table Name: %stable%_has_%dtable%
The Primary Key Column Name is the default
primary key column name when using the table editor. Likewise with
the default primary key data type, and column name and column
type. The remaining items are the default names used when using
the relationship tools on an EER diagram.
Items enclosed by percentage signs are variables. Their meanings are as follows:
%table%: The table associated with the object%column%: The column associated with the object%stable%: The source table%dtable%: The destination table
Legitimate values for the foreign key delete or update rules are:
RESTRICTCASCADESET NULLNO ACTION(default)
For more information about these actions see Section 7.7.1.3.5, “The Foreign Keys Tab”.
Use this tab to determine display settings for an EER diagram.
Select whether to expand new objects by checking the Expand New Objects check box and select whether to draw line crossings by checking the Draw Line Crossings check box.
From this tab you can also set the maximum number of characters for:
Column Names
Column Types
Routine Names
Note that this changes the display properties only, not the objects themselves.
Use this tab to set the available colors for the objects that appear on an EER diagram canvas. You can also add colors if you wish.
Changes made here affect the drop down list box of colors that appears on the toolbar when adding objects to an EER diagram canvas. For a discussion of using this list box see Section 7.5.2.1, “Tool-specific Toolbar Items”.
You can also use this tab to set the font face, font size, and the font style for the following list of items:
Editor
Layer Title
Text Figure Text
Text Figure Title
Connection Caption
Routine Group Figure Item
Routine Group Figure Title
Table Figure Items
Table Figure Section
Table Figure Title
View Figure Title
Choose from the drop down list of fonts, font sizes and styles.
Note that on Windows, the default font for the editor only
supports latin-1 characters. If you need to
use characters not supported by the latin-1
character set, you will need to change the font here.