C H A P T E R  3

Configuring Netra CP2500 Board Software

This chapter contains the following sections:


3.1 Hot-Swap Information

3.1.1 Hot-Swapping the Netra CP2500 Board

If the Solaris Operating System is running on a Netra CP2500 board, and you open the board's ejector levers, you will see a message that the operating system will shut down. When the OS achieves the OpenBoot PROM ok prompt level, you can safely remove the board.

CODE EXAMPLE 3-1 displays a typical example of these Solaris OS shut down messages, where hostname is the host name of the Netra CP2500 board being shut down.


CODE EXAMPLE 3-1 Netra CP2500 Board Shut Down Messages
Broadcast Message from root (???) on hostname Wed Dec  7 15:09:22...
THE SYSTEM hostname IS BEING SHUT DOWN NOW ! ! !
Log off now or risk your files being damaged
 
 
#
INIT: New run level: 0
The system is coming down.  Please wait.
System services are now being stopped.
Dec  7 15:09:21 hostname last message repeated 1 time
Dec  7 15:09:39 hostname pseudo: pseudo-device: tod0
Dec  7 15:09:39 hostname genunix: tod0 is /pseudo/tod@0
Dec  7 15:09:39 hostname pseudo: pseudo-device: pm0
Dec  7 15:09:39 hostname genunix: pm0 is /pseudo/pm@0
Print services already stopped.
Dec  7 15:09:41 hostname syslogd: going down on signal 15
umount: /xfn busy
The system is down.
syncing file systems... done
Program terminated
ok

3.1.1.1 Hot-Swap Status LED

The blue hot-swap LED, located on the front panel of the Netra CP2500 board (FIGURE 3-2), lights up when the hot-swap function is enabled by the system software. The hot-swap LED indicates that the board can be extracted from the chassis. When a board is inserted into a cPSB system, the LED is lit automatically until the hardware connection process is completed. The LED then remains off until the extraction is once again enabled by the system software.

FIGURE 3-1 shows how to release the Netra CP2500 levers. FIGURE 3-2 shows the location of the blue hot-swap LED.
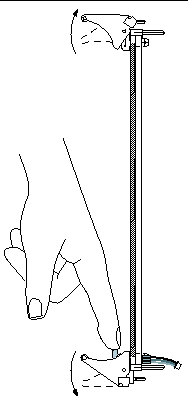

FIGURE 3-1 Releasing the Netra CP2500 Ejector Levers

Figure showing the proper way to press down on the ejector lever.


FIGURE 3-2 Blue Hot-Swap LED Location

Figure showing the location of the blue hot-swap LED on the board faceplate.


3.1.2 Retrieving Device Information

You use the Solaris platform information and control library (PICL) framework for obtaining the state and condition of the Netra CP2500 board, rather than the Solaris cfgadm framework used with other CompactPCI boards.

The PICL framework provides information about the system configuration that it maintains in the PICL tree. Within this PICL tree is a subtree named FRU tree, that represents the hierarchy of system FRUs with respect to a root node in the tree called chassis. The FRU tree represents physical resources of the system. The PICL tree is updated whenever a change occurs in the device status.

The prtpicl -v command shows the condition of all devices in the PICL tree. CODE EXAMPLE 3-2 displays example Netra CP2500 board output from the prtpicl command.


CODE EXAMPLE 3-2 prtpicl Command Output

# prtpicl -v
...
     frutree (picl, 36000005b5)
      :_class    picl 
      :name      frutree 
         chassis (fru, 36000005b8)
          :ConditionTime         Fri Dec  9 09:16:43 2005 
          :Condition     ok 
          :ChassisType   SUNW,NetraCT-810 
          :StatusTime    Fri Dec  9 09:16:43 2005 
          :State         configuring 
          :_class        fru 
          :name  chassis 
             CPU (location, 36000005f8)
              :State     connected 
              :AutoConfig        enabled 
              :StatusTime        Fri Dec  9 09:16:54 2005 
              :Power     on 
              :PdevProbePath     /pci@1e,600000 
              :devfs-path        /pci@1e,600000 
              :GeoAddr   0x1 
              :UnitAddress       1e,600000 
              :bus-addr  0x1 
              :Label     CPU 1 
              :SlotType  cpci 
              :_class    location 
              :name      CPU 
                 SUNW,Netra-CP2500 (fru, 3600000602)
                  :AdminLock     disabled 
                  :ConditionTime         Fri Dec  9 09:16:54 2005 
                  :Condition     ok 
                  :StatusTime    Fri Dec  9 09:16:54 2005 
                  :State         configured 
                  :FRUType       bridge/fhs 
                  :HostCPU
                  :_class        fru 
                  :name  SUNW,Netra-CP2500 
                     PMC-1 (location, 3600000605)
                      :devfs-path        /pci@1e,600000 
                      :GeoAddr   0x1 
                      :bus-addr  0x4 
                      :Label     PMC 
                      :SlotType  pci 
                      :_class    location 
                      :name      PMC-1 
             ...
             RTM (location, 360000066c)
              :StatusTime        Fri Dec  9 09:16:43 2005 
              :devfs-path        /pci@1f,700000 
              :bus-addr  1,1 
              :Label     RTM 
              :SlotType  rtm 
              :State     connected 
              :GeoAddr   0x1 
              :_class    location 
              :name      RTM 
                 RTM (fru, 3600000675)
                  :AdminLock     disabled 
                  :Condition     ok 
                  :State         configured 
                  :FRUType       RTM 
                  :_class        fru 
                  :name  RTM 
                     su0 (port, 360000067c)
                      :devfs-path        /pci@1e,600000/isa@7/serial@0,3f8 
                      :PortType  serial 
                      :GeoAddr   0x1 
                      :bus-addr  0,3f8 
                      :Label     COM A 
                      :_class    port 
                      :name      su0 
                     su1 (port, 3600000684)
                      :devfs-path        /pci@1e,600000/isa@7/serial@0,2e8 
                      :PortType  serial 
                      :GeoAddr   0x2 
                      :bus-addr  0,2e8 
                      :Label     COM B 
                      :_class    port 
                      :name      su1 
                     bge0 (port, 360000068c)
                      :devfs-path        /pci@1f,700000/network@1 
                      :PortType  network 
                      :GeoAddr   0x1 
                      :bus-addr  1 
                      :Label     ENET A 
                      :_class    port 
                      :name      bge0 
                     bge1 (port, 3600000694)
                      :devfs-path        /pci@1f,700000/network@1,1 
                      :PortType  network 
                      :GeoAddr   0x2 
                      :bus-addr  1,1 
                      :Label     ENET B 
                      :_class    port 
                      :name      bge1 
                     bge2 (port, 360000069c)
                      :devfs-path        /pci@1f,700000/network@3 
                      :PortType  network 
                      :GeoAddr   0x3 
                      :bus-addr  3 
                      :Label     ENET C 
                      :_class    port 
                      :name      bge2 
                     bge3 (port, 36000006a4)
                      :devfs-path        /pci@1f,700000/network@3,1 
                      :PortType  network 
                      :GeoAddr   0x4 
                      :bus-addr  3,1 
                      :Label     ENET D 
                      :_class    port 
                      :name      bge3 
 

TABLE 3-1 shows the FRU tree (frutree) entries and properties that describe the condition of the Netra CP2500 board.


TABLE 3-1 PICL FRU Tree Entries and Description for the Netra CP2500 Board

FRU Tree Entry:Property

Entry Description

Example of Condition

CPU (location) :State

State of the receptacle or slot

connected

CPU (fru) :Condition

Condition of the board or occupant

ok

CPU (fru) :State

State of the board or occupant

configured

CPU (fru) :FRUType

FRU type

bridge/fhs


For more information on the PICL framework, refer to the picld(1M) man page.


3.2 Setting the Time of Day

The Netra CP2500 board does not have a battery backup to save the time of day (TOD) over reboots and power-outages. However, the board contains a capacitor that will keep the TOD during power-outages of 4 hours in length.

If the TOD is not powered through the capacitor, the TOD will be programmed with a default date and time of 01/01/2000 00:00:00 GMT. You can update the date and time using the Solaris date command.

To set the time of day manually after the power is restored:

single-step bulletAs superuser, use the date command at a Solaris prompt to set the correct time.


# date [mmddHHMMccyy]

where:

Refer to the date(1M) command man page for additional information. After you set the date, you must reboot (but not power cycle) the system for the changes to take full effect. Failing to reboot can cause time conflicts among applications.


3.3 Downloading and Installing SunVTS

The Sun Validation Test Suite (SunVTStrademark software) is a comprehensive software package that tests and validates the Netra CP2500 by verifying the configuration and function of most hardware controllers and devices on the board. SunVTS is used to validate a system during development, production, inspection, troubleshooting, periodic maintenance, and system or subsystem stressing. SunVTS can be tailored to run on various types of machines ranging from desktops to servers with modifiable test instances and processor affinity features.

You can perform high-level system testing by using the appropriate version of SunVTS. For detailed information on SunVTS support and downloads, refer to the following web site:

http://www.sun.com/oem/products/vts/

Download version 5.1PS11, or a future supported version, of the SunVTS software, if you want to test the Netra CP2500 board hardware.

Ensure that the SunVTS software version is compatible with the Solaris OS version being used.

You can find information about the SunVTS software version installed on your system by viewing the contents of the .version file:


# cat /opt/SUNWvts/bin/.version

To obtain SunVTS documentation, contact your local customer service representative or field application engineer.


Note - For security reasons, only a superuser is permitted to run SunVTS. Installation and starting instructions are included with the software when it is downloaded.