How to Install the Power Distribution Board
What to Do
-
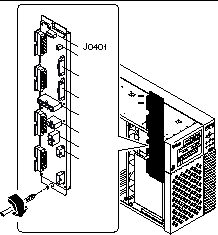
Position the power distribution board in its mounting brackets on the chassis ceiling and floor.
Align the two captive screws at the top and bottom edges of the board with the two holes in the mounting brackets. The four large power connectors along the edge of the board should face the power supply bays.
-
Tighten the two captive Phillips screws that secure the board to its mounting brackets.
It helps to separate the board slightly from its mounting brackets in order to engage the screws in the screw holes.
Figure 9-6

-
Reconnect all cables that you previously detached from the power distribution board.
Start at the top of the board and work your way down.
What Next
To reassemble the system, complete these tasks:
When you are ready to restart the system, be sure to run POST and OpenBoot Diagnostic tests to verify that the system functions correctly with the new parts you have just installed. For additional information, see Chapter 12, Diagnostics and Troubleshooting.
- © 2010, Oracle Corporation and/or its affiliates
