| Solstice Enterprise Manager 4.1 Customizing Guide |
Building Advanced Requests
Requests are the series of activities through which the Solstice Enterprise Manager (Solstice EM) Nerve Center polls for the attributes of managed objects or receives notifications from the agents of managed objects, or both. A request is typically initiated when a request template is launched at a target object. Design Advanced Requests is a tool that allows you to create request templates.
This chapter describes the following topics:
- Section 18.1 Components of Request Templates
- Section 18.2 Using the Design Advanced Requests Tool to Build Nerve Center Templates
- Section 18.3 Conditions
- Section 18.4 States
- Section 18.5 Transitions
- Section 18.6 Actions
- Section 18.7 Poll Rates
- Section 18.8 Modifying the Mapping of Colors to Severities
- Section 18.9 Graphical State Diagram Display
18.1 Components of Request Templates
States, conditions, and poll rates are the building blocks of request templates. Each template is made up of multiple states, with potentially multiple transitions between those states. A request state may be thought of as a request's representation of a state (such as Up or Down) of a network resource.
A condition is a set of instructions written in the Request Condition Language (RCL). Conditions can play two roles in requests:
- A single condition can be used to define when a request will undergo a transition from one state to another (or loop back to the same state). You must have exactly one condition associated with each transition. Where more than one transition out of a given state exists in a template, each defined by a distinct condition, the Nerve Center evaluates the conditions in the order they are entered in the request template.
- A second role of a condition is an action, taken in response to a transition. A condition is one of three types of action, the others being the sending of mail and the invocation of a Unix command. Multiple conditions can be invoked as actions resulting from a single transition. When multiple actions result from a given transition, Nerve Center executes them in the order entered in the request template.
As part of a request template, you can enter RCL statements that cause an event to be treated as an alarm and to be logged to an alarm log. The Request Condition Language is described in Chapter 20.
The alarm logging activity of Nerve Center affects the Alarm Manager and Log Manager, which displays a summary of alarms in one or more logs, and the Log Entries, which displays log records for events you have chosen to log. Both the Alarms and Log Entries are described in Chapter 11 ofManaging Your Network.
Nerve Center alarm logging also has an impact upon the color of icons in the Network Views. The MIS Alarm Service module monitors the alarm logs and updates the color of icons in the Network Views to reflect the severity of alarms logged against the managed objects represented by those icons. The default mapping of color to severity is described in Chapter 3. Nerve Center controls this mapping and you can change it through the Request Designer Edit \xd4 Severities option, described in Chapter 3.
18.1.1 State Machine Diagrams
A representation of a finite set of states, and the possible paths between those states, is a finite state machine. Before you start building a request template, you may wish to draw a state machine diagram in which you show the various device states you want to represent, the paths between them, the types of information that the request is to make use of to determine when to make each transition, and the actions that you want the request to take when it makes a transition (for example, logging an alarm or sending an e-mail message).
A state diagram shows how a request template works. The following figure shows a very simple, yet valid, example that illustrates request-related concepts.
Note – The "severities" that attach to template states in the Design Advanced Requests tool do not control the fault status indication (icon color) of devices in the Network Views. The severities of request states only affect the color attached to states in the Request Designer graphical display. Fault status color of devices in the Network Views is determined by the alarms logged against those devices. If you want the fault status color of icons to change when a request transitions from one state to another, you can control this using RCL alarm-logging functions. This is discussed in Chapter 22.
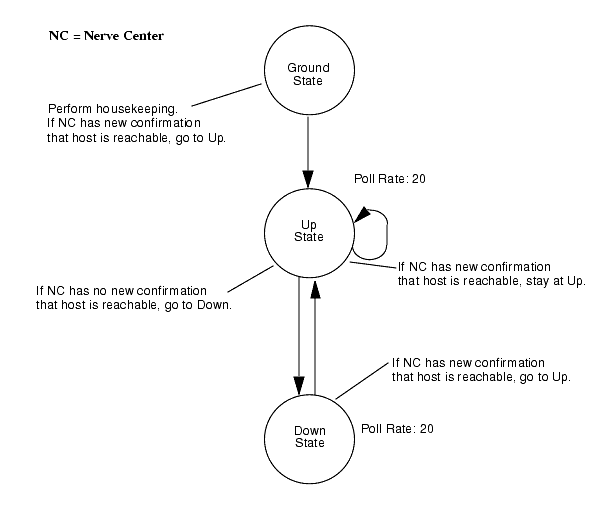
FIGURE 18-1 Request Example with Poll Rates and Severities18.2 Using the Design Advanced Requests Tool to Build Nerve Center Templates
Before embarking on building a request template from scratch, use the Design Advanced Requests tool to examine the sample request templates supplied with Solstice EM. You may be able to use a template as is, modify a template, or, short of these labor-savers, use one or more of the conditions that are used in the sample templates. See the following subsection for a procedure for creating a template from an existing template.
If you find you need to create a request template, the essential steps are as follows.

To Create a Request Template
1. Design a state machine: draw a picture for yourself showing the states you want to monitor and the paths between those states.
- Make note of conditions that would cause movement from one state to another.
2. Invoke the Design Advanced Requests tool, as described below in Section 18.2.1 Starting Request Designer.
- The following steps all involve the use of the Request Designer.
3. Create the conditions you need.
- You are supplied with a number of conditions. Conditions are reusable across all request templates. You may wish to develop a library of conditions that can be used in multiple templates.
4. Create the states you need.
- States are specific to each template, that is, you have to create new states for each template.
5. Create the transitions from one state to another.
- Transitions are specific to each template and are executed in the order in which they appear in the template. A condition is used to define when the transition is to take place.
6. Add actions, if any, that you want to occur when a transition takes place.7. Name the request template and enter a brief description of it.8. Save the template.
Note – You can save an incomplete template, to continue work on it at a later date, through the Request Designer Template \xd4 Export Current option. Use the Template \xd4 Import option when you want to reload that template into the Request Designer.
With a template created, you can invoke the Advanced Requests window from the Network Views menu and start requests using that template against target managed objects.
The bulk of the work in building a new request template is in the design of the template and in the coding of the conditions for the template. You should design your template before you invoke the Request Designer tool.
18.2.1 Starting Request Designer
To use the Request Designer tool, a Solstice EM MIS must be running and the Request Designer must be able to communicate with it.
You can start the Request Designer tool by selecting Administration \xd4 Request Designer. Also, the tool is brought up if you click Create or Modify in the Advanced Requests tool. (The Advanced Requests tool is described in Chapter 4 of Managing Your Network.)
You can also invoke the Request Designer tool, and have it connected to an MIS, by using the following command line format:
The <hostname> option is used to specify the name of the machine where the MIS is running. If you start the Request Designer from the command line, and you are logged on as a non-root user, you receive a Login window if password authentication has been activated for Solstice EM. To proceed, enter your password and click OK. Your access to Request Designer functions depends upon the permissions granted to you through the Solstice EM Security tool.
The Request Designer offers two modes of interaction--through a text-based window or through a graphical display, called a "State Diagram" window. Upon invoking the Request Designer, the tool comes up in its text mode. See Section 18.9 Graphical State Diagram Display for instructions on the using the graphical display.
18.2.2 Creating a New Nerve Center Template
The Request Designer tool provides two ways for creating a new Nerve Center template:
- You can create one from scratch, or
- You can use an existing template as a starting point, make modifications, and then save it under a new name.
Selecting File \xd4 New sets up the main Request Designer tool canvas for building a new template from scratch. The canvas is blank except for the presence of the Ground state. Do not delete the Ground state as every request must start from the Ground state.
Until you save the template, "NoName" is displayed as the template name in the footer.
Adding states, writing conditions, and defining transitions between states are the main work in the building of a Nerve Center template. These tasks are described below under Section 18.4 States, Section 18.5 Transitions, and Section 18.3 Conditions.
After adding states, and transitions between states, you can save your work by selecting the File \xd4 Save option. Saving the completed template loads it into the MIS. The name and description you enter when saving the template are displayed in the list of templates available to users in the Advanced Requests tool.
If you have not completed the template but want to save it to continue work on it later, you can use the File \xd4 Export Current option to save the unfinished template to an ASCII text file. To load this template back into the Request Designer workspace later, use the File \xd4 Import option. When prompted for a filename, specify the filename of the ASCII file to which the template was previously exported.
18.2.3 Modifying an Existing Nerve Center Template
Use the File \xd4 Open option to select the template you want to modify.
Note – You cannot save changes to a template under the same name if there are any running requests in the MIS based on that template. Invoke the Advanced Requests tool from the Network Views menu to determine if there are any requests running based on the template you wish to modify.
After making changes in the template, those changes are saved to the original template in the MIS if you select the File \xd4 Save option.
Existing templates are a convenient starting point for the creation of new templates. In this case you do not have to worry about the existence of requests based on the original template running in the MIS. You can save the template under a new name even if there are running requests based on the template you opened to start your template creation. Use the File \xd4 Save As option, after you have completed your modifications, to create a new template in the MIS.
18.2.4 Deleting Nerve Center Templates
Use the File \xd4 Delete option to delete a Nerve Center template from the MIS.
Note – You cannot delete a template if there are any requests running in the MIS that are based on that template. Invoke the Advanced Requests tool from the Network Views menu to determine if there are any running requests based on the template you wish to delete.
18.2.5 Exporting Nerve Center Templates to an ASCII File
Nerve Center templates, conditions, and poll rates can be exported to an ASCII file. If you export a request template to an ASCII file and print it out, you may find this helpful in analyzing the overall structure of the template. Also, if you want to copy a template from one MIS to another, one way to do this is to export the template to ASCII file from one MIS and then import that file into the other MIS.
There are three ways to export Nerve Center templates, conditions, and poll rates:
- You can export Nerve Center templates (and their components) using the Request Designer' File \xd4 Export option, the imported components are loaded into the MIS.
- You can export Nerve Center templates (and their components) using the em_ncexport command-line utility. The use of this utility is described in Chapter 19.
- You can export Nerve Center templates (and their components) using the Request Designer' File \xd4 Export Current option, the template is loaded into Design Advanced Requests but not into the MIS.
If you select the File \xd4 Export option, the Export Customized window is displayed (FIGURE 18-2). By clicking the appropriate button at the top of the window, you receive scrolling lists of Templates, Conditions, or Poll Rates which you can select for inclusion in the export to a specified ASCII file. In the following figure the SetInternetSystem condition has been selected for export to a file named myconditions.
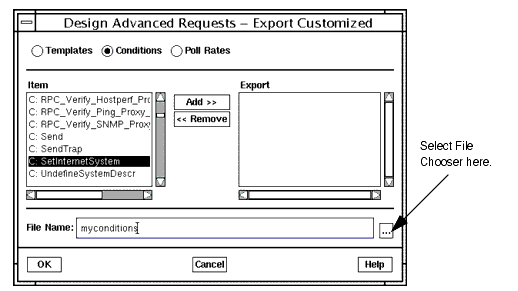
FIGURE 18-2 Example of Export to ASCII File18.2.6 Importing Nerve Center Templates from an ASCII File
Use the File Import option to import Nerve Center templates and their components from an ASCII file to which they were previously saved. The action of the Import option depends upon how the imported file was previously saved:
- If the imported file was previously saved using the Export option, the imported components are loaded into the MIS.
- If the imported file was previously saved using the Export Current option, the template is loaded into the Design Advanced Requests but not into the MIS.
18.3 Conditions
A condition is a script that contains one or more statements written in Request Condition Language (RCL). Conditions are used for two different functions in Nerve Center templates:
- To define when state-to-state transitions take place--this is described below in Section 18.5 Transitions.
- As actions to execute when a request transition takes place--this is described in Section 18.6 Actions.
Each RCL statement ends with a semicolon. For example, the following RCL statement logs a nerveCenterAlarm with a severity of critical:
RCL conditions may also contain control structures, using expressions such as IF, IF ELSE, WHILE, or FOREACH, with statements contained within them. For example, the following control structure counts the number of events from a specified device:
{$ping_response_count = ping_response_count+1;}Conditions cannot be modified or deleted once they are included in Nerve Center templates that have been stored in the MIS. A condition can be modified or deleted only if no existing request template has a reference to it. If a condition that is referenced by any other request templates must be modified or deleted, it must first be unreferenced or excluded from all other request templates.
Information on RCL can be found in the following locations:
- Components of the RCL language are described in Chapter 20.
- RCL system variables that can be used in building conditions are described in Chapter 21.
- RCL also includes built-in functions that can be used to build RCL conditions. The RCL functions are described in Chapter 22.
- Conditions for several sample request templates are described in Chapter 15.
- Conditions used in request templates that initiate SunNetManager event requests are discussed in Chapter 17.
The Request Designer Conditions window provides a text canvas in which RCL conditions can be composed. You can invoke the Conditions window (shown in FIGURE 18-3) from the main Request Designer window by clicking Conditions, or by selecting the Edit \xd4 Conditions menu option.
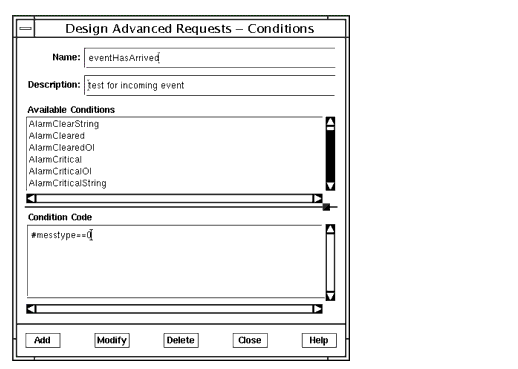
FIGURE 18-3 Viewing RCL Conditions in the Conditions WindowYou can use the Conditions window to do the following:
- Add a new condition to the MIS
- You create a new condition by saving your condition under a name that is not already in use for templates stored in the MIS.
- Modify an existing condition
- Double-click on a condition name in the scrolling list in the Conditions window to open an existing condition.
- Delete an existing condition from the MIS
Note – Conditions cannot be modified or deleted once they are included in Nerve Center templates. If you want to modify a condition that is used in an existing Nerve Center template, you will need to remove the action or transition in which that condition occurs before you can save your modifications to the MIS.
18.4 States
States are used to represent the request's current knowledge of the state of a device, such as a Waiting state if the request is waiting for incoming events from the device, or a Down state to represent the situation where information has been received indicating that the device is unavailable. A request template is a finite state machine, consisting of multiple states and transitions between states. Every request begins in the Ground state; but Ground is the only state required for every request template.
18.4.1 Adding States to a Nerve Center Template
To Add a State to a Request Template
1. From the Request Designer main window invoke the States window by clicking States or selecting the Edit \xd4 State menu option.2. Type in the name and description for the new state and select a poll rate.
- You can attach a different poll rate to each state, if desired.
3. Select a severity.
- This does not affect logging of alarms. This "severity" only selects the color used to represent the state in the Request Designer graphical display.
4. Clicking Add inserts this state into your template.18.4.2 Modifying States in a Nerve Center Template
To Change an Existing State in a Request Template
1. From the Request Designer main window invoke the States window by clicking States or selecting the Edit \xd4 State menu option.2. Select the state that you wish to change by typing its name in the name field or selecting the state in the tabular display.3. Make your proposed changes to the fields other than the name field. And then click Modify to make the changes take effect.18.5 Transitions
A transition occurs when a request moves from one state to another. A condition is used to define when a transition is to take place. The transition occurs if and only if the condition evaluates to true. A transition may cause a request to loop back from a state to that same state, or move to a different state. You may define multiple transitions out of a given state. There can be more than one transition defined from state A to state B. See the following figure.
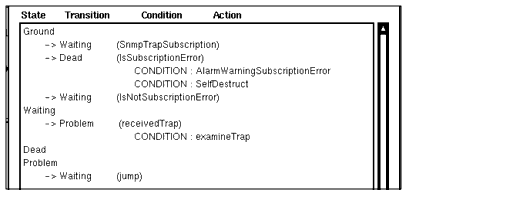
FIGURE 18-4 Order of Transitions in a TemplateTransitions out of a given state are evaluated by Nerve Center in the order they occur in the Request Designer tabular display. In the example in FIGURE 18-4, the transition from Ground to Waiting defined by the SnmpTrapSubscription condition is evaluated before the Ground to Dead transition defined by IsSubscriptionError.
Transitions out of a state are only evaluated if the state is "awake." An "awake" state can occur if:
- The request has previously subscribed for specified events and an event of the specified sort has arrived.
- Conditions defining transitions out of that state poll for the current value of attributes known to the MIS.
18.5.1 Creating New State-to-State Transitions in a Template
To Add a Transition to the Template
1. Invoke the Transitions window by clicking Transitions or selecting the
Edit \xd4 Transition menu option.2. Define the state the transition is from, and the state the transition is to.3. Select a condition to test to determine if the transition is to occur.4. You may also specify one or more actions to be executed if the transition occurs. (This is optional.)18.5.2 Deleting Transitions from a Template
To Delete a Transition From a Template
1. Invoke the Transitions window by clicking Transitions or selecting the
Edit \xd4 Transitions menu option.2. Define the state the transition is from, and the state the transition is to.3. Select the condition that defines when the transition is to occur.4. Select <none> for the Action field.5. Click Delete to delete the transition.18.5.3 Reordering Transitions
To Change the Order in Which the Transitions Out of a Given State are Evaluated
1. Invoke the Transitions window by clicking Transition or by selecting the Edit \xd4 Transitions menu option.2. Select the state whose transitions you wish to reorder on the From field.3. Click Order Transitions to invoke the Order Transitions window.4. You can change the order of the transitions out of that state by selecting a transition in the list and then clicking Move Up or Move Down, as shown in the following figures.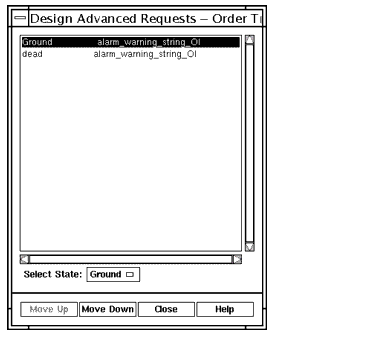
FIGURE 18-5 Reordering State Transition - Move Up
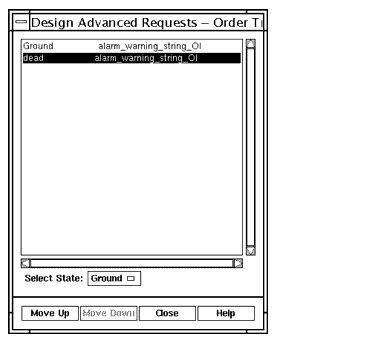
FIGURE 18-6 Reordering State Transition - Move Down18.6 Actions
Actions are executed when a request moves from one state to another state (or loops back to the same state) in a state transition. The Action menu in the Transitions window is used to select which sort of action you want the request to execute when the transition occurs. The Action menu options are described in the following table.
RCL system variables or variables that you define can be used to define data that is to be passed in an email message (see the following figure). RCL variables can also be used as parameters in a UNIX command.
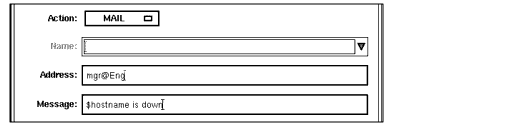
FIGURE 18-7 Use of RCL Variables in Mail Action18.6.1 Adding Actions at a Transition
The Transitions window allows you to add or delete actions at a transition.
To Add an Action at a Transition
1. If the Transitions window is not already displayed, invoke it by clicking Transitions or by selecting the Edit \xd4 Transitions menu option.2. Select the transition to which the action is to be added by setting the From, To, and Condition fields to match the target transition.3. Select the appropriate action type from the Action menu.
- If you selected MAIL, type in the email address in the Address field and the message in the Message field.
- User-defined or system RCL variables may be used in the message field.
- If you selected UNIXCMD, fill in the Command field and enter the required arguments for the command in the Arguments field.
- User-defined or system RCL variables may be used in the Arguments field.
- If you selected CONDITION, select the name of the condition to be executed from the scrolling list of conditions that are available in the MIS.
- This is inserted into the Name field after you have selected it. In the following figure, the alarm_warning_string_OI condition has been selected for adding as an action to the transition from the Ground to Dead state defined by the result_equal_false condition.
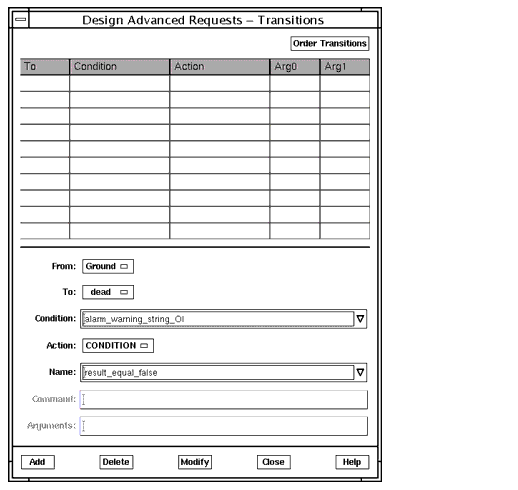
FIGURE 18-8 Adding a Condition as an Action at a Transition4. Clicking Add inserts this action into the transition.You can continue to add additional actions at the same transition by repeating this procedure. Actions are added to the transition in the order they are created.
18.6.2 Deleting Actions at a Transition
If there is more than one action at a transition, you can only delete the last action in the transition in a single step. If there are multiple actions at a transition and you want to delete an action other than the last one, you must first delete all of the actions that are listed after the target action in that transition.
To Delete the Action That is the Last Action in the List of Actions at a Transition
1. If the Transitions window is not already displayed, invoke it by clicking Transitions or by selecting the Edit \xd4 Transitions menu option.2. Select the transition from which the action is to be deleted by setting the From, To, and Condition fields to match the target transition.3. Select the appropriate action type from the Action menu.4. If the action to be deleted is a condition, select the target condition from the scrolling list.5. Click Delete.
Note – If you select <none> as the action type, clicking Delete removes the entire transition.
18.6.3 Reordering the Actions at a Transition
Reordering actions in a transition is done by deleting actions from the bottom of the list of actions, and then adding them back in the desired order. If action B follows action A in a transition but you want action B to be first and action A to follow, you will need to delete both action B and action A, and then add them both in the proper order.
18.7 Poll Rates
The poll rate is the length of delay before the first poll and interval between polls thereafter. Poll rates attach to states. Different states can thus have different poll rates. If the transitions out of a state require polling for attribute values, Nerve Center schedules required polls when a request first enters that state. Poll rates supplied with the product are listed in the following table.
18.7.1 Creating New Poll Rates
To Create a New Poll Rate
1. Select the Edit \xd4 Poll Rates menu option to invoke the Poll Rates window.2. Enter a name for your new poll rate and the polling interval (in seconds).
- In the following example, a poll rate of 90 seconds is created and given the name "90secs."
3. Click Add to load the new poll rate into the MIS.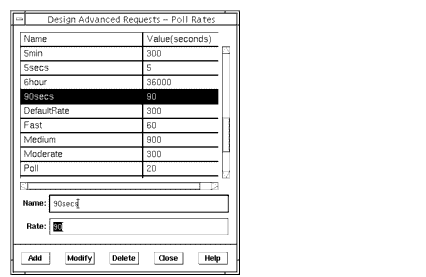
FIGURE 18-9 Creating a New Poll Rate18.7.2 Modifying a Poll Rate
Note – Poll rates cannot be modified if they are in use in a template stored in the MIS.
To Modify a Poll Rate
1. Select the Edit \xd4 Poll Rates menu option to invoke the Poll Rates window.2. Select the poll rate you wish to modify from the tabular display of poll rates.3. Enter the new rate (in seconds) in the Rate field.4. Click Modify.18.8 Modifying the Mapping of Colors to Severities
A severity describes the degree of importance you attach to a network resource entering a state. A severity is made up of three items: a name, a number, and a color. For example, "Warning 4 yellow" is one of the supplied severities. The Nerve Center's mapping of colors to severities (as shown in the following figure) controls the use of color in the Network Views and Alarms to represent the severity of alarms logged against managed resources.

FIGURE 18-10 Nerve Centre's Mapping of Colours to SeveritiesFor information on changing the color associated with a severity, see Section 3.3.1 Changing the Color Associated with a Severity.
18.9 Graphical State Diagram Display
In the Request Designer main window, select View \xd4 Graphical (or View \xd4 Both) to receive the State Diagram window shown in the following figure. In this figure, you start with the single state, "Ground," which is the required starting point for all request templates.
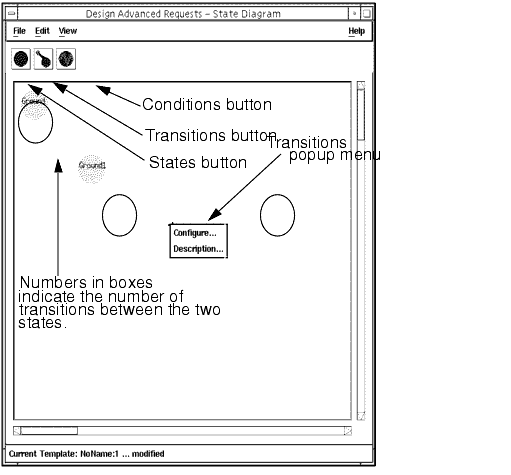
FIGURE 18-11 Graphical State Diagram DisplayThe menus at the top of this window are identical to those in the text-based display.
18.9.1 Creating a Template Through the State Diagram Display
The graphical display icons are pointed out in the above figure. These icons correspond to (from left to right) the States, Transitions, and Conditions buttons in the text-based display.
To Use the Graphical Display to Create a Request Template
1. Select the States (leftmost) icon.
- A new, unconfigured state displays in the graphical display. This state has a name of "NoName." At the same time, the Configure States window is displayed. This allows you to enter the same data as is accepted by the States window invoked from the text-based display. Refer to Section 18.4 States.
2. Enter a name and description and select a poll rate and severity for the new state. Select Add.
- The name just entered appears in the circle for the new state; the color specified in the state's severity is also displayed.
Note – At this point, you have the option of creating additional states--first adding a state (circle), then configuring that state--or making a transition from the Ground state to your new state. In these instructions, we proceed as if you are making a transition before making additional states.
3. Select the circle for the Ground state (the "from" state), use the middle mouse button to extend your selection to the circle for the new state (the "to" state), and then select the Transitions (center) icon.
- A line appears between the two states with a small box containing "0" on the line. We call this box the "transition-count box". At the same time, you receive the Transitions window, which is identical to the Transitions window invoked from the text-based display. See the explanation of how to use that window in Section 18.5 Transitions. When you bring up the Transitions window from the graphics display, the names of the two states connected by the transition are displayed in the From and To fields.
- You can also obtain the Transitions window by pressing right in the transition-count box in the newly made transition line and selecting Configure in the new transition's menu.
Note – When configuring states and transitions, do your work in indivisible pairs: create a state, configure that state; create a transition, configure that transition.
4. To make additional states and transitions, repeat Step1 through Step3.5. Invoke File \xd4 Save As to save the new template.
- You can create any number of states for a given template. However, you can display a maximum of nine (including Ground) in the Request Designer graphical display.
- The graphical display has a message area at the bottom of the window that is analogous to the text-display message area.
- The numbers in boxes indicate the number of transitions that have been created between a pair of states.
18.9.2 Other Tasks in the Graphical Display
To delete a state, select Configure from the menu for the state icon to be deleted. In the Configure States window, select Delete, then select OK in the dialog box that subsequently appears.
To delete a transition, press right in the transition-count box for that transition. Select Configure. You receive the Transitions window. In this window, select Delete, then select OK in the dialog box that subsequently appears.
To delete the action for a transition (not the entire transition), press right in the transition-count box for that transition. Select Configure. You receive the Transitions window. In this window, select the action you want to delete, enter any arguments (such as Command or Address), and select Delete. If you specify an action of <none>, all actions are deleted.
To obtain a description of a state or transition, press right in the state icon or in the transition-count box for the transition. Select Description. You receive a read-only State or Transition Information window.
|
Sun Microsystems, Inc. Copyright information. All rights reserved. |
Doc Set | Contents | Previous | Next | Index |