Previous Next Contents Index


Chapter 5 Managing Access Control

Netscape Directory Server provides you with the ability to control access to your directory. This chapter describes the Directory Server access control mechanism, a feature that is both powerful and flexible, you will want to spend some time planning your security policy before you start setting permissions for your directory.

This section includes the following topics:

Refer to the Netscape Directory Server Deployment Guide for tips on planning your access control strategy.


Understanding Access Control
The mechanism by which you define access is called access control. When the server evaluates an incoming request, it determines access based on the access control instructions (ACIs) you define. The collection of ACIs within a single suffix is called an access control list (ACL). The server uses the information in the ACIs to allow or deny permissions such as read, write, search and compare.

Using access control, you can set permissions for the entire directory, for a subset of the directory, for specific entries in the directory, for a specific set of entry attributes, or for configuration tasks for any 4.x Netscape Communications Corporation Server. In addition, you can set permissions for a specific user, all users belonging to a specific group, or all users of the directory. Finally, you can define access for a specific location such as an IP address or a DNS name.

Each entry in the directory can contain one or more ACI attributes, which holds the access control information for the entry. The access control instruction (ACI) is composed of three parts:

Targets. The target specifies what object, object attributes, or group of objects and attributes you are controlling access to.

Permissions. The permission specifically outlines what rights you are either allowing or denying.

Bind Rules. The bind rules specify the circumstances under which access is to be granted or denied. Bind rules indicate who can access the directory, when the directory can be accessed, and the physical network locations that the directory can be accessed from.

The permission and bind rule portions of the ACI are set as a pair, also called an Access Control Rule (ACR), and you can have multiple permission-bind rule pairs for each target. This allows you to efficiently set multiple access controls for a given target. For example:

<target>(<permission><bind rule>)(<permission><bind rule>)...

The following sections describe targets, permissions, and bind rules in more detail.

Targets

The target identifies what directory entry the ACI applies to. You can target a directory entry (usually a branch of your directory tree), a directory entry and one or more entry attributes, or a group of entries and/or attributes that are the result of a single LDAP filter. Each method of targeting is detailed in the following sections:

Targeting a Directory Entry

When you target a directory entry, the ACIs you set apply to the target and all of its children. For example, if you target the entry ou=accounting, o=airius.com, the ACI will apply to all entries in the accounting branch of the Airius tree. Most often, you will want to place your ACIs on branch points in the directory rather than on individual leaf objects.

You can also use wildcards when targeting a directory entry. For example, targeting uid=c*a, o=airius.com would target all directory entries with user ID attributes that start with c and end with a. You cannot use wildcards in the suffix portion of the distinguished name. For example, targeting uid=bjensen, o=*.com is invalid.

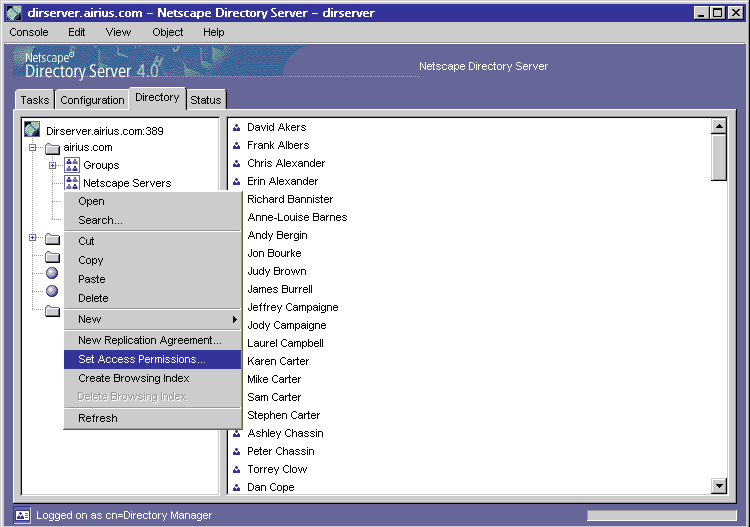
If you are setting access control using the Directory Server Console, you target an entry by selecting it on the Directory tab. For more information, see "Setting Access Control Using the Server Console". If you are setting access control using LDIF, "Setting Targets Using LDIF".

Keep in mind that the entry you target must be at the same level or a child of the entry containing the ACI. For example, if you are modifying an ACI attribute that resides on the ou=accounting, o=airius.com entry, you cannot target the uid=sarette, ou=people, o=airius.com entry because it is not a child of the accounting tree; rather it is within a separate branch of the Airius tree.

Targeting Attributes

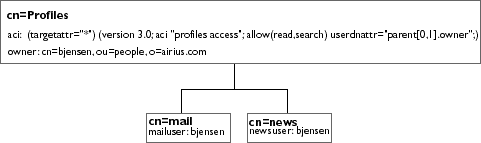
In addition to targeting directory entries, you can also target one or more attributes included in the targeted entry. This is useful when you want to deny or allow access to partial information about an entry. For example, you could allow access to only the common name, surname, and telephone number attributes of a given entry. Or you could deny access to sensitive information such as passwords or salary information. If you do not specify any attributes, then you are setting access control on the entry itself, not on particular attributes contained within the entry. For example, you might use this to provide add and delete access rights to an entire entry, instead of access rights to particular attributes contained within the entry.

You can specify that the target attribute either is (=) or is not (!=) equal to a specific attribute. The attributes you supply should be recognized members of your schema, although they do not have to be allowed by the object class of the targeted entry. For a listing of the attributes in Netscape Communications Corporation's standard schema, see the Netscape Directory Server Schema Reference.

If you are setting access control using the Server Console, you specify one or more attributes to deny or allow access to using the Set Access Permissions dialog box. For more information, see "Setting Access Control Using the Server Console". If you are setting access control using LDIF, see "Using the targetattr Keyword".

Targeting Using LDAP Filters

In addition to explicitly targeting directory entries and attributes, you can also use LDAP filters to target a group of entries and/or attributes that match a certain criteria. When searching the directory, LDAP filters select the entries to be returned as a result of the search operation. The same is true when you use LDAP filters in ACIs, except that the entries and attributes returned are then targeted by the ACI.

For example, if your target is o=airius.com, you could set the filter to target the ou=people and ou=groups trees. Without the filter, the ACI would apply to all entries below o=airius.com. However, with the filter, the ACI will only apply to the ou=people, o=airius.com and ou=groups, o=airius.com entries and their child entries. For more information on using LDAP search filters, see Chapter  8, "Finding Directory Entries."

If you are setting access controls using the Server Console, you can specify a target filter in the Target Filter area of the Select Attributes dialog box. For more information, see "Setting Access Control Using the Server Console".

If you are setting access control using LDIF files, see "Using the targetfilter Keyword".

Although targeting using LDAP filters can be useful when you are targeting entries and attributes that are spread across the directory, the results are sometimes unpredictable. Because search filters do not directly name the object that you are managing access for, it is easy to unintentionally allow or deny access to the wrong objects, especially as your directory becomes more complex. Additionally, filters can make it difficult for you to troubleshoot ACI problems within your directory. If you do use filtering, do so sparingly. Be sure to test your directory access thoroughly each time you change a filter so that you are certain what the results of the change mean for access to your directory.

Permissions

Permissions specify the type of access you are allowing or denying. You can either allow or deny an entity from performing specific operations to the directory. The various operations that can be assigned are known as rights.

If you selected Typical Install during installation, then by default, all members of the Administrators group and the user defined in the "Root DN" parameter have unlimited access to the directory. However, if no aci attributes exist within the directory then only the user defined in the "Root DN" parameter has unlimited access. By default all other users are denied access rights of any kind.

The user defined in the "Root DN" parameter is known as the root or unrestricted user. The unrestricted user has full access to your directory regardless of the permissions set for the directory. For this reason, you must set some permissions for your directory if you want any normal users to be able to access your directory. There are two parts to setting permissions: allowing or denying access, and assigning rights. These two parts are described next.

Allowing or Denying Access

You can either explicitly allow or deny access to your directory tree. When an LDAP client attempts to perform any kind of access to a directory entry, the Directory Server looks for access control information from the entry being accessed back to the top, or root, of the directory tree. When deciding whether to allow or deny access, you should keep the following precedence rule in mind.

Precedence Rule. If two permissions exist and are in conflict, the permission that denies access always takes precedence over the permission that grants access.

For example, if you deny write permission at the directory's root level, and you make that permission applicable to everyone accessing the directory, then no user can write to the directory regardless of the specific permissions you grant that user. To allow a specific user write permissions to the directory, you have to restrict the scope of the original denial for write permission so that it does not include the user. Then you have to create an additional allow for write permission for the user in question.

Because of this, and because by default users are denied access anyway, you should use deny permissions sparingly in order to avoid confusion.

For more guidelines on when to deny and when to allow access, refer to the Netscape Directory Server Deployment Guide.

When setting access control using the Server Console, you specify whether to allow or deny access using the Set Access Permissions dialog box. For more information, see "Setting Access Control Using the Server Console".

When setting access control using LDIF, you must use the allow or deny keywords in the permission portion of the ACI statement to explicitly allow or deny access. For more information, see "Setting Permissions Using LDIF".

Assigning Rights

Rights detail the specific operations a user can perform on directory data. You can allow or deny all rights, or you can assign one or more of the following rights:

Read. Indicates whether directory data may be read.

Write. Indicates whether attributes may be added, modified, or deleted.

Add. Indicates whether the user or application can create entries.

Delete. Indicates whether entries can be deleted.

Search. Indicates whether the directory data can be searched for. Users must have Search and Read rights in order to view the data returned as part of a search operation.

Compare. Indicates whether the data may be used in comparison operations. With compare rights, the directory returns a yes or no in response to an inquiry, but the user cannot see the value of the entry or attribute.

Selfwrite. Indicates whether people can add or delete themselves from a group. This right is only used for group management.

Proxy. Indicates whether the specified entry can access the target with the rights of another entry. See "Overview of Proxied Authorization" for more information.

All. Indicates that the specified entry has all rights (read, write, search, delete, compare, and selfwrite) to the targeted entry excluding proxy.

When setting access control using the Server Console, you specify which rights to allow or deny using the Set Access Permissions dialog box. For more information, see "Setting Access Control Using the Server Console".

When setting access control using LDIF, you use the rights keywords within the permission portion of the ACI statement to explicitly allow or deny access. For more information, see "Setting Permissions Using LDIF".

Bind Rules

Binding refers to logging in or authenticating to the directory. The circumstances under which binding occurs determine whether access to the directory is allowed or denied. Every permission set in an ACI has a corresponding bind rule that details the specific circumstance under which binding must occur for the ACI to be applied.

Bind rules can be simple. For example, a bind rule can simply state that the person accessing the directory must belong to a specific group. Bind rules can also be more complex. For example, a bind rule can state that a person must belong to a specific group and must log in from a machine with a specific IP address, between 8 AM and 5 PM.

Whether access is allowed or denied depends on whether an ACI's bind rule is evaluated to be true. Bind rules use one of the two following patterns:

<keyword> = "<expression>";

<keyword> != "<expression>";

where equal (=) indicates that <keyword> and <expression> must match in order for the bind rule to be true, and not equal (!=) indicates that <keyword> and <expression> must not match in order for the bind rule to be true.

Bind rules define who can access the directory, when, and from where. More specifically, bind rules specify

Additionally, bind rules can be complex constructions that combine bind methods using Boolean operators. See  "Boolean Bind Rules" for more information.

Each bind method is detailed in the following sections.

User and Group Access

Most commonly, bind rules state who can access the directory. A bind rule may state any of the following:

These five types of user and group access are described in the following sections.

Anonymous Access

Anonymous access can be configured for the directory such that anyone can access it. In this situation, users do not need to provide a bind DN or password to gain access. You can limit anonymous access to specific types of access (for example, access for read or access for search) or to specific subtrees or individual entries within the directory.

If you are setting access control using the Server Console, you define anonymous access through the Set Access Permissions dialog box. For more information, see "Setting Access Control Using the Server Console".

For information on setting anonymous access using LDIF, see "Using the userdn Keyword".

General Access

You can use bind rules to indicate that the permission applies to anyone who has successfully bound to the directory, that is, all authenticated users. This allows general access while preventing anonymous access.

If you are setting access control using the Server Console, you define general access on the Set Access Permissions dialog box. For more information, see "Setting Access Control Using the Server Console".

For information on setting up general access using LDIF, see "Using the userdn Keyword".

User Access

You can use bind rules to specify that access to the targeted resource will be granted or denied only if the user binds using a specific DN. You can also specify groups of users by using the wildcard character (*). For example, specifying a user DN of uid=u*, o=airius.com indicates that only users with a bind DN beginning with the letter u will be allowed or denied access based on the permissions you set.

If you are setting access control using the Server Console, you set user access from the Set Access Permissions dialog box. For more information, see "Setting Access Control Using the Server Console".

For information on setting user access using LDIF, see "Using the userdn Keyword".

Using LDAP URLs. You can dynamically target users in ACIs using a URL with a filter as follows:

"ldap:///<suffix>??sub?(filter)"

For example, all users in the accounting and engineering branches of the Airius tree would be granted or denied access to the targeted resource dynamically based on the following URL:

"ldap:///o=airius.com??sub?(ou=engineering)(ou=accounting)"

Note. Do not specify a hostname or port number within the LDAP URL or the server will skip the URL.

For more information about LDAP URLs, see Appendix  A, "LDAP URLs."

Parent Access. Another special user access bind rule is the case in which a user is granted or denied access to the entry only if the bind DN is the parent of the targeted entry.

If you are setting access control using the Server Console, you set up parent access on the Set Access Permissions dialog box. For more information, see "Setting Access Control Using the Server Console".

For information on setting parent access using LDIF, see "Using the userdn Keyword".

Self Access. Another special user access bind rule is the case in which you want to grant or deny users access to their own entries. In this case, access would be granted or denied if the bind DN matches the DN of the targeted entry.

If you are setting access control using the Server Console, you set up self access on the Set Access Permissions dialog box. For more information, see "Setting Access Control Using the Server Console".

For information on setting self access using LDIF, see "Using the userdn Keyword".

Group Access

You can use bind rules to specify that access to a targeted entry will be granted or denied only if the user binds using a DN that belongs to a specific group.

If you are setting access control using the Server Console, you define specific groups on the Set Access Permissions dialog box. For more information, see "Setting Access Control Using the Server Console".

If you are setting access control using LDIF, see "Using the groupdn Keyword" for information on setting group access.

Access Based on Attribute Value

You can set a bind rule such that the ACI applies only if the bind DN matches a DN in a specific attribute of the targeted entry. The named attribute must be one that is expected to contain a full DN. For example, you can specify that the bind DN must match the DN in the manager attribute of a user entry in order for the ACI to apply. In this situation, only the user's manager would have access to the entry.

If you are setting access control using the Server Console, you use the Set Access Permissions dialog box. For more information, see "Setting Access Control Using the Server Console".

If you are setting access control using LDIF, see "Using the userdnattr and groupdnattr Keywords" for information on setting user and group DN attribute access.

Access From a Specific Machine or Domain

Using bind rules, you can indicate that the ACI is applicable only if the bind operation is arriving from a specific IP address or fully qualified domain name or hostname. This is often used to force all directory updates to occur from a given machine or network domain.

You can also use the wildcard character (*) to denote multiple machines. For example, you could use a wildcard IP address such as 12.3.45.* to specify a specific subnetwork or 123.45.6.*+255.255.255.115 to specify a subnetwork mask. Or you could use a wildcard domain name such as *.airius.com to specify a specific DNS domain.

If you are setting access control using the Server Console, you can define specific machines to which the ACI applies through the Set Access Permissions dialog box. For more information, see "Setting Access Control Using the Server Console".

If you are setting access control using LDIF, see "Using the ip Keyword" and "Using the dns Keyword" for information on defining machine-based access.

Access at a Specific Time of Day or Day of Week

You can also use bind rules to specify that the ACI will only apply at a certain time of day or on a certain day of the week. For example, you can set a rule that will allow access only if it is between the hours of 8 AM and 5 PM Monday through Friday. The time used is the time on the local host.

If you are setting access control using the Server Console, you can define specific access times through the Set Access Permissions dialog box. For more information, see "Setting Access Control Using the Server Console".

If you are setting access control using LDIF, see "Using the timeofday Keyword", and "Using the dayofweek Keyword".

Access Based on Authentication Method

You can also set bind rules that state that the ACI will apply only if a client binds to the directory using a specific authentication method. Here are the authentication methods you specify:

None. Authentication is not required. This is the default.

Simple. The ACI will apply only if the client accesses the directory using a user name and password.

SSL. The ACI will apply only if the client accesses the directory over a Secure Sockets Layer (SSL) connection (over LDAPS). For more information on setting up SSL, see Chapter  11, "Managing SSL."

SASL. The ACI will apply only if the client accesses the directory over a Simple Authentication and Security Layer (SASL) connection. For information on setting up SASL, see the Netscape Directory Server Plug-In Programmer's Guide.

If you are using the Server Console to set access control, you can set up authentication-based bind rules through the Set Access Permissions dialog box. For more information, see "Setting Access Control Using the Server Console".

If you are using LDIF to set up access control, see "Using the authmethod Keyword" for information on setting authentication-based bind rules.

Boolean Bind Rules

Bind rules can be complex expressions that use the Boolean expressions AND, OR, and NOT to set very precise access rules. If you are using the Server Console to set access control, you will need to use the Extra area (or Customized Expressions) to enter the LDIF commands if you want to use boolean bind rules. For more information, see "Using Boolean Expressions in LDIF Bind Rules".

Boolean expressions are evaluated in the following order:

Also, the Boolean OR and Boolean AND operators have no order of precedence, and they are evaluated from left to right. However, the boolean NOT operator is evaluated before the Boolean OR and Boolean AND. Thus, in the following example the NOT operator is evaluated before the AND operator:

<bind rule 1> and not <bind rule 2>


Setting Access Control Using the Server Console
You can use the Directory Server Console to create, edit, and delete access control for your directory. You may set up multiple ACIs for a given entry in the directory. Although you can combine access control rules (ACRs) in an access control instruction (ACI) for a particular entry, Netscape Communications Corporation recommends that you create a separate ACI for each ACR.

Although the procedures you perform will depend on the specific access control required for your organization based on the security policy you have developed, this section provides general instructions for setting access control in the following sections:

See "Access Control Usage Examples" for a collection of some access control rules commonly used in Directory Server security policies, along with step-by-step instructions for using the Directory Server Console to create these standard ACIs.

Creating a New ACI

To create a new ACI:

  1. Make sure the Directory Server is running.
  2. Bind to the directory.
  3. You must enter the user name and password of a privileged directory user, such as the directory manager, who has access to ACIs that have been set for the directory. See "Binding to the Directory From Netscape Console" for specific instructions.

  4. On the Directory Server Console, select the Directory tab.
  5. Right-click the entry in the navigation tree for which you want to set access control, and select Set Access Permissions from the pop-up menu (Figure 5.1).
  6. Figure 5.1 Selecting an object in the navigation tree to set access control

    The Multi-value ACI Selector dialog box appears.

  7. Click New.
  8. The Set Access Permissions dialog box appears.

    The table lists the access control rules (ACRs) defined for this ACI. By default, the first ACR in the table denies access to everyone with the exception of the root DN (Directory Manager).

  9. Click ACI Attributes.
  10. The Select Attributes dialog appears.

  11. (Optional) If you want to change the name of the ACI, type the new name in the ACI Name text box.
  12. The name can be any string you want to use to uniquely identify the ACI. If you do not enter a name, the server uses "unknown".

  13. If you want to change the target, you may do so now. The Target text box contains the DN of the entry you selected in the Directory navigation tree.
  14. The target must be either the DN of the currently selected entry, or a direct or indirect child of the currently selected entry. Remember, the ACI you define applies to the target entry and all subentries in the directory tree. If you use the suffix, for example, o=airius.com as the target, the ACI applies to the entire directory tree.

    The target must be a valid DN. You can use the default "is" to set a target that is equal to the DN you enter or select "is not" to set a target that is not equal to the DN you enter.

    If the DN you target contains a comma as part of its value, you must precede the comma with a single backslash (\) escape character.

  15. You may enter a search filter in the Target Filter text box.
  16. You can use the default "is" to set a target filter that is equal to the value you enter or select "is not" to set a target filter that is not equal to the value you enter.

  17. You may enter an attribute to target in the Target Attribute text box.
  18. By default, all attributes (*) are targeted. You can use the default "is" to set a target attribute that is equal to the value you enter or select "is not" to set a target attribute that is not equal to the value you enter. If you want to enter more than one attribute, separate the attributes with a double-pipe "||". Click OK to return to the Set Access Permissions dialog box.

  19. To check or modify the LDIF syntax of the ACI, click View/Edit Syntax on the Set Access Permissions dialog box.
  20. The Edit ACI Syntax dialog box displays.

    For more information about modifying ACIs in LDIF, see "Setting Access Control Using LDIF Files". When you are finished, click OK to return to the Set Access Permissions dialog box.

  21. To edit an ACR in the table, double-click the cell to display a dialog box for entering additional information. Cells and related options are summarized in Table  5.1. For more specific information about access control parameters, refer to the online help.
  22. Table 5.1 The ACI Editor settings and options  

    Setting
    What it does
    Options
    Add Rule
    Adds an ACR to the ACI.

    Delete Rule
    Deletes the currently selected ACR from the ACI.

    Show Inherited Rules
    Displays rules inherited from branchpoints in the directory tree superior to the current entry.
    On/Off.
    Rule number
    Describes the order in which the ACRs were created.
    You cannot modify the rule number. This number has no effect on ACR precedence. Refer to "Allowing or Denying Access" for information about ACR precedence.
    Allow/Deny
    Specifies whether to grant or restrict access to the resources named in this rule.
    Double-click the cell in the Set Access Permissions dialog box and choose Allow or Deny from the drop-down list.
    User/Group
    Designates users or groups affected by this rule.
    In the Select Users & Groups dialog box:
    Anyone. Default. Allows unlimited anonymous access.
    Users or groups. To add a user or group to the list, select either "Add user to list" or "Add group to list" from the drop down, enter user or group names in the text box, and click Add. You can use wildcard patterns to add multiple users or groups at one time.
    All users/groups except those specified in the list. To exclude listed users and groups from the rule, select this option.
    User DN Attribute. Requires an attribute that is expected to contain a full distinguished name. For example, manager. See "Using the userdn Keyword" for information. If you want to use groupdnattr, you must define the ACI using LDIF. See "Setting Access Control Using LDIF Files" for information.
    Authentication Method. The options include:
    Host
    Designates host computers affected by this rule.
    DNS Hostname. Enter a host name or names, use commas to separate multiple entries, and then click Add to add them to the list.
    IP Address. Enter the hosts IP address or use the wildcard * to define multiple hosts. You can only use the wildcard * at the end of an IP address. The * must replace an entire byte in the address. For example, 198.95.251.* is acceptable; 198.95.251.3* is unacceptable. Click Add to add them to the list.
    All hosts except those on this list. To exclude listed hosts from the rule, select this option.
    Time
    Specifies an interval when the rule will be in effect.
    Define the start and end time in 24 hour format (HHMM). For example, 1400 signifies 2PM.
    Rights
    Specifies rights allowed or denied by this rule.
    Read. User can view an entry.
    Write. User can change or delete an entry.
    Search. Indicates whether data can be searched for. Users must have Search and Read rights in order to view the data returned as part of a search operation.
    Compare. Indicates whether data may be used in comparison operations. With compare rights, the directory returns a yes or no in response to an inquiry, but the user cannot see the value of the entry or attribute.
    Selfwrite. Indicates whether people can add or delete themselves from a group. This right is only used for group management.
    Delete. User can delete entries.
    Add. User can add entries.
    Proxy. User can authenticate with the rights of another entry in order to modify the target entry. See "Overview of Proxied Authorization" for more information.
    All. User has all access rights to the entry except proxy.
    View/Edit Syntax
    Lets you view or edit the LDIF ACI syntax.
    For more information on editing ACIs using LDIF, see "Setting Access Control Using LDIF Files".

  23. If you want, you can add more than one ACR to the ACI. To do so, click New Rule and edit as necessary.
  24. Netscape Communications Corporation recommends that you create a new ACI for each ACR in your directory. Doing so increases performance and manageability.

  25. When you are finished editing the ACI, click OK. The server creates the new ACI.
Editing an Existing ACI

To edit an existing ACI, do the following:

  1. Make sure the Directory Server is running.
  2. Bind to the directory.
  3. You must enter the user name and password of a privileged directory user, such as the directory manager, who has access to all ACIs that have been set for the directory. See "Binding to the Directory From Netscape Console" for specific instructions.

  4. On the Directory Server Console, select the Directory tab.
  5. Right-click the entry in the navigation tree for which you want to edit access control, and select Set Access Permissions from the pop-up menu.
  6. A dialog appears prompting you to select the ACI you want to edit. Select the ACI and click OK. The Set Access Permissions dialog box appears.

    The Set Access Permissions dialog box contains the ACRs and other information about the ACI. For details on the information you can edit using this dialog box, see Table  5.1.

  7. Make the desired changes to the various areas of the Set Access Permissions dialog box.
  8. Click OK when you have finished editing the ACI.
Deleting an Existing ACI or ACR

To delete an ACI or ACR, do the following:

  1. Make sure the Directory Server is running.
  2. Bind to the directory.
  3. You must enter the user name and password of a privileged directory user, such as the directory manager, who has access to all ACIs that have been set for the directory. See "Binding to the Directory From Netscape Console" for specific instructions.

  4. On the Directory Server Console, select the Directory tab.
  5. Right-click the entry in the navigation tree from which you want to remove the ACI, and select Set Access Permissions from the pop-up menu.
  6. A dialog appears prompting you to select an ACI.

    If you want to delete an entire ACI, select the ACI you want to delete and click Delete. You are done.

    If you only want to remove an ACR from the ACI:

Access Control Usage Examples

The following examples describe how to set some of the more common directory permissions using the Directory Server Console:

Setting Anonymous Access for Read, Search, and Compare

Most directories are run such that you can anonymously access at least one suffix for read, search, or compare. For example, you might want to set these permissions if you are running a corporate personnel directory that you want employees to be able to search, such as a phonebook. You can set this permission by doing the following:

  1. Make sure the Directory Server is running.
  2. Bind to the directory.
  3. You must enter the user name and password of a privileged directory user, such as the directory manager, who has access to all ACIs that have been set for the directory. See "Binding to the Directory From Netscape Console" for specific instructions.

  4. On the Directory Server Console, select the Directory tab.
  5. Right-click the suffix entry in the navigation tree, for example, o=airius.com, and select Set Access Permissions from the pop-up menu.
  6. The Multi-value ACI Selector dialog box appears.

  7. Click New.
  8. The Set Access Permissions dialog box appears.

  9. Click ACI Attributes.
  10. The Select Attributes dialog displays. In the ACI Name text box, enter a unique value such as "anonymous access". In the future, this will allow you to see at a glance which of your access controls allows anonymous read and search. Click OK to return to the Set Access Permissions dialog box.

  11. Click the cell under Allow/Deny in the table and select Allow from the drop down menu.
  12. Double-click the cell under Rights in the table.
  13. The Select Rights dialog box appears. Select the checkboxes next to Read, Search, and Compare, and deselect all the other checkboxes on the dialog box. Click OK when you are finished to return to the Set Access Permissions dialog box.

  14. Click OK.
  15. The server saves the ACI.

Allowing Users to Modify Their Own Directory Entries

Many directories allow users to change attribute values in their own entries. The following procedure shows you how to set this permission.

Note. By setting this permission, you are also granting users the right to delete attribute values.

  1. Make sure the Directory Server is running.
  2. Bind to the directory.
  3. You must enter the user name and password of a privileged directory user, such as the directory manager, who has access to all ACIs that have been set for the directory. See "Binding to the Directory From Netscape Console" for specific instructions.

  4. On the Directory Server Console, select the Directory tab.
  5. Right-click the suffix entry in the navigation tree, for example, o=airius.com, and select Set Access Permissions from the pop-up menu.
  6. The Multi-value ACI Selector dialog box appears.

  7. Click New.
  8. The Set Access Permissions dialog box appears.

  9. Click ACI Attributes.
  10. The Select Attributes dialog displays. In the ACI Name text box, enter a unique value such as allow-self-write. In the future, this will allow you to see at a glance which of your access controls allows users to edit their own entries. Click OK to return to the Set Access Permissions dialog box.

  11. Double-click the cell under User/Group in the table.
  12. The Select Users and Groups dialog box appears. Select Add User to List from the drop-down menu, type self in the text box provided, and then click Add. Click OK to return to the Set Access Permissions dialog box.

  13. Double-click the cell under Rights in the table. Select the Write checkbox and click OK to return to the Set Access Permissions dialog box.
  14. Click OK.
  15. The server saves the new ACI.

Allowing Users to Change Some of Their Own Attributes

Many directory administrators want to allow users to change some but not all of the attributes in their own entry. For example, you may want to allow a user to change his or her own password or telephone number, but nothing else. The following procedure shows you how to set this permission.

Note. By setting this permission, you are also granting users the right to delete attribute values.

  1. Make sure the Directory Server is running.
  2. Bind to the directory.
  3. You must enter the user name and password of a privileged directory user, such as the directory manager, who has access to all ACIs that have been set for the directory. See "Binding to the Directory From Netscape Console" for specific instructions.

  4. On the Directory Server Console, select the Directory tab.
  5. Right-click the suffix entry in the navigation tree, for example, o=airius.com, and select Set Access Permissions from the pop-up menu.
  6. The Multi-value ACI Selector dialog box appears.

  7. Click New.
  8. The Set Access Permissions dialog box appears.

  9. Click ACI Attributes.
  10. The Select Attributes dialog displays. In the ACI Name text box, enter a unique value such as write pw and tel. In the future, this will allow you to see at a glance which of your access controls allows users to edit their own passwords and telephone numbers.

  11. In the Target Attribute(s) field, enter userpassword  ||  telephonenumber.
  12. Click OK to return to the Set Access Permissions dialog box.
  13. Click the cell beneath Allow/Deny in the table and select Allow from the pull-down menu.
  14. Double-click the cell beneath User/Group in the table.
  15. The Select Users and Groups dialog box displays. Select Add User to List from the drop-down menu, type self in the text box provided, and then click Add. Click OK to return to the Set Access Permissions dialog box.

  16. Double-click the cell under Rights in the table. The Select Rights dialog box displays. Select the Write checkbox, and then click OK to return to the Set Access Permissions dialog box.
  17. This allows users to only write their own attributes. If you want the users to be able to read, search, or compare these attribute values, then make sure you set a separate permission to allow this. If you have set up anonymous search in your directory as described in "Setting Anonymous Access for Read, Search, and Compare", then you do not have to create any further permissions.

  18. Click OK.
  19. The server saves the new ACI.

Granting a Group Full Access to a Suffix

Most directories have a group that is used to identify directory administrators. This group of users is usually given full access to all or part of the directory. By applying the access rights to the group, you can avoid setting the access rights for each directory administrator individually. Instead, you grant users these access rights simply by adding them to the group.

The following procedure shows you how to grant the members of an administrators group full access to the user directory under the suffix o=airius.com.

You can create groups and add or delete members from the group using the directory tab on the Directory Server Console. See Chapter  9, "Managing Directory Entries," for information. In addition, you can also add entries using the Directory Server Gateway, or the Users and Groups area of the Netscape Console. See Managing Servers with Netscape Console and the online help available through the gateway for information.

  1. Make sure the Directory Server is running and that you have created a group whose members include the directory administrators.
  2. Bind to the directory.
  3. You must enter the user name and password of a privileged directory user, such as the directory manager, who has access to all ACIs that have been set for the directory. See "Binding to the Directory From Netscape Console" for specific instructions.

  4. On the Directory Server Console, select the Directory tab.
  5. Right-click the suffix entry in the navigation tree, for example, o=airius.com, and select Set Access Permissions from the pop-up menu.
  6. The Multi-value ACI Selector dialog box appears.

  7. Click New.
  8. The Set Access Permissions dialog box appears.

  9. Click ACI Attributes. The Select Attributes dialog displays. In the ACI Name text box, enter a unique value such as directory admin all.
  10. In the future, this will allow you to see at a glance which of your access controls allows the directory administrators group full access to the directory. Click OK to return to the Set Access Permissions dialog box.

  11. Click the cell beneath Allow/Deny in the table and select Allow from the pull-down menu.
  12. Double-click the cell under User/Group in the table.
  13. The Select Users and Groups dialog box appears. Select Add Group to List from the drop-down menu, type the DN for the directory administrators group in the text box provided. For example, cn=administrators, o=airius.com, and then click Add. Click OK to return to the Set Access Permissions dialog box.

  14. Click OK.
  15. The server saves the new ACI.

Granting a Group Rights to Add and Delete Entries

Many directories have a group that is used to identify individuals who add and delete entries from the directory regularly, such as a Human Resources group that is responsible for adding and deleting employees from the directory. By applying access rights to the group, you can avoid setting the access for each group member individually. Instead, you grant users these access rights simply by adding them to the group.

The following procedure shows you how to grant the members of the HR administrators group add and delete access to the user directory under the o=airius.com suffix.

You can create groups and add or delete members from the group using the directory tab on the Directory Server Console. See Chapter  9, "Managing Directory Entries," for information. In addition, you can also add entries using the Directory Server Gateway, or the Users and Groups area of the Netscape Console. See Managing Servers with Netscape Console and the online help available through the gateway for information.

  1. Make sure the Directory Server is running and that you have created a group whose members include the HR managers.
  2. Bind to the directory.
  3. You must enter the user name and password of a privileged directory user, such as the directory manager, who has access to all ACIs that have been set for the directory. See "Binding to the Directory From Netscape Console" for specific instructions.

  4. On the Directory Server Console, select the Directory tab.
  5. Right-click the suffix entry in the navigation tree, for example, o=airius.com, and select Set Access Permissions from the pop-up menu.
  6. The Multi-value ACI Selector dialog box appears.

  7. Click New.
  8. The Set Access Permissions dialog box appears.

  9. Click ACI Attributes. The Select Attributes dialog displays. In the ACI Name text box, enter a unique value such as HR managers all.
  10. In the future, this will allow you to see at a glance which of your access controls allows the HR managers group full access to the user directory. Click OK to return to the Set Access Permissions dialog box.

  11. Click the cell beneath Allow/Deny in the table and select Allow from the pull-down menu.
  12. Double-click the cell under User/Group in the table. The Select Users and Groups dialog box appears. Select Add Group to List from the drop-down menu, type the DN for the HR managers group in the text box provided. For example, cn=HR managers, o=airius.com., and then click Add. Click OK to return to the Set Access Permissions dialog box.
  13. Double-click the cell under Rights in the table. The Select Rights dialog box displays. Select the Add and Delete checkboxes, and then click OK to return to the Set Access Permissions dialog box.
  14. Click OK.
  15. The server saves the new ACI.

Allowing Full Access to a Specific Branch Point

One type of access control that is commonly used is to set up specific administrators of individual subdirectories. This allows you, for example, to have a group of people that are responsible for administering an Accounting subtree and another group of people that are responsible for administering a Marketing subtree.

The following procedure shows you how to allow a group called accounting administrators to have full directory access to the accounting subtree.

Before you can set these permissions, you must create the accounting branch point (ou=accounting, o=airius.com). You can create organizational unit branch points in your directory using the directory tab on the Directory Server Console. See Chapter  9, "Managing Directory Entries," for information. In addition, you can also add entries using the Directory Server Gateway, or the Users and Groups area of the Netscape Console. See Managing Servers with Netscape Console and the online help available through the gateway for information.

  1. Make sure the Directory Server is running and that you have created a group whose members include the accounting managers. For example, cn=accounting managers, ou=accounting, o=airius.com.
  2. Bind to the directory.
  3. You must enter the user name and password of a privileged directory user, such as the directory manager, who has access to all ACIs that have been set for the directory. See "Binding to the Directory From Netscape Console" for specific instructions.

  4. On the Directory Server Console, select the Directory tab.
  5. Right-click the accounting entry in the navigation tree, for example, ou=accounting, o=airius.com, and select Set Access Permissions from the pop-up menu.
  6. The Multi-value ACI Selector dialog box appears.

  7. Click New.
  8. The Set Access Permissions dialog box appears.

  9. Click ACI Attributes. The Select Attributes dialog displays. In the ACI Name text box, enter a unique value such as Accounting managers all. In the future, this will allow you to see at a glance which of your access controls allows the accounting managers group full access to the accounting branch of the directory. Click OK to return to the Set Access Permissions dialog box.
  10. Click the cell beneath Allow/Deny in the table and select Allow from the pull-down menu.
  11. Double-click the cell under User/Group in the table. The Select Users and Groups dialog box appears. Select Add Group to List from the drop-down menu, type the DN for the accounting managers group in the text box provided. For example, cn=accounting managers, ou=accounting, o=airius.com, and then click Add. Click OK to return to the Set Access Permissions dialog box.
  12. Click OK.
  13. The server saves the new ACI.

Allowing Access at a Specific Time of Day or Day of Week

Many directories have "blackout" periods where users cannot write to the directory. When setting up time-based access restrictions, it may be easier to manage an ACI that explicitly restricts time-based access rather than to search though the directory for all ACIs that allow "write" and restricting their scopes to exclude access during the designated blackout period. The following example shows you how to set up access control so that all write access to the directory (under a single suffix, o=airius.com) is denied between the hours of 11 am and 1 pm Sunday.

  1. Make sure the Directory Server is running.
  2. Bind to the directory.
  3. You must enter the user name and password of a privileged directory user, such as the directory manager, who has access to all ACIs that have been set for the directory. See "Binding to the Directory From Netscape Console" for specific instructions.

  4. On the Directory Server Console, select the Directory tab.
  5. Right-click the suffix entry in the navigation tree, for example, o=airius.com, and select Set Access Permissions from the pop-up menu. The Multi-value ACI Selector dialog box appears.
  6. Click New.
  7. The Set Access Permissions dialog box appears.

  8. Click ACI Attributes. The Select Attributes dialog displays. In the ACI Name text box, enter a unique value such as time/date. In the future, this will allow you to see at a glance which of your access controls restricts access to the directory based on the time of day and day of week. Click OK to return to the Set Access Permissions dialog box.
  9. Click the cell beneath Allow/Deny in the table and select Deny from the pull-down menu.
  10. Double-click the cell beneath Time in the table. The Select Times dialog box appears. In the Beginning at text box, type the beginning time in 24 hour format without the colon ":", for example, 1100. In the Ending at text box, enter the end time (1300). Type in the day(s) you want the ACR to be in effect. Enter the first three characters of the day you want to enter, for example, sun, mon, tue, wed, etc. Separate multiple days with commas (,). Click OK to return to the Set Access Permissions dialog box.
  11. Click OK.
  12. The server saves the new ACI.

Allowing Updates Only From a Specific Location

Many directories restrict directory updates to clients running from a specific DNS hostname or IP address. This ensures that the directory cannot be updated unless the person has access to a specific machine. This type of update restriction is most common when you are populating your directory using some HR or accounting package, or by using some kind of LDAP gateway.

The following procedure shows you how to allow write access to the Directory Server running on accounting.airius.com only to clients running on the machine named abacus.airius.com.

Before you can set these permissions, you must create the accounting branch point (ou=accounting, o=airius.com). You can create organizational unit branch points using the directory tab on the Directory Server Console. See Chapter  9, "Managing Directory Entries," for information. In addition, you can also add entries using the Directory Server Gateway, or the Users and Groups area of the Netscape Console. See Managing Servers with Netscape Console and the online help available through the gateway for information.

  1. Make sure the Directory Server is running and that you have created a group whose members include the accounting managers. For example, cn=accounting managers, ou=accounting, o=airius.com.
  2. Bind to the directory.
  3. You must enter the user name and password of a privileged directory user, such as the directory manager, who has access to all ACIs that have been set for the directory. See "Binding to the Directory From Netscape Console" for specific instructions.

  4. On the Directory Server Console, select the Directory tab.
  5. Right-click the accounting entry in the navigation tree, for example, ou=accounting, o=airius.com, and select Set Access Permissions from the pop-up menu.The Multi-value ACI Selector dialog box appears.
  6. Click New.
  7. The Set Access Permissions dialog box appears.

  8. Click ACI Attributes. The Select Attributes dialog displays. In the ACI Name text box, enter a unique value such as Updates from abacus. In the future, this will allow you to see at a glance which of your access controls allows updates from the machine names abacus. Click OK to return to the Set Access Permissions dialog box.
  9. Click the cell beneath Allow/Deny in the table and select Allow from the pull-down menu.
  10. Double-click the cell under Host in the table. The Select Hosts and IP Addresses dialog box appears. Select "DNS Hostname" from the drop-down menu, type the fully-qualified domain name of the host in the text box provided, for example, abacus.airius.com, and then click Add. Click OK to return to the Set Access Permissions dialog box.
  11. Click OK.
  12. The server saves the new ACI.

Allowing Access to a Suffix Over SSL Only

You might want the directory data being read or updated to be encrypted so that it cannot be captured or tampered with. This will often be the case if you are allowing updates to your directory from outside your firewall. For example, the directory administrator may want to be able to update or query the user directory from home.

The following procedure shows you how to allow access from a machine with the IP address 123.45.6.78 outside the airius.com firewall only if the user binds to the directory using a Secure Sockets Layer (SSL) connection.

  1. Make sure the Directory Server is running.
  2. Bind to the directory.
  3. You must enter the user name and password of a privileged directory user, such as the directory manager, who has access to all ACIs that have been set for the directory. See "Binding to the Directory From Netscape Console" for specific instructions.

  4. On the Directory Server Console, select the Directory tab.
  5. Right-click the suffix entry in the navigation tree, for example, o=airius.com, and select Set Access Permissions from the pop-up menu.
  6. The Multi-value ACI Selector dialog box appears.

  7. Click New.
  8. The Set Access Permissions dialog box appears.

  9. Click ACI Attributes. The Select Attributes dialog displays. In the ACI Name text box, enter a unique value such as SSL. In the future, this will allow you to see at a glance which of your access controls allows updates from the machine names abacus. Click OK to return to the Set Access Permissions dialog box.
  10. Click the cell beneath Allow/Deny in the table and select Allow from the pull-down menu.
  11. Double-click the cell under User/Group. The Select Users and Groups dialog box appears. Select SSL from the Authentication Method pull-down menu.
  12. Double-click the cell under Host in the table. The Select Hosts and IP Addresses dialog box appears. Select "IP Address" from the drop-down menu, type the IP address of the host in the text box provided. For example, 123.45.6.78, and then click Add. Click OK to return to the Set Access Permissions dialog box.
  13. Click OK.
  14. The server saves the new ACI.

Note. If other ACIs that allow access are set for this entry, then clients from other hosts or those not using SSL will still have access permissions. This ACI should be complemented with one or more ACIs that restrict the rights of other users and clients connecting from the host (unless you want to grant access to all users from the host).

Setting a Target Using Filtering

If you want to set access controls that allow access to a number of entries that are spread across the directory, you may want to use a filter to set the target. Keep in mind that because search filters do not directly name the object that you are managing access for, it is easy to unintentionally allow or deny access to the wrong objects, especially as your directory becomes more complex. Additionally, filters can make it difficult for you to troubleshoot access control problems within your directory.

The following procedure shows you how to grant user bjensen write access to the department number, home phone number, home postal address, JPEG photo, and manager attributes for all members of the accounting organization.

Before you can set these permissions, you must create the accounting branch point (ou=accounting, o=airius.com). You can create organizational unit branch points using the directory tab on the Directory Server Console. See Chapter  9, "Managing Directory Entries," for information. In addition, you can also add entries using the Directory Server Gateway, or the Users and Groups area of the Netscape Console. See Managing Servers with Netscape Console and the online help available through the gateway for information.

  1. Make sure the Directory Server is running and that you have created the accounting branch point. For example, ou=accounting, o=airius.com.
  2. Bind to the directory.
  3. You must enter the username and password of a privileged directory user, such as the directory manager, who has access to all ACIs that have been set for the directory. See "Binding to the Directory From Netscape Console" for specific instructions.

  4. On the Directory Server Console, select the Directory tab.
  5. Right-click the accounting entry in the navigation tree, for example, ou=accounting, o=airius.com, and select Set Access Permissions from the pop-up menu.
  6. The Multi-value ACI Selector dialog box appears.

  7. Click New.
  8. The Set Access Permissions dialog box appears.

  9. Click ACI Attributes.
  10. The Select Attributes dialog displays.

  11. In the ACI Name field, enter a unique value such as Accounting Filter. In the future, this will allow you to see at a glance which of your access controls uses filtering to allow access to the accounting branch of the directory.
  12. Select "is" from the Target Filter pull-down menu and enter the filter you want to use in the text box provided. For example, ou=accounting.
  13. Select "is" from the Target Attribute(s) pull-down menu and type the following in the text box provided:
  14. departmentNumber || home* || jpegPhoto || Manager

  15. Click OK to return to the Set Access Permissions dialog box.
  16. Click the cell beneath Allow/Deny in the table and select Allow from the pull-down menu.
  17. Double-click the cell beneath User/Group in the table. The Select Users and Groups dialog box appears. Select Add User to List from the pull-down menu, type the user's DN in the text box provided. For example, uid=bjensen, o=airius.com. Click Add. Click OK to return to the Set Access Permissions dialog box.
  18. Click OK.
  19. The server saves the new ACI.

Allowing Users to Add or Remove Themselves From a Group

Many directories set ACIs that allow users to add or remove themselves from groups. This is useful, for example, for allowing users to add and remove themselves from mailing lists.

The following example allows anyone to add or delete themselves from the Jokes group.

Before you can set these permissions, you must create the jokes group (cn=jokes, ou=Mail Server, o=airius.com). You can create groups using the directory tab on the Directory Server Console. See Chapter  9, "Managing Directory Entries," for information. In addition, you can also add groups using the Directory Server Gateway, or the Users and Groups area of the Netscape Console. See Managing Servers with Netscape Console and the online help available through the gateway for information.

  1. Make sure the Directory Server is running and that you have created the Jokes group. For example, cn=jokes, ou=Mail Server, o=airius.com.
  2. Bind to the directory.
  3. You must enter the user name and password of a privileged directory user, such as the directory manager, who has access to all ACIs that have been set for the directory. See "Binding to the Directory From Netscape Console" for specific instructions.

  4. On the Directory Server Console, select the Directory tab.
  5. Right-click the jokes group entry in the navigation tree, for example, cn=jokes, ou=Mail Server, o=airius.com, and select Set Access Permissions from the pop-up menu.
  6. The Multi-value ACI Selector dialog box appears.

  7. Click New.
  8. The Set Access Permissions dialog box appears.

  9. Click ACI Attributes. The Select Attributes dialog displays. In the ACI Name field, enter a unique value such as selfwrite jokes. In the future, this will allow you to see at a glance which of your access controls allows users to add or remove themselves from the jokes group. Click OK to return to the Set Access Permissions dialog box.
  10. Click the cell beneath Allow/Deny in the table and select Allow from the pull-down menu.
  11. Double-click the cell beneath User/Group in the table. The Select Users and Groups dialog box appears. Select Add User to List from the pull-down menu, type ALL, and click Add. Click OK to return to the Set Access Permissions dialog box.
  12. Double-click the cell beneath Rights in the table. The Select Rights dialog appears. Select the Selfwrite checkbox and click OK to return to the Set Access Permissions dialog box.
  13. Click OK.
  14. The server saves the new ACI.


Setting Access Control Using LDIF Files
Access control information is stored in the ACI attribute of each directory entry. Because the access control information is stored in the directory, it can be managed using LDIF files. For a general description of the LDIF language, see Chapter  2, "LDAP Data Interchange Format."

The ACI attribute is a special attribute; it is available for use on every entry in the directory, regardless of whether it is defined for the object class structure in use on the entry.

The following sections describe the ACI language syntax. You need to understand this syntax to use LDIF to manipulate access control permissions.

Tip. LDIF ACI statements can be very complex. However, if you are setting access control for a large number of directory entries, using LDIF is the preferred method over using the GUI because of the time it can save. To familiarize yourself with LDIF ACI statements, however, you may want to use the Directory Server Console to set the ACI and then click the View/Edit Syntax button on the Set Access Permissions dialog box. This shows you the correct LDIF syntax. If your operating system allows, you can even copy the LDIF and then paste it into your LDIF file.

The ACI Language Syntax

ACIs take the form

aci: (<target>)(version 3.0;aci"<name>";<permission><bind rule>;)

where

The permission and bind rule portions of the ACI are set as a pair, and you can have multiple permission-bind rule pairs for each target. This allows you to efficiently set multiple access controls for a given target. For example:

<target>(<permission><bind rule>)(<permission><bind rule>)...

ACIs are order independent with regard to the (<target>) and (<permission><bind rule>) parts of the ACI.

The following is an example of a complete LDIF ACI:

aci: (target="ldap:///uid=bjensen,o=airius.com")(targetattr=*)
(version 3.0;acl "aci1";allow (write) userdn="ldap:///self";)

In this example, the ACI states that the user bjensen has rights to modify all attributes in her own directory entry.

The following sections describe the syntax of each portion of the ACI in more detail.

Setting Targets Using LDIF

Targeting indicates which directory resources to which an ACI applies. For general information on targeting, see "Targets".

The general syntax for a target is:

aci: (<keyword> = "<expression>")

aci: (<keyword> != "<expression>")

where equal (=) indicates that the target is the resource specified in the <expression>, and not equal (!=) indicates the target is not the resource specified in the <expression>.

The quotation marks ("") around <expression> are required. What you use for <expression> is dependent upon the exact <keyword> that you supply.

The following table lists each keyword and the associated expressions.

Table 5.2 LDIF target keywords

Keyword
Valid Expressions
Wildcard
allowed?

target
ldap:///<distinguished name>
yes
targetattr
<attribute>
yes
targetfilter
<LDAP search filter>
yes

The following sections further detail the target syntax for each keyword.

Using the target Keyword

To target an entry, use the target keyword. The target keyword can accept a value of the following format:

"ldap:///<distinguished name>"

This identifies the distinguished name of the entry to which the access control rule applies. For example:

(target = "ldap:///uid=bjensen, o=airius.com")

Note. If the DN of the entry to which the access control rule applies contains a comma, you must escape the comma with a single backslash (\). For example:

(target = "ldap:///uid=lfuentes, o=Airius Bolivia\, S.A.")

You can also use a wildcard when targeting a distinguished name using the target keyword. The wildcard indicates that any character or string or substring is a match for the wildcard. Pattern matching is based on any other strings that have been specified with the wildcard. The following are legal examples of wildcard usage:

Note. You cannot use wildcards in the suffix part of a distinguished name. That is, if your directory uses the suffixes

c=US

and

c=GB

then you can not use the following target to reference both suffixes:

(target="ldap:///o=airius, c=*")

For more information on using the target keyword, see "Targeting a Directory Entry".

Using the targetattr Keyword

You can target a specific attribute by using the targetattr keyword. For example:

(targetattr = "cn")

The attribute identified on the targetattr keyword applies to the entry that the ACI is targeting, and to all that entry's child entries. That is, if you target the password attribute on the entry

uid=bjensen, ou=Marketing, o=airius.com

then only the password attribute on the bjensen entry is affected by the ACI. If however, you target the tree's branch point

ou=Marketing, o=airius.com

then all the entries beneath the branch point that can contain a password attribute are affected by the ACI.

For general information on targeting attributes, see "Targeting Attributes".

Targeting Multiple Attributes

You can use the ACI's resource information to target multiple attributes by using the targetattr keyword along with the || symbol. For example, to target an entry's common name, surname, and uid attributes, use the following:

(targetattr = "cn || sn || uid")

Targeting Both an Entry and Attributes

By default, the entry targeted by an ACI containing a targetattr keyword is the entry on which the ACI is placed. That is, if you put the ACI

aci: (targetattr = "uid")(<access control rules>;)

on the ou=Marketing, o=airius.com entry, then the ACI applies to the entire Marketing subtree. However, you can also explicitly specify a target using the target keyword as follows:

aci: (target="ldap:///ou=Marketing, o=airius.com")
(targetattr = "uid")(<access control rules>;)

The order in which you specify the target, the targetattr and the access control rules is not important. Also, the entry you target using the target keyword must reside within the domain controlled by the entry on which the ACI is supplied. For more information on using the target keyword, see "Using the target Keyword".

Using the targetfilter Keyword

You can target a group of entries and/or attributes using an LDAP search filter and the targetfilter keyword. For example:

(targetfilter = "<search operation>")

where <search operation> is a search operation in the standard LDAP search filter format. For information on the syntax of LDAP searches, see Chapter  8, "Finding Directory Entries."

For example,

(targetfilter = "(|(ou=accounting)(ou=engineering))"

targets all entries in the accounting and engineering branches of the directory tree.

For more information on targeting using LDAP filters, see "Targeting Using LDAP Filters".

Setting Permissions Using LDIF

Permissions indicate whether a specified right is allowed or denied. Whether the defined permission is allowed or denied is determined by whether the accompanying bind rule is evaluated to be true. For general information on permissions, see "Permissions".

Permissions take the form

allow|deny (<rights>)

where

In the following example, read, search, and compare access is allowed provided the bind rule is evaluated to be true:

aci: (target="ldap:///o=airius.com") (version 3.0;acl "acl2";
allow (read, search, compare) <bind rule>;)

Setting Bind Rules Using LDIF

Whether access is allowed or denied depends on whether an ACI's bind rule is evaluated to be true. Bind rules use one of the two following patterns:

<keyword> = "<expression>";

<keyword> != "<expression>";

where equal (=) indicates that <keyword> and <expression> must match in order for the bind rule to be true, and not equal (!=) indicates that <keyword> and <expression> must not match in order for the bind rule to be true.

Note. The timeofday keyword also supports the inequality expressions (<, <=, >, >=). This is the only keyword that supports these expressions.

The quotation marks ("") around <expression> are required as is the delimiting semicolon (;). What you use for <expression> depends on the exact <keyword> that you supply.

The following table lists each keyword and the associated expressions, and indicates whether wildcard characters are allowed.

Table 5.3 LDIF bind rule keywords  

Keyword
Valid expressions
Wildcard
allowed?

userdn
ldap:///<DN>
ldap:///all
ldap:///anyone
ldap:///self
ldap:///parent
ldap:///<suffix>??sub?(filter)
yes, in DN only
groupdn
ldap:///<DN> || <DN>
no
groupdnattr
<attribute>
ldap:///<DN>?<attribute>
no
userdnattr
<attribute>
no
ip
<IP address>
yes
dns
<DNS host name>
yes
dayofweek
sun
mon
tue
wed
thu
fri
sat
sun
no
timeofday
0 - 2359
no
authmethod
none
simple
ssl
sasl <authentication method>
no

The following sections further detail the bind rule syntax for each keyword.

Using the userdn Keyword

The userdn keyword requires one or more valid distinguished names in the format of ldap:///<dn>[||ldap:///<dn>][...], the keyword ldap:///self, ldap:///all, or ldap:///anyone. For general information about user access, see "User Access".

Note. If a DN contains a comma, the comma must be preceded by a backslash (\) escape character.

The following are examples of the userdn syntax:

userdn = "ldap:///uid=*, o=airius.com";

The bind rule is evaluated to be true if the user binds to the directory using any distinguished name of the supplied pattern. For example, both of the following bind DNs would be evaluated as true:

uid=ssarette, o=airius.com
uid=bjensen, o=airius.com

whereas both of the following bind DNs would be evaluated as false:

cn=Babs Jensen, o=airius.com
uid=tjaz, ou=Accounting, o=airius.com

userdn = "ldap:///self";

The bind rule is evaluated to be true if the user is accessing the entry represented by the DN with which the user bound to the directory. That is, if the user has bound as uid=ssarette, o=airius.com and the user is attempting an operation on the uid=ssarette entry, then the bind rule is true.

userdn = "ldap:///all";

The bind rule is evaluated to be true for any valid bind DN. To be true, a valid distinguished name and password must have been presented by the user during the bind operation.

userdn = "ldap:///anyone";

The bind rule is evaluated to be true for anyone; use this keyword to provide anonymous access to your directory.

userdn = "ldap:///uid=bj, o=airius.com || ldap:///uid=kc, o=airius.com";

The bind rule is evaluated to be true if the client binds as either of the two supplied distinguished names.

userdn != "ldap:///uid=*, ou=Accounting, o=airius.com";

The bind rule is evaluated to be true if the client is not binding as a UID-based distinguished name in the accounting subtree. Keep in mind that this bind rule only makes sense if the targeted entry is above the accounting branch of the directory tree.

userdn = "ldap:///o=airius.com???(ou=engineering)(ou=sales)";

The bind rule is evaluated to be true if the client belongs to the engineering or sales subtree.

Using the groupdn Keyword

The groupdn keyword requires one or more valid distinguished names in the format of ldap:///<dn> [|| ldap:///<dn> [|| ldap:///<dn>]...]. The bind rule is evaluated to be true if the bind DN belongs to the named group. For general information about group access, see "Group Access".

Note. If a DN contains a comma, the comma must be escaped by a backslash (\).

The following are examples of the groupdn syntax:

groupdn = "ldap:///cn=Administrators, o=airius.com";

The bind rule is evaluated to be true if the bind DN belongs to the Administrators group.

groupdn = "ldap:///cn=Administrators, o=airius.com" ||
"ldap:///cn=Mail Administrators, o=airius.com";

The bind rule is evaluated to be true if the bind DN belongs to either the Administrators or the Mail Administrators group.

Using the userdnattr and groupdnattr Keywords

The userdnattr and groupdnattr keywords require an attribute that is expected to contain a full DN. The userdnattr keyword should reference an attribute that contains the DN of a single user whereas the groupdnattr keyword can reference an attribute that contains the DN of a user or group. For example, the manager and owner attributes. For general information about user attribute access, see "User Access". For general information about group access, see "Group Access".

userdnattr example

The following is an example of the userdnattr syntax:

userdnattr = "manager";

The bind rule is evaluated to be true if the bind DN is the same as the value set for the manager attribute of the targeted entry. You might want to use this for allowing a user's manager to manage employees' password attributes.

groupdnattr examples

The following are examples of the groupdnattr syntax:

groupdnattr = "owner";

The bind rule is evaluated to be true if the bind DN is a member of the group specified in the owner attribute of the targeted entry. In this example, the owner attribute is the "variable attribute". You might want to use this for allowing a group to manage employees' status information. The group you point to can be a dynamic group, and the DN of the group can be under any suffix in the database. However, the process by which the server evaluates this ACI syntax is more resource intensive. Use this syntax sparingly. See "Groups" in Managing Servers with Netscape Console for information on dynamic groups.

groupdnattr = "ldap:///o=airius.com?owner;

The bind rule is evaluated to be true if the bind DN is a member of the group specified in the owner attribute of the targeted entry and the DN of the specified group is under the suffix specified in the groupdnattr portion of the aci. You cannot use this syntax to target dynamic groups. In this example, the DN of the group is under the o=airius.com suffix. However, you might want to use this syntax because the server processes it more quickly than the previous syntax example.

Using Inheritance with userdnattr and groupdnattr

Use inheritance to extend an ACI from a parent entry to include a number of its child entries. You add inheritance to an ACI using the parent parameter and the userdnattr or groupdnattr keywords.

The syntax for the parent parameter is as follows:

userdnattr = "parent[<inheritance_level>].<attribute>";

or

groupdnattr = "parent[<inheritance_level>.<attribute>";

Where <inheritance_level> is a comma separated list that indicates how many levels below the target you want to inherit the rule. You can set up to five levels of inheritance [0,1,2,3,4] below the targeted entry; where zero (0) indicates the targeted entry. The more levels of inheritance you specify, the bigger the negative impact on performance, so consider this option carefully before implementing it.

<attribute> is the attribute targeted by the userdnattr or groupdnattr keyword.

For example,

groupdnattr = "parent[0,1].manager";

userdnattr and groupdnattr Inheritance Example

The example in the following figure indicates that user bjensen is allowed to read and search the cn=Profiles entry as well as the first level of child entries which includes cn=mail and cn=news thus allowing her to search on her own mail and news IDs.

Figure 5.2 Using inheritance with the userdnattr keyword

In this example, if you did not use inheritance you would have to do one of the following to achieve the same result:

Using the ip Keyword

The ip keyword requires an IP address. The LDIF syntax for setting a bind rule based on IP address is as follows:

ip = "<IP address>" or ip != "<IP address>"

Wildcards are allowed. For example:

ip = "12.345.6.*";

The bind rule is evaluated to be true if the client accessing the directory is located at the named IP address. This is useful for, for example, allowing certain kinds of directory access only from a specific subnet or machine.

Using the dns Keyword

The dns keyword requires a fully qualified DNS domain name. The LDIF syntax for setting a bind rule based on the DNS host name is as follows:

dns = "<DNS Hostname>" or dns != "<DNS Hostname>"

Wildcards are allowed. For example:

dns = "*.airius.com";

The bind rule is evaluated to be true if the client accessing the directory is located in the named domain. This is useful for, for example, allowing certain kinds of directory access only from a specific domain.

Using the timeofday Keyword

The timeofday keyword requires a time of day in the 24 hour clock (0 to 2359). Inequality expressions are allowed. The LDIF syntax for setting a bind rule based on the time of day is as follows:

timeofday <operator> "<time>"

where <operator> is equal to (=), not equal to (!=), greater than (>), greater than or equal to (>=), less than (<), or less than or equal to (<=).

Note. The time on the server is used for the evaluation, and not the time on the client.

For example:

timeofday = "1200";

The bind rule is evaluated to be true if the client is accessing the directory at noon.

timeofday != "1200";

The bind rule is evaluated to be true if the client is accessing the directory at any time other than noon.

timeofday > "1200";

The bind rule is evaluated to be true if the client is accessing the directory at any time after noon.

timeofday < "1200";

The bind rule is evaluated to be true if the client is accessing the directory at any time before noon.

timeofday >= "1200";

The bind rule is evaluated to be true if the client is accessing the directory at noon or later.

timeofday <= "1200";

The bind rule is evaluated to be true if the client is accessing the directory at noon or earlier.

Using the dayofweek Keyword

The LDIF syntax for setting a bind rule based on the day of the week is as follows:

dayofweek = "<day>"

where <day> is one of the following: Sun, Mon, Tue, Wed, Thu, Fri, Sat. A list of values is allowed.

Note. The day on the server is used for the evaluation, and not the day on the client.

For example:

dayofweek = "Sun, Mon, Tue";

The bind rule is evaluated to be true if the client is accessing the directory on Sunday, Monday, or Tuesday.

Using the authmethod Keyword

The LDIF syntax for setting a bind rule based on authentication method is as follows:

authmethod = "<authentication method>"

where <authentication method> is "none", "simple", "ssl", or "sasl <sasl mechanism>".

For example,

authmethod = "none";

Authentication is not checked during bind rule evaluation.

authmethod = "simple";

The bind rule is evaluated to be true if the client is accessing the directory using a username and password.

authmethod = "ssl";

The bind rule is evaluated to be true if the client authenticates to the directory using a certificate over ldaps. This is not evaluated to be true if the client authenticates using simple authentication (bind DN and password) over ldaps.

authmethod = "sasl kerberos";

The bind rule is evaluated to be true if the client is accessing the directory using the Kerberos SASL mechanism. The SASL mechanisms such as Kerberos are not provided as part of the Directory Server. For information on integrating SASL with the Directory Server, see the Netscape Directory Server Plug-In Programmer's Guide.

Using Boolean Expressions in LDIF Bind Rules

Bind rules can be complex expressions that use the boolean expressions AND, OR, and NOT.

The general format for a Boolean bind rule is as follows:

<bind rule> [<boolean>][<bind rule>][<boolean>][<bind rule>]...;)

For example, the following bind rule will be evaluated as true if the bind DN is a member of either the administrator's group or the mail administrator's group, and if the client is running from within the Airius domain:

(groupdn = "ldap:///cn=administrators, o=airius.com" or groupdn = "ldap:///cn=mail administrators, o=airius.com") and dns = "*.airius.com";)

The trailing semicolon (;) is a required delimiter that must appear after the final bind rule.

ACI Usage Examples

The following examples describe how to set some of the more common directory permissions using the LDIF:

Defining Permissions for All Users

The following example allows all users at Airius read access to the directory. In the following examples, users must authenticate to the Directory Server to obtain access to the directory granted by this ACI:

dn: o=airius.com
objectClass: top
objectClass: organization
aci: (target = "ldap:///o=airius.com") (targetattr=*)
(version 3.0; aci "all-read"; allow (read) userdn = "ldap:///all";)

The following example allows every user write privileges only to their own userPassword attribute:

dn: o=airius.com
objectClass: top
objectClass: organization
aci: (targetattr = "userPassword")
(version 3.0; aci "write-self"; allow (write) userdn = "ldap:///self";)

The following example allows every user to read every attribute except the userPassword attribute:

dn: o=airius.com
objectClass: top
objectClass: organization
aci: (target = "ldap:///o=airius.com")(targetattr != "userPassword")
(version 3.0; aci "read-all-not-pw"; allow (read) userdn = "ldap:///all";)

Defining Anonymous Access

Anonymous access allows users to gain access to the directory by providing no authentication information to the Directory Server. You grant anonymous access to an entry by specifying no client request attributes in the ACI.

The following example allows anonymous read and search access to every entry in the directory:

dn: o=airius.com
objectClass: top
objectClass: organization
aci: (target="ldap:///o=airius.com")(targetattr=*)
(version 3.0; aci "anonymous-read-search"; allow (read, search)
userdn = "ldap:///anyone";)

The following example allows anonymous read or search access to the Marketing subtree:

dn: ou=Marketing, o=airius.com
objectClass: top
objectClass: organization
aci:: (target="ldap:///ou=Marketing, o=airius.com")(targetattr=*)
(version 3.0; aci "anonymous-search-mktg"; allow (read, search)
userdn = "ldap:///anyone";)

Defining Permissions for Individual Users

The following example allows a specific user read or search access to the Marketing subtree. The user will be required to authenticate before obtaining access to the directory:

dn: ou=Marketing, o=airius.com
objectClass: top
objectClass: organization
aci: (target="ldap:///ou=Marketing, o=airius.com")(targetattr=*)
(version 3.0; aci "bjensen-r-s-mktg"; allow (read, search)
userdn = "ldap:///uid=bjensen, ou=Marketing, o=airius.com";)

The following example allows a specific user write access to the userPassword or telephoneNumber attribute of his own entry:

dn: o=airius.com
objectClass: top
objectClass: organization
aci: (targetattr = "userpassword || telephonenumber")
(version 3.0; aci "ssarette-write-pw-phone"; allow (write)
userdn = "ldap:///uid=ssarette, o=airius.com";)

The following example allows either of the two users to write to the administrator's group. That is, both of these users can add and delete group members to the administrator's group or change attribute values for the group entry:

dn: o=airius.com
objectClass: top
objectClass: organization
aci: (target = "ldap:///cn=administrators,o=airius.com") (targetattr="member||uniquemember")(version 3.0; aci "write-admingrp"; allow (write)userdn = "ldap:///uid=ssarette, o=airius.com" ||
"ldap:///uid=bjensen, o=airius.com";)

The following example allows anyone to add or delete themselves from the Jokes group. This is useful, for example, for allowing users to add and remove themselves from mailing lists:

dn: o=airius.com
objectClass: top
objectClass: organization
aci: (target = "ldap:///cn=jokes, ou=Mail Server, o=airius.com")
(targetattr="member")(version 3.0; aci "selfwrite-jokes"; allow (selfwrite)userdn = "ldap:///all";)

The following example allows users to write access to the description and jpegPhoto attributes of their own entries:

dn: o=airius.com
objectClass: top
objectClass: organization
aci: (targetattr = "description || jpegPhoto")(version 3.0; aci
"write-jpeg-descrip-self"; allow (write) userdn = "ldap:///self";)

The following example allows the user to add and delete directory entries. However, because the ACI does not grant write permission, the user cannot modify the entry even if he created it himself.

dn: o=airius.com
objectClass: top
objectClass: organization
aci: (target = "ldap:///o=airius.com")(version 3.0; aci
"landrew-add-delete"; allow (add, delete) userdn = "ldap:///uid=landrew, o=airius.com";)

The following example allows the user to write to his own child entries:

dn: o=airius.com
objectClass: top
objectClass: organization
aci: (target = "ldap:///o=airius.com")(targetattr=*)(version 3.0; aci "ssarette-parent"; allow (write) userdn = "ldap:///parent";)

Defining Permissions for a Group of Users

The following example allows a group of users called Administrators to write to the entire contents of the directory:

dn: o=airius.com
objectClass: top
objectClass: organization
aci: (target="ldap:///o=airius.com")(targetattr=*)
(version 3.0; aci "Administrators-write"; allow (write) groupdn =
"ldap:///cn=Administrators, o=airius.com";)

The following example allows anyone who is in the Directory Administrator group and not in the Content Administrators group to write to the uid attribute of any entry in the directory:

dn: o=airius.com
objectClass: top
objectClass: organization
aci: (targetattr= "uid")
(version 3.0; aci "diradmins-write-UID"; allow (write)
groupdn = "ldap:///cn= Directory Administrators, o=airius.com" and groupdn != "ldap:///cn = Content Administrators, o=airius.com";)

The following example grants a manager full access to his or her employee's entries. In order for this to work, the manager attribute on each of the employee's entries must be set to the manager's distinguished name:

dn: o=airius.com
objectClass: top
objectClass: organization
aci: (target="ldap:///o=airius.com")(targetattr=*)
(version 3.0; aci "manager-write"; allow (all) userdnattr = "manager";)

The following example allows members of the HR group to add new entries to and delete entries from the people organizational unit:

dn: o=airius.com
objectClass: top
objectClass: organization
aci: (target="ldap:///ou=people, o=airius.com")
(version 3.0; aci "HR-add-delete"; allow (add, delete) groupdn =
"ldap:///cn=HR, o=airius.com";)

The following example allows members of the Engineering admins group to modify the homePhone, homePostalAddress, and manager attributes of all entries in the Engineering business category. This example uses LDAP filtering to select all entries with businessCategory attributes set to Engineering:

dn: o=airius.com
objectClass: top
objectClass: organization
aci: (targetattr="departmentNumber || home* || Manager")
(targetfilter="businessCategory=Engineering")
(version 3.0; aci "eng-admins-write"; allow (write)
groupdn ="ldap:///cn=Engineering Admins, o=airius.com";)

Defining Permissions for a Specific Subtree

The following example allows a client to bind as the accounting organizational unit entry, and then have full access to all the entries beneath the accounting subtree:

dn: ou=Accounting, o=airius.com
objectClass: top
objectClass: organizationalUnit
userPassword: {crypt}dksfjaoewirsdkfj
aci: (target="ldap:///ou=Accounting, o=airius.com")(targetattr=*)
(version 3.0; aci "accounting-branch"; allow (all)
userdn = "ldap:///ou=Accounting, o=airius.com";)

The following example allows any member of the accounting subtree to add themselves to or delete themselves from the Bean Counters group:

dn: o=airius.com
objectClass: top
objectClass: organization
aci: (target="ldap:///cn=Bean Counters, ou=Accounting, o=airius.com") (targetattr="member")(version 3.0; aci "selfwrite-beancounters"; allow (selfwrite)userdn = "ldap:///uid=*, ou=Accounting, o=airius.com";)

Defining Permissions for a Specific Location

The following example allows a client running on the machine ldap.airius.com full access to the directory:

dn: o=airius.com
objectClass: top
objectClass: organization
aci: (target="ldap:///o=airius.com")(targetattr=*)
(version 3.0; aci "aci 2"; allow (all) dns = "ldap.airius.com";)

The following example allows anonymous searching of the directory as long as the client is running on the specified subnet:

dn: o=airius.com
objectClass: top
objectClass: organization
aci: (target="ldap:///o=airius.com")(targetattr=*)
(version 3.0; aci "aci 2"; allow (read, search)
userdn = "ldap:///anyone" and ip = "2.3.1.*";)

Defining Permissions Based on the Day of Week or the Time of Day

The following example denies all access to everyone except the Directory Administrator's group from 1:00 am to 3:00 am (0100 to 0300) on Sunday, Tuesday, and Friday:

dn: o=airius.com
objectClass: top
objectClass: organization
aci: (target="ldap:///o=airius.com")(targetattr=*)
(version 3.0; aci "aci 1"; allow (all)
groupdn = "ldap:///cn=Directory Administrators, o=airius.com";)
aci: (target="ldap:///o=airius.com")(targetattr=*)
(version 3.0; aci "aci 2"; deny (all)
groupdn != "ldap:///cn=Directory Administrators, o=airius.com" and dayofweek = "Sun, Tues, Fri" and
(timeofday >= "0100" and timeofday <= "0300");)

Defining Permissions Based on Authentication Method

The following example allows members of the Directory Administrators group full access to the directory provided that they bind to the directory using the Simple Authentication and Security Layer (SASL) protocol:

dn: o=airius.com
objectClass: top
objectClass: organization
aci: (target="ldap:///o=airius.com")(targetattr=*)
(version 3.0; aci "aci 2"; allow (all)
groupdn = "ldap:///cn=Directory Administrators, o=airius.com" and
authmethod = "sasl kerberos";)

The following example allows read and write access from the machine named mastermind.airius.com if the bind is established using a Secure Sockets Layer (SSL) connection:

dn: o=airius.com
objectClass: top
objectClass: organization
aci: (target="ldap:///o=airius.com")(targetattr=*)
(version 3.0; aci "aci 1"; allow (read, write)
dns = "mastermind.airius.com" and authmethod = "ssl";)

Defining Permissions for DNs That Contain a Comma

DNs that contain commas require special treatement within your LDIF ACI statements. In the target and bind rule portions of the ACI statement, commas must be escaped by a single backslash (\). The following example illustrates this syntax:

dn: o=Airius Bolivia\, S.A.
objectClass: top
objectClass: organization
aci: (target="ldap:///o=Airius Bolivia\, S.A.")(targetattr=*)
(version 3.0; aci "aci 2"; allow (all)
groupdn = "ldap:///cn=Directory Administrators, o=Airius Bolivia\, S.A.";)


Overview of Proxied Authorization
Using proxied authorization, you can enable an LDAP client application (such as the Administration Server in Netscape Communications Corporation Delegated Administrator), to use a single thread with a single authentication to service multiple users making requests against the Directory Server. Instead of having to rebind for each request, the client application binds to the Directory Server and passes a proxy control (containing a proxy DN) as part of the LDAP operation the client application is attempting to perform.

The proxy DN is the DN of an entry that has access permissions to the target on which the client-application is attempting to perform an operation. The proxy DN must be contained within the control sent to the Directory Server. Once received, the Directory Server confirms that the client-application has proxy access rights to the entry affected by the operation, and then grants the rights defined for the proxy DN to the requesting client application.

The command-line utilities also include an argument (-y) that passes the proxy DN to the server allowing you to test the client-application controls you write. For more information, see:

This section contains information about:

Proxied Authorization ACI Syntax

Proxied authorization is an access right like read, write, and delete. You set the proxy right on the target and provide the bind DN of the client application in the ACI as follows:

allow(<access_rights>) <BindRule_Keyword>="<BindDN>"

where:

You do not specify a proxy DN in the ACI. The proxy DN must be included in the proxy control sent by the client application.

Proxied Authorization ACI Example

For this example, suppose:

Then in order for the client application to gain access to the Accounting subtree (using the same access permissions as the Accounting Administrator):

With this ACI in place, the MoneyWizAcctSoftware client application can bind to the directory and send a proxy control requesting that it be granted the same access rights as the entry it specifies in the proxy DN. (In the above example, the proxy DN sent in the control would be "uid=AcctAdministrator, ou=Administrators, o=Airius.com".)

Note. You cannot use the Directory Manager's DN (Root DN) as a proxy DN. Attempts to do so will be unsuccessful. Also if the Directory Server receives more than one proxied authentication control, an error is returned to the client application and the bind attempt is unsuccessful.

Specifying Proxy Authorization Rights On a Target

You can set proxy authorization rights on a target in two ways. This section describes:

Setting Proxy Rights Using the Server Console

To set proxy rights on a target in the Directory, you create an ACI that specifies that the bind DN of the client application has proxy rights to the target.

To specify proxy rights on a target:

  1. Make sure the Directory Server is running.
  2. From the Directory Server Console, bind to the directory.
  3. You must enter the user name and password of a privileged directory user, such as the directory manager, who has access to ACIs that have been set for the directory. See "Binding to the Directory From Netscape Console" for specific instructions.

  4. Select the Directory tab.
  5. Right-click the entry in the navigation tree for which you want to set proxy rights, and select Set Access Permissions from the pop-up menu (Figure 5.1).
  6. Click New.
  7. The Set Access Permissions dialog box appears.

    The table lists the access control rules (ACRs) defined for this ACI. By default, the first ACR in the table denies access to everyone with the exception of the root DN (Directory Manager).

  8. (Optional) Click ACI Attributes. The Select Attributes dialog appears.
  9. If you want to change the name of the ACI, type the new name in the ACI Name text box. The name can be any string you want to use to uniquely identify the ACI, for example, "Allow proxied authorization". If you do not enter a name, the server uses "unknown". Click OK to return to the Set Access Permissions dialog box.

  10. Click the cell under Allow/Deny in the table and select Allow from the drop down menu.
  11. Double-click the cell beneath User/Group in the table.
  12. The Select Users and Groups dialog box appears. Select Add User to List from the pull-down menu, type the client application's DN in the text box provided. For example, uid=MoneyWizAcctSoftware, ou=InfrastructureProducts, o=airius.com. Click Add and then click OK to return to the Set Access Permissions dialog box.

  13. Double-click the cell under Rights in the table.
  14. The Select Rights dialog box appears. Select the checkbox next to Proxy.

    You can also explicitly set permissions for the client application by selecting other access rights in this dialog box. For information on other access rights you can set using this dialog box, see Table  5.1.

  15. Click OK when you are finished to return to the Set Access Permissions dialog box.
  16. Click OK.
  17. The server saves the new ACI.

Setting Proxy Rights Using the Command Line

You can set proxy rights on an entry using LDIF from the command-line just as you would any other rights. See "Setting Access Control Using LDIF Files" for information on using LDIF to set access control, and see "Proxied Authorization ACI Syntax" for information on the ACI syntax to use when setting proxy authorization rights using LDIF.


Viewing the Access Control List for a Suffix
The Access Control List (ACL) is the complete list of all the ACIs under a single suffix in the directory. You can view this list by running the following ldapsearch command:

ldapsearch -h <host> -p <port> -b <baseDN> -D <rootDN> -w <rootPassword> (aci=*) aci

See "Using the Command-Line Utilities" for information on ldapsearch.


© Copyright 1999 Netscape Communications Corporation, a subsidiary of America Online, Inc. All Rights Reserved.