Chapter 1 Netra j Product Description and Navigation
This chapter describes the following basic topics on Netra j 2.0:
Netra j Software
Netra j is a software-only Solaris application that provides all the components required to boot and administer JavaStation clients and their users. Netra j software includes JavaStation(TM) client software, secure 3270/5250 web-to-host connectivity for any Java-enabled client, and browser-based management of complex network services such as DNS, NIS, and DHCP, as well as JavaStation clients and users.
Netra j software can be added to new or existing SPARC(TM) systems running Solaris 2.5.1 or later. For Solaris 2.5.1 systems, all the components required to support JavaStation systems and internet/intranet connectivity are included, such as Sun Internet Mail Server(TM) and Sun WebServer(TM).
Unlike prior Netra j products, Netra j 2.0 software enables experienced Solaris system administrators to use the command line for administration, while administrators with little or no UNIX\256 expertise can use the Netra browser interface to accomplish adds, moves, and changes for departments and remote sites. Both administration methods are supported. And since Netra j is a Solaris application, it can coexist with other Solaris-compatible applications, and it can be installed on any SPARC-based Sun system running Solaris 2.5.1 or 2.6.
Servers running the Netra j software can be set up as NIS clients or slaves in an existing Sun network, or as NIS masters for standalone and Java pilot deployment.
The Netra j software includes several software packages that are required to set up and configure the network computing environment to deploy JavaStation clients and applications for any Java-enabled client. The software packages include:
-
Netra j administrative software
-
JavaStation software
-
Solaris 2.5.1 add-ons
-
Open Connect Systems (OCS) software
Netra j Administrative Software
The Netra j administrative software enables you to set up and configure the servers and clients needed in your network environment. It also contains the following additional software:
Sun Internet Mail Server - Enables companies to setup an Internet mail server supporting IMAP4, POP3 and UNIX mail clients.
Sun WebServer - Enables companies to publish and distribute information and deploy web-based applications across any network environment.
GO-Joe - A thin client Java X server that provides access to all UNIX and X Window applications, including browsers such as HotJava Browser.
JavaStation Software
These software packages provide the operating system, boot images, and client applications for the JavaStation network computer:
-
JavaOS 1.1
-
HotJava Views 1.1
-
HotJava Views Demo Support
-
HotJava Views Documentation
-
HotJava Browser 1.1
Solaris 2.5.1 Add-ons
Netra j also includes Solaris 2.5.1 add-on software. The following software packages are required to support JavaStation clients on systems running the Solaris 2.5.1 operating environment:
-
Sun Internet Mail Server
-
PPP/IP asynchronous PPP daemon
-
Networking UUCP utilities
-
System localization
-
PPP/IP and IP dialup
-
X Windows optional fonts
-
NIS Kit 1.2
-
Dynamic host configuration protocol (DHCP)
OCS Software
Open Connect Software (OCS) provides a development tool to develop applets for SNA/AS400 legacy systems and software enabling legacy connectivity to mainframes, AS400, and VT220 hosts. The following OCS software is included with Netra j:
-
Netra j OpenVista
-
OC://WebConnect
-
OC://WebConnect Netra Integration
Hardware and Software Requirements
You can install Netra j 2.0 on any SPARC system running the Solaris operating environment, version 2.5.1 or later. Solaris 2.6 systems should have the full Solaris 2.6 distribution installed, as opposed to subsets such as the end-user cluster.
You will need an HTML-based web browser to administer Netra j 2.0. HotJava Browser is provided as part of this software.
Netra j also requires a web server on port 80. If no other web server is running on port 80, Netra j automatically configures and starts Sun WebServer on that port.
Note -
Netra j uses Sun WebServer as the administration web server on port 81. This must not be replaced by any other server.
Some systems have additional requirements, as shown in Table 1-1.
Table 1-1 Special Requirements for Netra j|
If you are installing Netra j ... |
Make sure your system has the following: |
|---|---|
|
As an upgrade to Netra i 3.1 or 3.1.1 |
Sun packages SUNWadmap and SUNWscpu These packages can be installed from the Netra Recovery CD-ROM, which accompanies the Netra i product CD-ROM. |
|
On a 2.5.1 system and you plan to administer the HotJava Views Calendar |
The Common Desktop Environment (CDE) CDE is available on the Solaris Update CD-ROM. |
Network Topology
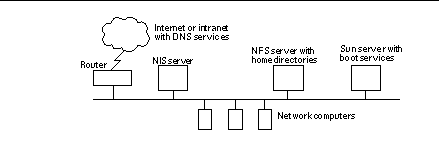
The Netra j software supports two network scenarios, as illustrated in Figure 1-1 and Figure 1-2.
Figure 1-1 shows a configuration that includes a single Sun server and several network computers. The Sun server provides all the network services for the NCs in this network.
Figure 1-1 Sample Configuration of a JavaStation Network Environment

Figure 1-2 shows a configuration in which the Sun server is integrated into an existing enterprise network that already incorporates a number of servers.
Figure 1-2 Integrating a Sun Server Into an Existing Enterprise Network
Netra j and Solaris Administration
This book provides system administration information for both the Netra j dministration interface (web-based administration) and the Solaris operating environment (command-line administration).
Netra j Administration Interface
The Netra j administration interface is a web-based user interface for performing administration tasks. This document describes the GUI and how to use it to perform administration tasks. The following chapters detail the GUI method:
Solaris Command Line
The Solaris operating environment can be used to manipulate files and directories. You can type in the file and directory names in conjunction with Solaris commands to carry out specific operations. References to Solaris procedures are intended for system administrators who are familiar with basic system administration and with the tasks described in the Solaris 2.x System Administrator's Guide.
If you use use Solaris command line for administration, you should have experience administering systems running the Solaris operating environment (2.5.1 or later). This document does not provide a complete description of the Solaris operating environment or a complete description of administration tasks to set up systems (server, client, network services, etc.). It does however, focus on advanced tasks to set up and configure JavaStation clients in a network environment using Solaris commands. The following chapters detail the command-line method:
Java Computing
The JavaStation is part of a new thin-client paradigm that is enabling organizations with outdated networks to upgrade their system architectures without discarding existing investments in software and hardware. This paradigm is called Java computing.
Java Computing Model
Early in business computing, users accessed business applications running on mainframe computers through 3270-type terminals and other similar devices. Applications running on the mainframe communicated with these stateless terminals by way of a specialized byte-stream. This approach offered a centralized control mechanism for data and applications on the mainframe, but because all application processing was done on the host, it was not particularly scalable.
The introduction of the personal computer (PC) into corporate computing solved some of the issues with the mainframe model but introduced new problems, in particular:
-
Decentralized administration. Because of their modular nature, each PC tended to be configured differently depending on its hardware composition and its user's needs. The resulting large support matrix has helped drive PC cost-per-seat to $11,900 (Gartner group estimate).
-
Corporate data migration. Since most PCs have local data storage, important corporate data can migrate onto PC desktops, making the local data inconsistent with central coporate data and inaccessible to the data center. Since users are often responsible for backing up their own systems, the data itself is often at risk.
-
Lack of built-in networking. Though more and more corporate PCs are now being attached to networks, networking is not a fundamental assumption of the PC architecture. Without built-in networking being part of the basic model, most PC applications use networks only for file sharing, printing, or licensing.
-
Lack of security. PC operating systems are fundamentally insecure with no way to tell one user from another or one system from another. This inherent insecurity leaves avenues open for viruses to proliferate.
Today the Java programming language, along with the wide adoption of Internet technology and standards such as TCP/IP and HTTP, is enabling a move to the powerful but simple Java computing model. This new way of deploying applications causes a significant change in the way distributed client/server network-based applications are designed and developed.
The Java computing model includes some or all of the following components:
-
JavaStation. The JavaStation thin client provides local application processing and highly interactive, graphical applications. JavaStation clients enable the Java Virtual Machine (Java VM) and allow Java applications to be downloaded and run from anywhere on the network.
-
Application server. The graphical portion of an application running on the JavaStation uses standard networking protocols to communicate with applications running on mid-tier application servers.
-
Data warehouse. Data warehouse systems centralize the management and control of data and applications. Data and applications remain in the centralized domain of the data warehouse, while desktop users receive the benefits of local application processing and dynamic user interfaces.
Customers who require an immediate solution for supporting JavaStation clients are encouraged to use the Netra j administration interface. The Netra j administration interface performs a seamless JavaStation installation and features sophisticated tools that simplify the setup of the network services required by the JavaStation.
JavaStation Network Environment
Unlike traditional workstations and PCs, network computers download all their software from a server. To run properly, these clients require a boot server, a domain name service (DNS) server, a network information service (NIS) server, a NFS server, a web server, a DHCP server, a router and a home directory for each user.
The JavaStation can be integrated into an existing network; however, the JavaStation does require a dedicated boot server.
The boot server "listens" on the network for a JavaStation booting up and supplies the JavaStation with its boot image: JavaOS and either the HotJava Browser, HotJava Views, or an alternate main application. You decide in advance which application a particular JavaStation will run.
If HotJava Views is used as the main application, the web server provides the HotJava Views applets to JavaStation clients that are running HotJava Views. You can configure the HotJava Views environment by using a tool from the Netra j software called HotJava Views Administration. (See "To Access HotJava Views Administration".)
The boot server and web server can be the same physical machine, but it is not a requirement. The JavaStation network environment also depends on the DHCP, DNS, NIS, and NFS services. NFS must be provided by the boot server; DNS and NIS can be provided by other machines in the nework. JavaStation home directories (accessed by NFS) can also reside on other machines in the network.
Once you've completed server installation and configuration, you can add clients and complete HotJava Views administration through Netra j.
The Netra j Administration Interface
The Netra j server uses a web-based interface for its administration. Each screen is a hypertext document. A browser running on a client or on the Netra system accesses these documents from an administration web server running on the Netra system.
Each administration function in the Netra user interface is called a module. Each module is made up of a set of related tasks. For example, the User Accounts module contains tasks to add user accounts as well as to modify or delete them. These modules are grouped in four categories:
-
Network Services Administration
-
Network Connection Administration
-
Security Administration
-
System Administration
The modules are displayed as hypertext links on the main administration page of the user interface. Selecting a link takes you to the module associated with the task.
Page Types
The Netra user interface has five types of pages:
-
Navigation
-
Task
-
Help
-
Glossary
-
Status
Navigation Page
A Navigation page is used to select tasks. You select a task by clicking on the link, which displays a Task page or another Navigation page. When you follow a link, you never change the state of the system.
Some navigation pages are dynamic: they display only the options that are available on your particular Netra system. If you enter information on a Task page that changes the available options, these Navigation pages will reflect the changes.
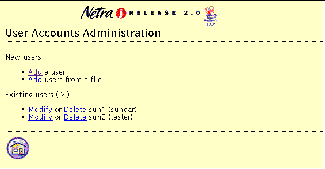
Figure 1-3 shows a Navigation page for the User Accounts module. From this page you can add a new user or modify or delete an existing user by selecting the apropriate links.
Figure 1-3 Navigation Page
Task Page
A Task page is also called a form. There are two types of forms: Regular and Special.
Regular Form
Regular forms provide the only way to change the system state. When a form is displayed, the values in the fields are either current or default values. You can enter information in a Regular form by typing it into the text boxes or by choosing the radio button options.
Regular forms have an OK button that you must click to activate any changes or new information that you entered and to change the system state.
Some Regular forms also have a Reset button. If you want to discard your changes before they are activated, use the Reset button to return fields to their previous values.
The user input elements in a form are described in Table 1-2.
Table 1-2 User Input Elements|
Element |
Description |
|---|---|
|
Text box |
Accepts one line of text input. |
|
Text area |
Accepts multiple lines of text input. |
|
Radio buttons |
A group of one or more buttons, only one of which can be selected. Click on a radio button to select it. This will de-select any other selected radio button in its group. The only way to de-select a radio button is to select another one. |
|
Check box |
Selects an option. Click on the button to change its state. |
|
Pop-up menu |
A list of options displayed in a menu. Only one option can be selected. The selected item is shown. Press the mouse button on the menu to display the list of options. Release over a new option to select it. |
|
Scrolling list |
A list of options displayed in a window. Click on an option to select it. Scrolling lists can allow multiple selections. |
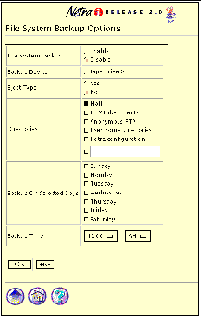
Figure 1-4 shows a Task page (Regular form) for the File Backup Options module.
Figure 1-4 Task Page (regular form)
Special Form
Special forms are based on Regular forms. Special forms are automatically displayed. There are two types of special forms: Error forms and Verify forms.
-
An error form does not change the system state. It displays an error icon, and enables you to correct the error and re-enter information in a Regular form. Errors are marked on the form next to the relevant field. Figure 1-5 shows an Error form for the User Accounts module.
Note -
If the information you enter in a form produces an error, the system state is not changed. The form is re-displayed with the erroneous data. You must correct the data.
-
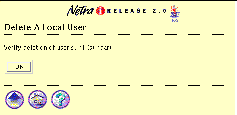
In a Verify form, you only confirm a previous choice (Figure 1-6)
Figure 1-5 Error Form
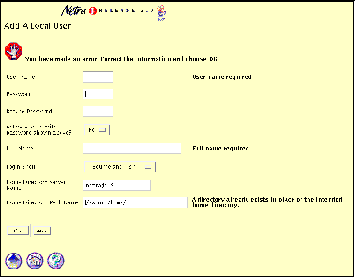
Figure 1-6 shows a Verify form for the User Accounts module.
Figure 1-6 Verify Form
Help Page
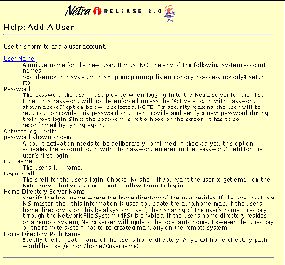
The Netra user interface opens a separate browser to display Help pages that contain the information you need to fill out a form. All forms have a help icon in the form of a question mark. Some Help pages use terms that are linked to the glossary.
Figure 1-7 shows a Help page for the User Accounts module.
Figure 1-7 Help Page
Glossary Page
You can access the Glossary page using links in the Help pages of a module. When you select a term that is a link, the term and its explanation are displayed at the top of the Glossary page. The Glossary page is displayed in a scrolling window. To return to the Help page, use the back arrow icon located at the bottom of the glossary.
Status Page
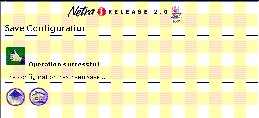
A Status page is displayed once you have completed all the forms for a task. It can contain either a success icon or an information icon. A Status page confirms that the system state has changed.
Figure 1-8 shows a success Status page for the Save Configuration module.
Figure 1-8 Success Status Page
Information Icons
The icons shown in Table 1-3 may be displayed while a task is being completed.
Table 1-3 Netra Information Icons|
Icon |
Description |
|---|---|
|
Information icon. Calls attention to important messages in response to submitting a form. The message indicates the status of the operation. |
|
|
Error icon. Calls attention to errors in form entries. |
|
|
Success icon. Shows that a task has been completed successfully. |
Navigation Icons
Every administration page has some of the icons shown in Table 1-4.
Table 1-4 Netra Navigation Icons|
Icon |
Description |
|---|---|
|
Home icon. Returns to the Netra Main Administration page. (Selecting the banner will also do this.) |
|
|
Help icon. Contains explanations of fields in the related form. |
|
|
Top of Module icon. Returns to a module's top-level page. |
|
|
Forward Arrow icon. Continues to the next configuration task. |
Accessing the Netra Administration Interface
The web-based Netra administration interface is accessed through a dedicated administration web server. To access Netra j, you must use a web browser and provide a user name and password. You can use either of the following two methods.
To Use a Netra Server With a Monitor
-
Power on the server.
-
At the console prompt, log in as the user setup.
-
Type setup for the password.
A window system and a browser are started. The browser is configured to access the Netra administration framework.
You are now required to authenticate the browser connection.
-
Type setup for the user ID and setup for the password.
The Netra Welcome page is displayed.
-
In the Netra Welcome page, click Administration.
If this is the first time you are accessing Netra j, the Initial Configuration page is displayed. Otherwise, the Main Administration page is displayed.
To Use a Client on the Network
-
Start a browser on the client system.
-
http://
hostname:81
The Netra password screen is displayed.
-
Type setup for the user ID and setup for the password.
The Netra Welcome page is displayed.
-
In the Netra Welcome page, click Administration.
The Main Administration page is displayed.
Accessing Netra j Documents From the Netra Administration Interface
You can access Netra j documents from the administration interface.
To Access Netra j Documents
- © 2010, Oracle Corporation and/or its affiliates
