Managing User Profiles
The User Profiles screen allows administrators to add, update, and delete administrators, account managers, and users. In addition, you can view a user's login status. Users and account managers are associated with the currently selected account from the current account drop-down list.
Administrators are not associated with any account.
In the User Profile section you can add, delete, or update user information.
Adding, Deleting, and Updating User Profiles
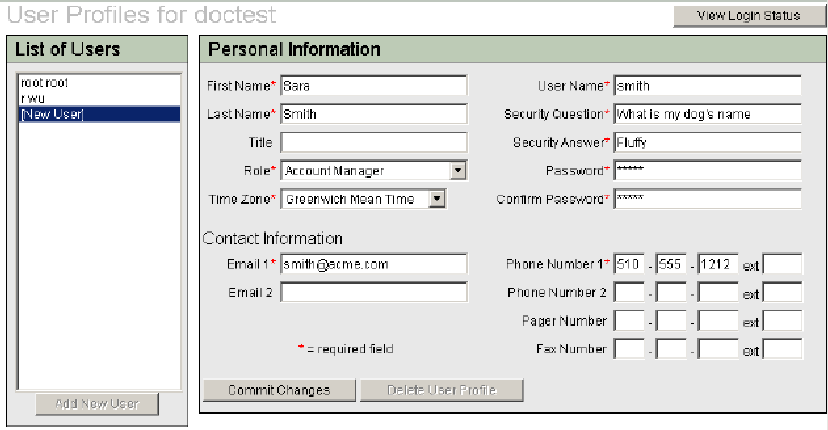
The User Profiles window has three sections of user information:
-
List of Users
-
Personal Information
-
Contact Information
Figure 3–7 illustrates the screen to add a new user:
Figure 3–7 User Profiles

 How
To Add a New User Profile
Steps
-
Log in to the Control Center Administration screen.
-
Click the User Profiles button in the tools bar.
-
Click the Add New User button and fill in all the required fields marked with an asterisk.
-
Select the user role from the Role drop-down list in the Personal Information area.
Select Administrator, Account Manager, or User.
The format for the phone and fax field is ###-###-####.
-
Click the Commit Changes button.
The new user profile is saved.
 How To Delete a User Profile
Steps
-
Log in to the Control Center Administration screen.
-
Click the User Profiles button in the tools bar.
-
Select the user account from the Current Account drop—down list above the tools bar.
-
Select a user name in the List of Users area.
All pertinent information about the user is displayed automatically in the dialog box after you select the user to be removed.
-
Click Delete User Profile and then click OK in the confirmation window.
The user profile is removed.
 How
To Update a User Profile Information
Steps
-
Log in to the Control Center Administration screen.
-
Click the User Profiles button in the tools bar.
-
Select the user profile from the List of Users in the User Profiles screen.
All pertinent information about the user displays automatically in the dialog box after you select the user to be updated.
-
Provide the update information in the appropriate fields.
Fields marked with an asterisk require information.
The format for the phone and fax field is ###-###-####.
-
Click Commit Changes.
User Login Status
The Login Status dialog box enables you to view users login status and manually lock and unlock users. By default, users are locked out of the system if their login attempts fail a configurable number of times within a configurable number of minutes. The lock is automatically released after another configurable number of minutes.
 How To View and Change the Login Status
of Account Users
Steps
-
Log in to the Control Center Administration screen.
-
Click the User Profiles button in the tools bar.
-
Click the View Login Status button on the top right corner of the User Profile screen.
-
Select the account from the User Login Status For drop-down list to view the login status of the user profiles associated with the account.
-
To change the login status of a user, use the Locked check box in the far right column.
-
To unlock a user, deselecting the Locked check box and clicking Commit Changes.
-
To lock out a user, select the Locked check box next to the user's name and click Commit Changes.
Note –Manually set locks do not expire so, you need to manually unlock the Locked check box to enable the user access to the Control Center.
-
- © 2010, Oracle Corporation and/or its affiliates
