Managing Accounts
Use the Administration screen to manage accounts. Refer to Administration Screen for information on navigating the Control Center Administration screen.
This section describes how you can create, remove, or update an account. You might update an account to change the name of the organization and contact details.
Adding, Deleting, and Updating Accounts
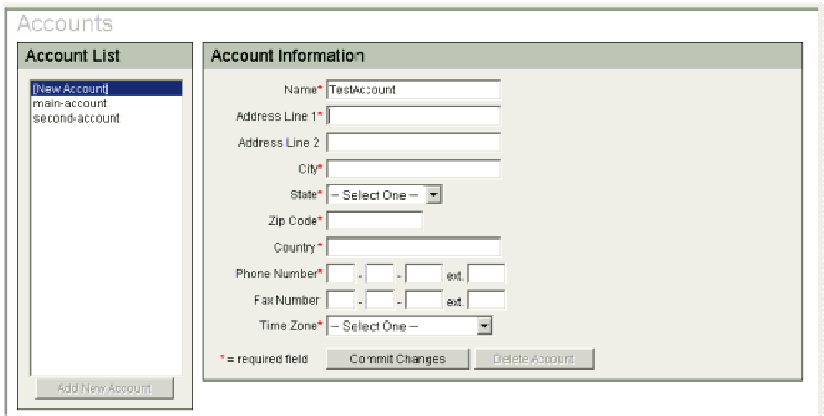
You must create an account before you can perform any other account related actions. Figure 3–2 shows the Add Accounts screen.
Figure 3–2 Add Account Screen
 How To Add
a New Account
Steps
-
Login to the Administration screen of the Control Center.
The Account Tools buttons are appear in the left pane.
-
Click Accounts on the tools bar.
The Accounts dialog box appears.
-
Click the Add New Account button.
-
Type the appropriate information in the Account Information dialog box fields.
Fields marked with an asterisk are mandatory fields.
Note –If the account name you have chosen already exists, an error message appears. Use a different account name. Account names are used in the Domain Name Service (DNS) names of farm elements. See DNS Naming Conventions.
-
Click the Commit Changes button.
The new account information is saved.
 How To Delete
an Account
Steps
-
Login to the Administration screen of the Control Center.
The Account Tools buttons are appear in the left pane.
-
Click Accounts on the tools bar.
The Accounts dialog box appears.
-
Select the account you want to delete from the Account List.
The account information appears in the right pane.
-
Click the Delete Account button in the right pane.
Note –You cannot delete an account if any user and farm is associated with the account. The users must be deleted first. See How To Delete a User Profile.
-
Click the Commit Changes button.
The account information is deleted.
 How To Update
an Existing Account
Steps
-
Login to the Administration screen of the Control Center.
The Account Tools buttons are appear in the left pane.
-
Click Accounts on the tools bar.
The Accounts dialog box appears.
-
Select the account you want to delete from the Account List.
The account information appears in the right pane.
-
Type updated account information into the appropriate fields.
Note –You cannot change an account name after the account is created.
-
Click the Commit Changes button.
The updated account information is saved.
Viewing and Updating Account Information
To modify account information, you must have at least Account Manager access privileges.
 How To Access the Account Information
Steps
-
From the Main screen, click Account in the Navigation Bar
-
On the Account screen, click Account Information.
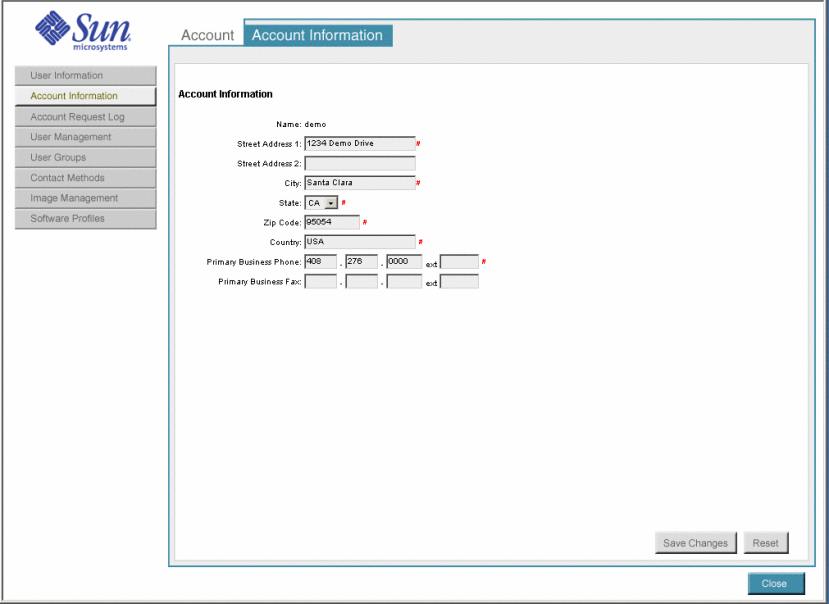
The Account Information screen appears.
Figure 3–3 Account Information Screen
-
Type new or updated account information into the appropriate fields.
The following table describes all the fields on the Account Information screen.
Field Name
Required/Optional/Display
Description
Name
Display
Display only. Shows the account name.
Street Address 1
Optional
Type the company street address—a maximum of 200 characters.
Street Address 2
Optional
Type a second street address, such as, a department for a large company or an alternative address, such as a post office box—maximum of 200 characters.
City
Optional
Type city name—a maximum of 30 characters.
State
Optional
Select a state from the drop-down list.
Zip Code
Optional
Type a zip code.
Country
Optional
Type the country name.
Primary Business Phone
Optional
Type a valid US telephone number as the company's business phone.
Note –The extension is optional.
Primary Business Fax
Optional
Type a valid US telephone number as the company's business fax.
Note –The fax and extension is optional.
-
Click the Save Changes button.
The new account information is saved.
Adding, Viewing, and Removing Users
Account managers and administrators can set up additional users. From the User Management screen you can perform the following tasks:
-
Add new users
-
View information for an existing user
-
Remove a user
 How To Add New Users
Steps
-
On the Main screen, click Account in the navigation bar.
The Account screen appears.
-
From the Account screen, click User Management on the tools bar.
The User Management screen appears.
-
To add a user, click the Add button near the left side of the User Management screen.
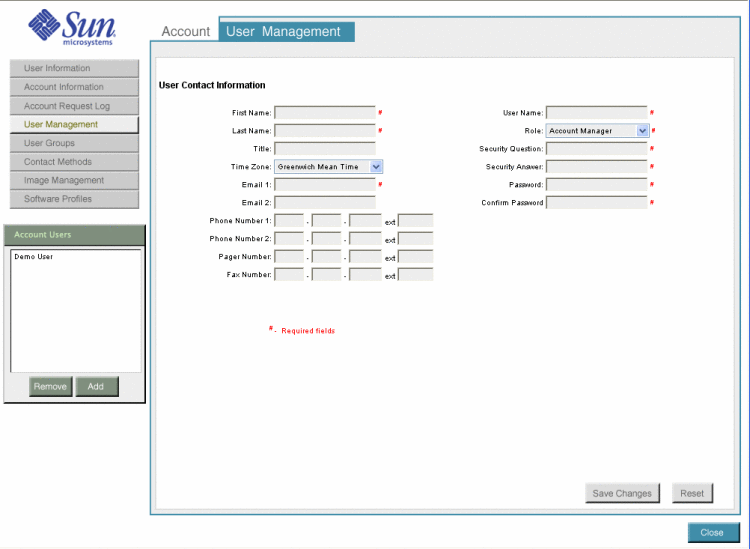
The Add User Contact Information screen appears.
Figure 3–4 User Management - Add User Contact Information Screen
-
Provide data to create a user account as described in Step 3.
-
Set up user accounts as required.
-
Click Save Changes.
-
Click the Close button to exit the screen.
 How To View Information for an Existing
User
Steps
-
On the Main screen, click Account in the navigation bar.
The Account screen appears.
-
From the Account screen, click User Management in the tools bar.
The User Management screen appears.
-
Select the user from the Account Users list in the left pane.
The user information appears in the right pane.
-
Click the Close button to exit the screen.
 How To Remove a User
Steps
-
On the Main screen, click Account in the navigation bar.
The Accounts screen appears.
-
From the Account screen, click User Management in the tools bar.
The User Management screen appears.
-
Select the user from the Account Users list in the left pane.
The user information appears in the right pane.
-
Click the Remove button.
-
Confirm your choice.
-
Click Close to exit the screen.
Adding User Groups
User groups provide a pool of people to contact for farm problems. The monitoring system can use this information for automatic notification when an alarm occurs. In addition, administrators use this information if they need to contact people as necessary. You cannot place a group within a group. You are required to have account manager or administrator access privileges to set up user groups.
You can do the following tasks:
-
View user group details
-
Create a new user group
-
Add users to or remove users from an existing user group
-
Remove user group
 How To Add a User Group
Steps
-
On the Main screen, click Account in the navigation bar.
The Account screen appears.
-
From the Account screen, click User Groups in the tools bar.
The User Groups screen appears.
-
To add a new user group, click the Add button .
The Add New User Group screen appears.
-
Type a new user group name in the Name field.
-
To add users to the new user group from the existing user list, select the user name and click the Add button.
-
Click the Save Changes button.
The new user group is saved.
-
Click the Close button to exit the Add User Groups screen.
Changing User Information
When users receive their login name and password for the Control Center, only the user or the administrator can modify this contact information. Administrators or the user can change this password and set up the contact information that is used for monitoring alarms.
Across various Control Center account functions, the following conditions apply:
-
Required fields are marked with a red pound sign (#)
-
Text in red indicates that required information is missing
 How To Change User
Information
Steps
-
On the Main screen, click Account on the navigation bar.
The Accounts screen appears.
-
From the Account screen, click User Information in the tools bar.
The User Information screen appears with user information highlighted with a red pound sign.
-
Provide user information using the guidelines in the following table.
-
Click the Save Changes button.
The updated user information is saved.
Note –You can also click Reset to reset the screen to previously saved values.
 How to Change
Your User Password
Steps
-
On the Main screen, click Account on the navigation bar.
The Accounts screen appears.
-
From the Account screen, click User Information in the tools bar.
The User Information screen appears.
-
Type the existing user password into the Password field.
The password must be less than 15 characters in length.
-
Type the new password into the New Password field.
The password must be less than 15 characters in length.
-
Retype the new password into the Re-enter New Password field.
-
Click the Save Changes button.
The new user password is saved.
Setting Up Contact Methods
A contact method defines a group or list of groups and a preferred method of contact for each group in case of a monitoring alarm. You need to have Account manager or administrator access privileges to set up Contact Methods.
You can do the following tasks:
-
View Contact Methods details
-
Create new Contact Method
-
Add or remove user groups to or from an existing Contact Method list
-
Remove Contact Method
 How To Add Contact Methods
Steps
-
On the Main screen, click Account on the navigation bar.
The Account screen appears.
-
Click Contact Methods in the tools bar.
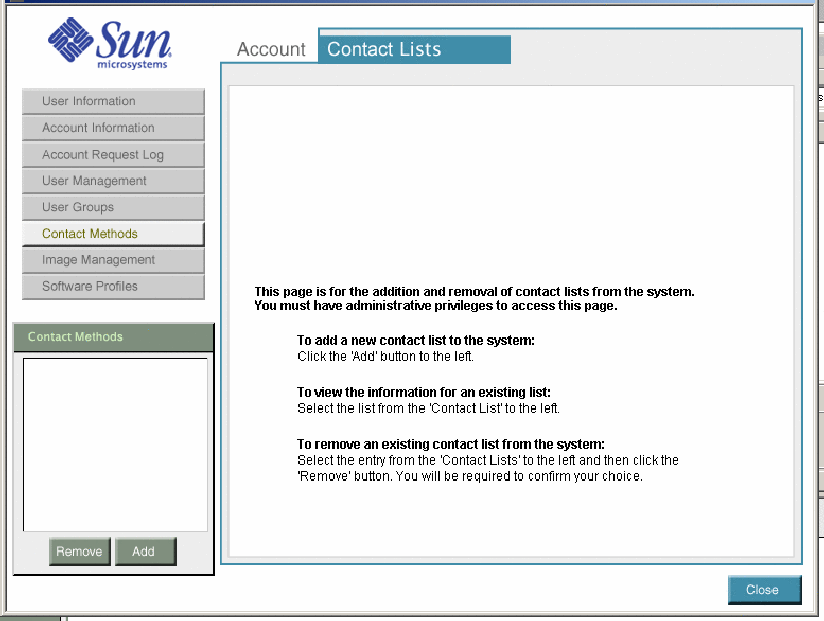
The Contact Lists screen appears.
Figure 3–5 Contact Lists Screen
-
Click the Add button.
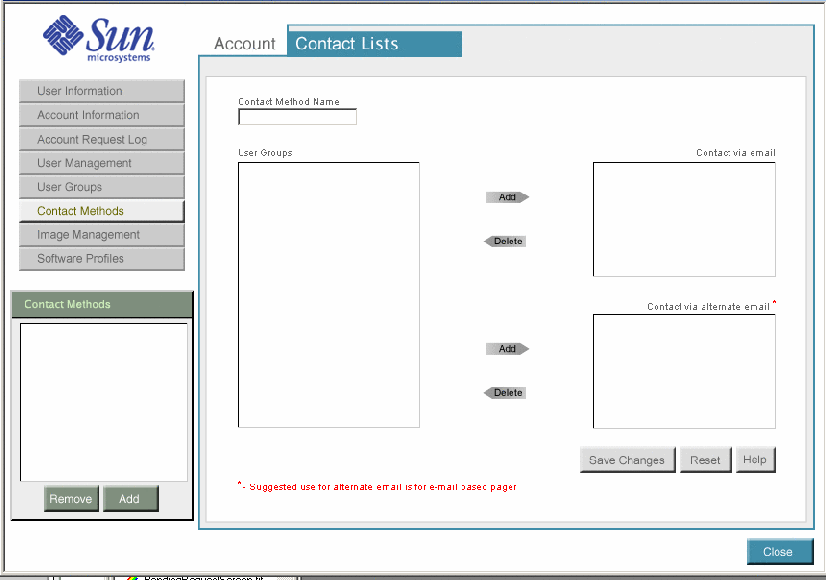
The Account Contact Lists screen appears. This screen identifies users in each group to be contacted by the regular email address or by the alternate email address.
Figure 3–6 Contact Method - Add
-
Type a contact method name.
-
Select user groups from the existing user group list and click the Add button to add the user group to the appropriate contact option.
-
Use Contact via Email to contact users through a primary email account.
-
Use Contact via Alternate Email to contact users through a secondary email account such as a pager.
-
-
Click the Save changes button.
The new contact methods are saved.
-
Click the Close button.
The Account Contact Lists screen is closed.
- © 2010, Oracle Corporation and/or its affiliates
