Saving and Activating Farms
Saving and Validating the Farm
Save your farm design periodically during the design process. This action not only saves the design, but also enables you to correct problems as you go at each save. To save your farm, choose Save from the File menu. When you submit your farm for activation, the Control Center validates your farm to ensure that the elements are wired according to the wiring rules and where applicable, are within your contract agreement boundaries.
Validating Farms
When the farm is submitted for activation in the Control Center, you can see the farm reflected in the Pending Requests screen. Likewise, you can be notified of the change in farm state by an email if this feature was configured during software installation.
 How To Validate
a Farm
Because the Control Center does not check for good design, you must do this manually.
Steps
-
Review the farm design in the Editor screen with the following design details in mind:
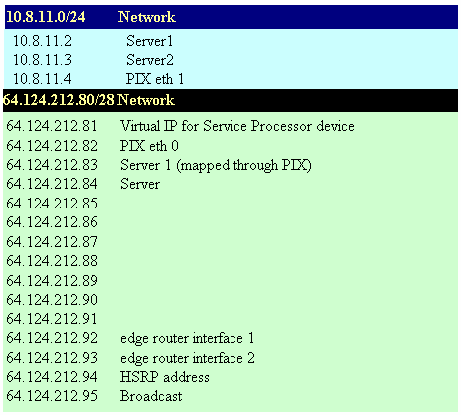
For each external subnet connection, the following six IP addresses are used for administrative overhead:
-
Network base address
-
A virtual interface for monitoring connectivity
-
Edge Router 1
-
Edge Router 2
-
HSRP address
-
Broadcast address
-
-
Verify that the external subnet connection specified is acceptable.
For example, the user did not request a whole class C address space.
-
If the farm design is valid, proceed to Farm Activation Tasks.
-
If the farm is already active and is being updated, refer to Updating Active Farms for instructions.
-
If the farm design is invalid, refer to Cancelling a Farm Request for instructions on how to cancel or reject the activation request.
Submitting a Farm Design for Activation
In order to activate a farm after the farm is configured, you must first submit the farm for activation.
Control Center Rules Checking
The Control Center performs a rules check before the farm is submitted for activation. If errors exist in your design, you are prompted to correct the errors.
The following rules are checked:
-
Every element must be configured according to the element's rules
-
Every hardware element must have the required wiring connections
-
A valid hardware device is configured for each element.
-
No element configuration can contain a reference to deleted elements
-
Every server must have a boot disk
-
No circular loops can exist in the default gateway configuration
-
The number of externally visible IP addresses that is needed cannot exceed the requested maximum
Note –The Control Center does not validate that your resources are within any limits set by your contract or available within the I-Fabric at that point in time.
-
Every VIP must be connected or a warning appears
-
Every server receiving traffic from a load balancer must have an interface on the data VLAN or a warning appears
 How To Submit the Farm For Activation
Steps
-
Open a farm in the Editor and review the farm to ensure that the design is correct.
-
Click the Submit button.
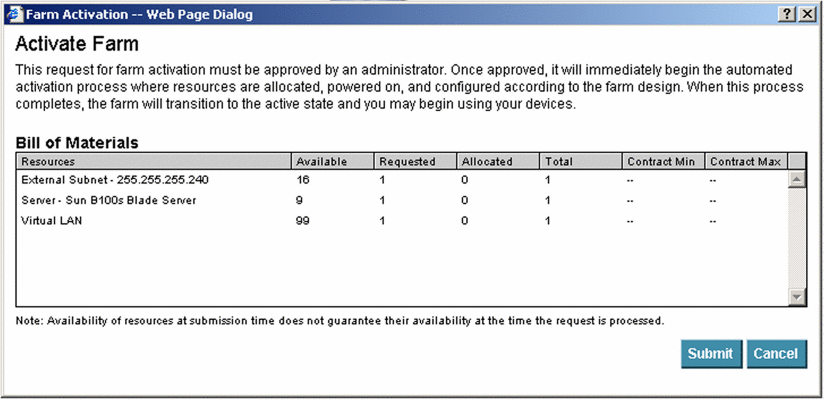
The Farm Activation dialog box appears. Any devices that are not available are highlighted in red text.
Figure 4–3 Farm Activation Dialog Box

-
If all requested resources are available to accommodate this request, click the Submit button.
Note –Requested devices may not be available at the time of the request because devices may be allocated to another farm during the activation process.
The farm lifcycle icon displays pending active on mouse-over. The line connecting D and A turns red. The circle surrounding the A is animated to indicate the target farm state.

The Main and Monitor screens display the most recently completed state of the farm. The Editor screen displays the requested state of the farm. When the activation process is complete, the Main and Monitor screens change to reflect that the Active state is now the most recently completed state of the farm. The farm lifecycle icon in the Editor changes to Active.
Farm Activation Tasks
This section lists the tasks required to activate a farm after the farm activation request has been submitted. Subsequent sections provide step-by-step instructions for the various tasks. To activate a farm, you need to perform the following tasks.
-
Set contract parameters for the farm in the Control Center Administration screen. See How To Set Contract Parameters
-
Unblock the farm activation request using the Administration screen or activate the farm using the command line interface. Requests for activation are initially blocked. See How To Unblock a Farm Activation Request How To Activate a Farm By Using the Farm Activation Commandand
After the farm is active, perform the following tasks:
-
Set up routing for the user's network.
-
Use ping, telnet, or any other remote accessing software to confirm that you can access externally available IP addresses on the farm.
Unblocking Farm Activation Requests
When you submit a farm for activation, the activation request is initially blocked. Use the Pending Requests option under Farm Management Tools in the Administration screen to unblock activation requests.
Note –
You can also use the Pending Request option to unblock other types of requests, such as putting a farm on standby, deactivating and reactivating a farm, or deleting a farm.
 How To Unblock a Farm Activation Request
Steps
-
Log in to the Control Center Administration screen.
-
Select the appropriate account and farm from the left side of the screen.
-
Click the Pending Requests button.
The Pending Requests screen appears.
-
Select the type of requests to display from the Show drop-down list.
-
From the Pending Requests In drop-down list, select the I-Fabric name to display farms pending requests from this I-Fabric.
-
Click the Show Pending Requests For All Accounts check box to display all pending requests for all accounts.
-
Locate the farm for which you wish to change state.
If you want to view the farm design in the Editor, click View Selected Farm.
-
Click Unblock Request to initiate farm activation.
A confirmation dialog box appears.
-
Click OK to unblock the request.
Tracking the Activation Process
After you unblock a farm request, the N1 Provisioning Server software identifies the hardware resources and software components required for the instantiation of the farm. The system first allocates all hardware resources from the resource pool. For each device, the system configures the physical device as specified in the farm design. The system also initiates the copying of the required images and configures servers according to the servers specified role.
Note –
The resource pool is a single pool of unused devices in an I-Fabric. When you create farms, the farms use available devices in this pool.
Farm Details
You can also keep track of farm requests by using the Farm Details section of the Main, Editor, and Monitor screens. The Main and Monitor Farm Details show you the farm request history. The Editor Farm Details enables you to click an item to view the farm topology and configuration at the time of the request.
 How To View a History of Farm Requests
Steps
-
Log in to the Control Center Administration screen.
-
Select the appropriate account from the Current Account drop-down list.
-
Select the appropriate farm from the Current Farm drop-down list.
-
Click the Farm Requests button.
The Farm Requests screen displays the history of requests for farms. The Messages area displays message log details for each Request ID.
-
Set up the farm request query.
-
To run the query, click the Go button.
Activating the Farm Manually
If you prefer, you may activate farms manually by using the command-line interface, as opposed to using the Administration screen in the Control Center. To do so, you first verify that adequate resources are available in the target I-Fabric to activate the farm. Use the command device -LF to list free devices. Use the command device -lr <deviceID> to see with which role a device has been configured.
The N1 Provisioning Server software identifies the hardware resources and software components that are required for the instantiation of a farm. The system first allocates all hardware resources from the resource pool. For each device, the system configures the physical device as specified in the farm design. The system also initiates the copying of the required images and configures servers according to the Control Center configuration.
Note –
The resource pool is a single pool of devices. The farms that you create use available devices in this pool.
Activating Farms By Using the Farm Activation Command
You can use the Administration Tools to execute the farm activation command to begin activation.
Note –
Use the command farm -h for help.
 How To Activate a Farm By Using the
Farm Activation Command
Steps
-
Type the command farm -a farm_ID to activate a farm on the SP.
Note –To add a high priority code to this request or to issue a request to a farm in ERROR state, use the -f option to create a high priority request. Refer to Chapter 6, Troubleshooting for more information on the ERROR state.
-
For software that runs on the Solaris Operating System, check the file /var/adm/messages for error messages. If you have turned on the debugging option in the /etc/opt/terraspring/tspr.properties file, check for any error messages in the file /var/adm/tspr.debug. You can view messages by using the command tail -f /var/adm/tspr.debug and by monitoring the error column in the output from the farm -l command. Also monitor the request queue for the farm using the command request -lf farm_ID to check the status of the queue.
Note –The tspr.debug will have messages interleaved if actions on multiple farms are issued the same time.
-
When the farm status changes to ACTIVE, display the farm resources using the command lr -lv farm_ID.
The farm configuration includes the server IP address and the subnet configuration for the farm. This information is available as soon as the allocation process is completed. You do not have to wait until the farm reaches the ACTIVE state.
Note –The Farm Manager keeps a log file of the farm activation process and any updates that are associated with the farm. The messages are logged in the file /var/adm/messages. Type the command tail -f /var/adm/tspr.debug on the farm's owner SP to view the debug log file if you would like to follow farm activities in real time.
Cancelling a Farm Request
Use the Pending Request option in the Administration screen to cancel or reject a farm request.
You can only cancel a farm request if the activation request has been blocked or the status is “Queued.” If the activation process has begun, the Cancel Request button is unavailable.
 How To Cancel a Farm Request
Steps
-
Log in to the Control Center Administration screen.
-
Select the appropriate account and farm from the left-hand side of the screen.
-
Click Pending Requests listed under the Farm Management Tools on the left-hand side of the screen.
-
Select the farm request that you wish to cancel or reject and click Cancel Request.
A confirmation dialog appears.
-
Click OK.
The following changes occur:
-
The farm state reverts to the previous state.
-
The lifecycle icon changes to Canceled.
-
The Request History displays Canceled
-
Locking and Unlocking a Farm
After a farm has been submitted for activation, you can lock the farm by applying a password so that no one else can modify the farm. You can lock a farm in any state except the Design state.
 How To Lock a Farm
Steps
-
Log in to the Control Center Administration screen.
-
Select the appropriate account and farm from the left-hand side of the screen.
-
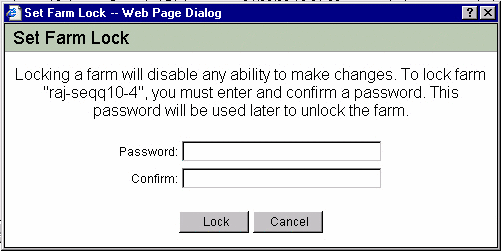
Click Lock Current Farm.
The Set Farm Lock dialog box appears:

-
Enter a password and re-enter the password for confirmation.
The maximum password length is 30 characters.
-
Click Lock to lock the farm.
The Editor displays an icon that indicates that the farm is locked.
 How To Unlock a Farm
Steps
-
Log in to the Control Center Administration screen.
-
Select the appropriate account and farm from the left side of the screen.
-
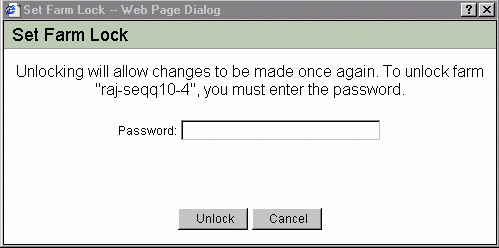
Click Unlock Current Farm.
The Set Farm Lock dialog appears:

-
Enter the password you set previously to lock the farm.
-
Click Unlock.
Resetting Your Farm Lock Password
If you forget your farm lock password, you must use the command-line interface (CLI) to reset it.
 How To Reset Your Farm Lock Password
Steps
-
Type the following command at the command line prompt and press Enter.
resetpasswd -f farm_ID
You are prompted to enter a new password.
-
Type a new password.
Note –This command does not require you to enter the old password. The command only prompts you for the new password to replace the old one.
Locking and Unlocking a Farm Using the CLI
You can also use the CLI to lock and unlock a farm. When you use the CLI, you can lock a farm without setting a password by using the command lockfarm -l farm_ID. Use the -p option to password protect your farm lock.
 How To Lock a Farm Using the CLI
Steps
-
Type the following command at the command line prompt.
lockfarm -l -p farm_ID
You are prompted to enter a password.
-
Type your password.
 How To Unlock a Farm Using the CLI
Steps
-
Type the following command at the command line prompt.
lockfarm -u -p farm_ID
You are prompted to enter a password.
-
Type your password.
Checking Resource Availability
Before activating a farm, check for resource availability.
 How To Check Resource Availability
Steps
-
Access the SP by using Telnet.
-
Use the following command to check for available resources for this farm request:
rsck farm ID
-
If you wish to see a list of free devices in an I-Fabric, type the following command:
device -LFt type
-
If the farm does not have adequate internal subnets, you can add additional subnets as required by using the following command:
subnet -cm mask_length starting_IP_address
-
If there are not sufficient external subnets available, you might need to consult your network administrator to find the address space available for your use. If you know which subnet to add, you can add the subnet by using the following subnet command:
subnet -xcm mask_length starting_IP_address
Note –The control plane server allocates any address space with the correct subnet mask.
-
If the farm has an Ethernet port device, that is, a device external to the I-Fabric, you must connect and configure the device manually as described in Configuring the Ethernet Port Element for Unmanaged Devices.
Delivering Active Farms
If you are activating farms on behalf of users and account managers, delivering an active farm to the user entails communicating the following information:
-
IP addresses
-
Device passwords
-
Additional information
Communicating Activation Information To Users
This section describes the type of information you need to communicate to users when delivering a farm.
IP Addresses
Users need to know the IP addresses for the farm. Users can view IP addresses for each device through the Control Center. You can also produce a report showing all the IP addresses assigned to the user devices. The data can be found by using the command lr -lv farm_ID.
For external public subnetworks, the address in a network, before broadcast, is the HSRP address, default gateway. The two addresses before are the edge router interfaces. The simplest report format is a spreadsheet as shown in Figure 4–4:
Figure 4–4 Simple Report Format

Device Passwords
Users also need to know the default passwords for farm devices and the passwords you assigned .
Additional Information
Advise the user about the following information:
-
The user should not change network device passwords (load balancers)without notifying the administrator. Failure to notify the administrator after changing the password of network devices results in the Control Center being locked out of network devices. Monitoring also ceases to function.
-
The user should change device passwords on the servers, all operating systems, immediately after they are initially assigned. The Control Center continues to access the servers. Monitoring continues to function, unless the user disables the monitoring agents.
- © 2010, Oracle Corporation and/or its affiliates
