Updating Active Farms
The Control Center enables you to modify or flex (scale) your farm according to your requirements and apply the changes to update the Active farm. You can also place farms on standby, reactivate farms, make farms inactive, and delete farms.
The Control Center enables you to update active farms from the Editor. To save changes, choose Commit from the File menu to request that these changes be made to the live farm.
Adding and Removing Computing Resources from a Farm
You can change or flex your farm according to your requirements. The term flexing is a description of the capability to add or remove computing resources. It can refer to the ability to add or remove a server to a server group, or add or remove other devices to or from a farm.
after you change the design of your active farm in the Control Center, you must choose Commit from the File menu to resubmit it for activation.
 How To Add and Remove Resources from
an Active Farm
Steps
-
Locate and select your Active farm.
-
Make changes to the design of your active farm in the Editor.
-
Choose Commit from the File menu.
The Commit Change for Farm Update dialog box appears.
The Bill of Materials section displays a list of resources that includes the following information:
-
Available—The number of available resources arranged by type.
-
Requested—The number of requested resources arranged by type.
-
Allocated—The number of resources currently allocated in the farm.
-
Total—The total number of resources you will have if this request is processed, that is, the sum of requested and allocated resources.
-
Contract Min—The minimum limit of resources that your contract allows.
-
Contract Max—The maximum limit, of resources that your contract allows.
 Caution –
 Any listing other than a subnet that appears in red indicates that there are not enough resources currently available in the I-Fabric to accommodate this request.
-
-
If all requested resources are available to accommodate this request, click Submit to submit your farm. Otherwise, click Cancel.
The physical resources you requested are available for the Active farm only after the requests are processed.
Note –You can view your request status through the Farm Details section of the Main and Editor screens, from the Farm Request section of the Administration screen, or from the Account Request Log from the Account Screen.
See Also
Changing the State of a Farm
You can perform the following state changes to deployed farms:
-
Activate a deployed farm
-
Place an active farm on standby
-
Inactivate a standby farm
-
Reactivate a standby farm
When an Active farm goes into a Standby state, all storage volumes are preserved, but hardware is returned to the free pool. Specifically, all elements, excluding storage, are returned to the idle pool. You can deactivate a farm (make a farm inactive), and retain the farm as a template, or you can delete the farm.
After the farm is placed on Standby, you can request reactivation of this farm and return the farm to the Active state. An Inactive farm cannot be reactivated. However, the SaveAs feature enables you to create copies of the inactive farm design that may be edited and submitted for activation.
Placing a Farm On Standby
The Standby state is a convenient way to free most of the resources used by an otherwise idle farm. The Standby state also preserves the farm's design and data for easy and rapid reactivation at a later date.
In the Standby state, servers and load balancers are returned to the free pool. The farm design, including the network configuration, resources, such as, IP addresses and VLANs, and disk data are preserved.
-
In the case of servers with local disks, the system makes an image copy of all disks before wiping the volumes and returning the servers to the free pool.
-
All contract quotas and monitoring configurations information are preserved.
Deactivating a Farm
The Control Center enables you to deactivate a farm. When deactivated, the farm is completely decommissioned, thus freeing and clearing all resources for other uses. Only the associated design and history are retained and tracked as an inactive farm in the Control Center.
If the farm includes an Ethernet-connected device as represented by an Ethernet Port element connection in the Control Center Editor design, ensure that this device is disconnected manually as part of the deactivation. Otherwise, the device IP address could be reallocated to another user's new farm, thus presenting a security risk.
 How To Change the State of a Deployed
Farm To Standby or Inactive
As with other farm requests, a request to deactivate a farm or set a farm to standby is initially blocked. Hence, after the farm request has been submitted, you need to unblock the farm request. Use the Farm Management Tools in the Administration screen to perform these tasks.
Steps
-
Do either one of the following steps:
-
From the Editor, select the farm that you want to place on Standby or make Inactive from the drop-down list.
-
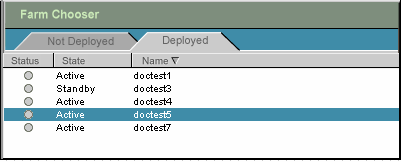
From the Main screen, select the farm that you want to place on Standby or make Inactive from the Farm Chooser's Deployed tab. Figure 4–5 shows an example of the Farm Chooser Deployed tab.
Note –A farm in Active state cannot be deleted. The farm must be deactivated first.
Figure 4–5 Farm Chooser Deployed List

The farm appears in the Farm View Area of the Main screen.
-
-
In the Farm Display area, click Edit to open the design in the Editor.
-
Click the Action menu to display the available options:
-
Standby - place the farm in Standby state.
-
Inactive - place the farm in Inactive state.
-
-
Choose the required change in state. You are prompted to verify your selection.
-
Deactivate this farm if you choose Make Inactive.
-
Set farm to standby if you choose to Make Standby.
-
-
Click OK.
Note –Other Control Center users can cancel your request to make standby if the users are administrators. You can reactivate a farm in standby state.
 How To Unblock a Farm Request After
Deactivating or Setting a Farm To Standby
Steps
-
From the Administration screen, open the Pending Requests screen from the Farm Management Tools area.
-
Select the request.
-
Click Unblock Request.
Refer to Unblocking Farm Activation Requests for detailed instructions on how to unblock a farm request.
Freeing Ethernet Port or Unmanaged Devices
Ethernet devices are not freed when a farm is deactivated; you must free them manually. You might also need to unwire and remove ethernet devices from the data center as well as from the database.
 How To Free an Ethernet Device and
Remove the Device From the Database
Steps
-
To free the Ethernet device type the following commands:
device -sB Ethernet_devid
device -sF Ethernet_devid
-
To remove the device from the database type the following command:
device -d Ethernet_devid
Canceling Standby and Inactive Request
Note –
You can cancel a request if you have not already unblocked the request or if the unblocked request has not been processed. After the request is in process, you cannot “undo” this change.
You can cancel the request to place the farm on Standby and to make a farm inactive, for example, if you realize you have changed the state of the wrong farm. Canceling a change request is possible only before the farm goes into Standby or Inactive states.
The only way to reactivate this farm is to copy the inactive farm to a new name and resubmit the farm for validation and activation. See Copying a Farm and DNS Naming Conventions for related information.
 How To Cancel a Request For Standby
or Deactivation
Steps
-
From the Administration screen, open the Pending Requests screen from the Farm Management Tools area.
-
Select farm request.
-
Click Cancel Request.
The farm remains in Active state.
Reactivating a Farm
You can reactivate a farm placed on Standby to Active state.
 How To Reactivate a Farm
Steps
-
Do one of the following steps:
-
From the Editor, select the farm that you want to reactivate from the drop-down list
-
From the Farm Chooser, select the farm on Standby from the Deployed list.
-
Click Edit to open the farm in the Editor.
The farm appears in the Farm View Area.
-
-
Click the Action menu and choose Reactivate

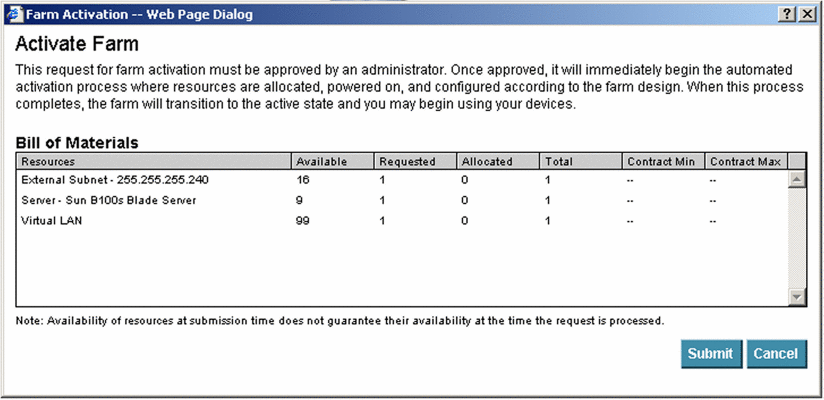
When you click Reactivate, the Activate Farm dialog appears as shown in Figure 4–6.
Figure 4–6 Submit for Activation

The Bill of Materials section of the Activate Farm dialog box displays a list of resources that includes the following information:
-
Available—the number of resources available by type at this point in time in the I-Fabric.
-
Requested—the number of resources by type that you are requesting in this submission.
-
Allocated—the number of resources allocated in the farm to date.
-
Total—the total number of resources you will have if this request is processed, that is, the sum of requested and allocated resources.
-
Contract Min—the minimum limit, or quota, of resources by type that your contract allows.
-
Contract Max—the maximum limit, or quota, of resources by type that your contract allows.
 Caution –
 Any listing that appears in red indicates that there are not enough resources currently available in the I-Fabric to accommodate this request. Consequently, click Cancel and either free resources and submit your farm again, or adjust your farm design and submit the farm.
Smaller subnets can be created from larger subnets. Consequently, allocation can succeed even though the Bill of Materials indicates otherwise.
-
-
If all requested resources are available to accommodate this request, click Submit to submit your farm.
After the farm update request has been submitted, you need to validate the farm design, unblock the farm request, and if necessary, change the contract parameters. Use the Farm Management Tools in the Administration screen to perform these tasks.
You should also check resource availability prior to unblocking the request to avoid getting a “No more resources available” message.
 How To Unblock the Farm Request After
Reactivating the Farm
Steps
-
From the Administration screen, open the Pending Requests screen from the Farm Management Tools area.
-
Select the farm request.
For detailed validation guidelines, refer to How To Validate a Farm.
-
Click Unblock Request.
For detailed instructions on how to unblock a request, refer to Unblocking Farm Activation Requests.
-
Open the Contact Parameters screen from the Farm Management Tools area and Make any necessary changes.
For detailed instructions on how to change contract parameters, refer to Setting Contract Parameters.
-
Click Submit.
Deleting a Farm
You can only delete a farm that is in the Inactive state or in the Design state.
A farm in the Design state can be deleted from either the Main or Editor screens. No further steps are required to delete a farm in the Design state.
A deactivated farm in the Inactive state can be deleted by clicking the Delete button in Control Center Editor. You must also unblock the request in the Pending Requests option under Farm Management Tools in the Administration screen.
 How To Delete a Farm From the Main
Screen
Steps
-
Select the farm to be deleted from the list displayed in the Farm Chooser's Not Deployed tab.
The farm is displayed in the farm View Area of the Main screen.
-
Click Delete button next to the Lifecycle Icon.

 How To Delete a Farm From the Editor
Screen
Steps
Copying a Farm
You can copy a farm that is in any state. This action copies the farm design and configuration to a new farm that is in the design state. If you wish to create a duplicate second farm, you need to create a copy of the farm and submit this design for activation.
 How To Copy a Farm
Steps
-
Open a farm in the Editor.
-
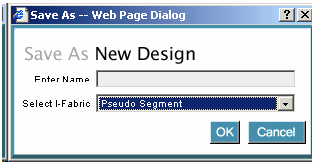
Click File and choose Save As.
-
Enter a new farm name and select the I-Fabric in which to deploy the farm.

-
Click OK.
See Also
- © 2010, Oracle Corporation and/or its affiliates
