Part II Setting Up and Maintaining AutoClient Systems
This part provides instructions on setting up and maintaining AutoClient systems. This part contains these chapters.
Chapter 6, Managing AutoClient Systems
"Managing Systems" provides instructions for how to set up AutoClient systems using Host Manager and describes how to add AutoClient support (that is, OS services) to a server.
Chapter 7, Booting a System From the Network
"Booting a System From the Network" provides instructions on how to manually boot your AutoClient systems from the network and how to set them up to automatically boot from the network.
Chapter 8, AutoClient Environment Maintenance
"Environment Maintenance" provides instructions for how to update your AutoClient systems' caches with their back file system, replace faulty AutoClient systems, log Host Manager operations, and patch AutoClient systems.
Chapter 6 Managing AutoClient Systems
This chapter describes how to use the Host Manager application to perform specific tasks for managing AutoClient systems in your network. The overall process includes:
-
Making additions/changes to your network
-
Viewing additions/changes on the Host Manager main window
-
Saving changes
This is a list of the step-by-step instructions in this chapter.
-
"How to Convert an AutoClient System to a Standalone System"
-
"How to Use the Command-Line Interface to Automate Setup Tasks"
Note -
This book focuses on using Host Manager to maintain AutoClient systems. For more information on other Host Manager functionality, use online help or see the Solstice AdminSuite 2.3 Administration Guide.
Starting Host Manager
Prerequisites
Be sure your network meets all the requirements identified in the Solstice AutoClient 2.1 Installation and Release Notes, and that you have completed the installation tasks described in the Solstice AutoClient 2.1 Installation and Release Notes. These tasks are summarized here:
-
You have a system running the appropriate Solaris 2.x software.
-
You have a bit-mapped display monitor connected to the system you are using, or you have the DISPLAY environment variable set to an appropriate display system.
-
Your system is running an X Window System.
-
You have the required access privileges such as root access to the local system or membership in group 14 (sysadmin group).
-
You have the necessary name service permissions if you are using a name service.
-
You have installed the Solstice AutoClient 2.1 licenses on the license server.
How to Start Host Manager
-
Verify that the prerequisites summarized in "Prerequisites" are met.
-
On the AutoClient server, type the following command to start the Solstice Launcher.
$ /usr/bin/solstice
-
Click on the Host Manager icon.

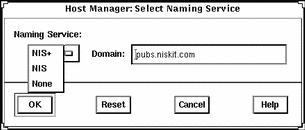
The Host Manager Select Naming Service window is displayed. If you are using a name service, it shows the server's domain name, or if you are using local files, the system name is displayed.
-
Choose a name service and click on OK.
You will see a message box telling you that the software is gathering the system data.
Note -You should choose the appropriate name service based on your site policy. For more information on setting up a name service policy, see Chapter 3, Using Solstice AutoClient in a Name Service Environment. If you choose NIS or NIS+ as your Naming Service, and then type a different domain name in the Domain field, the system you are running Host Manager on needs to have permission to access the specified domain.
Supporting AutoClient Systems
A Solaris OS server is a server that provides OS services to support AutoClient systems that have a kernel architecture different from the server's kernel architecture. For example, if a server with a Sun4c kernel architecture needs to support an AutoClient system with a Sun-4TM kernel architecture, client support for the Sun-4 kernel architecture must be added to the server.
Note -
When using Host Manager to set up and maintain AutoClient systems, the AutoClient server is the file server and OS server for the AutoClient systems.
To support clients of a different platform group, or clients that require the same or a different Solaris release than the OS server, you must add the particular OS service to the OS server. You must have the appropriate Solaris CD image to add OS services.
For example, if you have an OS server running Solaris 2.4 and you want it to support autoclients running Solaris 2.5, you must add the Solaris 2.5 OS services to the OS server.
How to Add OS Services to an OS Server
Note -
This procedure assumes that the AutoClient server is already set up to be an OS server. For information on adding an OS Server or converting an existing system to an OS Server, see the online help or the Solstice AdminSuite 2.3 Administration Guide.
-
Start Host Manager from the Solstice Launcher and select the name service, if not done already.
See "Starting Host Manager"for more information.
-
Select the OS server to which you want to add services from the Host Manager main window.
-
Choose Modify from the Edit menu.
The Modify window is displayed.
-
Click on Add in the OS Services window to add services.
If this is the first time you have added services in the current Host Manager session, the Set Media Path window is displayed, so continue with Step 5. If you have already added services in the current Host Manager session, the Add OS Services window is displayed, so skip to Step 7.
-
Fill in the Set Media Path window.
After choosing the system containing the Solaris CD image, which must be minimally set up as a managed system, complete the remaining fields as shown in Table 6-1.
Table 6-1 Setting the Media PathIf You Are Using ...
And ...
Then Enter the Path ...
The Solaris CD as the Solaris CD image
The Solaris CD is managed by Volume Management
/cdrom/cdrom0 or
/cdrom/cdrom0/s0 or
/cdrom/cdrom0/s2
The Solaris CD is not managed by Volume Management
Where you mounted the Solaris CD
A copy of the Solaris CD on the install server's hard disk (set up by using the setup_install_server command)
To the Solaris CD image
-
Click on OK.
The Add OS Services window is displayed.
-
(Optional) Click on Set Path to change the path to the Solaris CD image from which to add the client services.
If you previously entered a media path, the software will use this path as the default. If the path is incorrect, you need to complete this step.
-
Choose the distribution type.
The default distribution type is Entire Distribution.
-
Select a service you want to add and click on Add.
The Add OS Services window closes. If you want to add more services, repeat Step 4 through Step 9.
-
Click on OK.
The Modify window closes.
-
Choose Save Changes from the File menu to add services.
Example of a Completed Add OS Services Window
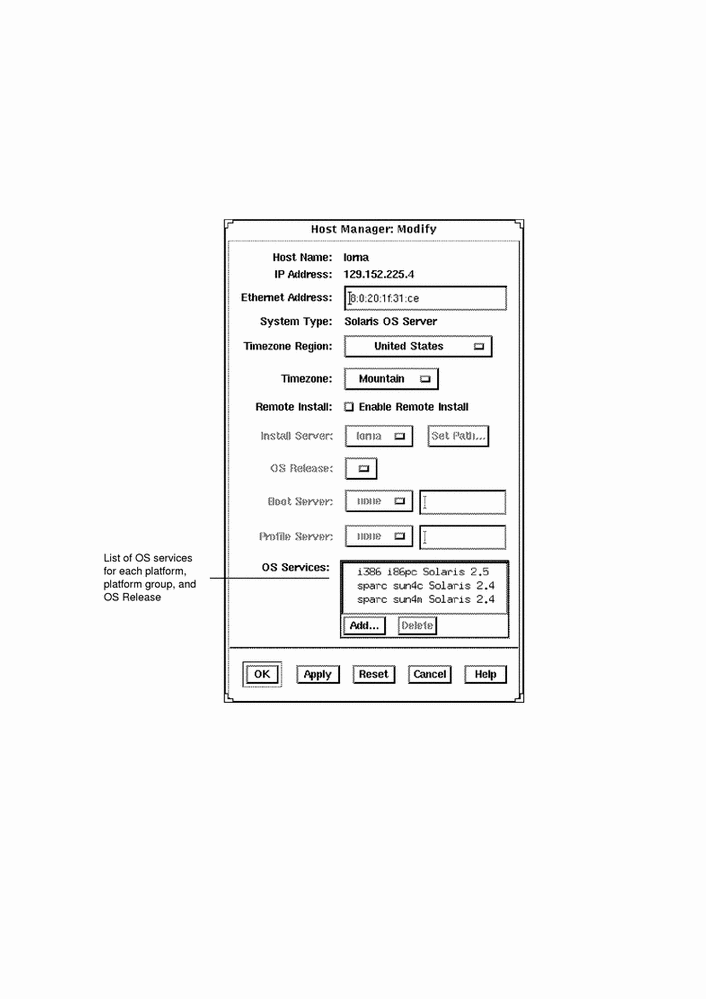
The following example shows a completed Modify window for an OS server, lorna, where services are being added (see the OS Services field).
Verification
To verify that all the OS services have been added, make sure the status line at the bottom of the main window says "All changes successful."
Example of a Command-Line Equivalent for Adding Services to an OS Server
The following command is equivalent to using Host Manager to add OS services to an OS server.
% admhostmod -x mediapath=jupiter:/cdrom/cdrom0/s0 \ -x platform=sparc.sun4c.Solaris_2.5 lorna |
In this command,
|
-x mediapath= jupiter:/cdrom/cdrom0/s0 |
Specifies that the Solaris CD image is on a mounted CD on a remote system named jupiter. Note that the remote system must be minimally set up as a managed system. |
|
-x platform= sparc.sun4c.Solaris_2.5 |
Specifies the services to be installed; in this case, the Solaris 2.5 services for a SPARC Solaris, Sun4c kernel architecture. |
|
lorna |
Specifies the name of the OS server. |
Adding AutoClient Systems
The procedure in this section explains how to add individual or multiple AutoClient systems to a server. When you add AutoClient systems to the server, the systems themselves may be up and running or powered down.
You will be required to provide the information shown in Table 6-2 when adding an AutoClient system to your network.
Table 6-2 Fields on the Add Window for the Solstice AutoClient System Type|
Field Name |
Default/Specifications |
|---|---|
|
Host Name |
No default. 1 to 255 alphanumeric characters. You can also use dashes, underscores, or periods. Do not begin or end the host name with a dash. |
|
IP Address |
No default. Enter an IP address in the form of n.n.n.n, where n is any number from 0 to 255. It must be a valid class A, B, or C IP address. |
|
Ethernet Address |
No default. Enter a hexadecimal Ethernet address in the form of n:n:n:n:n:n where n is 00 to ff. Valid characters are 0-9, a-f, and A-F. |
|
System Type |
The System Type should be Solstice AutoClient. |
|
Timezone Region |
The default is the server's time zone region. |
|
Timezone |
The default is the server's time zone. |
|
File Server |
The default is the server specified in the Set Defaults window. If none is specified, the local system is the default. For more information on setting defaults for Host Manager, see the Solstice AdminSuite 2.3 Administration Guide or the online help. |
|
OS Release |
The default is the OS release specified in the Set Defaults window. |
|
Root Path |
The default is the root path specified in the Set Defaults window. |
|
Swap Size |
The default is the size specified in the Set Defaults window. |
|
Disk Config
|
The default is 1disk. See Table 6-3for disk configuration options. Do not assume you can use the default. You must make sure that the disk configuration you choose is correct for this system. |
|
able |
The default is that the disconnectable feature is disabled, which means that users cannot use their cached file systems if the server is unavailable. Turning the disconnectable feature on (enabling disconnectability) means that when the AutoClient system's server is unavailable, users can continue to use their cached file system. The AutoClient system must be running the Solaris 2.5 or later software. |
|
Script Features |
The default is that the Enable Scripts feature is disabled, which means no scripts will run with the addition of the AutoClient system. Enabling the script feature means that the scripts you have chosen to run either before or after the AutoClient is added or before or after the AutoClient is booted will run when you select Save Changes or the first time the AutoClient is booted. |
|
Root Password |
The root password button causes the Password dialog box to appear. Within this dialog box, you must enter the root password for the AutoClient system that you are adding. |
Note -
The Swap Size default is the minimum amount of swap created. It is possible that you will have more swap space than you requested. If you choose 2disks as your configuration option, the entire second disk is used for swap. Always leave swap size at its default value if you choose the 2disks option.
Note -
The Disconnectable option allows access to unavailable network file systems as long as the requested file information is contained in the cache. The caching mechanism attempts to keep information in the cache; however, under various circumstances, the caching mechanism must invalidate entries in the cache. Because of this invalidation, information that users expect to be in the cache may not be in the cache at all times. To increase the likelihood that a file will be available when a server becomes unavailable, the cachefspack command must be run to verify that the needed files are resident on the client's machine. Refer to the cachefspack man page or "How to Pack Files in the Cache" for more information.
Disk Configuration
Table 6-3 describes the various disk configuration options for AutoClient systems. You will need to choose one of these options for each AutoClient system.
Table 6-3 Disk Configuration Options|
Disk Configuration Options |
Meaning |
|---|---|
|
1disk |
Use the whole disk as the cache. Swap is a file on that disk. |
|
2disks |
Use one disk for the cache and one disk for swap. |
|
local200 |
Use only with system disks that are 300 Mbytes or larger. Creates a 200Mbyte cache (including swap), and the rest of the system disk is used for a file system that is mounted on /local. |
|
local400 |
Use only with system disks that are 500 Mbytes or larger. Creates a 400Mbyte cache (including swap), and the rest of the system disk is used for a file system that is mounted on /local. |
The local200 and local400 disk configuration options allow you to set up a scratch file system on your AutoClient system. This file system can be used to store files that are not written back to the server. Since the files are not written back to the server, it is possible to lose this information if the system malfunctions. If you choose the local200 or local400 disk configuration option, and your system disk is smaller than 300Mbytes or 500Mbytes respectively, you could get a runtime error when the AutoClient system first boots.
Default Cache Disk Selection
The default cache disk is selected depending upon your system. The default cache disk is selected according to the following criterion:
-
First, the AutoClient software checks for a disk on your system that contains an existing root (/) file system record.
-
If that is not available, the AutoClient software checks for the boot disk specified in the eprom.
-
If that is not specified, the AutoClient software selects the first available disk.
Supported JumpStart Disk Configuration Profiles
You can use JumpStart to configure your AutoClient disk(s); the syntax used to configure the disk is the same as standard JumpStart profiles, except that only the disk related keywords are allowed.
The system_type is specified as cacheos. The new profiles are placed in /opt/SUNWadmd/etc/autoinstall/arch and the tools copy the selected profile to the client root when the client is created.
The basic 1disk profile is:
install_type initial_install system_type cacheos |
In this case, all the disk configuration settings are set to the defaults.
You can use the usedisk and dontuse keywords to force the disk configuration to use a specific set of disks on the machine. You can use the filesys keyword to partition the disks the way you want. The following sample profile is more complex:
install_type initial_install
system_type cacheos
partitioning explicit
filesys c0t3d0s7 existing /.cache
filesys c0t3d0s0 existing /local preserve
filesys   red:/opt 128.227.192.97 /opt rw,intr,hard,bg,noac
filesys   red:/var/mail 128.227.192.97 /var/mailrw,intr,hard,bg,noac
filesys   red:/export/calendar/visi7 128.227.192.97 /var/spool/calendar
          rw,hard,bg,intr,noac
|
The following list provides the keywords supported in the AutoClient profiles:
-
install_type
-
system_type
-
fdisk
-
partitioning
-
filesys
-
usedisk
-
dontuse
For more information about JumpStart, refer to your operating system documentation.
How to Add an AutoClient System to a Server
Note -
This procedure assumes that the AutoClient server is already set up as an OS server and is already installed with the kernel architectures of the AutoClient system(s) to be added. For information on adding an OS Server or converting an existing system to an OS Server, see the online help or the Solstice AdminSuite 2.3 Administration Guide.
-
Start Host Manager from the Solstice Launcher and select the name service, if not done already.
See "Starting Host Manager"for more information.
-
Choose Add from the Edit menu.
The Add window is displayed. Note that the default system type is Solaris Standalone.
-
Choose Solstice AutoClient from the System Type menu.
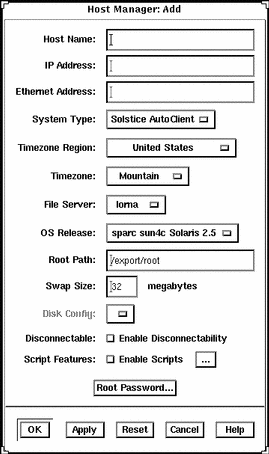
The Add window for a Solstice AutoClient system is displayed.
-
Fill in the system information for the AutoClient system.
-
After entering the required information, click on OK.
If you have not enabled licensing for the Solstice AutoClient feature, you will see a message saying that the software was unable to check out a license. For information on enabling licensing, see the Solstice AutoClient 2.1 Installation and Release Notes.
The AutoClient system becomes part of the list of AutoClient systems to add, and it is displayed on the Host Manager main window with a plus sign (+) next to it. The + means that the system is a "pending add."
-
Repeat Step 2 through Step 5 to add subsequent AutoClient systems to your "batch" of pending changes.
The "Total Changes Pending" status will be incremented each time you add a system.
-
When you are ready to confirm addition of all the AutoClient systems listed in the window, choose Save Changes from the File menu.
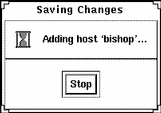
The Saving Changes message window appears. All of the AutoClient systems are added when you choose Save Changes from the File menu.
Adding each client takes several minutes, depending on server speed, current load, and the number and type of patches that will be automatically added.
As each AutoClient system is successfully added (as shown in the Saving Changes window), its corresponding entry no longer appears as a pending add in the Host Manager main window (that is, the + no longer appears next to the host name).
 Caution -
 For the AutoClient system to work properly, it needs root access to its /export/root directory. If Host Manager displays a message that the /export directory is already shared and has different share options than required, you need to allow root access to the client root area before the AutoClient system will function properly. The access mode for the client root is normally rw=clientname, root=clientname. If Host Manager displays a message that the /usr directory is already shared, it is because it tried to share /usr read-only. If you have it shared with read-write permissions, it is okay and you do not have to make any modifications.
-
Boot your AutoClient system(s) from the network.
For more information about booting your AutoClient systems, see Chapter 7, Booting a System From the Network.
-
Provide system configuration information for the AutoClient system during the initial boot process, if prompted.
-
Create a root password when prompted.
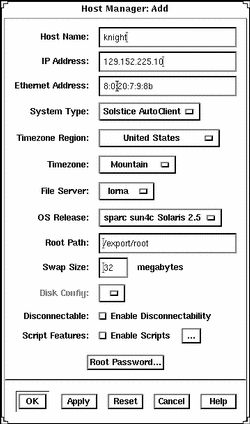
Example of a Completed Add Window
The following example shows a completed Add window for the Solstice AutoClient system type.
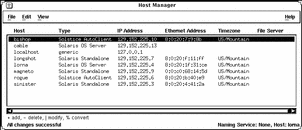
Verification
To verify that all the systems have been added, make sure the status line at the bottom of the main window says "All changes successful."
Example of a Command-Line Equivalent for Adding an AutoClient System
The following command is equivalent to using Host Manager to add support for an AutoClient system.
% admhostadd -i 129.152.225.10 -e 8:0:20:7:9:8b \ -x type=AUTOCLIENT -x tz=US/Mountain -x fileserv=lorna \ -x os=sparc.sun4c.Solaris_2.4 -x root=/export/root \ -x swapsize=32 -x disconn=N -x diskconf=1disk -x pass=abc knight |
In this example,
|
-i 129.152.225.10 |
Specifies the IP address of the AutoClient system. |
|
-e 8:0:20:7:9:8b |
Specifies the Ethernet address of the AutoClient system. |
|
-x type=AUTOCLIENT |
Specifies the type of system being added, in this case an AutoClient system. |
|
-x tz=US/Mountain |
Specifies the system's timezone. |
|
-x fileserv=lorna |
Specifies the name of the OS server. |
|
-x os= sparc.sun4c.Solaris_2.4 |
Specifies platform, kernel architecture, and software release of the AutoClient system. |
|
-x root=/export/root |
Specifies the root path of the AutoClient system. |
|
-x swapsize=32 |
Specifies the size of the swap file. |
|
-x disconn=N |
Specifies whether the disconnectable option is enabled, in this case it is not enabled. |
|
diskconf=1disk |
Specifies the AutoClient system's disk configuration. |
|
-x pass=abc |
Specifies the system's root password. |
|
knight |
Specifies the name of the AutoClient system. |
Troubleshooting Adding Systems
If you receive any error messages indicating that any AutoClient systems failed to be added, use Table 6-4 to troubleshoot the problem.
Table 6-4 Troubleshooting Adding AutoClient Systems|
If You Want To ... |
Then ... |
|---|---|
|
Stop the add process |
Click Stop in the Saving Changes window. Host Manager will stop adding AutoClient systems after it completes adding the current AutoClient system. Note: Because Host Manager completes the current operation before stopping the add process, it appears that nothing happens when you click on Stop. Just click on Stop once, and the add process will stop after the current operation is completed. |
|
Modify an AutoClient system that failed to be added |
1) Click on the specific AutoClient system in the main window. 2) Choose Modify from the Edit menu, or double-click on the selected system. The Modify window is displayed with the selected AutoClient system's information for you to modify. 3) Modify the information for the AutoClient system and click on Apply. 4) Repeat steps 1 through 3 to modify additional AutoClient entries. 5) Choose Save Changes from the File menu. |
|
Ensure you have permission to add clients |
Make sure you are a member of sysadmin group 14 on the specified file server, and that you have the appropriate permissions to use Host Manager. |
Converting an Existing System to an AutoClient System
In the Solaris environment, you can make the AutoClient system conversions shown in Table 6-5.
Table 6-5 AutoClient System Conversions|
You Can Convert A ... |
To A ... |
|---|---|
|
Generic System |
AutoClient System |
|
Standalone System |
AutoClient System |
|
Dataless System |
AutoClient System |
|
AutoClient System |
Standalone System |
A generic system is one that is not running the Solaris software, or whose type has not yet been updated using Host Manager's Update System Types feature, or uses local or loghost entries in the system management databases.
You will be required to provide the following information when converting generic, standalone, or dataless systems to AutoClient systems:
Table 6-6 Required Fields for Conversion to an AutoClient System|
Field |
Default/Specifications |
|---|---|
|
Timezone Region |
The server's time zone region. |
|
Timezone |
The server's time zone. |
|
File Server |
The file server specified in the Set Defaults window. |
|
OS Release |
The OS Release specified in the Set Defaults window. |
|
Root Path |
The root path specified in the Set Defaults window. |
|
Swap Size |
The size specified in the Set Defaults window. |
|
Disk Config |
1disk. See Table 6-3 for disk configuration options. Do not assume you can use the default. You must make sure that the disk configuration you chose is correct for this system. |
|
Disabled. |
How to Convert an Existing System to an AutoClient System
The system being converted may be up and running or powered down.
If you plan to convert existing generic, standalone, or dataless systems to AutoClient systems, you should consider this process as a re-installation. Any existing system data will be overwritten when the AutoClient system is first booted.
-
Start Host Manager from the Solstice Launcher and select the name service, if not done already.
See "Starting Host Manager"for more information.
-
Select a system or systems from the Host Manager main menu.
 Caution -
 If you are converting multiple systems in a single operation, make sure they are all of the same kernel architecture.
To select more than one system, click SELECT (by default, the left mouse button) on the first system. Then select each subsequent system by pressing the Control key and clicking SELECT.
-
Choose Convert to AutoClient from the Edit menu.
The Convert window is displayed with the selected system or systems appearing in the Host Name field.
-
Fill in the screen by accepting the default or selecting another entry for each field.
If you need information to complete a field, see Table 6-6 or click on the Help button to see the field definitions for this window.
-
Click on OK.
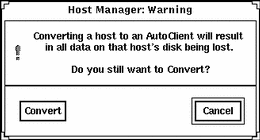
You will see the following message the first time you use the Convert option in a work session. Subsequent use of the convert option will not generate this message during the same work session. (The duration of a work session is the length of time Host Manager is open. You have to quit and re-start Host Manager to begin a new work session.)
-
Click on Convert when you are ready to continue.
If you have not enabled licensing for the Solstice AutoClient feature, you will see a message saying that the software was unable to check out a license. For information on enabling licensing, see the Solstice AutoClient 2.1 Installation and Release Notes.
-
Choose Save Changes from the File menu when you are ready to do the conversion(s).
 Caution -
 For the AutoClient system to work properly, it needs root access to its /export/root directory. If Host Manager displays a message that the /export directory is already shared and has different share options than required, you need to allow root access to the client root area before the AutoClient system will function properly. The access mode for the client root is normally rw=clientname, root=clientname. If Host Manager displays a message that the /usr directory is already shared, it is because it tried to share /usr read-only. If you have it shared with read-write permissions, it is okay and you do not have to make any modifications.
-
Boot your AutoClient system(s) from the network.
For more information about booting your AutoClient systems, see Chapter 7, Booting a System From the Network.
-
Provide system configuration information for the AutoClient system during the initial boot process, if prompted.
-
Create a root password when prompted if you have not specified the password using Host Manager.
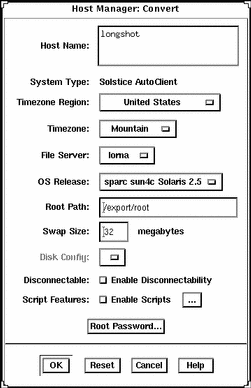
Example of a Completed Convert to AutoClient Window
The following shows an example of a completed Host Manager Convert window.
Verification
To verify all the systems have been converted, make sure the status line at the bottom of the main window says "All changes successful."
Example of a Command-Line Equivalent for Converting a System to an AutoClient System
The following command is equivalent to using Host Manager to convert a system to an AutoClient system.
% admhostmod -x type=AUTOCLIENT -x fileserv=lorna \ -x os=i386.i86pc.Solaris_2.5 -x root=/export/root \-x swapsize=32 -x disconn=N -x diskconf=1disk -x pass=abc -x postmod=postmodscript magneto |
In this example,
|
-x type=AUTOCLIENT |
Specifies the type of system after the conversion, in this case an AutoClient system. |
|
-x fileserv=lorna |
Specifies the name of the OS server. |
|
-x os= i386.i86pc.Solaris_2.5 |
Specifies platform, kernel architecture, and software release of the AutoClient system. |
|
-x root=/export/root |
Specifies the root path of the AutoClient system. |
|
-x swapsize=32 |
Specifies the size of the swap file. |
|
-x disconn=N |
Specifies whether the disconnectable option is enabled, in this case it is not enabled. |
|
-x diskconf=1disk |
Specifies the AutoClient system's disk configuration. |
|
-x pass=abc |
Specifies the Autoclient system's root password. |
|
-x postmod=postmodscript |
Specifies the script to run after modifying the AutoClient. |
|
magneto |
Specifies the name of the system being converted to an AutoClient system. |
Converting an AutoClient System to a Standalone System
If you convert an AutoClient system to a standalone system, you will be required to provide the following information:
Table 6-7 Required Fields for Conversion to a Standalone System|
Field |
Default/Specifications |
|---|---|
|
Timezone Region |
The default is the server's time zone region. |
|
Timezone |
The default server's time zone. |
|
Remote Install |
By default Remote Install is disabled. Click on the selection box if you want to install the Solaris software from remote media. (For more information on remote installation, see SPARC: Installing Solaris Software, x86: Installing Solaris Software. |
|
Install Server |
The default is the install server specified in the Set Defaults window. You must click on Set Path to specify the location of the install image. For more information on setting your media path, see Table 6-1. |
|
OS Release |
The default is the OS release specified in the Set Defaults window. |
|
Boot Server |
The default is none. Choose a boot server and then enter the absolute path for the boot file. |
|
Profile Server |
The default is none. Choose a profile server and then enter the absolute path for the autoinstall profile. |
An install server is a system on the network that provides a Solaris CD image (either from a CD-ROM drive or a copy on hard disk) for other systems to install from. A boot server is a system that provides the programs and information a client needs to boot. A profile server is a system that contains JumpStart files for systems to perform a custom JumpStart installation.
If you plan to convert an AutoClient system to a standalone system, you should backup any system data that you might need later because the client's root area (/export/root/client_name) gets removed during the convert(for example, cron jobs and calendar data), and then halt the system before completing the convert operation on the server.
How to Convert an AutoClient System to a Standalone System
Note -
This procedure assumes that the install server, boot server, and profile server are already set up. For more information on these tasks, see SPARC: Installing Solaris Software.
-
Start Host Manager from the Solstice Launcher and select the name service, if not done already.
See "Starting Host Manager"for more information.
-
Select an AutoClient system from the Host Manager main window.
-
Choose Convert to Standalone from the Edit menu.
The Convert window is displayed.
-
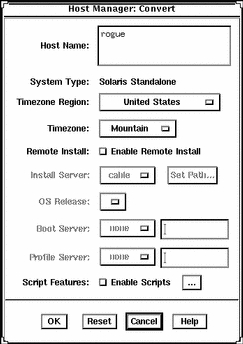
Fill in the system information.
If you need information to complete a field, see Table 6-7 or click on the Help button to see the field definitions for this window.
-
Click on OK.
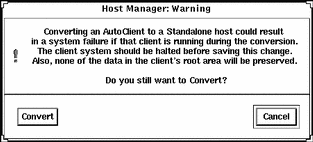
You will see the following message the first time you use the Convert option in a work session. Subsequent use of the convert option will not generate this message during the same work session.
-
Click on Convert when you are ready to continue.
-
Choose Save Changes from the File menu when you are ready to do the conversion.
-
Boot your standalone system.
Example of a Completed Convert to Standalone Window
The following shows an example of a completed Convert window for converting an AutoClient system to a standalone system.
Verification
To verify all the systems have been converted, make sure the status line at the bottom of the main window says "All changes successful."
Example of a Command-Line Equivalent for Converting an AutoClient System to a Standalone System
The following command is equivalent to using Host Manager to convert an AutoClient system to a standalone system. Note that in this example, the boot server, install server, and profile server are also set. (Any remote system must be minimally set up as a managed system.)
% admhostmod -x type=STANDALONE -x install=Y \ -x installpath=cable:/cdrom/cdrom0/s0 \ -x os=sparc.sun4c.Solaris2.5 \ -x bootpath=cable:/boot_dirs/boot_sun4c \ -x postmod=postmodscript -x profile=cable:/jumpstart/install_sample rogue |
In this example,
|
-x type=STANDALONE |
Specifies the type of system after the conversion, in this case a standalone system. |
|
-x install=Y |
Specifies that the Solaris software will be installed from remote media. |
|
-x installpath= cable:/cdrom/cdrom0/s0 |
Specifies the location of the Solaris software, in this case on a mounted CD on the remote server cable. |
|
-x os= sparc.sun4c.Solaris2.5 |
Specifies the software to be installed, in this case the Solaris 2.5 software for a SPARC Solaris, sun4c kernel architecture. |
|
-x bootpath= cable:/boot_dirs/boot_sun4c |
Specifies the boot server and the absolute path of the boot file. |
|
-x postmod=postmodscript |
Specifies the script to run after the AutoClient is converted. |
|
-x profile= cable:/jumpstart/install_sample |
Specifies the profile server and the absolute path for the autoinstall profile. |
|
rogue |
Specifies the name of the system being converted. |
Modifying an AutoClient System
After configuring an AutoClient system, you may want to change the characteristics of that system. You can make changes both before and after saving the changes; the procedure is the same. However, the information you can modify is different in each situation. See the online help for the field definitions.
How to Modify an AutoClient System
-
Start Host Manager from the Solstice Launcher and select the name service, if not done already.
See "Starting Host Manager"for more information.
-
Select the AutoClient system you want to change in the main window.
The system you select should be a pending add.
-
Choose Modify from the Edit menu.
The Modify window appears with fields filled in for the AutoClient system you selected. If you are modifying before saving changes, this Modify window is the same as the Add window for Solstice AutoClient systems.
-
Change the desired fields in the Modify window.
If you need information to complete a field, click on the Help button to see the field definitions for this window.
-
Click on OK.
The changes are implemented when you choose Save Changes from the File menu.
-
Choose Save Changes from the File menu when you are ready to complete the modification and other pending changes.
-
Boot your AutoClient system(s) from the network.
For more information about booting your AutoClient systems, see Chapter 7, Booting a System From the Network.
-
Provide system configuration information for the AutoClient system during the initial boot process, if prompted.
-
Create a root password when prompted if you have not already specified the root password when you modified the AutoClient.
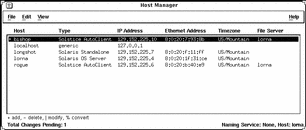
Example of a Modify Operation
In this example, the last digit of the IP Address was changed from a 1 to a 10. The operation is still a pending add because the add and modify operations have not yet been saved.
Verification
To verify all the systems have been modified, make sure the status line at the bottom of the main window says "All changes successful."
Example of a Command-Line Equivalent for Modifying an AutoClient System
The following command is equivalent to using Host Manager to modify the ethernet address on an AutoClient system named bishop.
% admhostmod -e 80:20:1e:31:e0 bishop |
In this example,
|
-e 80:20:1e:31:e0 |
Specifies the new ethernet address of the AutoClient system. |
|
bishop |
Specifies the name of the AutoClient system. |
Deleting an AutoClient System
You may need to delete an AutoClient system after it has been added or converted, for example, if the system's architecture is changing.
How to Delete an AutoClient System
-
Start Host Manager from the Solstice Launcher and select the name service, if not done already.
See "Starting Host Manager"for more information.
-
Select the system or systems you want to delete.
To select more than one system, click SELECT (by default, the left mouse button) on the first system. Then select each subsequent system by pressing the Control key and clicking SELECT.
-
Choose Delete from the Edit Menu.
The delete confirmation message appears.
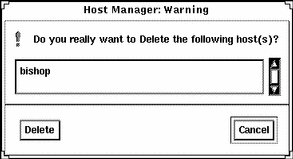
-
Click on Delete.
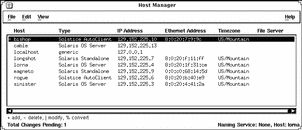
The system(s) will be marked as a delete change in the main window; you will see a minus sign (-) next to each system. The "Total Changes Pending" status will be incremented for each delete operation.
-
Choose Save Changes from the File menu when you are ready to delete the system information.
Example of Deleting an AutoClient System
This example shows a pending delete operation.
Verification
To verify all the systems have been deleted, make sure the status line at the bottom of the main window says "All changes successful."
Example of a Command-Line Equivalent for Deleting an AutoClient System
The following command is equivalent to using Host Manager to delete (that is, remove it from the name service database) an AutoClient system named bishop with the script postdelscript to run after the client has been deleted.
% admhostdel -x postdel=postdelscript bishop |
Reverting a System to Its Last-Saved State
You may want to revert systems marked with change symbols (|, -, or %) to their last-saved state in the name service database. Reverting these previously existing systems will not affect their presence in the main window.
However, reverting a newly-added (not yet saved) AutoClient system (identified with a +) will result in the entry being deleted from the scrolling list in the main window.
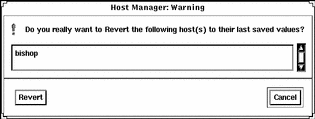
Note that when you select the Revert option, a message asks for confirmation.
How to Revert a System to Its Last-Saved State
-
Start Host Manager from the Solstice Launcher and select the name service, if not done already.
See "Starting Host Manager"for more information.
-
Select the system or systems you want to revert.
To select more than one system, click SELECT (by default, the left mouse button) on the first system. Then select each subsequent system by pressing the Control key and clicking SELECT.
-
Choose Revert from the Edit Menu.
The revert confirmation message appears.
-
Click on Revert.
The revert operation takes effect immediately.
Verification
Make sure the system type displays in the main window as its original type or with its original characteristics.
Using the Command-Line Interface to Automate Setup Tasks
Using the Host Manager command-line equivalents allows you to automate many of the setup tasks associated with creating new diskless and AutoClient systems. This automation is similar to what can be done when using the JumpStart product to install Solaris on standalone systems. By writing your own shell scripts and using the command-line equivalents, you can automatically customize the client environment in one operation.
The example in the next section shows how to use the command-line interface to set up an OS server, add OS services, and add a AutoClient system to that server. The server's name is rogue, and the AutoClient system is venus.
Note -
For additional command-line examples, see the command-line equivalent section at the end of most of the procedures in this chapter.
How to Use the Command-Line Interface to Automate Setup Tasks
-
Convert a standalone system to an OS server.
% admhostmod -x type=os_server rogue
-
Add OS services to the OS server.
-
This example adds the Solaris 2.5 End User Cluster OS services for the Sun4m kernel architecture to rogue. The Solaris CD image is on a mounted CD on a remote system named jupiter. Note that the remote system must be minimally set up as a managed system.
% admhostmod -x mediapath=jupiter:/cdrom/cdrom0/s0 \
		-x platform=sparc.sun4m.Solaris_2.5 -x cluster=SUNWCuser \
		rogue
-
This examples adds the Solaris 2.5.1 All Cluster OS services for the Sun4m kernel architecture to rogue. The Solaris CD image has been copied to hard disk on a remote system, saturn, and the automounter is used to access it. Note that the remote system must be minimally set up as a managed system.
% admhostmod -x mediapath=rogue:/net/saturn/export/Solaris_CD \
		-x platform=sparc.sun4m.Solaris_2.5.1 -x cluster=SUNWCall \
		rogue
-
-
Add the AutoClient system.
This example adds a Sun4m Solaris 2.5.1 AutoClient system named venus to the server rogue.
% admhostadd -i 129.152.225.2 -e 8:0:20:b:40:e9 \
-x type=autoclient 		-x fileserv=rogue \
-x os=sparc.sun4m.Solaris_2.5.1 \
-x swapsize=40 -x diskconf=1disk -x diskconn=n venus
You could use a similar version of this command in a shell script with additional operations to customize the AutoClient system's root as part of setting up the client. The script could be parameterized to accept the IP address, Ethernet address, and host name.
Chapter 7 Booting a System From the Network
After you add an AutoClient system (see "Adding AutoClient Systems") to an AutoClient server, or convert an existing system to an AutoClient system (see "Converting an Existing System to an AutoClient System"), the AutoClient system is ready to boot and run the Solaris environment.
Note -
AutoClient systems must always boot from the network.
This is a list of the step-by-step instructions in this chapter.
-
"SPARC: How to Manually Boot a Sun-4 System From the Network"
-
"SPARC: How to Set Up a System to Automatically Boot From the Network"
-
"SPARC: How to Set Up a Sun-4/3nn System to Automatically Boot From the Network"
-
"SPARC: How to Set Up a Sun-4/1nn, 2nn, or 4nn System to Automatically Boot From the Network"
-
"i386: How to Set Up a System to Automatically Boot From the Network"
Note -
Systems that you are going to add as AutoClient systems or convert to AutoClient systems may be up and running or powered down during the add and convert operations. They don't really become AutoClient systems until they are booted. The only exception is when converting an AutoClient system to a standalone system. In this case, the system being converted must be halted prior to completing the convert operation on the server.
SPARC: Booting From the Network
This section provides procedures on how to manually boot your SPARC system from the network, and how to set it up to automatically boot from the network.
You need to read only certain portions of this section. Table 7-1 shows you which task information to read for the type of systems you have on your network.
Table 7-1 System Booting Information|
If You Have This System ... |
See These Tasks ... |
On ... |
|---|---|---|
|
SPARCstation and above with the Solaris software already running (boot prom prompt) or out of the box (the ok prompt) |
"SPARC: How to Manually Boot a System From the Network" "SPARC: How to Set Up a System to Automatically Boot From the Network"" |
"SPARC: How to Manually Boot a System From the Network" "SPARC: How to Set Up a System to Automatically Boot From the Network" |
|
Sun-4 systems |
"SPARC: How to Manually Boot a Sun-4 System From the Network" "SPARC: How to Set Up a Sun-4/3nn System to Automatically Boot From the Network" "SPARC: How to Set Up a Sun-4/1nn, 2nn, or 4nn System to Automatically Boot From the Network" |
"SPARC: How to Manually Boot a Sun-4 System From the Network" "SPARC: How to Set Up a Sun-4/3nn System to Automatically Boot From the Network" "SPARC: How to Set Up a Sun-4/1nn, 2nn, or 4nn System to Automatically Boot From the Network" |
Note -
In the Solaris 2.5 environment, only the Sun-4c, Sun-4d, Sun-4m, Sun-4u kernel architectures, and the i386 platforms are supported. The Solaris 2.5 software no longer supports Sun-4 and Sun-4e.
Table 7-2 summarizes the commands you use to manually boot systems from the network for different system models.
Table 7-2 Sun System Boot Commands|
System Type |
Boot Command |
|---|---|
|
SPARCstation and above |
boot net |
|
Sun-4/3nn |
b le() |
|
Sun-4/1nn, Sun-4/2nn, Sun-4/4nn |
b ie() |
For more information about the booting process in general, see the Solaris 2.4 Administration Supplement for Solaris Platforms for the Solaris 2.4 product, and the System Administration Guide, Volume I for the Solaris 2.5 product.
SPARC: How to Manually Boot a System From the Network
Note -
If you want to manually boot a Sun-4 system from the network, see "SPARC: How to Manually Boot a Sun-4 System From the Network".
-
Make sure the AutoClient system has been set up as described in "Adding AutoClient Systems" or in "Converting an Existing System to an AutoClient System".
-
Make sure the system is in the prom monitor environment.
If the system is not running, power it up. If the system is currently running, use the init 0 command to get it to the boot prom prompt.
-
If the screen displays the > prompt instead of the ok prompt, type n and press Return or Enter.
The screen should now display the ok prompt. If not, see "SPARC: How to Manually Boot a Sun-4 System From the Network".
-
Boot the system from the network.
ok boot net
Example of Manually Booting a SPARC System From the Network
# init 0 > n ok . . . ok boot net Booting from: le(0,0,0) 2bc00 hostname: pluto domainname: Solar.COM root server: root directory: /export/root/pluto SunOS Release 5.4 Version [2.4_FCS] [UNIX(R) System V Release 4.0] Copyright (c) 1983-1994, Sun Microsystems, Inc. configuring network interfaces: le0. Hostname: pluto Configuring cache and swap:......done. The system is coming up. Please wait. NIS domainname is Solar.COM starting rpc services: rpcbind keyserv ypbind kerbd done. Setting netmask of le0 to 255.255.255.0 Setting default interface for multicast: add net 224.0.0.0: gateway pluto syslog service starting. Print services started. volume management starting. The system is ready. login: root password: # exit |
SPARC: How to Manually Boot a Sun-4 System From the Network
-
Make sure the AutoClient system has been set up as described in "Adding AutoClient Systems" or in "Converting an Existing System to an AutoClient System".
-
Make sure the system is in the prom monitor environment.
If the system is not running, power it up. If the system is currently running, use the init 0 command to get it to the boot prom prompt.
-
Type the appropriate boot command to boot the system from the network.
> b le()
or
> b ie()
SPARC: How to Set Up a System to Automatically Boot From the Network
Note -
If you want to set up a Sun-4 system to automatically boot from the network, see "SPARC: How to Set Up a Sun-4/3nn System to Automatically Boot From the Network", or "SPARC: How to Set Up a Sun-4/1nn, 2nn, or 4nn System to Automatically Boot From the Network".
-
Make sure the AutoClient system has been set up as described in "Adding AutoClient Systems" or in "Converting an Existing System to an AutoClient System".
-
Make sure the system is in the prom monitor environment.
If the system is not running, power it up. If the system is currently running, use the init 0 command to get it to the boot prom prompt.
-
If the screen displays the > prompt instead of the ok prompt, type n and press Return or Enter.
The screen should now display the ok prompt. If not, see "SPARC: How to Set Up a Sun-4/3nn System to Automatically Boot From the Network", or "SPARC: How to Set Up a Sun-4/1nn, 2nn, or 4nn System to Automatically Boot From the Network".
-
Determine the version number of the boot prom with the banner command. The following is an example:
ok banner
SPARCstation 2, Type 4 Keyboard

ROM Rev. 2.0, 16MB memory installed, Serial # 289
Ethernet address 8:0:20:d:e2:7b, Host ID: 55000121
-
Set the boot device.
If the boot prom is version 2.0 or greater, type the following command.
ok setenv boot-device net
boot-device=net
If the boot prom version is less than 2.0, type the following command.
ok setenv boot-from net
For more information about boot proms, see the OpenBoot 2.x Command Reference Manual or the OpenBoot 3.x Command Reference Manual.
-
Boot the system automatically from the network by using the boot command.
ok boot
SPARC: How to Display Existing Boot Device Values on Sun-4 Systems
This procedure describes how to display the current boot device values, if you need to record them before changing them.
-
Display the values of the system's current booting devices.
> q18
The system displays the first EEPROM value.
-
Write down the EEPROM number and value.
For example, you might see EEPROM 018:12?. The EEPROM number is 018 and the value is 12.
-
Press Return to display the next value.
-
Repeat steps 2 and 3 until the last value is displayed.
The last value is 00.
-
Quit the EEPROM display mode.
EEPROM 01B: 00? q
Example of Displaying Existing Boot Device Values on Sun-4 Systems
> q18 EEPROM 018: 12? EEPROM 019: 69? EEPROM 01A: 65? EEPROM 01B: 00? q > |
Entering q18 and pressing Return three times displays the three values. You should retain this information. The last q entry returns you to the > prompt.
SPARC: How to Set Up a Sun-4/3nn System to Automatically Boot From the Network
-
Make sure the AutoClient system has been set up as described in "Adding AutoClient Systems" or in "Converting an Existing System to an AutoClient System".
-
Make sure the system is in the prom monitor environment.
-
(Optional) Perform the procedures in "SPARC: How to Display Existing Boot Device Values on Sun-4 Systems" if you want to record the current boot device values.
-
At the command prompt, enter the following boot device code sequence.
> q18 12 6c 65
This is the code for le (the Lance Ethernet).
What you are doing for any of the Sun-4 architectures is programming the EEPROM (or NVRAM) by entering q followed by the hexadecimal address in the EEPROM. This sets the appropriate operating system boot device.
-
Boot the system automatically from the network.
> b
Example of Setting Up a Sun-4/3nn System to Automatically Boot From the Network
> q18 12 6c 65 EEPROM 018 -> 12 EEPROM 019 -> 6C EEPROM 01A -> 65 > |
If the system output looks like the example above, you set the codes successfully. If the output looks similar to the following:
> b EEPROM boot device... ie(0,0,0) Invalid device = `ie' |
you set the wrong code for the specific system architecture, and the system will not boot. You need to reset the codes. In the above example output, a Sun-4/3nn was set up with the wrong device code (ie instead of le).
SPARC: How to Set Up a Sun-4/1nn, 2nn, or 4nn System to Automatically Boot From the Network
-
Make sure the AutoClient system has been set up as described in "Adding AutoClient Systems" or in "Converting an Existing System to an AutoClient System".
-
Make sure the system is in the prom monitor environment.
-
(Optional) Perform the procedures in "SPARC: How to Display Existing Boot Device Values on Sun-4 Systems" if you want to record the existing boot device values.
-
At the command prompt, enter the following boot device code sequence.
> q18 12 69 65
This is the code for ie (the Intel Ethernet).
What you are doing for any of the Sun-4 architectures is programming the EEPROM (or NVRAM) by entering q followed by the hexadecimal address in the EEPROM. This sets the appropriate operating system boot device.
-
Boot the system automatically from the network.
> b
Example of Setting Up a Sun-4/1nn, 2nn, or 4nn System to Automatically Boot From the Network
> q18 12 69 65 EEPROM 018 -> 12 EEPROM 019 -> 69 EEPROM 01A -> 65 |
If the system output looks like the example above, you set the codes successfully. If the output looks similar to the following:
> b EEPROM boot device... le(0,0,0) Invalid device = `le' |
you set the wrong code for the specific system architecture, and the system will not boot. You need to reset the codes. In the above example output, a Sun-4/1nn, 2nn, or 4nn was set up with the wrong device code (le instead of ie).
Where to Go Next
If you have problems booting your AutoClient system, see "Troubleshooting Problems When Booting an AutoClient System". Otherwise, go on to Chapter 8, AutoClient Environment Maintenance."
i386: Booting From the Network
The following procedures apply to i386 systems. Booting an i386 system uses these two subsystems:
-
Solaris boot diskette (contains the program that provides booting from the network)
-
Secondary boot subsystem
The Solaris boot diskette, also known as the MDB diskette, provides a menu of bootable devices such as disk, network, or CD-ROM. (The system probes currently connected devices and displays the devices in the MDB menu.) AutoClient systems must boot from the network so you would always enter the code for the network device.
The second boot subsystem menu displays available boot options. The system automatically boots to run level 3 if you do not select an option within 60 seconds. The other options enable you to specify boot options or enter the boot interpreter (see boot(1M)).
i386: How to Manually Boot a System
This procedure describes how to manually boot your i386 system from the network. Screen displays will vary based on system configurations.
-
Make sure the AutoClient system has been set up as described in "Adding AutoClient Systems" or in "Converting an Existing System to an AutoClient System".
-
Insert the Solaris boot diskette into the drive.
-
Press the reset button.
The Primary Boot Subsystem menu is displayed after a short time.
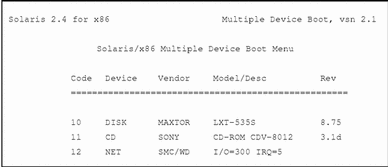
The Solaris boot diskette provides a menu of bootable devices such as disk, network, or CD-ROM. (The system probes currently-connected devices and displays the devices in the MDB menu.)
Note -The number 30 displayed in the bottom left corner counts down, indicating the number of seconds left to set the boot device code. If you do not specify the boot device code within 30 seconds, the system will attempt to boot from the C drive, which is the default device.
-
Enter the boot device code to boot from the network.
In this example the boot device code is 12.
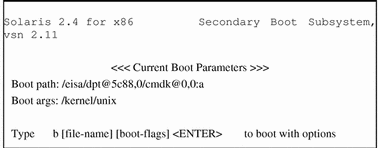
The Secondary Boot Subsystem menu is displayed after a short time.
-
Type b or boot to boot the system and press Return.
Note -Use the -f option of the boot command (or the b command) to re-create the cache on the AutoClient system. You need to re-create the cache if you get any booting errors (see "Troubleshooting Problems When Booting an AutoClient System") or if the server's file systems had to be restored from backup.
i386: How to Set Up a System to Automatically Boot From the Network
This procedure describes how to create an i386 multiple device boot (MDB) diskette so that your i386 AutoClient system will always boot from the network--so you do not have to be there to boot it. Otherwise, if the master MDB diskette is inserted into the drive, an i386 system will attempt to boot off the C drive after a power cycle (for more information see "i386: Booting From the Network").
Note -
Before following these steps to create an MDB boot diskette, obtain the master MDB diskette for the i386 system and a blank 1.44 Mbyte diskette. The blank diskette will be formatted, so do not use a diskette with data on it.
-
Change your working directory.
# cd /opt/SUNWadm/2.2/floppy
-
Create the MDB boot diskette.
# ./mk_floppy
The script prompts you when to insert the MDB master diskette and the blank diskette, and provides additional status information.
Please insert the master MDB floppy and press Return:
Please insert a blank floppy and press Return:
Formatting 1.44 MB in /dev/rdiskette
.............................................................
...................
fdformat: using "./mdboot" for MS-DOS boot loader
Successfully created the AutoClient floppy.
#
-
Insert the MDB boot diskette into the diskette drive of the i386 system.
You must leave this boot diskette in the diskette drive so that the system will automatically boot from the network if a power cycle occurs.
Where to Go Next
If you have problems booting your AutoClient system, see "Troubleshooting Problems When Booting an AutoClient System". Otherwise, go on to Chapter 8, AutoClient Environment Maintenance."
Troubleshooting Problems When Booting an AutoClient System
Table 7-3 provides a list of the most common error messages that may be displayed when you try to boot an AutoClient system. Each error message is followed by a description of why the error occurred and how to fix the problem.
Table 7-3 Booting Error Messages|
Error Message |
Reason Error Occurred |
How to Fix the Problem |
|---|---|---|
|
ERROR: Insufficient file system space configuration Slice/partition does not fit in disk segment. Not enough space on disk. |
You may have specified a swap size that is too large, or you selected the wrong disk configuration. Note: If you have i386 AutoClient systems, the free space on your DOS partition may be too small. |
Use Host Manager to set up the AutoClient system again, this time making sure that the disk config size is at least as large as swap space + 24 Mbytes. Note: For i386, the disk size is the Solaris partition. |
|
Could not create /.cache/swap file or Could not clear existing swap entries from /etc/vfstab |
System failure. |
Reboot the system using the -f option of the boot command. If you receive the error again, call your service representative. |
Note -
The first three messages have similar reasons why the error occurred. They have the same method of fixing the problem. All of the messages are followed by this flag: FATAL: Error in disk configuration.
You may receive error messages that contain a FATAL flag. If you do, you should reboot the system by using the -f option of the boot command. If you receive the FATAL flag error again, use Host Manager to set up the AutoClient system again.
You need to re-create the cache if you get any booting errors or if the server's file systems had to be restored from backup. To recreate the cache on the AutoClient system, type boot followed by the -f option. The -f option recreates the cache.
Note -
Some SPARC booting problems not related to AutoClient systems can be corrected if you use the reset command at the ok prompt before booting the AutoClient system. If the system begins to boot from somewhere other than the network after the AutoClient system resets, you must reboot the system. Then you can proceed to boot the AutoClient system with the appropriate boot command.
Chapter 8 AutoClient Environment Maintenance
After you have set up your AutoClient system network using Host Manager, you will need to perform certain maintenance tasks.
This is a list of the step-by-step instructions in this chapter.
-
"How to Copy Patches to an OS Server's Patch Spool Directory"
-
"How to Back Out a Patch from the OS Server's Patch Spool Directory"
-
"How to Synchronize Patches Installed on AutoClient Systems with Patches Spooled on the OS Server"
-
"How to Update All AutoClient Systems With Their Back File Systems"
-
"How to Update a Single AutoClient System With Its Back File System"
-
"How to Update a Specific File System on an AutoClient System"
-
"How to Update More Than One AutoClient System With Its Back File System"
Overview of AutoClient Patch Administration
In its simplest form, you can think of a patch as a collection of files and directories that replace or update existing files and directories that are preventing proper execution of the software. The existing software is derived from a specified package format, which conforms to the Application Binary Interface. (For details about packages, see the System Administration Guide, Volume I.)
On diskless clients and AutoClient systems, all software resides on the server. For example, when you add a software patch to an AutoClient system, you don't actually install the patch on the client, because its local disk space is reserved for caching. Instead, you add the patch either to the server or to the client's root file system (which resides on the server), or both. An AutoClient system's root file system is typically in /export/root/hostname on the server.
Applying patches to clients is typically complicated because the patch may place software partially on the client's root file system and partially on the OS service used by that client.
To reduce the complexity of installing patches on diskless clients and AutoClient systems, the Solstice AutoClient product includes the admclientpatch command. Table 8-1 summarizes its options and use.
Table 8-1 admclientpatch Options and Use|
Option |
Use |
|---|---|
|
-a patch_dir/patch_id |
Add a patch to a spool directory on the server. |
|
-c |
List all diskless clients, AutoClient systems, and OS services along with patches installed on each that are served by this server. |
|
-p |
List all currently spooled patches. |
|
-r patch_id |
Remove the specified patch_id from the spool directory. |
|
-s |
Synchronize all clients so that the patches they are running match the patches in the spool directory. |
Guidelines for AutoClient Patch Administration
The general procedure for maintaining patches on AutoClient systems is as follows:
-
Use admclientpatch -a or -r to create or update a spool directory of all appropriate patches on the local machine.
-
On any client server, use admclientpatch -s to synchronize those patches installed on clients with those patches in the spool directory.
This general procedure for maintaining patches assumes the OS server (that is, the server providing OS services to clients) is the same system with the patch spool directory. If, however, your site has several OS servers for your AutoClient systems, you may want to use a single file server for the patch spool directory, and then mount that directory on the OS servers.
If this is the way you choose to configure your site, you will have to do all updates to the patch spool directory directly on the file server. (You can't successfully run admclientpatch -a or -r from one of the OS servers if the patch spool directory is shared read-only.) When mounting the patch spool directory from a single file server, the general procedure for maintaining patches on AutoClient systems is as follows:
-
On the file server, use admclientpatch -a or -r to update a spool directory of all appropriate patches on the file server.
-
On all OS servers that mount the patch directory from the file server, use admclientpatch -s.
Do not manually add or remove patches from the spool directory. Instead use the admclientpatch command for all of your patch administration tasks.
What Happens When You Add a Patch With the admclientpatch -a Command
The admclientpatch -a command copies patch files from the patch directory to a spool directory on the local system. The spool directory is /opt/SUNWadmd/2.3/Patches. If the patch being added to the spool directory makes any existing patches obsolete, admclientpatch archives the old patches in case they need to be restored.
What Happens When You Remove a Patch With the admclientpatch -r Command
The admclientpatch -r command removes an existing patch from the spool directory and restores the archived obsoleted patches--if they exist. (Patches made obsolete by a new patch in the spool area are archived so that they can be restored.)
What Happens When You Synchronize a Patch With the admclientpatch -s Command
The admclientpatch command is a front-end to the standard patch utilities, installpatch and backoutpatch. Using these utilities, installing a patch and backing out a patch are distinct tasks. However, by using admclientpatch -s, you do not need to be concerned whether you are installing or backing out a patch. The -s option ensures that admclientpatch will take the appropriate actions. It either installs the patch on the server and in the client's own file systems on the server, or it backs out the patch from the clients and server and re-installs the previous version of that patch. This is what is meant by synchronizing patches installed on the clients with patches in the patch spool directory.
How Host Manager Uses the Patch Spool Directory
When you use Host Manager to add new diskless clients and AutoClient systems to a network's configuration files, it will automatically set up those new clients with the patches in the patch spool directory. Host Manager may detect that the installation of a patch in an OS service area may have made all other clients of that service out of sync with the patch spool directory. If so, Host Manager will issue a warning for you to run admclientpatch -s to synchronize the patches installed on existing diskless clients or AutoClients with the patches in the patch spool directory.
For More Information on Patch Administration
For details about what happens when you add or remove a patch and how patches are distributed, see the System Administration Guide. For more details about how to use admclientpatch, refer to the admclientpatch(1m) man page.
Managing Patches on AutoClient Systems
How to Copy Patches to an OS Server's Patch Spool Directory
-
Make sure you have your PATH environment variable updated to include /opt/SUNWadm/2.3/bin. For details, refer to the Solstice AutoClient 2.1 Installation and Release Notes.
-
Log in to the OS server and become root.
-
Copy patches to the default spool directory with this command.
# admclientpatch -a patch_dir/patch_id
In this command,
patch_dir
Is the source directory where patches reside on a patch server. The patch server can be the local or a remotely available machine.
patch_id
Is a specific patch ID number, as in 102209-01.
This completes the procedure for copying a patch to the default spool directory on the OS server.
Verification of Copying Patches to a Patch Spool Directory
To verify the selected patches have been added to the default patch spool directory for the Solstice AutoClient product, use the admclientpatch -p command to see the list of currently spooled patches.
Examples of Copying Patches to a Patch Spool Directory
The following example copies the patch ID 100974-02 from a patch server named cable to the spool directory on the local (OS server) system, using the automounter:
# admclientpatch -a /net/cable/install/sparc/Patches/100974-02 Copying the following patch into spool area: 100974-02 . done |
The following example copies the patch ID 102113-03 from a patch server named cable to the spool directory on the local (OS server) system, by mounting the patch server's patch directory on the local system:
# mount cable:/install/sparc/Patches /mnt # admclientpatch -a /mnt/102113-03 Copying the following patch into spool area: 102113-03 . done |
How to Back Out a Patch from the OS Server's Patch Spool Directory
-
Make sure you have your PATH environment variable updated to include /opt/SUNWadm/2.3/bin. For details, refer to the Solstice AutoClient 2.1 Installation and Release Notes.
-
Log in to the OS server and become root.
-
Back out patches to the default spool directory with this command:
# admclientpatch -r patch_id
In this command,
patch_id
Is a specific patch ID number, as in 102209-01.
This completes the procedure for backing out a patch from the default spool directory on the OS server.
Verification of Backing Out Patches from a Patch Spool Directory
To verify the selected patches have been backed out from the default patch spool directory for the Solstice AutoClient product, use the admclientpatch -p command to see the list of currently spooled patches.
Example of Backing Out Patches from a Patch Spool Directory
The following example backs out the patch ID 102209-01 from the default Solstice AutoClient spool directory.
# admclientpatch -r 102209-01 Unspooling the following patch: 102209-01 Removing the following patch from the spool area: 102209-01 . |
How to Synchronize Patches Installed on AutoClient Systems with Patches Spooled on the OS Server
-
Make sure you have your PATH environment variable updated to include /opt/SUNWadm/2.3/bin. For details, refer to the Solstice AutoClient 2.1 Installation and Release Notes.
-
Log in to the OS server and become root.
-
Synchronize patches on clients with patches in the spool directory on the OS server.
# admclientpatch -s
Using the -s option either installs or backs out patches running on clients, whichever is appropriate.
Note -It may be necessary to reboot your AutoClient systems after installing patches. If so, you can use the remote booting command, admreboot, to reboot the systems. For more information on this command, see the admreboot(1M) man page.
This completes the procedure synchronize patches on all clients.
Verification of Synchronizing Patches Running on Clients
To verify that the patches in the Solstice AutoClient patch spool directory are running on diskless clients and AutoClient systems, use the admclientpatch command with the -c option.
# admclientpatch -c
Clients currently installed are:
        rogue                    Solaris, 2.5, sparc
            Patches installed :  102906-01
OS Services available are:
        Solaris_2.5
            Patches installed :  102906-01
|
Example of Synchronizing Patches on Running Clients
The following command synchronizes all clients with the patches in the OS server's patch spool directory. The -v option reports whether admclientpatch is adding new patches or backing out unwanted patches.
# admclientpatch -s -v
Synchronizing service: Solaris_2.5
    Installing patches spooled but not installed
        102939-01      .....skipping; not applicable
Synchronizing client: rogue

All done synchronizing patches to existing clients and OS
services.
|
Updating Cached File Systems With Back File Systems
With the AutoClient technology, a new cache consistency mode has been added to the CacheFS consistency model. This consistency mode is called demandconst, which is a new option to the cfsadmin(1M) command. This mode assumes that files are generally not changed on the server, and that if they ever are changed, the system administrator will explicitly request a consistency check. So no consistency checking is performed unless a check is requested. There is an implied consistency check when a CacheFS file system is mounted (when the AutoClient system boots), and an AutoClient system is configured by default to request a consistency check every 24 hours. This model helps AutoClient performance by imposing less network load by performing less checking.
The risk of inconsistent data is minimal since the system's root area is exported only to that system. There is no cache inconsistency when the system modifies its own data since modifications are made through the cache. The only other way a system's root data can be modified is by root on the server.
The /usr file system is similar in that the server exports it as read-only, so the only way it could be modified is by the system administrator on the server. Use the autosync(1m) command to synchronize a system's cached file system with its corresponding back file systems.
You can update individual AutoClient systems, all local AutoClient systems in your network, or all AutoClient systems in a designated file, to match their corresponding back file systems. You should do this update when you add a new package in the shared /usr directory or in one or more system / (root) directories, or when you add a patch. The following procedures show how to use the autosync(1M) command. The command is issued from the server.
Requirements for Using the autosync Command
To use the autosync command, you need to be a member of the UNIX group, sysadmin (group 14).
If you need to create the sysadmin group, see "Setting Up User Permissions to Use the Solstice AutoClient Software".
How to Update All AutoClient Systems With Their Back File Systems
Use the autosync command with no options to update all cached file systems on all the AutoClient systems in your network that are local to the server you are running the autosync command on.
% autosync |
The system responds with the names of any systems that failed to be updated. No system response means the updates were all successful.
Example of Updating All AutoClient Systems With Their Back File Systems
The following example shows an update that failed on systems pluto, genesis, and saturn.
% autosync pluto:: failed: genesis:: failed: saturn:: failed: |
Verification
If there is no system response, all updates are successful.
How to Update a Single AutoClient System With Its Back File System
Use the autosync command with the -h option to update all cached file systems on a specified AutoClient system in your network:
% autosync -h hostname |
In this command,
|
-h |
Specifies one system. |
|
hostname |
Is the name of the system whose cache you want to update. |
Example of Updating One AutoClient System With its Back File System
The following example shows how to update all cached file systems on the AutoClient system pluto:
|
% autosync -h pluto |
If the system failed to be updated, you would get the following system response:
|
% autosync -h pluto pluto:: failed: |
Verification
If there is no system response, all updates are successful.
How to Update a Specific File System on an AutoClient System
Use the autosync command as follows to synchronize a specific file system on an AutoClient system with its back file system:
% autosync -h hostname cached-filesystem |
In this command,
|
-h |
Specifies one system. |
|
hostname |
Is the name of the system whose cache you want to update. |
|
cached-filesystem |
Is the name of the system cached filesystem you want to update. |
Example of Updating a Specific File System on an AutoClient System
The following example shows how to update the cached file system /usr on the AutoClient system foo:
|
% autosync -h foo /usr |
How to Update More Than One AutoClient System With Its Back File System
-
Create a file containing the names of the systems you want to synchronize with their back file systems.
The file can be located anywhere. For example, you could put the file in /tmp or /home. If you run the autosync command without arguments and several systems fail to update, put the names of the systems that failed to update in this file. For example, enter one name per line.
-
Use the autosync command as follows to update all AutoClient systems in the host_file file.
% autosync -H host_file
In this command,
-H
Specifies a file containing the names of all AutoClient systems to update.
host_file
Is the name of the file containing the names of all AutoClient systems in the network you want to update.
Example of Updating More Than One AutoClient System Using a File
The following example shows how to update all AutoClient systems in the host file net_hosts:
|
% autosync -H net_hosts |
For example, the contents of net_hosts might be:
mars jupiter saturn
How to Update an AutoClient System From the System Itself
Use the autosync command as follows to update all cached file systems on a AutoClient system. This command is used on the system itself, and not the server:
% autosync -l |
You can also specify a particular file system on the system that requires updating.
Example of Updating an AutoClient System From the System Itself
The following example shows how a client requests update of its own /usr file system:
|
% autosync -l /usr |
Replacing a Faulty AutoClient System
Since an AutoClient system contains no permanent data, it is a field replaceable unit (FRU). An FRU can be physically replaced by another compatible system without loss of permanent data. So, if an AutoClient system fails, you can use the following procedure to replace it without the user losing data or wasting a lot of time.
Note -
If you replace only the disks or another part of the system, and the Ethernet address stays the same, you must use the boot -f command to reboot the system so that the cache is reconstructed.
FRU Restrictions
You cannot switch kernel architectures or OS releases from the original configuration.
How to Replace a Faulty AutoClient System
-
If the system is currently running, use the halt command to get it to the prom monitor environment and turn it off.
-
Disconnect the faulty AutoClient system from the network.
-
Connect the replacement AutoClient system onto the network.
The replacement AutoClient system must have the same kernel architecture as the faulty AutoClient system.
-
Start Host Manager from the Solstice Launcher on the AutoClient system's server, and select the name service, if not done already.
See "How to Start Host Manager"for more information.
-
Select the faulty AutoClient system you wish to modify from the main window.
-
Choose Modify from the Edit menu.
The Modify window appears with fields filled in specific to the AutoClient system you selected.
-
Modify the Ethernet address and the disk configuration to be that of the new AutoClient system.
-
Click on OK.
-
Choose Save Changes from the File menu.
-
Turn on the new system.
-
If the screen displays the > prompt instead of the ok prompt, type n and press Return.
The screen should now display the ok prompt.
Note -This step is not required for Sun-4 systems, because they do not have the ok prompt.
-
Boot the AutoClient system with the following command:
If the AutoClient System Is A ...
Then Enter ...
Sun4/3nn
b le()
Sun4/1nn
Sun4/2nn
Sun4/4nn
b ie()
i386
All other Sun systems
boot net
-
After the AutoClient system boots, log in as root.
-
Set the AutoClient system's default boot device to the network by referring to "SPARC: How to Set Up a System to Automatically Boot From the Network".
Note -This step is necessary for an AutoClient system, because it must always boot from the network. For example, an AutoClient system should automatically boot from the network after a power failure.
Example of a Command-Line Equivalent for Replacing a Faulty AutoClient System
The following command is equivalent to using Host Manager to modify the Ethernet address for an AutoClient system.
% admhostmod -e ethernet_address host_name |
The following command is equivalent to using Host Manager to modify the disk configuration for an AutoClient system.
% admhostmod -x diskconf=disk_config host_name |
For more information on disk configuration options, see Table 6-3.
Packing Files in the Cache
You can use the cachefspack command to pack an AutoClient system's cache with specific cached files and directories, which means that they will always be in the system's cache and not removed when the cache becomes full. The files and/or directories that you pack in your cache must be from a cached file system, which means they must be under the root (/) or /usr file systems for AutoClient systems.
Note -
If you set up your AutoClient system with the disconnectable option, you will have the added benefit of continued access to your cache and the packed files if the server becomes unavailable. For more information on the disconnectable option, see Table 6-2.
How to Pack Files in the Cache
Pack files in the cache using the cachefspack command.
$ cachefspack -p filename |
In this command,
|
-p |
Specifies that you want the file or files packed. This is also the default. |
|
filename |
Specifies the name of the cached file or directory you want packed in the cache. When you specify a directory to be packed, all of its subdirectories are also packed. For more information about the cachefspack command, see the man page. |
Examples
The following example specifies the file cm (Calendar Manager) to be packed in the cache.
$ cachefspack -p /usr/openwin/bin/cm |
The following example shows several files specified to be packed in the cache.
$ cachefspack -p /usr/openwin/bin/xcolor /usr/openwin/bin/xview |
The following example shows a directory specified to be packed in the cache.
$ cachefspack -p /usr/openwin/bin |
Unpacking Files
You may need to unpack a file from the cache. For example, if you have other files or directories that are a higher priority than others, you can unpack the less critical files.
How to Unpack Files in the Cache
Unpack individual files in the cache using the -u option of the cachefspack command.
$ cachefspack -u filename |
In this command,
|
-u |
Specifies that you want the file or files unpacked. |
|
filename |
Is the name of the file or files you want unpacked in the cache. For more information about the cachefspack command, see the man page. |
Unpack all the files in a cache directory using the -U option of the cachefspack command.
$ cachefspack -U cache_directory |
In this command,
|
-U |
Specifies that you want to unpack all packed files in the specified cached directory. |
|
cache_directory |
Is the name of the cache directory that you want unpacked from the cache. For more information about the cachefspack command, see the man page. |
Examples
The following example shows the file /usr/openwin/bin/xlogo specified to be unpacked from the cache.
$ cachefspack -u /usr/openwin/bin/xlogo |
The following example shows several files specified to be unpacked from the cache.
$ cachefspack -u /usr/openwin/bin/xview /usr/openwin/bin/xcolor |
The following example uses the -U option to specify all files in a cache directory to be unpacked.
$ cachefspack -U /usr/openwin/bin |
You cannot unpack a cache that does not have at least one file system mounted. With the -U option, if you specify a cache that does not contain mounted file systems, you will see output similar to the following:
$ cachefspack -U /local/mycache cachefspack: Could not unpack cache /local/mycache, no mounted filesystems in the cache. |
Displaying Packed Files Information
You may want to view information about the files that you've specified to be packed, and what their packing status is.
How to Display Packed Files Information
To display information about packed files and directories, use the -i option of the cachefspack command, as follows:
$ cachefspack -i cached-filename-or-directory |
In this command,
|
-i |
Specifies you want to view information about your packed files. |
|
cached-filename-or-directory |
Is the name of the file or directory for which to display information. |
Examples
The following example shows that a file called ttce2xdr.1m is marked to be packed, and it is in the cache.
# cachefspack -i /usr/openwin/man/man1m/ttce2xdr.1m cachefspack: file /usr/openwin/man/man1m/ttce2xdr.1m marked packed YES, packed YES . . . |
The following example shows a directory called /usr/openwin, which contains a subdirectory bin. Three of the files in the bin subdirectory are: xterm, textedit, and resize. The file textedit is specified to be packed, but it is not in the cache. The file textedit is specified to be packed, and it is in the cache. The file resize is specified to be packed, but it is not in the cache.
$ cachefspack -i /usr/openwin/bin . . . cachefspack: file /bin/xterm marked packed YES, packed NO cachefspack: file /bin/textedit marked packed YES,packed YES cachefspack: file /bin/resize marked packed YES,packed NO . . . |
- © 2010, Oracle Corporation and/or its affiliates
