Adding AutoClient Systems
The procedure in this section explains how to add individual or multiple AutoClient systems to a server. When you add AutoClient systems to the server, the systems themselves may be up and running or powered down.
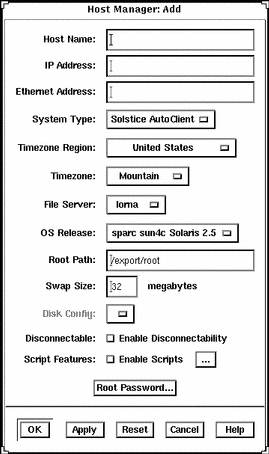
You will be required to provide the information shown in Table 6-2 when adding an AutoClient system to your network.
Table 6-2 Fields on the Add Window for the Solstice AutoClient System Type|
Field Name |
Default/Specifications |
|---|---|
|
Host Name |
No default. 1 to 255 alphanumeric characters. You can also use dashes, underscores, or periods. Do not begin or end the host name with a dash. |
|
IP Address |
No default. Enter an IP address in the form of n.n.n.n, where n is any number from 0 to 255. It must be a valid class A, B, or C IP address. |
|
Ethernet Address |
No default. Enter a hexadecimal Ethernet address in the form of n:n:n:n:n:n where n is 00 to ff. Valid characters are 0-9, a-f, and A-F. |
|
System Type |
The System Type should be Solstice AutoClient. |
|
Timezone Region |
The default is the server's time zone region. |
|
Timezone |
The default is the server's time zone. |
|
File Server |
The default is the server specified in the Set Defaults window. If none is specified, the local system is the default. For more information on setting defaults for Host Manager, see the Solstice AdminSuite 2.3 Administration Guide or the online help. |
|
OS Release |
The default is the OS release specified in the Set Defaults window. |
|
Root Path |
The default is the root path specified in the Set Defaults window. |
|
Swap Size |
The default is the size specified in the Set Defaults window. |
|
Disk Config
|
The default is 1disk. See Table 6-3for disk configuration options. Do not assume you can use the default. You must make sure that the disk configuration you choose is correct for this system. |
|
able |
The default is that the disconnectable feature is disabled, which means that users cannot use their cached file systems if the server is unavailable. Turning the disconnectable feature on (enabling disconnectability) means that when the AutoClient system's server is unavailable, users can continue to use their cached file system. The AutoClient system must be running the Solaris 2.5 or later software. |
|
Script Features |
The default is that the Enable Scripts feature is disabled, which means no scripts will run with the addition of the AutoClient system. Enabling the script feature means that the scripts you have chosen to run either before or after the AutoClient is added or before or after the AutoClient is booted will run when you select Save Changes or the first time the AutoClient is booted. |
|
Root Password |
The root password button causes the Password dialog box to appear. Within this dialog box, you must enter the root password for the AutoClient system that you are adding. |
Note -
The Swap Size default is the minimum amount of swap created. It is possible that you will have more swap space than you requested. If you choose 2disks as your configuration option, the entire second disk is used for swap. Always leave swap size at its default value if you choose the 2disks option.
Note -
The Disconnectable option allows access to unavailable network file systems as long as the requested file information is contained in the cache. The caching mechanism attempts to keep information in the cache; however, under various circumstances, the caching mechanism must invalidate entries in the cache. Because of this invalidation, information that users expect to be in the cache may not be in the cache at all times. To increase the likelihood that a file will be available when a server becomes unavailable, the cachefspack command must be run to verify that the needed files are resident on the client's machine. Refer to the cachefspack man page or "How to Pack Files in the Cache" for more information.
Disk Configuration
Table 6-3 describes the various disk configuration options for AutoClient systems. You will need to choose one of these options for each AutoClient system.
Table 6-3 Disk Configuration Options|
Disk Configuration Options |
Meaning |
|---|---|
|
1disk |
Use the whole disk as the cache. Swap is a file on that disk. |
|
2disks |
Use one disk for the cache and one disk for swap. |
|
local200 |
Use only with system disks that are 300 Mbytes or larger. Creates a 200Mbyte cache (including swap), and the rest of the system disk is used for a file system that is mounted on /local. |
|
local400 |
Use only with system disks that are 500 Mbytes or larger. Creates a 400Mbyte cache (including swap), and the rest of the system disk is used for a file system that is mounted on /local. |
The local200 and local400 disk configuration options allow you to set up a scratch file system on your AutoClient system. This file system can be used to store files that are not written back to the server. Since the files are not written back to the server, it is possible to lose this information if the system malfunctions. If you choose the local200 or local400 disk configuration option, and your system disk is smaller than 300Mbytes or 500Mbytes respectively, you could get a runtime error when the AutoClient system first boots.
Default Cache Disk Selection
The default cache disk is selected depending upon your system. The default cache disk is selected according to the following criterion:
-
First, the AutoClient software checks for a disk on your system that contains an existing root (/) file system record.
-
If that is not available, the AutoClient software checks for the boot disk specified in the eprom.
-
If that is not specified, the AutoClient software selects the first available disk.
Supported JumpStart Disk Configuration Profiles
You can use JumpStart to configure your AutoClient disk(s); the syntax used to configure the disk is the same as standard JumpStart profiles, except that only the disk related keywords are allowed.
The system_type is specified as cacheos. The new profiles are placed in /opt/SUNWadmd/etc/autoinstall/arch and the tools copy the selected profile to the client root when the client is created.
The basic 1disk profile is:
install_type initial_install system_type cacheos |
In this case, all the disk configuration settings are set to the defaults.
You can use the usedisk and dontuse keywords to force the disk configuration to use a specific set of disks on the machine. You can use the filesys keyword to partition the disks the way you want. The following sample profile is more complex:
install_type initial_install
system_type cacheos
partitioning explicit
filesys c0t3d0s7 existing /.cache
filesys c0t3d0s0 existing /local preserve
filesys   red:/opt 128.227.192.97 /opt rw,intr,hard,bg,noac
filesys   red:/var/mail 128.227.192.97 /var/mailrw,intr,hard,bg,noac
filesys   red:/export/calendar/visi7 128.227.192.97 /var/spool/calendar
          rw,hard,bg,intr,noac
|
The following list provides the keywords supported in the AutoClient profiles:
-
install_type
-
system_type
-
fdisk
-
partitioning
-
filesys
-
usedisk
-
dontuse
For more information about JumpStart, refer to your operating system documentation.
How to Add an AutoClient System to a Server
Note -
This procedure assumes that the AutoClient server is already set up as an OS server and is already installed with the kernel architectures of the AutoClient system(s) to be added. For information on adding an OS Server or converting an existing system to an OS Server, see the online help or the Solstice AdminSuite 2.3 Administration Guide.
-
Start Host Manager from the Solstice Launcher and select the name service, if not done already.
See "Starting Host Manager"for more information.
-
Choose Add from the Edit menu.
The Add window is displayed. Note that the default system type is Solaris Standalone.
-
Choose Solstice AutoClient from the System Type menu.
The Add window for a Solstice AutoClient system is displayed.

-
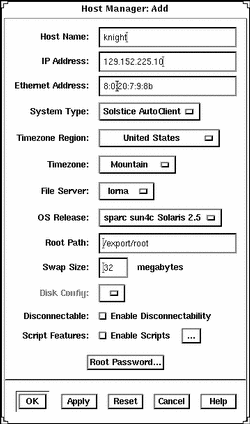
Fill in the system information for the AutoClient system.
-
After entering the required information, click on OK.
If you have not enabled licensing for the Solstice AutoClient feature, you will see a message saying that the software was unable to check out a license. For information on enabling licensing, see the Solstice AutoClient 2.1 Installation and Release Notes.
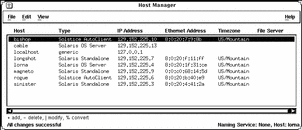
The AutoClient system becomes part of the list of AutoClient systems to add, and it is displayed on the Host Manager main window with a plus sign (+) next to it. The + means that the system is a "pending add."
-
Repeat Step 2 through Step 5 to add subsequent AutoClient systems to your "batch" of pending changes.
The "Total Changes Pending" status will be incremented each time you add a system.
-
When you are ready to confirm addition of all the AutoClient systems listed in the window, choose Save Changes from the File menu.
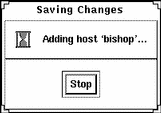
The Saving Changes message window appears. All of the AutoClient systems are added when you choose Save Changes from the File menu.

Adding each client takes several minutes, depending on server speed, current load, and the number and type of patches that will be automatically added.
As each AutoClient system is successfully added (as shown in the Saving Changes window), its corresponding entry no longer appears as a pending add in the Host Manager main window (that is, the + no longer appears next to the host name).
 Caution -
 For the AutoClient system to work properly, it needs root access to its /export/root directory. If Host Manager displays a message that the /export directory is already shared and has different share options than required, you need to allow root access to the client root area before the AutoClient system will function properly. The access mode for the client root is normally rw=clientname, root=clientname. If Host Manager displays a message that the /usr directory is already shared, it is because it tried to share /usr read-only. If you have it shared with read-write permissions, it is okay and you do not have to make any modifications.
-
Boot your AutoClient system(s) from the network.
For more information about booting your AutoClient systems, see Chapter 7, Booting a System From the Network.
-
Provide system configuration information for the AutoClient system during the initial boot process, if prompted.
-
Create a root password when prompted.
Example of a Completed Add Window
The following example shows a completed Add window for the Solstice AutoClient system type.

Verification
To verify that all the systems have been added, make sure the status line at the bottom of the main window says "All changes successful."

Example of a Command-Line Equivalent for Adding an AutoClient System
The following command is equivalent to using Host Manager to add support for an AutoClient system.
% admhostadd -i 129.152.225.10 -e 8:0:20:7:9:8b \ -x type=AUTOCLIENT -x tz=US/Mountain -x fileserv=lorna \ -x os=sparc.sun4c.Solaris_2.4 -x root=/export/root \ -x swapsize=32 -x disconn=N -x diskconf=1disk -x pass=abc knight |
In this example,
|
-i 129.152.225.10 |
Specifies the IP address of the AutoClient system. |
|
-e 8:0:20:7:9:8b |
Specifies the Ethernet address of the AutoClient system. |
|
-x type=AUTOCLIENT |
Specifies the type of system being added, in this case an AutoClient system. |
|
-x tz=US/Mountain |
Specifies the system's timezone. |
|
-x fileserv=lorna |
Specifies the name of the OS server. |
|
-x os= sparc.sun4c.Solaris_2.4 |
Specifies platform, kernel architecture, and software release of the AutoClient system. |
|
-x root=/export/root |
Specifies the root path of the AutoClient system. |
|
-x swapsize=32 |
Specifies the size of the swap file. |
|
-x disconn=N |
Specifies whether the disconnectable option is enabled, in this case it is not enabled. |
|
diskconf=1disk |
Specifies the AutoClient system's disk configuration. |
|
-x pass=abc |
Specifies the system's root password. |
|
knight |
Specifies the name of the AutoClient system. |
Troubleshooting Adding Systems
If you receive any error messages indicating that any AutoClient systems failed to be added, use Table 6-4 to troubleshoot the problem.
Table 6-4 Troubleshooting Adding AutoClient Systems|
If You Want To ... |
Then ... |
|---|---|
|
Stop the add process |
Click Stop in the Saving Changes window. Host Manager will stop adding AutoClient systems after it completes adding the current AutoClient system. Note: Because Host Manager completes the current operation before stopping the add process, it appears that nothing happens when you click on Stop. Just click on Stop once, and the add process will stop after the current operation is completed. |
|
Modify an AutoClient system that failed to be added |
1) Click on the specific AutoClient system in the main window. 2) Choose Modify from the Edit menu, or double-click on the selected system. The Modify window is displayed with the selected AutoClient system's information for you to modify. 3) Modify the information for the AutoClient system and click on Apply. 4) Repeat steps 1 through 3 to modify additional AutoClient entries. 5) Choose Save Changes from the File menu. |
|
Ensure you have permission to add clients |
Make sure you are a member of sysadmin group 14 on the specified file server, and that you have the appropriate permissions to use Host Manager. |
- © 2010, Oracle Corporation and/or its affiliates
