| Sun Fire X2250 Server Operating System Installation Guide |
| C H A P T E R 5 |
|
Installing Windows Server 2008 |
This chapter describes the installation process for installing Windows Server 2008 on a Sun Fire X2250 server.
This chapter contains the following topics:
Before starting the Windows Server installation, you should ensure that following requirements are met.
http://www.sun.com/servers/x64/X2250/downloads.jsp
The following tasks must be performed in the order in which they are listed. Note that not all tasks are mandatory.
|
Established installation environment. For more information see: |
||
|
Set optimal default settings in the BIOS Utility. For more information, see Configure BIOS Settings for New Installations. |
||
|
Locate the Sun Fire X2250 Tools and Drivers CD or download the mandatory device drivers for Windows 2008 from the following site: |
||
|
Implement a software RAID using the BIOS Setup Utility. For more information, see: |
||
|
Boot Windows Server 2008 installation media to initiate the operating system installation. For more information see one of the following sections: |
||
|
Installed the required system device drivers for Windows Server 2008 installations. For more information, see one of the following sections: |
The Sun-supplied hard disk drives for the X2250 servers are shipped without a RAID configuration. If a RAID configuration is required, you will need to configure the RAID Controller in the BIOS Setup Utility. Follow the procedures in this section to configure RAID for a Windows Server 2008 installation.
|
1. Reboot the server and press F2 when the Sun Logo appears.
The BIOS Setup utility dialog appears.
2. In the BIOS Setup utility dialog, select Advanced -> IDE Configuration.
The IDE Configuration menu appears.
3. In the IDE Configuration menu, select Configure SATA AS and press Enter.
A menu appears listing the SATA options: IDE, RAID, and AHCI. IDE is set by default.
4. In the SATA Options menu, select RAID and press Enter.
5. Press F10 to save your changes, exit the BIOS Setup utility, and reboot the server.
6. While the server is rebooting, press <Ctrl-I> to access the RAID configuration.
The Intel Matrix Storage Manager option ROM dialog appears.
7. In the main menu of the Intel Matrix Storage Manager option ROM dialog, select (1) Create RAID Volume and press Enter.
The Create RAID Volume menu appears.
8. In the Create RAID Volume menu, do the following:
a. Provide a name for the RAID volume and press Enter, or press Enter to accept the default name.
b. Select either RAID 1 (Mirror) or RAID 0 (Stripe) as the RAID level and press Enter.
Use the up and down arrow keys to scroll through the available RAID level values.
c. Specify the volume capacity and press Enter; or press Enter to accept the default volume capacity.
d. Select Create Volume and press Enter.
A warning message appears stating that all data could be lost.
e. In the warning message, press Y to confirm the volume creation.
The new RAID volume is created. Information describing the RAID volume appears (for example, the RAID ID, Volume Name, Level, Status).
9. Select EXIT and press Enter to exit the Intel Matrix Storage Manager utility.
A confirmation message appears confirming that you want to exit the Intel Matrix Storage Manager utility.
10. In the confirmation message, press Y to confirm the exit.
This section describes how to boot the Windows Server 2008 installation media from locally attached or remote media.
The following requirements must be met prior to performing the Windows Server 2008 installation:
If necessary, you can set a temporary boot device during the server’s start-up phase (after Step 2 in this procedure) by pressing F8.
|
1. Prepare the installation media by performing one of the following:
Note that if you are using the Sun ILOM Remote Console application to perform the installation, you must ensure that the CD-ROM option is selected in the Device menu of the Sun ILOM Remote Console application.
For more information about redirecting storage devices in the Sun ILOM Remote Console, see Appendix A.
2. Reset the Sun Fire X2250 server, for example:
3. Press F8 when the Press F8 for BBS POPUP prompt appears on the BIOS POST screen (see FIGURE 5-1).
The BBS POPUP menu will allow you to select a boot device.
")
4. Once the BIOS POST process is complete, the Boot Device menu appears (see FIGURE 5-2). Insert the Windows media DVD into the locally attached DVD drive or the virtual DVD drive on the client hosting the Sun ILOM Remote Console application.
FIGURE 5-2 Boot Device Menu Example

5. Select CD/DVDW from the Boot Device menu and press Enter.
If prompted with Press any key to boot from CD, quickly press any key.
6. The Windows installation wizard starts. Proceed through the installation wizard until you see the Installation Type page displayed, and then click Custom (advanced).
FIGURE 5-3 Select Installation Type Page

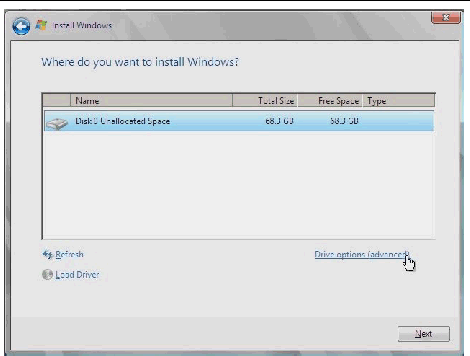
7. You will then see the Where Do You Want to Install Windows page (see FIGURE 5-4). Do one of the following:
FIGURE 5-4 Where to Install Windows Page Example

|
Caution - Formatting or re-partitioning a pre-existing partition will destroy all data on the partition. |
8. At the Advanced Driver Options page (see FIGURE 5-5), do the following:
FIGURE 5-5 Windows Partition Management Page
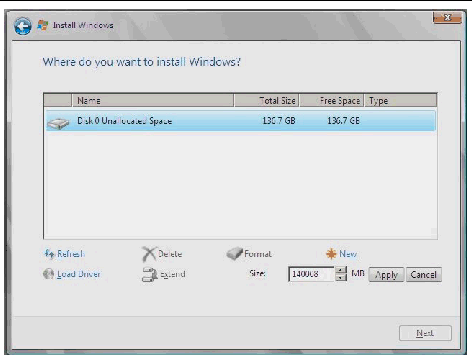
a. Click Delete to delete the existing partition.
b. Click New to create the new partition.
c. Change size settings as needed, and then click Apply.
d. Click Next and proceed to the next step.
9. The Windows installation begins.
The server will reboot multiple times during the installation process.
10. When Windows installation is complete, Windows starts and prompts you to change the user password. Click OK and proceed to set up the initial user login account.
Once the initial user account is created, the Windows Server 2008 desktop is displayed.
11. After the Windows installation completes, you must install the mandatory system device drivers for Windows Server 2008 installations.
For more information, see the following section Install Mandatory Windows System Device Drivers (Post Windows Installation).
After installing Windows Server 2008 software on the Sun Fire X2250 server, you must install, in the order specified, the following mandatory Windows system device drivers.
4. Trusted Platform Module (TPM) security driver
http://www.sun.com/servers/x64/X2250/downloads.jsp
|
The following procedure describes how to install the mandatory Windows system drivers on the Sun Fire X2250 server from the Sun Fire X2250 Server Tools and Drivers CD.
1. Insert the Sun Fire X2250 Server Tools and Drivers CD into the locally attached CD/DVD drive on the Sun Fire X2250 server or virtual CD/DVD drive on the client hosting the Sun ILOM Remote Console application.
Note that if you are using the Sun ILOM Remote Console application to perform the installation, you must ensure that the CD-ROM option is selected in the Device menu of the Sun ILOM Remote Console application.
For more information about redirecting storage devices from the Sun ILOM Remote Console, see Appendix A.
A list of menu options available on the Sun Fire X2250 Tools and Drivers CD appears.
2. In the Sun Fire X2250 Tools and Drivers menu, select Install and Update System Device Drivers.
The required system device drivers for Windows Server 2008 are automatically installed on the Sun Fire X2250 server.
This section describes how to install Windows Server 2008 over an established PXE-based network using a customer-provided Windows Imaging Format (WIM) image. WIM files are installed using Windows Deployment Services (WDS).
This chapter is not a tutorial on WDS; it provides guidance on how to incorporate the X2250 drivers into the WIM image. This chapter contains the following sections:
The X2250 server drivers that must be incorporated into the WIM image are as follows:
This section contains information about adding Sun Fire X2250 server drivers to the WIM image.
Before creating your WIM image, you need to do the following:
|
1. Copy all of the appropriate files for a 32-bit or 64-bit Windows installation from the version folders on the Sun Fire X2250 Server Tools & Drivers CD to the appropriate folder structure on a network share. See Step a and Step b below:
a. Identify the appropriate version files.
In the examples below, cdromdrive is the driver letter of the CD/DVD drive that contains the Sun Fire X2250 Server Tools & Drivers CD:
Tools & Drivers CD/DVD Windows 2008 32-bit files: cdromdrive:\drivers\windows\Display\2008_32 ...\RAID\LSI\2003_32 ...\RAID\StorageTEK\2008 ...\IntelNIC\PROXGB\Win32 ...\InetlNIC\PRO1000\Win32 |
b. Copy the files identified in Step a from their version folders and into the appropriate folder structure on your network share.
In the examples below, \\yourshare\share is the share path you have set up on the network, DriverPack\x64 is for 64-bit Windows, and DriverPack\x86 is for 32-bit Windows. All files must reside directly under the x64 or x86 folder or component subfolder (there should be no version subfolders as found on the Tools & Drivers CD). See examples below:
Windows 2008 32-bit WIM folder structure: \\yourshare\share\DriverPack\x64\Display ...\RAID\LSI ...\RAID\StorageTEK ...\IntelNIC\PROXGB ...\InetlNIC\PRO1000 |
Windows 2008 64-bit WIM folder structure: \\yourshare\share\DriverPack\x64\Display ...\RAID\LSI ...\RAID\StorageTEK ...\IntelNIC\PROXGB ...\InetlNIC\PRO1000 |
2. Select the service image to update and export the image:
a. Click Start, click Administrative Tools, and then click Windows Deployment Services.
b. Find the image to service. Right-click the image and then click Disable.
c. Right-click the image and click Export Image. Follow the Wizard directions to export the image to the location of your choice.
3. Mount the Windows image you just exported. For example,
imagex /mountrw C:\windows_distribution\sources\install.wim 1 C:\win_mount
The first Windows image in the Install.wim file is mounted to C:\wim_mount
4. Use Windows System Image Manager (Windows SIM, available in Windows AIK) to create an answer file that contains the paths to the device drivers that you intend to install.
See the Microsoft documentation for the Windows Automated Installation Kit for the details of starting the Windows SIM application.
5. Add the Microsoft-Windows-PnpCustomizationsNonWinPE component to your answer file in the offlineServicing pass.
6. Expand the Microsoft-Windows-PnpCustomizationsNonWinPE node in the answer file. Right-click DevicePaths, and then select Insert New PathAndCredentials.
A new PathAndCredentials list item appears.
7. In the Microsoft-Windows-PnpCustomizationsNonWinPE component, specify the path to the architecture (x86 or x64) folder in the DriverPack folder on the network share, and the credentials used to access the network share.
For example, the path and credentials for a 64-bit image might be:
<Path>\\yourshare\share\DriverPack\x64</Path>
<Username>MyUserName</Username>
<Password>MyPassword</Password>
8. Save the answer file and exit Windows SIM. The answer file must be similar to the following sample.
The sample assumes the architecture is 64-bit.
9. Use Package Manager to apply the unattended installation answer file to the mounted Windows image. Specify a location for the log file to create.
For more information about using Package Manager, see the Microsoft Windows AIK documentation. For example,
pkgmgr /o:"C:\wim_mount\;C:\wim_mount\Windows" /n:"C:\unattend.xml" /l:"C:\pkgmgrlogs\logfile.txt"
The .inf files referenced in the path in the answer file are added to the Windows image. A log file is created in the directory C:\Pkgmgrlogs\.
10. Review the contents of the %WINDIR%\Inf\ directory in the mounted Windows image to ensure that the .inf files were installed.
Drivers added to the Windows image are named oem*.inf. This is to ensure unique naming for new drivers added to the computer. For example, the files MyDriver1.inf and MyDriver2.inf are renamed oem0.inf and oem1.inf.
11. Unmount the .wim file and commit the changes.
imagex /unmount /commit C:\wim_mount
12. Replace the service image and Enable the image.
a. If the Windows Deployment Services snap-in is not running, click Start, click Administrative Tools, and then click Windows Deployment Services.
b. Find the image to service. Right-click the image and then click Replace Image. Follow the Wizard directions to replace the service image with the Windows image that was updated.
c. Right-click the service image and then click Enable.
The service image is now available and all of the X2250 drivers are added to the image.
This section explains how to install the Windows Server 2008 operating system over an established PXE-based network via a customer-provided WDS image.
Note that the procedure presented in this section documents the initial steps to install Windows 2008 over the network using a WDS image. Specifically, it explains the steps for selecting the server PXE network interface card that will communicate with your WDS install server. For further information about using a WDS image to install the Windows Server 2008 operating system, see Microsoft’s Windows Deployment Services documentation.
Follow the instructions in Determine Required Drivers.
Follow the instructions in Add Drivers to a WIM Image.
|
1. Reset the Sun Fire X2250 server.
2. Press F8 to specify a temporary boot device.
The Please Select Boot Device menu appears.
3. In the Please Select Boot Device menu, select the appropriate PXE install boot device and press Enter.
The PXE install boot device is the physical network port configured to communicate with your network install server.
The Boot Agent dialog appears.
4. In the Boot Agent dialog, press F12 for a network service boot.

5. Continue the normal Windows Server 2008 WDS network installation. For additional information, consult Microsoft’s Windows Deployment Services product documentation.
| Sun Fire X2250 Server Operating System Installation Guide | 820-4592-12 |
Copyright © 2009 Sun Microsystems, Inc. All rights reserved.
 To Configure RAID Controller in BIOS